1
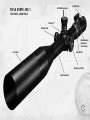
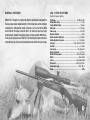
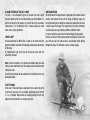
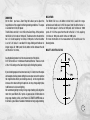
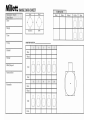
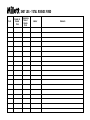
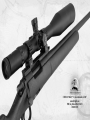
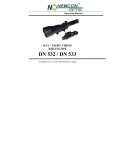
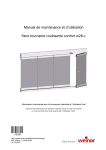
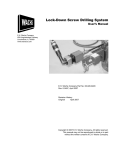
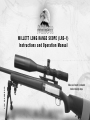
Lit.#: 92-0026/02-10 MILLETT LONG RANGE SCOPE (LRS-1) Instructions and Operation Manual Make sure firearm is unloaded before installing scope Turret Knob Lockscrew RIFLE SCOPE LRS-1 Fast Eye Focus FEATURES & CONTROLS Turret-Loc™ Windage Turret Illumination dial (available on select models) Lens Shade Zoom Control Range Focus Control 35mm Tube Body 2 GENERAL OVERVIEW LRS-1 SPECIFICATIONS Millett LRS-1 Rifle optic is a high quality effective sighting device designed for the long-range shooter. Added strength of 35mm body tube and the strongest components to withstand the recoil of firearms, such as the 50 CAL BMG round and the 338 Lupua, make the LRS-1 the choice for your long range shooting needs. Capable of engaging targets at ranges beyond 1000 meters. Thank you for your purchase of the LRS-1. By following the simple instructions contained here you will assure the best performance and life from your scope. Click Value---------------------------------------------------- .25 MOA or .1 Mil Weight (with covers )----------------------------------------------------2.2 Lbs Length (without shade)---------------------------------------------- 18 inches With shade---------------------------------------------------------- 22.2 inches Power range---------------------------------------------------------- 6X to 25X Objective diameter-------------------------------------------------------56mm Outside diameter of Objective------------------------------------- 2.56 inches Outside diameter of eye piece------------------------------------- 1.65 inches Exit pupil----------------------------------------------- 9mm at 6X 2mm at 25X Eye relief-------------------------------------------------------------- 3+ inches Focus range------------------------------------------------------ 15 yards to inf. Diopter adjustment----------------------------------------------------2 to 3.5+ Mil dot reference power-------------------------------------12.5 and 25 power Reticle-------------------------------------------------------------- Glass etched Lenses---------------------------------------------------------Fully multi-coated Water proof------------------------------------------------ 3 meters for 30 min. Temperature range---------------------------------------------- - 40 to 150+ F Shock---------------------------------------------------------------------- 2000g (Subject to change at anytime) 3 RIFLE SCOPE LRS-1 Installation and use of Millett LRS-1 scopes 1. MOUNTING Mounting your scope properly is important to the accuracy and durability of your firearm and scope. Proper mounting assures that the scope is aligned to the barrel and the scope is rigged to the rifle for accuracy. As the LRS is a heavy scope with a good amount of mass and the rifles it mounts on generally have a heavy recoil, it’s important to assure proper mounting. Solid mounting is critical to maintain the accuracy of this sighting system. We recommend using the Millett picatinny rail to fit your rifle and Millett supplied 35mm rings. Using the base and ring combination that you have chosen, make sure mounting bolts for the base are cleaned of all oil and grease and firmly tightened. We recommend using a locking glue such as Loctite® on all screw threads. On most bolt action rifles, 30 to 40 inch pounds is suitable for the torque for tightening screws. Use of torque wrench to tighten each screw and bolt to equal torque, will assure a better hold of the scope. Place the bottoms of the rings onto the base then center and tighten. Make sure ring bottom is aligned in base and not cocked or out of line with the bore. Failure to align the base and bottom of the rings can damage the scope. Clean the inside of the rings, removing all oil and grease before starting to install the scope. Lay the scope into the bottoms of the rings, with the eyepiece to the rear, and align the crosshairs to the vertical and horizontal, moving the scope back and forth to get a full sight picture. While looking through the scope, align the crosshairs and the eye relief. Millett Picatinny Rail 4 1. MOUNTING (Continued) The eye relief on this model scope should be about 85mm or 3.5 inches. Place the top caps of the rings on the bottoms and slightly tighten the screws. Check the alignment and eye relief before fully tightening the cap screws. For high recoil firearms, it’s recommended that you use hardening Loctite® or epoxy to bond the scope rings to the scope body and on the mounting rail and the firearm, to assure a solid mounting system no matter the recoil. Loctite® Is recommended to prevent the screws loosening under recoil. Loctite® 222 blue-type locking material is recommended for the screws and base on your rifle. If removal is necessary, use a soldering iron to heat the screws and soften the Loctite®. Note: The LRS -1 has over 140 MOA of adjustment for elevation. To get full use of this range of adjustment, the scope must be properly aligned and the elevation adjustment set at the bottom of the adjustment range at 100 yards zero. If the elevation is moved up to zero using much of the adjustment, there will be reduced range of elevation for longer range shooting. If the base is properly mounted and all the mounting is tightened, you may need to shim the rear of the scope ring to zero using the least elevation adjustment. All efforts should be made to assure the alignment of the scope to the bore of the rifle. Mis-alignment will increase the errors at longer ranges making it harder to engage targets. If you have questions on mounting, seek out professional help such as qualified gunsmith or armorer. 2. BORE-SIGHTING Bore-sighting is aligning the scope to the bore of the rifle to assist you in getting on-target when sighting in the rifle. There are several ways to bore-sight a rifle: 1. Looking through the scope and the bore of the rifle until they are both at the same point. 2. U sing an optical device inserted into the bore and aligning the scope to a point on the bore-sighter. 3. U sing a laser inserted into the barrel at the muzzle or chamber to make a reference point and aligning the scope crosshairs to that point. All of these systems work well, follow the instructions supplied with each method. 5 3. SIGHTING IN Sighting in your rifle is critical to assure that point-of-aim and impact yards are the same at a known range. The method we recommend is to start shooting at 25 yards or 50 yards with a target large enough to allow some room for error. The goal of properly sighting-in the scope is to eliminate human error, so use a solid rest to support the rifle. It’s best if at the time you sight in, the wind is calm. Fire 3 shots, carefully holding the crosshairs at the same point on the target for each shot. Measure the distance from the point you were aiming at and center of the 3 shot group. This is how much you will need to move your scope to align the crosshairs. Note: The arrows on the turrets of the scope are for direction of movement of the bullet. Move the target to 100m or yards and repeat the sighting in procedure to adjust the turrets until the scope is aligned to the rifle. Fire a group after adjustment to assure the proper sight-in. It is best to fire the rifle at the ranges that the sight will be used, to assure your zero and drop for various ranges. Many shooters set the sights a number of inches high at 100 yards so they have a longer point-blank range. Example, a 308 with the 168 match bullet, sighted 2 inches high at 100 will be dead on at 200 yards, extending the point blank range to over 300 yards. To align the 0 setting: After sighting in your firearm, lock the turret you wish to adjust, Using the proper size allen wrench loosen the screw on top of the turret. The screw will not come all the way out, loosen until the screw is in the uppermost position. Lift the turret straight up and turn until the 0 is aligned. Press the turret down and tighten the allen screw on top. It’s best to check your zero to make sure you did not move the elevation or windage in moving the turrets. Now it’s easy to count the clicks for elevation and windage and return to your basic zero. There are lines on the turrets for counting the number of come ups and right and left windage. Each line is one full turn of the turret. This allows easy adjustment for longer ranges and in strong winds. We recommend keeping a log of your settings with your firearm and loads, In the rear of this manual is a simple log book to aid in this log keeping. 6 4. Using features of the LRS-1 scope The LRS-1 was designed to give the shooter the most useful features needed under the most demanding use and conditions. To get the full benefit of the features it’s best to learn their use before needing them. Try the different LRS-1 features before you need them under varying conditions. Turret-loc™ Exclusive feature of the Millett LRS-1 scopes is the turret locks that prevent accidental movement of the windage and elevation adjustments of the scope. By tightening the ring at the base of the turrets to the right, the adjustment is locked. Side range focus On the left side of the scope there is a large knob that is used to remove parallax and improve the focus of the scope at differing ranges. By turning the knob you can adjust the scopes focus. Adjust until you have a sharp image of the target. The range marks may not be absolutely accurate due to your eyes, lighting conditions and other factors. It’s best to adjust the range focus for the best image and no parallax. Parallax can be seen if the crosshairs move from the point-of-aim, when you shift your eye from side-to-side or up-and-down while looking through the scope. This will effect accuracy at longer ranges. Note: As the lock is positive, it is important to carefully adjust the turret when you have unlocked the ring. There may be some tension when first moving the turret. Do not try to over power the lock when the lock is tightened as this may damage the scope. Fast Eye focus At the rear of the scope there is adjustment that is used to focus the crosshairs to your eyes. This is a diopter adjustment and is set from 2 + to – 3.5 diopter. Adjustments are made by rotating the rear ring. Adjust until the crosshairs are sharp to your eyes. 7 Zoom ring On the LRS-1 you have a Zoom Ring that allows you to adjust the magnification of the scope for differing shooting conditions. The scope is variable from 6X to 25X power. The Mil-Dot is set to be 1 mil at 25X on the Zoom Ring. At this position, the Mil-Dot is 3.6 inches at 100 yards. The distance from the dot to the bar is ½ mil-dot equaling 1.8 inches at 100 yards. As the mil-dotbar is set at ½ mil scale, it is excellent for range-finding and hold over at longer ranges. At 1000 yards the mil-dotbar reticle between the dot and the bar is 18 inches. Mil-dotbar The Millett LRS has a mil-dotbar reticle that is useful for range estimation and hold over. At 25X the space from the dot to the bar is ½ mil which equals 1.8 inches at 100 yards and 18 inches at 1000 yards. At 12.5X the space from the dot to the bar is 1 mil, equaling 3.6 inches at 100 yards and 36 inches at 1000 yards. For more information on the measurements of the reticle see the drawing below. Millett lrs reticle at 25x See the drawing below for all the measurements of the reticle. At 12.5X the reticle is 1 mil between the dot and the bar. There is a mark at the 12.5X setting on the Zoom Ring to aid in finding this position. If your shooting requires the utmost accuracy, it is best to test the scope and weapon at various power settings to assure your zero and to see how the magnification effects your shooting accuracy. As the magnification increases from lower settings the point-of-aim may change slightly due to differences in vision and lighting. We recommend getting training in long-range shooting skills to get the most from your Millett LRS-1 optics. A good source of information on long-range shooting is Maj. John Plaster’s ULTIMATE SNIPER book as it contains a great deal of valuable information on long-range shooting. 8 Sun Shade Helps to prevent glare and improves image in bright sunlight. Use care in screwing sunshade into scope body. Its important that in threading the lens shade you align the threads to prevent crossing the threads and damaging the scope. Cleaning. Use supplied silicone cloth to wipe away dust on the lens surface. If there is imbedded dust, dirt, or water stains, use good quality lens cleaning solution and lens cleaning tissue. These supplies can be purchased from your local camera shop. Do not use your shirt or other fabric that may have imbedded dirt that can damage the lens coating. If scope as been subjected to salt water or muddy water, gently rinse the outside of the scope with clean fresh water. Dry outside of scope with paper towel and clean lenses with lens tissue Maintenance The Millett LRS is designed to give many years of use when cared for properly. The lenses are multi-coated to transmit the most light and to give the sharpest image. Improper cleaning will damage this coating and reduce the value of the optic. Do not force the turrets when the lock rings are tightened. This can damage the turret screw. Loosen the lock before changing the settings on the turrets. Do not force the focus knob past the stops. The focus range is from 15 yards to infinity. Do not disassemble the scope, it is filled with inert gas and is O-ring sealed with high grade grease, and it is not user repairable. If you have a problem with your scope, please return it to Millett for service. Do not expose the lenses to strong cleaners that may damage the coating. Keep grease and oil off of the lenses, as this is very hard to remove without damage to the coating. Avoid gun cleaners, solvents and other strong chemicals on the lenses. Use supplied lens covers to protect the lenses when not in use. LIFETIME LIMITED WARRANTY Your Millett™ product is warranted to be free of defects in materials and workmanship for the lifetime of the original owner. The Lifetime Limited Warranty is an expression of our confidence in the materials and mechanical workmanship of our products and is your assurance of a lifetime of dependable service. In the event of a defect under this warranty, we will, at our option, repair or replace the product, provided that you return the product postage prepaid. This warranty does not cover damages caused by misuse, improper handling, installation, or maintenance provided by someone other than a Bushnell Authorized Service Department. Any return in the U.S. or Canada made under this warranty must be accompanied by the items listed below: 1) A check/money order in the amount of $10.00 to cover the cost of postage and handling 2) Name and address for product return 3) An explanation of the defect 4) Proof of Purchase 5)Product should be well packed in a sturdy outside shipping carton, to prevent damage in transit, with return postage prepaid to the address listed below: IN U.S.A. Send To: Bushnell Outdoor Products Attn.: Repairs 8500 Marshall Drive Lenexa, Kansas 66214 IN CANADA Send To: Bushnell Outdoor Products Attn.: Repairs 25A East Pearce Street, Unit 1 Richmond Hill, Ontario L4B 2M9 For products purchased outside the United States or Canada please contact your local dealer for applicable warranty information. In Europe you may also contact Bushnell at: Bushnell Germany GmbH European Service Centre Mathias-Brüggen-Str. 80 D-50827 Köln GERMANY Tel: +49 221 995568-0 Fax: +49 221 995568-20 9 This warranty gives you specific legal rights. You may have other rights which vary from country to country. ©2010 Bushnell Outdoor Products SHOT LOG - Total Rounds Fired Date Number of Rounds Fired Cumulative Total of Rounds Fired Shooter Comments SHOT LOG - Total Rounds Fired Date Number of Rounds Fired Cumulative Total of Rounds Fired Shooter Comments SHOT LOG - Total Rounds Fired Date Number of Rounds Fired Cumulative Total of Rounds Fired Shooter Comments SHOT LOG - Total Rounds Fired Date Number of Rounds Fired Cumulative Total of Rounds Fired Shooter Comments SHOT LOG - Total Rounds Fired Date Number of Rounds Fired Cumulative Total of Rounds Fired Shooter Comments SHOT LOG - Total Rounds Fired Date Number of Rounds Fired Cumulative Total of Rounds Fired Shooter Comments ©2010 B.O.P. Millett,™, ®, denote trademarks of B.O.P. www.millettsights.com 9200 Cody, Overland Park, KS 66214 1-800-423-3537