1
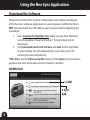
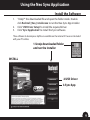
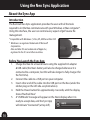
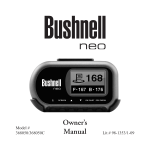
®
Model #
368050/368050C
User
Manual
Lit # 98-1353/05-10
Table of Contents
Section 1: Introduction
Welcome
Important Information
Package Contents / Additional Requirements
Battery Information
4
5
6
7
Section 2: Using the Neo Sync Application
Download the Software
Install the Software
About the Sync App / Before You Launch the Sync App
Downloading Courses
Sending Courses to Your Neo
Settings
8
9
10
11
13
14
Section 3: Playing Golf With Your Neo
Controls and Parts Reference
Button Functions
Start Up / Main Menu
Play Golf Mode
Button Functions
Shot Distance Feature
The Play Menu
Map Course Page
Course Name Function
Map GPS Point Function
Other Main Menu Pages
Settings Page
Section 4: Troubleshooting Problems
15
16
17
18
19
19
20
21
21
22
23
24
26
3
Introduction
Welcome
Dear Valued Consumer:
We sincerely hope you will find your Bushnell Neo both enjoyable and easy
to use. Knowing the exact distance for each shot will assist you in lowering
your score and enhance your overall golfing experience.
This User Manual was created for you to get the most out of your new device.
It only takes a few minutes to read, after which you can immediately begin
using the Bushnell Neo and enjoying its many features.
Also, please be sure to set up your iGolf.com membership (using the Neo
Sync application as described in this manual). As a member, you have access
to all the features and benefits iGolf.com has to offer, including access to an
extensive database of GPS enabled golf course files for use on your Bushnell
Neo.
Thank you for choosing Bushnell.
4
Introduction
Important Information
Legal Disclaimer
By using this product, you agree that Bushnell Outdoor Products will not be
held legally responsible for any injury or damage to you or any person or
property caused by the user’s improper operation and/or poor judgment
while using this product.
Note: See the Warranty statement for other limitations on our liability.
Additional Information
The Global Positioning System (GPS), a network of 32 satellites orbiting Earth,
is operated and maintained by the U.S. government. This GPS device requires
at least 3 satellites to be acquired to accurately determine your position. Any
change made to the system by the government could affect the accuracy
and performance of this product.
5
Introduction
Package Contents – Additional Requirements
Package Contents
1 - Bushnell Neo
1 - Belt Clip
1 - USB Cable
1 - AC/DC 5V Adapter
1 - Quick Start Guide
Additional Requirements*
PC with Windows 7, Vista, XP or 2000
or Mac with OS X, version 10.4.x or later **
Available USB port
*Required to transfer course data files.
**Windows is a registered trademark of Microsoft Corporation in the United States and
other countries. Mac and Mac OS are trademarks of Apple Inc.,
registered in the U.S. and other countries.
Note: earlier versions of the Neo also included a CD-Rom containing the Sync App and
Drivers. This CD is no longer included or necessary, as the latest software for your Neo
is now provided as a file download at www.bushnell golfgps.com as described in this
manual.
6
Introduction
Battery Information
Battery Information
This product contains an internal rechargeable lithium-ion battery. Under
normal operating conditions, a new battery will last 14-16 hours on a
full charge. However, battery life is diminished due to a variety of factors
including temperature and backlight usage. All rechargeable batteries lose
their effective charge length over time.
The internal battery can be charged by connecting the included USB cable
to the device and a computer. Alternatively, the battery can be charged by
connecting the USB cable to the device and using the included adapter to
plug the charger into a standard 110V wall outlet. The battery should be
charged for at least six hours before using the Neo for the first time.
7
Using the Neo Sync Application
Download the Software
Follow these instructions to assist in the proper and complete installation
of the Neo Sync software application on your computer. Confirm the Neo is
NOT connected with the USB cable to your computer before beginning the
installation.
1.
2.
Go to www.bushnellgolfgps.com. Make sure you have the latest
version & update of Java for Windows* (link provided-click to
download).
Click Download and Install Software and Save the file (zip folder)
to your desktop. You will automatically receive the correct file
contents for your computer OS.
* Mac Users: use the Software Update feature (in the Apple menu) to ensure
you have the most up-to-date version of Java for your Mac.
DOWNLOAD
1-JAVA
2-Sync
App
8
Using the Neo Sync Application
Install the Software
1.
2.
3.
“Unzip”* the downloaded file and open the folder inside. Double
click Bushnell_Neo_Installer.exe to run the Neo Sync App installer.
Click “USB Driver Setup” to install the required driver.
Click “Sync Application” to install the Sync software.
*Free software to decompress zip files is available on the internet if it was not included
with your PC or Mac.
1-Unzip downloaded folder
and run the Installer
INSTALL
2-USB Driver
3-Sync App
9
Using the Neo Sync Application
About the Sync App
Introduction
The Bushnell Neo Sync application provides the user with all the tools
required to let the Neo communicate with your Windows or Mac computer*.
Using this interface, the user can control every aspect of golf course file
management.
* Compatible with Windows 7, Vista, XP ,2000 and Mac OSX
* Windows is a registered trademark of Microsoft
Corporation.
Mac and Mac OS are trademarks of Apple Inc.,
registered in the U.S. and other countries.
Before You Launch the Sync App
1.
2.
3.
4.
5.
10
Charge the Neo for at least 6 hours using the supplied AC adapter
& USB cable (the Neo’s battery will also be charged whenever it is
connected to a computer, but this will take longer to fully charge it for
the first time).
Connect the cable to a USB port on your computer.
Insert other end of the cable into the USB port on the Neo (under the
rubber plug on the left side-see photo above).
Hold the Power button for approximately 2 seconds, until the display
shows “Bushnell Neo”.
A “USB Mode” message will appear on the Neo’s display when it is
ready to accept data, and the Sync App
will indicate “Connected” (at top left).
Using the Neo Sync Application
Downloading Courses
Set Up Your iGolf.com Membership
You are now ready to start the Sync App, and use it to set up your iGolf.com
membership so you can download the GPS data and scorecard info for any of
the thousands of golf courses in their extensive database. Note that the free
“trial” membership option will not allow you to download any course data.
1. Launch the Bushnell Neo Sync app by clicking the desktop icon, and
click the “GPS Download” tab.
2. Fill in the “Join Now” info to setup an iGolf membership (if already a
member, just “Log In”).
1b-GPS Download Tab
1a-Launch Sync App
2-Fill In Info
and Join
iGolf.com
11
Using the Neo Sync Application
Downloading Courses
Next, use the Search features on iGolf.com to find the golf course(s) you are
interested in playing, and download the GPS data for it.
1. Once logged in, enter the name of a course you want to play in
the box under “Search for Golf Course GPS Files”, and click
SEARCH.
2. Select the desired course from the results list to access the course
download page. If your search returns too many results, using the
“Advanced Search” feature instead may produce a shorter list.
3. Click Download GPS & Scorecard to download the data to your
computer.
1-Search for Course
Advanced Search option
2-Select Course
from Results
3-Download GPS
Course Data
12
Using the Neo Sync Application
Sending Courses to Your Neo
The downloaded course data is stored by the Sync App, ready to send to your
Neo. All courses you’ve downloaded will always appear under “My Courses”
unless you delete them. The Neo can store about 10 courses at a time in its
internal memory. Courses already stored on your Neo may easily be deleted
to make room for different or additional courses.
1.
2.
3.
4.
5.
After downloading, the course name will appear
in the MY COURSES box in the left column of the
Sync App window.
Select and highlight the course(s) you want to
load onto the Neo from the MY COURSES box.
Multiple courses can be selected for loading by
holding down the Ctrl key on your PC as you click
on their names.
Click the SEND button to transfer the course(s) to
the Neo.
The DELETE button can be used to remove the
downloaded data for any courses you do not
plan to play again.
The (lower) MY DEVICE box displays the courses
that are currently stored on the connected Neo.
Click DELETE to remove a course you no longer
need. A course can be copied from MY DEVICE
back to MY COURSES by simply dragging its
name from one box to the other.
MY COURSES Box
MY DEVICE Box
13
Using the Neo Sync Application
Settings
If you find it necessary (normally it is not), the Settings option of the Sync
App allows you to specify or change how the device communicates with
your computer and where the downloaded course files are stored.
1.
2.
3.
4.
Click Settings in the (upper, smaller) MY DEVICE box
Always leave COM Port set to “AUTO” unless the specific port being
used is known (this is a Windows only setting).
The default course file storage location is C:\My Documents\Bushnell\
Neo. If the setting must be changed, be sure to note the new location
and save all your future course downloads in the same folder.
Click OK to close the Settings Window after making any desired
changes.
1-Click Settings
Settings Window
You’re Ready to Hit the Links !
Once you finish sending the the data for all the courses you need from the
computer to your Neo, you may disconnect the USB cable from the Neo and
close the Sync App.
14
Playing Golf With Your Neo
Controls and Parts Reference
USB Connection >
Belt Clip
Hole #
Distance to the Center
Distance to
the Front
Distance to
the Back
Power Button / Backlight
SCREEN Button
ESC / MENU Button
OK / SHOT Button
Up / Down Buttons
15
Playing Golf With Your Neo
Button Functions
Power Button
• Turns the device on & off
• Turns the backlight on & off
SCREEN Button
• Switches between screens within Play Golf mode
Up Button
• Scrolls up
• Changes hole number (+)
Down Button
• Scrolls down
• Changes hole number (-)
OK/SHOT Button
• Selects highlighted option
• Activates Shot Distance
ESC/MENU Button
• Cancels current operation
• Returns to previous step or screen
Power Button
ESC / MENU Button
OK / SHOT Button
SCREEN Button
Up / Down Buttons
16
Playing Golf With Your Neo
Start Up and Main Menu
Power On
• Press and hold the power button until “Bushnell Neo” appears (about 2
seconds).
Power Off
• Press and hold the power button until the screen goes blank*.
Backlight On/Off
• From any screen, press the power button to turn the backlight on.
• Press power button again to turn the backlight off.
* Note: the unit will automatically power off after 45 minutes if no buttons are pressed.
To override this, change the “Auto Off” option under “Settings” to “OFF”.
Main Menu
The Main Menu displays all the pages (screens)
available to the user, which are explained in detail in
subsequent sections of this User Manual. To begin
using the device, scroll to highlight any page and
press OK.
Page Descriptions
Play Golf
Map Course
Delete Course
Satellites
Battery Level
Settings About
Select to play golf using GPS data
Select to create and customize golf course files
Select to delete files from the device
Select to view satellite position and signal strength
Select to verify remaining battery power
Select to customize additional features
Select to display version and company information
17
Playing Golf With Your Neo
Play Golf Mode
Play Golf Mode
In Play Golf mode, the screens display distance information-you will likely
spend most of your time using this screen. Course information must be first
downloaded from iGolf.com or manually entered using the Map Course
feature. If GPS data is available, distances to the front, center and back of the
green and up to four custom points per hole will be displayed upon satellite
acquisition. Highlight Play Golf on the Main Menu and press OK. Scroll to
highlight the desired golf course and press OK.
18
Playing Golf With Your Neo
Play Golf Mode
Button Functions (Play Golf Mode)
Up/Down buttons SCREEN button OK/SHOT button ESC/MENU button
Move between holes
Move between screens
Activate Shot Distance
Go Back (Keep pressing to return to Play Menu
Shot Distance Feature
From any Play Golf screen, press SHOT to activate the Shot Distance
feature. Press SHOT again to establish a starting point. The distance will
automatically update as you move. Once you reach the end position,
press SHOT to freeze the shot distance measurement. Press SHOT again to
reactivate the Shot Distance feature and establish a new start position. Press
ESC to return to the previous screen at any time.
19
Playing Golf With Your Neo
Play Golf Mode
The Play Menu
From any Play Golf screen, press MENU to access
the Play Menu. This menu allows you to easily
view satellite reception and battery level status,
or modify the settings being used for the current
course. The Play Menu options are:
Map Golf Hole
Allows the user to map the current hole being played without having to
exit the game.
Satellites
Displays various bar lengths to show signal strength for all satellites being
tracked.
Battery Level
Displays a horizontal bar representing the power remaining in the battery.
Return to Game
Resumes play from previous hole.
Exit
Returns to Main Menu.
20
Playing Golf With Your Neo
Map Course Page
Map Course
This page provides functions which allow you to
manually input a course name and map GPS data
points. Existing course files may be customized or
new files created using the Neo. Highlight Map
Course on the Main Menu and press OK. Scroll to
highlight the desired new or existing golf course
and press OK. You will then be able to select the
Map Course Function you want to use:
Note: press ESC to go back to the previous page at any time if needed.
1. Course Name Function
To revise the course name, highlight Course Name and press OK. Names
are limited to fourteen (14) characters and should be different from any of
your other golf courses. Using the UP/DOWN buttons, scroll to highlight
each character and press OK. To delete characters, scroll to “BKSPC” and
press OK. When finished, scroll to highlight “SAVE” and press OK.
Note: Course files may also be renamed using the Neo Sync application.
21
Playing Golf With Your Neo
Map Course Page
2. Map GPS Point Function
To add or revise GPS data, highlight Map GPS
Point and press OK. Select the desired hole using
the UP/DOWN buttons and press OK. Highlight
the point (Front, Center, Back) to map and press
OK. Stand at the desired location and press OK to
register the point. Do not move until the process is complete. Repeat these
instructions for all desired points. When finished, scroll to highlight “Save”
and press OK. Repeat for all holes, then scroll past the last hole to select
Save/Exit and press OK to return to the Main Menu.
To map a custom point, highlight its default name (CSTM 1, etc.) and press
OK. You can select a name for it from a list of common ABBREVIATIONS
(Creek, Hazard, etc) or give it your own USER DEFINED name. After you have
selected or created a name for the custom point, make sure you are standing
at the point, and press OK to register it. You can also just accept the default
name and go directly to REGISTER POINT.
Save/Exit
After any course name changes and/or custom
points have been entered or captured, be sure
to scroll to Save/Exit and press OK to save all
information. All entered data will be lost if either
Map Course function is exited without saving first.
22
Playing Golf With Your Neo
Other Main Menu Pages
Delete Course
This page allows you to permanently remove a golf course file from the Neo.
Highlight Delete Course on the Main Menu and press OK. Scroll (Up/
Down) to highlight the golf course to delete and press OK. To remove the
course from device, confirm by highlighting “YES” and pressing OK. (Note:
this only deletes the course from the Neo device. All downloaded course data is
still saved on your computer, and may be reloaded onto the Neo later by using
the Sync App). Press ESC to return to the Main Menu.
Satellites
This page displays the GPS satellites recognized by the device.
Highlight Satellites on the Main Menu and press OK.
Satellites providing location data to the device for use in distance calculation
are represented by black horizontal bars and black boxes around the satellite
numbers. Typically, at least three satellites providing location data are
required before GPS distance can be calculated.
Press ESC to return to the Main Menu.
Battery Level
This page displays the status of the battery in the device.
Highlight Battery Level on the Main Menu and press OK.
Battery information is displayed using a horizontal bar representing the
amount of power remaining in the battery.
Press ESC to return to the Main Menu.
23
Playing Golf With Your Neo
Settings Page
Settings
This page provides a menu with various settings
which allow you to set your Neo user preferences,
such as screen contrast, distance units and GPS
parameters. Highlight Settings on the Main Menu
and press OK. The Settings menu options are:
Screen Contrast
Allows you to adjust the contrast of the screen to aid viewing in various
light conditions.
Yard or Meter
Allows you to select yards or meters as the measure of distance.
WAAS
Allows you to select if location correction is used to improve GPS accuracy
within the United States. Commonly known as WAAS, this system of
satellites and ground stations provides GPS signal corrections for much of
the U.S. You may need to adjust the WAAS setting according to geographic
location. The default setting on the device is “On”.
24
Playing Golf With Your Neo
Settings Page
Stabilizer
Allows you to select the rate at which the Neo refreshes the GPS position.
With stabilizer set to “On”, the Neo will not refresh GPS distance readings
once movement has ceased. This can be useful if you experience
fluctuating distance readings, even when you remain stationary. The
default setting is “On”.
Default Settings
Allows you to reset the Neo to factory default settings. All data, including
course files, will be permanently deleted. It is recommended that you
save all of the Neo’s files to your computer prior to accessing this setting.
Update
For factory use only.
Auto Off
The default “On” setting will shut power off after 45 minutes of inactivity
(no buttons pressed) to save battery power. Selecting “Off” will allow the
Neo to remain powered on with no time limit, until the Neo is manually
turned off.
25
Troubleshooting Problems
Problem: The backlight does not work.
• Turn the Neo off for ten (10) seconds and try again. Re-test in a low-light
environment.
• From the Main Menu, press and release the power button.
Problem: The Neo will not turn off.
• Press and hold power button for at least ten (10) seconds.
Problem: There are no golf course names listed in the Play Golf menu.
• No golf course files are loaded on the Neo.
• Transfer file again and confirm that the Neo Sync software reads
“Completed” before disconnecting the Neo.
Problem: There is no GPS data for the selected golf course.
• No golf course files are loaded on the Neo.
• Confirm the GPS file was downloaded from the iGolf.com site. (Note: GPS
data is not included in Scorecard (only) file downloads).
• Confirm mapped GPS points were saved prior to exiting the Map Course
page.
• Confirm the Neo has acquired at least 3 satellites (using SATELLITES on
the Settings page menu).
Problem: There are no custom points available for my golf course.
• No custom points are loaded on the Neo.
• Confirm custom points are available on iGolf.com for the golf course in
question.
26
Troubleshooting Problems
• Confirm the GPS file was downloaded from the iGolf.com site. (Note: GPS
data is not included in Scorecard (only) file downloads).
• Confirm mapped GPS points were saved prior to exiting the Map Course
page.
Problem: GPS points cannot be mapped/registered on device.
• Ensure satellite strength is sufficient to obtain accurate data.
• Move to a clear, unobstructed view of the sky (i.e. no trees, buildings or
objects that might interfere GPS satellite strength).
• Time of day may affect GPS signal strength. Try again during different
hours of the day.
Problem: Entire golf course name cannot be entered in the space provided.
• Limit the golf course name to fourteen (14) characters.
• Abbreviate the name so it is different from other golf courses on device.
Problem: There are no satellites in view.
• Move to a clear, unobstructed view of the sky (i.e. no trees, buildings or
objects that might interfere GPS satellite strength).
• The time required to acquire satellites may increase to 5-10 minutes for
first use or if the Neo has not been used for an extended period of time.
Problem: The distances the Neo displays seem inaccurate.
• Confirm the correct golf course and hole number were selected from the
Play Golf screens.
• Move to a clear, unobstructed view of the sky (i.e. no trees, buildings or
27
Troubleshooting Problems
•
•
•
•
objects that might interfere GPS satellite strength).
Go to the Settings page menu and set WAAS to “Off”.
Go to the Settings page menu and set Stabilizer to “On”.
Remap GPS points using the Neo and confirm accuracy.
Report any GPS or scorecard errors found to iGolf.com.
Problem: The distances on the Neo are in yards, not meters.
• Go to the Settings page menu and set YARD OR METER to “Meters”.
Problem: The distance displayed on the Neo is fluctuating.
• Go to the Settings page menu and set Stabilizer to “On”.
• Move to a clear, unobstructed view of the sky (i.e. no trees, buildings or
objects that might interfere GPS satellite strength).
• Go to the Settings page menu and set WAAS to “Off”.
Problem: Sync software does not state “Connected”.
• Confirm the USB cable is connected to computer.
• Confirm the USB cable is connected to the Neo.
• Confirm the Neo Sync software was installed correctly. Remove and
reinstall the USB driver and Sync application if necessary.
• Confirm the correct COM port is selected (check “Settings” in Sync app).
Problem: Golf course files cannot be sent to the Neo.
• Confirm USB cable is connected to the Neo.
• Confirm sync software was installed correctly. Remove and reinstall the
USB driver and Sync application if necessary.
28
Troubleshooting Problems
• Confirm correct COM port selected.
• Confirm status as “Connected” on sync software.
• Confirm file to be sent is selected on sync software.
Problem: Golf course files cannot be saved to computer from the Neo.
• Confirm the USB cable is connected to the Neo.
• Confirm the Neo Sync software was installed correctly. Remove and
reinstall the USB driver and Sync application if necessary.
• Confirm the correct COM port is selected (check “Settings” in Sync app).
• Confirm status as “Connected” on Sync software.
Problem: No golf course files are available to transfer in Sync application.
• Check “Settings” in Sync application to view the file save location. The
default location is C:\My Documents\Bushnell.
• Perform a search for the file using the search feature on your computer.
Problem: Saved golf course files cannot be located on computer.
• Check “Settings” in Sync application to view the file save location. The
default location is C:\My Documents\Bushnell.
• Perform a search for the file using the search feature on your computer.
Problem: No more golf course files can be transferred to the Neo.
• Delete unused files from the Neo to make room for new files.
• Be sure that files deleted from the Neo are safely saved on your
computer before confirming deletion.
• Approximately ten (10) courses can be stored on your Neo.
29
Warranty
ONE Year LIMITED WARRANTY
Your Bushnell product is warranted to be free of defects in materials and workmanship for one year
after the date of purchase. In the event of a defect under this warranty, we will, at our option, repair
or replace the product, provided that you return the product postage prepaid. This warranty does
not cover damages caused by misuse, improper handling, installation, or maintenance provided by
someone other than a Bushnell Authorized Service Department.
®
Any return made under this warranty must be accompanied by the items listed below:
1)
2)
3)
4) 5) A check/money order in the amount of $10.00 to cover the cost of postage and handling
Name and address for product return
An explanation of the defect
Proof of Date Purchased
Product should be well packed in a sturdy outside shipping carton, to prevent
damage in transit, with return postage prepaid to the address listed below:
IN U.S.A. Send To: Bushnell Outdoor Products
Attn.: Repairs
9200 Cody
Overland Park, Kansas 66214
IN CANADA Send To:
Bushnell Outdoor Products
Attn.: Repairs
25A East Pearce Street, Unit 1
Richmond Hill, Ontario L4B 2M9
For products purchased outside the United States or Canada please contact your local dealer for
applicable warranty information. In Europe you may also contact Bushnell at:
Bushnell Germany GmbH
European Service Centre
Mathias-Brüggen-Str. 80
D-50827 Köln
GERMANY
Tel: +49 221 995568-0
Fax: +49 221 995568-20
This warranty gives you specific legal rights.
You may have other rights which vary from country to country.
©2010 Bushnell Outdoor Products
30
FCC Statement / WEEE
FCC Compliance Statement
This device complies with Part 15 of the FCC interference limits for Class B digital devices FOR HOME OR OFFICE USE. These limits are
designed to provide reasonable protection against harmful interference in a residential installation, and are more stringent than “outdoor”
requirements.
Operation of this device is subject to the following conditions; (1) This device may not cause harmful interference, and (2) this device must accept
any interference received, including interference that may cause undesired operation.
This equipment generates, uses and can radiate radio frequency energy and, if not installed and used in accordance with the instructions, may
cause harmful interference to radio communications. However, there is no guarantee that interference will not occur in a particular installation.
If this equipment does cause harmful interference to radio or television reception, which can be determined by turning the equipment off and
on, the user is encouraged to try to correct the interference by one or more of the following measures:
· Reorient or relocate the receiving antenna.
· Increase the separation between the equipment and receiver.
· Connect the equipment into an outlet on a circuit
different from that to which the receiver is connected.
· Consult the dealer or an experienced radio/TV
technician for help.
The device does not contain any user-serviceable parts. Repairs should only be made by an Authorized Bushnell repair center. Unauthorized
repairs or modifications could result in permanent damage to the equipment, and will void your warranty and your authority to operate this
device under Part 15 regulations.
The shielded interface cable which is provided must be used with the equipment in order to comply with the limits for a digital device pursuant
to Subpart B of Part 15 of FCC Rules.
Specifications and designs are subject to
change without any notice or obligation on
the part of the manufacturer.
31
®
Customer Service: (800) 423-3537
www.bushnell.com
©2010 Bushnell Outdoor Products