1
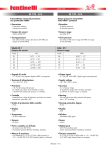
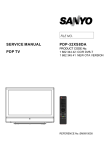
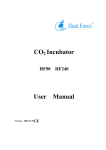
AMP-1033FD
Full HD Media Player
User Manual
Content
Introduction ………………….……………………….…...……..2
Warning………………….…………………………...…………..2
Chapter I Product Specification..….…………………………..3
1.1 Function List………..……………………………...……….3
1.2 Parameters List …………….………………………………5
1.3 Functional Feature ……………..………………………….7
1.4 Quick Installation………..…………………………….…...11
Chapter II Remote Control Function……………….…...…...13
Chapter III User Guide………. …………………………........16
3.1 Main Menu…….………………………………..………….16
3.2 Picture…………..…………………………………………..17
3.3 Music………….…………………………………………….20
3.4 Film……………..…………………………………………..23
3.5 E-book …………..…………………………………………25
3.6 Set …………..……………………………………………...26
3.7 Software Upgrade…………………………………………28
Chapter IV Polite Notice....………………………….………...29
1
INTRODUCTION
This guide shows you how to use and set up your product.
Please read it carefully before operation the unit for you
can exactly understand the using skill.
We repair the damaged goods not caused by users. Body
cases are not included in repair. This warranty does not
cover damage due to accident. Misuse abuse or
negligence and it doesn’t extend to any modification,
conversion and alteration.
In order to improve the function and capability of our
products, we reserve the rights to improve it without
notice.
WARNING
1. To prevent fire and electric shock, don’t expose the
unit to the moist or rain places. Don’t splash the unit
with water or other liquid.
2. Strong shock may damage the HDD. Please backup
your data, we are not responsible for the data lose.
2
3. Keep the unit away from magnetic devices, which
may cause damage of the data stored in the unit.
4. Please don’t interrupt the transfer progress while
upload or download file by an USB cable, otherwise
the data may be damaged.
5. The player will generate heat during work, so it is
recommended the user to put it at a ventilative place
to dissipate the heat, which is good for its steady
operation.
6. We may improve the function and capability of the
product without notice.
Chapter I Product
Specification
1.1 Function List
◆
◆
◆
Full HD decoding resolutions 720P, 1080I, 1080P
(1920*1080), and support a bit ratio up to 104Mbps;
Support decoding of H.264, MPEG1/2/4, DIVX, XVID
and other relevant full HD formats;
Film Play: Support many formats, such as TS, MKV,
3
◆
◆
◆
◆
◆
◆
◆
◆
RM/RMVB, TP, AVI, VOB, DAT, MPG, MPEG and MOV;
Music Play: Support MP3, WMA and other relevant
formats;
Audio Decode: support BTSC/A2/EIA-J demodulation,
support MPEG-1, MPEG-2 (Layer I/II), AAC, HE-AAC,
dolby digital (AC-3) and other relevant functions; also
support MP3, WMA and M4A (AAC);
Picture Play: Support full-screen play by lantern slide;
also support JPEG, BMP, PNG and other relevant picture
formats;
Text/Picture Background Music and Text Read Function.
Read E-book at your will under full HD mode, read text
or browser picture file whilst listening to music, making
you more comfortable;
HDMI 1.3 supports 720P and 1080P video output, and
the component Y/PB/PR supports 720P and 1080P
video output;
Support HDMI1.3Digital,Optical,Coaxial,L/R Stereo Audio
output.
Support various outdoor-hung subtitle; and support
multi-subtitle and multi-track switch;
Adjustable chroma and selectable color temperature,
many EQ modes to switch;
4
◆
◆
◆
◆
◆
◆
Support SD, SDHC, MMC and MS cards, it is possible to
lay the film, music and picture and read the text in this
card;
Support USB interface with HOST function, and able to
directly play the files stored in USB device (for example,
U disk, mobile hard disk and relevant devices), and also
support hot swap of the device;
Support USB power supply;
Support large-capacity mobile hard disk attached
ranging from 20GB to 500GB;
Easy and quick control via remote controller;
Language display: Simplified Chinese, Traditional
Chinese an English.
1.2 Parameters List
Power supply
Positive role (inside), and negative one
(outside), 5V/3A
Remote controller
Full-function infrared remote control, and
display in Chinese and English.
File system
FAT32, NTFS
Video output
Component YPbPr and HDMI1.3
Audio output
Analog stereo,HDMI1.3Digital, Coaxial,
Optical,
5
Video format
Support TS, MKV, RM/RMVB, TP, AVI, VOB,
DAT, MPG, MPEG and MOV
Support decoding of H.264, MPEG1/2/4,
DIVX, XVID and other full HD formats
(1080P,1080I and 720P)
Fully support RV8/RV9/RV10, support
decoding of 720P (1204*768) of RM/RMVB.
Audio format
Support demodulation of BTSC/A2/EIA-J,
and support MPEG-1, MPEG-2 (Layer I/II),
AAC, HE-AAC, dolby digital (AC-3) and
relevant functions.
Support MP3, WMA, M4A (AAC).
Picture format
JPEG, BMP, PNG(.jpg \ .bmp \ .png)
Max bit rate
Up to 104Mbps
Other port
USB2.0 HOST, all-in-one card holder
LED Status
POWER (green stands for “Working”, red
stands for “Standby”)
Working
environment
Working temperature: +5~+50℃; relative
humidity: less than 90%
Storage temperature: -20~+70℃; relative
humidity: less than 95%
6
1.3 Function Feature
H.264
Better HD picture quality, Smaller capacity
H.264, the latest HD Video Compression Technique with
definite standards, was used widely in the fields such as
Television and Radio Broadcasting, Blue-ray DVD and
HD-DVD. It can be keep better HD picture quality as well as
smaller files when you use H.264 to encode videos. This
product can play the HD movie that was encoded by H.264
with the highest resolution of 1080P.
MKV
Flexible HD format with free coding
There is a video file ,taking MKV as postfixes, appeared
frequently in the internet, which can collect various types of
audio track and subtitles track with flexible video coding such
as DivX, XviD, 3IVX,even the streaming video of RealVideo,
QuickTime, WMV.
TS
HD format of independent decoding for discretionary
segments
MPEG2-PS, full named Program Stream, which was mainly
7
used to serve the program with fixed durations, such as DVD
movie. While TS, named Transport Stream, was mainly used
to transport timely program, for example, the timely
broadcasting television programs. It is the feature that
MPEG2-TS format can decode independently from any
segments of streaming video.
AVI
HD coding format with the largest files
Audio Video Interleaved, the Audio Video Interleave, was
introduced by Microsoft in 1992 and was known with
Windows 3.1. Audio Video Interleave means interweaving AV
together to play in sync with good image quality and can be
used in multi-platforms, but the only weakness is bigger
cubage.
MOV
Higher compress ratio, Perfect definition
A video format, of which the default media player is
QuickTime Player, was developed by Apple Company. It
features with higher compress ratio and perfect definition,
and the most important character is crossing-platform that
can support not only MacOS, but also Windows series, that is
to say, it can support static *.PIC and *.JPG format, dynamic
*.MOV which is on the basis of Indeo compression and
8
*.MPG format that was based on MPEG compression as well.
HDMI 1.3
Pure digital AV with one line
This HD player used HDMI1.3 to export video and can be
connected with new HD television and HD projector, which
provide an access to connect your HD television directly
without more audio lines supporting, and can transport
non-compress digital video to support multi-access digital
audio without play decoding (highest 1080P). It is the unique
choice for the digital video and music output.
HD Real
Real HD video, Popular format on internet
RM, RMVB the different formats of Real Media ( AV
compression standard)which was made by Real Networks
Company, taking up the mainly video download ratio on
internet. The HD player is compatible with RM/RMVB,
supporting RM8/RM9/RM10, its dynamic index is higher than
720P, and highly to 1080 (1920*1080P)resolution.
104Mbps
Supporting ratio highly to 104Mbps
Player ID ratio is one of the indexes to reflect HD effect,
especially higher than 720P, the 1080I and 1080P has high
9
requirements for play rate. It is 45Mbps rate in market, and
always appear some weakness when playing the HD movies,
so high play rates is how important for a HD player
10
1.4 Quick Installation
Step.1: Connecting display device
Option.1:
Using Component HD AV Cable to connect signal, and
connect the signal line of Y (green), Pb (blue), Pr (Red) with
the relevant interface of display device (for example: the
television with component import interface), then connect the
audio lines.
After you finish television connection, plugging the AC
Adapter and shifting to component output mode.
Option.2:
Using HDMI to connect signal, connect HDMI line with the
relevant interface of display device (for example: the
television with HDMI import interface).
After you finish television connection, plugging the AC
Adapter and shifting to HDMI output mode.
Notes: There is only one way to export of component output
HDMI output, that is, component output without HDMI output,
vice versa.(the Factory Defaults is 720 output)
11
After appeared image on screen, press the “Screen” to
shift the scale, Full screen or Suitable scale.
Step.2: Connect storage device
1. It has USB HOST interface, can be connected with U-disk,
Mobile Disk and other storage device with USE interface.
2. It has multi-function card interface, can be compatibility
with various storage cards including SD, SDHC, MMC,MS.
Then, you can fully enjoy the interest of FULL HD MEDIA
CENTER
12
Chapter 2 Remote Control
Function
Please refer to the following table for more information of
the key codes and functions of remote controller. The user
can select the corresponding keys as required:
Key Code
Key function
Power
Standby/Power On
Mute
Silent(Open/Close)
Screen
Full screen/ Suitable scale
Y/Pb/Pr
Components shift of video output mode
HDMI
HDMI HD shift of video output mode
Audio
Various sound language choice
EQ Mode
Various sound effect choice
Subtitles
Various Choice
Color
Cold/ Normal /Warm
Image
Various choice
Zoom
Enlarge/ Dwindle image
Select play
Repeat
Information
MPC playing video/ picture
13
Set
Shortcut Key to settings
Return, ESC/Back to Menu
Navigation Key,Up
Navigation Key,Down
Navigation Key,Left
Navigation Key,Right
Play/Pause, choose to confirm
PgDn
PgUp
V+
VOL+
V-
VOLREW
F. F.
■
Stop
14
Image
15
Chapter III User Guide
3.1 Main Menu
After the player is connected to a display, it will start
initialization at time of powering on (the green light is on), and
then a message “Loading…” will appear on the display. After
the initialization is finished (it will take about 8 seconds to
finish initialization), it will enter the Main Menu of the player,
which consists of the options such as Picture, Music, Film,
Text and Setting as shown below.
16
3.2 Picture
On the condition that the storage device is corrected inserted,
pressing the Left/Right navigation key can select the “Picture”
icon under the Main Menu interface. At this time, all the
identifiable file names in the disk will be displayed in the list in
the middle. Press the key
to enter the list, and then
press the navigation keys Up or Down and
to select the
picture file to be played. At this time, the information of
picture file will display on the right of the screen and the right
window will automatically browse the selected picture as
17
shown below:
Under the Picture file directory interface, you can:
﹡ Press the navigation keys Up or Down to select the
option “Back To Previous Directory”, and press the key
to return to the previous menu;
﹡Press the keys
or
to page up or down;
﹡Press the navigation keys Up or Down to move the
cursor, so as to select the required picture;
﹡Press the key
to display a selected picture in full
screen, and play the pictures in the form of slide in the order
that the pictures are stored;
﹡Press the key Back to directly return to the Main
18
Menu;
﹡Press the keys “Select To Play” and
to select the
repeated playing functions: 1. If the cursor is in the file name
option, pressing the key
will pop up the operational
menus “Select All” or “Cancel All” in the screen. Press the
navigation keys Left or Right to make a selection and press
the key to
confirm; 2. If the cursor is in the file name
directory, pressing the key “Select To Play” will check the box
on the left of the file directory. At this time, the player will not
stop playing the selected files in circle until the selected
repeated files are cancelled.
On the condition that the picture is played in full screen,
you can:
﹡Press the keys Back or ■ to return to the file director
interface;
﹡Press the key
to pause continuous playing and
only display a single picture, and repress the key
to
cancel pause;
﹡Press the keys
or
to play the previous or
next picture;
﹡Press the key “Subtitle” to turn over the picture;
﹡ Press the key “Information” to display the related
information of picture on the screen.
19
3.3 Music
Under the Main Menu, press the navigation keys Left or Right
to select the “Music” icon, and then repress the navigation
keys Left or Right to select a disk. At this time, all the
identifiable file names in the disk will be displayed in the list in
the middle. Press the key
to enter the disk, and then
press the navigation keys Up or Down and
to select the
related files to be played. At this time, the information of
audio file will display on the bottom, right of the screen, and it
will start browsing the track to be played on the right window.
Press the key
to enter the playing interface. At this time,
the ID3 information, progress bar, time and music spectrum
will display on the right of the screen, and the track directory
will display on the left of the screen as shown below.
20
Under the Music file director interface, you can:
﹡Press the navigation keys Up or Down to select the
option “Back To Previous Director”, and press the key
to
return to the previous menu;
﹡Press the navigation keys Up or down to move the
cursor, so as to select the required track;
﹡Press the keys
or
to page up or down;
﹡ Press the key
to enter the music playing
interface;
﹡Press the key Back to directly return to the Main Menu
interface;
﹡Press the keys “Select To Play” and
to select the
21
repeated playing function.
When the music is playing, you can:
﹡Press the keys Back or ■ to return to the file directory
interface;
﹡Press the key Mute to prohibit inputting the sound, and
repress the key to release the mute status;
﹡Press the key
to switch between Pause and Play
of the audio file;
﹡Press the volume keys V+ or V- to change the volume;
﹡Press the navigation keys Up or Down to move the
cursor, and press the key “Select To Play” to select the tracks
to be played;
﹡Press the keys
or
to select the previous or
next track in the list;
﹡Press the keys
or
to select to fast rewind
or forward the track. You can select 2x, 4x, 8x and 16x.
Note: When the music is playing, you can continuously
press the key Back to return to the Main Menu interface. At
this time, you can enter the Picture or E-book play interface.
In this way, you can also browse the picture or e-book when
you listen to the music. At this time, you can press the key
Mute to prohibit inputting the sound, and repress the key to
release the mute status. You can also press the volume keys
22
V+ or V- to change the volume.
3.4 Film
Under the Main Menu, press the navigation keys Left or Right
to select the “Film” icon, and then repress the navigation keys
Left or Right to select a disk. At this time, all the identifiable
file names in the disk will be displayed in the list in the middle.
Press the key
to enter the disk, and then press the
navigation keys Up or Down and
to select the related
files to be played. At this time, the information of video file will
display on the bottom, right of the screen, and it will start
browsing the video file to be played on the right window so
that you can learn the general contents of the video as shown
below.
23
Under the Film file director interface, you can:
﹡Press the navigation keys Up or Down to select the
option “Back To Previous Director”, and press the key
to
return to the previous menu;
﹡Press the navigation keys Up or down to move the
cursor, so as to select the required film file;
﹡Press the keys
or
to page up or down;
﹡Press the key
to enter the film playing interface;
﹡Press the key Back to directly return to the Main Menu
interface;
﹡Press the keys “Select To Play” and
to select the
repeated playing function.
24
When the film is playing, you can:
﹡Press the keys Back or ■ to return to the file directory
interface;
﹡Press the key Mute to prohibit inputting the sound, and
repress the key to release the mute status;
﹡Press the volume keys V+ or V- to change the volume;
﹡Press the key
to switch between Pause and Play
of the video file;
﹡ Press the key Information to display the related
information of video file.
﹡Press the keys
or
to select the previous or
next video file in the list;
﹡Press the keys
or
to select to fast rewind
or forward the video file. You can select 2x, 4x, 8x and 16x.
3.5 E-book
Under the Main Menu, press the navigation keys Left or Right
to select the “Text” icon, and then press the navigation keys
Up or Down and
to enter, and then select the e-book file
to be played.
25
When the E-book is playing, you can:
﹡Press the keys Back or ■ to return to the file directory
interface;
﹡Press the keys
or
to select the previous or
next e-book file in the list;
﹡Press the keys
or
to page up or down.
3.6 Set
Under the Main Menu, press the navigation keys Left or Right
on the remote controller to select the “Set” icon or press the
key “Set” on the remote controller to enter the items as
26
shown below:
At this time, press the key
to enter, and then press
the navigation keys Up or Down to select the item to be
adjusted. Press the navigation keys Left or Right to make
adjustments as required, and then the player will change the
parameters settings.
The parameters settings of the player consist of the
below items:
﹡ Language: Select the language of the operation
screen. You can select Simplified Chinese, Traditional
Chinese or English;
﹡Repeat: Set the repeating mode of playing. You can
select All, Single or None;
27
﹡ Picture Playing Speed: Set the refresh speed of
automatic picture playing. You can select Fast, Medium or
Slow;
﹡Film Screen Setting: Set the width/height ratio of film
playing screen. You can select Fit To Film or Full Screen;
﹡Video Output: Set the output format of image signal.
You can select 720P or 1080P;
﹡Reset: System reset.
3.7 Software Upgrade
You can copy the upgrade file suffixed with BIN to the
root director of first disk of USB device to make the upgrading.
Under the “Set” page, press the navigation keys Up or down
on the remote controller to select “Reset”, and then press the
key “Information” on the remote controller to start software
upgrading as shown below:
28
Note:
1.Never power off during upgrading;
2.The file suffixed with BIN is an exclusive file in the
system. Never store the similar file in the memory.
Chapter IV Polite Notice
1.The simple folder system will greatly quicken the response
speed of the system. The more and complicated folders will
bring extra burden to the system and therefore affect the
processing speed of the system. It is suggested to use the
29
single folder system.
2.When the system is busy in processing your last operation,
never frequently press the keys. Otherwise, it will seriously
affect the processing speed of the system.
3.In case of abnormal failures caused by error operations,
please restart the player, and the system will reinitialize.
4.After your portable hard disk is used for a certain time,
there will be some file fragments. Please reorganize them in
time, otherwise it will affect the operational speed of the
system. When you reorganize the file fragments, you can
borrow the hard disk fragment reorganization procedure
supplied with the computer.
Special
Notice
The HDD Media Player which support the internal or inserted 3.5
inch SATA harddisk, please pay attention as follows:
1. Power adaptor: Positive voltage for inside and negative voltage
for outsaide, 12V/3A
2. The switch of external USB device and memory card: The unit
supports the external USB device and SD, SDHC,MMC,MS card.
30
What should be pay attention is do not insert card when you
connect the external USB device, and do not connect external USB
device when you insert the card, it will bring conflict when you use
both of them at the same time.
In the main menu, the default status is the read the external USB
device, it can be used when you connect the external USB device.
Exit the external USB devide when you want to insert card, press
the “stop” button in the remote control and it will change to the
status of reading card, then you can insert the card. Exit the card,
press the “stop” button again and it will back to the status of
reading the external USB card.
Note: With continuous improvement and upgrading of the
system, the actual display and operation will slightly differ
from what is described in the manual. It is normal, and will not
affect your normal operation and use.
Note: The illustrations are only for reference. Please refer to
the actual goods for detailed information.
31