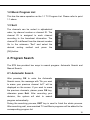
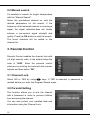
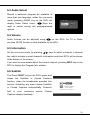
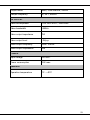
1
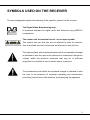
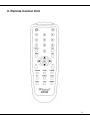
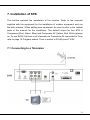
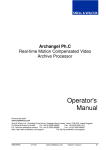
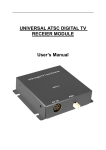
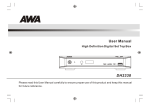
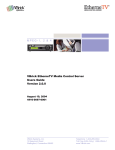
Table of Contents SYMBOLS USED ON THE RECEIVER .......................................................................... 3 SAFETY INSTRUCTIONS .............................................................................................. 4 I.GENERAL INFORMATION ........................................................................................... 5 1. Preface................................................................................................................. 5 2. Main Features ...................................................................................................... 5 3. General Operation of the Receiver....................................................................... 6 4. Front Panel .......................................................................................................... 7 5. Rear Panel ........................................................................................................... 8 6. Remote Control Unit............................................................................................. 9 7. Installation of STB ...............................................................................................11 7.1 Connecting to a Television .........................................................................11 7.2 Connecting to TV using YPbPr support..................................................... 12 7.3 Connecting to another receiver ................................................................. 12 II. MENU STRUCTURE................................................................................................. 13 1. Program List....................................................................................................... 14 1.1 TV Program List ........................................................................................ 14 1.2 Music Program List ................................................................................... 15 1.3 Sort ........................................................................................................... 15 2. Program Search ................................................................................................. 15 2.1 Automatic Search...................................................................................... 15 2.2 Manual search .......................................................................................... 16 3. Parental Control ................................................................................................. 16 3.1 Channel Lock ............................................................................................ 16 3.2 Parental Setting ........................................................................................ 16 3.3 Change PIN .............................................................................................. 17 4. System Setting ................................................................................................... 17 4.1 Video Setup .............................................................................................. 17 4.2 Advanced Setting ...................................................................................... 17 1 4.3 Language .................................................................................................. 18 4.4 Time Setting .............................................................................................. 18 4.5 System Schedule ...................................................................................... 18 5. Accessory........................................................................................................... 19 5.1 System Information ................................................................................... 19 5.2 Factory Default.......................................................................................... 19 5.3 System update .......................................................................................... 19 6. Shortcut Key Functions ...................................................................................... 20 6.1 Electronic Program Guide (EPG) .............................................................. 20 6.2 Program List.............................................................................................. 20 6.3 Audio Select .............................................................................................. 21 6.4 Volume ...................................................................................................... 21 6.5 Information ................................................................................................ 21 6.6 Subtitle ...................................................................................................... 21 III. TECHNICAL SPECIFICATION ................................................................................ 22 IV. TROUBLE SHOOTING ............................................................................................ 24 2 SYMBOLS USED ON THE RECEIVER The next paragraphs explain the meaning of the symbols, present on the receiver. The Digital Video Broadcasting logo. A broadcast standard for digital radio and television using MEPG-2 compression. The caution risk of electrical shock - do not open symbol This symbol tells you that you are not allowed to open the receiver. Only authorized (service) technicians are allowed to open the box. The lightning flash with arrowhead symbol within an equilateral triangle is intended to alert the user to the presence of uninsulated “dangerous voltage” within the product’s enclosure that may be of sufficient magnitude to constitute a risk of electric shock to persons. The exclamation point within an equilateral triangle is intended to alert the user to the presence of important operating and maintenance (servicing) instructions in the literature accompanying the appliance. 3 SAFETY INSTRUCTIONS Please read these safety instructions through carefully, before operating the receiver. Please observe all warnings and instructions on the equipment and contained in these operating instructions. Be sure to read this user’s manual before starting your operation. Never open the cover. It is very dangerous to touch the inside of the unit due to possible electric shock. Install the unit horizontally. Unbalanced installation may cause the unit to be damaged by itself. When you don’t use this unit for a long time, please pull the power cord from the outlet. Also do not use a damaged power cord. When the unit is suddenly moved to a hot area from a cold area, it may cause problems. In that case, turn off the power, and turn on after 1-2 hours. Do not touch the power with wet hand. If there is liquid flowing into the unit, pull out the power cord immediately because it may cause fire or electric shock. Install the unit in a place with: good ventilation suitable temperature no direct sunrays low humidity low vibration influence Place the unit in a well ventilated and no heat environment. Do not put heavy objects on the unit. 4 I.GENERAL INFORMATION 1. Preface The Set top Box is a high cost-effective digital receiver. It is fully compliant with MPEG-2 and DVB-T standards. It provides the enhanced OSD Multi-language menu. Equipped with the latest technology and design, the receiver is ensured to offer high reliable performance for your digital life. 2. Main Features Fully DVB-T & MPEG-2 Compliant Software upgrade via RS-232 serial port Parental lock Multi-language Subtitle output supported Multi-language OSD and friendly user menu Aspect ratio 4:3 and 16:9 Multi-language Audio supported 1000 channels memory space 7 days Electronic Program Guide and Information Plate 256 bit (TRUE) colors on screen display (OSD) supported Closed Caption Auto program update Timer function supported Program parameters memorization when power-off Support Video On Demand 5 PAL/ NTSC/SECAM supported Automatic power on/off supported Logical channel number (LCN) Supported Signal level & quality indicator Standby with low consumption Time adjustment Antenna Feed 5V Supported 3. General Operation of the Receiver The everyday operation of your receiver is accessed via user friendly on screen displays and menus. These menus can help you get the most from your STB, guiding you through installation and channel manager with its various functions to enhance your viewing pleasure. All functions can be accessed through the Remote Control Unit and the front panel buttons provide access to many functions. Please be aware that new software may change the functionality of the receiver. Should you experience any difficulties with the operation of your unit, please consult the relevant section of this manual or Trouble Shooting. Alternatively call your dealer or a customer service adviser. Note: Instructions and figures in the manual are just for your reference. If any discrepancy exists, the goods are subject to your purchase of practical object. 6 4. Front Panel : Press to switch between operation and standby modes MENU: Show the Main Menu and command box on the screen OK: Execute the selected item in the menu CH: When watching, change to the previous or next channel, or move to the next higher or lower item in the menu. VOL: When watching a channel, adjust the volume or move to the left or right item in the menu. 7 5. Rear Panel RS232: Connect to a PC for software upgrade * for servicing purposes only ANT IN: Connect to a terrestrial antenna LOOP OUT: Connect to another receiver (RF loop through output from digital tuner) YPbPR: Component video output. Supports high definition output L/R AUDIO: This socket outputs analog audio L/R signal. COAXIAL: This socket connects to a coaxial socket on your surround sound system. S/P DIF: This socket connects to a hi-fi system VIDEO: This socket outputs composite video signal. S-VIDEO: This socket outputs separate S-Video signal. 100-240V~: Power supply ON/OFF: Main power switch 8 6. Remote Control Unit 9 : : 0-9 : Press to switch between Operation and Standby modes Press to temporarily cut off the sound Enter required numbers in the input box or select a channel to watch RECALL: Press to switch back to previous channel INFO : Show information of the current channel MENU : Display the Main Menu on the screen EXIT : Press to return to the previous menu or escape from the item OK : Press to execute the selected item in the menu, or to confirm the desired value in input mode. :Move cursor up/down/left/right, Page up/down, Volume +/- p- / p+: Press to move up/down a page in the channel list TV/RADIO: Switch between TV and Radio modes GUIDE : Display EPG (Electronic Program Guide) menu FREEZE: Switch between Pause and Play FAV: Display the favorite channel list FORMAT: Used to switch between different video output modes AUDIO : When watching a channel, press to switch the audio languages SUB.T: Subtitle hotkey will select DVB bitmap type titles. Note that subtitles may not always work as the broadcaster may not provide the service ASPECT: Use this hotkey to select your television screen format. Continuously press this button to toggle through the different modes. 10 7. Installation of STB This section explains the installation of the receiver. Refer to the manuals supplied with the equipment for the installation of outdoor equipment such as the dish antenna. When adding new equipment, be sure to refer to the related parts of the manual for the installation. The default output for this STB is Component (Red, Green, Blue) and Composite AV (Yellow, Red, White) always on. To use SVHS first tune in all channels via Composite AV connected to Tune refer to page 15 Program search. Then to switch to SVHS press TV/AV. 7.1 Connecting to a Television 11 7.2 Connecting to TV using YPbPr support 7.3 Connecting to another receiver NOTE: This connection figure is for reference only. Connectors on the rear panel may be in different places or even be omitted due to different STB models. 12 II. MENU STRUCTURE Open the main menu by pressing the MENU button. Program List TV Program List Music Program List Sort Program Search Automatic Search Manual Search Parental Control Channel Lock Parental Setting Change PIN System Setting Video Setup Language Time Setting System Schedule Accessory System Information Factory Default System update Navigate with the arrow button and enter the submenus by pressing the “OK” button. Enter the upper menu level, or exit the main menu by pressing the “EXIT” button. 13 1. Program List 1.1 TV Program List From the menu” TV Program List”, the user can rename, sort, lock and add channels to favorite. Select the list you want to modify, the TV-list and press the “OK” button. Favorite Move the selector to the “Favor”-column. Select the channels you want to add as favorites by press the “OK” button. The selected favorite is marked with “ ”. In channel view mode, press the “FAV” button to display the favorites. Move Select the channel that you want to move and press OK key, the icon appears. Move the buttons. When channel in the list with the the channel is in its desired place, press the “OK” button. Del Move the selector to the “Del”-column. Select desired channel and press OK key. The channels are marked with a “X” icon. If you want to cancel this operation, please press OK key again at this channel. 14 1.2 Music Program List This has the same operation as the 1.1 TV Program List. Please refer to point 1.1 above. 1.3 Sort The channels can be sorted in alphabetical order, by channel number or channel ID. The channel ID is assigned to each channel according to the broadcast information. The channel ID is different from the channel number. Go to the submenu ”Sort” and select the desired sorting method and press the [OK]-button. 2. Program Search The STB has provided two ways to search program: Automatic Search and Manual Search. 2.1 Automatic Search After pressing OK to enter the Automatic Search menu, the message with “Do you want to erase your previous channel list?” will be displayed on the screen. If you want to erase the previous channels, please press OK key, otherwise press Exit. After executing your decision, the system will start to search program automatically. During the searching process, EXIT key is used to finish the whole process. After searching well, new searched TV and Music programs will be added to the corresponding program list. 15 2.2 Manual search It’s possible to search for single transponders with the ”Manual Search”. Select the pre-defined channel no. with the desired parameters for the search. If the frequency of the selected channel is receiving a signal, the signal indication-bars will clearly indicate a per-centual signal strength and quality. Press the OK-button to start the search. The found channels will be added to the channel list. 3. Parental Control Parental Control enables the channel lock with a 4 digit security code. In the default setup the code is ”0000”. Enter the parental control submenu by entering the code with the numeric buttons and then select ”OK”. 3.1 Channel Lock Select NO or YES by using keys. If YES is selected, a password is needed before you enter the Program Search menu. 3.2 Parental Setting This function allows you to lock the channel with a password in order to prevent children from accessing the channel. You can also protect your installed data and information using the Channel Lock. 16 In this menu, move the cursor to the channel which you want to lock, and press OK, the locking mark will be display on the selected channel name. If you want to cancel the operation, press OK key again on the selected channel. NOTE: Unless you enter the correct password, you can not watch the locked channel. 3.3 Change PIN Change pin-code from the submenu selection ”Change PIN”. Enter the old PIN, followed by the new PIN, twice. End by selecting ”OK”. 4. System Setting The settings for video, audio and time can be adjusted in the ”System Setting” menu. The system timer can also be activated from this menu. 4.1 Video Setup Display Type: Select the actual screen ratio of the TV 16:9 for wide screen-TV and 4:3 for traditional TV-format. Video Output: Select YPbPr or S-Video. 4.2 Advanced Setting Antenna Power : The user can activate the antenna power for passive antennas (without signal amplifica-tion). LCN(LOGICAL CHANNEL NUMBER) : By pressing keys, select the option to be ON or OFF. If it is ON, then all the channels will be listed according to their logical channel number. 17 4.3 Language Select the menu language, and the default settings for audio and subtitling. 4.4 Time Setting In order to display the local time correctly, it may be necessary to set a time offset indicating the difference between local time and GMT. When GMT-time is active, the time information is received from the broadcast and adjusted according to the selected time zone. The time zone in Finland is +02:00 during normal time and +03:00during summer time. GMT usage: Select the ON or OFF. If select OFF, you can set Date and Time by using numeric key on the RCU. If select ON, you can select proper option according to the time zone you are in. 4.5 System Schedule You can store ten channels at one time by using the function. Select a task from Schedule list, and press OK to move the cursor to the Detail window. Mode: select Stop, Once or Daily by using keys. Start Date: Enter the start date by using the numeric key on the RCU. Start Time: Enter the start time by using the numeric key on the RCU. 18 End Time: Enter the end time by using the numeric key on the RCU. Channel No.: Select the desired channel No. After setting well, press OK to finish. The task can be set to inactive or active by using keys in the schedule. 5. Accessory 5.1 System Information In this menu, you can view the system version. 5.2 Factory Default Select the Factory Default item in the Accessory menu and press the OK key. A sub-menu will seek your confirmation. Select YES key to restore factory defaults. Note : Reset to Defaults should be used with care as all programs found will be erased and Parameters re-set to factory default using this function. 5.3 System update * Used for Servicing purposes only The STB can upgrade new system version by using RS232. 1. Power off the master and slave STB. 2. Connect master STB to slave STB by a crossed 'RS232 serial cable'. (Data will transfer from master STB to slave STB) 3. Power on the master receivers. 4. Enter the System update window, 19 5. Power on the slave STB, the upgrade will start automatically, 6. Power off the two STBS. 6. Plug off the 'RS232 serial cable'. 7. Now reset the STB and enjoy the fantastic DTV programs. 6. Shortcut Key Functions The basic TV and Radio functions of your receiver are described below: 6.1 Electronic Program Guide (EPG) In normal view mode, press GUIDE key on the RCU to get into EPG Info. The up-left side of this window is program list where you can use keys to select desired program. The content is shown in up-right PIG (picture in graphic). In program list: If you want to know details about one EPG, pressing key at this EPG. Press EXIT to return to previous menu, or press MENU key to close this window. 6.2 Program List Display the Program List by pressing the OK key on the RCU (whilst not in Menu mode). Use keys to step through the programs available. Press the OK key on RCU to select a different program. The program list extinguishes after pressing EXIT or MENU keys. 20 6.3 Audio Select Should a particular program be available in more than one language, under the non-menu mode, pressing AUDIO key on the RCU will display Audio Select menu. Keys are used to switch among the preprogrammed options. 6.4 Volume Audio Volume can be adjusted using on the RCU, for TV or Radio services. MUTE function is also available on the RCU. 6.5 Information On the non-menu mode, by pressing keys to select a channel, a channel bar, which includes current channel’s information and short EPG, will be shown at the bottom of the screen. If you want to know details about the current channel, pressing INFO key on the RCU to display the Program Info window. 6.6 Subtitle The Green SUB.T key on the RCU opens and closes the Subtitles or Closed Captions function, when the broadcaster provides this service. Activating any menu closes Subtitles or Closed Captions automatically. Powerful built in error correctors ensure Closed Captions display flawlessly. 21 III. TECHNICAL SPECIFICATION TUNER Input frequency 174 ~ 860MHz UHF & VHF Bandwidth 7MHz or 8 MHz Input level -72 ~ -20 dBm Input impedance 75Ω DEMODULATION Demodulation QPSK, 16QAM, 64QAM FEC 1/2, 2/3, 3/4, 5/6, 7/8 Mode 2K, 8K Guard 1/4, 1/8, 1/16, 1/32 DEMULTIPLEXER Standard ISO/IEC 13818-1 Input max. bit stream rate 104Mbps(Serial) / 7.5MBps(Parallel) VIDEO DECODING Standard ISO/IEC 13818-2 MPEG-2 MP@ML Aspect ratio 4:3, 16:9 Video resolution 720×576 (PAL), 720×480 (NTSC) AUDIO DECODING Standard 22 ISO/IEC 13818-3 Output mode Mono, Dual-channel, Stereo Sample frequency 32, 44.1, 48KHz AV OUTPUT Video de-emphasis CCIR REC.405-1, 625LINES Video bandwidth 5.5MHz Video output impedance 75Ω Video output level 1.0Vp-p Audio output frequency 20Hz~ 20KHz Audio output Impedance Low POWER Input voltage 100-240~ Power consumption 15W max AMBIENT Operation temperature 0℃ ~ 40℃ 23 IV. TROUBLE SHOOTING Note : If you cannot solve the problem by referring to the above trouble shooting, please contact your re-seller. Problem Possible Causes What To Do The display on the Main cable is not connected. Check that the main cable is plugged into power socket. front panel does not light up. No sound and The unit is in standby mode. Press the RCU. Poor signal quality or bad Check the antenna system interconnections Check cable connections. Signal is too strong. Try a signal attenuator to the picture, but the front key on the panel shows time. No sound or picture. Bad picture/ Blocking error. RF IN port. No picture appears The system is connected by Check that you have selected on the TV screen. RCA leads and TV is not in the correct channel or Video AV/EXT mode. Input on your TV. There is interference The system is connected Change the receiver output on using RF leads and the channel to a more suitable output channel. your digital terrestrial channel. channel of the receiver interferes with an existing terrestrial channel or Video signal. The RCU working. 24 is not Battery exhausted. Change the battery.