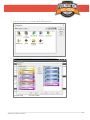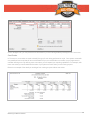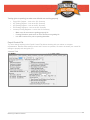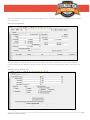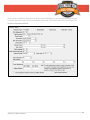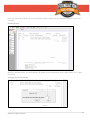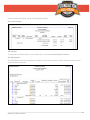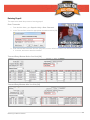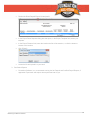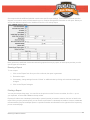
1
Foundation Software’s 3rd Annual CONSTRUCTION CPA CONFERENCE FOUNDATION COLLEGE FOUNDATION for Beginners: AUG. 5-7 — CLEVELAND, OH Mastering the Base 6 Modules FOUNDATION software DELIVERY METHOD: Group Live PROGRAM LEVEL: Beginner CPE CREDIT: up to 18 PRESENTER: Melissa Wood FOUNDATION for Beginners: Mastering the Base 6 Modules Top 10 Tips for Success with FOUNDATION 1. Learning what not to use/set up in F OUNDATION is as equally and sometimes more important than what to use. 2. Understand and document your system defaults and sequences. 3. Avoid making a mess in FOUNDATION. Don’t junk up your database. F OUNDATION is like pouring concrete; if not done correctly at the beginning, jack hammering it out takes 3 times as long. 4. If you are not sure of something in your setup, test it. If you are not sure how to test it, ask. 5. Keep in mind that there are 5 elements to systems (Software, Hardware, People, Procedures, and Data). If any of these 5 elements are off, you can have issues. 6. There are some elements that are critical to set up correctly and test before going live such as G/L, financials, payroll, sales and use tax, workers’ comp, T&M billing, and inventory. It is very important for these items to be set up and tested initially, which is why your trainer will sometimes try and focus on these items first. We must start with the G/L accounts. 7. There are many elements of FOUNDATION that can be set up after you go live, such as additional modules, burden and equipment allocations, WIP, custom reports, etc. These are the bells and whistles of the program. Don’t fret about the high-level items until you are ready, especially if you are not doing these things now. It will save you time, make things easier, and keep your implementation moving along. 8. Don’t purge anything without our help. Purge = Gone Forever whereas Delete = Hidden. You can undelete. You cannot undo purges. The only exception is timecards. 9. FOUNDATION gives you a lot of options. Before changing control files, check with the Training Department or the Support Department first. Changing settings in your control file may impact your system in a way that you don’t intend. 10. Just because you can do something in F OUNDATION doesn’t mean you should. Every decision you make has an impact on how easy or hard you will make using the system. It is much better to make it easy. The features I am referring to are things like income types, phases, divisions, and other complexities that are wonderful features if you need them, but total overkill if you do not. Mastering the Base 6 Modules 1 General Ledger Recommended Setup for G/L Accounts • • Balance Sheet Accounts o Assets – Start with a 1 o Liabilities Start with a 2 o Equities – Start with a 3 Income Statement Accounts o Revenue – Start with a 4 o Direct Job Expenses – Start with a 5 o Indirect Job Expenses – Start with a 6 o G&A Expenses – Start with a 7 o Misc. Income/Expenses – Start with a 8 o Ask Your Accountant – Start with a 9 ( I love this idea and it works well) Note: The benefit to using the above format is that you will know what statement the account goes on (Balance Sheet or Income Statement) by looking at the account number. You will also know if the account needs a job number, cost code, and/or cost class, as well as if (especially if you break out your indirect accounts with a 6) if it is going to burdened or allocated to jobs as a %. Different Accounting Methods 1. Percent Complete Method: Ninety-eight percent of commercial contractors use this method. Job costs and billing hit the Income Statement as costs for billings are incurred. Over/under billing adjustments are posted periodically to adjust profits based on Job to Date % Complete and Earned Revenue. 2. Completed Contract Method: Mainly used with residential contractors Job costs and billings hit the Balance Sheet (assets and liabilities) until the job is complete. This method is very rarely used method for commercial contractors, so we will not cover this process in today’s class. If you think this applies to your company, talk to a trainer or consultant one-on-one to determine the best way to set this up. 3. Income Statement with Cash Basis: Some companies run Income Statements on a cash basis. This is usually a QuickBooks feature. To do this in FOUNDATION, you need to add the A/P and A/R accounts to the Income Statement using the G/L DataGenie custom report writer. Note: FOUNDATION has nice Cash Flow Reports by Job in the Executive Dashboard. Look at these reports before jumping into a Custom Financial Statement. It is likely to be better than this option because it breaks cash flow down by job. Mastering the Base 6 Modules 2 Sample Chart of Accounts – Method A Assets Liabilities Equities Revenue Direct Job Exp. Indirect Job Exp. G&A Misc. Inc/Exp. Mastering the Base 6 Modules 3 General Ledger Vocabulary Force Job Costing A filter on an account. The general rules for using these filters are as follows: “Require Job Costing” - This option should be used on direct job costing accounts and payroll accounts. When transactions are posted to accounts with this job cost setting, job cost detail is required. “Require Job” - This option should be used on income accounts. When transactions are posted to accounts with this job cost setting, a job number is required. “Do Not Allow Job” - This option should be used on accounts on your balance sheet and overhead/indirect expense accounts. When transactions are posted to accounts with this job cost setting, you cannot enter a job or job cost detail. Note: We do not recommend that you use any of the job cost settings that include the word “option.” Divisions A method of dividing your general ledger accounts into smaller sections that you can compare. For example, you can create divisions for your income account to compare government income and residential income. We recommend that you set up your divisions with the help of your trainer or a support representative. Account Type A setting that determines if the account will have a reconciliation option. Checking, savings, and credit card accounts will have a reconciliation option. Accounts that do not fit into these categories should be set to “Other.” Statement Categories that allow you to organize your general ledger accounts on your balance sheets and income statements. You can do this by selecting the group in which an account will appear (Accounts Payable, Income, Job Expense). Categories History Detail A report that tracks all transactions made in the General Ledger. Mastering the Base 6 Modules 4 Using Divisions in FOUNDATION • Theoretical use: Income Statement by state, city, type of work, or department. Keep in mind you can get profit by job, city, state, and type of work in Job Costing reports. Divisions are only for breakdowns needed in the General Ledger on the G&A, Direct Cost, and Indirect Cost accounts. • Do not use divisions if you do not need them. It can make the setup of your system unnecessarily more complex) • If you are using divisions, make them long enough digit-wise to expand. • Never divisonalize your Balance Sheet. If you need to do this, you may need to set up a separate company. • Divisions are usually best when sequenced from a job, meaning a job only has one division. It can work when used other ways, but it needs to be thoroughly sequenced in each module and all setups. • Divisions are not “heading accounts.” They are not a way for you to subtotal a group of accounts together. If you want to “roll up” or “subtotal” a group of accounts into one category, you can do this with a custom financial statement. • Divisions are used so that you don’t need a lot of redundant G/L accounts, like Job Labor. You can have one account for Job Labor, but if you work in 5 states, you would have a division for each state. It would look something like this: o G/L Account 5000 – Job Labor Division 10 – Ohio Division 20 – California Division 30 – Texas Division 99 – Error (This should be your default in your control file) In example above, the 5000 Job Labor G/L accounts is broken into 6 different amounts, which can be totaled by all divisions or reported on just a few selected divisions. • Divisions can have up 4 different sub-levels • Defaulting/Sequencing Divisions – Default all control files to error division o o o o o o o A/P – Job, Vendor, Control File A/R (Hardcoded) – Job, Control File E/Q – Job, Category, E/Q Category, Attachment, Control File, P/R Division I/N – Job, Warehouse, Primary Category, Control File P/R – Job, Employee, Dept. S/D – Description of Repair T/M – Job, Control Files • Be careful when setting up P/R miscellaneous deductions. The deductions will not recognize divisions if the G/L accounts are set up to hit an income statement account. • You may want to set up an overhead job for each division and level. Mastering the Base 6 Modules 5 Sample P&L with Divisions Detailed Mastering the Base 6 Modules 6 Sample P&L with Divisions Combined Mastering the Base 6 Modules 7 Sample P&L with One Division Mastering the Base 6 Modules 8 Setting Up G/L Accounts Below is an example of the Force Job Costing setting on the “General” tab of the Account Record (General Ledger > Maintenance > Accounts). Note: G/L accounts that are set up to require job costing will force you to enter a job, cost code, and cost class. Mastering the Base 6 Modules 9 Force Job Costing Note: We do not recommend that you use any of the job cost settings that include the word “option.” There are two correct ways to force job costing. Pick one way and stick to it. Both are correct and both are specific to FOUNDATION logic. 1. Method A – Set up only Direct Job Cost accounts and P/R-related accounts to “Require Job Costing” (with the exception of your Burden Payable/CR Accounts). a. Testing – Run the G/L History Detail Report (General Ledger > Reports > History) using your live date. In the Group By Job field on the “Criteria 2” tab, select “Yes.” IN the Select Journal field, select your P/R journal. Any G/L accounts that say “No Job” are the ones that need to be fixed. 2. Method B – Set up all Income Statement Expense accounts to “Require Job Costing.” Note: Regardless of the method you use, never select the “Option Job Costing” or “Option Job” in the Force Job Costing field. Do not fall into the trap of setting this up a different way because your old system was that way or you are new to the company and think it is wrong. We set up the accounts this way to keep your general ledger and job costing in balance because the Payroll Module requires job costing. Mastering the Base 6 Modules 10 G/L Account Record “General” Tab A B C D E F Account Number Account Description Debit or Credit Indicator Job Cost Setting to Control JC & GL Reporting Account Type – Note: Drives Bank Rec Program Statement Category – Note: Drives Financial Statements Mastering the Base 6 Modules 11 Statement Categories Note: The Statement Category determines where the G/L account will appear on the Financial Statement. It also drives the setting of “Debit” or “Credit.” Click on the dropdown arrow to see if an account should be a debit or credit. Mastering the Base 6 Modules 12 Understanding G/L Defaulting (Let FOUNDATION manage data entry to minimize mistakes and increase efficiency) • • • • • Journals o Importance of Journals – The G/L account setting and the journal setting determine if something hits your job cost or not) • G/L Only • G/L with Job Costing • Recurring Accounts • Recurring Amounts • General Ledger Budgets Control Files Consolidating Financials o If you are going to do this, you can set up either” • The same accounts with same names • Different accounts with any name • No same accounts with different name because it will consolidation using only one of the names. o Typically this is only used for companies that have a separate Tax ID or EIN. You will need to set up a database for each company. o You need to be careful when setting up G/L accounts. You need to understand how the logic works and the data flows from one company to another. o Intercompany transactions will need to be done by booking payables and billings to/from each company. There is no intercompany feature that does this for you. Custom Financial Statements o A little time consuming to set up o Worth the time because you can drill down into the detail on any account Basic Pitfalls in FOUNDATION o Not setting up G/L accounts or payroll departments correctly o Not understanding your sequencing and defaulting o Using GOTHCHA programs outside of their intended purpose without understanding what they do o Not checking your G/L Registers to make sure that postings are correct o Not making sure that G/L and J/C tie out o Not properly correcting mistakes Mastering the Base 6 Modules 13 Tying Out Job Cost to the General Ledger Setting Up Your System So That General Ledger & Job Cost– Always Tie Out To the Penny Testing Already Posted Entries • • • • Run the G/L History Detail Report for your Direct Job Cost accounts. In the Select Journal field, select your payroll journal. In the Group by Job field, select “Yes.” All G/L accounts that have “No Job” are the ones you need to change to “Require Job Costing.” Run a Job History Detail Report (Job Costing > Reports > Job History Detail) for all jobs for the current year. On the “Criteria 3” tab, disable all of the transaction checkboxes except for the Job Journal checkbox. None of the other these transactions hit your G/L Job. If they are Direct Job Cost jobs, you should fix it by reversing it out and completing a G/J Journal on the Create Journal Entries window (General Ledger > Daily > Create Journal Entries). This will hit both the Job and G/L. Run a G/L History Detail Report for your Direct Job Expense Account. In the Select Journal field, select your G/L journal. In the Group by Job field, select “Yes.” If you have entries that went to jobs, and the G/L Journal is set to “No Job Distribution,” there is a chance that those entries did not go to jobs. Job Cost / General Ledger Query Mastering the Base 6 Modules 14 GOTCHA Programs – Things that can cause the G/L and J/C to be out of balance • • • • G/L Journals that are set up or used incorrectly – Only use G/L Journal to entries that hit the Balance Sheet. Never enter journal entries to the Accounts Payable, Accounts Receivable, Equipment, or Inventory Modules. If you need to make entries to these modules, they need to be done within the modules to keep them in balance. FOUNDATION will warn you, but it will allow it because that is how we enter beginning balances. Entering Cash History – This program should only be used for your first bank reconciliation to load your beginning bank balance from your live date and un-cleared checks that are not in FOUNDATION because they were already paid out of your old software. J/C Daily > Create Job Journal Entry – Never use this program because it does not hit the G/L. It is only used for entering beginning job cost detail from your old system when going live. Hide it from your users. Instead, use a G/L Job Cost Journal Entry to ensure the entry hits the J/C job and the G/L job. J/C Daily > Transfer Job Costs – This does not update you G/L. It will fix your job cost reports but it doesn’t look good to your CPA and bonding company if one job has $5,000 more in costs in Job Cost and another job has $5,000 less in the G/L. The totals of all jobs may still be correct but this could drive any “Type A” accountant completely insane! Instead, use a G/L Job Cost Journal Entry to ensure that the entry hits the J/C job and the G/L job. Mastering the Base 6 Modules 15 Correcting Mistakes The best way to fix something is to fix it from the same module and/or program in which the mistake was made. Please note that journal entries will not update A/P, A/R, or P/R Reports. If you want make the correction the right way, use the respective module to fix mistakes. • P/R Corrections – Unless the employee owes you money • P/R Voids • A/P Quick Reversal • A/R Quick Reversal • G/L Reverse Journal Entry Key Things to Verify Before Sending your Financials to your CPA or Bonding Company • • • • • • • Your A/P and A/R Aging Reports tie to your Balance Sheet to the penny Your job billings/income to date ties out to J/C billings to date in job cost Your job cost to date in G/L ties out to your job cost to date in J/C Your bank statements are reconciled The inventory on the Balance Sheet matches the Inventory Summary Report Your Balance Sheet balances All your entries are posted Mastering the Base 6 Modules 16 Control Files, Sequencing, and System Tools Control files are system wide settings that affect all users. It a good idea to secure this area of FOUNDATION, and you should not change any setting in any of the control files without checking with a FOUNDATION Support Representative or a Trainer. Changing control files may impact our system in ways that you don’t intend. Control File Dates Control the posting periods for each module. • • Sample of a hard close in 2014 – The Control Date Range would be 1/1/2015 through 12/31/2015, and the Flag would be set to “Prevent.” Sample of a soft close in July 2015 – The Control Date Range would be 8/1/2015 through 12/31/2015, and the flag would be set to “Warn.” o A/P Control File o A/R Control File o P/R Control File o I/N Control File o E/Q Control File o F/A Control File Required Fields On some control files, you can require that certain fields be filled out on certain records before they can be saved. Below are some our favorite fields to require a user to fill out before saving a record. • • J/C Control File o Customer (Job Record) o Payroll Tax Group (Job Record - if multi-state) o Project Manager (Job Record) o Default End Date when a job is closed (Job Record) P/R Controls o Payroll Dept (Employee Record) Auto Posting Gives you the option to have your invoices posted automatically. You can choose to always auto post, to be prompted to auto post, to not auto post but to receive a reminder about unposted invoices, or to never auto post. • • A/P Controls A/R Controls Dropdown Fields • • • • Job filtering for closed jobs PO filtering for closed POs Equipment usage filtering for unposted entries Name/number search - This is a fantastic feature that you should consider turning on Mastering the Base 6 Modules 17 Burdens – Actual vs. Extra • • Actual o o o Extra o FUTA SUTA Workers’ Comp Indirect Costs such as shop supplies, field phones, general liability insurance (for subs), auto expenses, fuel, etc. (These will be discussed in more detail later.) Note: Maintenance for the Payroll Module can also be set up to direct job cost for FICA, union fringes, and the employer contributions for health insurance, 401k, etc. Sequencing When FOUNDATION is told to find information, (when computing payroll, clicking [OK] on a transaction, etc.) it has a set order in which it looks for information. The order in which it searches in is called sequencing. Sequencing is similar to a routine you go through in your daily life. For example, before leaving the house you need to make sure you have your keys. First you look on the key hook. If you find your keys there you are ready to go. If you don’t find them you will look on the counter. If you find them on the counter you are ready to go. If you don’t find them you continue looking until you do. Because we, as users, are able to set most sequences in FOUNDATION, we can have the system take care of all of the “ifs” and unusual situations that occur when running a construction business. Sequencing Lessons: Just because you can do something in FOUNDATION doesn’t mean you should. Learning what not to use/set up in FOUNDATION is as equally, and sometimes more, important than what to use. Understand and document your system defaults and sequences. Example – Worker’s Compensation In this setup, the job takes precedence. If the job W/C class is blank, FOUNDATION will look to the cost code. If the cost code.is blank, FOUNDATION will get the W/C code from the Employee Record. This is where critical thinking skills come in handy. Example If you have OCIP or CCIP jobs, you can exempt those jobs from accruing any W/C costs, because the owner or contractor is paying for the policy. This is where you would only fill out the Workers’ Comp Class on the Job Record if the job was OCIP or CCIP; otherwise you want it to be blank. For all of your other jobs, the W/C class will default from the cost code. If the cost code is blank, then the Employee Record, and so on. It would be a big program if whoever set up your jobs was trying to be thorough and filled out the W/C field on the job! Right? Especially if it was a high W/C rate. Mastering the Base 6 Modules 18 What You Need to Understand About Sequencing is the Power of Leaving Certain Fields Blank G/L Account Defaulting/Sequencing in Control Files • • • • • • • • • • • • • • • A/P – Vendor, Cost Code, Cost Class (Ex. Leave the Vendor G/L field blank if costs hit multiple G/L Accounts) A/R – Control Files or Income Types E/Q Usage - Job, EQ Category, Equipment, Job or None E/Q Expense/Service – Control File, Service/Expense Code, Primary Category I/N – Job, Warehouse, Primary Category, Control File P/R – Hard Coded (Dept + Dept Earn Codes #1; Earn Code + Tax Setup - #2 P/R – Employer Contributions – Employee, Department, Deduction P/R – Extra Burden FUTA, SUTA – Department, Control File (Burden) P/R - Extra Burden –Department, Employee, Company, Trade, Union, Cost Code, Job PO/Sub – Vendor, Cost Code, Cost Class Sales Tax – Hard Coded – Sales Tax Authority #1, Sales Tax Control Files #2 Service Dispatch Income – Description of Repair, Income Types Service Dispatch Cost – A/P, P/R Depts, PO Sub, I/N T/M – Control Files or Income Types U/P – Control Files Division Defaulting/Sequencing – Note: Default All Control Files to Error Division • • • • • • • A/P – Job, Vendor, Control File A/R – Hardcoded – Job, Control File E/Q – Job, Category, E/Q Category, Attachment, Control File or P/R Division I/N – Job, Warehouse, Primary Category, Control File P/R – Job, Employee, Dept. S/D – Description of Repair T/M – Job, Control Files Note: Unless a sequence hardcoded, you can change the sequence to fit your needs. Whatever is the in first position takes precedence. If FOUNDATION finds that the first position is blank, it will look to next position. Mastering the Base 6 Modules 19 System Tools - Programs that Can Customize FOUNDATION Specifically to your Needs UDFs – Creating User Defined Fields (Main Menu > Tools > System > Other) • • • • • Unlimited # of Fields you can Add to Mostly Any Table o Employees – Great for Human Resource Dept o Vendor o Customer o Job o PO o AP Invoice o And Many, Many more….. Pick the correct Table to Set them up in (think one to many; many to one) Make sure the Field Doesn’t already Exist Pick the Correct Type of Field o Character o Numeric o Dropdown List (Use these whenever possible) o File Location o Folder Location o Integer o Email Address o Web Address o Date Make sure you setup the Field Correctly before you start adding data Avoid making a mess in F OUNDATION. Don’t junk up your database. F OUNDATION is much like pouring concrete. If not done correctly at the beginning, jack hammering it out takes 3 times as long. Exercise: Set Up Emergency Contact Name, Phone Number & Relation UDFs 1. Emergency Contact 1 – Character Field – 30 Characters 2. Emergency Contact 1 Phone – Character Field – 30 Characters 3. Emergency Contact Relation – Dropdown List (Spouse, Parent, Child, Sibling, Friend, Significant Other, Other) Mastering the Base 6 Modules 20 Next Number (Main Menu > Tools > System > Other) Next Number is where you can set up what the next job number, employee number, PO number, A/R invoice number, etc. will be if left blank. • Note: Some control file settings will allow you override or protect these fields. • You cannot change the next A/P or P/R check number. This is hard coded in the system. Green Button Feature Allows the user to save a PDF Copy of any Report to a Pre-Assigned Folder determined in the setup below, auto named (or not) that is time date stamped and can later be found from that same Report Screen that it was saved from. Green Button File User Locations (Setup located in Main Menu, Tools, Other – User Specific) Green Button File User Locations (Setup located in Main Menu, Tools, Control Files– Company Specific) Click this button when you are looking a report you want to save. Then this screen will pop up: Custom Adding Custom Spreadsheets, Word Documents, and other Links/Files to your Menus Common Uses for Custom Documents: • Custom Excel Queries Reports • User Manual/Instructions • Quick Access to Contract Forms • Quick Access to Websites for Ordering Materials • Quick Access to Employee Applications, Timecards, Blank I9 Forms, etc. Mastering the Base 6 Modules 21 To add a Custom link, follow these steps: 1. From the Main Menu, go to Custom > Manage. 2. Click on “Documents” tab. 3. In the Name field, enter a name. 4. In the Document Group field, select “General.” 5. In the Document Type field, select a document type. Your options are: a. File b. Website c. Email 6. In the Path field, enter the path/location of the document type using Browse button 7. If necessary, enable the Available in All Companies in this Database or the Available to All Users in this Company checkbox. 8. Click [Save Changes]. 9. From the Main Menu, go to Custom > Documents and move the custom link to your Quick Links menu. Exercise – Create a Custom Document Customizing Menus / Quick Links *Learning what not to use/set up in FOUNDATION is as equally, and sometimes more, important than what to use.* Creating custom menus that only have programs that you use or need on a regular basis. 1. 2. 3. 4. Click on the silver wrench. The Manage Quick Links Categories window opens. Click [Add…]. In the Name field, enter a name for the category. If you want to create a wizard that will automatically move you to the next step in a process, enable the Create Wizard checkbox. 5. Click [OK]. Sample Custom Quick Link Menus • You can add custom documents to Quick Link menus as well. • Drag-and-drop J/C Activity Reports (Click on dropdown list, click on the desired report, and drag-and-drop it on the Quick Links menu) • Create a custom Quick Links menu for “Gotcha Programs.” Mastering the Base 6 Modules 22 Sample Custom Menus Exercise: Create a Custom Menu Mastering the Base 6 Modules 23 Customizing Forms in FOUNDATION Three Areas of FOUNDATION Where You Can Customize Forms 1. DataGenie • AR Invoices Lump Sum Itemized (Unit Price and Quantity) Progress Service Dispatch Work Order A/R Proposals • PO/Subcontracts – Short Form (1-2 pages) • A/R Statements • A/P Lien Waiver Progress Final • Service Dispatch Proposals • J/C Change Orders 2. PO/Sub Template (Long Form PO or Subcontract) • Long Form Subcontract and/or Master Subcontract • PO longer than 2 pages These can be imported from a .RTF file using Microsoft® Word® 3. P/M Daily - Template Editors • RFC’s • RFI’s • RFP’s • Transmittals • Submittals • Misc. Documents Sample – 24 Hour Notice to Proceed Sample - 48 Hour Notice to Proceed Best Practices for Forms Use a template from FOUNDATION Add fields that don’t currently exist to the form Import your logo. For DataGenie forms, make sure the logo is in a .bmp format Try and keep forms consistent for marketing purposes Save often when making changes Test prior to going live Mastering the Base 6 Modules 24 Exercise: Create a Custom Form in the DataGenie 1. From the Main Menu, go to Tools > Genies > Form > InvoiceGenie. 2. Click the [Import] button. On the Select File dialog box, select your .FGF file. 3. Right-click on the logo to view the image properties. 4. In the Invoice field at the top of the window, enter a name for the invoice design. 5. Click [Save]. Mastering the Base 6 Modules 25 Sample Lesson: Create a Custom Employee List with UDFs 1. From the Main Menu, go to Tools > Data >Employee List. 2. Using the Employee ListGenie wizard, create your Employee List. Mastering the Base 6 Modules 26 Open the Employee List 1. From the Main Menu, go to Payroll > Reports > Lists > Employee List. 2. In the List Type field, select “Custom.” 3. In the Custom Design field, select the list you created in the Employee ListGenie. Notice: On the “Criteria” tab there a variety of options. Practice filtering and sorting the list using these options. Exercise: Using the same logic, create simple custom job list and find it and open it from your menu. Below is an example of a custom job list with Job Number, Job Name, Customer Name, PM Id, Original Contract Amount, and Original Estimate columns. Mastering the Base 6 Modules 27 System Maintenance The Maintenance Menus are where you add/modify records such as Job Records, Vendor Records, Customer Records, Employee Records, Terms, Cost Code Records, Project Classes, etc. Mastering the Base 6 Modules 28 Accounts Payable Maintenance The accounts payable maintenance we need to complete focuses mainly on setting up your Vendor Records. However, to fully set up your Vendor Records, you may first need to set up items like sales/use tax, payment terms, and other records you can include as defaults on your Vendor Records. Accounts Payable Maintenance Vocabulary Pay Classes 1099 Reporting Class Vendors Sales Tax Authorities Sales Tax Reporting Classes Terms Mastering the Base 6 Modules Categories you can use to sort and group vendors. Allows you to decide in which box the vendor will populate on the 1099. Example: Box 7 - Non-employee compensation. You may need to add one for attorney fees. Vendors are people from whom you buy materials or contract services. They may provide materials or services you need to complete a job or to run your office and may include companies such as a lumber yard, contractors, or even the phone company. State and local authorities that determine the taxable rate. While they are called “sales” tax authorities, these records can be used to track both sales and use tax. Categories you can use to sort and group sales tax authorities for reporting purposes. Payment terms that calculate the due dates of invoices and any applicable discounts. By defaulting terms to a vendor it will save the user a ton of time not having to enter Dues Dates, Discount Dates, amounts, etc. 29 Vendors Vendors are the people from whom you buy materials or contract services. Below are screen shots and brief explanations of some of the important Vendor Record tabs (Accounts Payable > Maintenance > Vendors). “General” Tab On the “General” tab of the Vendor Record, you will enter basic information, like the vendor’s name, address, and phone number. “Defaults” Tab On the “Defaults” tab, you can set certain items to default when you use this vendor. Mastering the Base 6 Modules 30 Vendor Defaulting Defaulting cost codes and cost classes is valuable because it can help your accounts payable team be faster and more accurate. Certificates If you subcontract work, you can enter Expiration Dates for general liability insurance or W/C, and set FOUNDATION to prevent or warn the A/P clerk if the certificates have expired or are close to expiring. You can also add dates for things like auto insurance, contractor license expiration, umbrella insurance, etc. You can turn on warnings for the following in the A/P Control File: • • • A/P Invoice Entry Select for Payment Print/Post Checks Pay Classes Can be uses as filters for Selecting Invoices for Payment, A/P Aging, or Printing/Posting Invoices. NOTE: If you pay when paid, typically you can use this feature to select all AP Invoices for Payment, on a Certain Job, for just your Subcontractors due through a certain date. Check Desc. Fill this out of you want your Account number with a vendor to print on a check, stub or both. Misc. Never enable this checkbox. This is only used for the designated miscellaneous vendor. Mastering the Base 6 Modules 31 “Divisions” Tab Only fill out this tab if this vendor should default to a specific division if 100% of the time. “1099 Info” Tab You only need to fill out this tab if the vendor requires a 1099. The Type and Reporting Class fields must be filled out for 1099’s to work. To create 1099 Types, go to Accounts Payable > Maintenance > 1099 Reporting Classes. Mastering the Base 6 Modules 32 “Inquiry” Tab You can click on the headers (column headings) here at the top to sort this information different ways. In the “A/P2” tab of the A/P Control File, you can set up an Invoice Lookup Start Date so that the “Inquiry” tab only lists invoices on or after that date. This is a good feature if you have been using FOUNDATION for many years. Note: On the “A/P1” tab, you can set it so that most recent transactions show up first on the “Inquiry” tab. Mastering the Base 6 Modules 33 Accounts Receivable Maintenance Accounts Receivable Vocabulary Bill/Ship To Address Customers Sales Tax Authorities An alternate address for a customers that can be used to indicated additional shipping information. The people who pay you for work you have completed. State and local authorities that determine the taxable rate. While they are called “sales” tax authorities, these records can be used to track both sales and use tax. Sales Tax Reporting Classes Terms Units Of Measure Mastering the Base 6 Modules Categories you can use to sort and group sales tax authorities for reporting purposes. Payment terms that calculate the due dates of invoices and any applicable discounts. Records used to describe a quantity of items or the size of a task. 34 A/R Customer Record Customers are the people who will be paying you for work you have completed. Below are screen shots and brief explanations of the some of the important Customer Record tabs (Accounts Receivable > Maintenance > Customers). Someone from you training team will discuss Customer Records in more depth. Customer “General” Tab On the “General” tab of the Customer Record, you will enter basic information, like the customer’s name, address, and phone number. Customer “Defaults” Tab On the “Defaults” tab, you can set certain items to default when you use this customer. For example, you can set terms, a tax authority, and a tax type to default when this customer is selected on an accounts receivable invoice. Mastering the Base 6 Modules 35 Job Costing Maintenance Setting up the Job Costing Module is a key part of your setup because it determines the detail level of your job costing. This information can help you improve your business and aids in the tracking of your real costs vs. your budgeted costs. Job Costing Maintenance Vocabulary Cost Codes Cost Classes Phases Cost codes allow you categorize total job expense by activity, or by important aspects of the job. Cost classes represent the basic cost performed on a job. For example, labor, material, etc. Phases are a method for tracking jobs that are divided into several sub-jobs or portions of the project. This allows you to classify job cost by the portion of the project in which it was used. For example, if a building is four stories tall, phase 1 can represent the first floor, phase 2 can represent the second floor, and so on. Sort Project Classes The manner in which a list or report is organized. For example, you can sort by employee name or job number. A project class is a label you can put on a job to organize and sort job cost reports. For example, commercial, residential, etc. Cost Code Groups A cost code group is a label you can put on a cost code. You can then sort and organize your job cost reports by cost code groups. Cost code group examples include installation, demolition, etc. Please note that using cost code groups is optional. Geographic Areas A geographic area is a label you can put on a job to organize and sort job cost reports. For example, states, counties, etc. Project Manager A person that is in charge of a job. User Defined Sorts Custom sorting options you can define in the Job Costing Module. Mastering the Base 6 Modules 36 Job Records Job Records are an important part of FOUNDATION, as they serve as a central point around which accounts payable, accounts receivable, and job costing information is entered. Below we will discuss some of the important aspects of the Job Record. “General” Tab On the “General” tab of the Job Record, you can set up fields that you can use to sort reports. The Project Manager, Geographical Area, and Project Class fields can all be used to sort job costing reports. Additionally, you can fill out the Original Contract and Original Estimated Cost fields on the “General” tab. “A/R” Tab On the “A/R” tab of the Job Record, you can enter the job address information as you want it to print on a purchase order or invoice. Mastering the Base 6 Modules 37 Job Record “Budgets” Tab On the “Budgets” tab, you can provide more information if you are entering detailed job budgets into FOUNDATION. Cost Codes In FOUNDATION, cost codes are used to classify the type of work being performed on a job. Your system comes with one predefined cost code that will serve as the default if you do not add other cost codes, but you might want to consider defining more. By defining more cost codes, you will expand your reporting capabilities. For example, with more cost codes you can break down the costs of your jobs even more when you are running reports. Below is an example of the detail you would get from running a report without cost codes. Mastering the Base 6 Modules 38 Below is an example of the detail you can get by using more cost codes. This report is more detailed, as it is broken down by more aspects of the job. The above reports are just two examples of the different reports in FOUNDATION. You can even create a variety of custom reports that include the cost class breakdown for each cost code. Mastering the Base 6 Modules 39 Payroll Maintenance Payroll Vocabulary Departments A way to group employees by where their wages and burden are sent in the general ledger. Trades A way of labeling employees by how a union/prevailing wage might define them or by the tasks they perform. For example, a journeyman, apprentice, or administrative employee. Earn Codes The type of earnings given to an employee. Earn codes determine how the system calculates earnings. For example, overtime, regular, wages, or salary. Benefit Types Labels that allow you to divide and classify union/prevailing wage benefits for certified payroll reporting. Compute Payroll Purge Computed Payroll The process in which FOUNDATION combines your predetermined settings (taxes, union deductions, etc.) with the hours and/or amounts from the timecard, and verifies payroll can post correctly. Clears the system of the previously computed timecards that have been posted. In many cases, purged payroll can be recomputed. Pre-Check Registers Fourteen different reports that reflect the current computed payroll before it is posted. This is where you can review payroll before posting it. Current Adjustments A type of timecard that allows you to change the calculated figure on an employee’s pre-check register before it becomes official. History Adjustments A type of timecard that allows you to change an aspect of an employee’s payroll history. For example, you can correct a tax amount. Pay Period Mastering the Base 6 Modules A method of grouping paychecks. You can set the beginning and end of the pay period, as well as the check/transaction date. For example, weekly or biweekly. 40 Payroll Vocabulary Payment Groups A tool that allows you to issue multiple paychecks to an employee in the same payroll week. For example, if you issue overtime or reimbursement checks separately, you would set up two payment groups so the amounts are not combined on one check. Minority Groups A labeling system that allows you track the different types of work a minority may perform for your business. Tax Groups Workers’ Comp Exposure Groups Miscellaneous Deductions Pre-Post Copy Post Sequencing A way of combining several taxes, often local, into one place. A tool that helps accrue and report on exposure and premiums in workers’ compensation. Deductions, other than taxes or union dues that are taken from the employee’s payroll check. These deductions can specify employer matching, for example, a 401K or health insurance. A method of creating an entire database backup as of the moment you perform the copy. When you perform a pre-post copy, the previous copy is overwritten. Sending a transaction to the general ledger. Once a transaction is posted, it becomes an official account transaction in FOUNDATION. The order in which the system looks for information. For example, the system might find the W/C state on the Employee, Job, or Cost Code Records. Sequencing determines the order in which it looks at those records. P Mastering the Base 6 Modules 41 Properly Setting up P/R Departments for Today and Future • • P/R Departments – Defaulted/sequenced from job, employee, or cost code The department is usually the best place to default from o All P/R defaults can be set up the Department Record Wages Taxes Workers Comp Divisions Employer Benefits & Contributions Burdens Extra Burdens • Typical P/R Departments o Office o Officer o Field o Shop • Best Practice – Set up a department for each wage G/L account you have on your P&L o If you use divisions, you might need departments for each division and wage account if a job needs to hit more than one division Office - OH Office – CA Officer – OH Field – OH Field – CA Shop – OH Shop – CA • Add every earn code to each department and set them up to default to the proper G/L account o Practical Example – You may not commission your field today or have salaried field employees. However, someday you might. Unless you have it set up correctly, you won’t remember to add this to your setup and FOUNDATION will not stop you from using an earn code that doesn’t exist on a department. It will just use the secondary default which could be incorrect. Setting up every earn code on each department will at least protect you from an unnecessary mistakes. • Set up an overhead job for each department and default the department to the job (only if multiple departments will not hit the job). The question is will more than one department hit a job. If yes, then you want to default departments to the employee or cost code. Mastering the Base 6 Modules 42 Testing (prior to posting) to make sure defaults are working properly • • • • • Payroll G/L Register – Look at the G/L Summary A/P Posting Register – Look at the G/L Summary A/R Posting Register – Look at the G/L Summary E/Q Posting Registers – Look at the G/L Summary Inventory Posting Registers – Look at the G/L Summary o o o Make sure all accounts are getting properly hit If using Divisions, make sure no Error Divisions are getting hit It is 300% easier to fix prior to posting than after Payroll Control File Try not to change anything in the Payroll Control File without checking with your trainer or a support representative. Because these settings control how FOUNDATION operates, we need to be aware your control file settings to properly train and guide you. “General” Tab Mastering the Base 6 Modules 43 “Sequences” Tab “Checks” Tab Mastering the Base 6 Modules 44 “Misc.” Tab Mastering the Base 6 Modules 45 Employee Maintenance Now that we have completed the setup for departments, workers’ comp, unions, prevailing wage, and tax tables, we can set up your Employee Records (Payroll > Maintenance > Employees). We had to set up the other maintenance items first because that information is necessary to set your employees up in FOUNDATION. On the “General” tab, you will enter the employee’s personal information, as well as some default information that will be pulled into timecards for the employee. Employee Record “General” Tab A Personal Information The top half of window contains fields for all of the employee’s personal information. B Department Select the department this employee usually works under. C Trade Select the employee’s normal work activity. D Union Select the employee’s home union, if applicable. Workers’ Comp Select the default workers’ comp information. Pay Information In the various pay-related fields, enter the appropriate pay settings. If the employee is in a union, you do not have to enter a pay rate. E F Mastering the Base 6 Modules 46 On the “Deduction” tab, you will configure the employee’s tax and miscellaneous deductions settings. “Deductions” Tab A Tax Withholding Section The top half of window is where you enter the employee’s federal, state, and local tax withholding information. B Miscellaneous Deduction Section The bottom half of the window is where you enter miscellaneous deductions. On the “Direct Deposit” tab you can add direct deposit information for the employee’s paycheck. “Direct Deposit” Mastering the Base 6 Modules 47 Accounts Receivable Now we will discuss A/R invoices and the different invoice format options that can be created in the genies as well as how to import the AIA Schedule of Values. AIAs The information you enter on the “General” tab of the AIA Entry window will be printed on the header of your AIA billing. “General” Tab On the “Billing” tab, you will enter your schedule of values. Each time you modify an AIA Billing Record, FOUNDATION will automatically update the billing and increment your application numbers. “Billing” Tab Mastering the Base 6 Modules 48 On the “Address” tab, you can enter an AIA-specific project address to display on the header. If you leave this tab blank, the job or customer address will be used. “Address” Tab AIA List/Post Window When you are ready to post an AIA billing, you will click the list button, which will take you to the AIA List/Post window. Enter your criteria and click on the “List” tab. Please note that to post the AIA billing, you must enter a date in the Posted Date field. “Criteria” Tab Mastering the Base 6 Modules 49 A/R Invoices On the A/R Invoice “General” tab, you will enter a majority of the invoice information. If your Job Records and Customer Records include default information, some information will default in for you. “General” Tab The “Printable” tab is available to you if you enable the Printable Invoice checkbox on the “General” tab. If you do not have the Inventory Module, use this tab to enter information that you want to appear on the body of a printed invoice. If you have the Inventory Module, use this tab to control what will display on the header and footer of the invoice. “Printable” Tab Mastering the Base 6 Modules 50 The “Line Detail” tab is available if you have the Inventory Module and the Printable Invoice checkbox on the “General” tab enabled. On this tab you can enter inventory items you want to display on the invoice. “Line Detail” Tab The A/R Invoice List/Post Window On the A/R Invoice List/Post window “Criteria” tab, you can enter criteria to determine what invoices will display on the Accounts Receivable Invoice List. “Criteria” Tab The A/R Quick Reversal Window Mastering the Base 6 Modules 51 On the A/R Quick Reversal window, you can choose to fully reverse an A/R invoice or reverse the invoice and copy it to create a new invoice. “General” Tab The Print/E-mail Invoices/Proposals Window On the Print/E-mail Invoices/Proposals Window “Criteria” tab, enter criteria to determine which invoices will be available on the “Invoice” tab for printing and e-mailing. “Criteria” Tab Mastering the Base 6 Modules 52 The Cash Receipts Window When you receive payments from customers, you will enter the payments as cash receipts into FOUNDATION. On the “General” tab, you will enter information, like the customer and job for which the payment will be applied. “General” Tab On the “Detail” tab, you will select the invoices to which the payment will be applied. “Detail” Tab Mastering the Base 6 Modules 53 A/R Reports Menu To access the Accounts Receivable Reports menu, from the Main Menu choose Accounts Receivable > Reports. A/R Reports Menu Mastering the Base 6 Modules 54 Purchase Orders/Subcontracts To access the PO/Sub Daily menu, from the Main Menu, choose PO/Subcontract > Daily. PO/Sub Entry To access the PO/Sub Entry window from the Daily menu, choose Enter PO/Subs. On the P/O Sub “General” tab, you will enter information about the PO/Sub, distribute the total amount of the PO/Sub to G/L accounts, and if applicable, enter job cost detail. “General” Tab If, on the “General” tab, you selected “Basic” in the Type groupbox, the “Basic” tab will be available. On this tab you will enter basic item information you want to print on the PO/Sub. “Basic” tab Mastering the Base 6 Modules 55 If, on the “General” tab, you selected “Detail” in the Type group box, the “Item Detail” tab will be available. On this tab, you will enter detailed item information you want to include on the PO/Sub, including item descriptions, quantities, units of measure, and price. “Item Detail” tab (Left Side) “Item Detail” tab (Right Side) Mastering the Base 6 Modules 56 On the “Additional” tab, you can enter additional information regarding the PO/Sub. Many of the fields pertain to printing and emailing the PO/Sub, or are informational only. “Additional” Tab PO/Sub Reports To access the PO/Sub Reports menu, from the Main Menu choose PO/Subcontract > Reports. The reports available on the PO/Sub Reports menu provide you with the necessary tools to analyze your committed costs. Mastering the Base 6 Modules 57 Accounts Payable To access the A/P Daily Menu, from the Main Menu, choose Accounts Payable > Daily. A/P Invoice Entry To access the A/P Invoice Entry window, select Enter Invoices. The “General” tab is used to enter a majority of the invoice information. There are two main sections of this tab – the A/P history section at the top of the tab and the distribution section at the bottom. “General” Tab - Blank The information in the A/P history section is primarily used to update the history for the invoice and vendor. The distribution section is used to distribute information to the General Ledger and Job Costing Modules. “General” Tab With Data Mastering the Base 6 Modules 58 When you are ready to post the invoice, the first step is “list” it. To do this, click on the post button that is circled in the image above. A/P Invoice List Button After you click the list button, the A/P Invoice List “Criteria” tab opens. On this tab, you can use the different criteria to filter what will display on the A/P Invoice List. When you are done setting the criteria, click on the “List” tab. A/P Invoice List “Criteria” tab Mastering the Base 6 Modules 59 On the “List” tab, you will see the A/P Invoice List. Review the information. If it is correct, post the invoice by clicking the post button circled in the image above. The A/P Invoice Post Button Quick Reversal If you need to reverse the invoice, one option is to use the Quick Reversal feature. On the Quick Reversal window, you can select the invoice you want to reverse, and choose to complete a full reversal or reverse the invoice and the copy invoice to create a new one. “General” Tab Mastering the Base 6 Modules 60 On the Easy A/P Check window, you can quickly print a payable check and record the payment at the same time. When you print a check on this window and confirm it printed correctly, FOUNDATION will automatically post the transaction to A/P history and the General Ledger. Easy A/P Check - Check View On the A/P Invoice Payment Select window, you can choose which invoices you would like to view and possibly pay. Enter your criteria, and when you click [OK], all invoices matching that criteria will display. A/P Invoice Payment Select Window Mastering the Base 6 Modules 61 On this window, a list of invoices matching the criteria on the A/P Invoice Payment Select window displays. You can choose to pay invoices by enabling the Pay checkbox. A/P Invoice Payment by Date Window On the Pre-Payment Register, you can review the invoices you selected for payment and verify all of the information is correct, and that you selected the correct invoices. Pre-Payment Register Mastering the Base 6 Modules 62 Once you have verified the information on the Pre-Payment Register, you can post the payments using the Print/Post Payments window. Enter the necessary criteria and a Check Date, and click on the “Report” tab. Print/Post Payments Window Mastering the Base 6 Modules 63 Once you click on the “Report” tab, you will be able to view the checks. You can print the checks out, or you can post them. Printing Checks When you post the checks, you will be asked if all checks are correct and ready to be posted. Select “Yes” to post the checks. Verifying Checks are Correct Mastering the Base 6 Modules 64 Once the checks are posted, the A/P Check Register displays. A/P Check Register A/P Reports To access the A/P Reports Menu, from the Main Menu, choose Accounts Payable > Reports. A/P Aging Report The Aging Report shows the progression of unpaid invoices, and is commonly used to determine which invoices will be selected for payment. Mastering the Base 6 Modules 65 Full Invoice Report The Full Invoice Report is a detailed invoice report. A/P Invoice History Report The A/P Invoice History Report provides a quick history of the invoices for a vendor or a job. Exercise: Create a Committed Cost Report Mastering the Base 6 Modules 66 Sample Timecards FOUNDATION comes with a preset group of timecards for you to use. You can edit those timecards or even create your own. You can do this using FOUNDATION’s Timecard Genie. In the Timecard Genie you can create timecards that work for you. To access the genie from the Main Menu go to Tools > Genies > Timecard. The Timecard Genie is separated into two sections: the Timecard Header and Timecard Detail. The fields you select for the Timecard Header section display at the top of your timecard, while the fields in the Timecard Detail section display on the bottom of the timecard and serve as row-entry fields. The fields in the header section apply to all of the fields in the detail section. For example, if the Job field is in the header section, all of the detail entered in the fields in the detail section would apply to that one job. While you edit and create timecards, please keep in mind that the following fields are required on each timecard: • Job • Cost Code • • Employee No Dates • Tax Table Once the required fields are added, you can customize timecards for you specific needs. Some fields you can add include: • Equipment • Start Time • County • Shifts • Union/PW • E/Q Work Orders • End Time • Crews • Payment Groups • Pay Rates Here are some samples of the types of timecards that can be created and used. Weekly by Employee Timecard In this timecard, the Employee No field is in the header. Since the Employee No field is in the header, FOUNDATION knows that all of the information in the detail is for the specified employee. Mastering the Base 6 Modules 67 Daily by Job Timecard In this timecard, the Job No in the header. Since the Job No field is in the header, FOUNDATION knows that all of the information in the detail is for the specified job. Bonus or Salary Timecard In this timecard, the Job No is in the header and the Employee No and Amount fields are in the detail. This is a non-hourly timecard and you can only enter dollar amounts. Full Week Timecard In this timecard, the Employee No is in the header and days of the week are in the detail. This option allows you to reduce line entry because time entered against that job, earn code, etc., can be entered for the entire week. Mastering the Base 6 Modules 68 Entering Payroll The steps below detail the process of entering payroll. Enter Timecards 1. From the Main Menu, go to Payroll > Daily > Enter Timecards. 2. In the Timecard field, select the appropriate timecards and click [OK]. 3. Enter the timecard information and click [OK] twice; once to default information into the timecard and verify it is correct, and once to save the timecard. Timecard Entry Window Before You Click [OK] Timecard Entry Window After You Click [OK] Mastering the Base 6 Modules 69 Compute Payroll 1. Preprocess your timecards. If you have employees that have their salary prorated or you have FOUNDATION set to automatically generate overtime, this step is necessary. Otherwise you can skip this step. • From the Main Menu, go to Payroll > Daily > Preprocess Timecards. • Fill out the “Criteria” tab as needed, and click the “Report” tab. 2. Compute payroll. • From the Main Menu, go to Payroll > Daily > Compute Payroll. • Fill out the tab as needed, and click the “Report” tab. Note: If you leave the Employee Range and To fields blank, FOUNDATION will compute payroll for all employees. Mastering the Base 6 Modules 70 Inspect 1. Run your Pre-Check Register. • From the Main Menu, go to Payroll > Daily > Pre-Check Registers > Pre-Check Registers. • Fill out the “Criteria” tab as needed and click the “Report” tab. • The Pre-Check Register will open. 2. Run your General Ledger Register. • From the Main Menu, go to Payroll > Daily > Pre-Check Registers > General Ledger Register. • Fill out the “Criteria” tab as needed and click the “Report” tab to run all records. The G/L Register will display. Mastering the Base 6 Modules 71 To run the General Ledger Register, from the Main Menu go to Payroll > Daily > Pre-Check Registers > General Ledger Register. Below are the key things to look for to determine if all settings are in place and flowing correctly: 1. The “1-Temporary Account” - If you see this account anywhere on the register it is a sign that something was forgotten in the setup. 2. On the G/L Summary - Check to make sure your Liability accounts are accruing correctly. If not, look at the Misc. Deduction Register. 3. If you use divisions, make sure that nothing is hitting your error divisions. In the example below there are General Ledger issues for both employees that would need to be fixed: • Employee 1 has a debit amount going to the “1- Temp Account.” • Employee 3 is an Admin Employee and has a debit amount going to account “5150” (a job cost account). • For employee 1, the $4.60 is what needs to be fixed. • For employee 3, you would have to check the timecard and the Department Record to begin the process of determining what is wrong. Mastering the Base 6 Modules 72 4. Run other necessary pre-check registers. • From the Main Menu, go to Payroll > Daily > Pre-Check Registers. • Determine which of the other pre-check registers are important to you and your company. For example, if you use unions, you should run the Union Deductions/Fringes Register. If you have a lot of miscellaneous deductions you should run the Miscellaneous Deductions Register. Talk with your trainer to determine the pre-check registers you should run. With the Pre-Check Register you can check most calculations in one place, including hours, gross pay, federal/state/local taxes, union deducts, and miscellaneous deductions. Note: FICA is the employee portion of the combined Social Security and Medicare rate, and may vary by 1-3 cents from your current payroll. Other Registers There are 12 other registers in the Pre-Check Register section of the Payroll, Daily menu. You should run and review any pre-check registers that apply to you. For example, if you are a union contractor, you should run the Union/Fringe and Deductions Register. If you have a lot of miscellaneous deductions, you should run the Misc. Deductions Register. Finding Something Wrong If you find anything that is wrong when you are testing payroll, such as a tax amount, union fringe, etc., you should look at the respective maintenance record to try and figure out the problem. For example, if your tax amount is incorrect, look at the maintenance record for that tax table. If you cannot solve the issue on your own, ask your trainer for help. Please note that the more careful you are when setting up the Payroll Module and when double checking your numbers, the more likely it is that the first payroll you put into FOUNDATION will be correct. It is highly recommended that you test your payroll more than once. Mastering the Base 6 Modules 73 5. Complete a pre-post copy. • Enable the Pre-Post Copy function by going to the “Copy” tab on the Server Console. Select the database on the left side of the window and click the [Enable Pre-Post Copy from Client] button. • From the Main Menu, go to Tools > System > Other > Pre-Post Copy. • Read the warning message. • If you understand and want to continue, enter a description in the Description field. • Click [Copy]. • After a moment, a message will appear indicating that the pre-post database copy was “Successfully created.” Click [OK]. Mastering the Base 6 Modules 74 Post 1. Print Paychecks and Direct Deposits. • From the Main Menu, go to Payroll > Daily > Print Paychecks and Direct Deposits. • Fill out the “Criteria” tab as needed. • Make sure the number in the Next Check field corresponds with your check stock. • Click the “Report” tab. Note: By default, direct deposits print separately from checks. If you would like to change this, make the appropriate selection in the Print Sequence field. 2. Print the checks and direct deposits. • After you click on the “Report” tab, the checks will display. • Print the checks and direct deposit by clicking on the print button on the toolbar. • On the Print window, select the correct printer and click [Print]. Note: Once checks and direct deposits are posted, they cannot be reprinted, so Foundation Software, Inc. recommends you print your checks and direct deposits before posting. Mastering the Base 6 Modules 75 3. Post the checks and direct deposits. Once posted, your payroll is committed to your payroll history and it updates your job costing and the General Ledger. • After you print and review the checks and direct deposits, a dialog box opens asking if everything is correct and ready to be posted. Verify everything printed correctly and select “Yes” and click [OK]. • If A/P Integration is set up, the A/P Invoice Pre-Post Summary window opens. Click [Continue Post]. Note: Foundation Software Inc. recommends that you purge your timecards. Mastering the Base 6 Modules 76 Evaluate/Export 1. Create an ACH file for your bank. • On the Account Record of your checking account, click on the “Direct Deposit” tab. • In the Format field, select “ACH.” • Fill out the necessary fields. • Click [OK] to save the record. 2. Export Direct Deposits. • From the Main Menu, go to Payroll > Daily > Export Direct Deposits. • Fill out the “Criteria” tab as needed and click the “Report” tab. Mastering the Base 6 Modules 77 • Review the Direct Deposit Export List and post it. • In the Export Direct Deposits dialog box that opens, in the Export Template field, select your template. • In the Export Filename field, enter the location the file will be saved to, or click the button to browse to the location. • Click [Export]. • Locate the file and upload it to your bank. 3. Run Select Reports. • Foundation Software, Inc., recommends running the 941 Deposit and Certified Payroll Reports, if applicable. Experiment and explore what reports are best for you. Mastering the Base 6 Modules 78 Customizing J/C Activity Reports 1. On the DataGenies “New” tab, select the type of custom report you want to create. “New” Tab 2. On the Column Selection window, select columns you want to appear. Column Selection Window Mastering the Base 6 Modules 79 Column Selection Window Continued 3. On the Report window, you can modify the report title, the column headings, and the column sizes. Report Window Mastering the Base 6 Modules 80 4. On the Drilldown window, you can create drilldown options for your custom J/C Activity report. Drilldown Window 5. On the Options window, enter the name of the report and set criteria defaults. Options Window Mastering the Base 6 Modules 81 Running J/C Activity Reports Reporting is one of the most powerful features of FOUNDATION. Reports detail the transactions posted to a single module or a combination of modules. For example, timecard data is pulled into payroll reports while timecard, invoice, and change order data can be pulled into job costing reports, while other information can be pulled into general ledger reports. Since the data comes from posted transactions throughout the system, data cannot be changed in a report, it can only be viewed. This means you cannot fix mistakes on a report. The menu for each module include a Reports section. The Reports section has a variety of reports you can choose from. The reports are specific to each module. You can access report menus two ways: 1. Main Menu: 2. Toolbar at the top of FOUNDATION: Mastering the Base 6 Modules 82 The “Criteria” Tab When you open a report, the first window that opens is the “Criteria” tab of the report. On the “Criteria” tab, you can use the fields to narrow down what displays on the report. The “Criteria” tab of each report varies by report. Below is the J/C Activity Report “Criteria” tab. For this report, you can choose to run the report for a specific date range, job, project manager, etc. Below are some fields to look for and tips to help you navigate through many of the reports in FOUNDATION: 1. FOUNDATION transactions are always recorded with a date, so on almost all reports you can enter a date range. If you can’t find the information you are looking for on a report, try widening the date range you enter on the “Criteria” tab. 2. The Totals Only field gives you the option to generate a simplified version of the report. 3. The Sort Order field determines the order in which the data in the report is grouped and organized. For example, it determines if a job costing report is organized by job name or job number. Mastering the Base 6 Modules 83 On job costing reports, sorting can be a great way to compare information. For example you can run reports by Project Manager or Geographic Area, as long as a these fields are indicated on the Job Record. Below is an example of an Over/Under Billing Report sorted by Project Manager. This is the same report, only in this example it is sorted by Geographic Area. Mastering the Base 6 Modules 84 Some reports include additional tabs that contain more specific report settings. These tabs are optional and often skipped, but contain a variety of fields that allow you to combine and separate information on the report. Below you will see the additional options on the “Additional” tab of the J/C Activity Report. Most reports have additional criteria tabs and sorting options that vary by report, as each report provides you with specific types of information. Running a Report To run a report: 1. Click on the “Report” tab. Once you click on this tab, the report is generated. 2. Review the report. 3. If necessary, change settings from the “Criteria” or additional tabs by clicking on the tabs and making the changes. 4. Click on the “Report” tab again. Printing a Report You can print a report three ways. You can click on the print icon on the FOUNDATION toolbar, hit <Ctrl> + <p> on your keyboard, or select File > Print on the top toolbar. Reports will either have a landscape (horizontal) or portrait (vertical) orientation, based on the level of detail in the report. When you print portrait reports, you can choose to print them in a landscape orientation. However, we do not recommend that you print landscape reports in a portrait orientation as information on the right side of the report may print on a second page. Mastering the Base 6 Modules 85 Exporting Reports You can also export reports as a PDF, Word, Excel, or CSV file using the icons on the FOUNDATION toolbar (pictured below). When you click on these icons, you will be asked to enter a file name and select the location to which you want to save the document. Once you save the file, the exported document will open. Customized Reports You can run customized reports in the Job Costing and General Ledger Modules J/C DAILY ADDING J/C CHANGE ORDERS & BUDGET ADJUSTMENTS If you’ve decided to budget your jobs in order to provide more material for job management and analysis, you’ll need to establish the initial budget for each job. Once the initial budget has been established, however, there will frequently be changes, either positive or negative, to those numbers. To record those changes, you will use the change orders function. Change orders do not need to be posted to take effect. They will be included on reports and in job totals as long as the Status is either “Approved” or “Estimate” and the report is run for a date after or including the Date of the change order. After entering change orders, you may choose to print them. Keep in mind that you can also use a “Pending”, “Internal” or “Rejected” status but those may need to be added to your reports in order to have the data print out. To enter a change order: 1. From the Main Menu, go to Job Costing > Daily, > Enter Change Orders. 2. Complete the appropriate fields on each tab. 3. Verify and save the record. The J/C Change Order General Tab The information on this tab is used to attach the change order to a particular job, give it a number, and establish total amounts of the change. The amount fields are totals that can be further broken down on the "Distribution" tab. The fields of the J/C Change Order "General" tab include: • Job No - Indicate for which job this change order is being entered. The dropdown menu will show all jobs, and it will indicate which jobs are budgeted and which are not. • Change Order No - Each change order that is entered for a particular job must have a unique change order number. You may enter one here or leave this field blank and allow FOUNDATION to determine the number. If you leave it blank, FOUNDATION will increment the number by one each time. Mastering the Base 6 Modules 86 • Seq - This field is not typically used, but it can work in conjunction with the Change Order No field to determine a unique number for a change order. It is useful when you need to enter an adjustment to an existing change order. Use the same number as the original change order, and enter up to three digits as the Seq number. • Owner Co No - This field is optional but can be used to indicate the job owner’s change order number if it is different than the Change Order No above. If entered, this number can be used as selection criteria in some reports. • Date - Enter the date the change order should be placed in job costing history. The change order will “take effect” as of the date entered here only if it’s Status has been set to “Approved” or “Estimate.” • Status - This field is used to indicate the current status of a change order. This field may be modified later, so you can initially enter a change order as “Pending” and then change it to “Approved” later. Your options include: • o “Approved” – Use this option to indicate that the change order has been accepted and should be included in reports as of the date in the Date field. o “Pending” – This option is useful if you want to enter a change order for tracking purposes before it has actually been approved. “Pending” change orders will not actually affect reports until the Status has been changed. o “Rejected” – You may need to change the Status of a change order to “Rejected” if it has not been accepted and you’re sure it won’t be. You could also simply delete the change order, but choosing “Rejected” allows you to continue tracking the change order without actually allowing it to affect reports. o “Estimate” – This choice is used to make changes to the original estimate information, as opposed to the contract information. “Estimate” change orders are considered approved as of the date in the Date field. This are normally used for Updating the Budget. It will give the company an audit trail, plus update your WIP Over/Under Billing Reports. o “Internal” – This choice allows another sorting option when listing change orders. However, it will not affect reports or job totals. Income, Quantity, Cost, and Units (Summary) - A change order can affect any combination of income, quantity, cost and units that were originally budgeted for the job. In other words, you could enter a change in income and cost, a change in income, cost and units, or a change in just cost. The numbers entered in these fields should reflect totals for all job cost detail for each change order. If the totals need to be broken down by phase, cost code or cost class, you will do so on the “Distribution" tab. Items broken down on the “Distribution" tab must equal the number entered on the “General" tab. o Income - If the change order should affect the budgeted income, enter the amount by which income should be changed here. For example, if income budgeted should be increased by $20,000, enter “20000” here. If the income should be decreased by $5,000, enter “-5000” here. Mastering the Base 6 Modules 87 o Quantity - If the change order should affect a budgeted quantity, enter the amount by which the quantity should be changed here. For example, if one cost code was originally budgeted to include 925 linear feet of water lines but should now include 1000 linear feet total, you would need to enter “75” here. You would then need to access the “Distribution" tab to distribute the increased quantity to a particular cost code. o Cost - If the change order should affect the budgeted cost, enter the amount by which cost should be changed here. For example, if the cost of three cost classes should be decreased by a total of -$5,000, enter “-5000” here. You would then need to access the “Distribution" tab to distribute the decreased cost to the correct cost codes and cost classes. o Units - If the change order should affect the number of units budgeted, enter the number by which the units should be changed here. For example, if one cost code was originally budgeted to include 15 units but should now only include ten, you would enter “-5” here. You would then need to access the “Distribution" tab to distribute the decreased units to the correct cost code. • Comments - This field is informational only and allows you to enter any comments pertaining to the change order. • Printable - If you want to be able to produce a printed version of the change order, enable this checkbox. Doing so will enable the “Printable" tab, where you may type the information that will appear in the body of the printed change order. • Enable Unit Price Detail - This checkbox is only available when the Printable checkbox is enabled. Enable this checkbox if you want to enter/print unit price detail for this change order. Doing so will make the UM, Quantity, and Unit Price columns available on the “Printable” tab. To cause this checkbox to be enabled by default for all printable change orders, enable the On Printable J/C COs Enable Unit Price Detail checkbox on the “General” tab of the Job Costing Control File. • Profit - This field is informational only and cannot be modified. FOUNDATION will calculate the change in profit from this change order only (Income – Cost) and display the results here. • Include in % Complete - This field is only relevant if the job against which you are entering the change order will be billed through the percent-complete method. If so, this checkbox can be used to indicate if the change order’s amounts should be used when determining the job’s percentage of completion. If so, enable the checkbox. Mastering the Base 6 Modules 88 The J/C Change Order Distribution Tab This tab only needs to be accessed if you need to distribute the total changed income, quantity, cost, or units to one or more phases, cost codes, or cost classes. It will only be enabled if the job selected on the "General" tab is marked as budgeted. The fields of the J/C Change Order "Distribution" tab include: • Phase - This field will only be visible if you have elected to use phases as part of your Job Cost Detail. If so, you may distribute a total from the “General" tab to a specific phase, cost code, and cost class by indicating a phase here. You will only be allowed to enter phases selected as part of the job’s budget. • Cost Code - To distribute a total from the “General" tab to a specific cost code or cost class, you need to indicate the cost code here. You will only be allowed to enter cost codes selected as part of the job’s budget. • Cost Class - To distribute a total from the “General" tab to a specific cost class, you need to first indicate the cost code, then indicate the cost class here. You will only be allowed to enter cost classes selected as part of the job’s budget. If you are distributing income on this row, you should not enter a cost class. • Cost, Units, Quantity, and Income - Enter the portion of either cost, units, quantity, or income that should be distributed to the corresponding cost code or cost class. You should only complete one of these fields per row. For instance, if you need to change cost and income for the same cost code, you’ll need to enter two rows with the same cost code. Complete the Cost field on one and the Income field on another. Note: The total for each item must equal the corresponding total from the “General" tab, which is displayed in the Total row. In other words, the total of all rows of cost must equal the total cost from the “General" tab. • Vendor -When a cost class has been selected for a distribution row, a vendor can also be attached to the row. If cost is also entered for the distribution row, FOUNDATION will prompt you to auto-create a PO/Sub when the change order is saved. • Distributed row - This row will display the totals of amounts entered in each column and cannot be modified. The totals must match the amounts entered on the “General" tab or in the Total row below. • Total row - This row will display the amounts entered on the “General" tab for each column. The amounts entered on the rows above must equal the amounts in this row. For example, if three rows of income are entered, the total of the three Income fields must equal the Income field in this row. Mastering the Base 6 Modules 89 The J/C Change Order Printable Tab This tab is only available if the Printable checkbox on the "General" tab is enabled. It is used to enter information that should appear on the printed change order. The fields of the J/C Change Order "Printable" tab include: • Change Order Text – For each item that should appear on the printed change order, you can add descriptive text in this field. The contents will word-wrap automatically, so just keep typing as you reach the end of a line. • UM/Quantity/Unit Price - These columns will only be available if the Enable Unit Price Detail checkbox is enabled on the “General” tab. If so, you may use these fields to enter unit price detail for the printable change order. • Ext. Price - For each item that should appear on the printed change order, you may enter an extended price amount. The amounts entered in this column will be totaled automatically in the Total field. The total of all Ext. Price amounts must equal the total Income indicated on the “General" tab. • Total - This field may not be modified. FOUNDATION will total all amounts entered in the Ext. Price fields and display the results here. The total will also appear on the printed change order. This total must match the total Income indicated on the “General" tab. Exercise - Create a J/C Activity Report with change orders Mastering the Base 6 Modules 90 THANKS FOR ATTENDING! 17999 Foltz Industrial Parkway, Strongsville, OH 44149 www.foundationsoft.com | (800) 246-0800 | [email protected] ©2015 Foundation Software, Inc. FOUNDATION® is a registered trademark of Foundation Software, Inc. Windows® is a registered trademark of Microsoft Corporation in the United States and other countries.