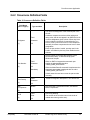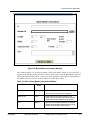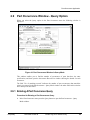
1
Volume 4 - Parts Part Occurrence User Manual HarnesSYS Version hr20a Document Version B Document status: Release (R) Last modified Date/time: July 26, 2012 19:28 Copyright Notice The information contained in this manual is believed to be accurate and reliable. However, Israel Aerospace Industries Ltd. (IAI) assumes no responsibility for any errors, omissions, or inaccuracies whatsoever. Information in this document is subject to change without notice and does not represent a commitment on the part of Israel Aerospace Industries Ltd. (IAI). The software and/or database described in this document are furnished under a license and/or agreement. The software and/or database may be used or copied only in accordance with the terms of such license and/or agreement. It is against the law to copy the software on any medium except as specifically allowed in the license and/or nondisclosure agreement. The purchaser may make one copy of the software for backup purposes. No part of this document and/or data base may be reproduced or transmitted in any form or by any means, electronic or mechanical, including photocopying, recording, or information storage and retrieval systems, for any purpose other than the purchaser’s personal use, without the express written permission of IAI. 2012 Israel Aerospace Industries Ltd. All rights reserved. Proprietary Document Version B Printed copy is for reference only i Contents Document Revisions History....................................................................................... vii Preface............................................................................................................................ ix Conventions........................................................................................................................ix Documents Organization .............................................................................................. xi About This User Manual....................................................................................................xi Related Documents ............................................................................................................xi 1 Introduction..................................................................................................................... 1 1.1 Part Occurrence Procedures ...........................................................................................................1 2 Part Occurrence Application ......................................................................................... 3 2.1 2.1.1 2.1.2 2.2 2.3 2.4 2.4.1 2.4.2 2.4.2.1 2.4.2.2 2.4.3 2.4.4 2.4.5 2.4.6 2.4.6.1 2.4.7 2.4.7.1 Part Occurrence Menu .....................................................................................................................3 Accessing Part Occurrence Menu ...................................................................................................4 Part Occurrence Menu Options .......................................................................................................4 The Occurrence Key ........................................................................................................................5 Part Occurrence Windows ...............................................................................................................6 Part Occurrence Window - Add Mode .............................................................................................6 Main Panel in Part Occurrence Window ..........................................................................................9 Occurrence Definition Fields..........................................................................................................11 Multi-bundle Parts ..........................................................................................................................18 Clocking Angle ...............................................................................................................................20 Effectivity Panel..............................................................................................................................22 Retrofit Data Panel.........................................................................................................................24 Part Note Panel..............................................................................................................................24 Controls in Lower Area of Part Occurrence Window .....................................................................25 Retrofit Master Document Window ................................................................................................26 Creating a Part Occurrence Automatically.....................................................................................27 Handling Effectivity for Part Occurrence ........................................................................................29 Example 1...............................................................................................................................29 Example 2...............................................................................................................................29 2.4.8 2.4.9 2.5 2.5.1 2.5.2 2.5.3 2.6 2.6.1 2.7 2.7.1 2.8 2.8.1 ii Creating a Part Occurrence Manually............................................................................................30 Band Marker Panel ........................................................................................................................30 Part Occurrence Window - Change Mode .....................................................................................34 Changing a Part Occurrence .........................................................................................................35 Mating Designator Window ............................................................................................................39 Supplied from Circuit Breaker/Bus Connection .............................................................................39 Part Occurrence Window - Delete Mode .......................................................................................42 Procedures for Deleting Part Occurrences ....................................................................................44 Part Occurrence Window - Replicate Option .................................................................................46 Procedure for Duplicating a Part Occurrence ................................................................................47 Part Occurrence Window - Group Change Option ........................................................................49 Procedure for Making a Group Change to Part Occurrences........................................................49 Document Version B Printed copy is for reference only Proprietary Example 1. Changing Occurrence Fields ...............................................................................53 Example 2. Changing Part Number........................................................................................53 2.8.1.1 2.9 2.9.1 2.10 Effectivity Options ..........................................................................................................................54 Part Occurrence Window - Query Option ......................................................................................55 Entering A Part Occurrence Query ................................................................................................55 Flight Condition Information Window .............................................................................................58 Glossary of Terms ........................................................................................................ 61 Index .............................................................................................................................. 68 Proprietary Document Version B Printed copy is for reference only iii List of Figures Figure 1: Part Occurrence Menu ........................................................................................................................4 Figure 2: Part Occurrence Window - Add Mode.................................................................................................7 Figure 3: Occurrence Definitions Main Panel...................................................................................................10 Figure 4: Window Listing Abbreviations ...........................................................................................................13 Figure 5: Multi-bundle LOV Button ...................................................................................................................18 Figure 6: Window Showing Bundles Connected to Part ..................................................................................18 Figure 7: Special Designators Window ............................................................................................................19 Figure 8: Old Special Designators WIndow......................................................................................................20 Figure 9: Warning Message About Bundle Number.........................................................................................20 Figure 10: Clocking Symbol in 2D Routing.......................................................................................................21 Figure 11: Clocking Angle and the Fiields Describing it...................................................................................21 Figure 12: Effectivity Panel in Part Occurrence Window..................................................................................22 Figure 13: Retrofit Data Panel in Part Occurrence WIndow.............................................................................24 Figure 14: Part Note Panel ...............................................................................................................................24 Figure 15: List of Notes ....................................................................................................................................25 Figure 16: Retrofit Master Document Window .................................................................................................27 Figure 17: Projects Defaults with Partial Effectivity for Parts List.....................................................................29 Figure 18: Band Marker Information WIndow...................................................................................................31 Figure 19: Band Marker Material Window ........................................................................................................33 Figure 20: Occurrence Window in Change Mode Shown Empty .....................................................................34 Figure 21: Row that Changed...........................................................................................................................35 Figure 22: Window Listing OCC Keys ..............................................................................................................37 Figure 23: Part Occurrences Containing the String..........................................................................................38 Figure 24: Mating Designator Window .............................................................................................................39 Figure 25: Supplied from Circuit Breaker Window ...........................................................................................40 Figure 26: Available Circuit Breakers ...............................................................................................................41 Figure 27: Part Occurrence Window in Delete Mode .......................................................................................42 Figure 28: Window Showing Designator and Part Number..............................................................................43 Figure 29: Message about Opening Files ........................................................................................................44 Figure 30: Delete Mode with Bundle Criterion Displayed.................................................................................45 Figure 31: Message Asking for Confirmation of Delete Action.........................................................................45 Figure 32: Part Occurrence Window in Duplicate Mode ..................................................................................46 Figure 33: Message About Duplicating Mating Field........................................................................................47 Figure 34: Part Occurence in Duplicate Mode Showing New OCC Key ..........................................................48 Figure 35: Part Occurrence Window - Group Change Mode ..........................................................................49 Figure 36: Group Change Window Showing Number of Records....................................................................50 Figure 37: Occurrence Record List Window.....................................................................................................51 Figure 38: Update Part Occurrence Warning WIndow.....................................................................................52 Figure 39: Group Change Set Window ............................................................................................................52 Figure 40: Message Indicating Report Created................................................................................................53 Figure 41: Part Occurrence Window in Query Mode........................................................................................55 Figure 42: Part Occurrence Query Mode Showing No. of Records .................................................................56 Figure 43: Occurrence Record List Window.....................................................................................................57 Figure 44: Flight Condition Information Window ..............................................................................................58 Figure 45: Flight Conditions WIndow ...............................................................................................................60 iv Document Version B Printed copy is for reference only Proprietary List of Tables Table 1: Part Occurrence Menu Options ............................................................................................................5 Table 2: Occurrence Definition Fields .............................................................................................................11 Table 3: Fields in Effectivity Panel in Part Occurrence Window ....................................................................22 Table 4: Fields in Part Note Panel in Occurrence Window..............................................................................24 Table 5: Fields in Lower Area of Part Occurrence Window............................................................................25 Table 6: Fields in Band Marker Information Window .....................................................................................31 Table 7: Fields and Buttons in Change Mode not in Add Mode......................................................................35 Table 8: Fields in List of OCC Keys Window from Left to Right ...................................................................38 Table 9: Delete Mode Action Buttons..............................................................................................................43 Table 10: Changing Effectivities of Groups.....................................................................................................54 Table 11: Flight Condition Information Window Fields..................................................................................58 Proprietary Document Version B Printed copy is for reference only v Preface Document Revisions History Revision B Proprietary date July 2012 Document Version B Change Summary Changes made to keep the user manual updated with latest HarnesSYS™ program. Printed copy is for reference only vii Preface Preface Conventions Italic text - is used to indicate a word or phrase, which has a special meaning with respect to HarnesSys, such as the name of a menu or option. Italic text is also used for examples. Smaller italic text is used for notes and helpful hints; these are also indicated by icons (see below) Bold text - Bold text is used for emphasis a word, sentence or paragraph. Bold italics - Bold italics is used for Procedure Heading. COURIER - Text printed in Courier font represents text that appears on your screen. Indicates note Indicates an example. Indicates a helpful hint. Indicates additional information. Indicates cautionary text or a warning. Both types of text are framed in a box. A Warning, however, is printed on a raster (gray) and has the title "WARNING!". Indicates an operation that you, the user, are to perform. Operations in a series are also numbered. Indicates a key on your keyboard. Indicates a path to take. This usually entails selecting a number of options from menus. Indicates a time consuming operation. Proprietary Document Version B Printed copy is for reference only ix Part Occurrence User Manual Indicate Procedure start Indicates Procedure continue Indicates what you should see on the screen - the computer's response. Indicates the end of the user guide. x Document Version B Printed copy is for reference only Proprietary Preface Documents Organization This manual includes the following chapters: Chapter Number Chapter 1 Title Introduction Description Introduces the Part Occurrence application. Chapter 2 Part Occurrence Application Describes functions. About This User Manual The Parts Occurrence User Manual describes how to enter details into the part occurrence database and how use the data stored in it. Related Documents This manual is one of the set of manuals that make up the HarnesSYS™ user documentation. HarnesSYS™ user documentation is organized in the following volumes: Proprietary Volume 0 - Getting Started Volume 1 - Schematic Wiring Diagram (SWD) Volume 2 - 2D Routing/Jig Volume 3 - Wires Volume 4 - Parts Volume 5 - Integration Volume 6 - Project Management Volume 7 - Manufacturing. Volume 8 - Generating Technical Publications. Volume 9 - Retrofit. Volume 10 - Utilities Volume 11 - Importer Volume 12 - Miscellaneous Document Version B Printed copy is for reference only xi 1 Introduction In This Chapter: Part Occurrence Procedures.............................................................................................1 1.1 Part Occurrence Procedures HarnesSYS handles parts data using 2 functions, Part Occurrence and Part Specification. The Part Occurrence function deals with the installation-dependent details of the electrical parts in a production unit. The part-specific data which is independent of installation is stored in the Part Specification library, which is described in the Libraries User Manual Vol 6. A part occurrence record is created each time a part is used, the data being stored in a part occurrence table. To enable quick reference to this table a unique part occurrence key is created for each occurrence. Part occurrences can be entered in one of two ways. In the first, HarnesSYS automatically inserts part occurrences in the database when the SWD (system wiring diagram) integration process is performed. The second way is to enter each occurrence manually. In the first method, as the occurrence data is extracted from the SWD it includes values, for the following: Part designator Occurrence key Bundle base number SWD base number System/Sub-system Effectivity of SWD Mating connector. These values appear in the report file, that has the extension prt, produced on integrating the SWD. It does not include the part number as entered in the Part Specification library, which has to be entered manually. Proprietary Document Version B Printed copy is for reference only 1 2 Part Occurrence Application In This Chapter: Part Occurrence Menu ......................................................................................................3 The Occurrence Key .........................................................................................................5 Part Occurrence Windows.................................................................................................6 Part Occurrence Window - Add Mode...............................................................................6 Part Occurrence Window - Change Mode.......................................................................34 Part Occurrence Window - Delete Mode.........................................................................42 Part Occurrence Window - Replicate Option...................................................................46 Part Occurrence Window - Group Change Option ..........................................................49 Part Occurrence Window - Query Option........................................................................55 Flight Condition Information Window...............................................................................58 The Part Occurrence application enables you to enter installation-dependent data in the database and generate reports from it. All actions start with the Part Occurrence Menu which has 8 options as shown in Part Occurrence Menu Options (on page 4). Each of the options is described in a separate paragraph. This information is necessary when procuring parts. Every part occurrence that is defined in a project is given a unique value - the part occurrence key. This is also useful for the quick location of parts in a project.This is an internally generated value. The part occurrence windows, described below, relate all the data to this key, which cannot be changed. If an occurrence is deleted or replaced the original record remains in the database. As mentioned, there are two methods of entering part occurrence data, automatic and manual. This section describes both methods and other procedures related to part occurrence. 2.1 Part Occurrence Menu The Part Occurrence application is made up of 7 different windows which are accessed through the Part Occurrence menu as described in Accessing Part Occurrence Menu (see "Accessing Part Occurrence Menu" on page 4). The Add window will be described first. Each of the other windows will then be described with reference to the Add window. Proprietary Document Version B Printed copy is for reference only 3 Part Occurrence User Manual Figure 1: Part Occurrence Menu 2.1.1 Accessing Part Occurrence Menu You access the Part Occurrence menu using one of the following paths depending on the version you are using: New Version MainData OperationsPart Occurrences Old Version Project Parts Occurrences 2.1.2 Part Occurrence Menu Options The menu consists of buttons that open windows enabling you to perform the functions that are described in the table. The performance of each function is described in a separate paragraph. 4 Document Version B Printed copy is for reference only Proprietary Part Occurrence Application Table 1: Part Occurrence Menu Options Option Function Add Opens Part Occurrence window in ADD mode to create a new Part Occurrence record manually. (see "Part Occurrence Window - Add Mode" on page 6) Change Opens Part Occurrence window in Change mode to change a Part Occurrence record manually. (see "Part Occurrence Window - Change Mode" on page 34) You use this option to edit an existing part occurrence record as well as to complete the data in a part occurrence record created automatically by the integrate SWD procedure. Delete Opens the Delete Occurrence Window for deleting part occurrence records. (see "Part Occurrence Window Delete Mode" on page 42) Replicate Opens Part Occurrence window in Duplicate mode to create a new Part Occurrence record with similar details to an existing one. Group Change Opens Part Occurrence window in Group Change mode. This option allows you to define a group of occurrences and globally change particular details of all the occurrences in the group. (see "Part Occurrence Window - Group Change Option" on page 49) Query Opens Part Occurrence window in Query mode Allows you to review the records that comply with conditions you set 2.2 Add/Change Flight Condition Data Allows you to add or change flight conditions for which the part is suitable. (see "Flight Condition Information Window" on page 58) Exit Closes the menu and returns to the Workspace. The Occurrence Key The Occurrence Key is a unique number, supplied by the system, designating a specific occurrence. The number refers to a unique combination of the designator, alternative part (if there is one), sequence and effectivity; (or alternatively, effectivity or bundle number plus dash number). In the Part Occurrence window the Occurrence Key field - designated Occ Key appears at the top right of the Part Occurrence window, except in Add mode. Using the LOV key on its right you can display the list of part occurrences in the project. The Occurrence Key is automatically assigned to an occurrence after the occurrence is added or created. The assigning of the Occurrence key can be automatic, by way of the SWD integrate process, or manual, by making a single change. Proprietary Document Version B Printed copy is for reference only 5 Part Occurrence User Manual When one or more of the fields in the part occurrence record are changed as a result of integration, the part occurrence is deleted and a new part occurrence record is added, including a new part occurrence key. If an Occurrence record is erased, its data is erased, while only the value of the occurrence key is retained, and this cannot be reused. 2.3 Part Occurrence Windows The Part Occurrence windows are a series of windows that enable you to perform all the Part Occurrence functions. For this reason the windows contain a large number of fields allowing you to enter complete details for each part. Since most of the fields appear in many of the windows they are described later. (see "Occurrence Definition Fields" on page 11) Fields only occurring in particular windows are explained when that window is described. If a field that is not mandatory is left blank for all part occurrences, all the functions, operations and reports will work except that the particular field in the part reports will be left empty. The Occurrence Record List Window contains the details of an occurrence and is accessed from the Part Occurrence Query window. (see "Part Occurrence Window - Query Option" on page 55) The top line in the window contains a Mode box indicating which working mode has been selected and an LCD (last change date) box indicating when the last change was made to the part occurrence record. The Occurrence key appears at the top of the Change, Duplicate and Delete windows and in the Flight Condition Information window. 2.4 Part Occurrence Window - Add Mode To add a part occurrence record manually you select the Add option in the Part Occurrence menu. The Part Occurrence window opens in the ADD mode as shown below. Enter data into as many fields as you need to. 6 Document Version B Printed copy is for reference only Proprietary Part Occurrence Application Figure 2: Part Occurrence Window - Add Mode The Part Occurrence window shown above has the following elements, from top: 1. Menu bar at the top of the window. Each item opens a menu that contains Oracle-type functions. See the Libraries User Manual for further details. 2. Main Panel See Main Panel in Part Occurrence Window (on page 9). 3. Effectivity Panel See Effectivity Panel (on page 22). 4. Retrofit Data Panel See Retrofit Data Panel (on page 24) 5. Part Note Panel See Part Note Panel (on page 24) Proprietary Document Version B Printed copy is for reference only 7 Part Occurrence User Manual 6. Group of Control Buttons for operating the entire window These controls are described in Controls in Lower Area of Part Occurrence Window (on page 25). 7. Message Bar Contains instructions and tips to assist the user. See the Libraries User Manual for further details. 8. Status Bar Indicates which record is being displayed, operation mode in use, etc. There are two types of fields in this window: 1. Those that can have any value, providing that the entry complies with the relevant format control rules. 2. Those that can only accept certain values which are selected from tables opened using buttons displayed in the window. 8 Document Version B Printed copy is for reference only Proprietary Part Occurrence Application 2.4.1 Main Panel in Part Occurrence Window The main panel contains the fields and controls shown below. You do not have to enter all the details, but you must enter the Designator field, the Part Number field and either the fields in the Effectivity or Retrofit Data panels. 9 Document Version B Printed Copy is for reference only Proprietary Part Occurrence User Manual Figure 3: Occurrence Definitions Main Panel 10 Document Version B Printed Copy is for reference only Proprietary Part Occurrence Application 2.4.2 Occurrence Definition Fields Table 2: Occurrence Definition Fields Field Name (No. in Figure) Type and Size Description The reference designator of the electrical part in the aircraft. Field Designator Character (1) 30 Hardware components such as rubber tubing and lacing wires, that do not appear in an SWD and so do not have designators given to them. When they have to be included in the bundle for manufacturing you have to enter a part occurrence for each component manually, but these components do not have to have designators. Enter the part number, bundle, quantity used in the bundle and effectivity and any other details that are relevant. Unique number for that part that appears in Part Specification library. It identifies the physical attributes of the part. Field Part Number Character (2) 32 Mandatory When an SWD is integrated an automatic part number is assigned with the value "FROM_WIRE_INTEGRATE". When the Make Retrofit command is implemented an automatic part number is assigned with the value "FROM_MAKE_RETROFIT". In both cases the user has to enter the part number manually. Occ Descrip. (3) Field reference designator description in free format text Character 40 See Components Button Opens Module Components window, see Module Block Components. Field Next using drawing Char The number of the next document in the chain of related documents (product tree). (4) NUD (5) Proprietary 32 Document Version B Printed copy is for reference only 11 Part Occurrence User Manual Field Name (No. in Figure) Type and Size Field Mating Character (6) 30 View/Change button Bundle Field (7) Number Button Description The designator of the part mating with the current part defined in the Part Occurrence window. Opens Mating Designator window. (see " Not active in Add mode. Wire bundle base number (for multi-bundle parts the base number of the call-out bundle) Part included in several bundles - 3 options: 1. Yes 2. No 3. blank Multi Bundle This field is updated automatically when the SWD is integrated. (8) There is no functional difference between the option No and when the field is left blank. The blank option was introduced for technical reasons. For further details see Multi-bundle Parts (on page 18). Field 12 Wire Diagram Character (9) 32 Document Version B Base number of wire diagram containing the part. If it is empty, this field will be populated with the first SWD containing the part that is integrated. If the part is included in multiple SWDs the base numbers of the second, third and later SWDs will not be recorded. Printed copy is for reference only Proprietary Part Occurrence Application Field Name (No. in Figure) Type and Size Field Character ≤ 4 Description Abbreviation defining class of part. If the abbreviation is set in SPT – Spare Pin Table panel of the Projects Default/Parts window, HarnesSYS™ will build a spare pin table. Placing the cursor on this field and pressing the List of Values button at the bottom of the window opens the window shown, giving the list of abbreviations which can populate this field. Highlight the appropriate entry and press OK key. Abbr/Class (10) Figure 4: Window Listing Abbreviations Indicates whether to build a Spare Pin Table for the part. This will override the Abbr/Class button above it. Yes Spare PIN Table (11) If the Abbr/Class field is blank, selecting Yes will build a spare pin table for the part. Button 3 options No If according to the Abbr/Class entered a spare pin table will be built, selecting No will cancel building the table. Blank Does not affect formation of Spare Pin Table Proprietary Document Version B Printed copy is for reference only 13 Part Occurrence User Manual Field Name (No. in Figure) Supplied from Circuit Breaker/Bus Connection Type and Size Description Opens Supplied from Circuit Breaker window. Button This field is updated automatically from the 3D program (CATIA or UniGraphics) when the BTP is integrated. (12) Flight Condition Data (13) View/Change button Opens Flight Condition Information window. The code of the system that the part is used in. Field System Character (14) 4 Field Sub Sys. Character (15) 2 Area Code (16) Field Character This field is updated automatically when the SWD is integrated. The name of the subsystem in which the part is installed. This is entered in the System panel in the Schema Properties window used to define an SWD. This field is updated automatically when the SWD is integrated. The area code indicating the section of the production unit (i.e., the station) in which the part is located. 30 Access Door Field (17) Number Length Field (18) Number See Specif. (19) Button Button Aircraft Mount The number of the door on the production unit that gives access to the part. Length of connector along buttock line Opens, for reference only, Part Specification Add/Change window as read-only. Identifies the part as an Aircraft Mounted part. Possible values: "YES", NULL. An aircraft mounted part is already installed on the aircraft and the bundle is connected to it during installation. (20) 14 This is entered in the System panel in the Schema Properties window used to define an SWD. Document Version B Printed copy is for reference only Proprietary Part Occurrence Application Field Name (No. in Figure) Type and Size Field Character Bag & Attach 2 options (21) Description Identifies the part as a Bag and Attach part. Possible values ’YES", NULL. Bag and attach parts are not assembled with the bundle, but are packed separately and delivered with the bundle to the vehicle. This is required where the part will not pass through a hole through which the bundle must pass and so must be connected to the bundle after installation on the aircraft. Indicates that there are additional components belonging to the designator, e.g. backshell. A - main component. B - backshell (minor component) – other letters indicate other types of additional components Blank means there are no additional components. Designator Seq (22) Field Character 2 Since most connectors (plugs and receptacles) have backshells, on integration of the SWD, the software builds two occurrences, one for - with sequence A - for the connector, and one with sequence B - for the backshell. If the connector does not have a backshell, you have to delete the occurrence with sequence B manually. When the designator has other components the field must be entered manually as C. Thus when a switch has a guard, the guard must be entered manually. Clocking Field Backshell clocking angle. Number This field is updated automatically from the 2D drawing or the 3D program (CATIA or UniGraphics) when the BTP is integrated. Field Mold code for potting information for a part. (23) Mold Code (24) Proprietary Character 30 Mold Angle Field (25) Number Document Version B Mold angle for potting information on a part. Printed copy is for reference only 15 Part Occurrence User Manual Field Name (No. in Figure) Type and Size 3 check boxes Qty (26) Description This parameter enables HarnesSYS™ to later calculate the quantity of this part number required per effectivity. There are 3 options: A/R + Number field for Value option REF 1. A/R - As required- Mark when the quantity is not to be calculated, but is required to be supplied, as with lacing wires, rubber tubes, etc. 2. REF - Reference- Parts which are not to be taken into account for purchasing, such as multi-bundle connectors in other call-out bundles. Value 3. Value -Number of occurrences of part-The field is only displayed when this option is marked. It displays the number of items per occurrence in the callout bundle. For example, if it is necessary to order pins for a particular connector, and the pin has an occurrence, then the number of pins to be ordered is derived from the occurrences of the pin. Number The alternate value for functionally interchangeable parts, is as follows: if there are interchangeable parts, the most preferred is indicated by a zero (0) in this field, the second preferred choice receives 1, and so on. Alternate (27) if there is no interchangeable part, this field is blank Band Marker (28) View/Change button Opens the Band Marker window used to enter the details of the band marker label. Item Field Item number in 2D routing document. (29) Number Link (30) Order No. (31) 16 Field Free format field for adding data for user’s purposes. Character 6 Field Purchase order number Character 8 Document Version B Printed copy is for reference only Proprietary Part Occurrence Application Field Name (No. in Figure) Type and Size Owner Key Field (32) Number Owner Desig. Display only Description The occ. key assigned to the part of which this part is a sub-part. (The owner part effectivity includes this part’s effectivity). Displays the owner’s designator number. (33) Shows whether a sealing plug is used with the part or not and if so what are the conditions. Offers 5 options: 1. Use BTP setting Sealing Plug Selection Button (34) 2. With Contact 3. Without Contact 4. No Sealing Plugs 5. Blank Displays location of part in vehicle. The X,Y,Z coordinates relate to the Absolute Coordinates System of the aircraft. 2 alternative coordinate methods are allowed, the method being selected in the Parts Project Defaults window (see Project Default User Manual). X/BL Y/STA Z/WL X/STA Y/BL Z/WL Location (35) 4 fields (BL buttock line) (STA station) (WL water line) In first field X coordinate, second Y and third Z. The fourth field displays the unit (selected in Administration Project Defaults Window). This field is populated automatically from the 3D program (CATIA or UniGraphics) via the 3D ASCII file (Integrate Jig - Build or Update) when the BTP is integrated; or manually in the Part Occurrence Form. Proprietary Document Version B Printed copy is for reference only 17 Part Occurrence User Manual 2.4.2.1 Multi-bundle Parts The part occurrence record includes data on a multi-bundle part, a part that is connected to more than one bundle. When a part is multi-bundle Yes appears in the Multi Bundle Field , and a LOV button is displayed on its right, as shown. Figure 5: Multi-bundle LOV Button When you press the LOV Multi button a read-only window opens with the base numbers of the bundles to which the part is connected. Figure 6: Window Showing Bundles Connected to Part Press OK or Cancel to close the window. (In this case there is no difference between OK and Cancel buttons.) When a part is multi-bundle the call-out bundle is that bundle to which the part is generally referred. Multi-bundles can be defined in the following ways 1. From the SWD When the SWD indicates (by having wire names belonging to more than one bundle) that a part is connected to several bundles, the Integrate Wires identifies the multi-bundle part and Yes appears automatically in the Multi-bundle field. At least two rows appear in the Bundle window shown above. 2. Manually When a part occurrence is added manually, you can select Yes using the the Multi bundle button. 18 Document Version B Printed copy is for reference only Proprietary Part Occurrence Application 3. Special Designator Designators that are defined as multi-bundle in the Special Designators windows, shown below. These part occurrences are always marked as multi-bundle. The New Version Special Designators window is accessed from the Administration section of the Main toolbar. Click the Project Settings icon and select the Special Designators option. New Version Window Figure 7: Special Designators Window Old Version Window The Multi-bundle window, as accessed from the old versions, is shown below. Proprietary Document Version B Printed copy is for reference only 19 Part Occurrence User Manual Figure 8: Old Special Designators WIndow Multi-Bundle Check When Integrating SWD On integration of an SWD a check is made if a part is already connected to another bundle but is not defined as multi-bundle. If it detects that this is so, the following warning is displayed. Figure 9: Warning Message About Bundle Number If it is a multi-bundle part, the user performing the integrate command enters Y and the integration continues; or else S to stop the integration and check the drawings. 2.4.2.2 Clocking Angle The clocking field is defined as NUMBER in the database (part_occur table) and in the Part_Occurrence form it is limited to 5 digits. It is intended that the value is in degrees, but as it is a numeric value you can use it as you wish. The direction and "0" point origin can be defined in the Project Defaults window while you see the face of the connector. Please see example below: Select the Clocking field and press the List of Values button to open the Clocking Angle Window which contains a list of the possible values. 20 Document Version B Printed copy is for reference only Proprietary Part Occurrence Application There are 3 normal sources for the Clocking value: 1. The Integrate BTP program detects a Clocking Symbol in the 2D-routing, and inserts the values (in the following example – 075) in the Clocking field of the Part_Occurrence table. Figure 10: Clocking Symbol in 2D Routing 2. As described in item 1, but the value is extracted from the 3D-model (CATIA, UG.) 3. The Clocking field in the Part_Occurrence form can be manually populated and if you enter a value once, subsequently it will appear in the LOV window. The following figure shows the clocking angle and its description. Figure 11: Clocking Angle and the Fiields Describing it 4. If the field is left blank for all part occurrences, all the functions operations and report will work except that the Clocking angle fields in the part reports will be empty. Proprietary Document Version B Printed copy is for reference only 21 Part Occurrence User Manual 2.4.3 Effectivity Panel When adding a part occurrence record manually it is mandatory to enter the effectivity for the part. The effectivity is described in the Configuration Control User Manual. Figure 12: Effectivity Panel in Part Occurrence Window Table 3: Fields in Effectivity Panel in Part Occurrence Window Field Name Model Type and Size Char Up to 30 Block Char Up to 10 From Number Description Any combination of characters that indicate the model, project, etc. Up to ten characters used to extend effectivities range. The lower limit. 4 digits COB Char A separator (Customizing, Optional, or Basic). 1 Available Options; 1. - = Production 2. * = Optional 3. # = Customize 4. @ = Test articles such as Stress Test 5. $ = Retrofit 6. T = Analyzer Test Documents 7. E = External (must also have an optional effectivity (*) to show reference). 8. : = Post retrofit 22 Document Version B Printed copy is for reference only Proprietary Part Occurrence Application To Number 4 The upper limit. The Add Row button enables you to add further rows of effectivities for the part occurrence. Likewise the Delete Row button enables you to delete a row in the effectivity panel. Proprietary Document Version B Printed copy is for reference only 23 Part Occurrence User Manual 2.4.4 Retrofit Data Panel Figure 13: Retrofit Data Panel in Part Occurrence WIndow In case of a retrofit the Retrofit Data panel enables you to indicate the applicable retrofit. This is explained in the Retrofit User Manual. 2.4.5 Part Note Panel The Standard Notes library (see the Libraries User Manual) contains notes relating to electrical parts. These notes can be attached to Part Occurrences and then seen in parts reports. Figure 14: Part Note Panel The Part Note panel displays any notes applicable to the part. Table 4: Fields in Part Note Panel in Occurrence Window Field Name 24 Type and Size Description Note No. Field Note number in Standard Notes library. APCOMB Field Code for an application or group of applications to which the note applies. LOV Button Opens the List of Notes window, displaying the standard notes. Document Version B Printed copy is for reference only Proprietary Part Occurrence Application Field Name Type and Size Description Note No. Field Note number in Standard Notes library. Custom LOV Button Opens the List of Custom Notes window if the user has created custom notes that are not in the Standard Notes library. Procedure: Inserting Note Numbers to Part Occurrence Record 1. Place the cursor on the Note No field and press the LOV button. This displays the list of notes. Figure 15: List of Notes 2. Select the note to be added and press OK. The note no. and the APCOMB number are added to the panel. When you generate part reports the notes will be included in the reports. 2.4.6 Controls in Lower Area of Part Occurrence Window This table below describes the buttons in the lower area of the Part Occurrence Window. The Part Note panel is described in Part Note Panel (see "Part Note Panel" on page 24). Table 5: Fields in Lower Area of Part Occurrence Window Field Name Proprietary Type and Size Description Add Row Button Adds row to Effectivity, Retrofit Data or Part Note panels. Delete Row Button Deletes row from Effectivity, Retrofit Data or Part Note panels Document Version B Printed copy is for reference only 25 Part Occurrence User Manual Retrofit Master Detail Button Opens the Retrofit Master Document window giving the details of the retrofit. See next paragraph. List of Values Button Place the cursor on one of the fields in the window and pressing this button opens a window containing possible values. Save & Continue Button Saves changes but window remains open. Return to Main Menu Button Returns to Main menu without saving changes. Button To use this button you must first complete the External Validation panel in the Project Default Parts window and prepare a suitable script. (Without Save) External Validation See Project Defaults User Manual. When all the data has been entered press the Save & Continue button. When you have added all the part occurrence records you require and have pressed the Save & Continue button for each entry, press the Return to Main Menu. Then press Exit to return to the workspace. 2.4.6.1 Retrofit Master Document Window If there has been a retrofit, when you press the Retrofit Master Detail button in the Part Occurrence window the following read-only window opens. This provides the document details of the RMD as well as its effectivities and components. Full details are given in the Retrofit User Manual. 26 Document Version B Printed copy is for reference only Proprietary Part Occurrence Application Figure 16: Retrofit Master Document Window 2.4.7 Creating a Part Occurrence Automatically SWD When an SWD is integrated part occurrences are created for every part, except for those parts with those special designators that exclude them from being inserted in the parts list. When integration is performed, the part number automatically appears in the part occurrence data as "FROM_WIRE_INTEGRATE". You then have to enter the part number manually from the list in the Part Specification library. The fields are populated as follows; Proprietary Designator = From SWD content . Part Number = "FROM_WIRE_INTEGRATE" Quantity = As specified in SWD Integrate Panel in Project Defaults/Parts window. Bundle = From SWD content - the call-out bundle of the part Document Version B Printed copy is for reference only 27 Part Occurrence User Manual Wire Diagram = Base number of SWD document System = System of SWD document Sub Sys. = Sub-System of SWD document Eff. = SWD effectivity; see Handling effectivity for Part Occurrence (see "Handling Effectivity for Part Occurrence" on page 29) The bundle number comes from the wire number appearing in the SWD, its position there depending on the format control fixed for the project. If a designator appears in SWDs of different bundles, the call-out bundle is that in the first SWD to be integrated. If the bundle has been entered manually already, that will be the call-out bundle and will appear in the part occurrence. BTP When a BTP is created a part occurrence record can be created automatically for the assembly covered by the BTP and added to the database. This record is termed C.A.P.O.R (Cable Assembly Part Occurrence Record) and enables the entire assembly to treated as one unit with one part occurrence. To create this record set the CAPOR toggle to YES in the Project Defaults Parts window. See Project Defaults User Manual. When the project is defined as a "Child" project, it must have been provided with "insert" authorization at the time it was defined. Otherwise automatic addition of C.A.P.O.R. does not occur. The fields are populated as follows; Designator = blank (you cannot enter a value for the designator manually) Part Number = BTP document name (in the Part Spec. as well) Description = "CABLE ASSEMBLY" (in the Part Spec. as well) Occ Description = BTP description (title) Quantity = 1 Part Group ID = "Y" (in the Part Spec. as well) Effectivity = BTP effectivity Notes = Notes affecting the document Retrofit When a retrofit is performed, the Make Retrofit command creates a part occurrence for each of the parts that have been added. The part number first appears as "FROM_ MAKE_RETROFIT, and you have to enter the actual part number manually. For parts that are not changed the effectivity of the retrofit is added to the existing part occurrence record. For further details see the Retrofit User Manual. 28 Document Version B Printed copy is for reference only Proprietary Part Occurrence Application 2.4.7.1 Handling Effectivity for Part Occurrence The Integrate function acts as follows regarding part occurrences that already exist in the database. 1. On integration full coverage is given of the occurrence effectivities against the SWD effectivity. Two examples follow. Example 1 The SWD containing the part with designator 10YP has effectivity 1-100. In the database the effectivity of 10YP is 1-50. The effectivity of the part list containing 10YP is 1-75. On integration the results depend on whether the part 10YP has a part number. If it has a part number, its effectivity will be changed to 1-75 (in accordance with the Part List Effectivity) and a new 10YP occurrence will be created with effectivity 76-100. If 10YP has no part number (the part number is displayed in the Part Occurrence window as FROM_WIRE_INTEGRATE), its effectivity will be changed to 1-100 (to match the SWD effectivity). Example 2 The SWD containing the part with designator 10YP has effectivity 1-100. There are 2 part occurrences in the database, as follows: 10YP without part number and with effectivity 1-50 10YP with part number and with effectivity 51-60 There are 2 part lists one with effectivity 1-50 and one 51-75. On integration the results are as follows: Part 10YP without part number and with effectivity 1-50 will get an additional effectivity 76-100. Part 10YP with part number and with effectivity 51-60 will extend its effectivity to 51-75. 2. The Integrate function compares the part list effectivity with the SWD effectivity and responds according to the Projects Defaults setting (in the Parts window) shown below. Figure 17: Projects Defaults with Partial Effectivity for Parts List If the defaults is selected, as in the figure above, the following message is displayed: Proprietary Document Version B Printed copy is for reference only 29 Part Occurrence User Manual Warning (WL-0201) SWD effectivity exceeds effectivity of the following PART LIST(s) with the base number 0125 PL9999WB0125-201 (-201) effectivity AB99-0001-0002 PL9999WB0125-203 (-203) effectivity AB99-0003-0003 Enter 'Y' after define document, 'C' to continue or 'S' to stop. If the default checkbox for Partial Effectivity for Parts is not marked, the following message is displayed: Warning (WL-0201) SWD effectivity exceeds effectivity of the following PART LIST(s) with the base number 0125 PL9999WB0125-201 (-201) effectivity AB99-0001-0002 PL9999WB0125-203 (-203) effectivity AB99-0003-0003 Enter 'Y' to continue after making corrections in configuration, or 'S' to stop. 2.4.8 Creating a Part Occurrence Manually Procedure for creating a part occurrence manually. 1. Access the Part Occurrence menu. (see "Accessing Part Occurrence Menu" on page 4) 2. Press the Add button to open the Part Occurrence window in the Add mode. 3. Fill in the details you require as explained in the table. (see "Occurrence Definition Fields" on page 11) use the List of Values button in the lower area of the window to open tables of possible values for each field. You must enter values for the designator, part number and effectivity. 4. In case of a retrofit, use the Retrofit Master Detail button to enter the retrofit details in the window. 5. When all the necessary details have been entered, press the Save & Continue button to create the Occ key. 2.4.9 Band Marker Panel A band marker is a label containing the part number or part description attached to the bundle segment adjacent to the part. When you press the View/Change button to the right of the Band Marker label the Band Marker Information window opens. 30 Document Version B Printed copy is for reference only Proprietary Part Occurrence Application Figure 18: Band Marker Information WIndow This window enables you to enter the details of the band marker, which is to be placed on a segment of the bundle near the part. Some of these values can be set in the Band Marker panel of the Project Defaults/Parts window. If they have been, then these values appear automatically in this window. However you can use this window to override these values. Table 6: Fields in Band Marker Information Window Field Name ID Type and Size Field Description ID number of band marker This is set by user and is not mandatory. Proprietary Material P/N Field Material from which band marker is to be made. This can be set in the Project Defaults window but can be changed in this window. LOV Button Opens the Band Marker Material List window, displaying the possible materials for the band marker. This window is shown below. Document Version B Printed copy is for reference only 31 Part Occurrence User Manual Length Field Number Width Field Number Character Size Field Number REF Width of band marker label - this can be set in the Project Defaults window. Character size of text - this can be set in the Project Defaults window. The number of band markers on the bundle. Band Marker Qty A/R Length of band marker label - this is can be set in the Project Defaults window. 3 checkboxes There are 3 options: 1. As required. Value 2. Reference + Number field for Value option 3. Number of occurrences of part. The field is only displayed when the bottom option is marked. It displays the actual number of markers on the bundle. This is useful for long bundles where the markers are placed in positions along the bundle. 32 Format Field Determines the format of the lettering of the band marker text. This can be set in the Project Defaults window. Text Field Text to appear on the band marker Return to Main Button Returns you to Part Occurrences window saving the data. Document Version B Printed copy is for reference only Proprietary Part Occurrence Application Figure 19: Band Marker Material Window Procedure: Entering Band Marker Data Only users with specific permission are allowed to enter band marker data. 1. Open the Project Defaults/Parts window and enter the values in the Band Marker panel. 2. Select the part occurrence for which the marker is to be supplied in the Part Occurrence window. 3. Press the View/Change button to the right of the Band Marker text in the window to open the Band Marker Information Window shown in Figure 9. 4. Using the LOV button open the Band Marker Material window and select the material for the band marker. 5. Change the details as you require. 6. Press OK which returns you to the previous window. 7. When the details have been entered press Return to Main button and the data is stored. Although the data is stored in the database, it does not appear in the regular reports. To retrieve it use the Query function, or else write a user function. Proprietary Document Version B Printed copy is for reference only 33 Part Occurrence User Manual 2.5 Part Occurrence Window - Change Mode To make any change to a part occurrence record select the Change option, the second option in the Part Occurrence Menu window. See Part Occurrence Menu (see "Part Occurrence Menu" on page 3). The following Part Occurrence Change Mode window opens. Figure 20: Occurrence Window in Change Mode Shown Empty As you can see it is very similar to the Add mode window but 2 more fields have been added in the row shown below, and one buttons has been added as described in the table below. 34 Document Version B Printed copy is for reference only Proprietary Part Occurrence Application Figure 21: Row that Changed Table 7: Fields and Buttons in Change Mode not in Add Mode Field Name LCD Type and Size Field Description Last Change Date. Indicates the last date that the occurrence record was changed. This field is present in the Add mode but is not active in that mode. Occ key Field Occurrence Key Unique number, supplied by the system, designating a specific occurrence. The title appears in the Add mode, but without the field. LOV Button Opens the List of Occ Key Window shown in the second figure in Changing a Part Occurrence (on page 35 ). See Components Button For module blocks. Opens the Components window which applies to module blocks. If the part is not a module block pressing this button opens a window stating the part is not a module block and asks - Do you want to continue? 2.5.1 Changing a Part Occurrence Procedure to change a part occurrence 1. Enter the part occurrence key in the Occ key field or select it from List of Occ Key window, the first window shown below. To open this window press the LOV button to the right of the Occ Key field. 2. Select the row that you require. If necessary use the scroll bar at the right of the window. Press the OK button (C) at the bottom center of the screen and click it to enter it into the main Part Occurrence Change window. 3. To find a part occurrence that contains a string, enter the string in the Find box (A) and press the Find button (B) at the bottom of the window. The second window below shows the parts Proprietary Document Version B Printed copy is for reference only 35 Part Occurrence User Manual that include the string 59595. Note that the Find box empties to allow you to make a different selection. 4. To close the window without taking any action press Cancel button (D). 36 Document Version B Printed copy is for reference only Proprietary Part Occurrence Application Figure 22: Window Listing OCC Keys 37 Document Version B Printed Copy is for reference only Proprietary Part Occurrence User Manual This window above contains the following fields (1-9). Table 8: Fields in List of OCC Keys Window from Left to Right Field Name Designator (1) Description The reference designator of the electrical part Additional accessories belonging to a given designator, e.g. backshell. Blank means there are no additional accessories. Sequence (2) A - main component. B and up – additional accessories. The sequence field only shows A when there is an additional accessory, B. OCC Key (3) Occurrence Key Unique number, supplied by the system, designating a specific occurrence. Part Number (4) Part number as in Part Specification library. Alternate (5) The alternate value for functionally interchangeable parts, is as follows: if there is no interchangeable part, this field is blank If there are interchangeable parts, the most preferred is indicated by a zero (0) in this field, the second preferred choice receives 1, and so on. You have to enter these values manually. Bundle (6) Bundle base number where part occurs Effectivity (7) Effectivity of part Condition (8) Retrofit condition if part is used in retrofit RMD Name (9) If used in retrofit, document name of RMD Figure 23: Part Occurrences Containing the String 38 Document Version B Printed copy is for reference only Proprietary Part Occurrence Application 2.5.2 Mating Designator Window When the Part Occurrence window displays the data of a part and the Mating field (No. 6 in paragraph 2.3.3) displays a number other than zero, pressing the mating designator Change/View button opens the Mating Designator window, shown below. This allows you to enter a suitable part for mating with the part whose part occurrence is displayed. The Mating field displays the number of mating connectors that have been entered manually and are available for this part in the database. Figure 24: Mating Designator Window This window indicates the designators with their part numbers of the possible mating parts. Pressing the LOV button in the row opens the full window listing the designators in the project. You can choose a mating designator from the list. The properties of the part are stored in the Part Specification Library. These properties are entered manually and can include those mating connectors compatible with that part. HarnesSYS will check when a part is selected if the mating connector is suitable. When a BTP is created you can run a report that lists the mating connector discrepancies. To do this select the BTP document, press <MB3>. In the Parts Only panel select the option Mating Connector discrepancies. 2.5.3 Supplied from Circuit Breaker/Bus Connection When you press the View/Change button to the right of the item Supplied from Circuit Breaker/Bus Connection the Supplied From Circuit Breaker window opens. This data is used to calculate the load on the bus. Proprietary Document Version B Printed copy is for reference only 39 Part Occurrence User Manual Figure 25: Supplied from Circuit Breaker Window This data in this window is entered manually. It enables you to select the the circuit breakers that supply power to the part having the occurrence in the top line of the window. This is the part occurrence in the main Part Occurrence window. The window displays the Occurrence Key,and designator of each circuit breaker. The phase field indicates the phase the circuit breaker operates - A, B or C. To find which circuit breakers are available press the LOV button and the window below opens. 40 Document Version B Printed copy is for reference only Proprietary Part Occurrence Application Figure 26: Available Circuit Breakers The window displays the Occ key and designator of the each circuit breaker. Select the item you require and press OK. The designator is the entered into the window above. For A/C circuits enter the phase - A, B or C is shown at the right in each row. Press OK to saver the circuit breaker details. This function enables you to calculate the load on the bus. This function has limited use. Proprietary Document Version B Printed copy is for reference only 41 Part Occurrence User Manual 2.6 Part Occurrence Window - Delete Mode The Delete Mode window allows you to delete part occurrences from the database. Part occurrences are deleted using the window shown below. Figure 27: Part Occurrence Window in Delete Mode To locate the part occurrence you wish to delete, place the cursor on any of the fields in the top panel except for the Multi bundle field and press the List of Values button. a window appears displaying possible values for that field. Thus when you select the Occ Key field and press the List of Values button the window shown in Changing a Part Occurrence. When you select the designator field and press the List of Values button a window appears displaying the designator numbers and the respective part numbers as shown below. 42 Document Version B Printed copy is for reference only Proprietary Part Occurrence Application Figure 28: Window Showing Designator and Part Number When any of the other property fields are selected the window displayed contains possible values for that property. The lower panel of the Part Occurrence Window in Delete Mode contains 4 option buttons described in the following table. Table 9: Delete Mode Action Buttons Name See All records for Deletion Function Allows you to view each record before deleting. Pressing once shows the first record. Pressing the Record Next arrow displays the next record. Pressing the Record Previous arrow displays the previous record. Delete & Continue Deletes displayed occurrence and leaving the window open to allow you to delete another record. Return to Main Menu (without Delete) Returns to the main Part Occurrence menu without deleting displayed occurrence. Get HELP on Key Opens Help window shown in Figure below. When you select a bundle and there are several parts with the given property, the box at the lower left marked "No of records to be deleted" indicates the number of occurrences that match the conditions. The box at the lower right marked "Current record" indicates the number of the record being displayed, and the arrow buttons above it allow you to move between records. However an occurrence key that has been deleted cannot be reused. Proprietary Document Version B Printed copy is for reference only 43 Part Occurrence User Manual 2.6.1 Procedures for Deleting Part Occurrences You can delete a part occurrence directly or can select certain properties of parts and delete a group of part occurrences that have those criteria. This section describes the two procedures separately. Procedure to delete a part occurrence directly 1. In the Part Occurrence menu press the Delete button and the Part Occurrence Delete Mode Window opens as shown above. 2. To find the part occurrence you wish to delete press the List of Values button at the top of the window. This opens the List of OCC Keys window 3. Place the cursor on the line containing the occurrence to be deleted. 4. Press OK and the part occurrence is entered in the Occ Key field. 5. Press the Delete & Continue button. Figure 29: Message about Opening Files 6. A window,shown above opens with the message that the files containing the occurrence will be opened. Press OK and the occurrence will be deleted and the records updated. Procedure to delete a group of part occurrences according to particular criteria 1. In the Part Occurrence menu press the Delete button and the Part Occurrence Delete Mode Window opens as shown above. 2. Place the cursor on the criterion, such as Designator, for selecting the part occurrence. Press the List of Values button at the top of the window. The Delete Mode Window fills with the properties of the first record that meets the criterion - in this case bundle no. 17717. Also this window displays the number of records that meet the criteria selected. In this case the window shows that there are 5 records to be deleted. At the bottom right of the window the Current record field shows which record is displayed. 44 Document Version B Printed copy is for reference only Proprietary Part Occurrence Application Figure 30: Delete Mode with Bundle Criterion Displayed 3. Press the See All Records for Deletion button. 4. Pressing the Next arrow above the Current record field will display the next record, and the Previous arrow will display the previous record. Start at the record number 1 and review each of the records in turn. 5. Press the Delete and Continue button. 6. The following window is displayed asking you if you are sure you want to delete the number of records in the group. Figure 31: Message Asking for Confirmation of Delete Action 7. Press OK and all the part occurrence records in the group are deleted. Proprietary Document Version B Printed copy is for reference only 45 Part Occurrence User Manual 2.7 Part Occurrence Window - Replicate Option When a part is added that is similar to an existing part the common data from one occurrence may be duplicated to a new part occurrence, saving time and effort. Although any of the criteria may be changed, it should be noted that it is mandatory for one of the following criteria to be changed - designator, designator sequence, effectivity. Some parts have a mating designator originating from the integration of a SWD. Although it is included in the database it does not appear in the window directly, and can only be seen by pressing the respective View/Change button. In such cases, to prevent this mating designator being duplicated automatically, a special window asks you whether you wish to duplicate the Mating field. Only when you press OK will this Mating designator be duplicated as part of the new occurrence. Figure 32: Part Occurrence Window in Duplicate Mode The Replicate Mode window contains the same fields as the Change Mode window. 46 Document Version B Printed copy is for reference only Proprietary Part Occurrence Application 2.7.1 Procedure for Duplicating a Part Occurrence Procedure to duplicate a single part occurrence directly 1. In the Part Occurrence menu press the Replicate button and the Part Occurrence Duplicate Mode Window opens as shown above. 2. To find the part occurrence you wish to duplicate press the List of Values button at the top of the window. This opens the List of OCC Keys window. 3. In the List of OCC Key window select the line containing the occurrence to be duplicated. 4. Press OK and a the message window asks you if you want to replicate the the Mating field as well. Figure 33: Message About Duplicating Mating Field 5. Press OK to replicate the mating field or cancel to ignore it. 6. The new occurrence key appears at the top of the window and a message in the message bar at the bottom of the window asks you to enter a suitable designator. Proprietary Document Version B Printed copy is for reference only 47 Part Occurrence User Manual Figure 34: Part Occurence in Duplicate Mode Showing New OCC Key 7. Enter a designator or select an existing designator from the list opened using the List of Values button in the lower part of the window. 8. If necessary, enter a new effectivity or a new designator sequence. 9. Make any other changes that are required. 10. Press Save & Continue button and the new occurrence key is entered into the database. 48 Document Version B Printed copy is for reference only Proprietary Part Occurrence Application 2.8 Part Occurrence Window - Group Change Option Figure 35: Part Occurrence Window - Group Change Mode The Group Change function allows you to change the same parameters for a group of part occurrences. You define a group of occurrences by determining "group membership" conditions, and then globally change those parameters that the group has in common, which have to be changed. You can check how many occurrences are affected. You may also review the record of each occurrence in the group you defined, one by one. This option is designed to help you avoid making massive, erroneous changes. For example, if you are making a change that is estimated to affect 50 or 100 occurrences and a list of 5000 occurrences appears when this option is used, then you know to go back and review the group membership conditions you set. 2.8.1 Procedure for Making a Group Change to Part Occurrences A group change can be made for parts with designators that have the same structure. Proprietary Document Version B Printed copy is for reference only 49 Part Occurrence User Manual Procedure for Making Group Change to Part Occurrence 1. In the Part Occurrence menu press the Group Change button and the Part Occurrence – Group Change Mode Window opens as shown above. 2. To define the group of part occurrences you wish to change enter a suitable value in the designator field that has the specific structure. In this example the designator MEIR was entered (% being the wild card to find all designators with the string MEIR). Press "Get number of matching records" button and the "Number of Matching records" field shows the number of records in the group (in this case 4). Figure 36: Group Change Window Showing Number of Records 3. Press the "Continue to Occurrence Record List Screen" button. 50 Document Version B Printed copy is for reference only Proprietary Part Occurrence Application Figure 37: Occurrence Record List Window 4. In the figure above the window shows that there are 4 matching records and that the data is shown for the first record. 5. To view the other records in turn press the down or up arrow. 6. After making the check press "Continue to Group Change Set Screen" button. The following warning window is displayed. Proprietary Document Version B Printed copy is for reference only 51 Part Occurrence User Manual Figure 38: Update Part Occurrence Warning WIndow 7. If the number of occurrences that are to be updated is not reasonable, press Cancel. If the number makes sense, press OK. The following window is displayed. Figure 39: Group Change Set Window 8. Enter the changes to the fields that affect all the occurrences in the group. 9. If you need to change the effectivity, enter one of the following options in the Set Type box in the Effectivity panel.: I – Implicit – Adds a new effectivity 52 Document Version B Printed copy is for reference only Proprietary Part Occurrence Application E – Explicit – Changes the effectivity D – Delete – Deletes the effectivity These options are explained below. 10. If you choose I, enter the new effectivity and press the "Update and Return to Main Menu" button. 11. If you choose E, enter the changed effectivity and press the "Update and Return to Main Menu" button. 12. If there are a number of effectivities when you choose D and enter the effectivity to be deleted. Press the "Update and Return to Main Menu" button. 13. The following message is displayed indicating where in your private directory the change is reported. Figure 40: Message Indicating Report Created 14. Press OK and the Part Occurrence menu is displayed. Example 1. Changing Occurrence Fields Group conditions: All occurrences in bundle 1406 in wire in SWD 810505. 15. Press Exit button to close Part Occurrence function. Change made in Group Change Set window: bundle number changed to 1500. Result: All occurrences in the group will be associated with bundle 1500. The specifications of the occurrences remain unchanged, as they are not changed in the SWD. Example 2. Changing Part Number Group conditions: All occurrences with part number A4576765-89 in bundle 1406 in SWD 810505. Change made in Group Change Set window: Part number changed to B7606355-89. Result: All occurrences in bundle 1406 in SWD 810505 which had part number A4576765-89 will be given new part number B7606355-89 and new specifications. Proprietary Document Version B Printed copy is for reference only 53 Part Occurrence User Manual 2.8.1.1 Effectivity Options There are three types of changes that you can perform: Implicit, Explicit, or Delete. The Set Type field allows you to specify the type of change you want to make, as follows: Implicit: Enter I in the Set Type field to make sure that the the occurrences in the group have the effectivities that you enter. Explicit: Enter E in the Set Type field, to make sure that the occurrences in the group have only the effectivities you enter. Delete: Enter D in the Set Type field to make sure that the occurrences in the group do not have the effectivities you enter. The table below gives examples of changing the effectivities of groups. Table 10: Changing Effectivities of Groups 54 Old Effectivities Effectivities Entered Type Set New Effectivities Comments SDP00010100 SDP01000200 I SDP0001-0200 Range entered is added. SDP00010200 SDP00500100 E SDP0050-0100 Range entered replaces old range. SDP00010200 SDP00500100 D SDP0001-0049 SDP0101-0200 Range entered is deleted form original range. SDP00010002 SDP00040010 SDP00200070 SDP00300080 I SDP0001-0002 SDP0004-0010 SDP0020-0080 New effectivities added to appropriate range. SDP00010002 SDP00040010 SDP00200070 SDP00060008 D SDP0001-0002 SDP0004-0005 SDP0009-0010 SDP0020-0070 Effectivities entered are deleted and the combinations are reorganized accordingly. SDP00010004 SDP00090015 SDP00030010 I SDP0001-0015 Effectivities are added, SDP00010010 SDP00200030 SDP00030004 SDP00150022 resulting in one continuous block. Document Version B D SDP0001-0002 SDP0005-0010 SDP0023-0030 Effectivities entered are deleted and the combinations are reorganized accordingly. Printed copy is for reference only Proprietary Part Occurrence Application 2.9 Part Occurrence Window - Query Option When you select the Query option in the Part Occurrence menu the following window is displayed. Figure 41: Part Occurrence Window in Query Mode This window enables you to find the number of occurrences of parts that have the same specification, and then open the Occurrence Record List window showing the details for each occurrence. The field "No. of matching records" indicates the number of part occurrences that match the criteria you entered in the Part Occurrence - Query Mode window. the other fields in this window have already been described. 2.9.1 Entering A Part Occurrence Query Procedure for Entering a Part Occurrence Query 1. In the Part Occurrence menu press the Query button to open the Part Occurrence - Query Mode window. Proprietary Document Version B Printed copy is for reference only 55 Part Occurrence User Manual 2. Enter the data in one or more of the window's fields and press Get number of matching record button. 3. The number of records containing the data entered appears in the No of Matching Records field. Figure 42: Part Occurrence Query Mode Showing No. of Records 4. The window shows that for Wire Diagram 47114 there are 5 matching records. 5. To view the records press the Continue to Occurrence Record List Screen button - the second option. 56 Document Version B Printed copy is for reference only Proprietary Part Occurrence Application Figure 43: Occurrence Record List Window 6. Press the arrow buttons at the bottom right of the window to pass from one record to the next or the previous record. The figure shows the details of the second record for Wiring Diagram 47114. If the part occurs in SWDs with other base numbers those occurrences will not be shown. 7. To return to the Part Occurrence - Query Mode window press Return to Condition Screen button. 8. To return to Main Menu press the Return to Main Menu button. Proprietary Document Version B Printed copy is for reference only 57 Part Occurrence User Manual 2.10 Flight Condition Information Window All parts are subject to the flight conditions under which they operate. HarnesSYS includes the flight conditions for which the part can be used in the parts database. The Flight Condition Information window, shown below, displays the conditions that apply to the part having the OCC Key, designator and Part Number displayed in the top line of the window. The data is used for Load Analysis purposes. Figure 44: Flight Condition Information Window The central panel displays the condition data. Table 11: Flight Condition Information Window Fields Field Name Type and Size Field Description Serial number in window Number Flight Condition 58 Field Document Version B One of 18 Flight Condition options shown in Flight Conditions List window Printed copy is for reference only Proprietary Part Occurrence Application LOV Button Opens Flight Conditions List Window shown below. High/Low Load Button Electric Load of component at which condition applies. 3 options High Low Blank Simultaneous Group Field Group of components operating together The buttons at the bottom of the window have their usual function. Procedure for Adding or Changing Flight Conditions: 1. In the Part Occurrence menu press the Add/Change Flight Condition Data button and the Flight Condition Information Window opens as shown above. 2. Find the part occurrence for which you wish to have the flight condition information by pressing the List of Values button at the top of the window. This opens the List of OCC Keys window. 3. In the List of OCC Key window select the line containing the desired occurrence. 4. Press OK and the designator and part number are displayed. 5. To add a condition, click the LOV button in the central panel and the Flight Conditions List window opens. 6. Select the applicable condition. 7. If the electric load is affected by the condition, select one the 3 options High, Low or blank. 8. If a group of components operates with the part, enter it in the Simultaneous Group field. 9. In the lines below repeat to change or add other conditions that are applicable. 10. Press OK to save the changes. There are 18 different conditions (hard coded) in HarnesSYS as can be seen in the figure below. Proprietary Document Version B Printed copy is for reference only 59 Part Occurrence User Manual Figure 45: Flight Conditions WIndow 60 Document Version B Printed copy is for reference only Proprietary Glossary of Terms Glossary of Terms A Abbreviation Class Defines the class of part (for example P for plug, SW for switch, etc) Access Door Access point (flap, door or other entrance) in aircraft used to install or access the part or bundle. Area Code The area code indicates the physical location of the part in the production unit. Authority Documents that authorize changes. They are located in the Authority Library B Backfield Protection for connector which provides grounding or mechanical support Box Interface Boxes are independent electrical units, often connected to bundles by specific interface. Braid Stop The distance between the BRD and the end of the braid (see Project Defaults, Manufacturing). Branch segment (branch) Is a geometric JIG element containing wires. The branch is identified by uniformity of its wires. BRD Basic Reference Designator, also referred to simply as a Designator, the connector’s local name. BTP (Build-To-Package) Document describing the packaging to produce a bundle. Generally it is a collection of WL/PL and JIG DATA. Must contain at least WL or PL. Proprietary Document Version B Printed copy is for reference only 61 Glossary of Terms Bundle Each wire must belong to a bundle. A bundle name is composed of a bundle (base) number and dash number. The number of the bundle to which the wire belongs is often entered before the wire name on the SWD. C CAD Computer Aided Design Contact Key Code determining number and names of pins, defined in Contact Configuration Library. A part number has a unique contact key. Contact Type Type of contact: 4 options – Pin, Stud, Socket, Solder D Dash Number A descriptor of a document or bundle which associates the document with effectivity. Designator Each occurrence of a part in a SWD has a "code name" e.g. YP100. This is the (base) designator of the part. This number is unique in the Product. Device Type Type of device installed in bundle. In HarnesSYS there are 15 options. Diameter The diameter of the segment which is calculated using a fixed formula which takes into account the various types of wires that pass through the segment. Document Configuration controlled document of a specific type such as SWD/WL/PL/BTP. E Effectivity The effectivity of an item is the set of production units (i.e. the subset of all the production units being manufactured) to which that item applies. The following documents have effectivities: part list (with dash number), wire list (with dash number), SWD (with dash number). 62 Document Version B Printed copy is for reference only Proprietary Glossary of Terms The following items also have effectivities: wire, part occurrence, bundle (with dash number). In effect the effectivity of a bundle (with dash number) is the same as the effectivity of its wire list (with dash number). EGN An attribute assigned to segments to enable separation of wires with different EMI attributes. EMI Electromagnetic interference. The code value representing the susceptibility to interference with the signals that a wire carries when these signals are disrupted by electromagnetic emission from adjoining current carrying wires. F Family Family code ferrule connecting several shields, name fields in wire record, Find Base Number Part List W/L Dash flt file FROM_WIRE_INTEGRATE. I Integrate BTP When the project default parameter Multi Path allowed is not checked, an error is displayed if the integrated source contains Multi Paths. Integrating a Wire Integration of part integration process data flow logic flow intersecting effectivity issue. J Jig A full scale 1:1 layout for the construction of a wire bundle. Also called Form-board. Jumper Name number translation of a short default wire. L LCD last Change Date. Date document last changed. M Mating Connector The matching Connector assigned to a connector via the Part Occurrence mating field. Proprietary Document Version B Printed copy is for reference only 63 Glossary of Terms Multi Path A path or a part of a path, which includes more then one alternative configuration for routing wires. N Null Path The default path, if there is no correlation between segments and wires. If there are several alternative routing options at a node and there is not enough information to define the path, the null path should be the longest one. P Parts List (PL) List of parts contain in a specific version of a bundle. Path Is a collection of continuous branch segments for routing wires. There may be single path or several parallel paths between two segments. Plug A device which by insertion to a receptacle establishes contact. Plug Program Number (PPN) The PPN (Plug Program Number) of a part is a key determining the order in which wires should be attached to the pins of the part. The key has 3 fields: major, sub and degree. Private File A file, generally a report, that is produced by a HarnesSYS transaction, stored in user’s private directory and only available to the user initiating the process. Production Unit The unit being designed or manufactured e.g. an aircraft. Protective Device A lamination protecting the bundle wires, such as; boot, sleeving, conduit or spiral-wrap. R Receptacle A contact device connected to a power supply and equipped to receive a plug. Retrofit Installation Drawings- RID Drawings showing only the change. 64 Document Version B Printed copy is for reference only Proprietary Glossary of Terms Retrofit Master Document RMD Folder that contains all the documents required to implement the retrofit Revision Letter Letter determining the issue of a document. Every time a document is opened in order to modify it, its revision letter is raised. It can have the values NEW or A, B, C etc. In addition the revision letter may include point release data. Point release is sequential number indicating inner release of the bundle. The document may be released in the following order: 00.01 00.02 Point releases NEW Firm release NEW.01 NEW.02 A Point releases Firm releases A.01 A.02... etc Routing The path taken by a wire from one part to another. S Same Wire In 2 SWDs schematic diagram sequence number shield levels name significant wire name spare pin special designators splice named translation of unnamed spt file starting/ending point status suffix SWD symbol bank system wire diagram. Segment A section of a bundle that lies between two nodes or between a part and a node or between two parts. Also referred to as a branch. Segment Length The length of a segment or branch, stated in millimeters or inches as defined in the Project Defaults. This length can be between two nodes or between a part and a node or between two parts. Service Code Type of retrofit change: A (Add), D (Delete), C (Change), B (Before). Shell Code Shell codes contain information about connector back shells (or rear side of the connector). The three variables concerning shell codes are the size, whether the connector is a receptacle or a plug, and whether it is straight or angled. Thus each shell size can have four shell codes. Shrink Ratio The nominal ratio of expanded diameter to recovered diameter of heat shrinkable tubing Signal Type Type of signal at interface box connection – 13 options: Proprietary Document Version B Printed copy is for reference only 65 Glossary of Terms Communication, GND Analog, GND Digital, GND Chassis, GND Power DC, GND Power AC, Lighting, MUX-BUS, Power AC, Power DC, RF, Signal Analog, Signal Digital Sleeve Size Diameter of sleeve around wire Spare Pin Is a designator pin, left unused (unattached to a wire). The pin requires special treatment such as capping. Stick Diagram Initial Jig diagram where all the lines are straight, the lengths of the branches are drawn to scale, and the dimension lines are removed. System Wire Diagram (SWD) or Schematic Diagram or Wire Diagram A document which presents the design of a logical system e.g. air conditioning, landing system. A SWD has a base number indicating the logical system which it describes, and a dash number indicating its effectivity. T Termination Code Code indicating possible terminations at that point U Update Update wire process. V Vendor Approved supplier of materials and parts whose details appear in Vendor library. W W/L List of wires contained in a specific version of a bundle. Wire Accommodation The Wire Accommodation indicates the range of wires that a terminator can accommodate Wire Length The length of a wire connecting one part to another (including the route through a number of segments and branches). 66 Document Version B Printed copy is for reference only Proprietary Glossary of Terms Wire List (WL) List of wires contained in a specific version of a bundle. Wire Type A 3-element code for describing type of wire; consists of family type, specification type and gauge, which are obtained from the bundle wire list data. Work Package Includes a group of instructions for maintenance and repair of the wire, or a list of tools needed for the task and a cross reference table for it Work Package Set Group of work packages for a system or sub-system Proprietary Document Version B Printed copy is for reference only 67 Index Entering A Part Occurrence Query • 55 A Abbreviation Class • 61 About This User Manual • xi Access Door • 61 Accessing Part Occurrence Menu • 3, 4, 30 Area Code • 61 Authority • 61 Family • 63 Flight Condition Information Window • 5, 58 H Handling Effectivity for Part Occurrence • 28, 29 B I Backfield • 61 Band Marker Panel • 30 Box Interface • 61 Braid Stop • 61 Branch segment (branch) • 61 BRD • 61 BTP (Build-To-Package) • 61 Bundle • 62 Integrate BTP • 63 Integrating a Wire • 63 Introduction • 1 C J Jig • 63 Jumper • 63 L LCD • 63 CAD • 62 Changing a Part Occurrence • 35 Clocking Angle • 20 Contact Key • 62 Contact Type • 62 Controls in Lower Area of Part Occurrence Window • 8, 25 Conventions • ix Creating a Part Occurrence Automatically • 27 Creating a Part Occurrence Manually • 30 M Main Panel in Part Occurrence Window • 7, 9 Mating Connector • 63 Mating Designator Window • 39 Multi Path • 64 Multi-bundle Parts • 12, 18 N Null Path • 64 D O Dash Number • 62 Designator • 62 Device Type • 62 Diameter • 62 Document • 62 Document Revisions History • vii Documents Organization • xi Occurrence Definition Fields • 6, 11, 30 E Effectivity • 62 Effectivity Options • 54 Effectivity Panel • 7, 22 EGN • 63 EMI • 63 68 F Document Version B P Part Note Panel • 7, 24, 25 Part Occurrence Application • 3 Part Occurrence Menu • 3, 34 Part Occurrence Menu Options • 3, 4 Part Occurrence Procedures • 1 Part Occurrence Window - Add Mode • 5, 6 Part Occurrence Window - Change Mode • 5, 34 Part Occurrence Window - Delete Mode • 5, 42 Part Occurrence Window - Group Change Option • 5, 49 Part Occurrence Window - Query Option • 6, 55 Printed copy is for reference only Proprietary Part Occurrence Window - Replicate Option • 46 Part Occurrence Windows • 6 Parts List (PL) • 64 Path • 64 Plug • 64 Plug Program Number (PPN) • 64 Preface • ix Private File • 64 Procedure for Duplicating a Part Occurrence • 47 Procedure for Making a Group Change to Part Occurrences • 49 Procedures for Deleting Part Occurrences • 44 Production Unit • 64 Protective Device • 64 W W/L • 66 Wire Accommodation • 66 Wire Length • 66 Wire List (WL) • 67 Wire Type • 67 Work Package • 67 Work Package Set • 67 R Receptacle • 64 Related Documents • xi Retrofit Data Panel • 7, 24 Retrofit Installation Drawings- RID • 64 Retrofit Master Document RMD • 65 Retrofit Master Document Window • 26 Revision Letter • 65 Routing • 65 S Same Wire • 65 Segment • 65 Segment Length • 65 Service Code • 65 Shell Code • 65 Shrink Ratio • 65 Signal Type • 65 Sleeve Size • 66 Spare Pin • 66 Stick Diagram • 66 Supplied from Circuit Breaker/Bus Connection • 39 System Wire Diagram (SWD) or Schematic Diagram or Wire Diagram • 66 T Termination Code • 66 The Occurrence Key • 5 U Update • 66 V Vendor • 66 Proprietary Document Version B Printed copy is for reference only 69