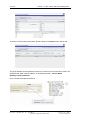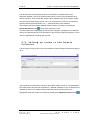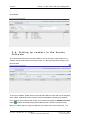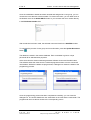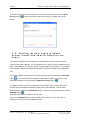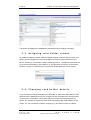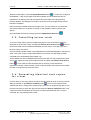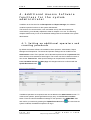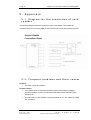
1
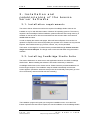
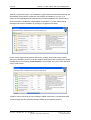
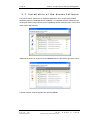
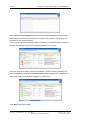
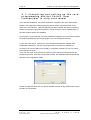
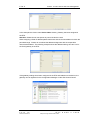
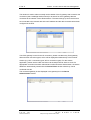
Axesso System Access control and time management based on the KNX installation bus Version 1.0 Installation and system manual Revision: 2009-06-30 I P A S Axesso – Access control and time management Copyright Notice The Axesso software and this documentation material are property of IPAS GmbH, Germany. Windows 2000, Windows XP, Windows Explorer are registered trademarks of Microsoft Corporation in the United States and other countries. Other brand and product names are also registered trademarks or trademarks of their respective organization. Attention: There may be country-specific data protection requirements for storing user data. IPAS does not guarantee the conformity of the Axesso software with these requirements. It is up to the software operator to check the respective data protection legislation. This user manual illustrates the installation and commissioning of the Axesso system. It contains detailed technical information, which requires an understanding of KNX and IP. Basic knowledge of the IPAS ComBridge Studio System is also recommended. Users and operators please also see the additional user manual. In terms of content the user manual corresponds roughly to chapters 3 and 4 of this system manual. Due to future technical developments, the content of the software and manual are subject to change without further notice. 2009, IPAS GmbH P a g e 2 Revision: 2009-06-30 I P A S Subject to change without further notice G m b H © 2 0 0 9 I P A S Axesso – Access control and time management Content 1. Overview and system structure ........................................................................................ 5 1.1. Structure and composition of the Axesso system...................................................... 5 1.2. Functioning of the Axesso system ............................................................................. 6 1.3. Card reader functions and versions ........................................................................... 7 2. Installation and commissioning of the Axesso Server Software..................................... 10 2.1. Installation requirements.......................................................................................... 10 2.2. Installing ComBridge Studio Suite ........................................................................... 10 2.3. Installation of the Axesso Software.......................................................................... 12 2.1. Connecting and setting up the card programming device/ Switch from transponder to chip card model........................................................................................................... 14 2.2. Setting up the IP connection / Connecting the gateways ........................................ 15 2.3. Commissioning the readers in the ETS ................................................................... 19 2.4. Setting the communication parameters in the Axesso Software ............................. 22 2.5. Setting up rooms in the Axesso Software ................................................................ 24 2.6. Setting up readers in the Axesso Software.............................................................. 25 2.7. Setting up readers for time management................................................................. 27 2.8. Anti-passback function of the Axesso System......................................................... 28 2.9. Using the Axesso Software from additional operator stations ................................. 28 3. Operation and function of the Axesso Server Software ................................................. 31 3.1. Setting up new card holders and generating access cards ..................................... 32 3.2. Setting up new users without access cards and search function for users ............. 35 3.3. Assigning card holder scenes .................................................................................. 36 3.4. Changing card holder details ................................................................................... 36 3.5. Cancelling access cards .......................................................................................... 37 3.6. Generating identical card copies for a user ............................................................. 37 3.7. Axesso Software protocol function and activity report ............................................. 38 3.8. Recording and calculating usage times ................................................................... 39 3.9. Protocolling unauthorised access attempts ............................................................. 41 3.10. Semi-automatic deletion of card holder details (“Reminder function“)................... 42 4. Additional Axesso Software functions for the system administrator............................... 44 4.1. Setting up additional operators and creating passwords ......................................... 44 4.2. Removing users and activities from the database ................................................... 45 4.3. Data storage and backups ....................................................................................... 45 4.4. Complete deletion of the database .......................................................................... 46 4.5. Database status information .................................................................................... 46 4.6. Setting the time period for semi-automatic deletion................................................. 46 I P A S G m b H © 2 0 0 9 Subject to change without further notice S e i t e 3 Revision: 2009-06-30 I P A S Axesso – Access control and time management 4.7. Setting the display language ....................................................................................47 4.8. Export and Import of card holder details via EXCEL files ........................................47 4.8 Setting user scenes ...................................................................................................49 5. Appendix ........................................................................................................................ 52 5.1. Diagram for the connection of card readers .............................................................52 5.2. Frequent problems and their causes........................................................................52 5.3. Technical Support.....................................................................................................53 P a g e 4 Revision: 2009-06-30 I P A S Subject to change without further notice G m b H © 2 0 0 9 I P A S Axesso – Access control and time management 1. Overview and system structure Thank you very much for choosing IPAS hard and software. The IPAS Axesso System offers a powerful hard and software for access control and time management based on a standardised KNX bus installation. With the rising use of the KNX system, more and more projects integrating all aspects of technical building equipment are possible. Extending the use of this universal infrastructure to the area of access control and time management therefore lies at hand. Ease of installation, manufacturer independence, simple wiring, and widespread programming and commissioning knowledge that have made this system so successful apply to these tasks in the same manner. 1.1. Structure and composition of the Axesso system The Axesso system principally consists of the Axesso server and the card readers that are connected to a KNXnet/IP gateway via a KNX installation bus system. The KNXnet/IP gateway (e.g. IPAS ComBridge NCI) connects the KNX system and the IP (Ethernet) network of the server. The communication between the server software and the readers is hence based on the existing network structures KNX and Ethernet. I P A S G m b H © 2 0 0 9 Subject to change without further notice S e i t e 5 Revision: 2009-06-30 I P A S Axesso – Access control and time management 1.2. Functioning of the Axesso system The Axesso readers work autonomously within the KNX system. Once the access cards have been programmed, no server is required for the system’s access function. If a card is inserted into the reader, the device compares the access code on the card and the code saved on the reader. If these are the same, the reader will permit access. An additional code (CardID-Code) is sent in encrypted format via the KNX bus for each attempted access. If the Axesso server is connected and active, the Axesso Software generates access reports, alarms and time recording data via this code. Special scenes may also be created for individual card holders. Apart from the card readers, the other central system component is the Axesso Software that is installed on the server. The Axesso Software is an independent web application based on the IPAS ComBridge Studio Suite. The software offers user administration, the storage of card holders and access data and the generation of alarms and scenes. For the system administrator the Axesso Software provides all the important setting and programming options to commission the system. However, the software’s main task is the generation and programming of access cards via the connected programming device and the sending of access information to the reader that is connected to the KNX. The first thing to do when programming the cards is to choose the rooms that are to be accessible to the card holder and possibly enter the personal details of the card holder in the Axesso database. An empty (new or deleted) card is inserted into the connected programming device. After an internal plausibility check, the Axesso Software then generates two new codes (Card-ID-Code, Access Code). The access code is sent via the P a g e 6 Revision: 2009-06-30 I P A S Subject to change without further notice G m b H © 2 0 0 9 I P A S Axesso – Access control and time management KNXnet/IP gateway to the readers that are connected to the KNX. To avoid misuse, the data transfer is encrypted. At the same time, the programming device programs the CardID-Code onto the user’s card. If a card is no longer needed or if a user is to be removed from the database, the removal is also done via the Axesso software. Codes in the connected readers are deleted the same way when creating a card via the KNX bus. 1.3. Card reader functions and versions Two types of card readers are available for the IPAS Axesso System: 1. Reader for contact cards (chip cards) The chip card technology requires the cards to be inserted into a slot on the front of the device. Sliding contacts with the card enable communication to the memory chip. 2. Reader for contactless cards (transponder or RF-ID cards) The transponder technology requires the card to be held about 1-2 cm away from the front of the reader. Data exchange between card and reader occurs without touch via a high frequency carrier signal (RF-ID). Within an Axesso system only one card type can be used. The mixed use of chip and transponder cards within a system is not possible. As there is no wear and tear with transponder cards, the use of such cards is preferable. I P A S G m b H © 2 0 0 9 Subject to change without further notice S e i t e 7 Revision: 2009-06-30 I P A S Axesso – Access control and time management Three device models are available for both the chip card and the transponder card reader: without pushbuttons, with one pushbutton or with two pushbuttons. The pushbuttons on the device make it possible to perform other KNX functions apart from the access function (e.g. bell button or light control). The functions are determined through the application in the ETS (see below). Apart from the devices shown there are additional transponder reader devices with three additional LEDs for hotel applications (Do Not Disturb, Please clean up, Room Alarm). All Axesso card readers have an integrated binary output to activate DC low voltage door openers. When choosing a door opener, please make sure not to exceed the integrated switch contact’s maximum current of 1A. In addition to the binary output all card readers have two binary inputs that can be connected to any potential-free contact (e.g. door contact or card holder in a hotel environment). The function of the contact input can also be set via the parameters in the ETS application. In addition to the KNX bus power supply, the Axesso card readers also require a low voltage of 8-26VDC. This auxiliary supply is not only used to supply the device electronics but also to activate the door openers. P a g e 8 Revision: 2009-06-30 I P A S Subject to change without further notice G m b H © 2 0 0 9 I P A S Axesso – Access control and time management The following illustrations show typical connection scenarios: A standard bus connector (KNX) and a screw clamp with 8 terminals are used to connect the devices. For an exact terminal lay-out, please see the appendix in chapter 5. All Axesso card readers have an integrated magnet sensor. If a device is removed from its installation box, which is equipped with a security magnet, it will be de-activated immediately. An alarm telegram can also be sent via KNX. I P A S G m b H © 2 0 0 9 Subject to change without further notice S e i t e 9 Revision: 2009-06-30 I P A S Axesso – Access control and time management 2. Installation and commissioning of the Axesso Server Software 2.1. Installation requirements The Axesso Server Software as well as the required ComBridge Studio Suite can be installed on any PC with Windows 2000 or Windows XP operating systems. The memory required is about 20 MByte. Before installation, please make sure that enough memory is available on the hard drive. We recommend devices with at least 1GHz clock rate and 256MB RAM hard drive. In order to display the Axesso web pages, Microsoft Internet Explorer from version 6.0 upwards is required on the server and possibly the operator’s PC. Please use only Internet Explorer. Other web browsers (e.g. Firefox, Chrome, etc.) are not permitted. The license on the target PC is cleared via the provided USB-Dongle. Please insert the dongle into a free USB port. The dongle must not be removed whilst using the Axesso Software. 2.2. Installing ComBridge Studio Suite The Axesso Software is an autonomous web application based on the IPAS ComBridge Studio Suite. Before installing the software it is therefore necessary to install the ComBridge Studio Suite on the Axesso server. Please insert the provided installation CD into the target computer. The installation setup is started automatically and the start screen appears. (Should the automatic start process be accidentally interrupted, go to the CD’s root directory and start the file start.exe manually.) The installation program will guide you through the installation menu. Once the IPAS license requirements have been accepted, the actual installation of the ComBridge Studio P a g e 1 0 Revision: 2009-06-30 I P A S Subject to change without further notice G m b H © 2 0 0 9 I P A S Axesso – Access control and time management Software components begins. The installation program starts the CBS Install Package and automatically checks which components may already be installed on your PC. If no version of the ComBridge Studio Software has ever been installed on the Axesso server, we recommend the installation of all available components. To do this, please tick all packages and start the installation by clicking on the green arrow button. Further license agreements (Apache Webserver, possibly Java) need to be accepted during the installation process. Once all installation steps have been completed, the Install Package shows the message: Install finished in the message box in the bottom left-hand corner of the window. A green tick shows all newly and successfully installed components. (The Microsoft Data Access Components are generally already installed via the operating system.) I P A S G m b H © 2 0 0 9 Subject to change without further notice S e i t e 1 1 Revision: 2009-06-30 I P A S Axesso – Access control and time management 2.3. Installation of the Axesso Software The Axesso Server Software is an additional application, which needs to be installed separately after the ComBridge Studio installation. To install the software, please choose the program CBS Control Center from the ComBridge Studio Suite start menu. The control center opens after the start. Additional functions can be shown via the Utilities Button in the bottom right-hand corner. A further selection window appears after pressing Install. P a g e 1 2 Revision: 2009-06-30 I P A S Subject to change without further notice G m b H © 2 0 0 9 I P A S Axesso – Access control and time management Use the Select Install Package button to select the Axesso installation package called axesso.ipkg from the CD’s root directory and confirm your selection. This will start the installation of the Axesso Software. As was the case with the ComBridge Studio installation, the Install Package now checks whether any individual components are already installed on the server. Press the green arrow button to start the installation. Once the Axesso installation has been completed successfully, the Install finished message appears in the message box and the individual components are marked with a green tick. Press Exit to leave the Installer. I P A S G m b H © 2 0 0 9 Subject to change without further notice S e i t e 1 3 Revision: 2009-06-30 I P A S Axesso – Access control and time management 2.1. Connecting and setting up the card programming device/ Switch from transponder to chip card model In the standard installation, the Axesso Software is installed for the use of transponder readers. The transponder card programming device can be connected directly to the server via a free USB port. After the USB plug has been inserted, the server’s operating system recognises the programming device. The device driver may be installed again. In this case, please confirm the installation. If the system is to be used with chip cards, additional installation and commissioning steps are required (Please skip the next paragraph if you use transponder devices). For the chip card version, we deliver a chip card programming device instead of the transponder card device. The chip card programmer is currently only available for connection via a serial COM port (not USB). It is therefore necessary to use a PC with a free COM port as server. If you use chip cards, it is necessary to install the driver CD which is delivered with the programming device. Once the CD has been inserted, the installation starts automatically and asks for the registration details. Please complete the fields with your personal details and the 16-digit serial number that is printed in the CD booklet. P a g e 1 4 Revision: 2009-06-30 I P A S Subject to change without further notice G m b H © 2 0 0 9 I P A S Axesso – Access control and time management When installing the driver, please select CHIPDRIVE extern and press next> to confirm your selection. The driver installation is now complete. To activate the driver, one more setting is required. Please open the file explorer and choose the following directory: C:\Programme\IPAS GmbH\ComBridge Studio Web\AxessoWeb\_custom Please delete the file prjenv.php from the above directory and create a copy of the file prjenv__chipcard__.php . Change the name of the file copy to prjenv.php . The system has now been changed to use chip card readers. 2.2. Setting up the IP connection / Connecting the gateways The Axesso software communicates with the readers on the KNX bus via a KNXnet/IP gateway. At the IP end, the gateway is connected to the same IP network as the Axesso server (Hub, Switch). At the KNX end, the accessibility of all connected card readers needs to be ensured (possibly via line or area couplers). Before the Axesso Software is commissioned further, the IP gateway needs to be registered in the Configuration Manager. In relation to the Axesso system, we generally recommend you assign a fixed IP address to the gateway in the ETS. Whilst it is possible and permissible to assign an IP address via a connected DHCP server, this might mean that in case of an interrupted network connection a new and different DHCP address will be assigned, making a re-newed registration necessary. If, as recommended, a fixed IP address is used, the gateway needs to be set first to manual IP assignment. In the example of the IPAS ComBridge NCI gateway the settings are performed in the device’s ETS parameters: I P A S G m b H © 2 0 0 9 Subject to change without further notice S e i t e 1 5 Revision: 2009-06-30 I P A S Axesso – Access control and time management In the example the chosen name Device Name Axesso_Gateway has been assigned in the ETS. Attention: Please do not use spaces as part of the device name! When assigning a fixed IP address please make sure that the chosen address is within the permitted range. Please do coordinate the address assignment with the responsible network administrator. The following example shows the address setting 192.168.1.70 for the IPAS gateway in the ETS: If the gateway settings have been configured in the ETS and loaded onto the device, the gateway can be registered in the Configuration Manager via the CBS Control Center. P a g e 1 6 Revision: 2009-06-30 I P A S Subject to change without further notice G m b H © 2 0 0 9 I P A S Axesso – Access control and time management To do so, please open the ComBridge Configuration Manager (CBCM) by clicking on the CBCM symbol in the Control Center. The field on the right hand side of the Configuration Manager shows the services connected to the system (Standard: Client Manager). On the left hand side the connected gateways are displayed. To add the Axesso IP gateway, please click on the Devices button in the top left hand corner. The Device Administration window appears. A further click on the Add-Device button at the top left opens the Device Editor window. I P A S G m b H © 2 0 0 9 Subject to change without further notice S e i t e 1 7 Revision: 2009-06-30 I P A S Axesso – Access control and time management This window is used to either manually set the details of the IP gateway that is used for the connection (see ComBridge Studio manual) or to search for the IP gateways that are connected to the network via the Browse button. The search brings up all IP devices that are connected to the network with their set IP address and the device name that has been configured in the ETS. If an IPAS gateway is used for the IP connection, please note that every IPAS gateway allows several connection types, which will be displayed simultaneously in the browser window (e.g. NCI 4 connection types, WCI 2 connection types). For the Axesso application, please use the UDP connection via the Object Server Service. Once the appropriate connection has been selected and confirmed via the Select button, the device details are automatically inserted into the Device Editor window where they can be confirmed with OK. The connected gateway is then displayed in the gateway list in the Device Administration window. P a g e 1 8 Revision: 2009-06-30 I P A S Subject to change without further notice G m b H © 2 0 0 9 I P A S Axesso – Access control and time management The flag in front of the gateway name in the list symbolises a successful connection. The windows for the Configuration Manager can now be closed one after the other. 2.3. Commissioning the readers in the ETS In order to commission and configure the Axesso readers, application programs are available for the ETS (from version ETS-3 upwards). To commission the transponder readers, please use application: 3707-ProxReader-01-0101 For the chip card version, please use application: 3706-ChipcardReader-01-0101 The Axesso Server software and the readers communicate via two 14Byte long communication objects of type EIS 16. Within the application programs, object numbers 0 and 1 are reserved for the communication. When a room is accessed, object number 0 called “Data“ is used to transmit the CardID to the server software for identification purposes (reports, time management). Object number 1 “Control“ is used for the bi-directional data and command exchange (including programming of the AccessCode) between readers and software. In order to ensure that the system functions properly, both objects need to be linked with group addresses. To transmit data within the communication object types, an encryption algorithm is available in the Axesso System. When linking the group addresses it is important to ensure that the data object of all readers used in the system is linked to the same group address whilst the control objects of the individual readers do have to be linked with different group addresses. For example: I P A S G m b H © 2 0 0 9 Subject to change without further notice S e i t e 1 9 Revision: 2009-06-30 I P A S Axesso – Access control and time management Additional parameters and objects are available in the application program for configuration and additional functions. Apart from the objects for data exchange with the software that were described above, the following communication objects are available: Obj. 4: Door Access – Open/Close The card reader sends a 1 Bit open telegram via this object when a valid card is placed in front of/ into the reader. After a configurable time period the object is changed to closed and re-sent. The object reacts in response to the internal binary output on the card reader. It can be connected directly if a switch actor (instead of the internal contact) is used to control the door opener. Obj. 5: External Opening – Open/Close This object is used to initiate the opening of the binary contact in the card reader via a 1telegam to the KNX bus. The duration of the opening can be configured just as the opening with a valid card. Obj. 6: Disable Reader – Disabled/Enabled This object can be used to disable the reader via the KNX bus. A disabled reader remains inactive even if a card is valid. A permanently red LED on the reader indicates that it has been disabled. The reader is only active again once it has been enabled via a 0 telegram. P a g e 2 0 Revision: 2009-06-30 I P A S Subject to change without further notice G m b H © 2 0 0 9 I P A S Axesso – Access control and time management Obj. 7: Alarm – On/Off An alarm telegram (1-telegram) is sent via this object if an unauthorised removal of the reader from its mounting box is attempted (magnet switch). The alarm can be used, for example, to activate an alarm bell or switch on the main lights. Obj. 8: Switching – On/Off A switch telegram (depending on the chosen function) is sent via this object when the right-hand (or central) pushbutton is pressed. Obj. 9: Switching – On/Off A switch telegram (depending on the chosen function) is sent via this object when the lefthand pushbutton is pressed. Obj. 10: External Contact 1 – On/Off A switch telegram is sent via this object if a connected external contact is activated. Obj. 11: External Contact 2 – On/Off A switch telegram is sent via this object if a connected external contact is activated. Obj. 12: Auxiliary Power – On/Off A 1-telegram is sent via this object when the required auxiliary power (12V / 24V) is missing from the card reader. Once the power is connected again, the object is re-sent with value 0. Obj. 13: Additional LED – Scene This object is only available if a hotel card reader is used and the right parameter selection is set. The additional LEDs on the hotel card reader can the be controlled via this object. The individual object values have the following meaning: Value 0 Æ LED All Off Value 1 Æ LED Room Alarm Value 2 Æ LED Please clean up Value 3 Æ LED Do Not Disturb Obj. 14: Alarm LED – On/Off This object is only available if a hotel card reader is used and the right parameter selection is set. The object can be used to switch on or switch off the Alarm LED via a 1 Bit telegram. I P A S G m b H © 2 0 0 9 Subject to change without further notice S e i t e 2 1 Revision: 2009-06-30 I P A S Axesso – Access control and time management 2.4. Setting the communication parameters in the Axesso Software Once the readers have been configured and commissioned with ETS, the communication parameters as well as the rooms and card readers need to be set up in the Axesso Server Software. To do this, please start the installed software under the program start directory ComBridge Studio Suite Æ Axesso Software Axesso then automatically starts the Internet Explorer and if the installation has been successful, the log-in-screen appears: The first time, please log in as administrator by pressing the corresponding button. After the login the software automatically changes to the Access site. During the first login the start can take up to 30 seconds as the connected card programming device has to be initialised first. P a g e 2 2 Revision: 2009-06-30 I P A S Subject to change without further notice G m b H © 2 0 0 9 I P A S Axesso – Access control and time management To set the communication parameters, please change to the Setup view in the top bar. The group address and the gateway that are to be used for the communication need to be entered under “Data Listener Address“ in the following format: <Device Name Gateway>:<Group Address>. For the chosen example this would be: I P A S G m b H © 2 0 0 9 Subject to change without further notice S e i t e 2 3 Revision: 2009-06-30 I P A S Axesso – Access control and time management The device name of the gateway arises from the setting in the parameters of the KNXnet/IP gateway. The group address arises from the common group address for all objects number 0 in the connected readers. When displaying the group address, please choose the three-step display format. Use “/“ as a separator as usual. Do not insert any spaces between the Device Name, the “:“ character and the group address. After entering the Data Listener Address, please confirm your entry by pressing the Update Recordset button in the upper right-hand corner. The other fields on the Setup page should only be changed in exceptional circumstances and by an experienced user (for a description of the functions, please see below). In most cases no adjustments or settings are required. 2.5. Setting up rooms in the Axesso Software The next step is to set up the rooms in the software. Please change to the Rooms page to do so. The individual rooms that are to be part of the system need to be set up. For identification and classification purposes the five fields No. / Identifier / Building / Floor / Description are available for each room. Please create all required rooms through entries in the appropriate fields and confirm your entries by pressing the Update Recordset button P a g e 2 4 Revision: 2009-06-30 I P A S Subject to change without further notice G m b H © 2 0 0 9 . I P A S Axesso – Access control and time management For example: 2.6. Setting up readers in the Axesso Software Once all the required rooms have been created, you can set up the card readers in the software, which will be used to access the rooms. For this purpose please change to the Devices page. To set up the readers, please choose on the left hand side the room that is to be assigned to the reader. Afterwards set the function, the physical address and the group address (incl. Gateway Device Name) and confirm your entries by pressing the Update Recordset button . Please remember that physical addresses are entered in the usual format BB.LL.TT without spaces. The group address entry refers to the control object (Nr. 1) of I P A S G m b H © 2 0 0 9 Subject to change without further notice S e i t e 2 5 Revision: 2009-06-30 I P A S Axesso – Access control and time management each reader. The syntax is analogue to the Data Listener Address with the device name of the KNXnet/IP gateway that is used for the communication at the front: <Device Name Gateway>:<Group Address> For example: For the Function setting you can choose between Internal, Outgoing or Incoming. For standard access applications, please always choose Internal. Only choose the settings Incoming and Outgoing when the readers are also to be used for time recording (see chapter 2.7). When assigning the readers, please remember that several readers can be assigned to one room (several entries). When access to the room is enabled for a user, the AccessCodes are automatically programmed onto all readers in the room. The following example shows a usual Device page: After the communication parameters have been set, the rooms created and the card readers set up, the Axesso System is operational. P a g e 2 6 Revision: 2009-06-30 I P A S Subject to change without further notice G m b H © 2 0 0 9 I P A S Axesso – Access control and time management 2.7. Setting up readers for time management If the Axesso system is to be used as a time management system, please remember that always at least two readers are required for the recording of time. Coming in and going out are always recorded via separate devices. The incoming reader(s) are usually set up outside the main entry (or possibly additional side entries). These devices can then also be used to open the respective entry. The outgoing reader(s) are usually mounted inside and only serve the purpose of time recording. Only occasionally (e.g. when turnstiles or exit barriers are used) these readers are also used to perform an opening function. The Axesso Server software makes it possible to calculate the time between coming in and going out. The time recording starts when the incoming reader is first activated and it stops upon going out. Please remember to set up all readers with an incoming or outgoing function as Incoming or Outgoing in the Axesso software. The readers are set on the Devices page of the Axesso Software. All readers that are set as incoming or outgoing are marked with an “I“ or “O“ in the list of devices. I P A S G m b H © 2 0 0 9 Subject to change without further notice S e i t e 2 7 Revision: 2009-06-30 I P A S Axesso – Access control and time management 2.8. Anti-passback function of the Axesso System If the system is used for the main entries of larger buildings or premises, it makes sense to activate the anti-passback function of the readers at the entries and exits. In this case the card can only be used for one entry. After the incoming reader has been activated , the card is blocked for further entries. Only once the exit reader has been passed, the card is ready for the next entry. This function is used particularly in combination with turnstiles or similar entry systems. It ensures that a card is not used by several people by passing it across the turnstile. Of course the anti-passback function can only be used sensibly when both incoming and outgoing readers are installed. Whether a reder is used for entry or exit is determined through the device’s ETS parameters. Attention: The setting Incoming- Outgoing-Reader in the ETS Parameters always activates the anti-passback function and bears no relation to the incoming and outgoing function of the time recording. The time recording has to be set in the Axesso Software (see chapter 2.7). Incoming and outgoing functions for time recording are also possible without activating the anti-passback function. Vice versa it is also possible to use only antipassback without time recording. 2.9. Using the Axesso Software from additional operator stations The web-based concept of the Axesso software makes it possible to operate the software from additional operator stations. This way the Axesso Server with the sensitive card P a g e 2 8 Revision: 2009-06-30 I P A S Subject to change without further notice G m b H © 2 0 0 9 I P A S Axesso – Access control and time management holder information can be installed for example in a safe server room whilst the operator stations used to generate the cards or to administer and generate reports can be set up locally for the respective service or administration employees. The operator stations require no specific software (other than possibly device drivers for the connected programming devices) as they directly access the Axesso pages via the standard Internet Explorer and the IP network. If the Axesso Software is installed and commissioned on the server, Internet Explorer has to be started on the computers that are connected to the network. The Axesso Server is accessed via the server’s IP address. For this purpose, the server’s IP address followed by the port number 31000 has to be entered in Internet Explorer in the following format: http://<IP>:31000/ , for example http://192.168.11.177:31000/ . Once the entry has been confirmed , the Axesso application starts on the browser. Attention: In addition to the TCP-Port: 31000 (for HTTP communication) the application also uses TCP-Port: 3013 (for internal communication). Please make sure that both ports are cleared on the network and not blocked by a firewall. Please do clarify this with the system administrator. To make it easier for the user, the web access can, of course, also be set up directly on the desktop. To create the link from Internet Explorer use the function File Æ Send Æ Link to the Desktop. I P A S G m b H © 2 0 0 9 Subject to change without further notice S e i t e 2 9 Revision: 2009-06-30 I P A S Axesso – Access control and time management If the external operator station is also to be used to generate cards, the right programming device (Chipcard or Transponder Card) needs to be connected. As the programming device requires drivers that are not part of the standard Windows system, the Axesso Driver Setup needs to be installed on the operator’s PC. To do this, please start the file Driver_Setup on the provided installation CD. The installation program will guide you through the installation process. P a g e 3 0 Revision: 2009-06-30 I P A S Subject to change without further notice G m b H © 2 0 0 9 I P A S Axesso – Access control and time management 3. Operation and function of the Axesso Server Software The Axesso software is the central component within the Axesso access control and time management system. The software fulfils the following tasks which are described in detail in the next chapters: • Setting up and administering users and generators of access cards • Communication with connected readers, downloading access codes • Activating scenes assigned to card holders • Overview of access data and alarms as well as generating reports For the system administrator there are further requirements that are covered by the software: • Commissioning the system, setting up rooms and readers • Creating scenes • Database maintenance and administration The Axesso software is realised completely as a browser application. The software is loaded from Internet Explorer via the server’s IP address http://<IP>:31000/ or a link that has been set up by the system administrator. After the start the software’s login screen appears in the browser window. Depending on your access rights you can now log in as Administrator, Report Manager or Receptionist (possibly other project-specific users have been created). I P A S G m b H © 2 0 0 9 Subject to change without further notice S e i t e 3 1 Revision: 2009-06-30 I P A S Axesso – Access control and time management 3.1. Setting up new card holders and generating access cards When logging in as Receptionist or Administrator you have the possibility to set up new card holders, to change card holder details and to generate or cancel cards. After the login (potentially after entering a password set up by the Administrator), the software starts the Access page. The first time the page is loaded, the connected programming device is initialised first. Please wait till the request Please insert card appears in the upper part. The initialisation process can take around 30 seconds. The programming device is now operational. If you would like to create a card holder and an access card, insert an empty card into the programming device first (chip cards) or place it onto the device’s contact surface (transponder cards). The software checks whether the card is empty. Should the card have been programmed already, the card holder’s details are displayed on the Access Screen. If it is a new or cancelled card, no entries appear under the card holder’s details and the request Please insert card changes to ACCESS CONTROL. You can now enter details in the entry fields under the categories -Personnel Data- and Contact-. The entries for First Name and Last Name are compulsory. All other entries are optional and can remain empty. A cardholder photo can also be assigned via the symbol and the Search function. A fully completed entry is shown in the following example: P a g e 3 2 Revision: 2009-06-30 I P A S Subject to change without further notice G m b H © 2 0 0 9 I P A S Axesso – Access control and time management For classification purposes, the card holder can be allocated to a user group. The group allocation is done in the selection window above the -Personnel Data- field. Apart from the purpose of organisation and order, the group allocation also influences the system function. By default the following special functions are valid for individual card holder groups: Card holder group Anti-Passback Automatic Extra function deletion for hotel Use User Yes No No User group for general card holders with standard functions Employee Yes No No User group employees with standard functions Visitor Yes Yes No User group visitors with extra function semi-automatic deletion (s. Chapter 3.10) Guest Yes No Yes User group guests with extra functions, only in hotel readers Manager No No Yes User group Manager with extra function, no Anti-Passback Service Personnel Yes No Yes User group service personnel with extra functions, only in hotel readers Security Personnel No No Yes Cleaning Personnel Yes No Yes Maintenance Personnel No No Yes I P A S G m b H © 2 0 0 9 Subject to change without further notice User group security personnel with extra function, no Anti-Passback, extra functions in hotel readers User group cleaning personnel with extra functions in hotel readers User group maintenance personnel with extra function, no Anti-Passback, extra functions in hotel readers S e i t e 3 3 Revision: 2009-06-30 I P A S Axesso – Access control and time management Once the cardholder’s details have been entered and assigned to a user group, you can choose the rooms that are to be accessible. To choose the rooms, you can either click on the desired rooms in the AVAILABLE window or you can enter the room number directly in the Edit Room Number field. After a selection has been made, the selected rooms are listed in the ACCESS window. To complete the process of user group and room allocation, press the Update Recordsetbutton . The details are saved in the Axesso database. Each card holder is given a unique personnel ID for administration purposes. At the same time the Axesso software generates Software Access and CardID-Codes. The software writes the codes onto the card and programmes them onto the connected card readers. Whilst the readers are programmed, a dialogue box shows the status of the programming process. Once the programming process has been completed successfully, you can close the dialogue box. The access details are now saved both on the card and the card reader. The programmed card now allows access to the corresponding rooms. P a g e 3 4 Revision: 2009-06-30 I P A S Subject to change without further notice G m b H © 2 0 0 9 I P A S Axesso – Access control and time management To confirm that a card has been issued, you can print a receipt. Please press the Print Receipt button in the function bar on the Access page. The receipt can now be printed. 3.2. Setting up new users without access cards and search function for users The previous chapter focused on setting up card holders in order to directly issue the corresponding cards. However, it is also possible to only enter the user’s details and save them in the database. If a card then needs to be generated at a later point, you can search for the already entered user details via the search function and create the corresponding card. To set up the details, please create an empty entry sheet first by pressing the Clear Edit button . You can now enter the details, as described in chapter 3.1, without a card. Complete the data entry by pressing the Update Recordset button . To create an access card for a user who was set up earlier, place a new (empty) card onto the device and select the already existing user in the database. You can enter different search criteria in the SEARCH field (e.g. initial of the surname) and search via the SEARCH button . Select the desired user to create an access card. If you use the SEARCH function without entering any criteria or if you select the “%“symbol, a list comes up with all database entries. I P A S G m b H © 2 0 0 9 Subject to change without further notice S e i t e 3 5 Revision: 2009-06-30 I P A S Axesso – Access control and time management The entries are displayed in alphabetically ascending order according to surname. 3.3. Assigning card holder scenes An additional software function makes it possible to assign a specific scene to each card holder. Specific telegrams are sent via the KNX bus when the card is placed onto the device. These may, for example, create a certain light scene. The different scenes are set by the system administrator (see chapter 4.9). The allocation of scenes to a card holder, however, is done via a selection box in the Access window when the card is created. 3.4. Changing card holder details If you would like to change the details of a card holder or extend the card holder’s access rights (access to additional rooms), the changes can also be made on the Access screen. If you have the card holder’s card at hand, place it onto the connected programming device. The software recognises the card holder and displays the holder’s details on the screen. You can now directly make the changes (e.g. new phone number or address, P a g e 3 6 Revision: 2009-06-30 I P A S Subject to change without further notice G m b H © 2 0 0 9 I P A S Axesso – Access control and time management different access rights). Press the Update Recordset button to confirm the changes in the database. If the access rights have been modified, the card readers are also reprogrammed. A dialogue box with information about the status of the programming process appears. The dialogue box needs to be closed once the programming process has been completed. Data can also be modified without the existing card. You can search for and select the user whose details you would like to change via the software’s search function (see above). Once the details have been changed, press the Update Recordset button . 3.5. Cancelling access cards To cancel a card, place it onto the programming device. The card holder’s details are displayed on the Access screen. Pressing the Release User Access button removes the access codes from the readers and deletes the card content. The card now has no longer access to the rooms. The card holder’s details remain in the database and can be selected again in the future to issue a new card. Only the system administrator can remove the card holder’s details completely from the database (see chapter 4.2). Access details can also be deleted without placing the card onto the programming device. In this case, select the user via the search function and press the Release User Access button . In this case the card still exists and is not empty. It still contains the programmed access codes. However, as the codes have been removed from the readers, the card no longer has any access function. 3.6. Generating identical card copies for a user In some cases, a user may require several functionally identical cards. A second card can easily be created via the Reforce Cardwrite button . Once the first card has been created (see above), simply place another empty card onto the programming device. Use the search function to select the right user and press the Reforce Cardwrite button. This creates a second card identical to the first one. Please remember that when a card is cancelled, the copy also becomes invalid. I P A S G m b H © 2 0 0 9 Subject to change without further notice S e i t e 3 7 Revision: 2009-06-30 I P A S Axesso – Access control and time management 3.7. Axesso Software protocol function and activity report All successful processes in the system are stored in an activity report. To display the report you need to be logged in as Report Manager or Administrator. All activities that were performed with valid cards are listed in the bottom part of the page. The activities are sorted in chronologically descending order, i.e. the last activity of a valid card is shown at the top. Apart from the exact time of the access, the list also displays the first and surname of the card holder as well as some details of the card reader that was used for the access. This makes it possible to fully trace the usage of each room. The displayed list can be limited to certain users or time periods via the SEARCH function. The entire activity list can be exported into a Microsoft EXCEL table via the csv Export Activity Data button . As the system’s time management function is also administered via the time entries for each activity, the entries can be edited manually or deleted retrospectively. To edit or P a g e 3 8 Revision: 2009-06-30 I P A S Subject to change without further notice G m b H © 2 0 0 9 I P A S Axesso – Access control and time management delete an entry, click on the entry in the list to select it. The name of the selected entry appears in the top bar ACTIVITY EDIT. Press the Clear Edit button to remove the entry completely from the time recording. The word CANCELLED now appears behind the entry in the list. To subsequently edit any entry for time recording purposes, set the time and date in the ACTIVITY EDIT bar and press the Post New Time Record button . In this case the entries are marked with MANUAL. 3.8. Recording and calculating usage times As all activities of a card holder are marked with a time stamp it is possible to calculate the usage/working hours between activation of the incoming and outgoing readers and to accumulate them to a total working time. This Axesso Software time management function is displayed on the Report screen. The desired card holder can be selected via the search function. An observation period can be entered in the SELECT PERIOD field. I P A S G m b H © 2 0 0 9 Subject to change without further notice S e i t e 3 9 Revision: 2009-06-30 I P A S Axesso – Access control and time management In the table of working hours shown below the daily start and finish times as well as the daily working time and the working time accumulated in the observation period are displayed for an individual user. These details can be directly sent to a printer via the Print Table button . They can also be exported to an EXCEL csv file via the Export Data button . The EXCEL file can then be edited for further analysis. In addition to the detailed display of the recorded working hours for each user, it is also possible to display the accumulated times (without details) for all users on an overview page. This can also be sent directly to print or exported into an EXCEL csv file. To print, press the Print Summary button P a g e 4 0 Revision: 2009-06-30 . I P A S Subject to change without further notice G m b H © 2 0 0 9 I P A S Axesso – Access control and time management To create the EXCEL csv data, press the Export Summary button . 3.9. Protocolling unauthorised access attempts If a card holder attempts to access a room to which he has no authorisation, an alarm entry is generated in the alarm list. Unauthorised access attempts are protocolled with a time stamp, name and room data. I P A S G m b H © 2 0 0 9 Subject to change without further notice S e i t e 4 1 Revision: 2009-06-30 I P A S Axesso – Access control and time management 3.10. Semi-automatic deletion of card holder details (“Reminder function“) For data protection reasons it may be necessary to delete the details of some users after a certain time period. For this purpose the software offers a “reminder function“. This function reminds the operator of data which have been stored on the database for longer than the allowed storage period. By default this function only applies to card holders in the user group Visitor. The pre-set time period, after which a reminder is created, is 90 days. If the software recognises card holders in the Visitor group, who have been set up more than 90 days ago, a reminder window appears. This list can also be called up manually at any time via the Clean activities button on the software’s Activity page. The displayed list shows both the date the card was created and the date the card was last used. The list shows all “expired“ users in the Visitor group independent of whether the user still has a valid card or whether the card has already been cancelled. P a g e 4 2 Revision: 2009-06-30 I P A S Subject to change without further notice G m b H © 2 0 0 9 I P A S Axesso – Access control and time management The State symbol in front of the card holder’s name provides quick and easy information. The symbols have the following meaning: Card has already been cancelled Card exists and has been used today Card exists and was used yesterday Card exists and has not been used for two weeks Card exists and has never been used If the entries refer to users whose cards have already been cancelled (symbol ), the users can be manually selected by clicking on the selection box: Pressing the Remove selected items button removes all details that belong to the user (personal details and activities) from the database. If the “expired“ user still has a valid card, this needs to be cancelled first on the Access screen (see chapterl 3.5) before a selection is possible. The reminder function for automatic deletion is only meant to remind the operator. The details that are to be deleted need to be confirmed manually through the individual selection process. Please remember to comply at all times with country-specific data protection requirements. The software operator has to ensure that all legal requirements are met and needs to instruct the operating personnel accordingly. I P A S G m b H © 2 0 0 9 Subject to change without further notice S e i t e 4 3 Revision: 2009-06-30 I P A S Axesso – Access control and time management 4. Additional Axesso Software functions for the system administrator In addition to the functions for the Receptionist and Report manager, the software contains important functions for the system administrator. The functions for communication, room and reader set up, that are necessary for commissioning, were already explained in detail in chapters 2.4 to 2.6. The following chapters therefore only focus on the additional settings that are accessible to the system administrator. 4.1. Setting up additional operators and creating passwords By default the Axesso Software is installed for three operators: Administrator, Report Manager and Receptionist. The names and operator settings can be modified on the Adminstrator screen. Each operator can be allocated a password via the password field, which will have to be entered for future logins. The access can also be limited in terms of time via the Timeslot field. Other specific settings can be performed via the Access Level, Cardwriter Access and Start page. All changes need to be confirmed with the Update Recordset button. If additional operators are required, these can be added on the Administrator screen. To create a new operator, please generate an empty entry via the Edit new recordset button. Enter the name and additional settings for the operator in the ADMIN EDIT field and confirm your entries by pressing the Update Recordset button . The next time the system is started, the additional operator can log in. P a g e 4 4 Revision: 2009-06-30 I P A S Subject to change without further notice G m b H © 2 0 0 9 I P A S Axesso – Access control and time management 4.2. Removing users and activities from the database The system administrator has additional options via the Database page to remove card holders and activities. Via the first function, whole users with all corresponding activities can be selected and removed from the database. Attention: Using this function only removes the entries from the database. It does not make the corresponding card invalid. Please make sure that the card is cancelled first (see chapter 3.5). Especially in systems with many card holders, the number of entries in the activity report can become very large. To reduce the amount of data, activities up to a certain date can be deleted. To delete the activities use the second function on the Database page. 4.3. Data storage and backups As with all IT systems, it is strongly recommended to regularly create backups of card holder and access data and archive them. To create a backup of the Axesso database, use the Backup database button . The backup files are stored in the directory C:\Programme\IPAS GmbH\ComBridge Studio Web\AxessoWeb\backup\db axessodb<date><time>.fbk under the name . Please remember that all data (card holders and activities) is backed up. This particularly applies to data in the user group Visitor. Should the country-specific data protection laws only permit a temporary storage of user data, the software operator needs to ensure that the backup files are deleted accordingly. For security reasons the restoration of the database from the backup files cannot be performed on the Axesso Web surface. Please use File Explorer to create a copy of the required file (usually the one with the latest date) from the backup directory C:\Programme\IPAS GmbH\ComBridge Studio Web\AxessoWeb\backup\db. file as axessodb.fbk. Then change to the directory C:\Programme\IPAS Studio Web\AxessoWeb\bin Rename the copied GmbH\ComBridge and use a double click to start the file restore.bat. The current database is automatically replaced by the backup data. I P A S G m b H © 2 0 0 9 Subject to change without further notice S e i t e 4 5 Revision: 2009-06-30 I P A S Axesso – Access control and time management 4.4. Complete deletion of the database To create an empty database you can also use the restore and backup process described in chapter 4.3. In this case all you need to do before using the function restore.bat is to rename the file axessodb_empty.fbk as axessodb.fbk . 4.5. Database status information To obtain information about the current status of the database, press the Get Database on the Database screen. Info button 4.6. Setting the time period for semiautomatic deletion Chapter 3.10 focused on the “reminder function“ and the semi-automatic deletion of card holders and activities for the user group Visitor. By default the time period after which a reminder is generated is 90 days. Depending on a country’s or system operator‘s data protection requirements other time periods can be set. The period is set in the file _timax.cfg.php in the following directory: C:\Programme\IPAS GmbH\ComBridge Studio Web\AxessoWeb\_timax . To change the time period please open this file with the editor and change the following line, for example from 90 to 30 days: P a g e 4 6 Revision: 2009-06-30 $GUEST_EXPIRE_DAYS I P A S Subject to change without further notice = 90; G m b H © 2 0 0 9 I P A S Axesso – Access control and time management 4.7. Setting the display language Following the installation, the Axesso Software is displayed in English. Via the language selection button in the CBWebDev.config.php file in the directory C:\Programme\IPAS GmbH\ComBridge Studio Web\AxessoWeb\_custom the software can be changed to other languages. At present the following languages are available: • Englisch Æ Entry en • German Æ Entry de • Spanish Æ Entry es • Dutch Æ Entry nl Other languages are currently in preparation. To change the language, open the above file with the editor and modify the following entry: $CBWD_LANG = "en"; After this has been saved and the computer re-started, Axesso appears in the selected language. 4.8. Export and Import of card holder details via EXCEL files The advanced operator (system administrator) has the option to not only enter card holders on the entry mask of the Axesso Software but also to import users from an EXCEL list or to export user details. Import and export are performed via a file in the EXCEL csv format with the separator “;“. The export can be performed at any time from the software’s Access page via the Export User Data button . The user details can then be saved in a csv file or (if MS-EXCEL is available on the operator station) directly displayed. The EXCEL file shows the details from the database in the following format: I P A S G m b H © 2 0 0 9 Subject to change without further notice S e i t e 4 7 Revision: 2009-06-30 I P A S Axesso – Access control and time management Within the list you can now add or modify data or add new users at the end of the list. To assign users to the cards and codes, use the scarduser_id. This value must never be changed. Added users at the end of the list must not be given a scarduser_id. This entry must remain empty for new users. Once the list has been modified or extended the file has to be saved again as a csv file with separators. The user group is set via a number from 0 to 8 in the scardgroup in column Q. The following allocation applies: • USER 0 • EMPLOYEE 1 • VISITOR 2 • GUEST 3 • MANAGER 4 • SERVICE 5 • SECURITY 6 • CLEANING 7 • MAINTANANCE 8 The card holder details can be imported via the Import User Data button on the Database page. Attention: The import overwrites existing card holder details irrevocably. Therefore only use the function if you have thoroughly checked all data entered. We strongly recommend you create a security backup of the database before the import (see chapter 4.3). After pressing the button, the following window appears: You can now select the file, which you would like to import, in the Import window. If you select a csv file that contains all user details and which is to overwrite the current data in P a g e 4 8 Revision: 2009-06-30 I P A S Subject to change without further notice G m b H © 2 0 0 9 I P A S Axesso – Access control and time management the database, remove the flag in the Append rows box. It is also possible to only add data via the csv export. In this case please use an EXCEL file which only contains the header and new user details. The fields in the SCARDUSER_ID column must then remain empty. The software creates its own ID during the import. If you would like to import a csv file which only adds users, please make sure you tick the Append Rows box. Attention: During the import data is not double-checked. Please therefore make sure that all settings are correct before pressing the Next button. If the Append-Flag is set and a previously exported csv file is imported again, all entries are doubled as the data has been appended. Once all windows have been confirmed with next>> the following message appears. Press the O.K. button to complete the import. 4.8 Setting user scenes The software offers the opportunity to allocate a specific user scene to each card holder. When the card is placed on the device, the KNX bus sends specific telegrams, e.g. to set a light scenario. The scenes are assigned when the cards or card holders are set up (see chapter 3.3). Defining and creating the scenes requires knowledge of the connected KNX system and therefore has to be done by the system administrator. To create the scenes, first go to the Setup window and set up the group addresses of all objects that are to be used in the scenes. Create a new object by pressing the Add new scene object button . Enter the object name in the Label field (we recommend you use the same name as in the ETS.) Enter the group address and the gateway in the field EIB-Address. Use the already known syntax <Device Name Gateway>:<Group Address>. In the field EIS Type enter the object type according to the ETS (e.g. EIS1 for 1Bit and EIS6 for 1Byte). I P A S G m b H © 2 0 0 9 Subject to change without further notice S e i t e 4 9 Revision: 2009-06-30 I P A S Axesso – Access control and time management The data cannot be imported from the ETS. Confirm the objects entered by pressing the Update scene object button . Once all objects and group addresses have been set up, you can create the individual scenes on the Scenes screen. First set up the name of the scene via Add New Scene in the Scene Name field. Use the Add new scene part button to assign each scene objects from the object table created on the Setup screen. Use the Room Identifier to determine which reader is to activate the object. In addition to the compulsory entries object and object value, you can also set a time period in which the object is to be sent. If the room is accessed outside the selected time period, the object is not sent. All entries in the fields on the Scenes screen need to be confirmed by pressing the Update scene parts button P a g e 5 0 Revision: 2009-06-30 . I P A S Subject to change without further notice G m b H © 2 0 0 9 I P A S Axesso – Access control and time management If all scenes have been set up, they can be assigned to individual card holders when the cards are generated. Individual settings can hence be automatically performed as soon as the card reader is activated. Attention: The scene objects are directly created and sent from the Axesso Software. For the scene modus to function it is therefore necessary that the Axesso Server is in operation and that a network connection exists. I P A S G m b H © 2 0 0 9 Subject to change without further notice S e i t e 5 1 Revision: 2009-06-30 I P A S Axesso – Access control and time management 5. Appendix 5.1. Diagram for the connection of card readers The following diagram shows the connection of the card readers. The readers are connected via a bus connector (KNX) on the back and via a screw block with 8 terminals. 5.2. Frequent problems and their causes Problem: • The setup cannot be installed. Possible causes: • Your system does not meet the necessary system requirements (outdated operating system). Please use a permitted operating system: Windows 2000, Windows XP • An older version of the software is already installed on your PC. Please un-install the old version. P a g e 5 2 Revision: 2009-06-30 I P A S Subject to change without further notice G m b H © 2 0 0 9 I P A S Axesso – Access control and time management Problem: • After the program start no cards can be read or created. On the Access screen the message “Reader connect failed“ appears Possible causes: • The USB connection to the programming device is interrupted. Please check the connection and re-start Axesso. • The device drivers for the programming device were not installed correctly. Please install the drivers again. More to follow 5.3. Technical Support For all problems and questions that could not be solved through chapter 5.1, please contact the IPAS GmbH technical support at [email protected] . I P A S G m b H © 2 0 0 9 Subject to change without further notice S e i t e 5 3 Revision: 2009-06-30