1
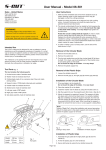
User Manual - Models 06-601 & 07-701
Sales - United States
User Instructions
Flynn and Me LLC
305 Dalehurst Dr.
Henderson, NV 89074
702-540-6631
[email protected]
www.s-cut.us.com
1. Make sure the immediate area is free from obstacles such as
hoses, electrical wires or other equipment which may get
damaged or affect the cutting procedure.
2. Make sure that the extendable knife (6) will automatically retract to
its safe position before cutting. Applies to Model 06-601 only.
3. Initiate the cutting procedure at an edge and cut with a pulling
action. A smooth, continuous cut should be made from the
patients head end and downward.
4. As an alternative method to section 3, extend the knife by pressing
at its rear end and then cut a slit in the material. Make sure that
the extendable knife (6) is automatically retracted before
proceeding with the normal cutting procedure.
Applies to Model 06-601 only.
WARNING!
The cutting edges of the circular blade and the
extendable knife (06-601 only) are very sharp and
must be handled with extreme care.
5. The circular cutting blade (3) can be rotated by first loosening the
knurled screw (1) approximately 1/4 turn. Do not touch the edge
of the blade while rotating - it is very sharp! Fully tighten the
knurled screw (1).
Never use the tool if you are uncertain of how it is
to be used. Store and use out of reach of children.
NOTE: For the version with the slitting function, loosen the knurled
nut (8) slightly before loosing the knurled screw (1) allowing the
blade to rotate. When finished, tighten the knurled nut (8) after
tightening the knurled screw.
Intended Use
The S-CUT cutting tool is designed for use on patients in rescue
situations as well as emergency procedures in hospitals. It is a fast
way to remove the patient’s clothes or other items to expose injuries
without needing to change the patient’s position which could inflict
further injury or unnecessary pain.
Rotate the circular cutting blade (3) regularly in order to make
sure the cutting edge will be sharp prior to the next cutting.
Replace the circular cutting blade (3) when excessive effort is
needed for cutting, if the blade gets damaged, or when it has been
rotated one full turn. The current replacement blades have sectors
clearly marked for ease of adjustment.
The material is cut by pulling the S-CUT and requires only a small
amount of force to cut the most common materials in clothes.
The cutting action is initiated at a fabric edge.
6. In order to initiate a cut at a heavy seam, use the area of the blade
shown in fig. 2.
For the S-CUT 06-601 equipped with the slitting function, the following may apply: Normally, the cutting would be initiated at the
edge of the garment but by using the extendable knife, a small slit
can be cut in order to reduce the need for an edge.
Removal of the Extendable Knife
1. Loosen the knurled nut (8).
Tool Parts
2. Remove the spring (7) and the extendable knife (6).
Do not touch the edge of the blade - it is very sharp!
(fig. 1)
The tool includes the following parts:
1) Knurled screw made of stainless steel
Removal of the Circular Blade
2) Washer made of anodized aluminum
3) Cutting blade made of low corrosion steel.
1. For Model 06-601; Begin by removing the extendable knife,
as described above.
4) Support made of POM plastic
2. Remove the knurled screw (1).
5) Handle made of anodized aluminum.
3. Remove the washer (2).
6) Extendable knife made of low corrosion steel (06-601)
4. Turn the tool upside down and let the circular blade (3) fall down
by itself. If it is stuck, use the threaded part of the knurled screw
(1) and press gently on the blade.
Do not touch the edge of the blade - it is very sharp!
7) Spring made of stainless steel (06-601)
8) Knurled nut made of anodized aluminum (06-601)
5. Remove the plastic support (4).
8 (only 06-601)
7 (only 06-601)
Installation of the Circular Blade
5
1. Fit a new blade in to the handle (5).
Do not touch the edge of the blade - it is very sharp!
2. Place the washer (2) on the blade.
3. Install the washer and the blade by using the knurled screw (1).
2
6
4. Slip the support (4) over the projecting arm (the hook). (fig. 3)
1
(only 06-601)
3
4
Weight: .170 kg
Length: 178 mm
Width:
24 mm
5. Mount the support by pressing it forward. The support will slide
into place and a click will be heard when it is correctly installed.
Tip: Use a tabletop to press the support. Example; Turn the tool
with the support tip against the tabletop and press the entire tool
downward until the click is heard. When mounting the support, a
tight fit is normal if the tool is new or a new support is being fitted.
6.0 oz.
7.0 in.
.94 in.
Note:
Always “Blade First” during the installation and removal procedure.
Mount the blade prior to the plastic support and remove the blade
before the plastic support is removed.
Fig. 1
Tool parts
Page 1(2)
User Manual - Models 06-601 & 07-701
Spare Parts
The circular cutting blade (3), plastic support (4), and the extendable
knife (6) are recommended spare parts. All other parts can be ordered
as replacement parts.
Parts information
Press
Fig. 2
Cutting a heavy seam
S-CUT complete tool assembly
with slitting knife
Fig. 3
Installation of Plastic Support
06601-06601
S-CUT complete tool assembly
without slitting knife
07701-07701
Handle
06601-07003
1 pcs
Installation of the Extendable Blade (Model 06-601)
Circular cutting blade
06501-06001
1 pcs
1. Fit the extendable knife (6) on the back side of the handle (5). Make
sure the guide pin is located in the knife’s guide slot (fig. 4.2).
Do not touch the edge of the blade - it is very sharp!
Washer
06501-06002
1 pcs
Knurled screw
06501-06008
1 pcs
Plastic support
06601-07014
1 pcs
2. Tighten the knurled nut (8), finger tight only. Make sure the extendable knife (6) can be moved up and down easily.
For product 06-601 the following parts will be added:
3. Install the spring (7) by fitting its small eye into the rear slot of the
extendable knife (fig. 4.1).
4. Pull and twist the large eye of the spring (7) in order to position it
between the knurled nut (8) and the knife (fig 4.2).
Extendable knife
06601-07020
1 pcs
Spring
06601-07021
1 pcs
Knurled nut
06601-07022
1 pcs
5. Press the knife forward and make sure it automatically retracts to
its safe position.
Recycling
4.1
The plastic support should be recycled as hard plastic. All anodized
parts, the handle and the washer and the knurled nut should be
recycled as aluminum. Glossy parts such as the circular cutting
blade, the extendable knife and the knurled screw should be
recycled as stainless steel.
4.2
Fig. 4
Spring Installation
Cleaning
Disassemble the complete tool.
Do not touch the edge of the blade - it is very sharp!
Clean all parts mechanically (i.e. by using a brush or similar method)
with a soap solution and water. Disinfect all parts with a 70% alcohol
solution and air dry. Make it a practice to replace the plastic support
regularly or when contaminated.
Repair
This product has no customer repairable parts.
Model 06-601 / 07-701
Maintenance
Make sure to inspect the tool on a regular basis for cleanliness and
damage. Prior to every use of the 06-601, make sure that the knife (6)
automatically retracts to its safe position.
Model 06-601 with slitting
function
Additional Information
CE-Marking
Manufacturer
This product is CE-marked according to the directive for medical
devices MDD93/42/EEC (LVFS 2003:11) class1.
ES Equipment AB
Medicinaregatan 8A
Sahlgrenska Science Park
SE-413 46 Gothenburg, Sweden
US Patent # 7624507.
Page 2(2)
ESEQ 09-0053 RA October 2009
Save this manual for future reference.