1
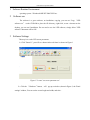
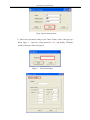
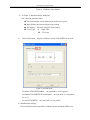
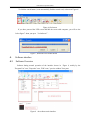
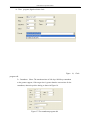
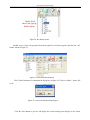
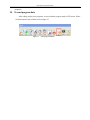
LED Software Operation Manual
LED Software Operation Manual
V3.2 and above Version
This manual is mainly targeted for LED systems integrators, manufacturers, end customers such
as LED editorial management
LED Software Operation Manual
Directory
1
Software Runtime Environment
2
Software use
3
Software Settings
4
Software interface
4.1
Software Overview
4.2
Preview Window
4.3
Attribute area
4.4
The main menu and toolbar
5
Program List
6
Programs type
7
Programs space
8
Preview
9
Program management
10
To send program data
11
Other features
LED Software Operation Manual
1 Software Runtime Environment
operating system:Windows98/ME/NT/2000/XP/Vista。
2
Software use
The software is a green software, no installation, copying, you can use! Copy “LED
software.exe” on the CD-ROM to place the file directory, right-click, create a shortcut on the
desktop, you can use! Installation. Do not need to use the LED software, simply delete "LED
software" document will be OK !
3
Software Settings
This step is to set the LED screen parameters.
1>: Click "Pannel 1" ,you will see a button in the red frame! as shown in Figure 1
Figure 1 To enter "set screen parameter set"
2>: Click the “Hardware”button,
will pop up a window ,shown in Figure 2, the "Panel
settings" window, You can set the screen length and width, and color .
LED Software Operation Manual
Figure 2 panel setting window
3>: Other screen parameter settings in the "More" button, click it, then pop up a
dialog figure 3 : input the setting password "168", and display "Hardware
Settings" dialog box shown in Figure 4.
Figure 3 : Password windows
LED Software Operation Manual
Figure 4
4>
Hardware Setup window
In Figure 4, "Hardware Setup" dialog box,
You can set the parameter blow:
u The screen height, screen width: Set the actual screen pixels.
u Data Polarity: the same as display screen setting.
u OE Polarity:
u Color Type:
the same as display screen setting
R : single color
RB: Two color
5>: Click "Scan" button,
display a window to set the LED SCREEN scan mode.
Figure 5 :Set scan mode
For indoor LED SCREEN indoor,
the scan mode is 1/16 in general
For outdoor LED SCREEN and semi-indoor,
the scan mode is 1/4 in general
4.1 or 4.3
For car LED SCREEN ,
the scan mode is 1/8 in general
6> communication settings
Devicewell LED control system have a function to auto search the LED screen.
LED Software Operation Manual
To click the search button ,it can automatically find the control card, as shown in Figure 6!
Figure 6, find screen
If you have powered the LED screen and link the screen with computer, you will see the
below figure 7 when you open “led software”.
Figure 7, Serach the LED control board
4.
Software interface
4.1
Software Overview
Software during normal operation of the interface shown in
Figure 8, mainly by the
"Program List" area, "Properties" area, "Edit" zone, "preview window" four parts.
Figure 8
the software main interface.
LED Software Operation Manual
4.2 Preview Window
LED software preview window is an important part of control software, which simulates the actual
display basically the same as display effect
Preview: program editing is completed in preview window shows the effect of a single observation.
4.3 Attribute area
Shows the basic parameters of the every program.. Property area as shown in Figure 9 by the way
animation, animation speed, stay time (Freeze), the border, belong to partition color components.
4.4
The main menu and toolbar:
Figure 8 shows
Figure 9, the main menu and toolbars
We may add five type progarm : Text program, RTF program, Clock program, Count
program, image program, by clicking the different program button ,in the red frame.
5
Program List
We can use the software to save the program and the panel parameter. Through the menu
"File "----" Save" or "Save As" to save settings and program edited to display information!
We can use the programs edit before , through the menu "File" - "Open" feature on the current
program to restore programes for example figure 10
Figure 10
5.1
File save.and restore
New Program List
Objective: To clear the old program of the current screen , and build a new program single data.
Methods and steps: Click on the menu bar "File" - "New."
LED Software Operation Manual
5.2
Export Program List
Objective: To export the current data of the edited screen to a single file (*. lcm).
Methods and steps:
1)
Click on the menu bar "File" - "Save As", "Save."
2)
In the pop-up "program for export to file" dialog box (Figure 11 below), choose to
export position, and enter the program name alone can be!
Figure 11, To save a program list file
5.3 Import Program
Objective: To import previously edited program list data
Methods and steps: Click on the menu bar "File" - "Import"
6
Programs type
We may add five type progarm : Text program, RTF program, Clock program, Count
program, Image program, by clicking the different program button ,in the red frame.
Program for the left side of the console, you can add the program types. There are seven
types: as shown in Figure 12.
Figure 12, Five program types
1> Text type, support the importation of Simplified, Traditional, English and
many other fonts. Text encoding
LED Software Operation Manual
Figure 13, TXT program edit
2>. RTF: Hypertext model, in the RTF program, every charater can be set for font and
body size, different color, and can be saved a separate program to maintain the hypertext
documents for later use. You can input any languages (such as Korean, Arabic, etc.)
that the Windows system supports.
Figure 14, RTF program edit
3>. Image program, support bmp, jpeg and other image formats.
Figure 15, Image program edit
LED Software Operation Manual
4>. Time program, digital real-time clock
Figure 16, Clock
program edit
5>. Countdown Show: The maximum time of 999 days..9999 days countdown
to the greatest support; if the target time is greater than the current time for the
countdown; otherwise positive timing, as shown in Figure 14:
Figure 17: The countdown program edit
LED Software Operation Manual
7 : Programs space
LED Control card save up to 80 different programs.
There is a indicator to display the left program space in the storage space on led card ,
see figure 18
figure 18, left program indicator
8
Preview
Program editing is complete, you can preview in the preview window by clicking the up or down
button show in Figure 19!
Figure 19, program preview
9
Program management
Method 1: In the console program for the left, select a program, click on the
menu bar "Edit"
Under the menu "Add", "delete", "Move Up" or "Move Down" button, or use
the quick button “del”to delete the program.
Method 2: Click on the corresponding tool on the toolbar button.
Method 3 (recommended): the direct use of right-click on the left side of the console
program for a program, drop-down menu in the pop-up can be achieved fast processing,
as shown in Figure 20.
LED Software Operation Manual
Figure 20, the shortcut menu
Another way to remove the programs from the program list ,click the program ,and click the “del”
button, shown in Figure 21.
Figure 21 Delete Information button
Click "Delete Information" button,then the dialog box in Figure 22. Click to "confirm " ,then it will
be ok.
Figure 22, remove the information dialog box
Click the down button to preview and display the current editing screen display of the various
LED Software Operation Manual
programs!
10 To send program data
After editing and preview programs, we need send the program send to LED screen. Please
click the button in the red frame such as figure 23.
figure 23
send program button