1
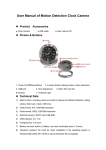
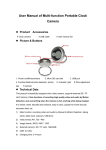
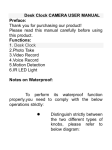
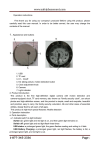
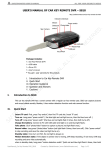
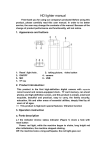
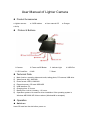
User Manual of Lighter Camera Product Accessories ● Lighter camera ● 2 USB cables ● User manual CD ● Charger ● A clip Picture & Buttons 1.Camera 2. Power on/Off Button 5. SD Card Slot 6. MIC 3. Indicate Light 4. USB Port 7. Reset Technical Data 1) 2) 3) 4) 5) 6) 7) 8) Main function: recording video and audio, taking photo, PC camera, USB drive Video format: AVI, 1280*960 Photo format: JPEG, 1280*960 External memory: SD card 2GB-8GB USB interface: 2.0 Charging time: 2-3 hours Battery time: built in Li-battery, 1~2 hours. Operation systems: No need for driver installation if the operating system is Windows ME/ 2000/ XP/ Vista or above (Windows98 is excepted) Operation Switch on Insert SD card into the slot before power on. Recording video and audio 1) Press Power on/ff button for some seconds, yellow and blue light turn on together, 2 seconds later, both of them turn off, it starts recording. 2) Press the button once, the light turns yellow, the device stop recording and store the data. It comes to video & photo standby mode again. At this time, press Power on/ff button for some seconds again, yellow light turns off, the camera start recording again. Attention: the camera saves video clips automatically every 3 minutes. Taking photo Under photo standby mode, press Power on/ff button once, yellow light flashes once then turns off, one photo is taken and saved. Switch off Under standby mode or video recording mode, press Power on/ff button for some seconds, the blue light flashes 2 times then turns off. Under any mode, insert the clip to the reset hole, the camera will power off. Attention: while recording mode, press the reset hole to power off, the video can not be saved. Reset Under incorrect operation or a certain reason, the camera may stop working, at this time, insert the clip into the reset hole to reset, then the camera is under power off mode. While resetting, just a little strength is enough. Play back video Under power off mode, connect USB cable with the camera first, then connect the USB cable with computer, there will be a moveable disk shown on computer, click the disk and playback the video. Attention: when there is no action with computer, reset the camera with the clip, then reconnect the camera with computer. PC camera Under power on mode, connect the camera with computer, install the PC camera software STK02N 2.0.exe in the manual CD, the PC camera will work. Charging If the device is of low electricity, yellow light and blue light flash two times together, then power off, the video file will be saved automatically before shutting down. 1) Connect the camera with computer, when charging, yellow light keeps on, yellow light and blue light turn on together when fully charged. 2) Connect the camera with charger, when green light of the charger keeps on, indicating it is being charged. When the yellow light turns off, it shows that the camera is fully charged. Attention: charging via charger is suggested. Set ting time When using the device for the first time, you can reset the time through the following way: 1) Connect the camera with computer 2) Create a new “ time.txt” file 3) Edit time as format: 2010.12.12 12:12:12 in the file 4) Copy the file to the root of the disk of the camera 5) When starting the camera again next time, the time will be simultaneous as the time file. Attention 1) When the device is lack of battery when taking video, the system will save the video data first, then shut down automatically. 2) Connecting computer: while connecting, do not do any operation, if the device cannot be recognized by computer, please check the computer system, driver, USB port, USB cable, then reconnect. 3) As the devise has built-in high-capacity polymer lithium battery, so it has a memory effect .We advise in the first 5 times of usage, charge the battery fully after the battery is out of use, so that the battery can work with its max working hours perfectly. 4) While resetting, just a little strength is enough.