1
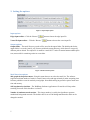
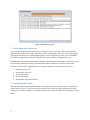
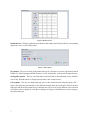
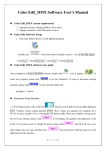
User Manual About this software ....................................................................................................................................... 2 Download and installation ............................................................................................................................ 2 Input graph features ...................................................................................................................................... 3 PC version ..................................................................................................................................................... 4 1- Installation and instructions .............................................................................................................. 4 2- Setting the options............................................................................................................................. 5 Input options ......................................................................................................................................... 5 Output options....................................................................................................................................... 5 Motif detection options ......................................................................................................................... 5 3- Performing motif discovery .............................................................................................................. 6 4- Visualizing the results ....................................................................................................................... 6 Cluster version .............................................................................................................................................. 8 Figure 1: Input graph format example .......................................................................................................... 3 Figure 2: The WaRSwapApp main layout .................................................................................................... 4 Figure 3: Input/output options ...................................................................................................................... 5 Figure 4: Motif detection options.................................................................................................................. 5 Figure 5: Motif discover progress ................................................................................................................. 6 Figure 6: Results browser ............................................................................................................................. 7 Figure 7: Filter options.................................................................................................................................. 7 1 About this software The WaRSwap Software Application (WaRSwapApp) is a network motif discovery tool for large multilayer biological networks. The WaRSwap Software Application is implemented in Java and is available in two versions. 1) A standalone PC version for MAC and desktop computers. 2) A Cluster version. Download and installation The software packages for desktop and cluster versions are available at: http://megraw.cgrb.oregonstate.edu/software/WaRSwapSoftwareApplication/index.html 2 Input graph features The input graph (network) is described in two files as follows: 1) Vertex file The vertex file is a tab delimited file that should contain one line for each node in the input network, each line must contain two items: one integer and one string. The integer represents the vertex/node label and the string represents the vertex/node type. The following node types are supported: TF - A transcription factor (TF) node may have a self-loop, and may target a microRNA node or a non-TF gene node. MIR - A miRNA node does not have a self-loop, and may target a TF node or a non-TF gene node. GENE- A non-TF gene node has no targets. 2) Edge file The edge file is a tab delimited file in which each line represents a directed edge by identifying the two connected vertex labels. For example the line: V1 V2 is interpreted as a directed edge from vertex V1 to vertex V2. To specify a bidirectional edge, add one edge in each direction. An example of an input graph with its corresponding vertex file and edge file representation is shown in Figure 1. 1 2 3 4 Graph 1 2 3 4 TF MIR GENE GENE Vertex file 1 1 1 1 2 2 1 2 3 4 3 4 Edge file Figure 1: Input graph format example 3 PC version In this section we introduce the user guide for the PC version of the WaRSwapApp. Figure 2 shows the main window of the WaRSwapApp. Figure 2: The WaRSwapApp main layout 1- Installation and instructions 1. Make sure you have Java jdk installed on your computer . 2. Download the software from http://megraw.cgrb.oregonstate.edu/software/WaRSwapSoftwareApplication/ 3. Extract the downloaded package to a destination folder. 4. Go into the directory in which you extracted the software and run the WaRSwap Software Application as follows: a. For windows: double click on jwarswap.jar b. For linux and mac: Open a command line terminal and type cd WaRSwapSoftwareApplication ./startApplication.sh 5. To test with the existing sample input graph, select the edge file and vertex file from the sample_inputs directory. 6. Change default options if desired, otherwise click on the "Start" button to run the program. 7. Wait while program is running. It may take a few minutes. 8. Find motif discovery output files in given location. 4 2- Setting the options Figure 3: Input/output options Input options Edges input toolbox - Click the “Browse” Vertex file input toolbox – Click the “Browse” button to choose the edge input file. button to choose the vertex input file. Output options Output folder – The motif discovery results will be saved in the output folder. The default path for the output folder is set to the “motifs_out” directory within the current directory, which the user can specify different path as desired. The output file is named as “motifs.OUT” and will contain human readable plain text, most useful for examining results in a text editor. Figure 4: Motif detection options Motif detection options Sub-graph size dropdown menu - Using this menu the user can select the motif size. The software supports an ultimate number of nodes in a motif, however beyond approximately 8 nodes computing time becomes prohibitive even for modestly sized graphs. Note that detecting large motifs requires much more time and memory. Self-loop detection checkbox – The WaRSwap Software Application will consider self-loops when searching for motifs if this checkbox is selected. Number of random networks textbox – This integer number is used by the algorithm to generate randomized background networks. The default value is set to 2500 background networks and it can be changed as needed. 5 Figure 5: Motif discover progress 3- Performing motif discovery If you selected all options described in the previous subsections, you are now ready to start detecting network motifs. Simply click on the “Start” button in the “running motif discovery” area of the program. The progress bar shows the overall algorithm progress. After motif discovery starts, a few intermediate files will be generated by the software. These files must not be deleted or changed by the user. Console area – The console window shows messages related to motif search progress. This includes any error messages produced by entering invalid options in the user interface, errors from a file format problem, or the step of the algorithm which is currently running. The following errors can occur: Invalid input edge file Invalid input vertex file Invalid vertex label Invalid output path Incompatible edge and vertex files 4- Visualizing the results When the motif discovery computation finishes successfully, then output motifs will be displayed in the results browser (Figure 2). The user can use the scoring filter options to select a different cut-off score stringency for results presentation. The output motifs can be saved in an HTML file by clicking on “Save” button. 6 Figure 6: Results browser Results browser– Displays graphical representation of the output motifs along with their corresponding significance scores (z-score and p-value). Figure 7: Filter options Save button – The user can click on this button and specify a file name to save the output motifs into an HTML file. The default output HTML file name is set to “motifs.html” in the specified output directory. Scoring filter options – The user can switch filters on and off (and set their threshold values), and then click on the “Refresh button” to display filtered results in the “results browser”. Color options – The user can change node type colors in the visualized results using this option. Selfloops in the motifs are represented by a color different from the three other node types. Each of the three node types and the self-loop node has a pre-defined color. The user can assign different colors if desired. Click on the color to change, the color chooser dialogue will pop up, and then select a color to assign to the related node type. 7 Cluster version Use the cluster version of the WaRSwap Software Application when the input network is very large (running the PC version of the software may take several days to finish). The cluster version is built on the DRMAA-Java library, and can be depolyed on gird engines including Oracle (Sun) Grid Engine and the GridWay framework which enables sharing of computing resources (clusters, servers, supercomputers, etc.) managed by different distributed resource management (DRM) systems such as Condor, Univa Grid Engine, and Son Grid Engine. 1. 2. 3. 4. Login into a cluster-head machine, which can submit jobs to other nodes in the cluster. Make sure that you have the "drmaa" library installed on your cluster (http://www.drmaa.org/). Download the cluster version of the software from the Downloads section. Extract the package and change the current directory to the extracted folder, and then type: cd WaRSwapSoftwareApplication/ 5. DRMAA settings: Ask your cluster admin about the location of libdrmaa.so and drmaa.jar files in the cluster. Open startApplication.sh file to change the DRMAA settings if needed: o Set the DRMAA_LIB_PATH variable in startApplication.sh to the directory in which libdrmaa.so is located (the default path points to: /local/cluster/sge/lib/lx24-amd64/) o Save changes in the startApplication.sh file. o (Optional) Copy drmaa.jar into WaRSwapSoftwareApplication/lib directory. (Note: do this step only if the current version of drmaa.jar located in WaRSwapSoftwareApplication/lib didn't work on your cluster) 6. Run the application : ./startApplication.sh [NETWORK_NAME] [EDGE_FILE] [VERTEX_FILE] [NO_OF_RAND_NETWORKS] [MOTIF_SIZE] [DETECT_SELF_LOOPS] * * * * * * NETWORK_NAME : an arbitrary string to name the input graph EDGE_FILE : a valid input edge file VERTEX_FILE : a valid input vertex file NO_OF_RAND_NETWORKS : the number of random networks (2500 is recommended) MOTIF_SIZE: an integer, default is 3 DETECT_SELF_LOOPS : TRUE or FALSE 7. The results are located in the “output” directory as follows: a. A text file named "NETWORK_NAME.motifs.out” which is a human readable text format file containing output motifs. b. An HTML file named “NETWORK_NAME.motifs.html” which is a graphical representation of output motifs (Use a web browser to open this file). * Note: load management on available cluster nodes - The DRMAA-Java application distributes jobs on available nodes which the user has access to. If being a good neighbor on your cluster requires you to limit node usage, you will need to run the program only on the appropriate queues (consult your cluster admin for the advised way to do this on your cluster). 8