1
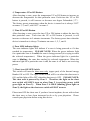
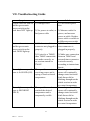
FIT504B Far Infrared Thermowrap Professional Body Slimming System Installation and User Manual Contents I. Foreword II. Working Principles III. Installation Instructions IV. System Control & Key Functions V. Operation Instruction VI. Cautions (please read carefully). VII. Troubleshooting Guide VIII. Technical Data 1 Rev 2. 7.27.11 I. Foreword Dear Customer, The fitTM Bodywrap device you have purchased is a technically advanced and powerful product. Your device was manufactured with the greatest care and precision. It went through numerous quality and safety checks in order to guarantee trouble-free, safe operation. This system adopts first-class technology to intelligently and accurately control temperature and time. The system implements ultra-low voltage (less than 36V) for added safety. Therefore, fitTM Bodywrap is the system of choice at beauty salons and weight loss facilities across Europe and America. Nonetheless, you can also make a significant contribution to your long-term satisfaction with your device. Following the tips and instructions in this manual will ensure consistent and trouble-free operation of your fitTM Bodywrap. • • • Read and observe the information in this manual. This will help you prevent misuse and ensure trouble-free operation. Always observe current legal and other regulations and legal requirements as well as the applicable environmental protection regulations. fitTM Bodywrap makes no therapeutic claims. Our product and the FIT504B system are not intended to diagnose, treat, cure, or prevent any disease or illness. Please consult your physician before using any deep heating treatment such as fitTM Bodywrap. Note: We reserve the right to make technical changes to the illustrations and specifications in this manual. Reprinting and reproduction, in whole or in part, of this manual is only permitted with our previous written approval and with the source specified. 2 Rev 2. 7.27.11 II. Working Principles fitTM Bodywrap is a dual-action system. The first action is caused by the far infrared heat of the fitTM Bodywrap. This heat does not make fat leave your body. Instead, the heat from a fitTM Bodywrap actually breaks stored fat down and converts it into fatty acids that are used by your muscles for energy. As the fitTM Bodywrap heats your body, you begin to sweat to cool down. This sweat is fueled by the energy from the converted fatty acids. The second action is caused by the proprietary fitBooster solution that you use before you start your wrap. This special spray creates a barrier on your skin so that your body has to work harder than it normally would (meaning you will burn even more calories) to produce sweat. fitBooster™ contains a complex of plant derived active ingredients to help decrease the accumulation of new lipids, and at the same time help stimulate the breakdown of lipids in the adipocytes. It offers body contouring, slimming and anti-cellulite properties. fitBooster also contains a topical diuretic to help with cellulite reduction and detoxification. When applied topically, it dehydrates the treated area and promotes loss of water, which carries waste and toxins along with it. After repeated use, the area also becomes smaller because of the loss of water. This decrease is only temporary when use is discontinued; any water we ingest is reabsorbed into the area. Repeated fit Bodywrap sessions will continue flushing waste and toxins out of the body, promoting continual detoxification. fitBooster was designed to work with the fitCoat that you wear during your body wrap. This coat was specifically engineered to create yet another barrier and enhances the effects of both the fitBooster and the far infrared heat from the fit Bodywrap, and also to contain the majority of the sweat generated during a session. Most people don't sweat enough. Sweat not only cools your body, but it acts as a garbage collector. Antiperspirants, artificial environments, smog, synthetic clothing, and a relatively idle physical lifestyle all conspire to clog skin pores and inhibit the healthy flow of sweat. But these detrimental effects can be reversed by sweating! When you're hot, as you would be in a sauna, heat-sensitive nerve endings produce acetylcholine, a chemical that tells the 2.3 million sweat glands 3 Rev 2. 7.27.11 embedded in your skin to react. During a 15-minute sauna, your body can produce as much as 2 pints of sweat. Most active people have a normal sweat rate for an entire day of about 1 or 2 pints. During a fitTM Bodywrap you'll actually sweat more than being in a sauna for 15 minutes. Sweating is good for you. Relaxing in a fitTM Bodywrap could be the most vigorous activity you've had all day! The heat produces a comfortable sweat, and every organ of your body jumps into action. While you look and feel relaxed, your inner organs are as active as though you were jogging. At the same time, your body is being cleansed from the inside out by your skin, which is busy sweating to get rid of all that waste. Ninety-nine percent of what sweat leaves on the surface of your skin is water. The remaining one percent is that undesirable waste. Sweating is such an effective detoxifier that that it even draws out lactic acid which causes stiff muscles and contributes to general fatigue. Your sweat also flushes out toxic metals such as copper, lead, zinc, and mercury, which your body absorbs in polluted environments. Sweating can remove the daily build up of heavy metals from your body that would normally take your kidneys as much as 24 hours to eliminate. 4 Rev 2. 7.27.11 III. Installation Instructions 1. Place the larger plate onto a horizontal surface with the 16 small holes facing up. 2. Fix the roller cart wheels onto the larger plate using the small screws provided. 3. Turn the larger plate over onto its wheels, and insert the large steel bracket into the two large holes as shown. 4. Turn the larger plate over again and fix the large bracket onto the larger plate with the 2 washers and 2 wing-nuts provided. 5. Place the smaller plate onto the bracket, and fasten them together with the 4 screws provided. 6. Turn over the completed roller cart with the wheels facing the ground. 5 Rev 2. 7.27.11 7. Align the bottom 3 holes of the device with the 3 screws on the smaller plate. Now slide the device forward gently to lock it in place. Note: If desired, the device can also be wall mounted within the customer’s reach. To do so, securely mount the smaller plate onto the wall (make sure you anchor into a wall stud), and attach the device onto the smaller plate as instructed in step 7. Attaching the device to a T-Max® 3A or similar external timer: Caution: This must be performed by a licensed electrician only The FIT504B is set at the factory to operate as a stand-alone unit (without the need of a separate timer). Optionally, you may wish to operate the FIT504B through an external timer system, such as the T-Max® 3A. This can be accomplished as follows. Note: For safety, please make sure to follow electrical code pertaining to the country/city where the FIT504B is to be operated. Please make sure your external timer and cables are rated to handle the electrical voltage, power, and current requirements of the FIT504B. Step 1 Unplug the fit external timer connector (bypass) from the back of the FIT504B device, and remove the screw at the top. 6 Rev 2. 7.27.11 Step 2 Loosen the screws holding the jumper wire, and remove the jumper wire. Step 3 Now connect the external timer’s designated relay (this would be connector J3 on the TMAX board) to the connector as shown in the illustration below. 7 Rev 2. 7.27.11 IV. System Control & Key Functions FIT504B Control Panel Control switch of chest area of the thermal energy blanket 闭开关 1). Power LED: Turn on the power switch located on the back of the device. The power indicator light on the panel will illuminate. The device will be powered, but the session will not start yet (the blanket will not be powered). 2) ON/OFF Button: Press this button to initiate the session (pressing it again will end the session). The session will always start at the factory preset temperature and time values, and may be adjusted afterwards. 3). Zone Selection Button: Press this button to choose the zone you would like to adjust. Repeatedly pressing this button will allow you to toggle between the 4 available zones. ①→②→③→④→① 8 Rev 2. 7.27.11 4) Temperature UP or DN Button: After choosing a zone, press the temperature UP or DN button to increase or decrease the temperature for that particular zone. Each time the UP or DN button is pressed, it will increase or decrease one degree Fahrenheit (1℉). The factory preset temperature when the device is turned on is always 120℉ on zones 1, 2, and 3, and 110℉ on zone 4. 5) Time UP or DN Button: After choosing a zone, press the time UP or DN button to adjust the time for that particular zone. Each time the UP or DN button is pressed, it will increase or decrease in 5 minutes increments. The factory preset time when the device is turned on is always 70 minutes on zones 1, 2, 3, and 4. 6) Zone LED indicator lights: The zone indicator lights will indicate if a zone is being powered or if it has reached its temperature. PLEASE NOTE: When the green indicator light for a particular zone is lit solid, the zone is being powered (it is trying to reach the selected temperature). When the green indicator light for a particular zone is blinking, the zone has reached its selected temperature. When the indicator light for a particular zone is off, the zone is off and is not receiving power. 7) Chest Area ON/OFF Switch: This switch will turn the chest area only (upper part) of the thermal energy blanket ON or OFF. The light on the switch will be on when the chest area is ON, and the light will be OFF when the chest area is OFF. PLEASE NOTE: The chest area is powered by Zone 2. Therefore, the light on the chest area switch will ONLY turn on when Zone 2 is receiving power (solid green light on Zone 2). When Zone 2 is IDLE (blinking green light on Zone 2), the light on the chest area switch will NOT turn on. Please turn OFF the chest area if you have breast implants, do not wish to heat the chest area, or have been instructed to do so by your physician. Please consult your physician before using this device. 9 Rev 2. 7.27.11 V. Operation Instruction 1. Insert the plugs on the blanket cables into the sockets on the front of the device. The arm sleeves cable corresponds to zone 1, while the blanket’s zone 2, 3, and 4 correspond to zone 2, 3, and 4 on the device. To avoid damage, please make sure that the groove on the plug aligns with the socket groove, then gently push the plug into the socket to connect and gently fasten the connector screw. Do NOT over-tighten the connector screw, or damage may result. 2. Connect the power cable to the socket on the back of the device, and plug into a standard 110V AC electrical outlet. Turn on the main power switch on the back of the device. The power indicator light will illuminate. 3. Press the ON/OFF button to turn on the system. The digital displays on the control panel will show the default working time and temperature for all the zones. All four zones will turn on at the same time at the default factory settings. 4) Chest Area ON/OFF Switch. Please turn OFF the chest area using the chest area switch: if you have breast implants, if you do not wish to heat the chest area, or if you have been instructed to do so by your physician. Please consult your physician before using this device. 5. Hour Meter: There is a six digit hour meter on the back of the device to measure the total hours the device has been used for. The hour meter will ONLY count when a session is in effect. If the device is powered, but a session has not been started using the ON/OFF button on the control panel, then the hour meter will not count. 10 Rev 2. 7.27.11 fitTM Session Procedure: BEFORE a) Turn on the fit™ system to pre-heat. b) Drink a bottle of water at room temperature, at least 16 oz. c) Disrobe completely and remove all jewelry. d) Apply fitBooster solution all over body, paying particular attention to the problem areas. e) Put on the fitCoat. This is specifically designed to amplify results. f) This process should take approximately five minutes. DURING g) Lay down into the fit™ blanket and pull it over to cover body. If you have breast implants, turn off chest area using the switch on the blanket. h) Put on the heated arm sleeves. i) If needed, some time into the session, you may adjust the temperature up or down to generate a comfortable sweat. Adjust the temperature by selecting the appropriate zone and then pressing the temperature up/down arrows. j) Drink water as needed. k) Your session may be up to 1 hour long. AFTER l) The fit™ system turns off automatically. m) Undo the fit™ blanket and arm sleeves. n) Remove and dispose of the fit™ body cover, and towel off using the towel provided. o) Drink another bottle of water at room temperature, at least 16 oz. p) Schedule your next appointment. 11 Rev 2. 7.27.11 VI. Cautions (please read carefully). Pregnant women and people under the age of eighteen should NOT use this device! • • • • • • • • • • • • Do NOT power the device without first plugging in ALL 4 blanket cables into their corresponding sockets. When the device is not in use, please turn off the power switch at the back of the device. To avoid electric shock, do not operate this device in damp environments or near water. All cables should be kept away from the heating blanket during use. If any of the cables or connectors show any damage, please discontinue use immediately. Do not pull on the cables. Clean the inside of the blanket and arm sleeves after every session to keep it clean and to protect the inner surface of the blanket and sleeves. Do NOT place the arm sleeves inside or tucked under the blanket during operation. Doing so will overheat and damage the arm sleeves and/or blanket, and void their warranty. Do not open or disassemble the device, the blanket, or the arm sleeves. Doing so will immediately void the product’s warranty. Device, blanket, and arm sleeves do not contain any user serviceable parts. Maintenance can only be performed by the manufacturer or an authorized agent. fitTM Bodywrap makes no therapeutic claims. Our product and the FIT504B system are not intended to diagnose, treat, cure, or prevent any disease or illness. Please consult your physician before using any deep heating treatment such as fitTM Bodywrap. Those who suffer from health conditions, illness or disease, please consult your personal physician before using this device. In case you feel unwell, dizzy, or tired during the session, please stop using immediately and consult a physician. Always observe current legal and other regulations and legal requirements as well as the applicable environmental protection regulations. 12 Rev 2. 7.27.11 VII. Troubleshooting Guide Symptom Cause System does not turn on, 1) Damaged fuse and the green main power switch on the back does NOT light up. 2) No power at outlet, or bad power cable Solution 1) Check and replace fuse 2) Measure outlet for power, and measure power at cable. Replace power cable or switch to a different power outlet System does not turn on, 1) Black external timer 1) Make sure external and the green main connector not plugged in timer connector is power switch on the properly plugged in properly. back DOES light up. 2) If wired to a TMAX, 2) Make sure connection then TMAX connection between TMAX and not made correctly, or external timer connector no session started on is wired correctly TMAX according to instructions herein Green light on a specific That specific zone is Normal operation. All zone is lit SOLID (ON) receiving power and is zones will continually trying to reach selected change states back and temperature forth from solid to blinking throughout the whole session in order to control temperature Green light on a specific That specific zone has Normal operation. All zone is BLINKING reached the desired zones will continually (IDLE) temperature and is change states back and temporarily on idle. forth from solid to blinking throughout the whole session in order to control temperature 13 Rev 2. 7.27.11 Green light on a specific zone is OFF 1) That specific zone is disconnected from the blanket or arm sleeves 1) Connect blanket or arm sleeves to that zone, and recycle power to the system 2) Damage has occurred to that specific zone in the blanket or arm sleeves 2) Replace blanket or arm sleeves 3) Damage has occurred to that specific zone in the main controller 3) Send the main controller to manufacturer for repair, or replace the main controller Chest area is powered by Zone 2. Therefore, the chest area switch light will not turn on while Zone 2 is idle (blinking) or off. Please wait until Zone 2 returns to an ON state (solid green light) Consider replacing blanket and/or arm sleeves soon, if discoloration becomes excessive. Chest area switch light NOT turning on Zone 2 is idle (blinking) or off Blanket and/or arm sleeve inner lining is discolored * Normal operation. Blanket and/or arm sleeves are showing signs of wear and tear, and may be reaching the end of their useful lifetime if discoloration becomes excessive * Discoloration of the blanket and arm sleeve lining after heavy use and continuous heating/cooling is normal, and not necessarily a sign of malfunction. The blanket and arm sleeves are considered wear and tear items, and their lining will begin to age after heavy use and continuous 14 Rev 2. 7.27.11 exposure to heat/cold cycles. Slight discoloration is merely cosmetic, and should not affect the performance of a session. Please visit http://www.fitbodywrap.com for warranty information. 15 Rev 2. 7.27.11 VIII. Technical Data Model: FIT504B Input Voltage: 100-120V AC/60HZ 5A Output Voltage: DC 36V/16.6A Input Power: 500W(max) Temperature Setting: 85℉-130℉ Time Setting: 5-95 minutes Zones: 4 independently adjustable zones 16 Rev 2. 7.27.11