1
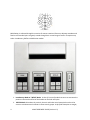
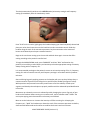
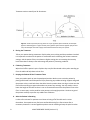
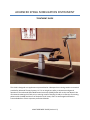
ADVANCED SPINAL MOBILIZATION INSTRUMENT TREATMENT GUIDE This Guide is designed as a supplement to personalized or videotaped user training sessions or materials provided by Advanced Therapy Systems, LLC. For an insight into safety, maintenance and general operation of the Advanced Spinal Mobilization Instrument (ASMI) please refer to the User Manual. We recommend reviewing this Guide prior to training as well as keeping it handy as a reference for treating patients with the ASMI and the use of the device. At all times, Users are encouraged to follow the Practice Guidelines of their respective professional boards. 1 ASMI TREATMENT GUIDE (Version 1.2) Table of Contents INTRODUCTION ........................................................................................................................................ 3 EQUIPMENT ............................................................................................................................................... 3 1. The Treatment Table ..................................................................................................................... 3 2. The Handset and Console ............................................................................................................ 3 1. Introductory Mode........................................................................................................................ 4 2. REFLEX Mode ................................................................................................................................ 4 3. MOBILIZATION Mode .................................................................................................................... 5 TREATMENT GUIDELINES ..................................................................................................................... 5 1. Preparing the Patient ..................................................................................................................... 5 Instructions to the Patient.................................................................................................................. 5 Patient's Self-Observation................................................................................................................. 5 Helping the Patient onto the Treatment Table ............................................................................... 6 2. Console Positioning ....................................................................................................................... 6 3. Palpating the Spine and Starting Treatment .............................................................................. 6 4. Performing the Treatment ............................................................................................................. 6 5. During the Treatment ..................................................................................................................... 8 6. Following Treatment ...................................................................................................................... 8 7. Helping the Patient Off the Treatment Table ............................................................................. 8 8. After the Patient is Standing ......................................................................................................... 8 HELPFUL TIPS......................................................................................................................................... 10 2 ASMI TREATMENT GUIDE (Version 1.2) INTRODUCTION For years, physical therapists have incorporated manual spinal mobilization (similar to Maitland theory and technique) as an integral part of their treatment and a means to improve the functional elasticity and mobility of the spinal vertebral joints. As many experienced manual therapists are aware, performing spinal mobilization can have a crippling effect upon the hands, fingers and wrists. The Advanced Spinal Mobilization Instrument and specialized treatment table were developed with the objective of providing Physical Therapists a more effective means to administer spinal mobilization. It is the first technology or power assisted device enabling therapists or other licensed health care professionals to: Perform targeted spinal mobilization to each segmental or vertebral pair level. Do repetitive consistent mobilization without injury to the hands and thumbs. Target the transverse processes of adjacent vertebral pairs. Treat the entire spine. EQUIPMENT 1. The Treatment Table Treatments are performed with patients lying prone on a specially designed and patented treatment table that places the patient in the optimal position for spinal mobilization. The table's convex shape opens the facets of the thoracic vertebral joints and the angle of the table and the weight of the legs provide gentle passive traction to the lumbar spine. In addition, the table is designed to provide for the comfort of both the patient and the treating therapist. Unlike other treatment tables, patient's find they are in a more natural and comfortable position of relaxation. There is minimal spinal joint compression, their arms rest comfortably in a natural and neutral position and the tapered shape allows the therapist to get closer and right over the spine. The unique and freely moving leaf-spring facemask acts to protect and support the cervical area during thoracic mobilization. 2. The Handset and Console The ASMI handset, connected to the console (figure 1), consists of four pneumatic pistons which moves in three user selected modes, each with its own frequency and intensity setting. Similar to the movements achieved with manual therapy, gentle, alternating, pressure is applied over diagonally opposed "transverse processes" of adjacent vertebral pairs (as demonstrated in "A" and "8" below). The handset automatically alternates between pairs of vertebrae as the therapist treats the spine. 3 ASMI TREATMENT GUIDE (Version 1.2) Mobilization is achieved through the exertion of counter-rotational forces on adjacent vertebrae and fixed or stiff vertebral pairs are gently moved through their normal range of motion. Therapists may select: Introductory, Reflex or Mobilization modes. 1. Introductory Mode or "INTRO" Mode: A short (15 second) mode that serves to accustom the patient to the touch and feel of the handset on the back and spine. 2. REFLEX Mode: Stimulates the cervical, thoracic and lumbo-sacral paraspinal muscles. Also serves to stimulate stretch reflexes in these muscle groups. As physical therapists are taught, 4 ASMI TREATMENT GUIDE (Version 1.2) the para-spinal reflexes enable protective responses at each vertebral level and assist the spine in the countless, constant adjustments necessary for balance and good posture. 3. MOBILIZATION Mode: As taught by Geoffrey Maitland, the father of modern mobilization theory, mobilization restores flexibility and mobility to individual vertebral joints or segments, in turn restoring function, the goal of all physical therapy. The counter-rotated forces generated with the use of the handset break fibrous adhesions. In addition, the gentle passive movements increase synovial fluid circulation and help lubricate joint surfaces. TREATMENT GUIDELINES NOTE: AS WITH ALL SPINAL MOBILIZATION THERAPY, A COMPLETE AND THOROUGH EVALUATION SHOULD BE PREFORMED PRIOR TO INITIATING TREATMENT WITH THE ADVANCED SPINAL MOBILIZATION INSTRUMENT. 1. Preparing the Patient Instructions to the Patient Explain to the patient the therapist uses the device to perform a non-invasive treatment and then perform a brief demonstration of how the device works. In addition, communicate to the patient that during and/or following treatment many patients experience mild discomfort or tenderness in their problem areas. Place the handset on the patient's relaxed palm, turn on the device and cycle through the modes. Demonstrate each and allow the patient to feel the piston movements. Explain the following: INTRO MODE: The fastest mode, explain to the patient this will accustom them to the feel of the device. REFLEX MODE: Describe that this mode is similar to a patella hammer eliciting a kneejerk reaction. Explain that this mode feels like consistent tapping on the muscles that run alongside the spine. MOBILIZATION MODE: Reset the settings to demonstrate the mobilization mode to an Intensity setting of 2 and a Frequency setting of 1 to properly introduce this therapeutic mode. You may explain to the patient that the movement of the pistons is designed to help restore the natural movement, flexibility and mobility of the spinal joints. Patient's Self-Observation It is useful to have the patient observe themselves in front of a mirror in order to demonstrate their posture, gait and stance. As they improve, they may quickly recognize the differences and positive results. Point out where they balance on their feet, that is, where they are bearing their weight, their heels, toes, etc ... Show them their posture and their head, shoulder, and pelvis 5 ASMI TREATMENT GUIDE (Version 1.2) placement. Pelvis forward, lateral shift, protective postural responses, etc ... Patients will readily notice an overall change in their appearance after the treatment. Helping the Patient onto the Treatment Table Ask the patient to remove any necklaces, unzip or unbutton their pants and disrobe to the waist. Women should continue to wear their undergarments. The patient should stand at the foot of the treatment table, climb onto the table by crawling up the incline, gently lower themselves onto the table, slowly place their face into the facemask and place their arms onto the arm rests. You'll note that when the patient breathes in their head will rise and when the patient breathe's out, it will fall. In order to properly set the facemask position, the therapist should ensure that the patient's chin does not touch the edge of the table. If the chin is touching, adjust the length of the leaf spring by turning the knob behind the telescopic jack underneath the table, and pull the leaf spring out and retighten the knob. To adjust the tension in the spring, loosen the knob found underneath the head of the table. The angle of the facemask is also adjustable by loosening the knob underneath the front of the facemask. The knob on the front of the facemask and the knob underneath the head of the table can also be adjusted by the patient so they can set the facemask's angle and the level of spring to their personal comfort level. The patient's upper extremities should be comfortably placed on the armrests so that the scapulaes and the shoulders are in a neutral position. If the patient is experiencing knee discomfort, extend the leg rest at the foot of the table. Please note: Extending the leg rest may decrease the lumbar traction provided. 2. Console Positioning (for pneumatic table) Position the console support arm opposite the therapist or the handset may be pulled and interfere with handset alignment. 3. Palpating the Spine and Starting Treatment Once the patient is comfortable, begin treating by spreading a small amount of oil or gel on the paraspinal area to reduce friction. Palpate and mentally map the patient's spine and determine sensitivity of the spinal joints as well as the surrounding musculature and fascia. 4. Performing the Treatment The device automatically starts in INTRO Mode at Intensity or Effort and Frequency settings of 9. Press Run and begin by placing the palm of your hand over the top of the handset. Start by placing the handset over the coccyx area and lightly move the handset up to the cervical area and back down. Remember this setting is limited to 15 seconds. 6 ASMI TREATMENT GUIDE (Version 1.2) The device automatically switches to the REFLEX mode (at Intensity setting 4 and Frequency setting 9) immediately after the Introductory mode. Press "RUN" on the console, lightly grasp the handset keeping your hand completely relaxed and place your other hand cross-wise over the knuckles in order to maintain control. Guide the handset along the track of the transverse processes. Pay close attention to the amount of bounce and rebound upon the para-vertebral muscles. Begin at the sacral area moving up to the cervical and back down again. Increase the effort setting according to the patient's comfort level. To begin the MOBILIZATION mode, press "MOBILIZE" and then "RUN" and based on the patient's joint mobility, medical history and sensitivity select the appropriate setting of Intensity always starting with a Frequency of 1. It is recommended you begin at the patient's sacrum at an Intensity setting of 2 or 3, Frequency setting of 1 and increase the Intensity and Frequency settings in accordance with the patients' tolerance. Start mobilizing by gently applying pressure to the handset with your top hand. Always keep a constant amount of pressure controlling the rise and fall of the handset (see figure 2 below). With experience and personal instruction you will learn to feel the mobility of each spinal segment, and develop the technique to properly mobilize with the Advanced Spinal Mobilization Instrument. Movement up or down the sacrum is achieved by subtly changing the center of gravity of your hands on the handset. Before moving on to another area, return to Reflex mode. "Reflex" the entire spine paying particular attention to the area just mobilized. Move on to the lumbar area. Increase the Intensity or Effort to setting 3 or 4 keeping the frequency at 1. "Walk" the handset up or down the track of the transverse processes. As before, alternate with Reflex mode and continue to mobilize the thoracic and cervical areas. 7 ASMI TREATMENT GUIDE (Version 1.2) Treatment sessions usually last 30-40 minutes. Figure 2: A and B represent pairs of pistons. As a pair of pistons fills and extend, the therapist applies a mobilizing force or effort. As that pair of pistons soften and the opposite pair fills and rises; the therapist continues to apply controlled resistance and the cycle repeats. 5. During the Treatment Talk to your patient during treatments. Explain what you are doing and the procedures involved. It is important to make sure the patient is comfortable and is tolerating the various treatment settings. Ask the patient if they can tolerate a higher setting prior to increasing the Intensity level. Remember to always treat and manage the patient's presenting condition. 6. Following Treatment Wipe the oil off the patient's spine. Explain they may feel disoriented or dizzy when standing up from the table and help them to their feet. 7. Helping the Patient Off the Treatment Table Have your patient push up into the quadruped position. Make sure to assist the patient by placing both hands around the patient's hips preventing any sudden twisting. Support and guard the patient as they crawl back down the table. Have the patient lower one leg at a time onto the floor while continuing to support themselves to prevent any twisting. You may need to raise or lower the height of the table so there is not an excessive distance from the patient's feet to the floor. In some cases, use the pedal to assist patents to the upright position. Continue to guard the patient carefully to prevent any sudden loss of balance. 8. After the Patient is Standing It takes a few minutes for patients to acclimate to being off of the table and re-orient themselves. Some patients may feel more comfortable sitting for a few minutes after a treatment, however it is encouraged that patients remain standing to keep the spinal muscles 8 ASMI TREATMENT GUIDE (Version 1.2) engaged. Always caution patients not to twist or bend immediately following a treatment in order to prevent a protective postural response. If possible, stand in front of a mirror with the patient and demonstrate some of these changes in their body position: Improved posture. Shoulders dropped back. Decreased forward head posture. Balance shifted towards the balls of their feet. Pelvis in neutral position. It is important to inform the patient that they may experience some soreness in the areas treated, later in the day or the following day. Caution the patient not to lift heavy objects, twist or bend excessively. 9 ASMI TREATMENT GUIDE (Version 1.2) HELPFUL TIPS If you feel the handset is hurting your hand then you may be gripping it too tightly. If you feel that the handset is not moving in a straight line, don't fight it. Not all spines are perfectly straight. Follow the track of the transverse processes understanding that they may not always follow the midline. Most beginning practitioners tend to position the table too high. The best height (for mobilization) for the practitioner is with the table approximately at the level of the knees while the legs are slightly bent. Raise the table to for Intro and Reflex modes. Place a drape over the patient’s clothes to prevent staining with the gel. Switch back and forth from Mobilize to Reflex mode periodically. Pay special attention to mobilizing fixed or stiffer joints. Following accepted PT guidelines, prior to mobilizing the cervical area, perform a vertebral artery test. At all times stay within the guidelines of accepted spine and particularly to hypermobile joints. For more information contact: Advanced Therapy Systems LLC http://www.advancedtherapysystems.com 10 ASMI TREATMENT GUIDE (Version 1.2)