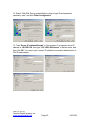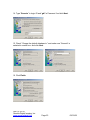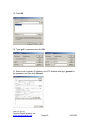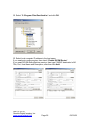
1
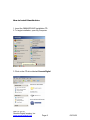
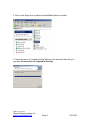
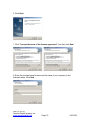
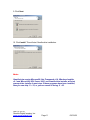
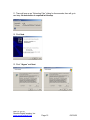
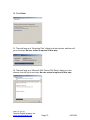
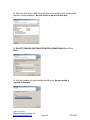
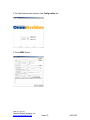
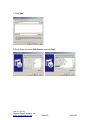
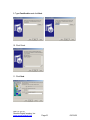
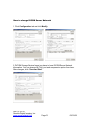
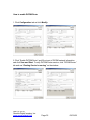
OmniArchive
Installation & User Manual
OmniArchive
Volume 1.0
DMR: QA-OA-005
Genesis Digital Imaging, Inc.
www.genesisdigital.com
Page 1
02/15/08
Copyrights
OmniArchive is a trademark of Genesis Digital Imaging, Inc.
All products and company name mentioned herein should be considered
registered trademarks or trademarks of their respective companies.
© 2008 Genesis Digital Imaging. All rights reserved.
The information in this manual is subject to change without notice.
02/15/08
DMR: QA-OA-005
Genesis Digital Imaging, Inc.
www.genesisdigital.com
Page 2
02/15/08
Table of Contents
Welcome to OmniArchive
Welcome to OmniArchive………………………………………………..…………
How to Use this Manual…………………………………………………………….
Key Features…………………………………………………………………………
Hardware Requirements……………………………………………………………
How to Install OmniArchive…………………………………………...
Installation of OmniArchive …………………………………………….………....
Directory and Files………………………………………………………………….
How to setup …………………………………………………………………….….
Modality Interface (M/I) and Testing………………………………………………
How to Use OmniArchive……………………………………………...
How to change DICOM Server Network.……………………………………….…
How to enable DICOM Router…………………. …………………………………
How to add Query/Retrieve C-MOVE destination…………………………….….
DMR: QA-OA-005
Genesis Digital Imaging, Inc.
www.genesisdigital.com
Page 3
02/15/08
Chapter
1
Introduction
•
•
•
•
Welcome to OmniArchive
How to Use this Manual
Key Features
Hardware Requirements
DMR: QA-OA-005
Genesis Digital Imaging, Inc.
www.genesisdigital.com
Page 4
02/15/08
Introduction of OmniArchive
Welcome to OmniArchive
OmniArchive is PACS Server software, which can be installed by Users or
Engineers. It enables Omni-Vue users to share patient’s exam and primary
diagnostic interpretations (Diagnostic Workstation) and Physicians to practice
patient care (Clinical Workstation).
In addition, OmniArchive provides a compression setup for the outstanding
image. Users can also directly access to OmniArchive as a client using direct
access of ODBC and retrieve the image data within 2~4 seconds.
OmniArchive is DICOM compatible including DICOM Storage and DICOM
Query and Retrieve for easy networking with third vendors' PACS or modalities.
How to Use this Manual
The Next chapter offers a walkthrough for typical usage of OmniArchive, which
includes how to install and setup.
Appendix and FAQ’s section should further assist or guide while working on
OmniArchive.
Key Features
1) Multi-Thread for incoming and outgoing DICOM service, and archiving
service.
2) Client workstation of OmniArchive supporting direct DB access.
3) JPEG Lossless Compression
4) DICOM Query and Retrieve SCP
5) DICOM Storage SCU and SCP
DMR: QA-OA-005
Genesis Digital Imaging, Inc.
www.genesisdigital.com
Page 5
02/15/08
Hardware Requirements
1) CPU: Pentium 4 or AMD equivalent.
2) Memory: 1 GB or higher.
3) HDD: 40G HDD or higher.
4) Ethernet network card: 10/100Mb NIC.
5) OS: Window XP Pro.
DMR: QA-OA-005
Genesis Digital Imaging, Inc.
www.genesisdigital.com
Page 6
02/15/08
2
Chapter
How to Install
OmniArchive
•
•
•
•
Installation of OmniArchive
Directory and Files
How to setup
Modality Interface (M/I) and Testing
DMR: QA-OA-005
Genesis Digital Imaging, Inc.
www.genesisdigital.com
Page 7
02/15/08
How to Install OmniArchive
1. Insert the OMNIARCHIVE Installation CD.
2. To begin installation, open My Computer.
3. Click on the CD drive labeled GenesisDigital.
DMR: QA-OA-005
Genesis Digital Imaging, Inc.
www.genesisdigital.com
Page 8
02/15/08
4. Click on the Setup icon to initiate the InstallShield Setup Launcher.
5. There will pop-up a “Preparing Setup” dialog for few seconds, then will go to
next step. No user action is required in this step.
DMR: QA-OA-005
Genesis Digital Imaging, Inc.
www.genesisdigital.com
Page 9
02/15/08
6. Click Next.
7. Click “I accept the terms of the license agreement”, and then click Next.
8. Enter the principal owner’s name and the name of your company in the
indicated areas. Click Next.
DMR: QA-OA-005
Genesis Digital Imaging, Inc.
www.genesisdigital.com
Page 10
02/15/08
9. Click Next.
10. Click Install. This will start OmniArchive installation.
Note:
OmniArchive require Microsoft® .Net Framework v2.0, Windows Installer
v3.1 and Microsoft® SQL Server 2005, and OmniArchive installer will start
prerequisites installer in next step. If these programs have been installed,
then you can skip 11 ~ 23, or you can cancel it during 11 ~23.
DMR: QA-OA-005
Genesis Digital Imaging, Inc.
www.genesisdigital.com
Page 11
02/15/08
11. There will pop-up an “Extracting Files” dialog for few seconds, then will go to
next step. No user action is required in this step.
12. Click Next.
13. Click “I Agree” and Next.
DMR: QA-OA-005
Genesis Digital Imaging, Inc.
www.genesisdigital.com
Page 12
02/15/08
14. There will pop-up a “Software Update Installation Wizard” dialog for a few
seconds, then will go to next step. No user action is required in this step.
15. Click Finish.
16. There will pop-up a “Microsoft .Net Framework 2.0” dialog for a few seconds,
and then will go to next step. No user action is required in this step.
DMR: QA-OA-005
Genesis Digital Imaging, Inc.
www.genesisdigital.com
Page 13
02/15/08
17. Click Next.
18. Click “I accept the term of the License Agreement” and Install.
19. There will pop-up a “Microsoft .Net Framework 2.0 Setup” dialog for a few
minutes, and then will go to next step. No user action is required in this step.
DMR: QA-OA-005
Genesis Digital Imaging, Inc.
www.genesisdigital.com
Page 14
02/15/08
20. Click Finish.
21. There will pop-up a “Extracting Files” dialog for a few minutes, and then will
go to next step. No user action is required in this step.
22. There will pup-up a “Microsoft SQL Server 2005 Setup” dialog for a few
minutes, then will go to next step. No user action is required in this step.
DMR: QA-OA-005
Genesis Digital Imaging, Inc.
www.genesisdigital.com
Page 15
02/15/08
23. Microsoft SQL Server 2005 Setup will start automatically and it will take a few
minutes to finish installation. No user action is required in this step.
24. DO NOT CHANGE ANYTHING FROM FOLLOWING DIALOG and Click
Next.
25. Now the installer will start installing OmniArchive. No user action is
required in this step.
DMR: QA-OA-005
Genesis Digital Imaging, Inc.
www.genesisdigital.com
Page 16
02/15/08
DIR and Files
Directory Info
OmniArchive creates the following directories (Logo, ARCHIVE, DICOM_IN,
DICOM_OUT, DICOM_SEND_FAIL and DICOM_SENT) at C:\Program
Files\Genesis Digital Imagng\OmniArchive. These directories are prerequisite
and shall not be deleted or renamed or modified. Multiple program files will be
created as well as described below. Upon start of OmniArchive for the first time,
these directories (ARCHIVE, DICOM_IN, DICOM_OUT, DICOM_SEND_FAIL
and DICOM_SENT) will be created automatically.
Mandatory Files
Logo.bmp
This file is necessary to operate OmniArchive.
OmniArchive.ini
This file contains options and setting value.
Located at C:\Windows
Dongle.ini
This file contains dongle options.
DLLs
To launch OmniArchive, these files are required.
DMR: QA-OA-005
Genesis Digital Imaging, Inc.
www.genesisdigital.com
Page 17
02/15/08
How to setup
Following steps are based on “first time start of OmniArchive”. Please refer to
“Chapter 3. How to use” to find configuration changes.
Before starting OmniArchive setup, USB dongle must be plugged-in and the
driver installation is required.
1. Run OmniArchive.
2. There will pop-up a “Loading…” dialog for few seconds, then will go to next
step. No user action is required.
3. There will pop-up a “OmniArchive” dialog, then click “OK”.
4. There will pop-up a “Loading…” dialog for a few seconds, then will go to next
step. No user action is required.
DMR: QA-OA-005
Genesis Digital Imaging, Inc.
www.genesisdigital.com
Page 18
02/15/08
5. On OmniArchive main window, click Configuration tab.
6. Click ODBC button.
DMR: QA-OA-005
Genesis Digital Imaging, Inc.
www.genesisdigital.com
Page 19
02/15/08
7. Click New.
8. Scroll down and select SQL Server, and click Next.
DMR: QA-OA-005
Genesis Digital Imaging, Inc.
www.genesisdigital.com
Page 20
02/15/08
9. Type OmniArchive and click Next.
10. Click Finish.
11. Click Next.
DMR: QA-OA-005
Genesis Digital Imaging, Inc.
www.genesisdigital.com
Page 21
02/15/08
12. Select “With SQL Server authentification using a login ID and password
entered by user” and click Client Configuration.
13. Type “Server IP address\Genesis” in Server name. For example server IP
address is 192.168.0.38, then type “192.168.0.38\Genesis” in Server name, and
then click OK. You need to get a server IP address from network administrator or
PACS administrator.
DMR: QA-OA-005
Genesis Digital Imaging, Inc.
www.genesisdigital.com
Page 22
02/15/08
14. Type “Genesis” in Login ID and “gdi” in Password. And click Next.
15. Check “Change the default database to:” and make sure “Genesis” is
selected in combo box. And click Next.
16. Click Finish.
DMR: QA-OA-005
Genesis Digital Imaging, Inc.
www.genesisdigital.com
Page 23
02/15/08
17. Click Test Data Source.
18. Make sure, you can see “TESTS COMPLETED SUCCESSFULLY!” in the
window. And click OK.
DMR: QA-OA-005
Genesis Digital Imaging, Inc.
www.genesisdigital.com
Page 24
02/15/08
19. Click OK.
20. Type “gdi” in password and click OK.
21. Select local computer IP address in the FTP Address and type “genesis” in
the password, and then click “Brower”
DMR: QA-OA-005
Genesis Digital Imaging, Inc.
www.genesisdigital.com
Page 25
02/15/08
22. Select “C:\Program Files\OmniArchive” and click OK.
23. Select local computer IP address in the host name.
If you need auto-routing service, then check “Enable DICOM Router”.
If you need DICOM Query/Retrieve service, then type C-MOVE destination’s AETitle, Port, Host Name and Description, after then click Add.
DMR: QA-OA-005
Genesis Digital Imaging, Inc.
www.genesisdigital.com
Page 26
02/15/08
24. Click Save and Start.
25. Click each tabs and make sure each service is running.
Main Tab
DICOM Server Tab
DMR: QA-OA-005
Genesis Digital Imaging, Inc.
www.genesisdigital.com
Page 27
02/15/08
Query/Retrieve Server Tab
DICOM Router Tab
Note:
DICOM Router Service is not mandatory service, so PACS administrator
can decide to disable it.
DMR: QA-OA-005
Genesis Digital Imaging, Inc.
www.genesisdigital.com
Page 28
02/15/08
Modality Interface (M/I) and Testing
Modalities must be in compliance with DICOM protocol.
AE Title, Port Number and IP Address must be assigned in both modality and
OmniArchive
Contact the modality provider to obtain more information.
- Please review DICOM conformance statement of modality.
- Some modalities can support limited DICOM standard functions.
- Some modalities can support multiple destinations for DICOM sending but
some cannot.
Modality Types
Modality with DICOM interface
Modality should be supported DICOM Storage SCU and/or SCP
How to Configure Modality
(DICOM Network Association)
Modality DICOM Network Association
- AE Title, Port Number and IP Address must be assigned at the modality or its
consoles or workstations.
- Modality must provide AE (Application Entity) Title
- Modality must provide Port Number
- Network administrator must provide IP Address for modality and OmniArchive
OmniArchive Network Association
- Check IP Address of OmniArchive
- AE title and Port Number are necessary at OmniArchive
Modality Interface Test
Network
Perform ping test to verify that network is operating properly. If ping test fails,
check network equipment and cables for hardware failure.
If ping test is successful but images are not transferred from modality to
OmniArchive, check DICOM configuration of the modality and OmniArchive.
Verify IP address, AE title and Port number.
100Mbps (or faster) networking is strongly recommended.
DMR: QA-OA-005
Genesis Digital Imaging, Inc.
www.genesisdigital.com
Page 29
02/15/08
3
Chapter
How to use
OmniArchive
•
•
•
How to change DICOM Server Network
How to enable DICOM Router
How to add Query/Retrieve C-MOVE
destination
DMR: QA-OA-005
Genesis Digital Imaging, Inc.
www.genesisdigital.com
Page 30
02/15/08
How to change DICOM Server Network
1. Click Configuration tab and click Modify.
2. DICOM Storage Service frame is a place to have DICOM Server Network
Information. You can change AE-Title, port and compression option from here.
After changes, click “Save and Start”.
DMR: QA-OA-005
Genesis Digital Imaging, Inc.
www.genesisdigital.com
Page 31
02/15/08
How to enable DICOM Router
1. Click Configuration tab and click Modify.
2. Click “Enable DICOM Router” and fill out rest of DICOM network information
and click Save and Start. To verify DICOM Router service, click “DICOM Router”
tab and see “Routing Service is running” on the window.
DMR: QA-OA-005
Genesis Digital Imaging, Inc.
www.genesisdigital.com
Page 32
02/15/08
How to add Query/Retrieve C-MOVE destination
1. Click Configuration tab and click Modify.
DMR: QA-OA-005
Genesis Digital Imaging, Inc.
www.genesisdigital.com
Page 33
02/15/08
2. Fill out the destination’s AE-Title, pot and IP address in DICOM Q/R Server
frame, and then click Add.
3. Click Save and Start. To verify DICOM service, click Query/Retrieve Server
tab and see “Listening Server!!!” in the log view.
DMR: QA-OA-005
Genesis Digital Imaging, Inc.
www.genesisdigital.com
Page 34
02/15/08