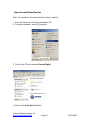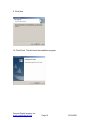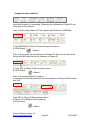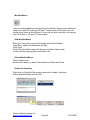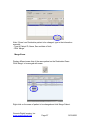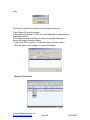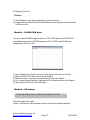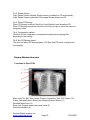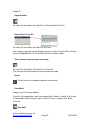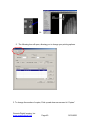
1
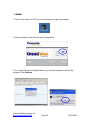
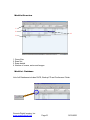
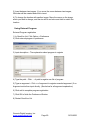
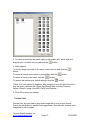
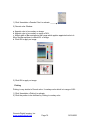
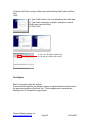
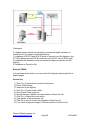
OmniVue Vet
Installation & User Manual
Page 1
12/19/2006
OmniVue Vet
Volume 2.0
Genesis Digital Imaging, Inc.
www.genesisdigital.com
Copyrights
OmniVue Vet is a trademark of Genesis Digital Imaging, Inc.
All products and company name mentioned herein should be considered
registered trademarks or trademarks of their respective companies.
© 2006 Genesis Digital Imaging. All rights reserved.
The information in this manual is subject to change without notice.
12/15/2006
Genesis Digital Imaging, Inc.
www.genesisdigital.com
Page 2
12/19/2006
Table of Contents
Welcome to OmniVue Vet
Welcome to OmniVue Vet………………………………………………………….
How to Use this Manual…………………………………………………………….
Key Features…………………………………………………………………………
Hardware Requirements……………………………………………………………
How to Install OmniVue Vet…………………………………………..................
Installation of OmniVue Vet ………………………………………………………..
Directory and Files………………………………………………………………….
Modality Interface (M/I) and Testing………………………………………………
Check Point of M/I…………………………………………………………………..
Common Error’s……………………………………………………………………..
How to Use OmniVue Vet
Logon…………………………………………………………………………………
Worklist Overview…………………………. ……………………………………….
Worklist Database:
• Exam Search and Open…………………………………………….
• Change the Query Condition……………………………………….
• Worklist Macro, Delete Worklist Macro.……………………………
• Change Patient Information (Merge, Split)………………………..
• Change Exam status (Verify) on the Worklist…………………….
Worklist – Query and Retrieve……………………………………………………..
• Query …………………………………………………………………
Genesis Digital Imaging, Inc.
www.genesisdigital.com
Page 3
12/19/2006
• Retrieve……………………………………………………………….
Worklist – DICOM CD-R Open…………………………………………………….
Worklist – CD Backup………………………………………………………………
• Backup CD Open………………………………………………………
• How to Use CD Back up………………………………………………
• Tips……………………………………………………………………..
Display Window Overview………………………………………………………….
Functions of Each Icon……………………………………………………………..
• Open Worklist …………………………………………………………
• Exam Close……………………………………………………………
o Close………………………………………………………………..
o Close All……………………………………………………………
o Close Current Exam and Open Next Exam ……………………
• Arrow…………………………………………………………………..
• View Mode…………………………………………………………….
o Non Split (1 Series)……………………………………………….
o Horizontal Split (2 Series Horizontal)……………………………
o Vertical Split (2 Series Vertical)………………………………….
o 2 by 2 Split (2 by 2 Screen Division)……………………………
o Series Layout………………………………………………………
o Chest CT View…………………………………………………….
o Compare View……………………………………………………..
o Stack View…………………………………………………………
o Pixel View………………………………………………………….
o DICOM header View………………………………………………
• Print…………………………………………………………………….
o Paper Print…………………………………………………………
o DICOM Print (Add printer) …………………………………….
• Reset, Reset All……………………………………………………...
• Window Level (W/L), Window Level All……………………………
• Zoom, Panning, Magnifying Glass…………………………………
• Rotate Image (Flip Horizontal, Flip Vertical, Arbitrary Rotate).
• Rotate CW, Rotate CCW…………………………………………...
• Measure, Compare Measure, Angle, ROI………………………..
• Annotation……………………………………………………………
Imaging Stitching…………………………………………………………………….
Image Subtraction ………………………………………………………………….
Scout View……………………………………………………………………………
Image File Open…………………………………………………………………….
• DICOM File Open……………………………………………………
• Non-DICOM File Open……………………………………………..
Image File Import/Export……………………………………………………………
• Export…………………………………………………………………
• Import…………………………………………………………………
Twain Driver Support……………………………………………………………….
Genesis Digital Imaging, Inc.
www.genesisdigital.com
Page 4
12/19/2006
Conference Folder (Add, Get, Remove)………………………………………….
Image Sending………………………………………………………………………
• E-Mail…………………………………………………………………
• Exam Send (DICOM Send, Send to Folder)……………………..
Image Processing…………………………………………………………………..
• LUT Preset ………………………………………………………….
• W/L Preset…………………………………………………………..
• Sharpen Preset………………………………………………………
Re-Arrange Image (Auto, Manual)………………………………………………..
Using External Program…………………………………………………………….
Thumbnail Window ………………………………………………………………....
Other Features………………………………………………………………………
• Copy to clipboard……………………………………………………
• Toolbar Edit…………………………………………………………..
• Pseudo Color…………………………………………………………
• Picking ……………………………………………………………….
• Inverse………………………………………………………………..
• Options - Preference…………..……………………………………
• Network ………………………………………………………………
• Database……………………………………………………………..
• Style…………………………………………………………………..
• Viewer………………………………………………………………..
• Environment…………………………………………………………
• Local DB backup ……………………………………………………
• Hanging Protocol ……………………………………………………
• External Program……………………………………………………
Applications………………………………………………………………………….
Personal purpose……………………………………………………………………
JPEG Image Display………………………………………………………………..
Slide Making…………………………………………………………………………
Teaching File Manage………………………………………………………………
Film Digitizer………………………………………………………………………….
External TWAIN Driver ………………………………………………………………
Trouble Shooting………………………………………………………………….
Slow Viewing………………………………………………………………………..
Image Not Found……………………………………………………………………
Response Time……………………………………………………………………..
Wrong Image Sequence……………………………………………………………
Multiple Monitor Setting…………………………………………………………….
Login Problems……………………………………………………………………...
Genesis Digital Imaging, Inc.
www.genesisdigital.com
Page 5
12/19/2006
Local DB Backup……………………………………………………………………
External Report……………………………………………………………………..
Error Message………………………………………………………………………
Appendix ………………………………………………………………
Delete Data from Local DB…………………………………………………………
Import…………………………………………………………………………………
Send DICOM………………………………………………………………………..
Toolbar Icon Description……………………………………………………………
Pull Down Menu…………………………………………………………………….
Short Cut Key……………………………………………………………………….
FAQ’s…………………………………………………………………...
Genesis Digital Imaging, Inc.
www.genesisdigital.com
Page 6
12/19/2006
Chapter
1
Introduction
•
•
•
•
Welcome to OmniVue Vet
How to Use this Manual
Key Features
Hardware Requirements
Genesis Digital Imaging, Inc.
www.genesisdigital.com
Page 7
12/19/2006
Introduction of OmniVue Vet
Welcome to OmniVue Vet
OmniVue Vet is DICOM viewing software, which can be installed by Users or
Engineers. It enables Radiologists to do primary diagnostic interpretations
(Diagnostic Workstation) and Physicians to practice patient care (Clinical
Workstation). Physicians can utilize the software for teaching, research and
conference activities as well as Teleradiology and Telepathology.
In addition, OmniVue Vet provides a non-linear lookup table for the outstanding
image quality especially for CR images. It also allows various image processing
and database management. Users can also directly access to PACS as a client
using direct access of ODBC and retrieve the image data within 2~4 seconds.
OmniVue Vet is DICOM compatible including DICOM Storage, DICOM Query
and Retrieve and DICOM Print for easy networking with third vendors' PACS or
modalities. OmniVue Vet provides means for efficiently managing patient and
medical data by integrating with the HIS (hospital information system).
How to Use this Manual
The Next chapter offers a walkthrough for typical usage of OmniVue Vet, which
includes locating a Worklist, Viewing and manipulation of the image, and
returning to the Worklist.
The rest of the chapters explore individual sections of OmniVue Vet in greater
detail, including the Worklist and Image Viewer screens, advanced image
viewing and manipulation tools / operations, printing to paper and film, creating
Patient CDs (“CD/DVD backup”), sending and receiving exams, and acquiring
exams from a supported acquisition device.
Appendix and FAQ’s section should further assist or guide while working on
Omni Vue Vet.
Key Features
1) Local databases and conference folders can be created.
2) Client workstation of Omni-PACS Server supporting direct DB access.
3) Display and convert DICOM versus non-DICOM images (JPEG, TIFF, PCT,
BMP, etc.)
4) DICOM Query and Retrieve,
5) DICOM Print, DIR and Key Notes.
6) Support one, two (Worklist, View) up to 2K
Genesis Digital Imaging, Inc.
www.genesisdigital.com
Page 8
12/19/2006
7) Support twain drives.
8) CD, DVD, and MOD backup with auto-run viewer.
9) Various image processing and editing capabilities.
10) Image stitching
11) Customize DICOM information overlay.
12) Auto logoff
13) Scout view for MR and CT images
14) Non-linear LUT
15) Support Hanging Protocol.
16) Logo of hospital can be displayed like a banner.
17) Support 3D Display Function.
18) Seamless interface with existing HIS/RIS.
19) Seamless interface with voice recognition system.
20) Support variable DICOM images including DICOM JPEG 2000.
Hardware Requirements
1) CPU: Pentium 4 or AMD equivalent.
2) Memory: 1 GB or higher.
3) HDD: 40G HDD or higher.
4) Ethernet network card: 10/100Mb NIC.
5) OS: Window XP Pro.
Genesis Digital Imaging, Inc.
www.genesisdigital.com
Page 9
12/19/2006
Chapter
2
How to Install
OmniVue Vet
•
•
•
•
•
Genesis Digital Imaging, Inc.
www.genesisdigital.com
Installation of OmniVue Vet
Directory and Files
Modality Interface (M/I) and Testing
Check Point of M/I
Common Errors
Page 10
12/19/2006
How to Install OmniVue Vet
Note: For Installation from web download, skip to step # 4
1. Insert the OmniVue Vet Viewer Installation CD.
2. To begin installation, open My Computer.
3. Click on the CD drive labeled GenesisDigital.
4. Click on the Omni-Vue Vet folder.
Genesis Digital Imaging, Inc.
www.genesisdigital.com
Page 11
12/19/2006
5. Click on the Setup icon to initiate the InstallShield Setup Launcher.
6. Click Next.
Genesis Digital Imaging, Inc.
www.genesisdigital.com
Page 12
12/19/2006
7. Click Yes if you accept the terms of the license agreement.
8. Enter the principal owner’s name and the name of your company in the
indicated areas. The serial number is “Omni-Vue Vet.”
Genesis Digital Imaging, Inc.
www.genesisdigital.com
Page 13
12/19/2006
9. Click Next.
10. Click Finish. This will close the installation program.
Genesis Digital Imaging, Inc.
www.genesisdigital.com
Page 14
12/19/2006
DIR and Files
Directory Info
OmniVue Vet creates the following directories (database, image, banner,
resource and style) at C:\Genesis Digital Imaging\Omni-Vue Vet. These
directories are prerequisite and shall not be deleted or renamed or modified.
Multiple program files will be created as well as described below. Upon start of
OmniVue Vet for the first time, two additional directories (cache, backup db) will
be created automatically. In the case of these two directories are deleted,
OmniVue Vet continues to work, However when you reuse cache or backup
functions, an error can occur.
Database
Master.mdb
This file is necessary to operate OmniVue Vet with basic information to run and
log on.
Database, User and password, User level, network, and DICOM printer settings.
Omni-Vue Vet.mdb
Local folder contains information of exam.
Study, Series, Image information tables, etc.
Image
Image save directory of OmniVue Vet.
Banner
Banner image such as facility logo can be inserted in OmniVue Vet. To display
banner, create an image in JPEG file format and insert in this folder. Name files
as follows:
For display in Landscape format: L_logo_banner.jpg
For display in Portrait format: P_logo_banner.jpg
The logo banner is displayed in the upper left hand corner of screen when
program is running.
Backup MDB
The directory in which OmniVue Vet automatically stores the local database
backup files (Master.mdb, Omni-Vue Vet.mdb). Go to Option -> Preference
Setting ->Local DB Backup to setup.
Genesis Digital Imaging, Inc.
www.genesisdigital.com
Page 15
12/19/2006
Located at C:\Genesis Digital Imaging\Omni-Vue Vet are following important
files:
Omni-Vue Vet.exe
OmniVue Vet Program execution file
Omni-Vue Vet RES.dll
DLL file contains resource files that are related with OmniVue Vet interface.
SCNJDPrint.dll
File manages DICOM Printer function.
An error occurs if the version does not match.
Omni-Vue Vet.ini
This file contains options and setting value.
Located at C:\Windows
Versionup.ini
To update OmniVue Vet automatically, this file contains OmniVue Vet version
information and the flag which compare server’s version and client’s version.
Modality Interface (M/I) and Testing
Modalities must be in compliance with DICOM protocol.
AE Title, Port Number and IP Address must be assigned in both modality and
OmniVue Vet
Contact the modality provider to obtain more information.
- Please review DICOM conformance statement of modality.
- Some modalities can support limited DICOM standard functions.
- Some modalities can support multiple destinations for DICOM sending but
some cannot.
Modality Types
Modality with DICOM interface
Modality should be supported DICOM Storage SCU and/or SCP
Modality without DICOM Interface
Genesis Digital Imaging, Inc.
www.genesisdigital.com
Page 16
12/19/2006
(Non-DICOM Equipment)
Some Analog CT, MR and ultrasound machines are not able to support DICOM
networking. These modalities require video acquisition gateway with frame
grabber.
How to Configure Modality
(DICOM Network Association)
Modality DICOM Network Association
- AE Title, Port Number and IP Address must be assigned at the modality or its
consoles or workstations.
- Modality must provide AE (Application Entity) Title
- Modality must provide Port Number
- Network administrator must provide IP Address for modality and OmniVue Vet
OmniVue Vet Network Association
- Check IP Address of OmniVue Vet
- AE title and Port Number are not necessary at OmniVue Vet
Modality Interface Test
Network
Perform ping test to verify that network is operating properly. If ping test fails,
check network equipment and cables for hardware failure.
If ping test is successful but images are not transferred from modality to
OmniVue Vet, check DICOM configuration of the modality and OmniVue Vet.
Verify IP address, AE title and Port number.
100Mbps (or faster) networking is strongly recommended.
Image Quality
If images in OmniVue Vet are different than the images at the modality, check the
number of bits, image processing method and the W/L setting of modality. Also
check the image transfer method.
Check point of Modality Interface
Modalities compatible with the DICOM Worklist automatically retrieve patient
information from the HIS. However, the Patient information must be manually
typed for other modalities. When an error occurs, you should first check with the
department of radiology. Modality setup and the image’s DICOM information
should be verified.
Genesis Digital Imaging, Inc.
www.genesisdigital.com
Page 17
12/19/2006
Some modality manufacturers may sell DICOM modules as an option, please
check DICOM functionality of your modalities with manufacturer.
Common Errors
Insufficient Space
OmniVue Vet requires a minimum hard disk space of: 70MB
Auto Update Error
A common error when you use OmniVue Vet as client for Omni-Web PACS.
OmniVue Vet client version attempts to download a patch file from Omni-Web
PACS when you turn on your PC. If the setting of Omni-Web PACS for automatic
patch download is complete, you can see Auto Update Error.
DB Connection Error
A DB Connection Error is displayed when there is a problem connecting to the
database server.
1) Check the network status including proper cable connections.
2) Verify IP address of Omni database server and adjust the ODBC settings.
File Server Error
A file server error is displayed when there is a problem with network connection
to Omni-Web PACS.
1) Perform FTP access.
2) Ping tests to Omni file server to check the network connection status.
Genesis Digital Imaging, Inc.
www.genesisdigital.com
Page 18
12/19/2006
Chapter
3
How to use
OmniVue Vet
1) Logon
12) Scout View
2) Worklist Overview
13) Image File Open
3) Worklist Database
14) Image File Import/Export
4) Worklist – Query and Retrieve
15) Twain Driver Support
5) Worklist – DICOM CD-R Open
16) Conference Folder
6) Worklist – CD Backup
17) Image Sending
7) Display Window Overview
18) Image Processing
8) Functions of Each Icon
19) Hanging Protocol
9) Arbitrary Rotate
20) Re-Arrange Image
10) Imaging Stitching
21) Using External Program
11) Image Subtraction
22) Thumbnail Window
23) Other Features
Genesis Digital Imaging, Inc.
www.genesisdigital.com
Page 19
12/19/2006
LOGON
1. Click on the Omni-Vue VET icon on the desktop to open the program.
2. When prompted, enter Genesis as your password.
3. If you have Windows Firewall enabled, you will be prompted to unblock the
program. Click Unblock.
Genesis Digital Imaging, Inc.
www.genesisdigital.com
Page 20
12/19/2006
Worklist Overview
1
2
4
3
1. Query filter
2. Exam list
3. Exam details
4. Number of exams, series and images
Worklist - Database
List of all Databases includes PACS, Backup CD and Conference Folder.
Genesis Digital Imaging, Inc.
www.genesisdigital.com
Page 21
12/19/2006
Exam Search and Open
From the Worklist menu click on DATABASE button
Choose your search criteria and press Search.
Highlight the desired exam to display patient files.
Double-Click exam to be searched and display the exam on Display Window.
Genesis Digital Imaging, Inc.
www.genesisdigital.com
Page 22
12/19/2006
Change the query condition
Input the information to be queried. (Searching by combination of Patient ID and
study date is Recommend).
Case 1) Query using Patient ID: Find a patient with Patient ID is MS00008.
a) Type MS00008 in Patient ID field as shown in the above.
b) Click Search
= Search
Case 2) Query using first two characters of Patient ID: OmniVue Vet will find all
Exams with MS being the first two character of Patient ID
a) Type “MS” in Patient ID field as shown above.
b) Click Search
= Search
Case 3) Query with Multiple Conditions:
a) OmniVue Vet will find exams with first two characters of Patient ID which starts
with “MS”
Type “MS” in Patient ID field as shown above.
b) Select CR in Modality field (Dropdown)
c) Click Search.
= Search
Genesis Digital Imaging, Inc.
www.genesisdigital.com
Page 23
12/19/2006
Worklist Macro
User can make predefined query button in the Worklist. Suppose one radiologist
need to just read CR exam and CR and CT chest exam, in this case user can
create query button on the Worklist, if user click the button one time, one can get
only CR exams or CR and CT Chest exams.
Add Worklist Macro
Make your own query in query field header and click Add Macro.
Type Macro Label and Description and Add
Click Close.
Click CR button (Button name will be same as Macro Label name.)
Confirm that the query properly executed or not.
Delete Worklist Macro
Click on Macro Icon
Select the list what you want to delete and click Delete and Close.
Header Customizing
Right-click on Wordlist’s filters section and select Header Customize.
Check all desired fields and click OK
Genesis Digital Imaging, Inc.
www.genesisdigital.com
Page 24
12/19/2006
Change Patient Information
The Worklist buttons are located in the top left-hand corner.
Merge Patient: Change the patient information of the exam.
Merge Exam: The exam merges to another exam.
Merge to One Series: Merge the series to another series.
Genesis Digital Imaging, Inc.
www.genesisdigital.com
Page 25
12/19/2006
Split Exam: Split the series to another exam.
Split Series: Split the image to another series.
Merge Patient
Change the Patient ID, Name, Sex and date of birth of the exam.
Right-click on the exam of patient to be changed and click Merge Patient.
Search Destination patient to be changed.
- Type [Patient ID] and click search
- Patient ID at the DB will be displayed on the Destination Patient List.
- Click the patient on the list and click merge.
Genesis Digital Imaging, Inc.
www.genesisdigital.com
Page 26
12/19/2006
Note: If there’s no Destination patient to be changed, type in the information
manually.
- Type in Patient ID, Name, Sex and date of birth.
- Click ‘Merge’.
Merge Exam:
Display different exam lists of the same patient on the Destination Exam.
Click ‘Merge’ to be merged with exam.
Right-click on the exam of patient to be changed and click Merge Patient.
Genesis Digital Imaging, Inc.
www.genesisdigital.com
Page 27
12/19/2006
Note:
If No Exam is selected the above error message will pop up.
Type [Patient ID] and click search.
If the patient information is in DB, list will be displayed on right portion of
Destination Patient.
Click the patient and click Merge to change the patient information.
Merge with exam of another patient.
- Type in the [PID] of patient in Destination Exam and click search.
- Click the exam to be combined in list and click Merge.
Merge to One Series
Genesis Digital Imaging, Inc.
www.genesisdigital.com
Page 28
12/19/2006
Right-click to apply Merge to one Series and click ‘Merge to one series’
Merge the series to another series.
Select Key series to be seen as Series Title.
- Click the series on the Series List
- Click ‘>’ (Click ‘<’ to release)
Select the series to be merged to Key Series
- Click the series on the Series List
- Click ‘>’ (Click ‘<’ to release
Click Merge
Split Exam:
Split series on exam as separate exam.
Genesis Digital Imaging, Inc.
www.genesisdigital.com
Page 29
12/19/2006
Right-click on the exam to apply Split Exam and click ‘Split Exam’
Select series to be split.
- Click the series to be split on current exam list.
- Click ‘>’ (Click ‘<’ to release)
(Use ‘Shift or CTRL’ key for multiple selection)
(Click ‘>>/<<’ to appoint/release all)
Click Split Exam
Genesis Digital Imaging, Inc.
www.genesisdigital.com
Page 30
12/19/2006
Split Series:
Right-click on the exam, which applies Split Series, and click ‘Split Series’
Click the image to be split on Series List
Select image to be split
- Click the image to be split on Image list
- Click ‘>’ (Click ‘<’ to release)
(Use ‘Shift or CTRL’ key for multiple selection)
(Click ‘>>/<<’ to appoint/release all)
Click ‘Split Exam’
Split image on series as separate series.
Genesis Digital Imaging, Inc.
www.genesisdigital.com
Page 31
12/19/2006
Change Exam Status
Right click on the exam and you can change the status
Authorized person can change report status on the Worklist.
Worklist – Query and Retrieve
Query
1) Click “Select ServerAE” arrow button.
2) Choose the server to be queried.
3) Select “Patient Root” drop down.
4) Click “Search”, and display patient list.
5) Select Patients and display series list.
6) Select Series and display image lists.
7) You can also right-Click at step 5) to 7), and
click Add.
Genesis Digital Imaging, Inc.
www.genesisdigital.com
Page 32
12/19/2006
8) Display Queue list.
Retrieve
1) Click Retrieve button after generating a queue list above.
2) Images will be retrieved from the selected server and stored in the local folder
in OmniVue Vet.
Worklist – DICOM CD-R Open
You can review DICOM images burned on CD or DVD which is DICOM CD-R
compatible and also burn DICOM images on CD or DVD using CD Backup
supported by OmniVue Vet.
1) Open Worklist from OmniVue Vet (or) click Open icon from icon tool bar
2) Select DICOM CD-R Open tab on the w Worklist.
3) Select the driver in which you inserted the CD and click Search.
4) Or, to search specific patient, type patient ID or Name and then click Search.
5) Select patient from PID, and click Open.
Worklist – CD backup
CD burning software (Nero 6) needs to be installed to burn CD’s
The Nero option box under
Option ->Preference->Environment must be checked for proper operation.
Genesis Digital Imaging, Inc.
www.genesisdigital.com
Page 33
12/19/2006
1. Click ‘CD Backup’ from Worklist window.
2. Click “Search” with proper criteria to display.
3. Select exam(s) from Worklist (to select multiple exams use Shift or Ctrl key)
4. Select backup path by clicking on "..." icon and click OK. (Default path is
C:\Temp)
5. Select “Copy” to copy exams to CD but not to delete selected exams from
local database or “Move” to copy exams to CD and delete selected exams from
local database.
6. Select "Copy Simple Viewer" to burn a Mini-Viewer on CD together with image
files.
7. Select "Direct CD Burning" for direct CD burn (if unchecked: OmniVue Vet will
just copy or move the exams to temporary folder)
8. Select Compression.
9. Select CD burning device and speed.
10. Click Backup
TIPS
Tip 1. Copy and Move
There are two methods for CD Backup.
Copy: Copy exams to CD without deleting from local database
Move: Copy exams to CD and also delete exam from local database.
Genesis Digital Imaging, Inc.
www.genesisdigital.com
Page 34
12/19/2006
Tip 2. Simple Viewer
Copy Simple Viewer checked: Simple viewer is installed on CD automatically
Copy Simple Viewer unchecked: Only image files are burned on CD.
Tip 3. Direct CD Burning
Direct CD Burning checked: OmniVue Vet will directly burn the patient CD.
Direct CD Burning unchecked: OmniVue Vet will just copy or move the exams to
temporary folder.
Tip 4. Compression options
OmniVue Vet will compress or uncompress images before copying files
according to user setting.
Tip 5. Set CD Burning speed
The user can select CD burning speed. (CD-Rom and CD needs to support the
functionality)
Display Window Overview
Functions of Each ICON
Menu List (File, Edit, View, Image Process, Annotation, Tool, W/L Preset, LUT
Preset, Sharpen Preset, Option, and Hanging Protocol Macro) (1)
Selected Menu Icons (2)
Exam List: Displays open exams and series (3)
Patient information (4)
Genesis Digital Imaging, Inc.
www.genesisdigital.com
Page 35
12/19/2006
Image (5)
Open Worklist
Or select File from Menu List and Click on Open Worklist (Ctrl+O)
Exam Close/ Close All
Or select File from Menu List and Click on Close
This function closes the current displayed study or select File from Menu List and
Click on Close All (Ctrl+C) this function will close all open studies.
Close current exam and open next exam
Or select File from Menu List and Click on Next (N)
This function will close present exam and open next exam
Arrow
Click Arrow icon to change to general cursor mode.
View Mode
Image Layout & Viewing Options
OmniVue Vet supports four split view modes (Non, Horizon, Vertical, 2 by 2) and
8 view modes such as Series Layout, Chest CT View, Compare View, Stack
View, etc.
Non Split
Genesis Digital Imaging, Inc.
www.genesisdigital.com
Page 36
12/19/2006
Horizon Split
Vertical Split
2 x 2 Split
In order to view multiple images at once, click the Tile button to change the
layout.
When viewing images one at a time, click the arrow buttons in the upper righthand corner to advance images.
Chest CT View
View mode for Chest CT. After one image displays on each window, preset
Window Level as normal to compare and search.
Genesis Digital Imaging, Inc.
www.genesisdigital.com
Page 37
12/19/2006
Setup value of Window Level Preset on Option _ Preference _ Viewer in Chest
CT View Window/Level.
Compare View
Compare View mode is for comparison of CT, MR image. It compares exam and
series on same patient or different patient.
Click the icon to display image on left window. Drag the image to right side of
window to search and compare.
Speed adjustment
Range adjustment
Stack View
Shift start point to the right.
Shift end point to the left.
: (Play)
: (Back Play)
: (Stop)
: Move to first image
: Move to last image
: Move to previous image
: Move to next image
: Reverse play and repetition
: Repetition and playback
: Pause
Genesis Digital Imaging, Inc.
www.genesisdigital.com
Page 38
12/19/2006
Pixel View
Displays pixel value and coordinates of selected location. Click on the icon and
move your mouse over the image and Hounsfield Unit will be displayed.
DICOM Header View
Or Click View_DICOM Header
This function displays DICOM Header information.
Print
1. Highlight an image and Click Print button or click File->Print
Genesis Digital Imaging, Inc.
www.genesisdigital.com
Page 39
12/19/2006
Or
2. The following box will open, allowing you to change your printing options.
3. To change the number of copies, Click up and down arrows next to “Copies.”
Genesis Digital Imaging, Inc.
www.genesisdigital.com
Page 40
12/19/2006
4. To change the print layout format, click on the
your desired layout.
button and drag the arrow to
5. Click Print Preview to view the selected layout.
6. Select the printer you have just installed in the Print Server box, and click
Print.
Note: You also have the option of printing to a paper printer. To use a paper
printer, click on the Paper tab in the Print window. You must have all the proper
drivers installed on your computer see Image 2.
Adding a DICOM Printer
Note: You must first have an image on file and selected before adding a printer.
1. Click Print button to open the Print window.
Genesis Digital Imaging, Inc.
www.genesisdigital.com
Page 41
12/19/2006
2. Choose “DICOM” tab for DICOM Printer.
3. The first time you print an image, you will have to
a printer.
4. Complete the form with your printer information. Consult your printer manual,
as this information will be specific to your particular printer. See below for an
example.
Genesis Digital Imaging, Inc.
www.genesisdigital.com
Page 42
12/19/2006
5. You are now ready to print.
Reset
Or click Process _ Display Original and click the icon on toolbar.
This function will return the selected image to its original setting prior to any
modification.
Reset All
Or click Image ‘Process _ Display All Original’ or click the icon on toolbar.
This function will return all the images to their original setting prior to any
modification
Genesis Digital Imaging, Inc.
www.genesisdigital.com
Page 43
12/19/2006
Window Level (W/L)
Click Image Process _ Window Level and cursor will be changed to W/L. Click
the image and drag to the left and right, window level value will be changed.
Short-cut key ‘W’ to select.
Window Level (W/L) All
Click Image Process _ Window Level and cursor will be changed to W/L. Click
the image and drag to the left and right, window level value will be changed.
OmniVue Vet supports window level all function by right-click drag.
Zoom
After click Zoom button, click and drag the image where you wish to see. If there
are multiple images, select all (Ctrl + A) and Zoom in/out all the images.
(Short-cut key: Z)
Genesis Digital Imaging, Inc.
www.genesisdigital.com
Page 44
12/19/2006
Panning
Panning image moves to another part. After click the Panning button, click the
image and drag to move the image. (Short-cut key: P)
Magnify Glass
Shift + Mouse Drag Adjustment of magnifying glass
Ctrl + Mouse Drag Magnify/Reduction magnified image
Alt + Mouse Drag Adjustment of W/L
To magnify part of an image, first click on the Magnify Glass button.
The magnifying glass will initially appear as shown below.
To change the size of the magnifying glass, hold Shift, click and drag the mouse
to the desired size.
Genesis Digital Imaging, Inc.
www.genesisdigital.com
Page 45
12/19/2006
To change the zoom within the magnifying glass, hold Control, click and drag to
the desired intensity. Drag up (lower magnification) and down (higher
magnification).
Rotate Images
To rotate or flip images, use the corresponding buttons (Flip Horizontal, Flip
Vertical, Rotate CW, and Rotate CCW).
Flip Horizontal (Image Process _ Flip Horizontal or click the icon)
.
Genesis Digital Imaging, Inc.
www.genesisdigital.com
Page 46
12/19/2006
Flip Vertical (Image Process _ Flip Vertical or click the icon)
Arbitrary Rotate
OmniVue Vet can rotate an image by arbitrary degree using this feature.
1) Click Image Process--->Arbitrary Rotate.
2) The following image will appear in the upper right hand corner of the image.
3) Click the line and move clockwise or counterclockwise
4) Click Save
Rotate CW (Click ‘Image Process Rotate CCW’
Genesis Digital Imaging, Inc.
www.genesisdigital.com
Page 47
12/19/2006
Rotate CCW (Image Process _ Rotate CW or click the icon)
Measure
Tool Measure or (Short-cut key: M)
1) Length measurement: Drag the mouse to measure the length of image.
2) Measurement between two lines: To draw the line, click the short-cut key ‘E’
and measure the length between two points.
Genesis Digital Imaging, Inc.
www.genesisdigital.com
Page 48
12/19/2006
Compare Measure
To measure different lengths from one point, click Tool ROI Compare Measure
and drag the mouse to draw the line. Two lines will be created and adjust by
drag.
Angle
To measure the angle, click Tool _ Angle or. (Short-cut key: A)
Drag the mouse on the image where you wish to measure.
To measure the angle when lines never across.
Genesis Digital Imaging, Inc.
www.genesisdigital.com
Page 49
12/19/2006
a. Draw the line for angle measurement.
b. The angle between two lines will be displayed, if you select two lines to
measure the angle.
c. To select two lines, press shift button and click the lines.
d. The ‘Make Angle Information’ message will be displayed if the two lines are
selected.
Click OK to display the angle.
Add Angle
Multiple angles can be measured from one point.
a. Click ‘Angle’ and select an end point. And right-click to select ‘Add Angle’.
b. Hold the end point and drag, another angle will be created.
c. It is possible to create multiple angles by same methods. (Click short-cut key
‘D’ and drag it.)
ROI
Rectangle, Circle, Polygon, and Freehand Draw
Genesis Digital Imaging, Inc.
www.genesisdigital.com
Page 50
12/19/2006
Circle
Rectangle
Polygon
Freehand Draw
ROI Option
After creation of ROI and right-click to see the menu.
1) Copy to Clipboard: Copy selected ROI parts
2) Delete ROI: Delete selected ROI
3) Property: Square, mean value of selected ROI (Hounsfield Unit will displays on
CT)
Annotation
Annotation, text input.
Genesis Digital Imaging, Inc.
www.genesisdigital.com
Page 51
12/19/2006
Image Stitching
1) Open Series from Worklist
2) Change Display setting to show all images in series
3) Click Tool ---> Select Spine Image
4) Select image by order. Following message will be appeared on the each
image
5) Click Tool->Image Stitching
Genesis Digital Imaging, Inc.
www.genesisdigital.com
Page 52
12/19/2006
6) Adjust image using following menu
- Auto: Auto stitching.
- Reset: Recover to beginning.
- Move Up: Move the image upward
- Move Down: Move the image downward
6) Click Save
7) Stitched image will be added to the series
Image Subtraction
1) Click ToolSelect
Source/Destination image.
Genesis Digital Imaging, Inc.
www.genesisdigital.com
Page 53
12/19/2006
2) Select source image.
3) Select destination image.
4) Click ToolImage subtraction.
5) Subtracted image will be created.
Scout View
There are two way displaying scout line. One is using “Hanging protocol” and the
other is using “Add scout image”
Scout On/Off button
If you set hanging protocol for MR or CT exams, and if series layout is selected
as multi series, in this situation whenever you click one image, scout line will be
drawn on other series which is crossed direction.
Genesis Digital Imaging, Inc.
www.genesisdigital.com
Page 54
12/19/2006
Click
To see scout line on the image, just click ”Scout Line”.
Add Scout Image
1) Right-click on the image and then select
Scout Image and click ‘Add scout image
dialog’
2) Display the image on Scout Image.
Click
to change to image of another series.
Converts to first
image
Converts to previous
If you check the “Unselected Line Draw” then all scout line will be
displayed.
Genesis Digital Imaging, Inc.
www.genesisdigital.com
Page 55
12/19/2006
3) In Display Window, if you click the image, the
scout line will be displayed as solid line in Add scout
image dialog.
4) In Add scout image dialog, if you click the Scout
Line, the image will be selected in Display Window.
Click Add Image and scout image will be saved in
Series.
In ViewScout Image, if you check Show/Hide,
scout image will be displayed to first page.
In ViewPopup, Check Scout Image Enable/Disable to display Scout Image as
popup window.
Image File Open (DICOM, Non-DICOM)
DICOM File Open
1) Click File->Open DICOM File
Genesis Digital Imaging, Inc.
www.genesisdigital.com
Page 56
12/19/2006
2) Select the file to be opened and click OK (Multiple selections with CTRL or
SHIFT)
Non-DICOM File Open (JPG, BMP, TIFF)
Click File->Open Non-DICOM File
Select the file to be opened and click OK (Multiple selections with CTRL or
SHIFT)
Image File Import / Export
Export
Images can be saved as DICOM, JPEG, BMP or TIFF.
Select the whole image or part of image and click File->Export.
Export Window
1. Select format to be converted
2. Select compression mode in Sub Type.
Genesis Digital Imaging, Inc.
www.genesisdigital.com
Page 57
12/19/2006
3. Select the location and click Save.
Import
Open an image by DICOM File Open or Non-DICOM Open and click File>Import.
Type in the information
Database: Select Local or Conference Folder
Patient Information: Input patient information
Study Information: Input exam information
Series Information: Input series information
Applied Range: Select the image to be imported (Selected Images, All Images)
Window Level: After open it in OmniVue Vet and select W/L (Current Value) or
Image W/L (Original Value)
Click OK to finish
Compression ratio value
A. Keep Original – Transmit the original image
B. Uncompress – Uncompress and transmit original image
C. Lossless JPEG – Transmit Lossless compression mode (½ ~ ¼ of original
image)
D. Lossy (Minimal, Mild, Moderate, Severe, Very Severe) – Transmit lossy
compression mode.
Twain Driver Support
Using external twain drivers, you can control film digitizers and acquire film or
paper images.
Genesis Digital Imaging, Inc.
www.genesisdigital.com
Page 58
12/19/2006
How to Use
1) Click File
Twain select source from top menu.
2) Select TWAIN driver.
3) Insert film at the digitizer.
4) Click File
Twain Acquire Multi.
5) Run External Twain program.
6) Scanned image is display on image window of OmniVue Vet.
7) Click File
Import from main menu.
8) Type patient, study and series, etc.
9) Click OK to store it to the local database of OmniVue Vet.
10) You can find imported image in Worklist window of OmniVue Vet.
Conference Folder
Most Doctor wants to make personal database and image for education or study.
Conference Folder gives great function for several purposes of doctors. Backup,
Conference files, Teaching files and so forth.
Add Conference Folder
Genesis Digital Imaging, Inc.
www.genesisdigital.com
Page 59
12/19/2006
1) Click Option->Conference folder
2) Type Name in Folder Name
3) Click Next and Next.
4) Type Author, Folder Name and Folder Description.
5) Click Next, and Finish.
Get Conference Folder
Conference folder, which did backup can be register in OmniVue Vet.
1) Click Option->Conference folder....
2) Click Get Conference Folder and Type [Name] in Folder Name
3) Click Next
4) 4) Click
to appoint MDB and image path of conference folder.
5) Click Next and Next.
6) Click Finish.
Remove Conference Folder
Delete Conference Folder
1) Click Option->Conference folder....
2) Click Remove Folder. And conference folder to be deleted
3) Click Next and Next.
4) Click Finish.
Image Sending
Transmit the selected images:
Send to E-mail
Send DICOM
Send to Folder
Send to Email
Genesis Digital Imaging, Inc.
www.genesisdigital.com
Page 60
12/19/2006
Transmit the image to e-mail by Outlook Express.
1) Select the image to be transmitted to E-mail. (Multiple selection by CTRL or
SHIFT)
2) Click ‘File -> Send to Email’ to attach the image on outlook.
3) Pre-Configure image type (DICOM, JPEG, BMP, and TIFF)
Go to Option ->Preference ->Environment->email image format
Note:
E-mail account has to be contained SMTP to use this function. Outlook (or
Outlook Express) has to be setup in advance
Configuring DICOM Send
1. To add a DICOM recipient, first select Preferences from the Option menu.
2. Make sure the Network tab is open. Click Add.
Genesis Digital Imaging, Inc.
www.genesisdigital.com
Page 61
12/19/2006
3. To obtain the necessary information to add a recipient, the receiving computer
needs to be accessed.
At this workstation, double click on the computer icon in the bottom right-hand
corner of the screen (on the taskbar)
4. Then enter the information as shown in the example below. Click
Add.
5. From the Worklist, choose the patient whose images you wish to send by rightclicking on his or her information. Select Send DICOM.
Genesis Digital Imaging, Inc.
www.genesisdigital.com
Page 62
12/19/2006
6. The Send Exam window should appear as shown below. Select the desired
recipient from the list. Click Connect Test to make sure there is a working
connection between sender and recipient.
7. If a connection exists, the following window will pop up to confirm.
8. To proceed with sending, click the Send button.
9. If the Connection Test fails, the following window will appear. Check the
recipient’s information to be sure it has been correctly entered.
Genesis Digital Imaging, Inc.
www.genesisdigital.com
Page 63
12/19/2006
Send to folder
Right-click on the exam to be transmitted and click Send to Folder.
Select Destination Database (Local or Conference Folder) and click Send
Image Processing
Adjustment of image quality by: LUT Preset, W/L Preset, Sharpen Preset
Hanging Protocol, Rearrange Processing
LUT Preset
OmniVue Vet can expand the image's gray scale range by adjusting the nonlinear curve. Adjust the window level value by right-click the image and adjust the
curve to assign a more detailed vale
(Apply only to gray-level images of 10 bit or greater)
Genesis Digital Imaging, Inc.
www.genesisdigital.com
Page 64
12/19/2006
How to Adjust the LUT Graph
Click LUT preset from top menu.
Drag points on the line to be sigmoid curve and look at the image quality.
Drop points if the quality of image is achieved.
Method I: Drag Pointer
Method II: Input value of Scroll Bar (1) or Gamma Value (2)
You can preset window level and Lookup Table values for each modality, body
part, series or study for images to open with matching values.
How to Preset Lookup Table
1) Open the image then click LUT Preset from main menu.
2) Select Preset Lookup Table after image processing.
3) Click Add. The station name and body part of the selected image are read
automatically.
4) Type [LUT Name] and click OK. Station name and body part are registered
with LUT value.
5) Click OK.
Genesis Digital Imaging, Inc.
www.genesisdigital.com
Page 65
12/19/2006
Lookup Table Tool
_Select from curve-line adjustment graph
_Select from straight-line adjustment
_Add adjustment pointers
_Delete adjustment pointers
_Reset: Reset to initial values
_Vertical: Top/Bottom curve conversion
_Horizontal: Left/Right curve conversion
Note:
Station and body part read in DICOM information and must use to the automatic
in the content to be input. If random user input or modify the content, it can’t
operate AUTO MATCHING.
AUTOMATCHING priority is BODYPART –> SERIES DESCRIPTION. If there
are series and description information, we should not to register all information.
Even LUT AUTO MATCHING applies, the image, which already saved and
verified with window level adjustment cannot apply.
W/L Preset
Adjust window level easily with registration of short-cut key.
1) Adjust W/L and click ‘W/L Preset_W/L Preset’
Genesis Digital Imaging, Inc.
www.genesisdigital.com
Page 66
12/19/2006
1
1
1
2) Modality and W/L value will be input automatically.
3) Click the short-cut key
4) Type in name “Chest”
5) Click “Update”
6) Click “OK” to register
2
4
5
3
6
Sharpen Preset
Sharpen value can be adjusted by preset. (17 presets in basic)
1) Click Sharpen Preset to see registered preset. Click the preset to adjust
sharpen value of the series.
Genesis Digital Imaging, Inc.
www.genesisdigital.com
Page 67
12/19/2006
2) Click Sharpen Preset -> Sharpen Preset to register, delete and adjust preset
Re-Arrange Processing
Arrange the sequence as new.
Re-Arrange Image (Auto)
Click Tool->Rearrange Image
Image Arrange Method: Acquisition Date/Time, Image Date/Time, Image Number
Sort Method: Ascending, Descending
Rearrange Image (Manual)
1) Click Tool->Rearrange Image to change the mode of Rearrange Image. The
rim of image will be changed to the blue color.
2) Click the image to change with green color.
Genesis Digital Imaging, Inc.
www.genesisdigital.com
Page 68
12/19/2006
3) Insert between two images. If you move the cursor between two images,
White bar will be created and click to insert.
4) To change the location with another image. Move the cursor on the image,
which you wish to change, and the rim will be red color and click to switch the
location.
Using External Program
External Program registration
1) In OmniVue Vet, Click Option ->Preference
2) Click external program in preference
3) Input description – The explanation about program to register
4) Type the path – Click … of path to register exe file of program
5) Type an argument – Click << of argument to register essential argument. (If no
Argument exists then input directly. (See below for all argument explanation)
6) Click add to complete program registration
7) Click OK to finish the Preference Window.
8) Restart OmniVue Vet.
Genesis Digital Imaging, Inc.
www.genesisdigital.com
Page 69
12/19/2006
Argument explanation
Clear Initialization the registered Argument
-ui UserID OmniVue Vet User ID call
-un Username OmniVue Vet User Name call
-pi Patient ID PID call of opened exam
-pn Patient Name Patient name call of opened exam
-ps Patient Sex Patient sex call of opened exam
-an Accession Number Accession number call of opened exam
-sd Study Date Study date call of opened exam
-mo Modality Modality call of opened exam
-de Department Department call of opened exam
-si Study instance UID study instance UID call of opened exam
-bp Examed Body Part Body part call of opened exam
-ie Userfile Every images on opened exam will be provided as user file
Userfile name need to be assigned directly.
-is Userfile Every images on opened series will be provided as user file
Userfile name need to be assigned directly
-ii Userfile Every images on opened selected image will be provided as
user file Userfile name need to be assigned directly.
-ik Userfile Every images on opened key images will be provided as
user file Userfile name need to be assigned directly
* Contents of Userfile will be created at cache folder automatically when
OmniVue Vet external program is running.
External Program registration in Tool Bar
In OmniVue Vet, Click Option -> Toolbar
2) Click external in Toolbar Menu Selection Manager
3) Drag & Drop registered program icon
4) Click OK
5) Registered external program icon came into being at Tool bar.
How to Use External Program
Click the icon at Tool Bar
Or
Click the registered part in Display Window of Tool Menu
Thumbnail Window
Thumbnail window is not configured by default. If you want to use thumbnail
window, please configure Thumbnail window as described below.
How to Configure Thumbnail Window On/Off
Genesis Digital Imaging, Inc.
www.genesisdigital.com
Page 70
12/19/2006
1) Select Option -> Preference ->Viewer on top menu.
2) To use Thumbnail window on image display window, check Show Thumbnail
window from Viewer tab or uncheck to not use the window.
How to Hide/Show Thumbnail Window
1) Open exams from Worklist window.
2) Thumbnail image window is displayed when you move the cursor to the
bottom of image display window and hides when you move the cursor away.
3) Thumbnail image window displays yellow opened mark on opened series or
exams
4) Drag thumbnail image and drop into display window
Layout of Thumbnail Window may be modified by clicking on “<” or “>” button
OTHER FEAUTRES
Copy to Clipboard
OmniVue Vet supports image-editing function for documentation. You may
capture the whole image by copying to clipboard or a piece of image by region of
interest (ROI)
To copy an entire image
Genesis Digital Imaging, Inc.
www.genesisdigital.com
Page 71
12/19/2006
1) Select the image and Click Copy to Clipboard
2) Right-click and select Paste or press Ctrl+V on word and PowerPoint.
To copy a part of the image
1) Select the image.
2) Click ROI Icon to select ROI type and draw ROI on the image.
3) Right-click on the edge of ROI.
4) Select Copy To Clipboard.
5) Right-click and select Paste or press Ctrl+V on word, PowerPoint.
Toolbar Edit
1. To change the buttons shown on the toolbar, select Toolbar Configuration from
the Option menu.
2. The window will appear as shown below.
Genesis Digital Imaging, Inc.
www.genesisdigital.com
Page 72
12/19/2006
3. To move an icon from the menu (right) to the toolbar (left), either click and
drag the icon, or select the icon and click the
button.
4. Other options:
To move a single icon back to the menu, select the icon and click the
button.
To move all icons from the menu to the toolbar, click the
button.
To return all icons to the menu, click the
To restore the toolbar to its default settings, click the
button.
button.
(*Note: If an icon seems to disappear after dragging it from the right to the left, it
may be under a different tab. Check the different tabs, including Common,
Layout, DocInfo, Image, AnnoROI, OnOff, and External.)
5. Click OK to save your settings.
Pseudo Color
Pseudo color lets you mask a gray-scale image with a color of your choice.
Check the distribution by window level appointment. Pseudo color function is not
supported for color images.
Genesis Digital Imaging, Inc.
www.genesisdigital.com
Page 73
12/19/2006
1) Click ‘Annotation->Pseudo Color’ to activate
2) Pseudo color Window
a. Appoint color to be overlay on image.
b. Appoint color to be overlay on range of W/L.
c. Adjust width of Bar and appoint the range which applies appointed color in b.
Move the Bar up/down to check W/L of image.
d. Click OK to apply on image.
3) Click OK to apply on image.
Picking
Picking is very similar to Pseudo color. It overlays color which is in range of W/L.
1) Click ‘Annotation->Picking’ to activate.
2) Click the portion to be checked by Picking to overlay color.
Genesis Digital Imaging, Inc.
www.genesisdigital.com
Page 74
12/19/2006
3. Adjust color to be overlay and appoint the range, which will be applied.
Inverse
Right-click on image. Click Inverse
Or click on the icon.
Option – Preferences
Network (Local, Remote)
Local
Setup DICOM network information for OmniVue Vet.
Assign AE Title, IP and Port. Then appoint the path, which is saved local image.
Genesis Digital Imaging, Inc.
www.genesisdigital.com
Page 75
12/19/2006
Remote
Register remote host to use Send DICOM.
Click ADD to display registration window.
Type in [AE Title], [Hostname] (IP Address), [Port] of Remote Host
Click ADD
Database (Local, Remote)
Local
Appoint the path Local Database (OmniVue Vet.mdb) of OmniVue Vet.
(Unchangeable)
Remote
Register Omni-PACS Server to be used in Worklist.
Database Option
Search all Exams for local database
Setup study date of local as all in OmniVue Vet
Genesis Digital Imaging, Inc.
www.genesisdigital.com
Page 76
12/19/2006
STYLE
DICOM Information
Change default font settings for DICOM information
Annotation
Appoint color, line thickness and font to be used in Annotation
Profile Line
Define color, line and thickness in Profile
Genesis Digital Imaging, Inc.
www.genesisdigital.com
Page 77
12/19/2006
Viewer
Chest CT View Window/Level
Setup W/L to be applied for Chest CT View Mode
Auto Close
Option to automatically close an exam
Do not save and close: OmniVue Vet will not save but closes current exam.
Save and close: OmniVue Vet will save current exam without prompting the user.
Confirmed save exam: OmniVue Vet will prompt you to save current exam.
Annotation continue mode
When checked, this function allows same annotation functions in current open
series to be used in subsequent series
Window/Level ROI Size
Set size of preview window when Window Level is adjusting. (Restart OmniVue
Vet to apply)
Genesis Digital Imaging, Inc.
www.genesisdigital.com
Page 78
12/19/2006
Interpolation Method
To apply interpolation (anti-aliasing) functions to different modalities.
Note: Do not apply interpolation on image.
Linear: Apply linear interpolation on image.
Bi-Cubic: Apply more linear interpolation on image.
Auto Window Level
Apply automatic window width/level using median value or mean value.
Auto logoff
When checked, OmniVue Vet will automatically log off after configured time.
Environment
LUT Auto Matching
Whenever OmniVue Vet displays image, if this option is set, OmniVue Vet will
apply LUT value which is saved in server database or local database to the
image.
Cache Image Expire Duration
OmniVue Vet use cache database whenever open image. This option mean how
long you want to keep images in the cache database. If you set too long period,
your local drive will be full. We recommend set 2 days for keeping period.
Exam List Refresh Interval
OmniVue will reconnect database and query the database whether the database
has new patient or exam for every configured time. It means that OmniVue Vet
Worklist will be refreshed every configured time.
E-Mail Image Format
This option is to define type of attached image on e-mail
Genesis Digital Imaging, Inc.
www.genesisdigital.com
Page 79
12/19/2006
Local DB Backup
Registered Folders
You can see what database is created in your local system.
Backup: Backup current selected database on Registered Folders List.
Restore: Restore backup database in your local system.
Always backup local DB files on viewer exit: If this option is checked, OmniVue
Vet will backup local database when user close the OmniVue Vet
Genesis Digital Imaging, Inc.
www.genesisdigital.com
Page 80
12/19/2006
Hanging Protocol
Using the actual hanging
When checked, this option uses default hanging protocols set by PACS
administrator.
1exam 1series layout is all series mode
If this option is checked, OmniVue Vet will display images on all series mode if
the display layout is set 1exam 1series.
2 exam 1series layout all series
No: OmniVue Vet will not apply all series mode on any other layout condition.
Both exams: OmniVue Vet will apply all series mode for each exam.
Left exam: OmniVue Vet will apply all series mode to be located in left side of
monitor.
Right exam: OmniVue Vet will apply all series mode to be located in right side of
monitor.
Genesis Digital Imaging, Inc.
www.genesisdigital.com
Page 81
12/19/2006
Hanging protocol layouts
You can define series layout and image layout for each modality and OmniVue
Vet will display images according to configured layout for each modality
Change Series Layout
In OmniVue Vet, series layouts are defined as follows:
1 Series: Display only one series in the screen.
2 Series: Display two series in the screen. (1Row, 2Column)
4 Series: Display four series in the screen (2Row, 2Column)
2 Exams: Possible to display two exams in one monitor (1Row, 2Column)
Change Image Layout
After selecting series layout, then you have to define image layout. But if you
select 1 series in the series layout option, image layout will be fixed by default
CR: You can define 1 by 1 to 2 by 2 layouts.
MR & CT: You can define 1 by 1 to 5 by 5 layouts.
US & OT: You can define 1 by 1 to 4 by 4 layouts.
Default Image Layout
If you set 1series in series layout option, image layout option will be fixed default
layout
To use Multi Monitors, the features are as follows,
Genesis Digital Imaging, Inc.
www.genesisdigital.com
Page 82
12/19/2006
Monitor Link – Basically one monitor on one exam window. It is possible to set
the multi monitors as one exam window by monitor link.
Series Link – The monitor is set to one series window if it uses with series link
together. (Monitor link)
Ex 1) The case which opens MRI exam with two Monitors.
(Series Layout: 2X2, Image Layout: 2X2)
New
Old
2 Exam Window (New-Old)
Exam Window is identical with each monitor.
The MR exam displays on left monitor.
(Different exam cannot be displayed concurrently.) The Old exam which has
taken lately will be display on right monitor.
2 Exam Windows (Old-New)
Old
New
Exam Window is identical with each monitor.
The MR exam displays on right monitor.
(Different patient’s exam cannot be displayed concurrently.) The Old exam which
has taken lately will be display on left monitor.
2 Exam Window (New-Empty)
New
Empty
Exam Window is identical with each monitor.
The MR exam displays on left monitor.
(Different exam cannot be displayed concurrently.) Any other patient’s exam can
be display on right monitor.
2X2 Series Window
After the series layout sets 2 x 2, the series
windows will be created. The basis of order to
display is right to left and top to bottom.
Genesis Digital Imaging, Inc.
www.genesisdigital.com
Page 83
12/19/2006
(Each series displays orderly when an exam
opens.)
2X2 Image Window
After the image layout sets 2 x 2, 4 images will
be displayed on each series window.
Ex 2) The case which opens MRI exam with two Monitors.
(Series Layout: 1X1, Image Layout: 2X2, 1 exam 1series layout is all series
mode)
1 Exam Window
Two monitors are recognized as one monitor to
create one exam window.
1X1 Series Window
If 1exam 1series layout is all series mode is
checked, one series window will be created on
two monitors.
2X2 Image Window
Four images on each monitor in series window
Genesis Digital Imaging, Inc.
www.genesisdigital.com
Page 84
12/19/2006
will be displayed with 2 x 2 layouts.
User can customize to display exam, series and image.
Displaying Window is divided by Exam Window, Series Window and Image
Window. (Appoint series window and image window on an each modality.)
Exam Window: the space to display the exam. For use of hanging protocol, one
monitor will be recognized as one exam window.
Series Window: The space that each series is to be seen to be included in exam.
Image Window: The space that images is to be seen to be included in series.
How to set up
Click Option _ Preference _ Hanging Protocol Tab in Display Window.
1) Exam Layout: Confirm exam layout for each modality.
1 Exam: Display only one exam on monitors
Genesis Digital Imaging, Inc.
www.genesisdigital.com
Page 85
12/19/2006
New-Old: Display current selected exam on left monitor and the old exam which
has taken latest will be displayed on right monitor.
Old-New: Display current selected exam on right monitor and the old exam that
has taken last will be displayed on left monitor.
2) Series Layout: Confirm series layout for selected modality.
If Exam layout set to 1 Exam, you can’t set odd column for series layout.
Please select series layout regarding as one monitor.
3) Image Layout: Confirm image layout for selected modality.
Once you set series layout, OmniVue Vet will automatically set optimized image
layout. You can also set manually.
External Program
Refer to page: XXXX (BEN)
Genesis Digital Imaging, Inc.
www.genesisdigital.com
Page 86
12/19/2006
Chapter
4
Applications
Personal purpose
JPEG Image Display
Slide Making
Teaching File Manage
Film Digitizer
External TWAIN Driver
Genesis Digital Imaging, Inc.
www.genesisdigital.com
Page 87
12/19/2006
Applications – Personal purpose
JPEG Image Display
Import function of OmniVue Vet can convert common images
(JPEG, TIFF, BMP) to DICOM files and store them into local
database of OmniVue Vet. Export function of OmniVue Vet can
convert DICOM images to common image format reversely.
Slide Making using DICOM files
OmniVue Vet supports Clipboard for word processor and Power
Point, so you can make presentation or word documents easily.
Teaching File Management
OmniVue Vet supports users to make personal database
(called by Conference folder), which will be utilized for
education, clinical research and so forth.
CD Backup
OmniVue Vet supports DICOM Media Backup for several
purpose like teaching file backup, and images burned on CD for
transferred patients. OmniVue Vet provides auto-run viewer
with patients' images on CD, so that referred doctors don't need
to install DICOM viewers on their PCs. When they insert CD in
their PC, our auto-run viewer of CD will display the patients’ images
automatically.
JPEG Image Display
Genesis Digital Imaging, Inc.
www.genesisdigital.com
Page 88
12/19/2006
OmniVue Vet can open normal image file and make local database. Exporting
selected images, saving them in a popular format such as JPEG, and retrieve the
images that you wish to integrate into a single study using 'Open DICOM File' or
'Open non-DICOM File'. If you import retrieved images, they will be integrated
into a new teaching file and stored in a local folder.
How to Use
Import DICOM Images
To open DICOM files of selected directory and then store them to the local
database of OmniVue Vet. Imported images are stored in the directory of Image
of OmniVue Vet.
1) Select File > Open DICOM
File.
2) From window of Open,
select images.
3) Select File > Import.
Patient, study, and series, etc
will be displayed. You can
modify some of them if you
want.
4) Click OK to store them to the local database.
5) You can find imported images at Worklist of
OmniVue Vet on the local tab.
Genesis Digital Imaging, Inc.
www.genesisdigital.com
Page 89
12/19/2006
Import Non-DICOM Images
Open non-DICOM file at selected directory and then store them to the local
database of OmniVue Vet. Imported images are stored in the directory of Image
of OmniVue Vet.
1) Select File Open Non-DICOM file.
2) From window of Open, select images.
3) Select FileImport.
4) Type patient, study, and series, etc.
5) Click OK to store them to the local database.
6) You can find imported images at Worklist of OmniVue Vet.
Export
To convert DICOM images to common image file formats (JPEG, BMP, TIFF,
etc). You can use this function to save images to the hard disk or a floppy disk
which can be utilized for general documentations and presentation materials.
1) Select images from image window.
2) Select File > Export.
3) From window of export selected image, type file name and select file format,
and then press Save.
4) You can find exported images in the directory you assigned.
Slide Making
OmniVue Vet basically support image-editing function for documentation.
- Capture whole image by Copy to clipboard.
- Capture a piece of image by ROI (region of interest).
- Slide making using Power Point.
How to Use
To copy an entire image
Genesis Digital Imaging, Inc.
www.genesisdigital.com
Page 90
12/19/2006
1) Select the image and Click Copy to Clipboard
2) Click Edit > Copy to Clipboard from top menu.
2) Right-click and select Paste or press Ctrl+V on word and PowerPoint.
To copy a part of the image
1) Select the image.
2) Click ROI Icon to select ROI type and draw ROI
on the image.
3) Right-click on the edge of ROI.
4) Select Copy To Clipboard.
Right-click and select Paste or press Ctrl+V on word, PowerPoint.
Genesis Digital Imaging, Inc.
www.genesisdigital.com
Page 91
12/19/2006
Teaching File Management
OmniVue Vet
OmniVue Vet makes medical doctors and personnel manage their own medical
image database for personal purpose. They can manage them according to body
parts, specialties, departments, imaging modalities, etc.
For Education:
For example, to manage MR Brain for the training, Conference DB function of
OmniVue Vet is very helpful. They can make CD backup easily and cheaply.
For Research: To prepare the paper and research, Conference Folder of
OmniVue Vet can build multiple local databases privately.
For Patient care: To keep case report or special diagnosis, Conference Folder
function of OmniVue Vet is very supportive.
How to Create a New Folder in Your Hard Disk
1) Click Option Conference Folder from top menu
Genesis Digital Imaging, Inc.
www.genesisdigital.com
Page 92
12/19/2006
2) Select Add Folder and type folder name with checking Add Folder. And then
click
‘Next’.
3) Type Folder Path or use it by default and then click Next.
4) Type folder information of author, description, internal
folder name) and click Next’.
5) Click Finish.
6. Go to the Worklist window and
verify that new folder tab created.
Film Digitizer
Basic of connection with film digitizer
Commercial film digitizers can acquire images on digital media and transfer them
the personal computers (OmniVue Vet). Those images can be retrieved and
displayed on PC and printed using printers.
Genesis Digital Imaging, Inc.
www.genesisdigital.com
Page 93
12/19/2006
Omni PACS
OmniVueVet
Checkpoint
To display images (which are acquired by commercial digital cameras) on
OmniVue Vet, you need to check the following:
1) Installation of SCSI Cable & SCSI driver to connect your film digitizer to the
PC (Film digitizer provides SCSI connection, and the PC need to SCSI card.)
2) Installation the software to edit and visualize images acquired by the film
digitizer
3) Installation of OmniVue Vet
External TWAIN
Using external twain drivers, you can control film digitizers and acquire film or
paper images.
How to Use
1) Click File Twain select source from top menu.
2) Select TWAIN driver.
3) Insert film at the digitizer.
4) Click File Twain Acquire Multi.
5) Run External Twain program.
6) Scanned image is display on image window of OmniVue Vet.
7) Click File Import from main menu.
8) Type patient, study and series, etc.
9) Click OK to store it to the local database of OmniVue Vet.
10) You can find imported image in Worklist window of OmniVue Vet.
Genesis Digital Imaging, Inc.
www.genesisdigital.com
Page 94
12/19/2006
Chapter
5
Trouble Shooting
Slow Viewing
Image Not Found
Response Time
Wrong Image Sequence
Login Problems
Local DB Backup
External Report
Error Message
Genesis Digital Imaging, Inc.
www.genesisdigital.com
Page 95
12/19/2006
Trouble Shooting
This category will support professional users who have experiences of Omni
PACS products and solutions.
Preference Setting
1) Click Option Preference from top menu.
2) You can set preference of network, database, style, environment, and viewer.
Image display
1) You can rearrange the sequence of images on image display window.
2) How to configure multiple high-resolution grayscale monitors and a color
monitor at once.
3) Detail information of scout view for CT and MR images.
Slow Viewing
OmniVue Vet -User Jobs
1) Close all images in OmniVue Vet, which can make memory full.
(Open reasonable number of exams only.)
2) Check Option Preference Viewer from the menu. And then select none
interpolation for CR.
3) Uninstall unnecessary programs like Game, etc.
4) Check OmniVue Vet configuration like
interpolation, automatic cache clearance, etc.
5) Check virus invasions using anti-virus software.
6) Check hardware specification of your PC
including CPU, memory and disc space sufficient.
Consider upgrading them, if needed.
Omni PACS-Administrator Jobs (Talk to PACS administrator)
7) Ping test from OmniVue Vet to Omni PACS to check network or server
problems.
(Start Run type CMD type PING IP Address of network or server)
Genesis Digital Imaging, Inc.
www.genesisdigital.com
Page 96
12/19/2006
8) Uninstall or remove unnecessary applications or processors of Omni PACS,
for example, Internet information server.
9) Check CPU rate and memory of Omni PACS.
Compare the workload to system configuration.
Exam on Worklist without image (Image Not Found)
If, after loading the studies, the above message “Image Not Found” appears in
the viewing window, it may be due to one of the following reasons:
1) The database capacity was exceeded during image transfer to the database.
2) You attempted to load the study before the image data had been transferred to
the database.
Possible Solutions
1. Check space availability of your local storage.
2. Check FTP connection using DOS command.
3. Compare image-stored path in server’s drive and path in database.
Response Time
OmniVue Vet -User Jobs
1) Close all images in OmniVue Vet, which can make memory full. (Please open
reasonable number of opened exams.)
2) Check Option Preference Viewer of top menu. And then select None
interpolation for CR.
3) Uninstall unnecessary programs like Game, word, etc
Genesis Digital Imaging, Inc.
www.genesisdigital.com
Page 97
12/19/2006
4) Check OmniVue Vet configuration like interpolation, automatic cache
clearance, etc.
5) Check virus invasions using anti-virus software.
6) Check hardware specification of your PC including CPU, memory and disc
space sufficient. Consider upgrading them, if needed.
Omni PACS-Administrator Jobs (Talk to PACS administrator)
7) Ping test from OmniVue Vet to Omni PACS to check network or server
problems.
8) Uninstall or remove unnecessary applications or processors from Omni PACS,
for example, Internet information server.
9) Check CPU rate and memory of Omni PACS. Compare the workload to
system configuration.
10) OmniVue Vet supports both MS SQL 7.0 and 2K. However the case
according to 7.0, the client version is not suitable in OmniVue Vet and DB
connection.
Wrong Image Sequence
Rearrange Image (Manual)
1) Click ToolRearrange Image to change the
mode of Rearrange Image. The border of image
will change to the blue color.
2) Click the image to change to green color.
3) Insert between two images.
If you move the cursor between two images.
White bar will be created and click to insert.
4) To change the location with another image.
Move the cursor on the image, which you wish to
change, and the border will be red color and click
to switch the location.
Genesis Digital Imaging, Inc.
www.genesisdigital.com
Page 98
12/19/2006
Rearrange Image Position
To rearrange the sequence of images automatically according to Date/Time,
Acquisition Date/Time, and Image Number
1) Click Tool Rearrange image position from the main menu.
2) Select image Arrange Method and Sort Method.
3) Click OK button and then selected images are rearranged according to the
selected method.
Rearrange Series
Use the thumbnail window and manually rearrange series.
Thumbnail image is 1 series unit.
1) Open an image
2) Move the mouse down on the image window and then show the thumbnail
window.
3) Drag an Image to a Desired Location
Login Problems
Type User ID & Password
USER Registration
Genesis Digital Imaging, Inc.
www.genesisdigital.com
Page 99
12/19/2006
1) In enterprise PACS environment, OmniVue Vet should have made an
additional New account to main server by admin tool.
2) Management server accounts and local accounts by separated.
3) Default login user ID and Password for local database of OmniVue Vet are
OmniVue Vet.
Change Password
OmniVue Vet user accounts information can be changed
1) Allows the user to change the password.
2) Click Change PW on the log-on screen.
3) Type an old password.
4) Type a new password and click OK.
Log-on Failure
Check 3 cases of login failure.
1) Wrong user Id/Password
2) Server connection error: In cases of server Database troubles, Network
troubles, ODBC connection troubles
3) Local Database Error: In case of error on local DB of OmniVue Vet
a. Click Cancel on error message.
b. Click OK.
It takes too long to log on.
1) If the initial screen does not appear for a long time after providing your ID and
password, there is a problem with the link to the registered server, or the server
does not exist on the network. Log on as a local user and go to Option Preference. Delete the registered server form the database setting or adjust the
link configuration.
2) OmniVue Vet supports both MS SQL 7.0 and 2K. However the case according
to 7.0, the client version is not suitable in OmniVue Vet and DB connection.
The speed comes to be slow. Consequently we strongly recommend you to use
MS-SQL 2K.
Local DB Backup
Genesis Digital Imaging, Inc.
www.genesisdigital.com
Page 100
12/19/2006
OmniVue Vet has two local Database (Master mdb and OmniVue Vet mdb
Conference folder has unique mdb of itself
Master mdb
What is master mdb
Necessary of the OmniVue Vet operating
It has the basis information of OmniVue Vet start and log on
ex) Database, User and password, User level, network...
Genesis Digital Imaging, Inc.
www.genesisdigital.com
Page 101
12/19/2006
Chapter
6
Appendix
Delete Data from Local DB
Import
Send DICOM
Toolbar Icon Description
Pull Down Menu
Short Cut Key
Genesis Digital Imaging, Inc.
www.genesisdigital.com
Page 102
12/19/2006
Delete data from local database
When an image is deleted, the data is supposed to be in local DB.
To open DB, MS access 2000 has to be installed in the PC.
OmniVue Vet mdb contains data that is in local tab of worklist.
To delete the data that related with exam, the method is as follows.
How to Delete Data from Local DB
Delete Data from OmniVue Vet
1) Double Click OmniVue Vet.EXE Icon.
2) Type Login ID, Password.
3) Search data from Worklist.
4) Select Data.
5) Right Click.
6) From Pop up Menu, Click Delete Exam.
7) From Exam Delete, Click Yes.
Delete Data from Microsoft Access
1) Double Click Microsoft Access Icon.
2) From Micro Access, Click Cancel.
3) Click Option of main menu, and then click File Open
4) From Open, Search local DB file from Look in and then click Open.
File location C:\Genesis Digital Imaging\OmniVue Vet \Database\OmniVue
Vet.mbd
5) From OmniVue Vet DataBase, Double Click PatientTab, StudyTab, SeriesTab
and ImageTab.
6) Select delete data (PID: Patient ID) in PatientTab.
7) Select Studykey in StudyTab
8) Select SeriesKey in SeriesTab.
9) Select ImageKey at ImageTab and Delete record drag.
10) Right Click and From Popup Menu.
11) Click Delete Record (Exam Real Delete),
Tip: Delete Data sequence
Image record Series record Study record Patient record
Genesis Digital Imaging, Inc.
www.genesisdigital.com
Page 103
12/19/2006
Localization DICOM image
When DICOM image import, patient information for DICOM Header has to be
input manually. We recommend number 2 that is the method to DICOM sends to
local and open DICOM image.
There are two ways to add DICOM File in local worklist.
1) Method 1: Import Open DICOM File and Open Non-DICOM File to.
2) Method 2: DICOM sends File to local and open DICOM Image.
Recommend Method 2
Import
Import function open DICOM and non-DICOM images. If they are non-DICOM
images, it converts them to DICOM files and stores them at local database.
How to Import
Open DICOM Files
1) Click File of main menu, and then click Open DICOM File....
2) From Open, Search DICOM file in Look In.
3) Select DICOM File.
4) Click Open.
5) Click File of main menu, and then click Import.
6) From Import into local DB.
7) Type Select Database, Patient Information, Study Information, Series
Information and Import Setting.
Open Non-DICOM File
1) Click File of main menu, and then click Open Non-DICOM File....
2) From Open, Search Non-DICOM file in Look In.
3) Select Non- DICOM File.
4) Click Open.
5) Click File of main menu, and then click Import.
6) From Import into local DB.
7) Type Select Database, Patient Information, Study Information, Series
Information and Import Setting.
For example, see 1. Open DICOM Files.
8) Click OK.
Genesis Digital Imaging, Inc.
www.genesisdigital.com
Page 104
12/19/2006
Send DICOM
You can use the Viewer’s local DICOM server to exchange images with remote
DICOM servers or viewers.
How to Send DICOM
1) Select exams in Worklist.
2) Right-Click, and then display Popup Menu.
3) Click Send DICOM.
4) From Send Exam, select Destination Hostname, and then click Connect Test
(DICOM network connection test).
6) Select Compress Method among keep Original, Uncompression, Lossless
JPEG, Lossy-Minimal, Lossy-Mild, Lossy-Moderate, Lossy-Severe, or LossyVery severe.
7) Click Send.
Notice:
When you have Image display or transmission problem due to
Compression status of stored images, we recommend you to select
Uncompression of 6) which makes compressed images
decompressed and transmitted.
Genesis Digital Imaging, Inc.
www.genesisdigital.com
Page 105
12/19/2006
Genesis Digital Imaging, Inc.
www.genesisdigital.com
Page 106
12/19/2006
Genesis Digital Imaging, Inc.
www.genesisdigital.com
Page 107
12/19/2006
Pull Down Menu
File
Edit
Genesis Digital Imaging, Inc.
www.genesisdigital.com
View
Page 108
12/19/2006
Image Process
Option
Tools
Tool
Sharpen Preset
Genesis Digital Imaging, Inc.
www.genesisdigital.com
W/L Preset
Page 109
LUT Preset
12/19/2006
Genesis Digital Imaging, Inc.
www.genesisdigital.com
Page 110
12/19/2006