1
eComStation 1.1 Entry English Manual
Chapter 1: Welcome
This manual will help you through the installation process of
eComStation 1.1 onto your system. Please refer to it if you have
questions or problems during your install. Especially important are the
sections on LVM and the Boot Options Menu. Make certain you
understand how LVM functions before you make changes to your
harddisk.
This manual contains the following sections:
Chapter 2: Installation
Describes how to install eComStation 1.1 using either the Easy or
Advanced installation method.
Chapter 3: What's Next?
Will talk about adding support for several hardware items and will
touch shortly on the installation of additional applications.
Chapter 4: Getting Connected
Explains briefly how to get connected to the Internet and your Local
Network. Also contains a tips on networking within a Windows
Environment.
Chapter 5: Getting Involved
Describes some ways you can help to support the development and
evolution of eComStation
Appendix A: License Agreement
Appendix B: Trademarks
Contains Trademark notices and Acknowledgements
Appendix C: LVM
Describes in detail the usage of the LVM program
Appendix D: Boot Options Menu
Explains the options available at the Boot Options Menu when you
start from eComStation CD#1
Appendix E: Troubleshooting
Lists some frequently asked questions and answers. Consult this
section if you have problems!
Appendix F: Getting Support
Points you to the available documentation on the several CD's.
Appendix G: Coexisting with other OSes.
Contains some tips on setting up eComStation alongside other
Operating Systems.
Chapter 1: Welcome - 1
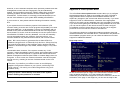
Minimum
Chapter 2: Installing eComStation 1.1
Video
This chapter will describe in some detail the several installation options
you have and guide you step by step through the installation process of
eComStation 1.1.
Before you begin
Before you start your installation of eComStation 1.1 make sure you
have the registration key readily available on either floppy, harddisk or
paper. You should have received the registration key by email, if you
did not you can request it via the customer area of
http://www.ecomstation.com/ (after login). Also, you might want
to check http://www.ecomstation.com/support/ for last minute
information and tips on the install process.
Hardware requirements
CPU
Memory
Recommended
Intel Pentium 133 MHz or
equivalent (including
Intel Celeron, PIII, P4
and AMD K6, Athlon and
Duron processors)
Any modern CPU will do, but
the higher the speed the
more responsive your system
will be. Intel P4 HT
processors are supported,
but eCS will not be able to
detect it as a dual cpu setup
in all cases.
48 MB (absolute
minimum required for
installation from CD)
2 - eComStation 1.1 Manual
A practical minimum amount
of memory is 64 MB but your
system will operate
considerably better when
more than 64 MB memory is
installed. In short: install as
much memory as you can in
your system. 4 GB is the
maximum supported amount.
PCI VGA video card with
at least 512 kB memory.
AGP video board supported
by Scitech Display Doctor.
See www.ecomstation.com
for a full list of supported
adapters.
Drivespace 500 MB
When selecting more options
in the installer, more
drivespace is required. A
practical working size is 1
GB.
Mouse
Any PS/2, serial or USB
mouse
A PS/2 mouse is
recommended for best
performance.
CD drive
IDE or SCSI CD-ROM
drive
an IDE or SCSI CD rom or
DVD player with boot
capability supported in the
BIOS to ease the installation
process.
In order to succesfully install eComStation 1.1 please take in
consideration these minimun and recommended minimum system
requirements:
Minimum
Recommended
Getting started
Your eComStation 1.1 Entry package consists of two CD's:
CD#1
CD#2
contains the eComStation 1.1 base product and installer.
contains a host of applications and drivers to enhance your
eComStation experience.
Additionally, you can order the eComStation 1.1 Application Pack,
which will be referred to as CD#3.
CD#3
contains commercial applications.
Prepare your system
If you are planning to install eComStation 1.1 on your system and you
want to upgrade your existing OS/2 Warp 4, OS/2 MCP1, OS/2 MCP2,
eComStation Preview or eComStation 1.0 installation, please refer to
migrate.txt on CD#2 in order to prepare your system for installation.
Always make sure you have a tested backup of your working system!
Chapter 2: Installing eComStation - 3
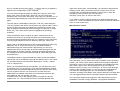
Start your installation
Creating boot diskettes from CD#1
To start the installation process, the computer needs to boot from the
installation CD. Insert CD #1 and hit the reset button or turn off your
computer and turn it on again. Some computers only scan the CD-ROM
for a CD to boot from when they perform a "cold boot". If your system
boots succesfully from CD #1 you will be prompted with an option
menu:
If you are unable to boot from the installation CD, it is possible to create
boot diskettes to start your computer. These diskettes can be used to
run the installation.
The default option is to
continue to boot from
harddisk.
When you select to boot from the CD another menu appears which
enables you to select between the normal CD boot or the Boot Options
Menu:
(see Appendix D: Boot
Options Menu for details)
1. Run makedisk.bat on a DOS based machine on which you have
CD-ROM access. Or run makedisk.cmd on an OS/2 based machine
on which you have CD-ROM access. This allows you to create a set
of boot diskettes with several options:
To install eComStation from CD-ROM you can create installation
diskettes (3.5 inch HD floppy diskettes, 2.0 megabytes unformatted)
that may be modified to work with non-standard hardware
configurations.
Note: There are two versions of the boot diskettes plus two versions
of a boot update diskette to supplement the CD-ROM.
If you want to create a set of installation diskettes that will use the "Boot
Options Menu", hit '1' in the menu presented to you.
If you want to create a set of installation diskettes that can be modified
by the user, hit '2' in the menu on the next screen.
On most systems with IDE hard drives and CD-ROMs, it suffices to
select the first option, Boot with default values.
If you want to create a prepared diskette with a test kernel to update the
memory disk during CD boot, hit '3' in the menu on the next screen.
If you have a SCSI connected hard drive or CD-ROM, or other specific
requirements, you should select Boot with menu for own values.
Please refer to Appendix D for details on this menu option.
If you want to create a prepared diskette to update or copy files to the
memory disk during CD boot, hit '4' in the menu on the next screen.
Features you select in the boot options menu will not only be used
during the boot process but will also be added to the installation
configuration on your harddisk.
Adding driver support via floppydisk:
You can also boot from CD rom and supply additional drivers on floppy
disk. How to do this is documented in Appendix D: Boot Options Menu.
The option to Display online documentation will present you with
instructions (also available in Appendix D) and a list of supported
hardware.
If you do not see one of these option screens to boot, please refer to
the installation troubleshooting section in Appendix E
4 - eComStation 1.1 Manual
Chapter 2: Installing eComStation - 5
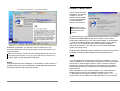
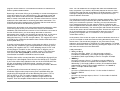
Installation Program
Once the CD bootprocess has been completed, you should be
presented with the installer:
You can select the installer
language (currently only
English), keyboard layout and
font size of the installer screens.
Font size can be changed at
any time during install by
pressing the key combination
"CTRL +" or "CTRL -"
Once properly set you can click next to proceed to the License
Agreement screen. After careful reading the license agreement you
should check the Agree box and press next to proceed to the screen
where you can select the type of installation.
The following options are available:
§ Easy installation
§ Advanced installation
§ Management console
Easy installation
This option should be selected by most users, as it offers certain
options, especially network configurations, preconfigured to ease the
burden on the user. For example, your workstation is automatically
configured for a Dynamic IP network. If yours is a Static IP environment
and your Network Administrator has assigned your workstation a
specific IP number, then you should use the Advanced Installation.
Management console
The management console will exit the installation program and offer you
some options to maintain your harddrive, run applications and start a
command prompt. This can be a convenient way to access your
harddrive in certain situations.
Also it will enable you to use the
advanced Logical Volume
Manager text mode interface for
special requirements. Please refer
to Appendix C: LVM for more
information on LVM.
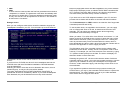
Installation Volume
Once you have selected either Easy or Advanced install, you will have
to select the installation volume. When the installer does not find any
suitable volume on your harddrive, you will first have to define these
with either MiniLVM or LVM. See
Appendix C: LVM for more
details.
Pressing the New volume button
will invoke the Mini Logical
Volume Manager which will guide
you through the process of
creating an installable volume. It
has extensive online help, which
explains the various menu
options.
If the installer does find a suitable
volume you will be prompted with a
screen similar to the one shown
above.
Advanced Installation
Advanced Installation offers you more control over which software
components get installed and allows you to set up the network
configuration.
Choose this option if you want or need to:
§ configure your network to use static IP addressing,
§ disable eComStation specific enhancements to the user interface,
§ deselect certain software components.
At this time you can decide if you
want to format the existing volume or
not. If this is a new harddisk, it is
recommended to perform a format
with errorchecking enabled (this is
also the default selection). Doing so
will ensure that the entire volume is
6 - eComStation 1.1 Manual
Chapter 2: Installing eComStation - 7
correctly initialized, however the process can take a long time (up to
several hours on large volumes that are many gigabytes in size!)
If you are installing onto an existing volume and you choose to not
format it, you will automatically upgrade the existing installation.
Note: To properly prepare your existing installation please refer to
migrate.txt on CD#2.
Enter Registration Code
After the correct volume has
been selected you will need to
enter your registration code to
be able to continue with the
installation process. This
registration code has been
emailed to the email address
you entered at the time of
purchase.
You can request the
registration key to be sent to you again by logging on to the
http://www.ecomstation.com/ website, and selecting the
appropriate option from the Customer Menu.
By saving the email text to either harddrive or floppy disk you can easily
import the key into the registration screen. Alternatively you can type
the key in manually, although this is not advised.
Locale and timezone settings
After succesful registration you will be prompted with a screen to verify
your locale and timezone settings. You can also change your codepage
settings in this screen.
Hardware and peripherals
configuration
eComStation 1.1 will try to
detect installed hardware in
your system and preconfigure
the settings in the hardware
page accordingly. You can still
alter or update the selections
that thie installer has made.
8 - eComStation 1.1 Manual
The following hardware subsections can be configured:
Display Driver
Select between Scitech Display Doctor (with an extensive list of
supported hardware accelerated 2D video card drivers) or Generic
Support. Generic Support should only be selected if you know that your
graphics card is having problems with the Scitech drivers; in most cases
you can leave this setting to the default of Scitech)
Storage
Enables you to choose which IDE driver your system will use, as well as
to review the autodetected SCSI host adapter. Most SCSI adapters
should be recognized properly.
Standard Devices
Enables you to select the proper mouse driver as well as choosing
between the enhanced serial port driver or the basic IBM driver. The
last option allows you to disable APM support. You can re-enable it at a
later time when necesarry - please refer to Appendix E.
USB Support
Allows you to specify which USB host controller will be enabled. USB
controllers should be properly autodetected, so in general you should
leave them at the preselected setting. Additionally you can specify any
extra USB devices you want to support by checking the appropriate
checkboxes for CD, floppy disk drive, or modem
Notebook & PCMCIA Support
If you are installing on a laptop computer, you should take special care
to verify this section. There are a lot of preconfigured IBM ThinkPad
models listed, as well as a large number of PCMCIA chipsets with
brands that are known to use these chipsets. The hardware
autodetection in eComStation 1.1 will not detect them, so you should
select the appropriate one manually.
The PCMCIA services section allows you to define which PCMCIA
devices should be supported.
Kernel Options
Allow you to specify special options for the operating system kernel. It is
not advised to change the preselected default settings.
Chapter 2: Installing eComStation - 9
Select Components (Advanced Install)
The Select Components screen (only available if you have selected
Advanced Install) allows you to determine in detail which system
components will be installed to your harddrive. The Additional Features
section will allow you to install eComStation 1.1 without the specific
enhancements, thus creating a more or less default OS/2 Warp
desktop. To do this, you should deselect the Usability
Enhancements.You can disable the Enhanced help viewer and Desktop
productivity tools as well, if you don't wish to have them installed.
Configure Network
Network configuration will allow you to select which network protocols
will be installed (if you choose to install network support at all) and to
which adapter these protocols should be 'bound'.
In the Network adapters and
protocols (only available
during Advanced Install) you
can determine in detail what
settings your network card
should have. Most users
should find the default values
will suffice.
If no network card was
detected by the
hardware-autodetection, the
screen will be blank and you
should press the "Add
adapter" button first to select your network adapter. If the list does not
contain a driver for your adapter, you can select other adapter to
point to a directory on harddisk or to a floppydisk which does contain
the drivers for your NIC. If these are found, they will be copied onto the
installationdrive and you can proceed with the configuration.
TCP/IP settings (Advanced Install - when TCP/IP protocol is selected)
allows you to configure your IP address to use either DHCP or a static
IP address.
LAN settings (when appropriate) requires you to enter your Workstation
ID and the LAN domain name.
Accept Configuration
When you are satisfied with the configuration options you have made
(you can go back and change them by pressing the 'previous'
button) you should confirm the configuration and press 'next' to start
the actual installation.
This process can take up to an hour depending on the speed of your
system and CD-ROM drive and will reboot the system a couple of times.
You can leave the system unattended, as it does not require any more
intervention from you.
If for some reason you want to abort the installation you can press the
stop button at any time. This will offer you the option to start the
maintenance console, or abort the installation which will take you to the
first page of the installer. All your previous selections will be lost
Finishing installation
The installer will now finish the installation by copying files to your
harddrive. This process will take a while and the system will reboot
during the process. If you experience any problem, please refer to
Appendix E: Troubleshooting.
After a number of reboots your system should be ready and present you
with a desktop similar to the screenshot on the next page. You will find
a system eCSGuide which will help you to configure your system:
§
§
§
§
§
§
screen resolution and refresh rate
change your network userid (if networking is selected)
configure the DHCP timeout value (if necesarry)
change the look and feel of the eComStation desktop
configure the clock of your system
allow you to install a local printer
(You can always restart this system eCSGuide by selecting
Local System -> Install/Remove -> eComStation Setup
from your desktop).
Note: Make sure that the domain name is the same as your other
eComStation / Windows machines if you want to share files and
printers between all machines. Windows uses the term "Workgroup
Name" to name the domain.
10 - eComStation 1.1 Manual
Chapter 2: Installing eComStation - 11
The desktop of eComStation 1.1 right after installation:
Chapter 3: What's Next?
After finishing the initial
installation, described in
Chapter 2, you are
advised to insert CD#2
in your CD-ROM player
to install additional
features and software.
Note: Before using
CD#2 for the first time
please reboot your
system!
Besides the eCSGuide, you will also notice a help screen in the
screenshot above, this is the help that will be shown the first time you
boot the system.
Tip: You can invoke context sensitive help throughout the system at
any time by pressing the F1 key on your keyboard, for almost every
system object specific help will be displayed.
Ready!
This concludes the basic installation of eComStation. Please read on in
Chapter 3 about using the eCSGuides to install additional applications,
supported hardware and other hints and tips!
12 - eComStation 1.1 Manual
An extensive menu of eCSGuides will be displayed when you start the
installer with install.cmd from the root of CD#2. A check will be
performed to make sure you are running the installer on eComStation
1.1 and not an older (possibly incompatible) version. Again, please
make sure you did a system restart, after the basic installation
described in Chapter 2. This will make sure your base multimedia
system is properly set up.
CD#2 contains additional software applications and drivers for several
hardware devices like ISDN adapters and multimedia devices.
Video
If you had selected to install legacy VGA during installation, you may
want to upgrade to a more advanced video driver, which is provided by
the means of "Scitech Display Doctor" (SDD). This driver supports
almost every modern video chipset on the market today and offers
excellent performance by enabling the 2D hardware acceleration of
these chipsets.
SDD is installed onto your system already, if you selected Scitech
Display Doctor during the eComStation installation from CD#1.
To add it later to your system manually, you can run the video.cmd
script from the root of CD#2 which will install SDD on your computer.
Chapter 3: What's Next? - 13
Printer
Additional software
To install a locally connected printer in eComStation, you can use the
Printer Installation Guide, available in the Printers folder within the
eComStation folder on your desktop. Alternatively you can use a Printer
Template from the templates folder and drag and drop it to the Printers
folder. When you want to install a Network Printer, you will have to
install it via the template drag and drop method, since the Printer Guide
only supports local printers. The shipping drivers contain support for
over 1000 printer models and are up to date to 2003. Additional drivers
will be available via the website http://www.ecomstation.com/
You can install several applications available on CD#2. A short list:
Multimedia
Base multimedia support is automatically installed at the end of the
base installation of eComStation 1.1.
You can install additional features and drivers via the Multimedia Menu
of CD#2. (invoke it with install.cmd)
The following can be installed through the Multimedia Menu:
§ OpenGL 1.1 (software 3D engine)
§ ELSA hardware MPEG playback support
§ Hauppauge TV card support (PCI/ISA)
§ Cinema/2 (TV viewer application)
§ LBMix (audio mixer)
Audiodrivers for the following brands:
§ Advanced Gravis (ISA)
§ Analog Devices (AC97)
§ Cmedia (PCI)
§ Creative Labs/Ensoniq (PCI/ISA)
§ Crystal (PCI/ISA/AC97)
§ ESS (ISA)
§ Realtek/Avance Logic (PCI/ISA/AC97)
§ Sigmatel (AC97)
§ Yamaha (PCI)
§ USB audio support
Additionally you can reset, remove and reinstall your multimedia
configuration with the menu of CD#2. Please refer to the instructions
given onscreen.
14 - eComStation 1.1 Manual
Full function applications:
§ Acrobat Reader 3 (view PDF documents)
§ Desktop On Call (control your desktop remotely over the internet)
§ PostgreSQL
§ Stellar Frontier
§ WarpIN installer
(advanced relational database)
(arcade game from Stardock)
(essential to install many eCS or OS/2
applications)
§ eCSCoNet
(dialer for Internet Access - see Chapter 4)
§ Mobile File System (IBM MFS - synchronize directories between
notebook and desktop computer)
§ Netware Client for eCS (IBM - add support to access a Netware
network)
§ OpenWatcom C/C++/FORTAN compiler (see Chapter 5)
§ IBM Toolkit 4.52 (enables you to develop new applications for
eComStation)
§ Java 1.3.1
(runtime and developer toolkit from IBM)
§ FaxWorks
§ IBM Works
§ VoiceType
(send and receive faxes)
(simple but functional office suite)
(control your desktop with your voice!)
Trial applications
§ Cool FM
§
§
§
§
§
§
(radio tuner with support for most hardware
radioboards)
Flash 5
(trial version of Macromedia Flash 5 player for
OS/2)
Graham Utilities (suite of disk and system utilities)
Maul Publisher
(desktop publishing application)
Norman Virus Control (antivirus software, includes free 3 month
update subscription)
PM Downloader (application to download hassle-free from the
Internet)
RSJ CD writer
(will write CD and DVD data discs)
Chapter 3: What's Next? - 15
eComStation Maintenance Tool
The eComStation Maintenance Tool is intended to update an
eCS installation with IBM Convenience Package updates
(known as fixpacks), apply customized updates furnished by
Serenity Systems, Inc, installed selected features, or backout updates
that have been applied. It is also capable of applying and removing
updates from IBM and Serenity Systems that are not applied using the
IBM service process. If you have the eCS Pro (SMP) version, the
eComStation Maintenance Tool also supports the addition and removal
of SMP support.
You can install the maintenance tool by invoking the eCSGuides from
CD#2 (install.cmd) and selecting the eComStation Software menu.
eComStation 1.1 Application Pack
When you purchased the eComStation 1.1 Application Pack you will
also find CD#3 in your eComStation package.
Chapter 4: Getting Connected
Internet
The Internet is a huge network of computers, itself incorporating many
thousands of individual subnetworks known as intranets (LAN's). The
Internet is the largest network of computers in the world and it's
importance as a medium to communicate and interact with other users
has become very clear in recent years.
eComStation is a very capable Internet client system for many services
available on the Internet, such as (e)mail, webbrowsing, IRC ('chatting'),
ftp (downloading files), telnet (remote console access) and much, much
more. eComStation by default installs Netscape Communicator for
webbrowsing and some other tasks (mail, news, ftp). More clients are
available, either as installed application or as seperate download. (for
an overview please have a look at the 'Internet' folder on your
eComStation desktop).
This CD-ROM contains the following software/features:
Before you are able to access the Internet, you will have to configure
how your connection will be made. The list below gives an overview of
the possibilities available in eComStation.
§ Lotus SmartSuite 1.7.1 (full office suite)
§ HobLink X11 (enables you to run X11 applications on the
eComStation desktop)
§ Sti scanner drivers and Applause Image utility
§
§
§
§
You will require a separate registration key to be able to install these
applications. You should have received the key from your vendor, but
can also request it by registering on the website:
http://www.ecomstation.com/
General Information Required
Before you start to configure your Internet Access, make sure you have
the following information at hand:
You can install the applications by starting install.cmd from the root of
CD#3.
16 - eComStation 1.1 Manual
Modem (analogue/ISDN)
Cable
ADSL/DSL
LAN
§ Your ISP dial in telephone number (in case of modem/ISDN)
§ The username/password required to login to your ISP
§ Your ISP nameserver IP address (most of the time there are two IP
addresses, Primary DNS and Secondary DNS)
§ In case of a LAN connection the IP address of the gateway PC
§ Additionally you may want to configure a Proxy Server (within your
browser)
Chapter 4: Getting Connected - 17
eCSCoNet
eCSCoNet is an OEM version of a program called ISDNPM and is both
a dial-in client and server program for analogue and digital data
connections.
eCSCoNet supports the following interfaces:
§ Analogue modems: up to four serial interfaces (COMx) at a time.
§ ISDN: up to eight CAPI interfaces (both version 1.1 and 2.0).
§ (A)DSL: one xDSL connection using its implementation of the PPP
over Ethernet network protocol.
§ (A)DSL one connection using its implementation of the Point to Point
Tunneling Protocol (PPTP).
A short list of interesting features:
§ Dial On Demand (eCSCoNet will dial in to the Internet if you request
a document which is not locally available).
§ NAT (Network Address Translation) supports up to 253 PC's on your
LAN to share one internet connection.
§ Supports dial-in, dial-back and can be used as a remote access
server
§ Built-in firewall with extensive rulesets.
Installing eCSCoNet
You can install eCSCoNet after the basic installation of eComStation
has finished by starting the Internet/Networking eCSGuide from CD#2
(run install.cmd).
Click the Install button to start the installation. After installation
completes, a folder "Internet Assistant for eComStation" and a folder
"eCSCoNet v1.00" will have been created in your Internet folder.
18 - eComStation 1.1 Manual
Configuring your Internet connection
Double Click the "Configure eCSCoNet with Internet Assistant!" icon in
the eCSCoNet v1.00 folder to start configuring your Internet connection.
You will be guided step by step to configure your dialer (eCSCoNet or
IBM Dial In program) and your installed webbrowser as well.
Internet Assistant can configure all connections eCSCoNet offers:
Analogue Modem
To configure an analogue modem, most default settings can be used,
the notable exception is the port-speed. Please set this to 57.600 baud.
Setting it higher will not have a positive effect, but a lower setting will
seriously slow down your connection.
ISDN card
Internet Assistant will detect and configure a properly installed ISDN
card. This requires you to setup your ISDN driver before starting the
Internet Assistant. To install your ISDN card, please use the ISDN
eCSGuide ....
All included drivers are licensed for distribution with eComStation.
There may be drivers suitable for your ISDN adapter, which are not
included on CD. Please contact your hardware vendor if you are
unable to find a correct driver.
PPPoE DSL connection
Selecting this option in Internet Assistant will ask you on which network
adapter your DSL modem is connected. Select the proper one and
check the eCSCoNet checkbox in the next screen.
PPtP DSL connection (KPN MxStream)
Currently connections to DSL modems using PPTP cannot be
configured for eCSCoNet directly. In order to use such DSL modems:
1. configure a serial dummy connection with the correct parameters
from your provider (userid, password etc.)
2. finish installing with Internet Assistant
3. find the script cfgenable from the eCSCoNet package
(x:\programs\ecsconet\bin\cfgenable.cmd) to migrate that
connection to use PPTP.
Chapter 4: Getting Connected - 19
4. call the script as follows: cfgenable pptp 'connectionname'
where connectionname is the name you entered in the first page of
Internet Assitant.
Note: there is extensive documentation available on eCSCoNet and
advanced configuration options. Please see the Online Help icon in
the eCSCoNet folder.
LAN
Using your Local Area Network to access the Internet is possible when
the TCP/IP protocol is installed and configured as described in Chapter
2. You do not require Internet Assistant for this type of connection.
The main thing you need to know is whether your LAN uses DHCP to
assign IP addresses to workstations, or that it uses static IP addresses.
Consult your network administrator if in doubt. You can setup your IP
configuration in detail by opening the Internet -> TCP/IP -> TCP/IP
Configuration (local) from your desktop.
Cable Internet Connections
Direct Internet Access is by far the easiest to use and setup in
eComStation. All that is required is that you install and configure the
TCP/IP stack as described in Chapter 2. You can setup your IP
configuration in detail by opening the Internet -> TCP/IP -> TCP/IP
Configuration (local) from your desktop.
Note: some Cable Internet Service Providers use a serial modem to
connect you to the Internet and use a special login-'phone'-number
you can use. If this is the case with your provider, use Internet Dial Up
from Internet -> Dial Up Tools or eCSCoNet as described above,
instead.
Local Networking
eComStation has the ability to communicate in almost any network
setup available. However, there are some caveats which will be
discussed briefly in the following sections.
Note: If you do not use your eComStation workstation in a network
setup, you can skip the following section.
20 - eComStation 1.1 Manual
In the present eComStation architecture, the networking is referred to
as Multi-Protocol Transport Services. The support is provided by drivers
called requester's. The requester's are specified in the config.sys file
and loaded at boot. Network communication is provided to and from the
requester's and protocol's using NDIS (Network Driver Interface
Specification). eComStation ships with the following requesters: IBM
LAN, 3270 Emulation, Netware (via ThirdParty eCSGuide) and IBM
TCP/IP. A very extensive online book "MPTS Configuration Guide" has
been placed in the Online Information folder in the Help Center of your
desktop.
When properly configured, eComStation is able to communicate /
network with:
§ Windows 95/98/Me
§ Windows NT/2000/XP
§ Linux (Samba)
§ Netware
§ and more
Networking Interoperability: Windows
You will need to install File and Printer Sharing to interoperate with a
Microsoft Network. The eComStation client is very easy to setup to
interoperate with a Microsoft Network if you know the tricks involved.
The "File and Print Client Guide" is placed in the Online Information
folder of the Help Center when you installed File and Printer Sharing. It
contains a brief section on interoperability with Microsoft Networks.
The three protocols generally needed to interoperate with Microsoft
Networks are TCP/IP, NetBios, and NetBios over TCP/IP. The NetBios
protocol can only be used on a local ethernet network because it
contains no routing information. The advantage is that the NetBIOS
LAN can never be approached from the internet. (A subnet can be
approached from the internet and is most often a NT TCPBEUI or
Novell network).
NetBios over TCP/IP (TCPBEUI) can see past a router and this protocol
is generally used by newer versions of Windows. Since Microsoft
installs by default TCPBEUI for File and Printer Sharing for so-called
Microsoft Networks, the most convenient way for eComStation to
communicate with Windows machines in a network is to use the Netbios
over TCP/IP protocol.
Chapter 4: Getting Connected - 21
In order to properly configure your network with Windows, you should
pay attention to several issues :
Connecting to Windows NT, 2000 or XP
An eComStation client can take advantage of Microsoft Network in one
of two ways. The eComStation client can logon to the NT domain or
logon locally. However, browsing is severely limited on a Microsoft
Network if the servers have been configured with the default settings
(more on this in a later section). Either method will achieve the desired
results of using the resources on a Windows NT/2000 server domain.
One precaution, your local eCS logon must exactly match the logon ID
on the NT/2000 domaincontroller. In addition, NT/2000 server allows
lower case in passwords whereas eComStation is case-insensitive for
passwords.
In a segmented network architecture where the eComStation client is
separated from the NT/2000 server via a router, domain authentication
is impossible with the default configuration of the eCS client. In order for
the eCS client to be authenticated by the NT/2000 domain controller the
IP-address will have to be added to the RFCBCST.LST file. This is
because NetBIOS via TCP/IP cannot acknowledge the complete TCP/IP
(inter) network as NetBIOS locally does. It works with distinct
Point-to-Point communications. So only the NETBIOS SERVERS in
RFCBCST.LST are initially notified of the appearance of a new machine
on the network.
Other NT/2000/XP resources can be added to the RFCNAMES.LST file.
This list can be compared with the host file of the DNS and has its
analogue in Windows in winnt\system32\drivers\etc\lmhosts .
These files may be updated by editing the Netbios over TCPIP protocol
in MPTS or editing the files directly with a text editor.
If you are using a one segment network, that is all machines are within
the same networkrange, you only need to add the highest IP-address of
the networkrange you are part of (e.g. 192.168.0.255) to the
broadcastlist (RFCBCST.LST file) and the IP-addresses of the Windows
clients to the Nameslist (RFCNAMES.LST).
After the RFC files have been modified, the RFCADDR command can
be run from an OS/2 window which will update the system and prevents
the client from having to be restarted.
22 - eComStation 1.1 Manual
Connecting to a network with WINS available
WINS (Windows Internet Name Service) is a combination of a Domain
Name Server and a NetBios Name Server. eComStation clients can
take full advantage of the NT/2000 WINS NetBios Name Server. Editing
the Broadcastlist and Nameslist files would be no longer necessary. The
only thing you have to do is to manually edit the protocol.ini file
and add the WINS IP-addresses (NBNSADDR and NBNSBACKADDR)
into the TCPBEUI section. If you are using DHCP you can request these
IP-addresses and view them from the DHCP monitor program.
Also the node type should be set to "H-Node" when operating in a
segmented network (leave it to the default B-Node for a one segment
network).
Change the following section of your protocol.ini (you can change
these values also via MPTS -> Edit Protocol)
[TCPBEUI_nif]
DriverName=tcpbeui$
Bindings=PCNTND_nif
NODETYPE="H-Node"
NBNSADDR="XXX.XXX.XXX.XXX"
NBNSBACKADDR="XXX.XXX.XXX.XXX"
OS2TRACEMASK=0x0
SESSIONS=130
Network Performance
To enhance the performance of an eComStation workstation in a
Windows NT/2000/XP Network you can change the default settings of
MAXIN and MAXOUT from 1 to 3 in eComStation, either by using MPTS
or directly in \IBMCOM\PROTOCOL.INI
Windows Network Browsing
To enable your eComStation client to browse your Windows Network
resources, you need to take into account the fact that eComStation
clients cannot see the resources of Microsoft TCPBEUI Servers in their
File and Print Client Resource Browser, when the Windows servers
have their LAN Manager parameter lmannounce set to off.
Unfortunately, this is Microsoft's default. This parameter defines the
response to LAN Manager 2.x browser broadcasts. The default
Chapter 4: Getting Connected - 23
response is to ignore these broadcasts. However, the "net view"
command can show resources when the resource is specified as
follows: "net view \\resource". If the command "net view" is
used, nothing will show except your workstation or other OS/2
Servers/Workstations on your network. Even putting the servername in
the broadcast list does not change this.
The Window's servers and workstations will have to have their default
settings changed as outlined below to enable browsing from OS/2 and
eComStation.
Windows for Work Groups:
The parameter "lmannounce=yes" will have to be added in the
[network] section of the system.ini file.
Windows 95/98/ME:
The parameter "LMAnnounce" is in located in Network settings under
File and Print sharing properties.
Windows NT 4.0 Server:
In Network settings, Services, Server, select the Make Browser
Broadcasts to LAN Manager 2.x clients at the bottom of the dialog page.
Windows NT/2000/XP Workstation:
Users will have to manually modify the Lmannounce entry in the
registry. The entry is as follows:
\HKEY_LOCAL_MACHINES\System\CurrentControlSet\Ser...
...vices\LanmanServer\Parameters
This setting will have to be changed from the default of 0 to 1. The
regedt32.exe program will have to be used for the above procedure. It
is located in \WINNT\SYSTEM32. Alternatively you can use Start -> Run
-> Regedit -> Edit -> Find "Lmannounce". Doubleclick on the highlighted
"Lmannounce" and change the DWORD 0 to 1. This would result in:
\HKEY_LOCAL_MACHINES\System\CurrentControlSet\Ser...
...vices\LanmanServer\Parameters\Lmannounce (1)
Note: Windows needs to be restarted before the LM Announce setting
takes effect.
24 - eComStation 1.1 Manual
Chapter 5: Developing for eComStation
Included with eComStation are the basic tools needed to develop new
programs. On the CD#1 you will find the Toolkits for Java (both the Java
1.1.8 and Java 1.3.1 versions) and the OS/2 Developers Toolkit
(version 4.52) is available on CD#2. Also included with the system is the
powerful REXX language, which can be used to make text mode
applications, or with some extensions can also be used to develop PM
applications (see below). If you want to get started on development it is
advisable to install the toolkits, which will give you extensive information
on all aspects of programming for eComStation. If you are not
interested in native application development, but only Java
development, installation of the Java Toolkit would suffice.
Open Watcom 1.0 C/C++/FORTRAN
By kind permission of Scitech Software, Inc.
(www.scitechsoft.com) included in this release of
eComStation is Open Watcom 1.0.
Open Watcom C/C++/FORTRAN is a suite of advanced,
easy to use cross platform compilers and development
tools. Supported platforms include DOS, Windows, OS/2 and Netware.
Included is an Integrated Development Environment, graphical
debugger, profiler and a class browser.
Open Watcom 1.0 is developed as a joint effort between SciTech
Software Inc, Sybase, and the Open Source development community.
To learn more about the OpenWatcom project, download new releases
or make a donation to support the effort, please visit
www.openwatcom.org. You can install the compiler by using the
installer in the developer eCSGuide of CD#2 (use install.cmd to
invoke the main guide)
The developer eCSGuide also enables you to install the IBM Developer
Toolkit 4.52 and contains information by Daniela Engert on writing
device drivers.
Other tools available:
Besides the included tools, there are several other developer tools
available for eComStation:
Chapter 5: Developing for eComStation - 25
EMX GCC
EMX GCC, the GNU Compiler Collection, including the EMX runtime
libraries that implement part of the standard UNIX functionality will soon
be commercially released by Innotek, for more information please see:
http://www.innotek.de/
Pascal Compilers:
§ Virtual Pascal, a free highly Borland Pascal/Delphi compatible
compiler with a Borland Pascal like development environment
§ EMX GNU Pascal, part of the GNU Compiler Collection mentioned
above.
§ Free Pascal: A free, Turbo Pascal 7 compatible compiler
BASIC Interpreters:
§ QBasic, DOS version is included with eComStation. QBasic is an
BASIC interpreter only, you can't compile to a executable
§ Liberty Basic, a commercial BASIC for Windows and OS/2, which
can also produce standalone programs
REXX extensions:
§ VX-REXX: REXX extensions to develop PM applications with REXX
§ DrDialog, RAD development tool for REXX which allows you to
develop PM applications, available on the IBM Developers' Toolbox.
Next to these there are several commercial development tools like
VisualAge for Java, VisualAge C++, Simplicity for Java, VisPro REXX,
etc, and there certainly are more free-, and shareware products out
there which we did not include in this list. A good place to start looking
for more free-, and shareware products is the /pub/os2/dev directory
of the Hobbes archive.
Links:
eComStation Developer Portal: http://dev.ecomstation.com/
OpenWatcom: http://www.openwatcom.org/
EDM/2 programmers magazine: http://www.edm2.com/
Netlabs: http://www.netlabs.org/
Hobbes ftp archive: http://hobbes.nmsu.edu/
Virtual Pascal: http://www.vpascal.com/
Free Pascal: http://www.freepascal.org/
Liberty BASIC: http://world.std.com/~carlg/basic.html
IBM Developers' Toolbox: http://www.developer.ibm.com/devcon/
26 - eComStation 1.1 Manual
Appendix A: License Agreement
eComStation End User License Agreement
READ THE TERMS AND CONDITIONS OF THIS LICENSE AGREEMENT
CAREFULLY BEFORE INSTALLING AND USING THIS COMPUTER
SOFTWARE AND THE ACCOMPANYING USER DOCUMENTATION (THE
"PROGRAM"). THE PROGRAM IS COPYRIGHTED AND LICENSED (NOT
SOLD). BY INSTALLING THE PACKAGE CONTAINING THE PROGRAM,
YOU ARE ACCEPTING AND AGREEING TO THE TERMS OF THIS LICENSE
AGREEMENT. IF YOU ARE NOT WILLING TO BE BOUND BY THE TERMS
OF THIS LICENSE AGREEMENT, YOU SHOULD PROMPTLY RETURN THE
PACKAGE TO THE PLACE OF PURPUASE TO ARRANGE FOR A REFUND OF
YOUR PURCHASE. THIS LICENSE AGREEMENT REPRESENTS THE ENTIRE
AGREEMENT CONCERNING THE PROGRAM BETWEEN YOU AND
SERENITY SYSTEMS INTERNATIONAL, AND IT SUPERSEDES ANY PRIOR
PROPOSAL, REPRESENTATION, OR UNDERSTANDING BETWEEN THE
PARTIES.
NOTE: IF YOU ARE USING A PREVIEW COPY OF THIS SOFTWARE, YOU
ARE REQUIRED TO INSTALL THE GENERALLY RELEASED PRODUCT. AT
THAT TIME, NO FURTHER USE OF THE PREVIEW SOFTWARE IS
AUTHORIZED.
License Grant:
Licensor hereby grants to you, and you accept, a nonexclusive license to use the
Program and the computer programs contained therein in machine readable, object
code form only (collectively referred to as the "Software", see Information About
Your Software, later on this document), and the accompanying User Documentation,
only as authorized in this License Agreement. A license of eComStation is required
for each computer owned, leased, or otherwise controlled by you and on which you
will operate eComStation. Or in the event of the inoperability of that computer, on a
backup computer selected by you. Neither concurrent use on two or more computers
nor use in a local area network or other network is permitted without separate
authorization and the payment of other license fees.
You may transfer all your license rights under this agreement. You must transfer all
media, documentation, and a copy of this agreement. All components of eComStation
must be transferred as a unit and cannot be broken up or transferred separately. Such
a transfer terminates your rights to use the program.
Appendix A: License Agreement - 27
A program is considered in use when it resides in memory or is otherwise stored in
the machine. A program stored on a network server, solely for the purpose of being
distributed to other machines is not considered to be in use. But your use may not
exceed the total number of users authorized.
Upon loading the Software into your computer, you may retain the Program Media
for backup purposes. In addition, you may make one copy of the Software on a
second set of media for the purpose of backup in the event the Program media is
damaged or destroyed. You may make one copy of the User's Manual for backup
purposes. Any such copies of the Software or the User's Manual shall include
Licensor's copyright and other proprietary notices. Except as authorized under this
paragraph, no copies of the Program or any portions thereof may be made by you or
any person under your authority or control.
Licensor's Rights:
You acknowledge and agree that the Software and the User's Manual are proprietary
products of Licensor protected under U.S. copyright law and other countries as
appropriate. You further acknowledge and agree that all rights, title, and interest in
and to the Program, including associated intellectual property rights, are and shall
remain with Licensor. This License Agreement does not convey to you an interest in
or to the Program, but only a limited right of use revocable in accordance with the
terms of this License Agreement.
License Fees:
The license fees paid by you are paid in consideration of the licenses granted under
this License Agreement. Payments must be made to Serenity Systems International,
or designated distributors and resellers from whom you acquired eComStation. You
agree to notify Serenity Systems, or its distributors or resellers, and pay any
applicable charges if you change the number of users.
Term:
This License Agreement is effective upon your installation and use of this package
and shall continue until terminated. You may terminate this License Agreement at any
time by returning the Program and all copies thereof, save one copy which may be
kept for your archive, and extracts therefrom to Licensor. Licensor may terminate this
License Agreement upon the breach by you of any term hereof. Upon such
termination by Licensor, you agree to return to Licensor the Program and all copies
and portions thereof.
28 - eComStation 1.1 Manual
Limited Warranty:
Licensor warrants, for your benefit alone, for a period of 90 days from the date of
commencement of this License Agreement (referred to as the "Warranty Period") that
the Program media in which the Software is contained are free from defects in
material and workmanship. Licensor further warrants, for your benefit alone, that
during the Warranty Period the Program shall operate substantially in accordance
with the functional specifications in the User's Manual. Serenity Systems does not
warrant uninterrupted or error-free operation of eComStation.
If during the Warranty Period, a defect in the Program appears, you may return the
Program to your distributor for either replacement or, if so elected by distributor,
refund of amounts paid by you under this License Agreement. You agree that the
foregoing constitutes your sole and exclusive remedy for breach by Licensor of any
warranties made under this Agreement.
EXCEPT FOR THE WARRANTIES SET FORTH ABOVE, THE PROGRAM,
AND THE SOFTWARE CONTAINED THEREIN, ARE LICENSED "AS IS", AND
LICENSOR DISCLAIMS ANY AND ALL OTHER WARRANTIES, WHETHER
EXPRESS OR IMPLIED, INCLUDING, WITHOUT LIMITATION, ANY
IMPLIED WARRANTIES OF MERCHANTABILITY OR FITNESS FOR A
PARTICULAR PURPOSE.
Limitation of Liability:
Licensor's cumulative liability to you or any other party for any loss or damages
resulting from any claims, demands, or actions arising out of or relating to this
Agreement shall not exceed the license fee paid to Licensor for the use of the
Program. In no event shall Licensor be liable for any indirect, incidental,
consequential, special, or exemplary damages or lost profits, even if Licensor has
been advised of the possibility of such damages. THE LIMITATION OR
EXCLUSION OF LIABILITY FOR INCIDENTAL OR CONSEQUENTIAL
DAMAGES, MAY BE CONTROLLED BY LOCAL REGULATION, SO THE
ABOVE LIMITATION OR EXCLUSION MAY NOT APPLY TO YOU.
Trademark:
eComStation, eComServer, WiseMachine, WiseManager, WiseServer, and
WiseClient are trademarks of Licensor.
No right, license, or interest to such trademark is granted hereunder, and you agree
that no such right, license, or interest shall be asserted by you with respect to such
trademark.
Appendix A: License Agreement - 29
Governing Law:
This License Agreement shall be construed and governed in accordance with the laws
of the applicable jurisdiction.
Costs of Litigation:
If any action is brought by either party to this License Agreement against the other
party regarding the subject matter hereof, the prevailing party shall be entitled to
recover, in addition to any other relief granted, reasonable attorney fees and expenses
of litigation, as appropriate under applicable jurisdiction.
Severability:
Should any term of this License Agreement be declared void or unenforceable by any
court of competent jurisdiction, such declaration shall have no effect on the remaining
terms hereof.
No Waiver:
The failure of either party to enforce any rights granted hereunder or to take action
against the other party in the event of any breach hereunder shall not be deemed a
waiver by that party as to subsequent enforcement of rights or subsequent actions in
the event of future breaches.
Information About Your Software:
eComStation includes a license to use the following products with eComStation:
§ IBM OS/2 Warp V4, IBM Product Number 31L0480M
§ Note: eComStation upgrade product users are required to supply their own valid
§
§
§
§
§
§
license for OS/2 V4
IBM OS/2 Warp Convenience Pak, IBM Product Number AS6Y5NA
IBM Desktop on Call for OS/2, IBM Product Number AS6YBNA
IBM SMP feature when purchased as an option, IBM Product Number AS6Y9NA
eWP - an OEM version of XWorkPlace
eCSCoNet - an OEM version of ISDNPM
NTFS for eComStation - a read only OEM version of NTFS
Third Party Work:
eComStation contains driver(s) and application(s) belonging to a Third Party,
hereinafter referred to as Third Party Work (TPW). TPW is licensed to Serenity
Systems International for distribution with eComStation from the following
companies and or persons (hereinafter referred to as the licensor):
§
§
§
§
§
§
§
§
§
§
§
§
§
§
§
3Com Corporation
Abbotsburry Software Ltd.
Artem GmbH
AVM GmbH for International Communications Technology
Analog Devices
Creative Technology Ltd.
Cirrus Logic Inc.
Christian Langanke (Internet Assistant).
DAWICONTROL Computersysteme GmbH
Eicon Networks Corporation
Elsa AG
HST High Soft Tech Gesellschaft fur Telekommunikation mbH
Mainconcept
Realtek
Teles AG TCS
In accordance with the agreements with HST, and Eicon, we must inform you that:
The HST and Eicon ISDN drivers you receive with eComStation may not be installed
on systems without a valid eComStation license.
In accordance with the agreement with Creative Technology Ltd., we must inform
you that:
The supplied SB 16 and SB AWE 32/64 may only be used with Creative products.
All copyrights, patents, trademarks belong to the respective licensor(s) of the TPW.
The TPW is provided on an "AS IS" basis. No warranty of any kind is offered, and
no claim of suitability for use on any system should be assumed.
None of the drivers that come with eComStation can be redistributed, and may not be
uploaded to FTP servers.
30 - eComStation 1.1 Manual
Appendix A: License Agreement - 31
Appendix B: Trademarks
Acknowledgements
The following terms, are trademarks of SSI or the TouchVoice Corporation in the
United States, or other countries, or both:
§ Managed Client
§ eComStatio\n
§ eCS
§ WiseManager
§ WiseServer
§ WiseClient
§ WiseMachine
§ WiseTalker
§ Drag-n-Drop Deployment
Parts of this document are based on the kind contributions of the following
people:
The following terms, are registered trademarks of International Business Machines
Corporation in the United States, or other countries, or both:
§ IBM
§ LAN Distance
§ OS/2
§ WebSphere
§ WIN-OS/2
§ Micro Channel
§ ServeRAID
The following terms are trademarks of other companies:
§ Approach, Freelance Graphics, Lotus, Lotus Notes, Lotus Organizer, Lotus
SmartSuite, and WordPro are trademarks of Lotus Development Corporation in
the United States, other countries, or both.
§ Tivoli is a trademark of Tivoli Systems Inc. in the United States, other countries,
or both.
§ Java and all Java-based trademarks and logos are trademarks of Sun
Microsystems, Inc. in the United States, other countries, or both.
Microsoft, Windows, Windows NT, Windows XP and the Windows logo are
trademarks of Microsoft Corporation in the United States, other countries, or both.
Other company, product, and service names may be trademarks or service marks of
others.
32 - eComStation 1.1 Manual
Paul Jarvinen
Oliver Rick
Alexander Taylor
Robert Thomas
Gerrit Schoenmaker
Sjoerd Visser
(Artwork)
(Boot Options Menu)
(MiniLVM)
(Windows Network - [email protected])
(Windows Network, co-existing with other OS)
(Windows Network)
eComStation includes a number of software packages from a number of
individuals, and companies. We are very grateful of their contributions.
Check http://www.ecomstation.com/ for a complete list of
contributors.
Abbotsbury Software has been so kind to license their
Hauppage drivers so these could be included with
eComStation. These drivers allow the use of Hauppage
TV boards to function under eComStation.
For any commercial request regarding these drivers
please contact:
Abbotsbury Software Ltd.
West Yard Barn
West Street
Abbotsbury
Dorset DT3 4JT
United Kingdom
tel:
fax:
web:
email:
(+44)-(0)1305-871543
(+44)-(0)1305-871688
http://www.abbotsbury.com
[email protected]
MainConcept GmbH has been so so kind to license their
OS/2 AVI codecs for inclusion with eComStation.
For more info on MainConcept, please have a look on the
following webaddress: http://www.mainconcept.de
Scitech Software, Inc. has kindly allowed us to redistribute
their binary OS/2 installer of OpenWatcom C/C++/FOTRAN.
Please visit Scitech at: http://www.scitechsoft.com/
Appendix B: Trademarks - 33
Appendix C: LVM
The role of LVM (Logical Volume Manager) is to present a simple
logical view of underlying physical storage space, ie. harddrive(s).
LVM manages individual physical disks - or to be more precise, the
individual partitions present on them. LVM hides the numbers, size and
location of physical partitions from users. Instead it presents the
concept of logical volume. A logical volume may correspond to a
physical partition (but that obviously almost defeats the purpose of
LVM) but it doesn't have to. One volume may be composed of several
partitions located on multiple physical disks. Not only that, the volumes
can even be extended (not shrunk - people usually want more space,
not less). They can even be extended while the OS is running and the
filesystem is being accessed! Of course, most home and SOHO users
don't have the hardware required for this.
LVM can be used in several ways:
§ You can invoke the text-mode interface by typing 'LVM' in an
command window.
§ There is an graphical version which can be called by typing 'LVMGUI'
in a command window. This version is a Java application and you
need to have Java installed to be able to run it.
§ Lastly, the installer of eComStation 1.1 provides MiniLVM which is a
GUI to the most important features of LVM. We recommend you use
this tool to setup your harddisk for installation of eComStation 1.1
Creating an installable volume
In order to install eComStation, you need to have at least one empty,
visible compatibility volume available on your hard disk.
If you do not already have a suitable volume ready to install
eComStation, you will need to create one.
Creating a volume is very straightforward using MiniLVM. If you need
advanced features you may want to use one of the other LVM tools as
mentioned in the beginning of this appendix.
Tip: An excellent step by step guide for using text mode LVM is
available in the online help during installation, please consult it if you
34 - eComStation 1.1 Manual
need to perform harddisk or partition management. You can also view
this document directly from the root of CD#1: lvmhelp.inf
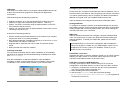
MiniLVM
The MiniLVM interface is
self-explanatory and features
an online help system.
MiniLVM will guide you
through the necesarry steps
to prepare your harddisk for
installation.
General Considerations
Make sure you have your harddisk layout the way you want it, before
you install eComStation. The use of partitioning tools, like
PartitionMagic of PowerQuest, FIPS, or others should be prevented if at
all possible after you have installed eComStation.
If you have more than one operating system installed, you are
required to use the IBM bootmanager, install via (Mini)LVM, to
switch between those systems. IBM bootmanager is LVM aware, most
other bootmanagers are not.
Multiple operating systems on your computer
You can use multiple operating systems alongside eComStation,
however you need to take into account the following remarks:
Note: the IBM MCP installer uses a tool to automatically "tag" all
available partitions with a LVM "fingerprint". A compatibility volume is
simply a partition which has been tagged in this way. The fingerprint is
used by LVM to store extra information specific to volume
management. This tool is called Volume Conversion Utility (VCU) and
is known to cause trouble on some configurations. That is why the
eComStation installer does not invoke this tool automatically. This
requires that you create the volumes yourself with LVM or MiniLVM.
Operating systems which do not "understand" logical volumes will
simply continue to treat compatibility volumes as partitions in the
traditional sense.
Appendix C: LVM - 35
However, if non-LVM-aware software which performs partition-level disk
management is used, then this "fingerprint" may be inadvertently
erased. Such programs include the "FDISK" utilities from most other
operating systems, and also software such as Partition Magic from
PowerQuest. For this reason, it is strongly recommended that you do
not use such software on your system after installing eComStation.
If you must do so, then please read the following information carefully
first:
If your system does not contain any special "LVM volumes" (JFS
volumes mostly), then the use of such programs will probably not cause
permanent data loss. In all probability, however, eComStation will not
be able to boot from the affected disk drive until the LVM "fingerprints"
are recreated. To do this, it will be necessary to boot the system off the
eComStation CD-ROM or recovery diskettes, run LVM, and manually
convert the partitions back into volumes. Once this is done, your
volumes should be fully restored and functional, with no loss of data.
Note: We cannot, however, guarantee that no data will be lost.
Partition management is an inherently risky business. Always back up
any and all existing data on the computer, before working with disk
partitions: whether through LVM, FDISK, Partition Magic, or any other
means.
Appendix D: Boot Options Menu
The eComStation boot options menu screens allow you to configure
the hardware support in order to successfully boot from CD-ROM or
floppy diskettes. Most computers with standard hardware will not
require any changes in the screens and will boot normally. If you need
support for SCSI or USB hardware, a selection of the appropriate
drivers for the used host bus adapters resp. host controllers is required.
If you have trouble getting the CD-ROM or floppy diskettes to boot, then
you can use the options on the various screens to either configure
eComStation so that it will be able to boot or to help you or support
personnel to find out what the cause for the failure is.
The options are limited to configuration settings required to boot and
install eComStation onto hard disk drives. The selections are passed to
the installation program where you can refine the selections and add
support for additional hardware.
Keys help screen
The situation alters, however, if the system contains any "LVM
volumes". Unlike compatibility volumes (which are fundamentally normal
partitions), LVM volumes depend on a special data format which other
partition management software (like FDISK or Partition Magic) does not
recognize. In such a case, the volume information could be corrupted
beyond recovery, resulting in the loss of all data stored on the LVM
volume.
Therefore, if you believe you will have cause to use third-party
partition management software on your system, avoid using LVM
(JFS) volumes. (As noted, you are discouraged from using such
software at all.)
Always prepare a tested backup of all data on the system,
before working with partitions or volumes.
36 - eComStation 1.1 Manual
On this screen the keys for usage of the menu and the version of the
menu including language (-xx) of the package are displayed.
Additionally a note about this appendix for further reference is shown at
the bottom of the page. In the large box you can see the help for the
Appendix D: Boot Options Menu - 37
keys to navigate through the screens or pages and how to adjust the
options to the configuration of your computer.
You can rotate through the pages by hitting the "Page Up" and "Page
Down" keys, where "Page Down" will move you to the next page
positioning the cursor at the first option, and "Page Up" will return you to
the previous page setting the cursor at the last option of the respective
page.
The next option is selectable by hitting the "Tab" key, while hitting the
"Tab" key together with "Shift" moves back to the previous option. When
the next or previous option is located on the next/previous page, that
page is displayed automatically without hitting the "Page Up" or "Page
Down" key. The current active option is highlighted by a blinking
character.
might occur during boot. Fundamentally, you should not suppress the
loading of a file. After you pressed a key to exit the menu you are
prompted with a confirmation message. Press "Enter" to save the
changes you have made in the menu and boot
with them. Press "Esc" to return to the menu.
If you want to reset the options values to the default (detected) ones,
press "F11". At the confirmation box press "Enter" to reset the values or
"Esc" to return to the menu.
Miscellaneous screen
There are different ways to change an option. Options that can be
activated are shown by an empty character when deactivated or by a
checkmark when activated (shown with a '#' character in this ASCII file).
You can toggle between these two states by hitting the "Space" bar.
Options with a vertical double arrow offer multiple predefined values. By
hitting the "Up" or "Down" arrow keys you can rotate forward or
backward through the offered values. Alternatively you can hit an
alphanumeric key to directly jump to the first value that begins with the
pressed letter or number if present. Pressing the same alphanumeric
key multiple times will rotate forward through all values that begin with
the pressed key.
The fields enclosed in sqare brackets with a block cursor are editable
options that can be modified by typing at the blinking cursor. The values
can be edited with the usual keys like "Backspace", "Insert", "Delete",
"Left" or "Right" arrow.
When you are finished with the configuration, you can leave the menu
by pressing the "F10" function key. If you want eComStation to display
the drivers and executables loaded during the boot process then hit the
"Alt" key together with the "F2" function key to leave the menu.
Additionally eComStation will pause at non-base device drivers and
executables to ask you whether you want
to load the file or not or stop pausing when you press the "Alt" key
together with "F4". This is useful to look for a possible problem that
38 - eComStation 1.1 Manual
This screen offers a mixture of various options.
In the first block you can select the locale information for the operating
system. The country option sets the default country/region dependent
information, which can be refined in detail after the installation through
the "Locale" object. Since the keyboard layout you use might be
different from the country you are located in, or from the the language
version of the operating system you use, the layout is selectable as
well. With the code page option you can determine the primary
character encoding eComStation uses, and an alternate code page that
you can toggle between after the operating system has been started.
The next option selects what program to start after booting from the
installation CD-ROM or floppy diskettes. The graphical installation
Appendix D: Boot Options Menu - 39
program can be started or a command line interface for maintenance
tasks or problem determination.
Reserving a drive letter offers you a possibility to control the assignment
of the drive letters for your CD/DVD drives. The operating system will
assign drive letters to all drives that are partitioned media like hard
disks or certain removable drives first. The letter of the last one of these
media is the first valid letter for a working drive letter reservation. The
CD/DVD drives will be assigned the next letters after the reserved one
in the order the drives are detected by your PC.
Changing the drive letter to be reserved automatically adjusts the value
of the next option where you can select the drive the eComStation
installation CD-ROM has been inserted. If the CD-ROM is not located in
the first CD/DVD drive, you must change this letter to match the
appropriate drive. Usually, this would be the second drive, so just move
the drive letter one further by pressing either the "Up" arrow key or
hitting the letter key ('T' for the example above). The range of the values
is limited by the selected reserved drive letter and the fixed letter of the
memory boot drive ('Z').
If you do not know about the letters assigned to your drives, leave the
menu after the selection of your storage controllers in the next screen
by hitting "Alt" together with "F1". In the following screen hit "F2" and
run the program "ecsdrinf" on the command line. It will give you an
overview of the drive letters, labels, and file systems. The drive letter
next to the label "ECS_CDRUN" is the one of the drive where the
eComStation installation CD-ROM has been inserted.
The drive letter of the memory boot drive should only be changed if you
already have a drive/logical volume that has the default of 'Z' assigned.
If you select a drive letter identical to the one of the CD/DVD drive that
has the eComStation CD-ROM inserted, a warning message is
displayed and leaving the menu is prevented until you select a different
drive letter.
If you have quite a low amount of memory in your system, the
installation might need to swap memory onto a writeable drive that
needs to be formatted with one of the following filesystems: FAT12,
FAT16, HPFS, or JFS. To enable swapping check the option by
pressing the "Space" bar, and then select the target drive for the
swapfile. Then the swapfile will be written to the root of the selected
40 - eComStation 1.1 Manual
drive. You can delete the file "swapper.dat" after the installation has
been completed. If you select a drive letter identical to the one of the
CD/DVD drive that has the eComStation CD-ROM inserted, a warning
message is displayed and leaving the menu is prevented until you
select a different drive letter.
The following two options are useful for problem determination. The first
one pauses the boot process after the system detected an error and
asks you to continue the process. That way you can write down the
error message and pass it to the support channel. Furthermore this
option suppresses the automatic reboot of your computer in case it has
been initiated automatically. The second option will activate the verbose
mode of the various drivers loaded during boot. Since there might be a
lot of output displayed, it is recommended to leave the menu by
pressing "Alt" together with "F4" instead of "F10" (see section
"Information screen").
At the bottom of the screen an option to reserve hardware resources of
your PC is offered to avoid the resources being allocated by the wrong
device driver. This should only happen in very rare cases, mostly
related to old ISA hardware or PCMCIA (PC Card) adapters. To enable
resource reservation check the option by pressing the "Space" bar, and
then enter the resources in the field below.
Valid parameters:
§ /IO:x,y or /P:x,y
to reserve I/O ports, where 'x' is the base port number in
hexadecimal, followed by 'y' the length (number of ports) in
hexadecimal, both separated by a comma. Example: /IO:340,4
§ /MEM:x,y
to reserve memory, where 'x' is the base memory address in
hexadecimal, with the assumption that the address is nnnn:0,
followed by 'y' the length (address number) in hexadecimal, both
separated by a comma. Reserveable addresses are C000:0 to
DFFF:. Example: /MEM:CA00,1000
§ /DMA:x
to reserve a DMA channel, where 'x' is the number in decimal.
Example: /DMA:2
§ /IRQ:x
to reserve an interrupt request, where 'x' is the number in decimal.
Example: /IRQ:10
§ /EXC
Appendix D: Boot Options Menu - 41
§ /MUL
§ /SHA
to set a resource reserved with the first four parameters as exclusive,
multiplexed, or shared. The parameter must follow immediately after
the resource it should affect. The three attributes exclude each other,
so only one at a time can be specified for a resource. The default for
all resources is "exclusive"
Both ATA(PI)/(E)IDE drivers are not compatible to any of the software
RAID setups offered by some so called ATA/IDE RAID controllers like
HPT, Promise FastTrack, AMI! However, the chips are supported in
non-RAID mode (see BIOS setup of these controllers).
Storage screen
The file bootmenu.txt on CD#1 contains an extensive list of supported
controllers (both IDE and SCSI)
Here you can configure what drivers should be loaded to support the
hostadapters installed in your PC. You can select up to three different
If you have one or two SCSI adapters installed in your PC, the boot
process tries to detect and list them as second and third controllers.
To use another driver, not supplied in the bootmenu, you can supply
one on a floppydisk. How to do this, is described at the end of this
appendix. You can supply any adapter device driver supporting
eComStation and OS/2 Warp 3 or higher
When you select "Use other driver from diskette" a red arrow "=>" will
appear to the left of the field where you have to enter the name of the
driver without extension (.ADD), for example "AIC7770". Leaving the
menu is prevented until you have entered either the driver name or
have deselected the value to load a driver from diskette. Please refer to
the end of this appendix on how to supply the driver.
The field below each of the controller options can be edited to add
parameters to the drivers. Usually, this is not required in order to boot
correctly. For example you can force the driver to be verbose by typing
"/V" (without double quotes) into the field. The driver will display his
detection results on the screen then.
hostadapters whose drivers will be loaded in the order listed on the
screen.
If you boot from CD-ROM, the driver for the hostadapter that has the
CD/DVD drive with the eComStation installation CD-ROM attached
must be loaded first.
Selecting one driver more than once is allowed in the screen, but not
needed anyway, so only the first one will be loaded.
The value "Extended ATA(PI)/(E)IDE (DaniS506, DaniATAPI)" is
preselected as the first controller by default. If your SCSI hostadapters
were detected, they will be listed as second resp. third controller.
42 - eComStation 1.1 Manual
Selecting the generic INT 13h driver will reset the values of all three
controller options to "None", since they are mutually exclusive. Use this
option only as a fallback in case your hostadapter is not supported.
However, certain restrictions apply, and the usage of this driver is not
recommended.
If you experience problems when the boot process accesses your
CD/DVD drive, you may try the extended CD/DVD driver to replace the
standard driver. For older hardware, you can try the older standard
driver which does not support DVD drives.
Appendix D: Boot Options Menu - 43
USB screen
Supply additional or updated drivers
The Boot Options Menu offers the possibility to start the installation with
additional or updated drivers, provided on a floppy disk.
The driver files must be supplied in the root of a floppy diskette either
labeled BOOT_UPDATE or having a file named BOOT_UPD.TXT in
one of the first two floppy diskette drives (letters 'A' or 'B'). The boot
process will copy all files from this diskette to the memory disk and will
overwrite any files of the same name already present there. So you
should supply only the files you want to add or to update.
If you see some lines showing registers with hexadecimal values
followed by the line "disk read error", at least one file contains an error
most likely because the diskette is defective. Please copy the files to an
error-free diskette again and retry.
If the menu detects the presence of USB host controllers, it preselects
up to 4 controllers for each detected type of controller plus support for
USB keyboards and pointing devices. You can modify the number from
zero to four (maximum number of supported controllers not ports) by
rotating through the options with the "Up" and "Down" arrow keys or by
pressing a number key. In order to successfully run attached USB
devices, the USB controllers must have hardware resources assigned
(IRQ, please consult the manual of your mainboard's BIOS resp. the
one of your discrete controller board).
The following lists the USB host controllers supported (others might
work, but have not been tested):
If you boot from installation diskettes you must copy the driver files onto
the diskette labeled "eCS Diskette 2" (the one that only contains the
files "ecsdisk3.pf" and "BOOT_UPD.TXT").
If you have created the diskettes without the menu or the diskettes for
the IBM installation procedure, then you must copy base device driver
files (loaded with a BASEDEV=<driver> statement in the CONFIG.SYS
file) onto "IBM/NoMenu Diskette 1", and copy the usual device driver
files (loaded with a DEVICE=<driver> statement in the CONFIG.SYS
file) onto "IBM/NoMenu Diskette 2".
Edit the CONFIG.SYS file (located on "IBM/NoMenu Diskette 1") to add
new drivers or driver parameters.
SCSI Support
The file bootmenu.txt on CD#1 contains a list of supported UHCI,
OHCI and EHCI (USB 2.0) controllers.
The next three options control USB devices that might be needed for
installation like pointing devices, a keyboard or external storage
devices. The menu will prevent activation (by hitting the "Space" bar) of
these options until at least one USB host controller is selected.
44 - eComStation 1.1 Manual
Many SCSI controllers will work normally with default settings. However,
there are some types of SCSI controllers that can create problems.
Most notably, these devices tend to either be Adaptec, LSI, or Tekram
controllers. If you have a SCSI controller in your computer and are
having trouble getting the system to boot, find out what kind of controller
you have and select the appropriate driver for your controller. The file
bootmenu.txt on CD #1 contains an extensive list of supported
adapters with possible driver switches.
Appendix D: Boot Options Menu - 45
Appendix E: Troubleshooting
This chapter discusses some common problems you may encounter
during the installation of eComStation. More information and tips can be
found in the FAQ.TXT document in the root of eComStation 1.1 CD#2.
For a more extensive list of problems and solutions, please see the
support forum at: http://www.ecomstation.com/support/ and
the newsserver at: news://news.ecomstation.com/
PRE INSTALLATION
Q: Can I install eCS in a system that's already running Windows XYZ, or
XYZ Linux, or XYZ operating system?
A:
As long as you have free space for eCS to create a bootable volume,
there is no problem. However be forewarned that eCS uses a partition tool
called Logical Volume Manager (LVM) which is quite different from the typical
FDISK program in other operating systems. Be sure to read the file
LVMHELP.INF by issuing the command:
VIEW ?:\LVMHELP.INF
from a command window (where ? is the drive letter of the CD-ROM).
Q: Can I install on top of eCS 1.0? Will I be able to continue using the
bonus applications from eComStation 1.0 ?
A:
Yes, see the file migrate.txt on CD#2 for instructions. To install the
Bonus Applications, insert eComStation 1.1 CD #2 and start install.cmd then
select the option "eComStation 1.0 CD #3" (last menu option).
Q: Do I *have* to install the eCS networking sub-system? I only have one
machine.
A:
Even if you are not connected to another machine, it's highly
recommended that you instruct the eCS installer to install networking support.
This will make it easy to enable networking support in the future. In addition,
if you need to access the Internet through a modem, you will need networking
support. If you don't have a network card (called the NIC) at this point, you
can specify "IBM NULL MAC Driver (NULLNDIS.NIF)" when prompted to
select a network adapter.
INSTALLATION
Q: The system will not boot from the bootable CD.
A1: Verify that your motherboard and/or disk controller BIOS support
booting from CD and that you selected the right boot order.
46 - eComStation 1.1 Manual
A2: Watch the cd-rom ready light and the BIOS cd boot messages. Did the
cd-rom become ready after the BIOS checked for a CD? If the cd-rom is
taking too long to become ready, check if there is setting in the motherboard
or disk controller BIOS to delay or wait longer for the cd-rom to become
ready. In some cases a newer BIOS may provide this feature. Sometimes you
can delay the boot process by pressing the Pause key.
Q: I get an "unable to reserve drive R" error message when booting from
the eCS CD
A:
By default, the eCS installer attempts to reserve drive letters R,S, and
Z. If these drive letters are in-use, you need to reboot from the eCS CD,
select "Boot from eComStation CD-ROM", then select "Boot with menu for
own values" and then wait for the BOOT OPTIONS screen to come up. Hit a
page down and TAB down to the "Reserve the following drive letter:" field,
and change the default value to an unused value. The value of "eComStation
CD-ROM located in drive" will get bumped automatically each time you
change the value of the "Reserve the following drive letter:". When done, hit
F10, and then Enter to continue.
Q: During phase 2, the installer seems to be hung when installing the peer
service. I don't see any disk activity. Should I reboot and try again?
A:
The peer installer does a number of checks. On some machines, this
process can take quite some time (particularly if you are running under Virtual
PC on a slow machine). Keep in mind that the entire installation process can
take up to an hour to complete for some older machines. Don't intervene
unless the installation time has been something rather unreasonable.
Q: My machine locked up during installation, or I otherwise interrupted the
install process. How can I restart the installation?
A:
You can restart the installer at any time in a specific phase of the
installationprocess. This is recommended for advanced users only, please
refer to section Adv_1 of FAQ.TXT on CD#2.
Q: I would like to invoke some commandline commands from the CD
booted eComStation installer.
A:
You can invoke a command prompt by selecting 'Maintenance Console'
in the installer.
Q: My system hangs or freezes when during startup, before I get the
Presentation Manager (Graphical User Interface)
A:
If the boot process hangs during boot you can disable hardware
detection. Press Alt+F1 before the logo appears and select disable
Hardware detection.
Appendix E: Troubleshooting - 47
Q: The installer reports no recognizable filesystems and no freespace.
A:
Currently FAT32, NTFS, EXT2 and other filesystems will not be
recognized by the eCS. Please use other disk tools to create space for eCS
bootmanager and boot partition, then let MiniLVM create the eCS partitions
and BootManager during installation. Please see Appendix C: LVM for more
instructions.
INSTALLATION - SCSI
Q: I have an Adaptec SCSI Adapter and SCSI CD-ROM and I couldn't get it
to boot the eCS bootable CD.
A: Check the following to settings:
1. In the Adaptec BIOS, for the cdrom device set disconnect "NO"
2. Also some cdroms will not work properly in sync mode, try turning off
initiate sync negotiation in the BIOS.
Q:
When booting from the CD I get the following message:
eCS in unable to operate your hard disk or diskette
drive. The system is stopped.
A:
Is your cd-rom connected to a SCSI disk controller?
eCS supports more SCSI disk controllers than most other OSes. Due to the
large number of drivers there is a high possibility for a conflict between
drivers. If you have a SCSI controller you have to use the boot options menu
and specify which SCSI driver you wish eCS to use. See the file
bootmenu.txt on CD#1 for more information.
bootmenu.txt on CD#1 contains a full list of support SCSI adapters,
included drivers and driver switches. Please refer to that file for more
information.
GENERAL USE - HARDWARE
Q: My computer beeps, and the harddisk is spinning up and down all the
time, what is going on?
A:
Probably you have a problem with reading from harddisk. If eCS detects
problems with reading from harddisk it tries to recover by resetting the
diskcontroller. A common reason for read problems is a computer that is not
properly grounded. Please check the electric grounding of your PC or
harddrive. See also P1_3 in FAQ.TXT on CD#2.
Q:
A:
I am having trouble booting past APM.SYS
Workaround: REM out APM support in your config.sys (3 lines):
DEVICE=?:\OS2\BOOT\APM.SYS
48 - eComStation 1.1 Manual
DEVICE=?:\OS2\MDOS\VAPM.SYS
RUN=?:\OS2\APMDAEMN.EXE
Q: When I reboot via Ctrl-Alt-Del, I get a trap screen. At the top of the
screen it says:
An exception occured in module:SIO2K
or:
An exception occured in module:UART
A:
Please refer to Post_3 of FAQ.TXT on CD#2 for a solution.
Q: How do I install my sound driver after installation?
A:
You can install audio drivers from CD#2 by starting install.cmd from
the root of this CD.
In most cases, the sound driver manufacturer would have provided you with
either a zip file or a CD containing the necessary files - and the instruction
typically would tell you to go to the System Setup -> Installation folder and
execute the program "Multimedia Application Install". If that's what the
instruction says - DON'T DO THAT.
Instead, open a command window, attach to the directory containing the
sound driver files, then issue the command: MINSTALL
You should find your sound driver listed in the screen that follows. From that
point on, you can continue with the installation.
Q: What USB network hardware is supported in eComStation?
A:
eComStation has support for USB Ethernet apapters, which are based
on the Kawasaki KL5KUSB101 chipset. You can install this driver via the
Adapters and Protocols tool (MPTS) you can find in the System
Setup -> Network folder.
The following USB ethernet network cards have been tested:
§ 3COM USB Network Interface
§ D-Link Corp. USB Ethernet Adapter (DSB-650)
§ ADS Technologies Inc. USB Ethernet Adapter (USB-10BT)
Q: What are the USB drivers in my config.sys?
A:
BASEDEV=USBMSD.ADD
(Mass storage driver for ZIP drives, external disk drive and other devices
that confirm to the USB mass storage standard)
BASEDEV=USBCDROM.ADD
(Support for HP USB Cdwriter 8200 and Sony Spredds CDRW)
device=x:\os2\boot\usbkbd.sys
device=x:\os2\boot\usbmouse.sys
(Support for USB keyboards and mice).
Appendix E: Troubleshooting - 49
device=x:\os2\boot\usbcom.sys
(Support for USB Rockwell based modems)
Q: What other USB hardware is supported?
A:
If you require more information on eComStation or OS/2 and USB
please refer to the excellent website http://www.os2world.com/usb/
GENERAL USE - APPLICATIONS
Q: While the IBM Browser is nice, I heard that there is a new version 1.3 of
Mozilla that has some real nice features, why aren't you installing that
instead?
A:
The Mozilla 1.3 package is included with eCS 1.1. You can install it by
starting install.cmd from CD#2 and select the Web Browser menu from the
eCSGuide. Please follow the given onscreen instructions.
Q: I installed some IBM BonusPak applications via install.cmd of CD#2,
where are they gone?
A:
The BonusPak applications can be found in the Programs ->
Installed software folder on your desktop
Q1: I installed my network for use with Windows (TCPBEUI) but I cannot get
my eCS computer to connect to other machines in the network. What is
wrong?
Q2: After I used MPTS.EXE, during startup of my machine I now see an
error message which refers to IFS:?\IBMLAN\NETPROG\NETWKSTA.200
A:
Sometimes, the use of MPTS causes inconsistancies in the
PROTOCOL.INI and IBMLAN.INI configuration files. You can automatically fix
this problem by running the "Update IBMLAN inifiles" in the Network/Internet
guide from CD#2 (invoke with install.cmd)
Please refer to FAQ.TXT on CD#2 for more instructions and solutions to
possible problems. Also, at http://www.ecomstation.com/support/
you will be able to find an online version of the FAQ which might be more up
to date.
APPENDIX F: Getting support
If you run into problems with eComStation there are several places to
get support. First of all a lot of documentation is included with the
product. Most of it are text files which you can read with an editor like
tedit.exe or e.exe. The .inf files can be viewed with view.exe and
the .pdf files with acroread.exe.
On the CD's you can find the following documents:
General Documents - CD#1
readme.1st
General info on eComStation 1.1 - Last minute installation notes and a
quick troubleshooter for CD boot
readme.ibm
Documentation from Merlin Convenience Pack from IBM
readme2.txt
Addenda to readme.ibm
license.txt
The full license as included in Appendix A.
bootmenu.txt
Information on the use of the bootmenu presented to you when booted
from CD. Contains an extensive list of supported hardware (IDE, SCSI,
USB controllers) - extended version of Appendix D.
lvmhelp.INF
LVM documentation from Serenity Systems - includes tutorial approach for
setting up your system
Next to these documents you can find the helpfiles in .inf format for
eComStation in the following directory: \OS2\BOOK
Recovery and System Tools - CD#2
\bontrial\trial\grahutil\graham20.inf
Documentation for the Graham Utilities - Filesystem and Recovery tools.
Please note that the Graham Utilities can be run directly from CD to
provide maintenance possibilities for your system
\bontrial\ecs\ecsmt\ecsmt200.txt
Documentation for the eComStation Maintenance Tool 2.00 - it can be
installed by the eComStation Software Menu from CD#2. This tool can be
used to install system updates from www.ecomstation.com onto your
computer.
50 - eComStation 1.1 Manual
Appendix F: Getting Support - 51
On the installed system
Appendix G: Coexisting with other operating systems
Once your system is installed,
you will find all support
documents conveniently
ordered in the help center
folder. You can open this folder
from Local System -> Help
Center
Information on the internet
If the readme's do not help, you can always try to consult the support
forums on the internet, to help you forums have been created at the
following sites:
§ http://www.ecomstation.com/support/
§ http://www.ecomstation.nl/
Other websites of interest are:
§ http://www.os2ezine.com/
§ http://www.os2voice.org/
§ http://www.warpdoctor.org/
Alternatively you could have a look at the OS/2 newsgroups or mailing
lists and the OS/2 and eComStation usergroups.
support by email is provided on a best-effort basis and there is no
guarantee for timely response:
§ [email protected] for multimedia related issues
§ [email protected] for eCSCoNet related issues
§ [email protected]
for generic support questions
Please submit your bugreports to the bugtracker, which you can
access after you have logged in to the main eComStation website.
Before submitting a report, please make sure your bug is not yet listed,
so to minimize time spent on handling of duplicates.
52 - eComStation 1.1 Manual
eComStation is quite capable of coexisting with other operating systems
on your computer. This can be convenient in some situations, where
you may want to use certain applications which are not able to run on
eComStation.
There are some details you should pay attention to, which are listed
below. If you want to exchange data between operating systems, make
sure you have a volume which is read/writeable by these systems. Most
of the time special drivers will be required to make this possible, e.g.
you will need the OS/2 FAT32 driver to allow eComStation to read and
write FAT32 partitions.
General Considerations
Make sure you have your harddisk layout the way you want it, before
you install eComStation. The use of partitioning tools such as
PartitionMagic by PowerQuest, should be prevented if at all possible
after you have installed eComStation.
If you still want to change your harddisk layout, please consult Appendix
C; LVM.
You always have to keep in mind that changing a partition that already
has a logical volume that was assigned to LVM usually causes LVM not
to recognize that specific partition anymore.
To restore your logical volumes it should be sufficient in most cases to
run LVM and assign the original drive letters for the changed partitions.
On occasions it may be necessary to create a new logical volume for
that particular partition.
Windows NT/2000/XP
As far as we know at the moment there are no specific problems that
have arisen by installing Windows XP alongside eComStation on your
harddisk.
If you are going to install Windows 2000 on your computer, please
install Windows 2000 and then apply service pack 3 first. If you already
have Windows 2000 on your system and want to install eComStation,
also install service pack 3. If you do not do this, every time Windows
2000 starts up, it will destroy the eCS boot manager. This is a bug in
Windows 2000. If your boot manager is destroyed you can restore it by
Appendix G: Coexisting with other Operating Systems - 53
booting eComStation into the maintenance console from CD#1 and run
LVM, where you can reinstall the bootmanager.
Windows NT 4.0, Windows 2000 or XP will list HPFS partitions as being
available in 'My Computer'. If you double click on that drive letter it will
say it can not read that partition and sometimes you will be prompted
with an option to format it. Of course you should not accept this offer,
since it will render your HPFS volume useless. For your own safety it is
strongly adviced to use the option to mark the HPFS partitions as not
having a drive letter.
Linux
eComStation can be installed without problems alongside a Linux
installation on the same system. Please use the LVM Bootmanager
instead of lilo.
To read/write HPFS volumes you will need to obtain a module for Linux.
Please note that the OpenJFS is not compatible with eComStation
JFS and as such it is not advised to access your JFS volume from
Linux. This may change in the future.
Windows 95, 98 or Millenium Edition
If you have installed eCS and you are going to install a DOS-based
operating system like Windows 95, 98 or Windows ME you have to
realize that these systems will install on the very first primary partition of
your harddisk only. So, it might be necessary to resize/move your eCS
partition with the aid of a partition manager to allocate free space for the
creation of a primary partition at the beginning of your harddisk.
Consider the remarks about changing LVM volumes in the "General
Considerations" section.
Always be very careful with this kind of operation which can cause your
eCS system fail to boot. In either case you have to assign a new
bootable LVM volume and run the "sysinstx" command for the particular
eCS partition.
During the installation procedure of Windows you will probably receive a
warning about a 'bootmanager being disabled' or that you will 'no longer
be able to start OS/2'. Ignore these warnings. When the installation has
finished you can enable the bootmanager again by booting eCS from
the installation CD#1 and run LVM to set the partition as active (the
bootmanager partition is usually about 4 to 7 MB in size).
FAT32 support
If you have FAT32 partitions on your hard drive you can enable support
under eComStation by using the driver available on CD#2 in the
directory \FAT32SUP\. Please read the document ecs11inst.txt!
The filesystem for FAT 32 is unsupported and supplied only for your
convience. You are not required to install partfilt.flt or replace
os2dasd.dmd. If you have rebooted your computer and the driver is
loaded you will get read and write access to a FAT32 volume when that
drive has a drive letter assigned under LVM.
VFAT partitions require the use of a VFAT driver, these are available on
http://hobbes.nmsu.edu/
another option to access VFAT partitions is by using NetDrive:
http://www.blueprintsoftwareworks.com/netdrive/
54 - eComStation 1.1 Manual
Appendix G: Coexisting with other Operating Systems - 55
Cover design by "Meneer van Rooijen"
Artwork by Paul Jarvinen
2003, Mensys BV, The Netherlands
http://www.mensys.nl/
Printed in the Netherlands
PDF Rev 1.1.0
56 - eComStation 1.1 Manual