1
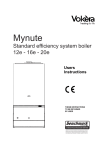
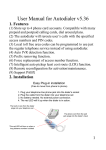
DVR 8/16-Channel Digital Video Recorder M anual 8/16 Channel Digital Video Recorder Security Notice z Power supply This Digital-Video-Recorder uses DC 12 voltage indoor power supply. The voltage of the power must be verified before using. When the machine is not in use for a long time, pull out the plug from the socket and disconnect the power. z Security This machine is indoor using equipment; in order to avoid dangers of short circuit or electric shock, please do not expose the machine in rain or moist environment. In case any solid or liquid get into the machine’s case, please cut off the power supply immediately, and ask for qualified technicians to check the machine before restart. This machine is precise instrument; do not attempt to repair any unit of the machine by yourself without technical aid. When there is any malfunction with the machine, please ask for qualified technicians to debug and repair, or contact the dealers in your area. z Installation Please choose appropriate site to install the machine, to ensure well ventilation around the machine to avoid the machine being excessively hot. The machine cannot be installed near radiator and ventilating trunk etc. heat sources, or under direct sunshine, dusty places or anywhere there are mechanical librations or impact. z Advice While recording TV programs or VCD programs, please don’t pirate the third-party’s authority and/or any other relative rights. Features of this DVR z z z z z z z z z z z z z z z z Video input: 8/16channels input; video output: 3 output. Audio input: 4channels input; audio output: 1 output Four optional levels of image quality: very high, high, normal, low. Record and playback frame rate changeable for recording. Compression mode: Modified MJEPG. Compatible with NTSC and PAL format. Support alarm recording and time recording. Multi-function searches: be able to distinguish different alarm records and time records from ordinary records; be able to search by time, by segment or by event. Support various playback modes: pause, several fast forward and backward play modes. Support zoom, auto function, watermark security 8/16 alarm input and 1 relay alarm output. Equipped with remote device, and PTZ control enable. Support loss and motion detection functions. Triplex operation, can play back and search play while it is recording. Support network view. Support USB backup and CD_RW backup. 480 frames (NTSC, PAL is 400) per second for view, 120 frames (NTSC, PAL is 100) per second for recording. 1 8/16 Channel Digital Video Recorder Table of Contents SYSTEM SETUP ......................................................................... 1 1. SETUP METHODS OF MENU .............................................................................................................1 2. ACCESS MENU ................................................................................................................................1 3. SYSTEM SETUP ...............................................................................................................................2 4. TIME/DATE SET ..............................................................................................................................2 5. HDD FORMAT SET ..........................................................................................................................3 6. FACTORY RESET..............................................................................................................................3 7. MENU LANGUAGE ..........................................................................................................................4 8. CHANGE PASSWORD .......................................................................................................................4 9. FIRMWARE UPDATE ........................................................................................................................5 10. DISPLAY SETUP .............................................................................................................................6 11. CAMERA NAME .............................................................................................................................7 12. COLOR SETUP ...............................................................................................................................8 13. AUTOSEQ SETUP ...........................................................................................................................9 14. RECORD SETUP .............................................................................................................................9 15. AUDIO CH SETUP ........................................................................................................................10 16. REC CH SETUP ...........................................................................................................................11 17. NETWORK SETUP ........................................................................................................................11 18. N/W ENABLE SET .......................................................................................................................12 19. MAC SET.....................................................................................................................................13 20. SENSOR SETUP ............................................................................................................................13 21. MOTION DETECTION SETTINGS...................................................................................................14 22. AREA SET....................................................................................................................................15 23. SCHEDULE SET ...........................................................................................................................16 24. BACKUP SET ...............................................................................................................................17 25. STORAGE INFO ............................................................................................................................17 26. PROTOCOL SET ...........................................................................................................................18 BUTTONS ON THE FRONT PANEL ..................................... 19 1. 2. 3. 4. 5. RECORDING/PLAYING CONTROL BUTTONS AREA ....................................................................19 FUNCTION CONTROL AREA(16 CH) ..........................................................................................19 FUNCTION CONTROL AREA(8 CH) ............................................................................................21 CHANNEL CHOOSING CONTROL AREA(16CH) ..........................................................................22 CHANNEL CHOOSING CONTROL AREA(8CH) ............................................................................23 SYSTEM CONNECTION......................................................... 24 1.BACK PANEL AND CONNECTION TERMINALS ................................................................................24 2.VIDEO AND AUDIO CONNECTION ..................................................................................................25 3.ALARM CONNECTION ....................................................................................................................25 4.HARD DISK CONNECTION..............................................................................................................27 2 8/16 Channel Digital Video Recorder USER GUIDELINE ................................................................... 28 1.START THE MACHINE .....................................................................................................................28 2.TURN OFF THE MACHINE ...............................................................................................................28 3.NORMAL RECORDING ....................................................................................................................28 4.ALARM RECORDING ......................................................................................................................29 5.TIME RECORDING ..........................................................................................................................29 6.PLAYBACK .....................................................................................................................................30 7.SEARCH PLAY ................................................................................................................................30 8. TIME SEARCH ...............................................................................................................................31 9. EVENT SEARCH .............................................................................................................................31 10. START STOP SEARCH...................................................................................................................32 11.USB BACKUP ..............................................................................................................................33 12.CD_RW BACKUP ........................................................................................................................33 13.USB UPDATE ...............................................................................................................................35 14.ZOOM OPERATION .......................................................................................................................36 15.INFORMATION DISPLAY ...............................................................................................................36 16.PTZ OPERATION ..........................................................................................................................37 17.DEFAULT SETTING .......................................................................................................................38 18.REMOTE CONTROL ......................................................................................................................40 19. PC VIEW SOFTWARE OPERATION................................................................................................41 EXTERIOR SIZE............................................................................................................46 INCASE LIST .....................................................................................................................46 APPENDIX A: TROUBLE SHOOTING GUIDE ...........................................................47 APPENDIX B: PROTOCOL FOR DVR CONTROL ....................................................50 APPENDIX C: RECORD TIME IN FOR 120G HARD DISK (HOUR) ......................53 APPENDIX D: INTERNET VIEW/PLAYBACK CONFIGURATIONS .....................54 3 8/16 Channel Digital Video Recorder System Setup Before using the video recorder, the first step is to setup the system according to user’s needs; otherwise the machine will run in the default settings. 1. Setup Methods of menu When in setup mode, press upward button or downward button, the cursor will move among the settable items, continuous pressing will make the cursor move among the options one by one, and it can recur. The selected one will change to yellow color. While choosing digital fields, e.g. year, month, day, hour, minute, second etc, press leftward button or rightward button, the cursor can move leftward or rightward among the digits , and it can recur. Please press “Add” or “Dec” button to change the value, press “ENTER” button to enter sub menu and press menu button to return to previous menu. 2. Access Menu To access the menu, for 16ch DVR user, please long press menu/search button on the front panel, for 8 ch DVR user, please just press menu button, it will display password input window. The password is a random combination of 4 digits of “0-9”. The default is “0000”. You should input the correct password to enter the menu,. If the password you input is incorrect, the system will automatically return. If you don’t want to input the password and give up the operation, you can press menu button to return. While inputting the password, in order to avoid being revealed to stander-bys, the password you input is displayed on the screen as “*” signs. To change the password, please refer to “password change”. If you enter the correct password, the main menu will display as below. 1 8/16 Channel Digital Video Recorder 3. System Setup When the cursor moves to System Setup, please press enter button, the System Setup window will appear, which is illustrated as below. VIDEO SYSTEM: video format, NTSC/PAL BUZZER SOUND: buzzer switcher, if set to “OFF”, the buzzer will not work.. 4. Time/Date Set When the cursor moves to TIME/DATA SET, please press enter button, the Time/date setup window will appear, which is illustrated as below. Please note if the DVR is in recording mode you cannot access this menu unless you stop record first. 2 8/16 Channel Digital Video Recorder . Please press up, down, left, and right buttons to move the cursor, press ADD and DEC button to modify the value. FORMAT: the time display format, different for USA, EURO and Asia users. DISPLAY: if set to “OFF”, time will not display no the screen. LOCAL: time display position. 5. HDD Format Set When the cursor moves to HDD FORMAT SET, please press enter button, the HDD Format Setup window will appear, which is illustrated as below. If you select “YES” and press the enter button, all video files on the HDD will loss, if you want to give up, please select “NO”. 6. Factory Reset When the cursor moves to System Setup, please press enter button, the Factory Setup window 3 8/16 Channel Digital Video Recorder will appear, which is illustrated as below. If you select “YES” and press the enter button, all setting of the DVR will reset to default, if you want to give up, please select “NO”. 7. Menu Language When the cursor moves to Menu Language, please press enter button, the Menu Language window will appear, which is illustrated as below. Please push “+” or ”-” to change language. 8. Change Password When the cursor moves to Change Password, please press enter button, the Password window will appear, which is illustrated as below. 4 8/16 Channel Digital Video Recorder Password Level: password type of the DVR, the DVR has various types of password: SETUP: If set “YES”, you have to input password to enter menu. SYSTEM: If set “YES”, you have to input password to boot the DVR. RECORD: If set “YES”, you have to input password to stop manual recording. SCHEDULE: If set “YES”, you have to input password to cancel schedule. If you select the Password Change and press enter button, Password change window will display as below: Please enter the current password, then input new password and confirm the password. 9. Firmware Update When the cursor moves to Firmware update, please press enter button, the update window will appear, which is illustrated as below. 5 8/16 Channel Digital Video Recorder Update Method: There are two methods to update the system, usb and network(not support yet) USB update: make a new folder named “firmware” in the USB device ‘s root directory, copy the update file to the folder, plug in the USB device, enter this menu and select Update Start and press enter button, the system will start updating, if updating finish, the window will display as below, please manually reboot the DVR. 10. Display Setup When the cursor moves to Display Setup, please press enter button, the Display Setup window will appear, which is illustrated as below. 6 8/16 Channel Digital Video Recorder 11. Camera Name When the cursor moves to Camera Name, please press enter button, the Camera Name Setup window will appear, which is illustrated as below. Press upward button or downward button to select channels, press enter button to change the channel name in the below window. 7 8/16 Channel Digital Video Recorder Each channel’s name is the combination of eight characters. Press left or right button to select each character, press add or DEC button to modify each character, and then press enter button to save this name. DISPLAY: if set to “OFF”, the channel’s name will not display on the screen. 12. Color Setup When the cursor moves to Color Set, please press enter button, the Color Setup window will appear, which is illustrated as below. CON: picture contrast BRI: picture brightness HUE: picture hue SAT: picture saturation Press left or right button to select CON/BRI/HUE/SAT, press ADD or DEC to change the 8 8/16 Channel Digital Video Recorder value, if setup over, press ADD or DEC to change channel. 13. Autoseq Setup When the cursor moves to Autoseq Set, please press enter button, the Auto Sequence Setup window will appear, which is illustrated as below. Press up button or down button to select channel, press ADD or DEC button to change auto Sequence time. 14. Record Setup When the cursor moves to Record Setup, then press enter button, the Record Setup window will appear, which is illustrated as below. Press upward or downward button to move the cursor. Press “+”or “-” button to change the value. While the DVR is in recording or playback mode, you cannot access this menu unless you stop record or play first. 9 8/16 Channel Digital Video Recorder OVER WRITE: if set to “YES”, the DVR will automatically overwrite the HDD when the HDD is full. If set to “NO”, the DVR will automatically stop recording when the HDD is full. If there are two HDD in the DVR, when the MASTER HDD is full, the video will store to the SLAVE HDD, and when the SLAVE HDD is also full, the DVR will overwrite the MASTER HDD if set this to yes, otherwise it will stop recording. REC SPEED: the recording frame rate of the DVR, factory default setting is 30F/SEC under NTSC (25F/1SEC under PAL), Which means DVR records the events at the speed of 30 shots of frames per second. The higher of the record frame rate, the more natural look will be displayed on the screen when you playback. The lower of the record frame rate, the more you can save the space on the hard disk. The highest frame rate is 120F/SEC(PAL is 100F/SEC) when the resolution is in 320 mode REC QUALITY: There are four different video quality settings: VERY LOW, LOW, NORMAL, HIGH. The higher of the video quality, the clearer images you can get when you playback. The lower of the video quality, the more you can save the space on the hard disk drive. RESOLUTION: the record picture size of the DVR have two modes: 360 and 720,default is 360. In 720 mode, the record picture is twice bigger than in 360 mode, in 320 mode the REC speed is 120F/SEC(PAL is 100F/SEC) and the maximal REC speed in 720 mode is 60F/SEC(PAL is 50F/SEC). PB SPEED: the frame rate of playback, default is NO USE, which means the same as record. 15. Audio ch Setup When the cursor moves to Audio CH Set, please press enter button, the Audio CH Setup window will appear, which is illustrated as below. There are four audio input channels, for each channel you can select anyone of the 16 channels. Although there are four audio input channels, you can only record one channel’s audio at the same time, so, for setting the audio right, you have to select one channel within these four channel in the Record Setup menu. 10 8/16 Channel Digital Video Recorder 16. REC ch Setup When the cursor moves to REC ch Set, please press enter button, the REC ch setup window will appear, it is different for 720 size and 360 size, in 720 size, the window is illustrated as below, press upward and downward buttons to select channel, press ADD or DEC button to change the setting, if the channel is set “OFF”, this channel will not record in recording mode If the resolution is set to 360 size, the REC ch Setup window can’t be setup 17. Network Setup When the cursor moves to Network Setup, then press enter button, the network setup menu window will appear, which is illustrated as below. Please note if a PC View software from Internet is connected to the DVR. You cannot access this menu unless you disconnect the PC View software. 11 8/16 Channel Digital Video Recorder IP MODE: the DVR has 2 IP mode, STATIC IP and DHCP, if you select STATIC IP, you can set the IP address manually, if you select DHCP mode, the DVR will automatically get the IP address. For STATIC IP, press upward, downward, leftward or rightward button to move the cursor among the digits, you can press ADD and DEC button to modify the digits, also, when selecting a digit, you can press enter button then press left or right button to select each digit, and then press ADD or DEC button to modify this digit, press enter to save you change. NETWORK ENV: the DVR has three types of different network conditions: LOCAL, EXTER_LAN, EXTER_WAN, if in local network, please select LOCAL, if for internet use, please choose EXTER_LAN, if the internet condition is not very good, please select EXTER_WAN. VIDEO PORT: the video transmit port for the computer. COMMAND PORT: the command transmit port for the computer. If you change any of the VIDEO PORT and COMMAND PORT or MAC address, you have to restart the DVR to use the “net viewer” software. Note: if you have change the MAC address, you can not see the “MAC ADDR SET”. 18. N/W Enable Set When the cursor moves to N/W Enable, then press enter button, the N/W Enable setup window will appear, which is illustrated as below. 12 8/16 Channel Digital Video Recorder If one channel here set OFF, this channel will not transmit to the network, so if you want to see a channel from network, you have to set this channel on. 19. Mac Set When the cursor moves to Mac Set then press enter button, the Mac Set window will appear, which is illustrated as below. If you have more than one DVR in a local area network, you have to set each DVR to have an exclusive MAC address, but remember that you have only one chance to modify the MAC address, once you have changed the MAC address, this menu will not appear again. If you want to change the MAC address again, please load the factory set, then you can change the MAC address. For MAC address, you’d better set the first two bytes to “00 00”, and change other bytes. 20. Sensor Setup When the cursor moves to Sensor Set, then press enter button, the sensor setup window will appear, which is illustrated as below. Press upward or downward button to move the cursor. Press 13 8/16 Channel Digital Video Recorder “+” or “-“ to change the value. ALARM ENABLE: alarm trigger switch, can be set to off, low lever or high lever. If users set it to off, the DVR will ignore the alarm input. MOTION ENABLE:Motion alarm switch, can be set to on or off, if set to off, the motion alarm will be ignored. MOTION LEVEL: motion sensitivity level, if the figure in the picture is small, please set to high or very high, default is normal. BUZZER TIME: buzzer sound time when there is a sensor or motion alarm. SENSOR RECTIME: when a motion or sensor alarm occurred, the time of DVR record, default is 1 minute SCREEN SWITCH: if set on, when there is an alarm happens on one channel, the screen will automaticlly switch to that channel by full picture. Note: Users should press Schedule button after setting up the parameters so to activate the settings. 21. Motion Detection settings 1) When surveying nearby objects (2-10 meters) When in daytime, please set motion detection sensitivity to Normal level; when in night, please set to low. 2) When surveying objects in 50-100 meters area The objects 50-100 meters away will be quite small on the screen. When in daytime, please set motion detection sensitivity to high level. 14 8/16 Channel Digital Video Recorder When in night as below, please set to normal level. Note: the above suggestions are summarized from many times’ tests. User can select the best parameters according to the actual operation environment. 22. Area Set When the cursor moves to Alarm Set, then press enter button, the alarm setup window will appear, which is illustrated as below. Please press up, down, left, right button to move the cursor and press enter button to change, long press enter change all area block’s condition will be the same as you selected. 15 8/16 Channel Digital Video Recorder If one area is set to yellow, this area is motion detected enable, and gray is disable. So if you want to mask some place, just set these area gray. 23. Schedule Set When the cursor moves to Schedule Set, please press enter button, the schedule setup window will appear, which is illustrated as below. You can change a recording schedule during a week by using this setup, from Monday to Sunday, you can set a period time each day. START: start record time STOP: stop record time Note: Manual record mode and schedule record mode (including motion detection record mode, sensor record mode and time schedule record mode) cannot be valid at the same time. Once users select Schedule record mode, manual record mode will invalid; once user select manual record mode, schedule record mode will be invalid. 16 8/16 Channel Digital Video Recorder 24. Backup Set When the cursor moves to Backup Set, please press enter button, the backup setup window will appear, which is illustrated as below. The CD-RW function is selectable. There are two types of backup mode, USB and CD_RW(selectable). If you select USB backup, plug in the USB device, and press enter button, you can see the below picture. There are two types of backup mode: STILL and MOVIE, in STILL mode you can backup picture and in MOVIE mode you can backup video. Press ADD or DEC to change the backup mode. Please refer to USB Backup. For CD_RW backup, please refer to CD_RW backup. 25. Storage Info When the cursor moves to Backup Set, please press enter button, the backup setup window will appear, which is illustrated as below. You can see the HDD information in this window 17 8/16 Channel Digital Video Recorder 26. Protocol Set If set the protocol rightly, you can control the SPEED DOME by the DVR.. When the cursor moves to Protocol Set, then press enter button, the protocol set window will appear, which is illustrated as below. Press upward or downward button to move the cursor, and press “+” or “-“ to change the value. CHANNEL SEL: channel which is connected to the speed dome you want to control BAUDRATE: Changeable form 1200bps to 19200bps.The default is 2400bps. DOME ADDR: The address of the speed dome, changeable from 0x00 to 0xff。 PROTOCOL: The protocol of speed dome, include pelco-p, pelco-d, neon, lilin. DVRPROTOCOL: The protocol is suitable for computer or keyboard to control the DVR, please refer to appendix A DVRADDRESS: The address of the DVR for DVRPROTOCOL, can be changed from 0x00 to 0xff DVRBAUDRATE: The baud rate of the DVR for DVRPROTOCOL. 18 8/16 Channel Digital Video Recorder Buttons On the Front Panel The front view of the video-recorder is illustrated as below. 1. Recording/Playing Control Buttons Area 1.Record: It is manual recording button. Press this button to record, Re-press this button, it will stop recording (need password). So, this button is the switch button of manual recording and stopping recording operations. Recording and stop will work simultaneously on 16 channels. This button doesn’t work in schedule mode. 2.Play: Press this button to start playing the video stored in hard disk, Re-press this button, it will stop playing So, this button is the switch button of playing video and stopping playing operations. Play and stop will work simultaneously on 16 channels. This button doesn’t work while Time recording and Alarming recording. 3.Rew: Fast backward button. Press this button to start fast backward playing till press play button to start normal playing 4.Forward: Fast forward button. Press this button to start fast forward playing till press play button to start normal playing The fast forward has five speeds; each time you press the button will change the speed from slow to fast then repetition 5.MODE: Mode change key, press this key to switch to shift mode, re-press to change to normal mode. 2. Function Control Area(16 ch) 19 8/16 Channel Digital Video Recorder 1.Auto/1: Auto key, in shift mode, press this button, The DVR will be in auto dwell state, it dwells according to the time set in auto sequence set menu, you can set the dwell time of each channel. Press this button to quit this mode. If not in shift mode, press this button to see big picture of channel 1. While inputting numbers, this button is used as number key of “1”. 2.Zoom/2: Zoom key, in shift mode, press this button, the DVR will be in zoom mode, please refer to zoom operation in user guideline for details, press zoom button again to cancel zoom operation. If not in shift mode, press this button to see big picture of channel 2. While inputting numbers, this button is used as number key of “2”. 3.PIP/3: USB key, in shift mode, press this button, the DVR will start USB backup, please refer to USB backup operation in user guideline for details. If not in shift mode, press this button to see big picture of channel 3. While inputting numbers, this button is used as number key of “3”. 4. Display /4:Display key, in shift mode, press this button to display current information on the screen, press again this to clear the information display. If not in shift mode, press this button to see big picture of channel 4. While inputting numbers, this button is used as number key of “4”. 5.Freeze/5: Freeze key, in shift mode, press this button, the DVR will be in freeze mode, please refer to freeze operation in user guideline for details, re-press this button to quit freeze mode, If not in shift mode, press this button to see big picture of channel 5. While inputting numbers, this button is used as number key of “5”. 6.Schedule/6: schedule key, in shift mode, press this button to enter schedule state, if the DVR is in schedule state, there will be a “S” symbol on screen, press again this button to quit schedule mode. If not in shift mode, press this button to see big picture of channel 6. While inputting numbers, this button is used as number key of “6”. 7.ADD/7/: Add key, press this button to see big picture of channel 7. When in system setup menu, this is an increase button. While inputting numbers, this button is used as number key of “7”. 8.DEC/8/: Decrease key, press this button to see big picture of channel 8. When in system setup menu, this is a decrease button. While inputting numbers, this button is used as number key of “8”. 9. SR/9: Single frame backward button, in shift mode, while in playback state, long press this button can see single frame backward, press play button to play normally. If not in shift mode, press this button to see big picture of channel 9.While inputting numbers, this button is used as 20 8/16 Channel Digital Video Recorder number key of “9”. 10. SF/0/10: Single frame forward button, in shift mode, while in playback state, long press this button can see single frame forward, press play button to play normally. If not in shift mode, press this button to see big picture of channel 10. While inputting numbers, this button is used as number key of “0”. 11.WM/10+: Watermark button, In shift mode, if the DVR is playing video, you can press this button to see the watermark of the picture, if the video was recorded by this DVR and has not be changed, there will be a watermark symbol in each picture, press watermark key again to clear the display. If not in shift mode, press this button and then press 1 to 6 to see big picture of channel 11 to channel 16. 12.Menu/search: press this key to enter search menu, long press this key to enter menu(need password), if in menu setup, press this key to quit current menu. 3. Function Control Area(8 ch) 1.Auto/1: Auto key, in shift mode, press this button, The DVR will be in auto dwell state, it dwells according to the time set in auto sequence set menu, you can set the dwell time of each channel. Press this button again to quit this mode. If not in shift mode, press this button to see big picture of channel 1. While inputting numbers, this button is used as number key of “1”. 2.Zoom/2: Zoom key, in shift mode, press this button, the DVR will be in zoom mode, please refer to zoom operation in user guideline for details, press zoom button again to cancel zoom operation. If not in shift mode, press this button to see big picture of channel 2. While inputting numbers, this button is used as number key of “2”. 3.USB/3: USB key, in shift mode, press this button, the DVR will start USB backup, please refer to USB backup operation in user guideline for details. If not in shift mode, press this button to see big picture of channel 3. While inputting numbers, this button is used as number key of “3”. 4. Freeze /4:Freeze key, in shift mode, press this button, the DVR will be in freeze mode, please refer to freeze operation in user guideline for details, re-press this button to quit freeze mode. If not in shift mode, press this button to see big picture of channel 4. While inputting numbers, this button is used as number key of “4”. 21 8/16 Channel Digital Video Recorder 5.Stop/5: Stop key, in shift mode, press this button, the DVR will stop record and play. If not in shift mode, press this button to see big picture of channel 5. While inputting numbers, this button is used as number key of “5”. 6. WM/6: Watermark button, In shift mode, if the DVR is playing video, you can press this button to see the watermark of the picture, if the video was recorded by this DVR and has not be changed, there will be a watermark symbol in each picture, press watermark key again to clear the display. If not in shift mode, press this button to see big picture of channel 6. While inputting numbers, this button is used as number key of “6”. 7.ADD/7/: Add key, press this button to see big picture of channel 7. When in system setup menu, this is an increase button. While inputting numbers, this button is used as number key of “7”. 8.DEC/8/: Decrease key, press this button to see big picture of channel 8. When in system setup menu, this is a decrease button. While inputting numbers, this button is used as number key of “8”. 9.Display/9:. Display key, in shift mode, press this button to display current information on the screen, press again this to clear the information display. If not in shift mode, press this button to see big picture of channel 9.While inputting numbers, this button is used as number key of “9”. 10. Schedule/0: Schedule key, in shift mode, press this button to enter schedule state, if the DVR is in schedule state, there will be a “S” symbol on screen, press again this button to quit schedule mode. If not in shift mode, press this button to see big picture of channel 10. While inputting numbers, this button is used as number key of “0”. 11.Menu: Menu key, press this button to enter system setup menu, in menu setup mode, press this button to save settings and quit current menu. 12.Search: Search key, press this button to enter search menu, please refer search play in user guideline for details. 4. Channel Choosing Control Area(16ch) 22 8/16 Channel Digital Video Recorder 1.Big picture/up: Press this button to see full screen, re-press this button to see the next channel. While selecting menu items, press this button to move up the cursor. 2.Four pictures/down: Press this button to see four pictures display, re-press this button will display next four pictures. While selecting menu items, press this button to move down the cursor. 3.Nine pictures/left: Press this button to see nine pictures display, re-press this button to see eight pictures. While selecting menu items, press this button to move the cursor leftward. 4.Sixteen pictures/right: Press this button to see sixteen pictures display, re-press this button to see thirteen pictures. While selecting menu items, press this button to move the cursor rightward. 5.Enter: While selecting menu items, press this button to select the item. While playing video, press this button to pause the play, press play button to continue play. 5. Channel Choosing Control Area(8ch) 1.Big picture add/up: Press this button to see full screen, re-press this button to see the next channel. While selecting menu items, press this button to move up the cursor. 2. Big picture dec/down: Press this button to see full screen, re-press this button to see the preview channel.. While selecting menu items, press this button to move down the cursor. 3.Four pictures/left: Press this button to see four pictures display, re-press this button to see next four pictures. While selecting menu items, press this button to move the cursor leftward. 4. Eight pictures/right: Press this button to see eight pictures display. While selecting menu items, press this button to move the cursor rightward. 5.Enter: While selecting menu items, press this button to select the item. While playing video, press this button to pause the play, press play button to continue play. 23 8/16 Channel Digital Video Recorder System Connection 1.Back Panel and Connection Terminals The power cable and input, output signal terminals are all at the back of the machine, the connections to monitor, camera etc equipments are all carried out through the terminals and sockets on the back panel. The back view of the machine is illustrated as below. Take 16 ch for example, 8 ch is much the same as 16 ch. Each part of the back panel is illustrated as below: 1. video input 1-16 2. main output 3. assistant monitor 4. s video 5. audio input 6. audio output 7. net interface 8. USB port 9. alarm and RS485 port(see below) 10. debug port 11. fan 12. power Alarm and RS485 port define: 1---12: sensor 1---sensor 12 20,24,25: GND 14---17: sensor 13---sensor 16 18: RS485A 21: COM 19: RS485B 22: NC 23: NO 24 8/16 Channel Digital Video Recorder 2.Video and Audio Connection The DVR can support up to 16 cameras video input at the same time. There are two steps for camera installation. Ⅰ.Connect the Video Signal Line to the DVR channel input. Ⅱ.Connect the power adaptor jack to the camera. The DVR can connect 4 channel’s audio input, but you can only select one for recording. To display the DVR image, the DVR’s video output signal should be displayed to your TV set or monitor. Any TV set that has a “video input” terminal is suitable for displaying the image. The figure above shows the video and audio signal line connection. Note: at one time, you can only connect one audio input, which means, if you connect an audio to cam1, you cannot connect anyone else from cam2 to cam 4. 3.Alarm Connection The DVR can support 16 alarm input and 3 alarm output. Alarm input: There are two types of alarm input. 1. Voltage output(5V and 0V) A: In case sensor output high voltage (5V) normally and output low voltage when triggered (0V), then users must set DVR as low voltage alarm. B: In case sensor output low voltage (0V) normally and output high voltage when triggered (5V), then users must set DVR as high voltage alarm. Please refer to the picture below, channel 2 to channel 16 are the same as channel 1. 25 8/16 Channel Digital Video Recorder 2. Open/Close output A: N.O. Normal open,close when triggered. DVR must set as low voltage alarm. B: N.C. Normal close,open when triggered,DVR must set as high voltage alarm. Please refer to the picture below, channel 2 to channel 16 are the same as channel 1. Alarm output There are three alarm output pin, the status of these pin are illustrated as below After alarm Before alarm N.O. COM N.C. N. O . COM N.C. There is an example for alarm output connection N.O. COM N. C. Alarm 5V 26 8/16 Channel Digital Video Recorder 4.Hard Disk Connection There are process to install the hard disk If the DVR come without a CD-RW, please fellow the below steps. 1. Pull out the hard drive rack from the DVR side 2. Open the top cover of the drawer. panel. 3. Jump HDD to Master 4. Connect the ribbon cable (IDE) cable & power cable. Jump to Master 5. Close the top cover of the drawer and put the hard 6. Lock the hard drive draw by turning the key drive drawer back into the DVR. (Make sure the clockwise. cables are firmly pressed onto the HDD interface) If you have another HDD, please jump that HDD to SLAVE, and open the machine, put the HDD to the HDD shelf, and then connect the power and digit cable. Note: If the DVR comes with a CD-RW, please fellow the below steps.. Open the DVR cover, fix the HDD to the DVR HDD shelf of soleplate, then connect the power and digit cable. If you have another HDD, please jump the first one to MASTER and the other HDD to SLAVE put that HDD to the other HDD shelf, and then connect the power and digit cable. 27 8/16 Channel Digital Video Recorder User Guideline 1.Start the Machine Before starting the machine, please make sure all the items in the “Security Notice” at the beginning of this manual are fulfilled. Before starting the machine, please check the system connection, input and output equipment connection. Please insure the video-recorder’s video format (NTSC/PAL) and the monitor video format (NTSC/PAL) meet the demands. Start exterior equipment after checking over. Insert the removable hard disk case to the end, and lock it up (turn the hard disk lock to right); connect the power, then the machine start to work. 2.Turn off the Machine Normally turn off the machine when the system shutdown, which means do not to turn off the machine while playing or system setting up, especially not to turn off the machine while recording Press recording button to stop recording or press playing button to stop playing or exit from system setup menu, then turn off the power. If do not use the video recorder for a long time, please pull out the power line from the electrical outlet. 3.Normal Recording Connect the power to all related equipments; ensure that there is video input. Press display button to check spare space of the hard disk, if there is not much space, please think whether to change hard disk first or select overwriting modes. Check recording parameter setup before recording; select video quality, frame rate. you cannot change record setting during the process of recording. Manual recordings belong to normal recording. Under the manual mode (non-schedule status), pressing record button will record all channels’ video. Press the record button to begin recording, sixteen channels will start simultaneously recording. While in normal recording mode, press record button, and enter the correct password, it will stop recording. During the process of recording, if the hard disk is full, and the system is set to automatic overwrite, then the recording will not be interrupted, and it begins to overwrite the earliest recorded files; if the system is set to overwrite unable, it will stop recording. 28 8/16 Channel Digital Video Recorder 4.Alarm Recording Alarm recording is not started by manually pressing record button. Alarm recording can be activated by alarm input signal or motion, so it must to check whether the connection of alarm input equipment is correct, stable and reliable, and the alarm set is right, please refer to sensor setup. The prerequisite condition of whether the alarm recording can be activated by exterior input signal or the motion is the system must be set on schedule, also, in the menu of alarm setup, for exterior input alarm, alarm enable of that channel must set to “ON”, for motion alarm, motion enable of that channel must set “ON”, and set the area you want for motion detection. Under the state of off-schedule, system will never start alarm recording. Please note setting schedule on or off is achieved through pressing the schedule button on the front panel, not through system setup menu and window. Under schedule-on situation, the character “S” will display on the screen. Alarm video recording cannot stop by pressing record button, but can stop by removing schedule. Because once the system is set on schedule, the schedule cannot be removed randomly, there is a password protection to remove schedule, only after inputting correct password, you can take schedule off. Check alarm recording setup before recording; confirm the video quality and the frame rate, the record setting cannot change during recording process. As long as the alarm input signal is effective, the alarm recording continues. When the alarm input signal loses efficacy, the time set up by “A/M REC TIME” becomes effective, and when the time goes by, the alarm recording automatically stops. In course of this, if you want to manually stop alarm recording, the only way is to remove schedule (answer the password). 5.Time Recording Time recording starts and stops recording automatically according to the pre-arranged time period. It is applied to fixed timetable, for example, the periodical work time recording (or off time recording) with fixed start/stop time. To start Time recording function, Make record schedule setup beforehand, and press down the schedule button on the front panel to set schedule on. While pressing down this button, the schedule symbol “S” will display on the screen. Without pressing the schedule button, the Time recording parameter setup will not work. The prerequisite condition of whether the time recording takes effective is system must be set according to schedule. In time record state, you can press again schedule button then enter password to stop time recording. 29 8/16 Channel Digital Video Recorder Because Time recording is correlated closely with time, so before using this function, should previously adjust the time. 6.Playback Press play button,system begins to play the images recorded In the process of playing, press pause button to pause playing, re-pressing play button can continuously play. In the process of fast forward playing or fast backward playing, pressing press play button will begin normal playing from the current one. Continuous pressing forward button will change the fast-forward among five levels of speed (X2, X4, X8, X16, X32) circularly. Continuous pressing backward button will change the fast backward among four levels of speed (X2, X4, X8, X16) circularly. During playback mode, long press single frame button will play backward frame by frame, long press single frame forward button will play forward frame by frame. Press play button to play normally. Press play button again will stop playing. 7.Search Play Press search button,search play window will display on the screen. TIME SEARCH: search play by input time. EVENT SEARCH: search play by event list. START STOP SEARCH: search play by segment. 30 8/16 Channel Digital Video Recorder Press upward and downward button to move cursor, then press enter button to enter sub menu you select, press search button to quit from search menu. 8. Time Search When the cursor moves to Time Search, then press enter button, the time search window will appear, which is illustrated as below. There red block means there has video file that time Press leftward and rightward button to move the cursor among year, month, day, hour and minute, if you select the year and press enter button you will select month and so it is same with day and hour. Press add and DEC button to modify the time. If you select the minute and that minute has a red block then you can press enter button to play the video from that time you selected. 9. Event Search When the cursor moves to Event Search, then press enter button, the event search window will appear, which is illustrated as below. There are four types of event list: MOTION, ALARM, SCHEDULE and NETWORK. MOTION means motion alarm recording, Alarm means sensor alarm recording, SCHEDULE means time recording, NETWORK means network recording Press upward and downward button to move the cursor among the event list, press leftward and rightward button to see previous or next page, press enter button to play the segment you select. Press search button back to Search Play menu. 31 8/16 Channel Digital Video Recorder If you want to change the HDD between MASTER HDD and SLAVE HDD, just press mode key, then press enter key to change, press menu to give up. 10. Start Stop Search When the cursor moves to Start Stop Search, then press enter button, the Start stop search window will appear, which is illustrated as below. All record segments are displayed here, press upward and downward button to move the cursor among the segment list, press leftward and rightward button to see previous or next page, press enter button to play the segment you select. Press search button back to Search Play menu. 32 8/16 Channel Digital Video Recorder If you want to change the HDD between MASTER HDD and SLAVE HDD, just press mode key, then press enter key to change, press menu to give up. 11.USB Backup Plug in the USB device, go to the menu of Backup set, check whether the USB device was detected, and the free space of the USB device is enough, select the backup mode, then quit the menu setup. In shift mode, if you select “STILL” for the backup mode in the Backup Set menu, press the USB button, it begin to backup the main out picture to the USB device, there will be a “S” blinking on the screen, when it stop blinking, the backup of the picture is done, you can plug the USB device out and see the picture on a computer with the net viewer soft. If you select “MOVIE” for the backup mode in the Backup Set menu, press the USB button in shift mode, it begin to backup the main out video to the USB device from the moment, press USB button again to select the end of the backup video, there will be a “A” blinking on the screen. This may take a little time, and make sure the USB device has enough free space, if blinking stops, the backup is ok, you can see the video on a computer with net viewer software. NOTE: if you backup still picture, please choose full picture display. 12.CD_RW Backup This function is selectable, if your DVR has a CDRW, then if you enter CD_RW backup menu, you will see the picture below: 33 8/16 Channel Digital Video Recorder Start Time Set: you can set the backup start time. START: backup start time display. END: backup end time display. Backup Start: start backup with CD_RW. If you select Start Time Set and press enter button, the Backup Start Search window will appear, which is illustrated as below: The operation is the same with time search, please select the start time you want to backup. If you have selected the start backup time, then you have to change the backup size, here you can change the backup size you want from 1M to 650M. After these steps, then you can put you CD to CDROM and select Backup Start, you can see the picture below: 34 8/16 Channel Digital Video Recorder If backup finish, you can use the net viewer soft’s DriveScan function to see the video on CD. If the cd has been writed, press usb button to format the cd. 13.USB Update Create a folder named “firmware” in the USB root directory, copy the update files to the folder. Plug in the USB device, go to the menu of Backup set, check that whether the USB device was detected, go to the Firmware Update menu and select USB method, move to Update Start and press enter button, update will start, if you see picture below, update is ok.. Then reboot the DVR. NOTE: do not shut down the DVR when the DVR is updating, it may cause fatal problem. 35 8/16 Channel Digital Video Recorder 14.Zoom Operation In shift mode, press zoom button, the DVR will be in zoom mode, which is illustrated as below. Press upward, downward, leftward or rightward to move the zoom area, then press enter button to zoom, press zoom button again to cancel zoom operation. 15.Information Display In shift mode, press display button, the main information of the DVR will display on screen. 36 8/16 Channel Digital Video Recorder HDD SIZE: the size of the hard disk HDD USED: the used space of the hard disk. HDD READ: current HDD address for playback OVERWRITE: overwrite time of the HDD NETWORK IP: IP address of the DVR. REC LIST: number of record list EVENT LIST: number of event list REC OVER: record list overwrite or not EVENT OVER: event list overwrite or not. S/W VER: software version 16.PTZ Operation This DVR can control all speed domes which are connected to the DVR. To control the speed dome, make sure all the lines are correctly connected, first you must set the right protocol, baud rate, and speed dome’s address for each speed dome, please refer to protocol set. For example, you connect the first speed dome to channel one, you should make sure that the baud rate, the protocol, and speed dome’s address is the same as the speed dome you connect to the channel. PTZ can only be operated by remote device, press the PTZ button on the remote device, “PTZ” will be display on the screen, then select 1 to 16 to choose PTZ channel, the channel number will be displayed after “PTZ”, please refer to the picture below: 37 8/16 Channel Digital Video Recorder You can press upward, downward, leftward, rightward button to move the speed dome, and press the enter button to stop. If you press the Iris button, the character “Iris” will appear on the screen, please refer to the picture below, then you can press the “+” and “-” button to change the iris, the same to control the focus, zoom, and speed, also press enter button to stop. Press the PTZ button one more time to exit from PTZ control. 17.Default Setting Default setting for each item is shown in the below chart. “Defaults” is the initial setup by the manufacturer. User can change the setup according to the actual environment and demands. If there is any confusion or unexpected effect, choose “Defaults” and readjust. You can choose “FACTORY RESET” in “SYSTEM SET” menu, and reset all settings to default setting. 38 8/16 Channel Digital Video Recorder item General setting S Y S T E M S E T U P Recording Para Net Work Setting Alarm setting Protocol Setting Setup items Default setup Selectable setup Year/Month/Day/ Hour/Minute 2005/01//01 12/00/00 2000~2099/Common sense rules Auto Time 1 second 0~99second Buzzer Sound ON ON/OFF Password 0000 N/A Play Repeat YES YES/NO Video Input NTSC format NTSC/PAL Quality Normal Very high/High/Normal/Low Overwrite Enable YES YES/NO Rec Speed 60f/s(NTSC) 50f/s(PAL) 120f/s~1f/2s(NTSC) 100f/s~1f/2s(PAL) Resolution 360 360/720 PB Speed NO use 120f/s~no use(NTSC) 100f/s~no use(PAL) Audio Enable CAM 1 CAM1~CAM16/OFF A/M REC Time 1 Minute 1~99minute Sub Net 255.255.255.0 N/A Gate Way 192.168.1.1 N/A IP Address 192.168.1.111 N/A Net Work Speed Fast Fast/Normal N/W Enable ON ON/OFF Mac Address 0a0b0c0d0e0f N/A Alarm Enable OFF ON/OFF Motion Enable OFF ON/OFF Motion Level Normal Very low/Low/ Normal/High/Very high Buzzer Sound No Use 0~99 second Schedule setting OFF OFF/ON Baud Rate 2400 2400/4800/9600/19200/38400 Protocol PELCOP PELCOP/PELCOPD/ LILIN/ NENO Address 01-16 0~0xff 39 8/16 Channel Digital Video Recorder 18.Remote Control All the function of the DVR can be operated by the remote device. 40 8/16 Channel Digital Video Recorder 19. PC View Software Operation Use the PC View software, you can view the DVR through Internet, also, you can view and backup the video information on the HDD through a computer. Open the software, you will see the window below: Please click “Setting” button, you will see the window below: 41 8/16 Channel Digital Video Recorder Enter the IP address and click “OK” button. Click connect button, enter password, the password is the same as the DVR’ password. then click the OK button, if connect to the DVR, you can see the picture below. Click the “Confirm” button. When users survey by Internet, they should firstly open ports 5000-5002 (default and can be changed on the DVR) on the router side. Please learn more about how to do from the manual of router. 1. Play: if you select this, you will start to play the video on the DVR. 2. Stop: if you select this, you can stop the play. 3. AVI: if you select this, you can save the picture to AVI format on you computer. 4. LOCAL: you can save the video in you computer, and open with this software. 5. Live: you can select this button to see live picture, just click the play button. 42 8/16 Channel Digital Video Recorder 6. Playback: you can view the playback video in the DVR 7. ScanDisk:.if you select this, you can view the video on the HDD or CD which recorded in the DVR and then connect to the computer. 8. File Play: you can play the video file on the computer. AVI Save: when play video, click “AVI” button, the video will save as AVI format on the computer, you can play the file with any media player supports. Local: when video is playing, click “Local” button, the video will save to the computer, you can play the file with this software, please refer to File Play. Live Operation: if the software is in live mode (click Live Play), then click “Play”, it will connect to the DVR, and the live pictures will be transmitted to display on the window. Click “Stop”, it will stop transmitting pictures. Net Search operation: if the software is in net search mode (click PlayBack), net search window will display. First, you should select the HDD of the DVR. Click the “Get Event List” button, then click “Select Event List”, if the DVR has event list, you can see the window below: Double click the event list, you can see the playback video. The record list operation is the same as event list operation. Drive Scan: Connect the HDD that used in the DVR to a PC and then select Drive Scan, Drive Scan window will display, click and select one HDD, then you can play all the video on 43 8/16 Channel Digital Video Recorder the HDD. File play: if the software is in File Play mode (click” File Play”), file play window will display, it can play the video on HDD of you computer. Click “Open”, select one video file, the click play, it will play the video file 44 8/16 Channel Digital Video Recorder Main standard & parameter chart Item Specification Video signal NTSC/PAL Video input Composite:1.0V p-p/75Ω,BNC×8/16 Video output Composite:1.0V p-p/75Ω,BNC×2 S video Audio input -8Db 22KΩ, RCA connector×4 Audio output -8Db 3KΩ, RCA connector×1 Alarm input 16 Alarm output 1 Compression standard Modified MJPEG Record time 18-1680 hours/40G Electron clock Year/Month/Day;Hour/Minute/Second Secrete function Password protection Power source DC12V Power 40W Environment temperature Work Temperature:+5℃~+50℃;humidity:< 90% Store Temperature:-20℃~+70℃;humidity:< 95% Exterior size 432×55×366mm Weight About 4 Kg Notice: Sorry for not inform in time of any changes to the standards and exterior sizes. 45 8/16 Channel Digital Video Recorder Exterior size 43 2mm 70mm 55mm POWER REC PLAY REW FORWARD MOD E 36 6m m Incase list Incase list Name Quantity 16-channel hard disk video recorder 1 Remote device 1 CD-RW(selectable) 1 Power wire 1 Netviewer software CD 1 User guideline 1 In case of any question, please do not hesitate to contact the dealer directly. 46 8/16 Channel Digital Video Recorder Appendix A: Trouble shooting guide Q. What kind of camera should I buy for this DVR? A. Any BNC or RCA interface indoor/outdoor/infrared camera will work with the DVR. It doesn’t matter whether it’s a color or black/white camera. However, web cameras that require a USB interface are not compatible with the DVR. Q. What kind of alarm device should I buy for DVR? A. Most sound alarms are compatible with our DVR. Q. I can’t turn on DVR. A. Make sure that the power cord is plugged in correctly and the power light on DVR front panel is on. Q. I see nothing but a blue screen after I turn on DVR. A. Check the camera input and video output connection on DVR back panel. If you can’t find problem with these connections, check whether the camera power cable is firmly connected. Make sure the system format for NTSC and PAL is right. Q. Can I prevent other people from stopping the recording while I am gone? A. If the DVR is in schedule or recording mode, set password “on” in menu setup, no one can change the set unless he has the right password. Q. How can I erase all data on the hard disk drive? A. Select “HDD Format Set” option in the menu. Q. I forgot my password. What should I do? A. Press “MODE” button 12 times to reset to 0000. Q. Can my desktop PC read the video data on hard disk drive in DVR? A. Yes, you can use our software to read all video data on hard disk. Q. What happens if I install my PC hard disk drive into the DVR? A. You can use a PC hard disk drive in the DVR. However, once it runs in DVR, it will delete any PC operation system and files on the hard disk drive. Q. What kind of hard disk drive should I purchase to make the DVR run? A. Any PC compatible IDE, ATA hard disk drive will work. Q. Does this DVR kit come with sensors, cameras, or hard disk drive? A. No. You have to buy each accessory separately. Q. What is the capacity to record? 47 8/16 Channel Digital Video Recorder A. Up to a year with two 120 GB HDD at the lowest quality setting when set at 1 frame per second. Q. Does this DVR come with a remote control either hardwire or wireless? A. Yes, there is a remote control come with the DVR. Q. Why cannot I access Time/Date Set, HDD Format Set, Record Set menu? A. Please stop record or play before you access these menu. Q. Why cannot I access Network Set menu? A. Please stop the connection of the PC View soft from Internet before you access Network Set menu. Q. I press record button, but the DVR does not start recording, why? A. Press display button to see if there is a hard disk detected, also if the DVR is in schedule mode (there is a “S” on the screen in yellow), you cannot start recording by press record button, you have to press schedule button again to cancel schedule mode. Q. I press record button while recording, but the DVR does not stop recording, why? A. If the DVR is recording in schedule mode (there is a “S” on screen), you cannot stop recording unless you quit schedule mode first. Press schedule button to cancel schedule mode. Q. There is a movement, but the DVR does not start recording. A. Make sure the motion enable of that channel is on, the area set is ok, the A/M rec time is not set to off, and the DVR is in schedule mode. Otherwise set the motion level to HIGH or VERY HIGH. Q. When the network connection between DVR and client computer is cut off, why the DVR halts and clock stops? A: In case network is cut off abnormally, DVR machine will halts for 20 seconds without response to any operation of pressing front panel buttons. 20 seconds later, it will restore normal state, but the icon that shows network status won't disppear in 10 minutes and in this period client computer cannot connect to the DVR or enter network menu. Q. I press the menu button, but it do not display the password menu to enter menu, why? A. For 16 ch user, to enter menu, you have to long press the “Menu/search” button, if you just press this button, you will see the search menu. Q. I long press the “Menu/search” button, but it do not display password menu, and directly enter the menu, why do not I need a password? A. If the password level setup in Password Setup is “NO USE”, you do not need a password to enter the menu, if you want to need a password when enter menu setup, just change the password level to “SETUP”. Q. How much HDD size dose this DVR support? 48 8/16 Channel Digital Video Recorder A. Any type size of the HDD is OK to the DVR, but if the size is much more then 300G, it may display only 300G on the DVR, and it does not effect the real size use on the DVR. 49 8/16 Channel Digital Video Recorder Appendix B: protocol for dvr control Serial port setting: BAUD, n, 8, 1 (BAUD RATE = 1200,2400,4800,9600,19200) PTC1: (three byte) Command (CHAR) Hexadecimal Number Function Description /RE 0x2F 0x52 0x45 Record /DP 0x2F 0x44 0x50 Display /SC 0x2F 0x53 0x43 Schedule /US 0x2F 0x55 0x53 USB /AU 0x2F 0x41 0x55 Auto /ZM 0x2F 0x5a 0x4d ZOOM /FR 0x2F 0x46 0x52 Freeze /CM 0x2F 0x43 0x4d CH Minus /CP 0x2F 0x43 0x50 CH Plus /AD 0x2F 0x41 0x44 Add /DE 0x2F 0x44 0x45 Dec /MN 0x2F 0x4d 0x4e Menu /WM 0x2F 0x57 0x4d Water mark /PL 0x2F 0x50 0x4c Play /PA 0x2F 0x50 0x41 Pause /ST 0x2F 0x53 0x54 Stop /FW 0x2F 0x46 0x57 Forward /RW 0x2F 0x52 0x57 Rewind /RR 0x2F 0x52 0x52 Frame rewind /FF 0x2F 0x46 0x46 Frame forward /PT 0x2F 0x50 0x54 PTZ /ZO 0x2F 0x5a 0x4f Zoom /FO 0x2F 0x46 0x4f Focus /IR 0x2F 0x49 0x52 Iris /SP 0x2F 0x53 0x50 Speed /UP 0x2F 0x55 0x50 Full/up /DW 0x2F 0x44 0x57 Quad/down /LE 0x2F 0x4c 0x45 Nine/left /RT 0x2F 0x52 0x54 Hex/right /EN 0x2F 0x45 0x4e Enter /01 0x2F 0x49 0x52 Ch1 /02 0x2F 0x30 0x32 Ch2 … … … /0F 0x2F 0x30 0x3F Ch15 /0G 0x2F 0x30 0x40 Ch16 50 8/16 Channel Digital Video Recorder PTC2: (seven byte) Transmitting S.N Transmitting worth Instructions Byte1 0x03 Fixed byte Byte2 0xaa DVR identifier word Byte3 0x01 Fixed byte Byte4 Device id DVR device address Byte5~7 Refer to PTC 1 Same command as PTC 1 PTC3: (seven byte) Byte1 Byte2 Byte3 Byt4 0xFF Addr Var1 Var2 Byte5 Byte6 Byte7 Check sum Var1 Var2 Function PELCO-D 0x00 0x08 Full/up Up 0x00 0x10 Quad/down Down 0x00 0x04 Nine/left Left 0x00 0x02 Hex/right Right 0x04 0x00 Enter Iris close 0x00 0x40 Record Zoom wide 0x00 0x20 Play zoom tele 0x02 0x00 Search Iris open 0x00 0x80 Add Focus far 0x01 0x00 Dec Focus near Byte 5 and byte 6 are ransom value from 0x00 to 0xff. Byte 7 = mod [(byte2 + byte3 + byte4 + byte5 + byte6)/100] Note: This protocol is the same as PELCO-D, which is used to control speed dome. So, if you use PELCO-D to control speed dome by a keyboard, you can also use the keyboard to control the DVR through this protocol, we can use different address to distinguish the DVR and the speed dome. PTC4: (eight byte) Byte1 Byte2 Byte3 Byte4 Byte5 Byte6 Byte7 Byte8 0xa0 Addr 0x00 0x07 0x00 Var 0xAF Checksum Byte8 = byte1 xor byte2 xor byte3 xor byte4 xor byte5 xor byte6 xor byte7 51 8/16 Channel Digital Video Recorder Var Function Var Function 0x01 Ch1 0x21 Zoom 0x02 Ch2 0x22 Freeze 0x03 Ch3 0x24 Ch Minus 0x04 Ch4 0x25 Ch plus 0x05 Ch5 0x26 Add 0x06 Ch6 0x27 Dec 0x07 Ch7 0x28 Menu 0x08 Ch8 0x33 Water mark 0x09 Ch9 0x35 Play 0x0A Ch10 0x36 Pause 0x0b Ch11 0x37 Stop 0x0c Ch12 0x38 Forward 0x0d Ch13 0x39 Rewind 0x0e Ch14 0x40 Frame forward 0x0f Ch15 0x41 Frame rewind 0x10 Ch16 0x42 PTZ 0x16 Record 0x43 Zoom 0x17 Display 0x44 Focus 0x18 Schedule 0x45 Iris 0x19 USB 0x46 Speed 0x20 Auto Note: This protocol is the same as PELCO-P’s call function; you can use PELCO-P’s call function to control the DVR. First, you must set right protocol, baud rate and address, second, you press call button on the keypad, then press the number according to Var above, last press enter button. 52 8/16 Channel Digital Video Recorder Appendix C: record time in for 120G hard disk (hour) Rec rate field/sec Picture quality Resolution Recording time 60 fps Very high 720 22.5 hours 60 fps Low 720 60 hours 120 fps Normal 360 22.5 hours 1 fps Normal 720 2160 hours Note: The above figures are from our test results. Just for users’ reference. Different definition and stabilization (objects’ movement) of the images will make some kind of different results. 53 8/16 Channel Digital Video Recorder Appendix D: Internet View/Playback Configurations 1. About Network Users can select the following types of networks: 1): Local Area Network (LAN): telecom companies offer the Internet connection, e.g. optical fiber, and users of a community/building setup Internet server, then put cables into the end user’s office/home through HUB. 2): ADSL: user applies for ADSL from Internet services supplier and get an ADSL MODEM, and then connect the computer to the ADSL MODEM, by inputting user name and password in the dialing software users can connect to Internet. 3): Close Circuit Television Broadband: users applies for CCTV connection from CCTV services supplier, and connect a computer to a CABLE MODEM to surf online. 4): In companies or Internet cafes, network administrators utilize routers or proxy server to connect all the computers to one Internet cable, and all the computers use the same Internet IP address. Most companies are using this kind of network nowadays. ISP Inte rnet ADSL Modem Ro uter Swic the r LAN COMPANY ISP ADSL Modem Inte rnet HOME 2. Network Configurations After connecting to Internet, our DVR card users should make the following configurations to make remote view/playback. 1): When in LAN, network administrators should open the following ports for specifics computers: 5000- 5002. Please make sure that the other services don’t use the same ports. 54 8/16 Channel Digital Video Recorder 2): In case users use ADSL network and the surveillance system computer connect to the ADSL MODEM, then the ports have all opened by default. If not, please close fire wall by guidance of the ADSL MODEM user’s manual. 3): In case connect to Internet by proxy server, users should utilize port mapping software and open ports 5000 –5002 for the surveillance computer. 4): In case users connect to Internet by router, then users should add the IP address of the surveillance computer and open the abovementioned ports in DMZ setup or Virtual Server setup (the names maybe different in different kind of routers) of the router. 5): For CABLE MODEM type and ADSL MODEM type, the configurations are some kind of the same: 55 8/16 Channel Digital Video Recorder As ADSL and CABLE MODEM network users usually use dynamic IP address, so once the MODEM restarts, the IP addresses will change. For this situation, users should apply for DNS services. 56