1
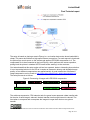
Final Technical report The AirJaldi Bandwidth Maximizer (BwM)
Proving Concept, Demonstrating potential and Viability
Dates covered by this report
March 2009 – June 2010
Country where the project has been implemented
Project leader name
India
Michael Ginguld
Team members (list)
Michael Ginguld
Fredric Renet
Aurelien Personnaz
Yahel Ben David
Arti Sinha
Friday, July 9, 2010
Submission date
AirJaldi BwM
Final Technical report
Table of Contents
Synthesis.............................................................................................................................................................................................................4 I. Development Problem .........................................................................................................................................................................5 II. Project Process......................................................................................................................................................................................5 III. Principal Findings ................................................................................................................................................................................6 IV. Fulfilment of Objectives ...................................................................................................................................................................7 V. Project design and implementation.............................................................................................................................................8 5.1. Introduction........................................................................................................................................... 8 5.1.2. A Note on Traffic and Performances Analysis..................................................................10 Real-time Analysis Tools ......................................................................................................................................... 11 Historical Analysis Tools .......................................................................................................................................... 11 5.2. Caching.................................................................................................................................................12 5.2.1. Introduction.................................................................................................................................................... 12 5.2.2. Requirements............................................................................................................................................... 12 Caching Software ........................................................................................................................................................ 12 Operating System (OS) ............................................................................................................................................ 13 HD/Storage Type and Size..................................................................................................................................... 13 RAM .................................................................................................................................................................................... 13 LAN Interface ................................................................................................................................................................. 14 5.2.3. SQUID Configuration ............................................................................................................................... 14 CDN and YouTube...................................................................................................................................................... 14 Windows Updates ....................................................................................................................................................... 15 Unwanted Content ...................................................................................................................................................... 16 Impact of Changes...................................................................................................................................................... 16 5.3. Load balancing and fail over........................................................................................................17 5.3.1. Introduction.................................................................................................................................................... 17 5.3.2. Mpath................................................................................................................................................................ 17 Description ...................................................................................................................................................................... 17 Mpath Load Balancing .............................................................................................................................................. 18 Failover Functions ....................................................................................................................................................... 19 Modifications of Mpath .............................................................................................................................................. 19 5.4. Content re-compression ................................................................................................................20 5.4.1. Introduction.................................................................................................................................................... 20 5.4.2. Formats Compressed .............................................................................................................................. 21 5.4.3. Compression Setup .................................................................................................................................. 22 5.4.4. Content Compression Results............................................................................................................. 25 VII. Project Outputs and Dissemination.......................................................................................................................................26 VIII. Capacity Building...........................................................................................................................................................................26 XI. Impact ....................................................................................................................................................................................................27 This work is licensed under the Creative Commons Attribution-‐Noncommercial-‐Share Alike 3.0 Unported License. Page 2 of 37 AirJaldi BwM
Final Technical report
XII. Overall Assessment ......................................................................................................................................................................28 XIII. Recommendations: Directions for Further Research.................................................................................................28 XIV. Annexes.............................................................................................................................................................................................29 Annex 1: Installation Procedure for the AirJaldi BwM .............................................................................. 29 1.1. Requirements ................................................................................................................................................... 29 1.2. Installing Ubuntu Server 10.4 .................................................................................................................. 29 1.3. Installing Required Packages .................................................................................................................. 30 1.4. PDND – Recursor Configuration ............................................................................................................ 31 1.5. Mpath Installation ........................................................................................................................................... 31 Configuration.................................................................................................................................................................. 32 Gateways and Rules’ Configuration .................................................................................................................. 33 Test ..................................................................................................................................................................................... 35 Use of Mpath Web Interface .................................................................................................................................. 35 1.6. SQUID Installation ......................................................................................................................................... 36 1.7. SNMPD Installation ....................................................................................................................................... 37 1.8. Firewall Script................................................................................................................................................... 37 This work is licensed under the Creative Commons Attribution-‐Noncommercial-‐Share Alike 3.0 Unported License. Page 3 of 37 AirJaldi BwM
Final Technical report
Synthesis
The main obstacle facing network operators in rural areas of developing countries is the low economic
viability of setting up broadband Internet networks using expensive commercial technologies to reach
relatively few and dispersed users. The typically high cost of Internet upstream bandwidth in such areas
adds significant challenges. Further, frequent upstream congestion and long hours of total service
downtime - often resulting in slow, limiting, and erratic service - are common.
One of the necessary conditions for ISPs operating in such areas lies therefore in finding ways to ensure
uninterrupted Internet connectivity and maximizing the utilization of available bandwidth with minimal
impact on the end user’s experience.
In this project, we focused on the development of a unique set of solutions for this challenge, collectively
referred to as the “Bandwidth Maximizer” (BwM). Essentially, AirJaldi’s BwM combines local content
caching and filtering with tools that enable the use and load-balancing of multiple upstream connections.
More specifically, the project objectives were:
1. Further develop and integrate a prototype bandwidth maximizer which will be operational on the
AirJaldi Network in Dharamsala;
2. Develop user manuals for configuration and use of BwM components as well as the BwM system as a
whole;
3. Demonstrate, through reports based on real-life field measurements, the technical and financial
benefits of the BwM; and
4. Outline further development needs for improving the product and making it user-friendly and easily
deployed.
Our work began with examination of existing products and initiatives, which could contribute to our
objective. An intensive process, during which more than a dozen different commercial free and open
source software (F/OSS) packages were identified and tested, resulted in the selection of a group of
F/OSS products that formed the AirJaldi BwM.
After more than a year of work, we now have a working product. The AirJaldi BwM is presently deployed
successfully in Dharamsala and will shortly be deployed in two additional networks in India. As
importantly, the product is fully replicable, although familiarity with networking and F/OSS-based
networking in particular is required. An installation manual is included in this report and will shortly be
available online. Our tests and real-life deployment of the solution show that it leads to considerable
bandwidth conservation and can potentially increase the revenue of a rural ISP by about 10%.
This report, which is the third and final submitted to ISIF, describes our work in some detail. We aim to
cater to different groups of readers •
•
•
First and foremost practitioners – people who operate similar networks to ours and who face
similar issues to the ones described in Section I of this document.
Second, Researchers and F/OSS developers and supporters – we hope our work has contributed
to the multiple efforts carried out by those working together to bring viable connectivity to rural
areas.
We also feel that this document will be of use to policy makers in developing countries – we hope
this report will enhance the credibility of small/medium scale ISPs, so that they can perform as
viable service providers, in particular in rural areas.
This work is licensed under the Creative Commons Attribution-‐Noncommercial-‐Share Alike 3.0 Unported License. Page 4 of 37 AirJaldi BwM
Final Technical report
The document has two distinct parts. The first is the report itself, which is meant to explain the process
and rational behind our choices and implementation, and the second is a hands-on installation manual.
We hope you’ll find the report a good resource that is user-friendly and possibly enjoyable. We have
surely enjoyed and and continue to enjoy our work on the BwM project.
I.
Development Problem
The main development problem we identified in this project is the “rural supply-demand gap” in
the provision of Internet services, or more specifically - how to provide viable broadband
Internet services in areas where an Internet Service Provider (ISP) is tasked with reaching a
relatively small number of users who often live in challenging areas.
We focused on the supply-side challenges, in particular the following issues:
• High infrastructure costs;
• High bandwidth costs;
• Low reliability and quality of service;
• Network Security; and
• Bandwidth-hogging applications (and users)
Much of our work focused on addressing these issues with the ultimate aim of reducing
bandwidth usage and thereby enabling an increase in the number of users per given amount of
bandwidth (usually referred to as an ‘over-subscription ratio’) with a minimal impact on the users'
experience.
To achieve this goal, we are developing a Bandwidth Maximizer (BwM), which is essentially a
package of integrated software and network management policies.
II.
Project Process
The project methodology consisted of a rather straightforward iterative process: we identified the
main problem we wished to address, followed closely by a definition of project goals. We then
broke these to smaller processes by identifying specific problem areas and targets. We then
explored existing solutions for addressing each specific problem. Some experimentation
involved testing a few candidates on a live network in Dharamsala, India and chose the ones
that performed best. We then sought to integrate the preferred solution into a cohesive system –
the Bandwidth Maximizer or BwM.
Overall, the process worked well, in particular the following three processes:
Three processes that worked:
• Definition of overall needs and problems to be addressed by the AirJaldi BwM: Our
understanding of the challenges we are trying to solve has deepened and evolved from
the time this proposal was first submitted. We attribute this to the ongoing management
of a live network and the need to provide ongoing solutions to the challenges as they
arise. Some of these challenges include upstream provision offerings, popular
applications, usage patterns (local and global), threats, and other limiting factors.
• Identification and research of BwM components: As we were already operating a live
network in a rural area, we had a rather good idea of our basic needs, and some
knowledge of a number of “candidate products”.
This work is licensed under the Creative Commons Attribution-‐Noncommercial-‐Share Alike 3.0 Unported License. Page 5 of 37 AirJaldi BwM
Final Technical report
•
Adaptation and configuration of tools for use on the network: The availability of the
network and its real needs contributed greatly to a quick conceptualization-testingdeployment cycle. The need to constantly address various issues has helped us to
maintain a focus on practical, easily deployable solutions.
Problems
Team recruitment was harder than expected and led to delays in the project. This in turn meant
that, although the project period was extended, we feel that more could have been achieved had
we been able to address this issue earlier.
III.
Principal Findings
Traditionally, bandwidth optimization is confined to the low network layers, probably to avoid any
negative effect on user data. This has proven to be the safest approach but we have found that
in order to increase the number of users on a severely bandwidth-constrained network, it is
necessary to reduce the bandwidth consumption by interfering with content.
For most users, the Internet is synonymous with HTTP. Nearly everyone uses web mail, which
has almost completely replaced SNMP/POP/IMAP. In a similar vein, file transfers are also
carried out through HTTP (FTP being relegated to the same fate as its mail contemporaries),
VoIP applications such as Skype are convenient, making SIP obsolete. Much of what is left as
traffic is encrypted.
The wide implementation of filtering policies and protocol blockage tools has led to the
development of new encrypted protocols which are harder, if not totally impossible, to
differentiate. This has subsequently rendered port-based packet classification ineffective and
therefore useless.
The only apparent solution is the use of deep packet inspection, but even that does not
guarantee long-term success. If we encounter encrypted UDP packets, for example, they could
be anything from a Skype VoIP call, or a torrent tracker communication, a VPN, or a World of
Warcraft stream. We see the same trend on the HTTP layer, where more and more traffic is
encrypted. Protocol detection tools use heuristics in order to guess the application responsible
for the packets, but even the latest of these commercial deep packet inspection software
packages do not guarantee a 100% matching rate.
Our principle findings from this project demonstrate our belief (and resulting project objectives)
that it is still possible to gain meaningful bandwidth savings:
•
Through our work on this project, we managed to increase our byte caching rate from
18% to 25%.
•
Prevention of unwanted content from reaching the network and users generated
bandwidth savings and enhanced user experience.
This work is licensed under the Creative Commons Attribution-‐Noncommercial-‐Share Alike 3.0 Unported License. Page 6 of 37 AirJaldi BwM
Final Technical report
•
Content recompression proved very effective, and can reduce bandwidth consumption
for website browsing by as much as half. However, such an aggressive methodology is
easily noticeable by most users and hence we have implemented this in our network in a
milder manner.
In addition to our findings and implementation of bandwidth-saving methods, we also addressed
the problem of upstream redundancy by implementing a simple load-balancing solution that
does not necessitate the use of expensive hardware or closed source solutions.
IV.
Fulfilment of Objectives
Our project objectives are to:
1. Further develop and integrate a prototype bandwidth maximizer, which will be operational
on the AirJaldi Network in Dharamsala.
This objective was fully achieved. During the project period, we moved tested three major
versions of the BwM. The process resulted in a more tightly integrated solution deployed on one
main server that unifies functions carried earlier by a server, hardware load-balancer, and main
network router.
2. Develop user manuals for configuration and use of BwM components as well as the BwM
system as a whole.
A user manual, designed to cater for system administrators managing small/medium size rural
ISPs, was developed and is available as an annex to this report. We will make this manual
available for download through our website in the near future.
3. Demonstrate, through reports based on field measurements, the technical and financial
benefits of the BwM.
Our work clearly demonstrates the technical benefits (bandwidth saving, more efficient
management of the network) and the economic benefits. In addition, we increased our savings
by approximately 10% - equal to an increase of almost 100% over the previous savings rate,
from 18% to about 28% - as a direct result of this project. We estimate that these savings can
contribute an additional 8-10% of revenue for an ISP, given a quantity of purchased bandwidth.
4. Outline further development needs for improving the product and making it user-friendly
and easily deployable.
Solving problems often leads to new questions. This has been the case during the
implementation of this project. A few of these questions and suggestions are included in Section
XIII of this document. We hope to be able to address at least some of them in the near future.
This work is licensed under the Creative Commons Attribution-‐Noncommercial-‐Share Alike 3.0 Unported License. Page 7 of 37 AirJaldi BwM
Final Technical report
V.
Project design and implementation
5.1.
Introduction
The project design and the definition of our research objectives were based on the analysis of
network traffic trends on the Dharamsala network and clarification of needs. Based on these,
and the close examination of a number of tools commonly used for network management and
bandwidth management in particular, we focused our work on four related areas:
•
Content caching
•
Content Compression
•
Virus and malware protection (note that aside from security threats, these tend to be
large network consumers)
•
Load balancing of multiple lines
We will describe our work on these areas in some detail in the section below. Additional
information on research approaches, products tested, and actual test results are included in our
first and second reports submitted in June 2009 and February 2010.
5.1.1. Project Setup – Technical Details
Bandwidth
For research purposes: 2 Mpbs unlimited upload and download
Total on testing environment: 8 Mbps
Hardware
At project commencement:
Main server: Intel Core2duo 2.3GHz Processor; 4GB RAM; 320GB RAID1
Main Router: Mikrotik RB60Ah
Load Balancer: PepLink Balance 300
At project completion:
Main server: Same as above
Main Router: Same as above (this function is to be carried out on the main server in the near
future)
Load Balancer: on the main server
This work is licensed under the Creative Commons Attribution-‐Noncommercial-‐Share Alike 3.0 Unported License. Page 8 of 37 AirJaldi BwM
Final Technical report
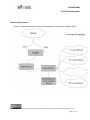
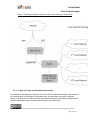
Network setup scheme
Figure 1: Dharamsala Network Scheme at the beginning of the project (February 2009)
This work is licensed under the Creative Commons Attribution-‐Noncommercial-‐Share Alike 3.0 Unported License. Page 9 of 37 AirJaldi BwM
Final Technical report
Figure 2: Dharamsala Network Scheme at the end of the project (June 2009)
5.1.2. A Note on Traffic and Performances Analysis
Two families of data analysis tools exist: one is for real-time, instantaneous data; and another is
for historical data. In this project we used both tools, as sometimes we sought to optimize
latency (real time) while at other times we measured caching rate, which takes several hours to
have an observable impact on traffic takes several hours to take effect.
This work is licensed under the Creative Commons Attribution-‐Noncommercial-‐Share Alike 3.0 Unported License. Page 10 of 37 AirJaldi BwM
Final Technical report
Real-time Analysis Tools
•
CURL (http://curl.haxx.se/) is a command line tool used for transferring data with URL
syntax. It supports HTTP and FTP as well as many other protocols. One this tool’s best
features is its ability to time the different parts of an exchange, which helps to detect the
latency in different parts of a network’s infrastructure.
•
IPTRAF (http://iptraf.seul.org) is a console-based network statistics utility that runs on the
network gateway and provides real-time bandwidth consumption data either on a global
aggregate level or for a single connection.
•
TCPDUMP prints out a description of the contents of packets on a network interface that
matches a pre-defined filter. It is useful for troubleshooting and for capturing traffic for
further analysis.
•
Wireshark (http://www.wireshark.org/) is a network protocol analyzer that offers a graphic
interface and filters for displaying traffic packets.
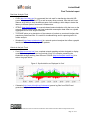
Historical Analysis Tools
•
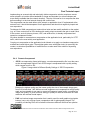
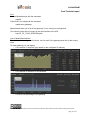
Cacti (http://www.cacti.net/) is a complete network graphing solution designed to display
quantitative data gathered over long periods of time. An example, presenting the
bandwidth savings resulting from the use of SQUID (http://www.squid-cache.org/) is in
red on the graph below:
Figure 3: Squid statistics as Displayed in Cacti
•
Calamaris (http://cord.de/tools/squid/calamaris/) parses log files from SQUID and
generates multiple indicators from them.
This work is licensed under the Creative Commons Attribution-‐Noncommercial-‐Share Alike 3.0 Unported License. Page 11 of 37 AirJaldi BwM
Final Technical report
5.2.
Caching
5.2.1. Introduction
The purpose of a caching proxy server is to accelerate “[...] service requests by retrieving
content saved from a previous request made by the same client or other clients. Caching proxies
keep local copies of frequently requested resources, allowing ISPs to significantly reduce their
upstream bandwidth usage and cost, while significantly increasing performance.”
(http://en.wikipedia.org/wiki/Proxy_server).
The setup described in this document is based on F/OSS and uses SQUID as the web caching
proxy. Although no detailed installation instructions are provided, enough information is available
here in order to allow system administrators to implement the system on their infrastructure.
On most Linux distributions, SQUID can be easily installed with one simple command and it will
work “out of the box” with minimum hassle. In order to get the optimum bandwidth savings,
however, one must tweak SQUID and implement helpers. While a stock configuration can save
around 18% of bandwidth on a typical small ISP network, implementation of all the tweaks can
increase savings to about 25% of the bandwidth consumption.
The two main indicators for a caching proxy are the hit rate and the byte rate. Hit rate indicates
how many objects are served from the proxy instead of being fetched from the Internet, and byte
rate indicates the amount of data served from the proxy instead of being fetched from the
Internet. While two indicators are related they are not identical: if, for example, you serve a large
picture from the proxy it represents only one hit, but can save more than 1MB of traffic.
Alternatively, if you serve 10 HTML pages from proxy they represent 10 hits but the overall
saving might be only few KB.
For an ISP it is therefore more important to increase the byte rate, although generally if you
increase the hit rate the byte rate will follow.
5.2.2. Requirements
Caching Software
Two main branches exist for SQUID: versions 2.7 and 3.1. Version 3.1 was rewritten in C++
instead of plain C, which was used to write 2.x and earlier versions. 3.1 has new features that
are geared mostly toward access control, but also lacks some important features present in the
2.7 branch.
A proxy can be used to control access to the web based on rules defined by the organization
operating the proxy but ISPs generally use the proxy in transparent mode, which means that
users do not need to configure anything, access control features are not used, and all users on
the network are allowed to access web sites.
The work presented here is based on the 2.7 branch. In the future, if all necessary features are
ported to the 3.x branch, a newer version could be used.
This work is licensed under the Creative Commons Attribution-‐Noncommercial-‐Share Alike 3.0 Unported License. Page 12 of 37 AirJaldi BwM
Final Technical report
Operating System (OS)
SQUID can run on Windows, but it was designed to run on UNIX, which fits with our goal to use
F/OSS. We use a Linux base as the underlining OS. If this model is replicated on a BSD
system, certain adaptations will be required that are not covered in this report.
In this project we chose to use Ubuntu server edition but any other Linux distribution can be
used.
Beside SQUID itself there is no need to run any other software on the server for basic bandwidth
operation, other than a DNS. You do not have to run an authoritative DNS; a simple cache DNS
will suffice. A server with of adequate hardware size should be able to run other services, but
anyone attempting to run multiple services should be careful of memory bottlenecks. As the
SQUID process is mostly input/output (I/O) and memory-bound, the speed of the processor
should not be an issue so long as it has a speed in excess of 1GHz.
HD/Storage Type and Size
The most important subsystem is the storage media. The quicker the hard drives are, the better.
As SQUID accesses many small files randomly, a lower access time is more important than a
high throughput rate. It is also recommended to distribute the cache directories on several hard
disks and have each hard drive on a separate controller.
There is no need to have a RAID controller for SQUID storage, as the objects stored will be
automatically balanced between the available directories. It may be wise to use a RAID1 or
RAID5 set up for the OS itself.
Memory requirements depend on the size of cache storage, and cache storage, in turn, depends
on the available upstream bandwidth and the usage patterns of your customers. A basic rule of
thumb is that a higher storage size will increase the hit rate, which will increase the chances of
having the object stored in the cache.
A cache with an infinite size is obviously not a realistic option, so generally the ability to store
around one week's worth of data in the cache is adequate. Our experience, as well as others',
suggests that if an object has not been requested within one week of being cached, it will not be
requested any time soon.
RAM
The rule of thumb for memory requirement is approximately 10 MB of memory per 1GB of
cache.
In order to demonstrate these principles, take the example of a small ISP that has 8 Mbps
upstream bandwidth and handles around 100GB of HTTP traffic each week. In this case, the
required cache size will be 100 GB, or better still around 150 GB cache HD, in order provide
some room for future bandwidth upgrades. Accordingly, we suggest allocating about 1.5 GB
RAM for SQUID. It is also important to allocate RAM for the OS itself and the other processes
running on the server. An overall RAM size of 4 GB should suffice for these requirements.
This work is licensed under the Creative Commons Attribution-‐Noncommercial-‐Share Alike 3.0 Unported License. Page 13 of 37 AirJaldi BwM
Final Technical report
LAN Interface
In this project we equipped the server with two Ethernet cards in order to easily separate the
upstream and downstream traffic. The server also functions as a router and a firewall for all the
network traffic. You may prefer to have the server only handle the proxy cache function, which
will require a slightly different network configuration than what is described in this document.
5.2.3. SQUID Configuration
A significant part of our research work was dedicated to improving the cache rate (and therefore
bandwidth saving capacities) of a typical SQUID installation through fine-tuning of existing tools
and the addition of external tools. Our main findings in this area are presented in the sections
below.
A typical SQUID installation offers the administrator many different configuration parameters
(see: http://www.visolve.com/squid/squid27/contents.php for more information). Only a few
parameters are detailed in the following sections, but other useful parameters are explained in
the installation file, which is included in the annex.
CDN and YouTube
Content Delivery Networks (CDN) and YouTube are major data consumers on our network, as
they are in many other networks. CDNs are operated mostly by companies such as Akamai,
although big websites also have their own CDNs.
In order to economize on bandwidth use – in particular long distance (and expensive) traffic CDN networks (and YouTube) use several servers located across the globe to serve the same
content to different clients in different locations. While a great solution for the content provider,
the use of this method means that several different URLs exist for any particular object (file,
video, image, etc.) hosted on a system using CDN. These different URLs prevent SQUID from
caching the content, as it will regard each URL of a single file as separate entities.
For example the a Google image's URL might look like :
http://t1.gstatic.com/images?q=tbn:vuFJrjMPnxxaXM:http://www.emperor-penguin.com/penguinchick.jpg
But Google can also send the same image with slightly different URL:
http://t2.gstatic.com/images?q=tbn:vuFJrjMPnxxaXM:http://www.emperor-penguin.com/penguinchick.jpg
or
http://t3.gstatic.com/images?q=tbn:vuFJrjMPnxxaXM:http://www.emperor-penguin.com/penguinchick.jpg
SQUID will regard these three URLs as separate objects, and it will not serve them from the
cache unless a client asks for the exact same URL. A workaround solution is to use a helper
application, which is capable of “unifying” the different URLs for the same object on a CDN and
instruct SQUID to store it under the same URL. The storeurl configuration directive is used for
this process. This configuration option allows SQUID to store one URL with a certain name (e.g.
content A fetched from X and cached as B), and then store an additional, different URL pointing
to the same object using the first reference (e.g. the same content A now fetched from Y will be
directed to point to B).
This work is licensed under the Creative Commons Attribution-‐Noncommercial-‐Share Alike 3.0 Unported License. Page 14 of 37 AirJaldi BwM
Final Technical report
This helper application was written in Python, which provides good readability and can be easily
modified.
In order to enable SQUID to use the helper, it is necessary to first identify which URL will be
handled by the storeurl helper and then configure the PATH of the helper.
There are no optimal or perfect methods for creating the helper rules. Each CDN/provider uses
somewhat different methods and logic for creating its CDN, and those can change often. It is
therefore a good practice to regularly check the cache hit statistics on each website where the
storeurl method is used. A sudden drop in the percentage of cache rate on a website will often
indicate that the provider changed the URL encoding and that the helper should be adapted
accordingly.
We use the storeurl method for the following websites: HI5, Facebook, ytimg, gstatic, and
YouTube. Additional information on the installation of storeurl can be found in the installation
manual in the annex to this report.
Windows Updates
Windows OS is the system in use by the vast majority of our users, and as a result Windows
updates consume significant bandwidth, as it's the second highest rated web site in terms of
usage with almost 5% of the bandwidth used. In order to fetch the files used for updates,
Windows uses a partial content request, fetching only part of the file. The problem, from a
caching perspective, is that SQUID does not know how to handle these requests and an attempt
to cache them will result in a TCP_MISS for the Windows update with no object actually cached.
A “quick and dirty” solution for this is to enable the configuration directive: quick_abort_min -1
KB. This directive instructs SQUID to download the whole file even if the user aborted the
download or requested only part of it.
The solution works well for caching the Windows updates but as it can not be enabled on a siteby-site basis (e.g. by using ACL) but only globally it has a very nasty side effect: if a user
requests a large file (e.g. an ISO file for a Linux distribution), and even if the user stops the
download before completion, SQUID will continue to download the file, consuming upstream
bandwidth. If this is done by more users you might very soon end up with a high percentage of
bandwidth dedicated to downloading objects which will not be used by anyone, as they do not
represent real demand but, as it were, “aborted desires”. A malicious user can even do this
intentionally in order to increase network traffic, resulting in an impact on the network's
performance that is similar to a Denial Of Service attack.
This solution is of little practical use unless a way to use the quick_abort feature is found. That
feature, which is meant to address these issues and would require implementation for
microsoft.com updates only and not globally.
An alternative solution, which showed the best results, is to put the Windows updates
asynchronously in the cache. Each night, when bandwidth usage is lower, a script parses the
SQUID logfile and builds a list of files requested the previous day. Once this is done, it
downloads these files without using partial requests and the files will be cached. On the
following day, when other users make partial requests to this files, SQUID will be able to serve
them as it has cached them in their entirety.
This work is licensed under the Creative Commons Attribution-‐Noncommercial-‐Share Alike 3.0 Unported License. Page 15 of 37 AirJaldi BwM
Final Technical report
Unwanted Content
SQUID can be configured to not process particular URLs, a feature which can be used to restrict
the availability of certain web sites and, as we do, to protect users from viruses and to prevent
them from processing web-bugs.
It is possible to run an anti-virus along with SQUID and have every file checked for virus content.
A project called SQUIDGUARD does exactly that and has also other filtering capabilities. While
this may be a good solution for small companies, we would not recommend it for ISPs due to the
considerable processing power it requires. An easier and less resource-intensive malware
filtering solution is MalwarePatrol: http://www.malware.com.br.
MalwarePatrol utilizes a user-generated list of URLs known to host malware, which is processed
by SQUID to deny access to them. While not a perfect solution, we found it protects users from
the most common attacks.
Web Bugs (or trackers) are used to track users' browsing patterns. They can be in javascript
and/or a 1x1 pixel images. The top 10 web bugs are responsible for more than 3% of the HTTP
requests.
The problem with web bugs is not in their bandwidth consumption, which is usually very low
(less than 1KB). Their presence, however, means that each page loaded by a web browser
needs to connect to another server. The resulting added latency can be as high as 1 second in
loading time for the user. Adding no benefits for the users, it makes sense to remove web bugs
in order to speed up web page display time. By preventing SQUID to load web bugs from
Google Analytics, quantserve.com, doubleclick, and yieldmanager,we removed more than 2.5%
of the requests (a good place to learn about it is http://www.ghostery.com/ which provide a
Firefox extension to remove these web bugs).
Impact of Changes
The cumulative impact of the tools and tweaks we worked on and implemented in this project is
considerable. Our present cache hit rate is 40% and the byte hit rate is 29%, as compared to a
cache hit rate of 30% and a byte hit rate of 18% achieved with an out-of-the-box squid. The
following table provides a breakdown of these results:
Table 1: Cache Byte rate before and after implementation of SQUID add ons and tweaks
Application
Cache byte rate before
changes
Cache byte rate after
changes
YouTube
0.1%
25%
Windows Updates
2%
61.4%
HI5
50.4%
63.2%
Jpeg Images
34%
44%
PNG images
54%
61.5%
This work is licensed under the Creative Commons Attribution-‐Noncommercial-‐Share Alike 3.0 Unported License. Page 16 of 37 AirJaldi BwM
Final Technical report
5.3.
Load balancing and fail over
5.3.1. Introduction
Load balancing is the act of distributing the load (bandwidth used) coming from a given network
between different lines or gateways serving that network.
This function is not very useful in most developed countries, where the Internet lines are usually
quite good and reliable. It is, however, important in many developing countries, where reliability
is a real problem.
The use of different lines from different ISPs helps to reduce downtime as the statistical
probability that different lines will all go down at the same time is lower. In order to optimize the
use of multiple upstream lines, an ISP needs to have the ability to share the load coming from its
network between these different lines (load balance) when all of them are up, and to find a way
to automatically redirect the connections going from a faulty line to a working one (failover).
5.3.2. Mpath
There are different ways to implement these two functions, with different levels of complexity.
After checking a number of alternative solutions, we decided to use an F/OSS tool called Mpath
(http://mpath-tools.optilian.org/)
Description
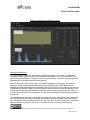
Mpath is a load balance tool developed in PHP. It was originally composed of a command line
tool to control the different gateways and routes, and a basic PHP Ajax web interface to monitor
the load and latency on each gateway.
This work is licensed under the Creative Commons Attribution-‐Noncommercial-‐Share Alike 3.0 Unported License. Page 17 of 37 AirJaldi BwM
Final Technical report
Figure 4: Screenshot of MPATH software
Mpath Load Balancing
The load balance in Mpath is based on the route cache entries in the server. For each new
connection, Mpath reads the source and destination addresses. If no route is available in the
cache for these addresses, it creates a new route and sends the connection through a gateway
depending on the weight defined for each gateway.
Mpath is configured with a list (or array) of available gateways. In this project, we used two
gateways, which represented upstream lines from two different ISPs. Each gateway was
assigned a weight representing the bandwidth capacity of that line. In our case the first line was
8 Mbps and the second 2 Mbps. This meant that the first line had four times the capacity of the
second, and was accordingly assigned a weight 4 while the second line was given a value of 1.
In other words, for every five connections, four are directed through the first gateway and one to
the second.
This load balancing technique is quite basic and does not take in consideration the current load
on each gateway or the quality of the links. Its operation principle is based on the assumption
that, statistically, each gateway should receive the same ratio of “large connections” (downloads,
video streaming, big pictures, etc.) and of “small connections” (text and small pictures).
This work is licensed under the Creative Commons Attribution-‐Noncommercial-‐Share Alike 3.0 Unported License. Page 18 of 37 AirJaldi BwM
Final Technical report
We successfully implemented Mpath on the AirJaldi network in Dharamsala. A clear and simple
indicator for success is the ratio of load measured on each gateway, which is very near to the
ratio of the weights defined for each.
It is important to note that this kind of load balance using the routing table requires some basic
tuning of the Linux kernel routing settings; by default the kernel flushes the route cache every 10
minutes, which results in a need to rebuild whole load balance cache. This can result in some
lost connections, if a connection is switched from one line to another.
This 10-minute time-out is defined in the file /proc/sys/net/ipv4/route/secret_interval. We decided
to set it to a 24-hour time-out, which seems to be a good compromise between the drawbacks of
the flushing process and the need to do so. We chose not to disable this option altogether
because the load balance is based on a statistical approach, and this could have led to an
imbalance (e.g. too much load on one line because it gets most of the “large connections”). In
order to ensure that this does not happen (or at least if it does, it will correct itself), we decided
that it would be better to reset the load balance every day by flushing the routes.
Failover Functions
Mpath manages the failover automatically. It does this by detecting line failures and switching
the connections automatically to the working ones.
An interesting feature of Mpath is its ability to manage some routes by sending the traffic to or
from a particular network address to a particular gateway.
This means that, for example, if we decide to send all the traffic destined to google.co.in through
one of our gateways only, we could do so by adding a rule to Mpath and the connections to
google.co.in will all go through this gateway, regardless of the load balancer.
If we had added this route without using Mpath and that chosen line of the gateway goes down,
google.co.in would not be reachable. Mpath will ignore a route if a certain line goes down and
instead send connections over a working line.
One shortcoming of Mpath is that since the load balance is based only on the route cache and
on the source-destination address pairs, it is for now impossible to route the traffic on the basis
of port numbers.
Modifications of Mpath
Mpath came with many functions, but it was only configurable through the command line. To
improve the ease of use, we have decided to complete the web with some control functionalities.
Figure 5: New configuration functionalities in MPATH
This work is licensed under the Creative Commons Attribution-‐Noncommercial-‐Share Alike 3.0 Unported License. Page 19 of 37 AirJaldi BwM
Final Technical report
It is still a work in progress but the following functions are already available:
•
Change the weight of a gateway
•
Extract a gateway from the array defining the default gateway (i.e. make it a dedicated
gateway for purposes/destination defined and ensuring that no other connections are
sent through this gateway by the load balancer)
•
Disconnect a gateway
•
Add a route sending the connections coming from a given network to a given gateway
•
Add a route sending the connections going to a given network to a given gateway
Functions which will be added in the near future:
•
Complete the gateway settings edition
•
Add and remove a gateway
We are in contact with the author of Mpath to share our modifications. We have generated a
patch for the sources of Mpath, which will be available soon.
5.4.
Content re-compression
5.4.1. Introduction
Having maximized the “cacheability” of the proxy server as shown in the previous sections, we
examined additional ways of saving bandwidth. Reducing the size of graphic content by
compressing it before it reaches our local network was a clear target. Although graphic content
is normally more modest in its bandwidth requirements than video or audio, it is still uses a
considerable amount of bandwidth.
This work is licensed under the Creative Commons Attribution-‐Noncommercial-‐Share Alike 3.0 Unported License. Page 20 of 37 AirJaldi BwM
Final Technical report
Implementing an economically and technically viable compression solution requires a remote
server placed in a location where bandwidth is cheap and abundant (or at least cheaper and
more readily-available than the network location). The role of this server is to compress the data
before sending it to the local network through the costlier lines.
The compression can be made either at the network or application level. If implemented at the
network level, it should be transparent for all applications and should not negatively impact end
user experience.
Techniques for WAN compression at network level exist and are readily available on the market
(e.g. on Cisco routers) but for ISPs dealing with mainly private customers the gain is small. Most
of the content, such as videos, pictures, VoIP, and archive files, is already compressed and
cannot be compressed further.
We chose instead to concentrate on compression at the application level, particularly for HTTP
traffic, which is the most widely used application.
Carrying out compression at the application level allowed us to apply non-lossless compression
methods and reach higher gains. These higher gains come with higher risks. As we modify the
content, we introduce possibilities of malfunction so we also need to be mindful of impacting
user experience.
5.4.2. Formats Compressed
•
JPEG is a compressing format with losses - once decompressed the file is not the same
as the uncompressed original. Each JPEG image is compressed with a quality setting,
which ranges from 0 to 100.
Figure 6: Image detail at Different Quality Settings of JPEG Compression
Between the highest quality and the lowest quality the size of the example image goes
from 3 kB to less than 1 kB. While most web images are not compressed at a high quality
mark and we certainly do not want to convert all images to lowest quality, converting an
image from quality 75 (most common setting) to quality 50 leads to more than 20% size
reduction with minimal visual impact.
•
PNG is a lossless image compression that is mainly used for small graphics (navigation
buttons, icons, etc) and has a poor compression rate for photography images. The
possibility of reducing PNG size is limited but there are different tools that can optimize
This work is licensed under the Creative Commons Attribution-‐Noncommercial-‐Share Alike 3.0 Unported License. Page 21 of 37 AirJaldi BwM
Final Technical report
PNG encoding and reduce the size of PNG files by up to 20%. A good explanation of the
process is available at: http://optipng.sourceforge.net/pngtech/optipng.html
•
HTML/CSS/JavaScript can be easily compressed and, as these files contain only text
and repetitive markup. The compression ratio is usually high (more than 70%). Further
size reduction is possible by removing content that is of little use (e.g. comments, empty
lines, etc) from the file before compression. An inherent risk is introducing errors in the
cleanup process.
If the HTML code of a site/page is not well defined, implementations in different web
browsers can pose problems. In such cases, web designers have to take the website's
performance on different platforms into account. Automatic tweaking with the resulting
settings (which can be rather messy) can lead to a bad user experience as it may
introduce a rendering bug in a particular web browser, even if the resulting file is
regarded “legitimate” from the HTML/CSS/JS specification point of view.
5.4.3. Compression Setup
There are two main proxies which can be used for image recompression:
•
Ziproxy : http://ziproxy.sourceforge.net/
•
RabbIT proxy http://www.khelekore.org/rabbit/
The two provide similar functions, but Ziproxy is written in C instead of Java and offers an
interesting option with JPEG2000 compression, which should lead to smaller data size as,
JPEG2000 is more efficient than standard JPEG (http://en.wikipedia.org/wiki/JPEG_2000). For
this reason, Ziproxy was chosen for testing in this project.
Figure 7: Network architecture with Ziproxy re-compression
This work is licensed under the Creative Commons Attribution-‐Noncommercial-‐Share Alike 3.0 Unported License. Page 22 of 37 AirJaldi BwM
Final Technical report
The setup is based on placing a remote Ziproxy in a co-location data center where bandwidth is
cheap. This server should have a high-speed Internet connection. For each request it downloads
the picture from a web server on the Internet and applies JPEG2000 compression to it. The
compressed file is then forwarded to the local Ziproxy, which performs the inverse operation,
putting back the picture in standard JPEG format before sending it to the customer.
Our tests showed that this setup works well and, as expected, leads to interesting size reduction.
It is not a practical solution for an ISP as it causes an increase in latency and degrades image
quality, as two different compressions are applied serially. A good introduction to artifacts in
image compression can be found at: http://www.stat.columbia.edu/~jakulin/jpeg/artifacts.htm
The serial process is as follows:
Figure 8: Processing of images with JPEG2000 compression
The red boxes represent a CPU-intensive task; the green boxes represent a data transfer task.
As the size of each image is reduced, the data transfer time through Internet is reduced. The
time taken to compress and uncompress the images is longer than what we can gain on
transfer.
This work is licensed under the Creative Commons Attribution-‐Noncommercial-‐Share Alike 3.0 Unported License. Page 23 of 37 AirJaldi BwM
Final Technical report
Given these unfavorable trade-offs we decided to go for a simpler compression approach that
does use JPEG2000 compression but still achieves meaningful, if more modest, bandwidth
savings. This operation can be done without total decompression and recompression and is
therefore quicker and less processor-intensive.
Figure 9: Processing images to lower quality
Figure 10: Comparison Between Original Image (Left) and Recompressed Image (Right)
Note: Images enlarged for better view. Original size is 226 x 17.
The illustration above shows the recompressed JPEG on the right. The image has been reduced
from 14,791 Bytes to 7,254 Bytes, i.e. almost 50%. The time required for image transfer is also
reduced. If, for example, a customer has a 256 kbps line, the original image (on the left) will take
0.45 seconds to transfer while the recompressed image (on the right) will take only 0.22
seconds. The gain is only 0.2 second as this is a small image, but on news websites such as the
bbc.co.uk, where each page contains around 10 images, the overall saving will result in each
page will load a full two seconds faster.
The image degradation is indeed perceptible, but mainly because we enlarged the image to
highlight the change in image quality. In reality the distortion would be less noticeable, in
particular if the image is surrounded by text:
Figure 11: Recompressed JPEG at normal size
This work is licensed under the Creative Commons Attribution-‐Noncommercial-‐Share Alike 3.0 Unported License. Page 24 of 37 AirJaldi BwM
Final Technical report
5.4.4. Content Compression Results
The content compression tests were conducted with a limited set of users. The settings gave a
modest compression ratio, so as to have minimal negative visual impact. Images bigger than 1
MB were not tested, as we sought to keep Hi-res images untouched.
The images were recompressed to quality levels between 40 and 50, depending on their size.
The parameter ImageQuality in ziproxy.conf is set as follows: ImageQuality = {50, 45, 40, 40}.
The first value is for images of less than 5,000 pixels in size, the second value is for images of
5,000 to 50,000 pixels, the third value is for images of 50,000 to 250,000 pixels and forth value
is for images larger than 250,000 pixels.
We also tried compression of JavaScript and CSS but it introduced errors with different websites
and we subsequently disabled it. The HTML compression worked without problems and was
kept.
The results are as follows:
•
Global compression rate: 26%
•
Compression rate on JPEG: 65%
•
Compression rate on HTML: 43%
The compression rate on HTML consists of HTML optimization (removing useless information)
and straight gzip compression. While many web sites do not compress HTML prior to sending
them to the browsers, Ziproxy does this compression. This partially explains the high ratio (we
estimate that the optimization alone – without Ziproxy – will generate about 15% compression
rate).
Processing each object is a time-consuming task and even with a relatively good processor
(Quad core duo 2.6GHz), running Ziproxy increases latency. The reduced time to transmit the
data resulting from increased image size does not offset the time taken to process the data. An
additional factor contributing to this outcome was the upstream/downstream bandwidth on the
Ziproxy server we deployed in Delhi, which was not much larger than our own Internet
bandwidth (10 Mb versus 8 Mb).
Processing of HTML page:
http://www.nytimes.com/2010/06/22/technology/22reader.html?ref=technology
Took 1.7 seconds and it reduced the compressed size from 18 kB to 15 kB.
In comparison, processing of the image:
http://ak2.static.dailymotion.com/static/video/142/361/23163241:jpeg_preview_large.jpg?201006
23140621
Took 1.3 seconds and reduced the size from 60 kB to 10 kB.
This work is licensed under the Creative Commons Attribution-‐Noncommercial-‐Share Alike 3.0 Unported License. Page 25 of 37 AirJaldi BwM
Final Technical report
The time gained during download is dependant of the user’s download speed. Less bandwidth
on the user’s end results in more effective recompression in terms of delay.
These results suggest that the usage of content compression can be rather useful for ISPs with
very low upstream bandwidth and with a significantly larger bandwidth at the place where
Ziproxy is running. Quick processors with large cache memory (such as Xeon from Intel) for
more efficient processing of the JPEGs will also increase the effectiveness of our preferred
solution.
It is important to note that the decision on the use of this solution is also a
business/management one, as the network managers need to gauge the visual quality impact. A
trade-off of browsing speed is acceptable to the particular network's users.
VI.
Best Practices
We believe these are covered in other sections, in particular Sections VIII and XI
VII.
Project Outputs and Dissemination
See section XI and Annex
VIII.
Capacity Building
The project’s impact on capacity building is summarized as follows:
•
Increased research capacity within the organization: The project support allowed us to
recruit a chief researcher and other technical staff. The impact of their work is
demonstrated in this report but also goes beyond the scope of the report, as their daily
presence and involvement with our team has had far-reaching impact on other areas of
work, for example improvement of existing network infrastructure.
•
Increased professionalism of local team: The project team worked not only as
researchers, but also as technical guides/mentors to the AirJaldi team. Our local system
administrators have been involved with the project work and are now capable of
managing the BwM system themselves. The project team also carried out a number of
formal and informal training sessions for the team, focusing on networking and system
management in general, which have added to the team’s collective knowledge and
professional capacity.
•
General professionalism: The project team helped us to improve our professional
conduct. They have done so first and foremost by demonstrating dedication and
professionalism in carrying out their tasks on an ongoing basis. They have also shared
their knowledge and experience on issues ranging from administration to field installation
with the team.
IX.
Project Management
This work is licensed under the Creative Commons Attribution-‐Noncommercial-‐Share Alike 3.0 Unported License. Page 26 of 37 AirJaldi BwM
Final Technical report
Project management is an area where improvement is needed. Being a rather small operation
tasked with ongoing fieldwork, new project work, and many technical challenges, our
administration practices could be improved.
On the other hand, we feel that the scientific and technical management of the project was
carried out at a high level of professionalism. We followed our charted course of action; despite
delays in recruiting key personnel, we managed to complete our work in line with the objectives
defined and outcomes presented to ISIF.
X.
Project Sustainability
We believe that project sustainability can be addressed on a number of levels:
1. Implementation: The systems and solutions developed in this project are of immediate
practical use. We are already using them on our network here and will shortly implement
them on two additional networks. Parts of the system are also being used in projects we
are conducting in Delhi and other cities in India.
2. Continuation of Research: Without additional funding it will be difficult for us to continue
the project with the same level of intensity. However, we will continue to improve upon
the existing systems and hope to secure additional funding to continue our work in this
area. We also hope that others will find this research useful and add their findings to
keep this work dynamic, as people often do in F/OSS-based projects.
XI.
Impact
The text below is also relevant to sections VI and VII (Best Practices and Outputs and
Dissemination).
The products and findings of this project will be of direct use to system administrators of small
and medium-size ISPs that are open to using F/OSS solutions. We believe that by putting our
findings to practical use on their networks, real gains will be made within a short period of time.
Users will also benefit from faster, more secure, and more stable services. The easy-to-use
installation manual, which provides detailed instruction on how to deploy the BwM, should
further encourage managers of rural ISPs to implement it.
Further, with the integration of all the components needed to run on a commodity PC, we
achieved cost reduction to allow future ISPs to start with lower capital costs. The solution we
propose replaces three pieces of equipment – a server, the load balancer, and a router – with a
single PC. (Note: on our network, an additional server is used for monitoring and for office use.
The description of its configuration and functioning is outside the scope of this paper).
The project also contributes to the F/OSS community as a whole; the entire project is based on
F/OSS. We gave back to the overall F/OSS undertaking through bug correction (SQUID and
Cacti on Ubuntu) and by enhancing projects (Mpath).
This work is licensed under the Creative Commons Attribution-‐Noncommercial-‐Share Alike 3.0 Unported License. Page 27 of 37 AirJaldi BwM
Final Technical report
XII.
Overall Assessment
We believe the issues to be discussed here are dealt with in some detail in other sections of the
document, in particular sections VI, VIII XI, and XIII.
XIII.
Recommendations: Directions for Further Research
ISIF’s project management was commendable. We use this term as we feel that its managers
used good judgment in not seeking to impose tedious reporting and control processes. We also
appreciated ISIF’s flexibility in agreeing to extend the project duration. We hope the results will
justify this approach, but in any case strongly support th management approach taken.
As for recommendations, we feel that the most useful set of recommendations we can provide is
to outline directors for further research that emerged out of the project:
The system, as it exists today, fulfils its role and can be easily installed and operated by an
experienced Unix administrator. It is, however, not recommended for an untrained administrator.
This is particularly true for the tweaks and modifications of the whole system and its different
components.
With this in mind, we propose that in the next iteration of the product, the solution should be
based on several virtual machines, each with a limited role and a limited set of possible
modifications.
The first virtual machine will be based on www.vyatta.com, which is a soft router with an
interface similar to Cisco IOS. This machine will handle all the routing and the firewalling of the
network and the other virtual machines.
The second virtual machine will consist of a custom installation of SQUID, similar to what we
have done in this project.
The third virtual machine will be a network monitoring solution; we are currently evaluating
existing solutions like Zenoss (http://www.zenoss.com/), EzCacti (http://cactiez.cactiusers.org/)
and others. We want to reuse an existing solution and not develop our own.
The fourth virtual machine will be include integrated billing and customer management based on
Freeside (http://www.freeside.biz).
Using virtual machines simplifies the deployment and upgrade of the infrastructure as it allows a
sys administrator to match the hardware specs according to the growth of the ISP and to migrate
virtual machines to new servers as required. It also simplifies the upgrade of each component
and makes the backup and recovery process simple and straightforward. The use of existing
F/OSS products allows us to reduce the workload and take advantage of the existing
documentation and graphic interfaces designed for each solution.
This work is licensed under the Creative Commons Attribution-‐Noncommercial-‐Share Alike 3.0 Unported License. Page 28 of 37 AirJaldi BwM
Final Technical report
As for the bandwidth usage optimization, we will continue to improve performances of SQUID
and tweak it for new schemes to be used by web sites.
XIV.
Annexes
Annex 1: Installation Procedure for the AirJaldi BwM
1.1.
Requirements
This document details the installation procedure for BwM server version 1.0. The attached
configuration files and specific software packages are necessary to complete a successful
installation.
In order to do the installation you need the following:
• A PC with at least 80 GB, Processor speed >1 GHz, RAM >1 GB
• CDROM Ubuntu Server 10.4
• Working Internet connection to download updates
• This document and the attached files: XXXX.tgz and YYYY.tgz
The basic requirements for the server will not allow you to use the server in a production
environment, unless you operate with a less than 2 Mbps upstream speed.
For a production environment with a 10Mbps upstream link the server should be:
• Processor >1.6GHz Core 2 Duo with 64 bits support
• RAM 4 GB
• 2 HDD SATA 7200tr/mn 300 GB or more
1.2.
Installing Ubuntu Server 10.4
The 10.4 version of Ubuntu server is tagged LTS (Long Term Support), it means the version will
be updated and security fixes will be supported for the next 5 years. More information can be
found at:
https://help.ubuntu.com/10.04/serverguide/
A very detailed documentation for Ubuntu server installation can be found at:
https://help.ubuntu.com/10.04/installation-guide/amd64/index.html
Recommended reading:
https://help.ubuntu.com/10.04/serverguide/C/advanced-installation.html#software-raid
In order to configure RAID partitions.
This work is licensed under the Creative Commons Attribution-‐Noncommercial-‐Share Alike 3.0 Unported License. Page 29 of 37 AirJaldi BwM
Final Technical report
Hard drive partitioning:
With two 300 GB HD we do the following partitioning:
• /raid1 5 GB
• /usr raid1 20 GB
• /var raid1 120 GB
• /tmp raid1 1 GB
• /squid1 on SDA 120 GB
• /squid2 on SDB 120 GB
• /swap1 on SDA 8 GB
• /swap2 on SDB 8 GB
The raid partitions will allow the system to withstand the failure of one hard drive. We
recommend having two separate partitions for squid cache, one on each hard drive, and to not
use raid on these partitions. The two partitions will be mounted as /squid1 and /squid2.
In the event of a disk failure, the SQUID configuration file will need to be modified by removing
the cache pointing the failed drive.
All partitions will be formatted with the ext4 file system and the remaining drive space (if any) is
left not used.
You do not need to install any package in addition to the base system, so when you are
prompted to install other packages or choose “tasks” do not select any item and complete the
installation.
1.3.
Installing Required Packages
In order to install the required packages type the following command:
sudo aptitude install openssh-server snmpd squid pdns-recursor apache2 ntop
This will install the main components of the server and the associated dependencies
automatically.
When the installation is finished, each component must be configured. The files with custom
configuration options are in an archive named bwm-1.0-conf.tgz. Transfer this to your home
directory using scp from another computer:
scp bwm-1.0-conf.tgz IpAddressOfTheNewlyInstalledServer:/home/NameOfUser
You must replace IpAddressOfTheNewlyInstalledServer by the real IP of the server, and
NameOfUser by the username given during the installation.
To know the IP address of the server if not set statically type the command:
ifconfig
This work is licensed under the Creative Commons Attribution-‐Noncommercial-‐Share Alike 3.0 Unported License. Page 30 of 37 AirJaldi BwM
Final Technical report
1.4.
PDND – Recursor Configuration
First allow PDNS-Recursor to start, edit the file with:
sudo vi /etc/default/pdns-recursor
Then replace the line START=no by START=yes and then save the file.
Next copy the configuration file:
sudo cp ~/bwm-1.0-conf/etc/powerdns/recursor.conf /etc/powerdns/recursor.conf
Next you should start the server:
sudo /etc/init.d/pdns-recursor start
You must then configure the system to use the newly installed DNS:
sudo vi /etc/resolv.conf
This file must contain only one line: nameserver 127.0.0.1
You can now test the DNS by typing the commands:
sudo aptitude install dnsutils
dig A www.google.com @127.0.0.1
1.5.
Mpath Installation
To install PHP:
sudo aptitude install php5 php5-cli libphp-adodb
Copy the two files necessary for MPath in your account:
scp mpath-tools-airjaldi.patch mpath-tools-1.0.0.tgz \
IpAddressOfTheNewlyInstalledServer:/home/NameOfUser
You must replace IpAddressOfTheNewlyInstalledServer by the real IP of the server, and
NameOfUser by the username given during the installation.
To untar the sources:
tar -zxvf mpath-tools-1.0.0.tgz
Move inside:
cd mpath-tools-1.0.0
Patch the sources:
patch -p1 < ../mpath-tools-airjaldi.patch
This work is licensed under the Creative Commons Attribution-‐Noncommercial-‐Share Alike 3.0 Unported License. Page 31 of 37 AirJaldi BwM
Final Technical report
Install
sudo php install.php
sudo cp -r www /var/www/mpath
Configuration
IP route configuration
Some specific IP route configuration is needed to run Mpath.
Edit the /etc/iproute2/rt_protos file and add
#
# mpathd
#
200 mpathd
Edit the /etc/iproute2/rt_realms file and add
#
# local
#
1 gateway1
2 gateway2
Replace the gateway1 and 2 by the names of your gateways. You can add more if needed.
Edit the /etc/iproute2/rt_tables file and add
#
# mpathd
#
1 gateway1
2 gateway2
10 mpath_dyn_0
11 mpath_dyn_1
12 mpath_dyn_2
13 mpath_dyn_3
14 mpath_dyn_4
15 mpath_dyn_5
16 mpath_dyn_6
17 mpath_dyn_7
18 mpath_dyn_8
19 mpath_dyn_9
This work is licensed under the Creative Commons Attribution-‐Noncommercial-‐Share Alike 3.0 Unported License. Page 32 of 37 AirJaldi BwM
Final Technical report
20 mpath_dyn_10
21 mpath_dyn_11
22 mpath_dyn_12
23 mpath_dyn_13
24 mpath_dyn_14
25 mpath_dyn_15
26 mpath_dyn_16
27 mpath_dyn_17
28 mpath_dyn_18
29 mpath_dyn_19
Replace the gateway1 and 2 by the names of your gateways. You can add more if needed.
Gateways and Rules’ Configuration
• Gateway definition files
The gateways are defined in the directory /etc/mpath-tools/gateways.
Remove all the gateways except adsl.conf in /etc/mpath-tools/gateways. Copy it once for each
of the gateways and rename them with the names of your gateways. Edit the ip_addr, network,
nexthop and interface values inside to fit with your settings.
ip_addr is the address of your server connected to this gateway.
network is the address of the network that you use to connect to this gateway
nexthop is the address of this gateway
interface is the name of the network interface you use to connect to this gateway.
gateways.conf
Then edit the file /etc/mpath-tools/gateways.conf to have one block like the following for each of
your gateways and remove everything else:
•
gateway "GW" {
include "gateways/GW.conf";
}
You have to replace GW by the name of your gateways.
• mpathd.conf
Edit the file /etc/mpath-tools/mpathd.conf.
Then edit the events – shutdown parameter. It decides which gateway should be used when
mpath is shut down. So replace “ppp0” by the name of the device of this gateway and “adsl” by
the name of this gateway.
This work is licensed under the Creative Commons Attribution-‐Noncommercial-‐Share Alike 3.0 Unported License. Page 33 of 37 AirJaldi BwM
Final Technical report
probe_common.conf
Edit the file /etc/mpath-tools/probe_common.conf
Add the following line at the end:
ip_addr “IP ADDRESS”;
•
This defines which address the program will try to reach with a ping to check if the gateways are
alive. Replace IP ADDRESS with an IP of your choice (we recommend 8.8.8.8 which is the DNS
of Google)
rules.conf
Edit the file /etc/mpath-tools/rules.conf
In the section “default”, remove the second “via” line and edit the first one. This line defines
which gateway is used and what is its weight. You have to enter the gateways like this :
via “GW1:WEIGHT” “GW2:WEIGHT” “GW3:WEIGHT”
In our case it gives :
via "airtel:4" "reliance:1";
•
Finally, edit the “fwmark” sections. It defines the marking of the connections on each gateway.
You have to set a “fwmark” section for each of your gateways like this:
fwmark "0xID/0x0f" {
via "GATEWAY";
}
You have to replace ID with a hexadecimal value between 00 and FF, which should be different
for each gateway. And replace GATEWAY by the name of your gateway.
In our case it gives:
fwmark "0x01/0x0f" {
via "airtel";
}
fwmark "0x02/0x0f" {
via "reliance";
} • Automatic startup
Use the startup script manager of your distribution to start /etc/init.d/mpathd automatically.
With ubuntu/debian the command is:
update-rc.d mpathd defaults
This work is licensed under the Creative Commons Attribution-‐Noncommercial-‐Share Alike 3.0 Unported License. Page 34 of 37 AirJaldi BwM
Final Technical report
Test
Run the Mpath daemon with the command:
mpathd
Check that it is working with the command:
mpath show gateways
Mpath should return you a list of the gateways. If not, check your configuration.
You should now be able to connect to the web interface at the URL:
http://IP_OF_YOUR_SERVER/mpath
Use of Mpath Web Interface
The web interface is separated in blocks, one for each of the gateways and one for the routing
rules.
For each gateway you can display:
• A live monitor of the probe (ping details to the configured IP address)
•
A live monitor of the traffic on this interface
•
A form to edit the settings of this gateway
This work is licensed under the Creative Commons Attribution-‐Noncommercial-‐Share Alike 3.0 Unported License. Page 35 of 37 AirJaldi BwM
Final Technical report
There you can edit the weight of the gateway and change the status of the gateway by hand.
The available status options are:
• Active, the gateway is part of the load balancing.
• Disengaged, some traffic can go on this gateway but it is no longer part of the load
balancing.
• Disabled, the gateway is down.
Finally you can add or remove some routes managed by Mpath in the routing rules block
To add a rule you have to give the address of a machine or a network, to choose if it is a source
or a destination address, and to choose to which gateway the traffic will be sent.
Source means that all the traffic coming from the given address will be sent to the given
gateway.
Destination means that all the traffic going to the given address will be sent to the given
gateway.
1.6.
SQUID Installation
First copy the configuration files to their location:
sudo cp ~/bwm-1.0-conf/etc/squid/* /etc/squid/
Next copy the storeurl helper script and the windows caching script to its location:
sudo cp ~/bwm-1.0-conf/usr/bin/storeurl.py /usr/bin/
sudo cp ~/bwm-1.0-conf/usr/bin/windows_update-squid.sh /usr/bin/
And finally the cronjob for the windows update script:
sudo cp ~/bwm-1.0-conf/etc/cron.d/win-update-squid /etc/cron.d/
SQUID is now ready to run:
sudo /etc/init.d/squid restart
To check if squid is working:
curl -x 127.0.0.1:3128 http://www.google.com
This work is licensed under the Creative Commons Attribution-‐Noncommercial-‐Share Alike 3.0 Unported License. Page 36 of 37 AirJaldi BwM
Final Technical report
You should see the HTML code for the page displayed in your console. If it is not working you
should check SQUID's log files:
sudo tail -n 100 /var/log/squid/access.log
sudo tail -n 100 /var/log/squid/error.log
1.7.
SNMPD Installation
In the basic configuration, you will need to add a script to get Power DNS data by adding the
line:
extend pdns-rec /usr/local/bin/pdns_stats.sh
at the end of the file: /etc/snmp/snmpd.conf
and copy the script:
sudo cp ~/bwm-1.0-conf/usr/local/bin/pdns_stats.sh /usr/local/bin/
and finaly reload the snmpd configuration:
sudo /etc/init.d/snmpd reload
1.8.
Firewall Script
The firewall script open only the necessary ports on the server and does the transparent proxy
redirection for all TCP traffic on port 80. First copy the script in its location:
sudo cp ~/bwm-1.0-conf/etc/init.d/firewall.sh /etc/init.d/
To start it at each boot, put a link in the RC2.d directory:
sudo ln -s /etc/init.d/firewall.sh /etc/rc2.d
And finally run the script :
sudo /etc/init.d/firewall.sh start
This work is licensed under the Creative Commons Attribution-‐Noncommercial-‐Share Alike 3.0 Unported License. Page 37 of 37