1
USER MANUAL
All Appliance Models
Software Release 2.2
By:
1
Table of Contents
Preface: About This Manual............................................................................................................................. 6
1 WiDirect Administration Interface............................................................................................................... 7
1.1 Logging In .................................................................................................................................................... 8
1.2 System Status Menu .................................................................................................................................... 8
1.2.1 Home ...............................................................................................................................................8
1.2.2 Active Users ....................................................................................................................................8
1.2.3 Event Viewer ..................................................................................................................................9
1.2.4 AP Status.......................................................................................................................................10
1.2.5 Bridge Status ...............................................................................................................................11
1.2.6 System Check ...............................................................................................................................12
1.3 Users Menu................................................................................................................................................. 13
1.3.1 Viewing All Users (List All).........................................................................................................13
1.3.2 Find User.......................................................................................................................................14
1.3.2.1 Find User Wildcards ............................................................................................................ 14
1.3.3 Add User .......................................................................................................................................15
1.3.4 Banning MAC Addresses ............................................................................................................16
1.3.5 Viewing User Details....................................................................................................................16
1.3.6 View User's Connection History .................................................................................................17
1.4 User Experience Menu .............................................................................................................................. 18
1.4.1 Preferences....................................................................................................................................18
1.4.2 Walled Garden .............................................................................................................................20
1.4.3 Blocked Sited ................................................................................................................................21
1.4.4 Message of the Day.......................................................................................................................22
1.4.5 Profile Branding...........................................................................................................................22
1.4.5.1 Using Images in Branding ................................................................................................... 24
1.5 Reports........................................................................................................................................................ 26
1.5.1 Functionality Overview ...............................................................................................................26
1.5.2 Connections ..................................................................................................................................26
1.5.3 Registrations.................................................................................................................................26
1.5.4 Overall Usage ...............................................................................................................................26
1.5.5 Billing (Purchases) .......................................................................................................................27
1.5.6 Access Point Usage .......................................................................................................................27
1.5.7 Downloads.....................................................................................................................................27
1.6 System Configuration................................................................................................................................28
1.6.1 Profiles ..........................................................................................................................................28
1.6.2 Access Plans..................................................................................................................................28
1.6.2.1 Access Plans Page ................................................................................................................. 28
1.6.2.2 Adding a Plan ....................................................................................................................... 28
1.6.3 Coupons ........................................................................................................................................30
1.6.4 Access Points.................................................................................................................................31
1.6.5 WiDirect Clients and WCMS………………………………………………………………… .33
1.6.6 Payment Gateways.......................................................................................................................34
1.6.7 Network Configuration................................................................................................................36
1.6.8 Network Routing ..........................................................................................................................37
1.6.9 Date and Time ..............................................................................................................................38
1.6.10 Log Viewer..................................................................................................................................38
2
1.6.11 License Key.................................................................................................................................39
1.6.12 Admin Users ...............................................................................................................................39
1.6.12.1 Add New Administrator .................................................................................................... 40
1.6.12.2 Change User Level.............................................................................................................. 40
1.6.12.3 Change Password ............................................................................................................... 41
1.6.12.4 Delete ................................................................................................................................... 41
1.6.13 Shutdown ....................................................................................................................................41
1.6.14 Support........................................................................................................................................41
1.7 Services Menu ............................................................................................................................................ 42
1.7.1 DHCP ............................................................................................................................................42
1.7.2 Radius............................................................................................................................................43
1.7.3 HTTP.............................................................................................................................................44
1.7.4 Firewall .........................................................................................................................................45
1.7.4.1 Firewall Configuration Options .......................................................................................... 46
1.7.4.2 Traffic Filtering Firewall Configuration Items ................................................................. 48
1.7.5 NTP................................................................................................................................................50
1.7.6 Preproxy........................................................................................................................................51
1.7.7 Web Cache ....................................................................................................................................51
1.7.8 DNS................................................................................................................................................51
1.8 Access Point Support................................................................................................................................. 53
1.8.1 Nortel ....................................................................................................................................................... 53
1.8.1.1 FTP .............................................................................................................................................53
1.8.1.2 AP List Tool...............................................................................................................................54
1.8.2 EnGenius ................................................................................................................................................. 54
1.8.2.1 Access Point Configuration ......................................................................................................54
1.8.3 BelAir ....................................................................................................................................................... 55
1.8.3.1 Access Point Configuration ......................................................................................................55
1.9 Tools............................................................................................................................................................ 57
1.9.1 Ping................................................................................................................................................57
1.9.2 Traceroute ....................................................................................................................................57
1.9.3 DNS Query....................................................................................................................................57
2 Command Line Interface ............................................................................................................................. 59
2.1 Secure Shell access ................................................................................................................................... 59
2.2 Using “sudo” commands . ......................................................................................................................... 59
2.3 Changing the password ............................................................................................................................. 59
2.4 Restarting System Services ....................................................................................................................... 60
2.5 Generate SSL Key & Certificate .............................................................................................................. 60
2.6 Using Emacs to Edit Files.......................................................................................................................... 61
2.7 Configure Port Forwarding ...................................................................................................................... 61
2.8 Using Tcpdump to monitor Traffic.......................................................................................................... 61
2.9 Using Arping to test a User's Connection................................................................................................ 62
2.10 Access SQL Database .............................................................................................................................. 63
2.10.1 Reset Failed Login Attempt ......................................................................................................63
2.10.2 Recover GUI Administrator Password ....................................................................................63
2.10.3 Delete Expired Users..................................................................................................................63
2.11 More Information .................................................................................................................................... 64
3 Installation..................................................................................................................................................... 65
3.1 Support Services ........................................................................................................................................ 65
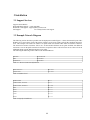
3.2 Example Network Diagram ...................................................................................................................... 65
3
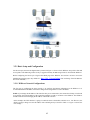
3.2.1 Basic Setup and Configuration ...................................................................................................66
3.2.1.1 WiDirect Network Configurations...................................................................................... 66
3.2.1.2 Configure Firewall ............................................................................................................... 68
3.2.1.3 Configuring WiDirect Client ............................................................................................... 68
3.2.1.4 Configure DNS...................................................................................................................... 68
3.2.1.5 Adding Access Points ........................................................................................................... 69
3.2.1.6 Verifying DHCPD configuration ........................................................................................ 70
3.2.1.7 Add Profile ............................................................................................................................ 70
3.2.1.8 Create Access Plans.............................................................................................................. 71
3.2.1.9 Create Coupons and Payment Gateways ........................................................................... 73
3.2.1.10 Create Administrators ....................................................................................................... 73
3.2.1.11 Setting Profile Preferences ................................................................................................ 73
3.2.1.12 Branding the User Pages.................................................................................................... 73
3.2.1.13 Setting Walled Garden Sites.............................................................................................. 73
3.2.1.14 Configuring the Message of the Day................................................................................. 73
3.2.1.15 System Check...................................................................................................................... 73
3.2.2 Acceptance Testing of Sample Network..................................................................................... 74
3.2.2.1 Run AP status to see if the Access Points are up ............................................................... 74
3.2.2.2 Access the Internet Wirelessly............................................................................................. 74
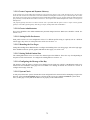
4 Special Deployment Scenarios ..................................................................................................................... 75
4.1 Enabling MAC Authentication For Specific Stations............................................................................. 75
4.2 Customizing a Network by Profile ........................................................................................................... 75
4.2.1 Configurinbg the User's Profile ..................................................................................................75
4.2.2 Branding .......................................................................................................................................76
4.2.3 Access Plans..................................................................................................................................76
4.3 Configuring VLANs ……......................................................................................................................... 76
4.3.1 Creat VLANs ................................................................................................................................76
4.3.2 Configure DNS and DHCP Servers............................................................................................76
4.3.3 Configure Firewall .......................................................................................................................77
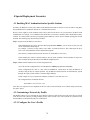
4.4 Setup Recurring Billing to Authorize.net CIM....................................................................................... 77
4.4.1 Payment Gateways.......................................................................................................................77
4.4.2 Access Plans..................................................................................................................................77
4.4.3 User Details...................................................................................................................................77
4.4.4 Branding .......................................................................................................................................77
4.4.5 Failed Payments ...........................................................................................................................77
4.4.6 Activating Accounts .....................................................................................................................77
4.4.7 Making a Payment .......................................................................................................................78
4.4.8 Updating an Account ...................................................................................................................78
4.5 Turning off External DNS Resolution ..................................................................................................... 78
4.6 Hiding Access plans from Users ............................................................................................................... 78
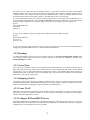
4.7 Entering Ingress (From Internet) Firewall Rules ................................................................................... 79
4.8 Disabling DHCP Dependency ................................................................................................................... 80
4.9 Disabling NAT (Network Address Translation) ..................................................................................... 80
4.10 Enable Ping on WAN Interface .............................................................................................................. 80
4.11 How to Disable Mobile Node Access to the Admin Pages .................................................................... 81
412 Login and Logout URL ............................................................................................................................ 81
4.13 Sendmail SMTP Configurations ............................................................................................................ 81
4.13.1 Updating the SMTP domain name ...........................................................................................81
4.13.2 Adding an SMTP Relay.............................................................................................................81
4
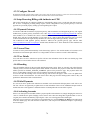
4.13.3 Restarting the Sendmail Process...............................................................................................81
4.14 Hosted WiDirect ……….......................................................................................................................... 82
4.15 Disable Proceed Page When Using MAC Authentication.................................................................... 83
4.16 Automatically Logout Dead Connections .............................................................................................. 83
4.17 Increased Customization of Logout Page .............................................................................................. 83
4.18 Enable SNMP Monitoring of the WiDirect ........................................................................................... 84
4.19 Automatic Login on Multiple Devices.................................................................................................... 85
4.20 Account MAC Restrictions ..................................................................................................................... 85
4.21 Enable Refunds ............. .......................................................................................................................... 85
4.22 Failed Login Reports .... .......................................................................................................................... 86
4.23 Creating Profile Specific User and Administrator Accounts............................................................... 86
4.24 Multiple WiDirect Hot Standby ............................................................................................................. 86
4.24.1 Overview .....................................................................................................................................86
4.24.2 Configure Hostname ..................................................................................................................87
4.24.3 Install Packages ..........................................................................................................................87
4.24.4 Create Firewall Rules ................................................................................................................87
4.24.5 Configure Local Settings ...........................................................................................................87
4.24.6 Create Shared Drive ..................................................................................................................88
4.24.7 Configure Services for Failover ................................................................................................90
4.24.8 Further Configuration...............................................................................................................91
4.24.9 Failover Recovery ......................................................................................................................92
4.24.10 Software Updates .....................................................................................................................92
4.25 Performing a System Backup ................................................................................................................. 92
4.26 Performing a System Recovery .............................................................................................................. 93
5 Administration & Maintenance................................................................................................................... 94
5.1 Active Users................................................................................................................................................ 94
5.2 Event Viewer .............................................................................................................................................. 94
5.3 AP Status and Transit Link Graph.......................................................................................................... 94
5.4 System Check ............................................................................................................................................. 94
5.5 System Verification.................................................................................................................................... 94
5.5.1 Verify Processes............................................................................................................................94
5.5.2 Verify Captive Portal Features ...................................................................................................94
5.5.3 Speed Testing................................................................................................................................95
5.5.4 Ping Test .......................................................................................................................................95
5.5.5 DNS Verification ..........................................................................................................................95
5.5.6 Verify APs.....................................................................................................................................96
6 Software......................................................................................................................................................... 97
6.1 Software Upgrades & Patching ................................................................................................................ 97
6.2 Logs and Log Rotation .............................................................................................................................. 97
6.3 Log Location .............................................................................................................................................. 97
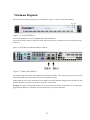
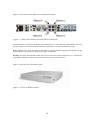
7 Hardware Diagrams ..................................................................................................................................... 98
8 Technical Support....................................................................................................................................... 100
5
The information in this User Manual has been carefully reviewed and is believed to be accurate. AllCity Wireless
assumes no responsibility for any inaccuracies that may be contained in this document, makes no commitment to update
or to keep current the information in this manual, or to notify any person or organization of the updates. For the most upto-date version of this manual, please visit the AllCity Wireless support website at
http://www.allcitywireless.com/support/. AllCity Wireless reserves the right to make changes to the product
described in this manual at any time and without notice. This product, including software, if any, and documentation
may not, in whole or in part, be copied, photocopied, reproduced, translated or reduced to any medium without prior
written consent.
IN NO EVENT WILL ALLCITY WIRELESS, LLC. BE LIABLE FOR DIRECT, INDIRECT, SPECIAL,
INCIDENTAL, OR CONSEQUENTIAL DAMAGES ARISING FROM THE USE OR INABILITY TO USE THIS
PRODUCT OR DOCUMENTATION, EVEN IF ADVISED OF THE POSSIBILITY OR SUCH DAMAGES. IN
PARTICULAR, ALLCITY WIRELESS, LLC. SHALL NOT HAVE LIABILITY FOR ANY HARDWARE,
SOFTWARE, OR DATA STORED OR USED WITH THE PRODUCT, INCLUDING THE COSTS OF REPAIRING,
REPLACING, INTEGRATING, INSTALLING OR RECOVERING SUCH HARDWARE, SOFTWARE, OR DATA.
Any disputes arising between manufacturer and customer shall be governed by the laws of Anne Arundel County in the
State of Maryland, USA. The State of Maryland shall be the exclusive venue for the resolution of any such disputes.
AllCity Wireless’ total liability for all claims will not exceed the price paid for the hardware product. Unless you
request and receive written permission from AllCity Wireless, you may not copy any part of this document. Information
in this document is subject to change without notice. Other products and companies referred to herein are trademarks or
registered trademarks of their respective companies or mark holders.
Copyright 2011 by AllCity Wireless, LLC.
All rights reserved.
Printed in the United States of America
Revision History
Rev
Date
Editor Description
1.0
11/11/2007 JLB
Initial Draft
1.01
11/23/2007 JLB
Minor Formatting Edits
1.02
12/19/2007 JLB
minor edits
1.3
10/25/2008 DV
Updated for version 1.3.1
1.3.2
3/5/2010
Updated for all Hardware
1.5
11/23/2010 DV
Updated for version 1.5
2.0
6/1/11
JB
Updated for version 2.0
2.1
11/11/11
DV
Updated for version 2.1
2.2
1/1/12
JB
Updated for version 2.2
PM
6
Preface: About This Manual
This manual is written for system administrators, system integrators, network administrators and others who use the
WiDirect appliance. The WiDirect models span a broad spectrum of possible applications. The product can be used to
manage wire line and wireless networks, both local and remote. The WiDirect gives the ability to segment the network
into multiple profiles, and to give the user a unique user experience depending on their location.
The WiDirect line is split into two classifications, Auth Server and Client. All networks initially require a WiDirect
Auth Server which has the ability to function independently. Through WiDirect Client Management Service (WCMS)
WiClients can be added to expand the network size, both from local user processing and to expand in different
geographic locations. The smaller models are appropriate for small office applications and local WISP applications.
Larger models can manage common carrier network environments. Each WiDirect unit contains the same software and
most of the features are available for use in each model. The most notable differences pertain to embedded firmware and
Micro model line. The feature set within the WiDirect appliance is broad and is expected to continue to grow over time.
These features provide significant capabilities that create a network infrastructure, one that can be used in numerous
creative ways depending on the environment.
If you are installing a WiDirect for the first time, you should read this entire manual in order to become familiar with the
settings and tools. However, the steps to actually install and configure a new WiDirect box begin with Section 3:
Installation. Other helpful answers to common questions can be found in Section 4: Special Deployment Scenarios.
7
1 WiDirect Administration Interface
1.1 Logging In
In order to gain initial access to the WiDirect's web based GUI, a cross-over cable can be connected to the ETH1
(Ethernet 1) interface to another computer. See Section 7: Hardware Diagrams for a diagram of the Ethernet ports. The
WiDirect will provide the other machine with an IP address in the 10.4.1.0/24 subnet via DHCP. (Be sure that the
connecting computer is configured for DHCP to receive the IP address.)
Once the IP address has been established, open a web browser such as Firefox, and open the following URL:
http://10.4.1.1/portal/admin
This URL opens the WiDirect Admin login page. To login, use the preconfigured username of admin and the password
widirect.
Note: If the IP address of Eth1 has changed from the default, use the new IP address instead of 10.4.1.1.
WARNING: For security reasons, if a user fails to enter the proper login credentials three times in a row, their IP
address will be banned from the login page for fifteen minutes. After fifteen minutes has passed, they'll be able to
attempt another login.
1.2 System Status Menu
The system status menu is the first menu that is located in the left hand navigation bar of the WiDirect web GUI.
1.2.1 Home
The Home button, which is located in the top left hand corner of the administrator page, returns the user to the home
screen. This is the same page that is displayed upon first logging into the WiDirect. The home page gives a quick status
on the number of users that are currently connected to the WiDirect.
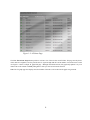
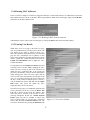
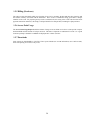
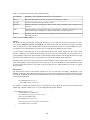
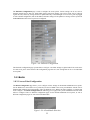
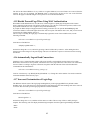
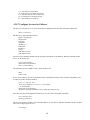
1.2.2 Active Users
The Active Users page as shown in Figure 1-1 displays all the information about users that are currently connected to the
WiDirect.
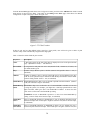
The table provides the username, traffic, start time, time connected, IP, MAC, Access Point (AP), Client, and Profile.
See Table 1-1 for more information on each entry.
Field
Description
User
The username of the user connected to the WiDirect. Clicking this links brings up the user
details page for that user.
InBytes &
OutBytes
The amount of bandwidth (in bytes) the user has used for this session.
Start Time
The date and time the session began.
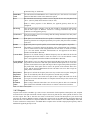
8
Time
Total time connected for this session in Hours: Minutes: Seconds.
IP
The IP address the user is currently using. If the network has multiple WiClients using the
same subnet, then users may appear to be using the same IP address.
MAC
The user's current MAC address.
AP
The AP the user is on. Only available if the getapfromradius is enabled in the firewall. The
AP will be determined either from RADIUS messages or from DHCP relay requests. See
Firewall configuration for more information. Otherwise, the AP will display as “unknown.”
Client
The client that the user is currently connected to.
Profile
The profile the user has associated with for this session. Profiles are used to provide a
custom user experience depending on where the user is located.
Disconnect Clicking on this link will automatically disconnect the user from the network.
Table 1-1: Active User Fields
The Disconnect button at the end of each row allows administrators to quickly disconnect individual users. There is a
Disconnect All button at the bottom of the page that allows an administrator to completely disconnect all active users in
a single step.
Figure 1-1: Active Users Screenshot
9
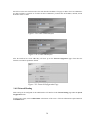
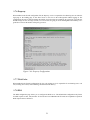
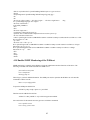
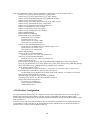
1.2.3 Event Viewer
The WiDirect’s Event Viewer, which is in the System Status menu, provides a time line of activity in the network. It
shows administrator log-in time, AP status checks, watchdog events, process start/stop actions, client monitoring, and
other system activity.
Events are rated on severity, which ranges from Info, Alert, and Critical. If needed, administrators can obtain more
detailed event information in the Reports section, which allows sorting by severity.
Note: The Event Viewer page also displays the local current system time, which allows administrators to quickly figure
out timing of recent events.
Figure 1-2: Event Viewer Page
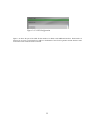
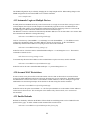
1.2.4 AP Status
WiDirect administrators can use the AP Status page, which is under the System Status menu, to monitor the Access
Points on their wireless networks. Access Points are added in the System Configuration->Access Points menu, which is
covered later in this manual. This page only reports the status of configured and enabled access points.
Every Access Point that has been enabled will automatically be monitored by the WiDirect. This page provides a quick
overview of an up/down status of the Access Points, as shown in Figure 1-3. Each AP lists Status (up/down), Name, IP,
and Last Ping Time. If the AP Name is clicked, the WiDirect opens the detail page for that AP, which lists all the
information that has been gathered via network monitoring. Last Ping Date is the last time the WiDirect successfully
pinged the AP.
10
Figure 1-3: AP Status Page
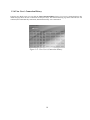
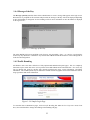
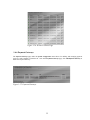
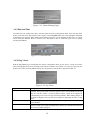
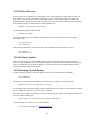
The View Transit Link Graph button provides a real time view of the wireless mesh TL links. This page not only shows
which APs have neighbors, but also provides the TL signal strength and the current number of associated users on the
AP. Figure 1-4 shows a sample TL graph link page. Although considered real time, this graph only updates every 5-10
minutes due to the amount of SNMP polling data to collect per Access Point on the network.
Note: The TL graph page also displays the serial number of the AP as well as the time the graph was generated.
11
Figure 1-4: TL Graph Sample
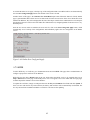
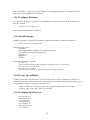
1.2.5 Bridge Status
The Bridge Status page provides a quick overview of the up/down status of the wireless bridges being monitored by the
WiDirect. Bridges are added using the same method as adding access points, except their type is set as a bridge. This
page only reports the status of access points that are enabled and have their type set as a bridge.
Figure 1-5: Bridge Status Page
12
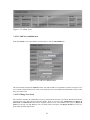
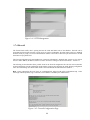
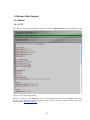
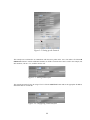
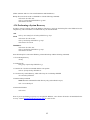
1.2.6 System Check
The System Check page under the System Status menu displays a snapshot of the current health of the WiDirect system,
as show in Figure 1-6. This page analyzes important system functions, such as Radius, DNS, DHCP, Firewall, NTPD,
PreProxy, Squid, and FTP services by establishing if they are running or not. If for any reason a service has been
disabled, click on the Control button next to each process in order to re-enable it.
Although the WiDirect has a built in watchdog program that automatically restarts any WiDirect process that has failed,
it will not restart any process that the administrator has explicitly stopped. For example, if the administrator stops the
Firewall via the control window, the watchdog program understands this action and will not attempt to restart the
firewall. However, if the Radius process dies, the watchdog will automatically restart the process without Administrator
intervention.
Other information that can be found on this page is Interface Settings, Routing table, NTP status, and Network
statistics. Information here can indicate configuration errors if errors or dropped packets are reported. When contacting
AWI technical support, the data on this page will be used to troubleshoot the health of the WiDirect.
Figure 1-6: System Check
13
1.3 Users Menu
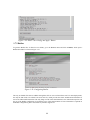
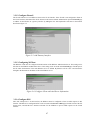
1.3.1 Viewing All Users (List All)
Clicking on the Users->List All menu provides an extensive list of all users currently in the WiDirect database. This
page views 25 users at a time.
Figure 1-7: List All Users
This screen shows a snapshot of all users stored in the database, displaying their username, first and last names, status
(active, expired, etc.), the date of their last login, and the date they registered. Clicking on a username brings up the
user’s edit profile page, which provides all of the user’s account information.
14
1.3.2 Find User
If a customer forgets their login information, or wants to update their profile, this page allows administrators to quickly
search for that user’s account.
To find a user, enter at least one piece of information about the user, such as username, last name, first name, email
address, password, or MAC address and click the Lookup User button. The WiDirect will search the database for the
information provided and display any matches that it finds.
Figure 1-8: Find User
1.3.2.1 Find User Wildcards
Wildcard searches are supported with the character %. For example:
z Find a username that begins with b and ends with y, use "b%y"
z Find a username that contains the word smith, use "%smith%"
z Find all email address that end with hotmail.com, use "%hotmail.com"
If multiple matches are found on the provided search criteria, the WiDirect provides the administrator with a list of all
matches.
15
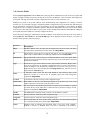
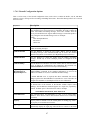
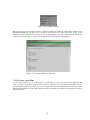
1.3.3 Add User
Figure 1-9: Add User
An administrator can use the Add User page to add a user to the WiDirect’s local user database. Most fields are self
explanatory with the exception of Status, Plan Type, and Primary MAC.
Status can be Active, Disabled. Expired, or Purchasing. Table 1-2 describes all the possible user status codes.
Active
The user is fully activated and ready to use the system without further configuration.
Disabled
The user has been effectively banned from the network and can never login without administrator
help.
Expired
The user’s plan has expired and the user will be asked to select or purchase a new plan upon their
next network login.
Purchasing
The user has been registered but has not purchased a plan, which is useful for creating an account
and still having the user to be challenged for a plan selection on their next login.
Table 1-2 User Status Types
Plan Type is the plan the user is currently using. If a user is added and set to active, then a valid plan must be selected.
The WiDirect shows all active plans in the pull down menu for this item.
Primary MAC is the MAC address of the user. This entry is only important if MAC based authentication has been
enabled and can normally be left blank by the Administrator when adding a new user. The WiDirect will automatically
populate this field upon the user's next valid login to the network.
16
1.3.4 Banning MAC Addresses
In the event that a computer is found to be engaged in malicious or unfavorable behavior, an Administrator can ban the
MAC address from the network via the MAC-Banned page under the Users menu. On this page, simply click Add MAC
which asks for the MAC address to ban.
Figure 1-10: Banning a MAC from the network
Administrators can also remove bans from this page by clicking the delete button next to the MAC address.
1.3.5 Viewing User Details
When on the Active Users page, or the Find Users page,
click on an individual user to bring up their details. The
user details screen, which is shown in Figure 1-11,
shows the registration information for the user. From that
page the user’s information can be updated, or their
status can be changed to expired to mark their account as
inactive. Update any of that information and click the
Update User Information button to update the user’s
account information.
It is important to use the Change User Plan option when
activating a user’s account. Simply changing the user’s
status to be active on the top part of the form does not
update the user’s registration date. If an account was
previously automatically expired, and the administrator
simply changes their status to be active again, then the
user’s account will be automatically expired again. If the
user is on a recurring plan then this action could cause
the user’s credit card to be charged again. To activate a
user you should select the new plan and click the Update
Plan button. This action will update the user’s
registration date to be the current time.
The bottom of the page gives additional operations that
can be performed on the user. Click the Delete This
User link to delete the user from the database. That
option may not be available if the user has an active
recurring subscription. In that case a Delete Payment
Profile option will also be available to remove that
user’s payment profile. To view the user’s connection
history click the View Connection History link. The
user can be disconnected by pressing the Disconnect link.
17
Figure 1-11: View User Details
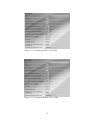
1.3.6 View User’s Connection History
From the user details screen you can click the View Connection History link to view a user’s connection history. By
default the page shows the user’s connections for the past 7 days. The connection history page shows when the user was
connected, how much data they transferred, and which client they were connected on.
Figure 1-12: View User’s Connection History
18
1.4 User Experience Menu
1.4.1 Preferences
The Preferences page, shown in Figure 1-13, allows an Administrator to define the look and feel for users of the
network. For example, the redirect page field forces each user to see a specific web page upon logging onto the
network. This configuration might work for attendees at a conference to see the day’s events, an apartment
community to see the rules and regulations, or even expose end users to a splash page of advertisements.
Figure 1-13: Preferences
The default entries for each field, which are described in the table below, provide the default behavior of each
setting. Administrators can override each setting at the Profile level. If an entry is configured in the Profile settings
submenu, the Profile level setting will be used if the user connects to the Profile.
If no setting is configured in the Profile settings submenu, the default setting will be used.
Field Dependencies - (Default vs. Per Profile) User experience preferences can be either a global default setting or
Profile specific parameters.
MAX_CONNECTION_TIME_SECONDS The maximum connection time, in seconds, before a user is
19
disconnected and needs to login again. This setting is
useful for advertisement based networks, where users
should view the login ads at intervals.
MAX_IDLE_SECONDS
Maximum time in seconds that an idle user is allowed to be
connected. If no traffic is passed on their connection, they
are considered idle. Once idle for this many seconds, they
are disconnected from the WiDirect.
NETWORK_NAME
Name of the network. It is displayed in the login page, the
terms and conditions on the registration page, and where
ever the %NETWORK_NAME% variable is used on the
branding pages.
COMPANY_NAME
Name of the ISP. It is used in the branding wherever the
%COMPANY_NAME% variable is used.
REDIRECT_PAGE
The page the user is redirected to upon logging into the
network. Leave this field blank to redirect user to their
originally requested URL.
EMAIL_SUPPORT_ADDRESS
Email address displayed to the user in branding.
ALLOW_MAC_BASED_AUTHENTICA This setting allows the user to bypass entering a username
and password on the login page. The user must still start
TION
their browser to be 'logged' into the system.
The firewall must be properly configured in order for a
user's MAC address to be determined automatically.
ALLOW_MAC_BASED_AUTHENTICA This setting allows users to be authenticated via radius and
DHCP messages. As soon as a user is connected to the
TION_WITHOUT_SPLASH
mesh, they will be authenticated into the system without
starting a browser.
In order for this setting to work properly, the
ALLOW_MAC_BASED_AUTHENTICATION option
must also be enabled and the getapfromradius must be set
in the firewall configuration. See firewall section for more
information
VALIDATION_SEND_EMAIL
This setting tells the WiDirect to send a welcome email to
the user. In this email the user is requested to verify their
email address by clicking on a link.
VALIDATION_PUBLIC_WEB_IP
The public IP or domain of the web server, which is used in
the verification emails sent to newly registered users. In the
email the user is asked to click on a URL at this domain to
validate their account. This setting must also be properly
filled in to accept payment through Authorize.net or
PayPal. This field sets the domain of that URL
VALIDATION_PERIOD
This setting is currently unused by the system and is for
customer’s who request this feature.
If this feature is enabled by AllCity Wireless Support, it
will define the number of seconds (usually 1 day or more)
that the user has to click on the validation email URL
before their account is disabled.
In other words, if they do not validate their email address
by clicking on the URL in the validation email, their
20
account will be suspended until they do.
VALIDATION_FROM_ADDRESS
The email address that a user sees verification emails
originating from.
VALIDATION_PERIOD_TEXT
The amount of time in text format that is displayed to the
user in the validation email. Instead of saying the amount
of seconds that's defined in the VALIDATION_PERIOD
setting, this option allows the administrator to define a
more human readable form of the amount to time. For
example, '1 day' might be a desirable value instead of
saying 38640 seconds.
DISABLE_USER_PASSWORD_AUTOR If set to yes, the “Forgot Password?” link will be removed
from the login page. This setting is a security parameter
ECOVERY
that can be used at the administrator’s discretion.
ALLOW_REGISTER
Set this value to no to hide the link on the login page for
users to create an account.
FIRST_NAME_ASK
FIRST_NAME REQUIRED
FIRST_NAME_TEXT
LAST_NAME_ASK
LAST_NAME_REQUIRED
LAST_NAME_TEXT
ORG_ASK
ORG_REQUIRED
ORG_TEXT
CITY_ASK
CITY_REQUIRED
CITY_TEXT
STATE_ASK
STATE_REQUIRED
STATE_TEXT
ZIP_ASK
ZIP_REQUIRED
ZIP_TEXT
PHONE_ASK
PHONE_REQUIRED
PHONE_TEXT
TERMS_AND_CONDITIONS_ASK
CAPTCHA_ASK
These options allow for customization of the registration
process for new users of the network. Each of the standard
fields can be changed to ask for something different, or
disabled completely.
The CAPTCHA, a security code used to prevent automated
registrations, can also be enabled to prevent automated
account registrations. If the CAPTCHA is enabled the user
will be asked to enter the text from an image on the
registration page.
The text of the terms and conditions can be edited in the
profile branding section.
COLLECT_USERNAME_AND_PASSW
ORD
The collection of usernames and passwords can be disabled
if authenticating users based on their MAC address.
Table 1-3: Preferences Options
21
1.4.2 Walled Garden
The WiDirect’s Walled Garden allows administrators to host content (e.g., community website) that can be
integrated into the captive portal-landing page. For example, administrators might want their users to be able to go to
google.com without network authentication. In order to allow this, only “.google.com” needs to be added to the
Walled Garden list. The WiDirect can also be configured to automatically search for web pages to add to the walled
garden. This feature allows for the user to browse not only that web site, but also all the sites linked from that web
site. If some sites do not need to be crawled as deeply as others, the depth to be crawled of each site can be specified
on the same line as the site. As the Walled Garden Crawler may not be able find all sites that are needed to display a
web page properly, it is a good idea to test that the pages are displaying correctly and add additional sites as needed.
Figure 1-14: Walled Garden
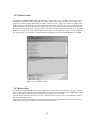
1.4.3 Blocked Sites
The WiDirect has a Blocked Sites page for the administrator to specify a list of sites that users should be restricted
from accessing. Simply add the list of blocked domains, one per line, to the list and click the Update button when
done. Updating the list of blocked sites will cause a service outage of about 30 seconds.
You can also use that form to upload a list of sites to be blocked from a text file. The text file should be a plain text
file, with one domain per line.
Note: Content filtering is not available by default on the Micro WiDirect or Micro WiClient. Use of firewall rules or
a DNS filtering service is encouraged for content filtering on these devices.
22
1.4.4 Message of the Day
The Message of the Day (MOTD) feature allows administrators to create a message that appears on the login screen.
When the user is prompted for the username and password, the message of the day will also be displayed depending
on how the branding is configured. See the branding section for more information on how the MOTD is displayed
on the login screen.
Figure 1-15: Message of the Day
The entire MOTD field can accept HTML code. However, only hyperlinks, <font>, <p>, and <br> tags should be
used to keep any distortion to a minimum. Any external links added to the MOTD need to be in the walled garden or
in the firewall configuration.
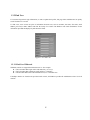
1.4.5 Profile Branding
All WiDirect units come with a default set of fully implemented authentication portal pages. This is a completely
functional Captive Portal and can be used to perform all needed authentication related functions. New users may
sign up through this portal by entering their desired login/password, name, contact information, and billing
information. The included portal may be modified to include customized graphics and textual information such as
usage agreements and contact information.
Figure 1-16: Sample Login Page
To customize these Authentication pages, click on Profile Branding link under the User Experience menu. From
here, select which Profile to change the branding on the branding edit page.
23
Select the Preview button to view what the login, Forgot Password, Change Password, and Register pages will look
like to users with this branding.
Figure 1-17: Profile Branding Selection
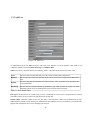
When a profile is selected from the Branding Selection page, a new page is shown that lists each possible brandable
page, as shown in Figure 1-18.
Figure 1-18: Profile Branding
On this page, there are Login, Register, Purchase, Terms & Conditions, Forgot Password, Change Password,
Expired Page, Stylesheet, and Verification email templates. Each page has certain keywords that it supports. Each
page has a list to the right that describes which variables are valid for that page.
For example, the Login page allows the following variables.
%%HTML%%
Available on all branding pages. Used when referencing images and other files
existing on the WiDirect. See the Using Images in Branding section below for
24
more information.
NOTE: This must also be used when referencing the CSS stylesheet. See the
example branding file below as an example.
%%MOTD%%
The WiDirect replaces this with the text from the MOTD.
%%ERROR_MESSAGES%%
If there was an error message, such as “Incorrect Password”, this variable tells
the WiDirect where to place that information.
%%LOGIN_FORM%%
Where the login form will be displayed. This variable IS REQUIRED for the
login branding page.
Table 1-4: Login Form Branding variables
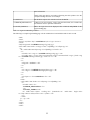
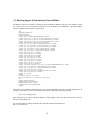
The following is a sample login branding page. All the variables have been bolded to make it easier to read.
<html>
<head>
<link rel="stylesheet" href="%%HTML%%/style.css" type="text/css">
</head>
<body background="%%HTML%%/images/bg_body.jpg">
<table width="500" border="0" align="center" cellpadding="0" cellspacing="0">
<tr>
<td><table width=500 cellspacing="0" cellpadding="0" border="0">
<tr>
<td width="32"><img src="%%HTML%%/images/logo.jpg"></td>
<td width="468"><a href="http://www.annapolis-wireless.com/contact.html" target=_blank><img
src="%%HTML%%/images/banner.jpg" border=0></a></td>
</tr>
<tr>
<td bgcolor="#ad0006"></td>
<td bgcolor="#ad0006"></td>
</tr>
<tr>
<td><img src="%%HTML%%/images/photo1.jpg"></td>
<td><img src="%%HTML%%/images/photo2.jpg"></td>
</tr>
<tr>
<td colspan=2><h3>%%MOTD%%</h3></td>
</tr>
</table>
<table width="500" border="0" cellspacing="0" cellpadding="0">
<tr>
<td width="200"><br>
%%ERROR_MESSAGES%% <br>
<br>
%%LOGIN_FORM%%</td>
<td width="300"><iframe scrolling="no" frameborder="0" width="300" height="250"
src="http://adserver.allcitywireless.com"></iframe></td>
</tr>
</table>
<p> </p></td>
</tr>
</table>
</body>
</html>
25
1.4.5.1 Using Images in Branding
On the Branding Edit page, there is also an area at the bottom of the screen that allows images to be uploaded for
the branding. After uploading, the images can be referenced in any of the branding pages (except stylesheet) by
using the following convention:
<img src=”%%HTML%%/images/imagename.gif”>
The imagename.gif is the name of the image to be displayed. The WiDirect will automatically replace
%%HTML%% with the correct URL information. If the %%HTML%% keyword is not listed, the image will not be
displayed correctly.
WARNING: Be careful about HTML construction. If unsure, administrators can use the preview button to view
what the branded pages look like.
Just about anything can be changed, including the login form, by editing the Stylesheet portion of the branding. With
the exception of the variables described in the previous section, any HTML code is valid in the branding pages.
Unfortunately, listing all the possible HTML tags is outside the scope of this document. To learn more about HTML
tags and page construction, see the guide at http://www.w3schools.com/html/
26
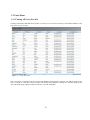
1.5 Reports
1.5.1 Functionality Overview
The WiDirect is able provide many reports that are useful in both budgeting and planning for future growth. It is also
important to understand usage trends, and to be able to reach out to users for marketing purposes. Reporting is an
important part of understanding how much the network is used and where it is used the most. Reporting can also
help find potential problems as well as monitoring anomalous behavior for either equipment or end users.
Figure 1-19: Sample Report Output
1.5.2 Connections
The connections report shows connections to a particular profile in increments of 1 to 30 days, monthly, or annually.
This report is a representation of how many individuals presented user credentials and were permitted out onto the
internet. An additional connections report is available that shows the manufacturer of the network cards of the users.
1.5.3 Registrations
Registration report is available in increments of 5 to 30 days, monthly, or annually. This report illustrates how many
people signed up for an access plan in the given period.
1.5.4 Overall Usage
The Overall Usage tab indicates how much the network has been utilized by each user, which is sorted in
descending order. It will give outputs based on both amount of bandwidth used and time spent on the system for any
given date range.
27
1.5.5 Billing (Purchases)
The end user report that details which user signed up for service by username, the date and time they signed up, and
the amount of money associated with the transaction. There is also a confirmation string given that is a unique
identifier of the event. For payment gateways such as Authorize.Net, this string is the result code from the actual
payment transaction. Otherwise, this string is a unique identifier for each purchase, including free plan purchases.
1.5.6 Access Point Usage
The Access Point Usage Report details the amount of usage an Access Point received over a time period. It reports
both bandwidth and the amount of unique end users. This data is important to understand if an AP is in a good
location or perhaps it should be a candidate for deployment to a better used area.
1.5.7 Downloads
Some reports are downloadable to CSV files. These reports include user account information, user e-mail accounts,
and event reporting on several severity levels.
28
1.6 System Configuration
1.6.1 Profiles
To control multiple profiles, they must be defined in the System Configuration area of the WiDirect user
management console. Once the profile is defined it can use the standard preconfigured look and feel which it
receives from the default settings, or it can be customized for different networks or events.
Figure 1-20: Adding Profile
To edit the look and feel of a profile, see the Branding discussion earlier in this document.
1.6.2 Access Plans
This page works in conjunction with the local user database and the Captive Portal. It allows end users to pick a
plan for which they will be billed when they sign up and when they need to recharge their account. A plan is defined
by the Administrator and restricts the amount of usage time a user can have.
1.6.2.1 Access Plans Page
The Access Plans page under the System Configuration menu lists the available access plans to end users. Figure
1-21 shows this page, which lists all the currently available plans. To create a new plan, click on the Add Plan link.
Figure 1-21: Access Plans
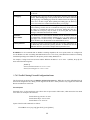
1.6.2.2 Adding a Plan
29
From the Access Plans page under the System Configuration menu, just click on the Add Plan link which is located
under the list of current Access Plans. This brings up the Adding Access Plans page, which allows for detailed
configuration of a plan. This page is shown in Figure 1-22.
Figure 1-22: Plan Creation
If there is only one free plan defined in the system for a given profile, users will not be given a choice of plan
selection. They will be automatically assigned to the single plan.
Table 1-5 describes all the fields for plan creation.
Keyword
Description
Name
A descriptive name for the plan. This name is displayed to users on the plan selection
page. (alphanumeric field, 1 – 100 characters)
Firewall ID
A unique ID for each plan from 101 to 200 (numeric field, 3 characters). If unsure, use
the default number given.
Days
Number of days duration a plan is valid for (numeric field, possible values 0 – 999, 0=
unlimited)
Minutes
Number of minutes a plan is valid for. This field may be used in addition to the days
field. An access plan will only be unlimited if both the days and minutes field are blank
(numeric field, possible values 0 – 999, 0= unlimited)
Bandwidth Up
Bandwidth limitation in kbps a user is allowed to upload from their machine. (numeric
field, unit of measure: kbps, 0= unlimited)
Bandwidth Up
Burst
Bandwidth in kbps a user is allowed to use if extra bandwidth is available. (No one else
is using the system) For example, you might have a 200 kbps upload limit but a 400
kbps burst limit, which gives users extra bandwidth if available. In most cases this
value can be set the same as the bandwidth up setting.
WARNING: Do not set Bandwidth Up Burst to a value lower than Bandwidth Up
setting. (numeric field, unit of measure: kbps, 0= unlimited)
Bandwidth
Down
Same as bandwidth limitation as Bandwidth Up, but for defining download speeds.
Measured in kbps 1024 would equal 1 megabits (numeric field, unit of measure: kbps,
0= unlimited)
Bandwidth
Down Burst
Same as bandwidth limitation as Bandwidth Up Burst, but for defining the user’s
download speeds. Measured in kbps. 1024 would equal 1 megabit (numeric field, unit
30
of measure: kbps, 0= unlimited)
Bandwidth
Total
The total amount of bandwidth the user is allowed in bytes. After the user exceeds this
amount of data their account will be marked as expired.
Cost
The amount the user must pay in order to receive the plan. If set to zero, the plan will be
“Free”. (currency field, unit of measure: USD, 0= free)
Note: To collect payment via the WiDirect, the payment gateways must also be
configured.
Recurring
This setting determines whether or not the plan should be automatically billed again
after the time expires. In WiDirect Version 2.1 recurring transactions only use the
Authorize.net CIM payment gateway.
Occurrences
If the access plan is set to be a recurring, then this setting determines how many times
the user will be billed.
Default
If the plan is set to default and if no user profile is available or the user's profile doesn't
match any plans that are configured specifically for a profile, this plan will be available
to the user.
Profile
Applies this plan to a specific profile, or leave blank if the plan applies to all profiles.
Ad Interval
The number of seconds in between the display of the advertisement page. Postproxy
must be enabled in the firewall configuration file for this feature to work. See section
1.7.4.1 for more details. Interstitial advertisements are not supported on the Micro
WiDirect and the Micro WiClient.
Content Filter
Whether or not content filtering is disabled. Postproxy must be enabled in the firewall
configuration file for this feature to work. See section 1.7.4.1 for more details. Content
filter is not supported on the Micro WiDirect and the Micro WiClient.
Login Allowed
on any Profile
If this option is set to Yes, then an account created with this access plan can be used on
any profile in the network. If both this option and the Default option are set to No, then
accounts created on this access plan will only be able to login on the profile specified in
the profile field. T\his option can be used if one portion of the network allows free
access, and the network administrators do not want those users to be able to login on
other potions of the network.
Delay Before
Repurchase
This option is to limit the frequency that a user may reselect an access plan. Setting this
value to 30 would only allow the access plan to be selected once per month.
Number of
Concurrent
Logins
The number of times a user on this access plan is able to login at the same time. If the
user signs in on more than this number of computers then all the previous sessions will
be disconnected.
These settings control the times that a user on an access plan are able to be connected.
Permitted
These fields can be left blank to allow the user to connect with no time restrictions.
Times
Table 1-5: Plan creation fields
1.6.3 Coupons
Coupons can be used as a method to give users access to the network. Each coupon has a description, code, and plan
associated with it. The plan associated with the coupon is the access plan the user will be placed on after he or she
uses the coupon. The code is what the user enters to activate their account. The description is just used to help
categorize the coupons. Multiple coupons with the same coupon code can be added, but the description and access
plans also have to be identical. If a coupon is added once then it can be used once. If it is added multiple times then
it can be used however many times it was added. Before coupons can be used the coupon payment gateway must be
added on the payment gateways screen.
31
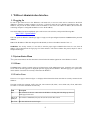
1.6.4 Access Points
On the System Configuration->Access Points menu, this page allows administrators to list all the access points and
bridges configured on their network. By entering an access point, the WiDirect is able to monitor and configure the
access point. This page lists all the currently configured Access Points, as shown in Figure 1-23.
Adding access points to the system enhances future troubleshooting and configuration. For example, on Nortel
networks it is very important to properly configure the Radius configuration files. By taking the time and entering all
the AP information requested on this page, the WiDirect can use this information to assist during the Radius
configuration step. For example, the WiDirect helps the administrator build Radius files based off the serial number
of the Access Point. With other models of access points, such as the EnGenius ECB3500 and ECB9500, adding the
access points allows the WiDirect to remotely configure the devices.
On the main access point page, administrators can edit or add new Access Points. By clicking on an Access Point, or
clicking Add New Access Point, the Access Point Edit page will be displayed as shown in Figure 1-24. Table 1-6
describes all the possible values for this page.
Keyword
Description
MAC
The MAC address of the AP. This must be unique across all access points. The MAC
can frequently be obtained from a sticker on the AP. REQUIRED
IP
The IP that the system will use to ping the AP, such as 10.3.1.50. This field must be
filled in with a valid IP address for monitoring and data collection. REQUIRED
Alternate IP
This optional field is used to specify a secondary IP address for the access point. When
using Tropos access points this field is required for any access points that are connected
directly to the WiDirect.
Type
Sets the device type. Choices: Nortel, Proxim, Tropos, BelAir, EnGenius, Bridge, Other.
Some access points have an automatic configuration option as well. If that option is
chosen the WiDirect will automatically configure the access point. If the type is set to
Bridge then the device will be displayed on the Bridge Status page, otherwise it will be
displayed on the AP Status page.
Name
A descriptive name of the AP. This field should be kept relatively short (10-20
characters), because it is used in the TL graphing pages and visual management
components. REQUIRED
Location
A description of the AP, used only on the configuration page.
Contact Info
Email address of the user who should get emailed on an up/down event. If no email
address is defined, no email will be sent on up/down events.
Serial Num
The access point’s serial number. For Nortel access points, the serial number is required
to generate the keys in the radius file. For EnGenius access points this setting is used for
automatic configuration. REQUIRED
SNMP
The SNMP public community string. If unsure, use the default of “public”.
Latitude
Location of the AP. Used only on the configuration page.
Longitude
Location of the AP. Used only on the configuration page.
Mode
This Field identifies the access point as being connected to network backhaul (@NAP)
or as a standard meshing access point (SAP) REQUIRED
Status
Dropdown field for defining the operational status of an access point (enabled /
disabled) If a device is 'disabled', then it will not be monitored by the WiDirect.
32
REQUIRED
Username
This field tells the WiDirect the telnet/web username for the Access Point. The default
Nortel username is 'admin'
Password
This field tells the WiDirect the telnet/web password for the Access Point. The default
Nortel password is 'admin'. When editing an access point this field can be left blank for
the password to remain the same.
Table 1-6: Keywords and Descriptions for Access Points
Figure 1-23: Access Points
Figure 1-24: Adding a New Access Point
33
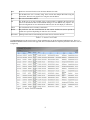
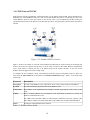
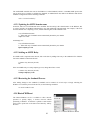
1.6.5 WiClients and WCMS
Each WiClient controls geographically separated networks over the Internet using WCMS. All user management is
handled by the central WiDirect Auth server, but the WiClient handles the process of redirecting the user to the
central WiDirect when he or she first connects to the network. After a user is authenticated all their traffic goes
straight from the WiClient to the Internet. If one WiClient goes down, only the people connected to that network are
affected.
Figure 1-25: Example WiDirect Network
Figure 1-25 shows an example of a network with a WiDirect and WiClients at remote locations. Even though each
of these clients lies on a separate network, they can all be setup to connect to the central WiDirect authentication
server, which allows a common user base to be defined across all the wireless networks. To the user, all the
WiDirect networks appear to be under a single entity.
To configure the list of WiDirect clients, click WiClients under the System Configuration menu. To add a new
client, click the Add a Client link at the bottom of the WiClient Administration page. Table 1-7 lists all the fields
for this page.
Keyword
Description
Description
The name of the WiDirect server. The built in “local” client is always named Local WiDirect.
Location
Text that describes the physical location of the WiDirect client.
Contact Info
Email address of the administrator that should be emailed when up/down events occurs for the
client.
GWID
This is a unique identifier for each WiDirect. This field MUST be entered in correctly for
WiDirect communication to occur.
The GWID value is the MAC address of ETH1 interface without the colons. For example, if the
MAC address of ETH1 was 00:00:0A:BC:DE:1F, the GWID value would be 00000ABCDE1F.
Status
Provides the enabled/disabled of the WiDirect.
Table 1-7: WiDirect Client Fields
34
Figure 1-26: WiDirect Clients Page
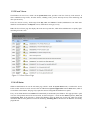
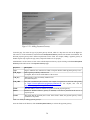
1.6.6 Payment Gateways
The Payment Gateways page under the System Configuration menu allows for defining and managing payment
gateways, such as PayPal or Authorize.net. Once at the Payment Gateways page, click Add Payment Gateway to
add a new Payment Gateway.
Figure 1-27: Payment Gateways
35
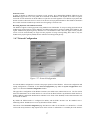
Figure 1-28: Adding Payment Gateway
From this page, first select the type of payment gateway desired, which is a drop down list next to the Type slot.
Fill in the rest of the information, and click the Create Payment Gateway button at the bottom when finished. The
different payment gateways have different requirements for the fields. For example, adding a payment gateway to
handle coupons only requires the type, status, and profile fields to be set properly.
Administrators can also choose to look at the available Payment Gateways by the clicking on the List All Payment
Gateways link at the bottom of the Payment Gateways page.
Keyword
Description
Type
Paypal, Authorize.Net, Authorize.net CIM, or Coupons. Defines which payment gateway to use.
GW_Login
API Login ID provided by Authorize.Net
For PayPal, this will be the email address of the account.
GW_Key
API login Key Value provided by Authorize.Net
Not used for PayPal
GW_URL
The URL to authenticate the transaction. For example, for Authorize.net, this URL will typically
be https://secure.authorize.net/gateway/transact.dll. For PayPal, this will be
https://www.paypal.com/cgi-bin/webscr.
Email
The email address of the account that is registered with the payment gateway.
Status
Enabled or Disabled. When a gateway is disabled, it will not be presented to the user as a
payment option.
Profile
The profile that the payment plan is used. If this field is blank, the payment gateway will be
available for all profiles.
Table 1-8: Fields for adding payment gateways.
Once the fields are all filled out, click Create Payment Gateway to activate this payment gateway.
36
Preferences Note:
In order for PayPal or Authorize.net payments to work properly, the VALIDATION_PUBLIC_WEB_IP on the
Preferences page must be set to the public IP or hostname of the WiDirect. The PayPal server makes a separate
return call for each transaction to this IP address to report the successful payment. For Authorize.net payments this
domain is used to redirect the user to a secure site to enter his or her payment information. The WiDirect should also
have an SSL certificate installed to prevent the user from getting a certificate error.
Recurring Payments with Authorize.net CIM:
The WiDirect supports recurring payments using Authorize.net CIM module. To setup recurring payments both an
Authorize.net payment gateway and an Authorize.net CIM payment gateway need to be added on the WiDirect. The
regular Authorize.net payment gateway should be set to be disabled so that it does not appear on the purchase
screen. It will be used internally for single one-time payments. If using recurring billing there must be only one
Authorize.net payment gateway added, and one Authorize.net CIM payment gateway.
1.6.7 Network Configuration
Figure 1-27: Network Configuration
Accurate IP address configuration is critical to the proper operation of the WiDirect. All network configuration and
routing configuration is controlled via the Network Configuration page under the System Configuration menu.
Figure 1-27 shows the Network Configuration window.
This page allows configuration of the WiDirect interfaces, the default route, and the DNS servers. The first section
allows the administrator to set which interface is to be used as the WAN interface. By default the WAN interface is
ETH0. If DHCP is enabled the Default Route and DNS server fields will be disabled, because that information will
be retrieved via DHCP.
By default the ETH0 interface is configured for DHCP, and the ETH1 interface uses the standard 10.4.1.1
addressing scheme. IP addresses are not set by default for ETH2 or ETH3.
The bottom of the Network Configuration page has buttons to add a VLAN interface or a subinterface. A VLAN
can be used on any interface to help separate users on the network. A subinterface is a secondary IP on the interface
37
that will be on the same local network as the main interface IP address. The pages to add a VLAN or Subinterface
are shown in Figures 1-28 and 1-29. To add a VLAN or subinterface you must enter an IP address, netmask, and an
ID number from 1 to 4095.
Figure 1-28: Create VLAN Interface
Figure 1-29: Create Subinterface
After the interfaces have been added they will show up on the Network Configuration page. From there the
interfaces can either be updated or deleted.
Figure 1-30: Network Configuration Page
1.6.8 Network Routing
Static routing can be configured via the administrative GUI interface in the Network Routing page under the System
Configuration menu.
To add a route, simply click on Add a Route at the bottom of the screen. Fill in the information required and click
the Submit button.
38
Figure 1-31: Network Routing Page
1.6.9 Date and Time
To modify the time settings select Date and Time under the System Configuration menu. From the drop down
menus, set the time zone, date and time. Don’t forget to click the Update button next to the appropriate commands
to implement your selections. When making major changes to the time, or when changing the time zone, it is a good
idea to restart the WiDirect. Refer to section 2 for a description of how to restart all system services without
restarting the WiDirect.
Figure 1-32: Date and Time
1.6.10 Log Viewer
With the Log Viewer page, located under the System Configuration menu, log file scan be viewed in real-time.
Choose the appropriate log file by clicking on the link and a separate screen opens to view the log. This page will
update as new entries are being added to the log file. The purpose of each log file is described in Table 1-9.
Figure 1-33: Log Viewer
Log File
Syslog
Radius
AWICP
Description
This log file contains various system messages that can be helpful for troubleshooting
problems. The log will contain a record of system events in case the WiDirect locks up.
This file will also contain a record of DHCP requests, which can be helpful for
troubleshooting a user who is having connection problems. When making changes to
the DHCP configuration this log file can be helpful for identifying the source of any
errors.
The Radius log file will contain a record of Radius messages that have been processed
by the WiDirect.
The AWICP log file is a record of log entries made by the captive portal. The log will
contain a record of user logins and registrations, and may also include information if a
user is having trouble signing on.
39
AWICP-Manager
The AWICP-Manager log file contains a record of users who are disconnected or have
had their accounts expired by the WiDirect. This log will contain the reason that their
account was disconnected or marked as expired.
Purchases
The purchases log file contains a record of users who have purchased access plans. It
includes all Authorize.net and PayPal purchases.
Table 1-9: Descriptions of Log Files
1.6.11 License Key
The WiDirect comes preconfigured with a certain number of user licenses depending on the WiDirect model. There
are two types of user classifications for licenses; Active Users and Concurrent Users. An Active User is a user that
has been registered and is eligible to use the network. All users, including users that have been disabled or expired,
count towards the Active User count. Concurrent Users are the total number of users that can be using the system
simultaneously at a given time. Once the maximum number of concurrent users has been reached, new users must
wait for a currently connected user to disconnect before using the network. All WiDirects shipping with version 1.5
and above have no restrictions on the number of concurrent users.
If needed, new license keys can be added to the WiDirect. To add new licenses, select License Key under the System
Configuration menu. Browse to the directory where the license file is located on the local machine and then click
Upload. The WiDirect will add the new license files to the database and the end user counts will be reflected in the
license key tab.
Depending on usage of the system and the license that was originally purchased, a new license may need to be
purchased to support more users. Contact support at AllCity Wireless if a new license is required.
Figure 1-34: License Key
1.6.12 Admin Users
The Admin Users page allows the administrator to add and remove administrative accounts, change access levels,
contact information, or even reset passwords.
Opening Admin Users under the System Configuration menu shows the list of administrators for the WiDirect
device. Each administrator is assigned a user level that defines his/her access restrictions. Each administrator can
have full (Administrator) or restricted (Report and Status Only) access to the administrative areas within the
WiDirect.
40
Figure 1-35: Admin Users
1.6.12.1 Add New Administrator
In the User Admin screen of the WiDirect (pictured above), click on Add Admin User.
Figure 1-36: Add New Administrator
Fill in all the fields and click the Add User button. All fields should be self explanatory with the exception of User
Level, which is described in the next section. If the email alerts box is checked then the administrator will get email
alerts for certain events.
1.6.12.2 Change User Level
The customer can change any Administrator’s role by selecting the desired new role from the drop down menu after
clicking on the user’s name and going into their profile. There are two user levels; Administrator and Reports &
Status Only. An Administrator level user has complete and total access to the WiDirect GUI system. A Reports &
Status user can only view/edit WiDirect users, run status checks, and reports. The Reports & Status level user is a
good setting for phone support staff.
41
1.6.12.3 Change Password
Each Administrator has a password that allows him or her access to the management console. To change the
Administrator's password, enter the new password in the text box then click on the Submit button. A full access
Administrator can change other administrator’s passwords.
1.6.12.4 Delete
Select this button if you want to delete an administrator.
WARNING: Never delete the admin user. Instead changed the password to something unique and keep it in a safe
location. All administrators should have their own unique usernames and passwords.
1.6.13 Shutdown
The Shutdown page, which is listed under the System Configuration menu, allows the administrator to remotely
shutdown or reboot the WiDirect unit. The appliance should never be powered off by disconnecting the power
supply.
The shutdown procedure should be run to make sure that the file systems are correctly unmounted. If the WiDirect is
not properly shutdown, it will cause a longer startup sequence the next time the WiDirect is powered up.
WARNING: Use this function with caution. Once the WiDirect unit is remotely shutdown, it can not be restarted
unless someone has physical access to it.
1.6.14 Support
The Support page under the System Configuration menu displays the contact information you can use to contact a
WiDirect professional in case you have additional questions. (Contact information is also listed at the end of this
Manual.)
42
1.7 Services Menu
1.7.1 DHCP
The WiDirect provides DHCP services to all available LAN interfaces. Multiple subnets may be defined for each
LAN interface, and each subnet has a definable DHCP lease address range associated with it. DHCP can be disabled
on some subnets and enabled on others. Providing DHCP services on multiple subnets makes network
administration easier because static addressing is not required on either subnet. DHCP can be configured to assign a
given hardware Ethernet address (MAC) the same IP every time.
Figure 1-37: DHCP Service
To Edit the DHCP table click on DHCP under the Services menu. The entire DHCP configuration file will be
presented in an editable text field, as shown in Figure 1-37.
Once the configuration has changed, use the Save Config and Apply to save the changes. This button is shown in
Figure 1-38. The WiDirect automatically stores a retrievable backup of the file.
The WiDirect uses a standard version of DHCP that can be modified to suit any network environment. To learn
about all the configuration items for this file, consult the ISC DHCP documentation at:
http://www.isc.org/products/DHCPD
43
Figure 1-38: DHCP 'Save Config and Apply’ Button
1.7.2 Radius
To generate Radius files for Nortel Access Points, go to the Services menu and click on Radius, which open a
Radius edit window as shown in Figure 1-39.
Figure 1-39: Configuring Radius
The only two Radius files that are editable through the GUI are users.conf and clients.conf. For most deployments,
the only file that needs to be edited is the users.conf file, which provides the Nortel Authorization information as
well as the VPN tunnel information. The only thing covered in this documentation is the Authorization portion. All
the rest of the Radius configuration is beyond the scope of this documentation. If more information is required on
the Radius configuration, please consult All City Wireless support site.
44
As with all the other service pages, a backup copy of the configuration that was modified will be saved automatically
once the Save Config and Apply button at the bottom of the screen is clicked.
Another feature of this page is the Generate New Nortel Data helper button. When this button is clicked, another
page is generated that shows all the correct User-Passwords for Nortel Access Points. If the Access Points have been
added to the WiDirect, they will be displayed at this time. This helper window allows administrators to cut-and-paste
the output into the users.conf section of the radius file. Without this tool, configuring Radius for Nortel can be a very
difficult process.
Once the new Access Points are added to the users.conf file, click on the Save Config And Apply button, which
automatically saves a backup of the configurations and immediately applies the new configuration to the Radius
service.
Figure 1-40: Radius Save Config and Apply
1.7.3 HTTP
To add a HTTP key or Certificate, go to the Services menu and click HTTP. This page allows an administrator to
configure a proper SSL certificate for the WiDirect.
While this page also has a Restart button at the top, which allows the HTTP service to be restarted, there are no
Stop or Start buttons on this page. If the HTTP process was ever stopped, access to the Admin and user login pages
would be impossible without a reboot of the WiDirect.
To update the certificates, simply cut and paste them into the Key and Certificate form fields and click Update. If
there is an error with the new key and certificate, the old key and certificate will be automatically used instead. The
new key and certificate installation should be verified in a web browser after updating.
45
Figure 1-41: HTTP Management
1.7.4 Firewall
The firewall filters traffic that is passing between the LAN and WAN sides of the WiDirect. Firewalls can be
programmed to block traffic based on a wide variety of criteria. Traditionally, firewalls enforce policies to maintain
network security by using a set of rules that determine whether or not traffic is allowed to pass between the LAN and
the WAN on a per-packet basis.
The Firewall configuration file also handles how certain user information is obtained from various services such as
the user's MAC address, IP address, and Access Point. All of these settings are discussed in Tables 1-10 and 1-11.
The following section describes all the possible items for the Firewall configuration file. The first section describes
all the Non-filtering firewall configuration items and the second section describes the traffic filtering configuration
times. Firewall filtering rules dictate which traffic is allowed inbound and outbound of the WiDirect.
Hint: In the configuration file itself, there are commented lines which provide in-line configuration help. These
lines begin with the pound (#) sign. Comments can be added to if needed by the Administrator.
Figure 1-42: Firewall Configuration Page
46
1.7.4.1 Firewall Configuration Options
Table 1-10 lists many of the firewall configuration items, such as how to obtain the Profile, AP, IP, and MAC
addresses of users, turning on/off web caching, and adding trusted users. The traffic filtering features are covered in
the next section.
Keyword
Description
profile
Defines a profile, along with the IP address range assigned to that profile.
This command saves processing time by eliminating the need to obtain the
profile from Radius accounting messages, and is also available when the
access point model does not support Radius messages. The default profile is
set by setting the start and end IP range to 0.0.0.0. Example:
profile {
name AnnapolisWireless
start 0.0.0.0
end 0.0.0.0
}
getapfromradius
Tells the WiDirect to obtain the user's Access Point information from the
Radius Accounting messages.
getmacfromradius
Tells the WiDirect to obtain the user's MAC address from the Radius
Accounting messages. This command should only be used if the standard
DHCPD configuration is unavailable (See dhcpdommapi keywords below).
getssidfromradius
Tells the WiDirect to obtain the profile from the Radius Accounting
messages. Should only be used if multiple profiles are configured on the
network.
getmacfromdhcp
Tells the WiDirect to obtain the user's MAC address directly from the DHCP
server. In almost all configurations, this command is the preferred over
getmacfromradius because of increased speed and reliability.
dhcpdomapikey
dhcpdomapisecret
dhcpdommapiserver
These keywords are for DHCP communication when using the
getmacfromdhcp command. If the standard configuration is used on the
WiDirect for DHCP service, these commands should not change.
If another DHCPD server is required, then these commands will need to
change to point to the other DHCPD server and the new server will need to be
configured for OMAPI. See the dhcpd.conf file for more information.
TrustedIPList
This command allows the WiDirect to allow a set of trusted IP addresses from
the internal side of the network to the Internet without Captive Portal
challenge. The IP addresses should all appear on a single line, separated by
commas. No blank space is allowed between entries. Example:
TrustedIPList 192.168.20.11,10.4.1.20,10.4.1.30
TrustedMACList
This command allows the administrator to enter a list of trusted MAC
addresses. These devices will be allowed direct Internet access without any
restrictions.
preproxy
Preproxy must be enabled to use the walled garden or landing page feature.
Set preproxy to 0 to disable these features.
applesupport
Set this value to 1 to have Apple mobile devices, such as the iPhone and iPad,
automatically display the login page when the device connects to the WiFi
47
network. If the device doesn’t login then it will automatically disconnect from
the network.
landingpage
The landing page is the page the user is redirected to when they start using the
network. If the landing page is not specified, then the user will be redirected
to the login page. The landing page needs to contain a link to the login page
for the user to be able to login. When updating the landing page, the PreProxy
service also needs to be restarted from the PreProxy service page.
postproxy
Postproxy is used to handle web caching, acceleration, monitoring, and
content filtering. Set this value to 0 to disable the web proxy for all users. Set
this value to 1 to enable the web proxy for all users. Setting this value to 2
will enable the web proxy only for users on an access plan with content
filtering or interstitial advertisements enabled.
HostName
SSLAvailable
If the WiDirect has a valid certificate installed, then the HostName should be
set appropriately, and SSLAvailable should be set to yes. This enables the
login page to be accessed securely. In a WiDirect Client the HostName
option should be set to the hostname of the main WiDirect server.
The gateway interface is the interface that users are forced to authenticate on.
By default only eth1 is listed as a gateway interface. To authenticate users on
additional interfaces you can have multiple GatewayInterface lines.
Table 1-10: Firewall Configuration Items
GatewayInterface
WARNING: For all commands that are Radius accounting dependent, the access points need to be configured to
use the WiDirect as their accounting and authentication server. The access points MUST have Radius Accounting
enabled and pointing to the WiDirect as the primary and secondary Radius Server.
For example, if using Nortel Access Points and the WiDirect IP address is set to 10.4.1.1 (default), the ap.ftp file
must contain the following lines:
[RADIUS]
PrimaryAuthenticationServer=10.4.1.1:1812
PrimaryAccountingServer=10.4.1.1:1813
1.7.4.2 Traffic Filtering Firewall Configuration Items
The firewall rules are broken into two RuleSets; Global & Known-users. While there are other defined RuleSets in
the firewall configuration file, editing is NOT supported at this time. AllCity Wireless only supports the Global and
Known-users Rulesets at this time.
Firewall Syntax
Essentially, there is allow and block rules. These rules are processed in FIFO order, which means the first match
wins. Here is an example of firewall rules.
firewall allow tcp port 80 to 10.10.1.1
firewall allow udp to 172.32.1.0/24
firewall block to 172.16.0.0/12
Syntax of the Firewall command is as follows:
FirewallRule action [tcp | udp] [port XYZ] [ to IP][/subnet]
48
Table 1-11 describes each portion of this command in detail.
FirewallRule
Mandatory. Tells the WiDirect that the rule is a firewall rule.
action
Describes the behavior of the line. It can be set as either allow or block.
tcp | udp
Optional. Describes what type of traffic to filter.
port XYZ
Optional. Describes a specific port to block or allow. Ports value XYZ can be a number from 1
to 65536.
to IP
Optional. Defines a specific IP or IP range to apply the rule. A domain is allowed here as well.
If the domain points to multiple IPs, only the first IP address found will be used.
/subnet
Optional. Can only be used with the IP command, which defines a subnet rather than a specific
IP to apply the list to.
Table 1-11: FirewallRule Options
Global
The Global firewall section defines all the rules that apply to every single state of the user's connection. A user's
state could be 'unknown', 'known', and 'disabled'. Any global firewall rules that are defined will apply to all these
states. In other words, if a rule is defined in the Global section that allows the users to a certain IP address, all users
are allowed to access that IP address even if they have not logged into the WiDirect's captive portal.
A good example is allowing users to access advertisement driven sites without logging into the system, which
provides a different sort of walled garden definition. In some cases, some Ad insertion sites only need access to
certain IP address instead of an entire domain. If requirements state that certain Ads are displayed on the user's login
page, this section might be the only way to provide access to the image and links on the login page.
Another instance when users need to be allowed to certain IP addresses if for PayPal support. Users must be able to
login to their PayPal account to pay for their access plan, so port 443 to the IP addresses of the PayPal web site must
be allowed in the firewall. Due to the nature of the secure http protocol, walled garden sites can only use regular
non-secure http.
Known-users
The Known-users firewall section defines firewall rules for users that have successfully authenticated to the
WiDirect. Although it might seem counter intuitive, this section allows an Administrator to DENY traffic to specific
destinations. By default, the WiDirect allows authenticated users to have complete unrestricted access to the Internet
with the following RuleSet:
FirewallRuleSet known-users {
FirewallRule allow to 0.0.0.0/0
}
For example, if requirements state that users are not allowed to access SMTP to any mail server except the local
SMTP relay with an IP address of 10.1.1.10, the configuration might look like this:
FirewallRuleSet known-users {
# Allow SMTP to our SMTP relay
FirewallRule allow tcp port 25 to 10.1.1.100
# Deny all other SMTP traffic
FirewallRule block tcp port 25
#
# Now just let every out everywhere (required rule)
FirewallRule allow to 0.0.0.0/0
}
49
1.7.5 NTP
The WiDirect appliance internal clock must remain accurate for a number of the critical systems to function. In
order to make this work properly, an NTP server is polled to synchronize the internal clock with a known NTP
clock. NTP also provides time services to local devices.
To edit the NTP configuration, go to the NTP page under the Services menu. This is the standard NTP configuration
and it will allow you to change NTPD servers as needed. If more information is required for configuring NTP,
please see the NTP web site: http:://www.ntp.org.
NOTE: This page is NOT where you change the local date and time, this is only for Network Time Protocol (NTP).
To configure the Date & Time on the WiDirect, see the Date and Time Configuration section in this document.
Figure 1-43: NTPD Configuration
50
1.7.6 Preproxy
When enabled in the firewall configuration file, the Preproxy service is responsible for redirecting users to either the
login page or the landing page. It also allows users to visit sites on the walled garden without logging in. The
configuration file may be edited to change the number of processes that are running at any given time. Typically the
default settings are fine. In a large network, or if a lot of users are going to use the walled garden functionality, it is a
good idea to increase the number of Preproxy processes.
Figure 1-44: Preproxy Configuration
1.7.7 Web Cache
When enabled in the firewall configuration file, the web caching service is responsible for accelerating user’s web
sites, tracking sites visited, content filtering, and advertisement delivery.
1.7.8 DNS
The DNS configuration page allows you to configure the DNS server. The default DNS configuration only listens
for DNS requests on eth1, eth2, and eth3. If VLANs have been added then the file needs to be updated to respond to
DNS requests on those interfaces.
51
Figure 1-45: DNS Configuration
Figure 1-45 shows the part of the DNS file that needs to be edited to add additional interfaces. Each interface is
listed on its own line. VLAN interfaces would be a combination of the VLAN tag number and the interface name.
VLAN 600 on eth1 would be listed as eth1.600.
52
1.8 Access Point Support
1.8.1 Nortel
1.8.1.1 FTP
The FTP files can be edited under Services menu after clicking on NORTEL Support then choosing FTP. The file
defines attributes of access points and is pulled from the server every time an access point attempts to join the mesh.
Figure 1-46: FTP Configuration
This file is strictly for Nortel Equipment The file is called ap.ftp and is stored in the NortelWarp user's home
directory on the WiDirect. For more information on the syntax of this file, consult the Nortel Access Point
documentation at http://www.nortel.com.
53
1.8.1.2 AP List Tool
The AP list tool is a special piece of software that helps control and modify how a Nortel mesh configures itself with
blocking lists and preferred lists. This tool takes the complicated task of blocking list creation and makes it more
manageable by allowing the Administrator to just click check boxes to generate the proper lists. The WiDirect
queries each and every Nortel AP to find the existing neighbor lists and shows them in table format.
Clicking on the View Transit Link Graph button a graphic is displayed of the current network and its TL
connections. Clicking the View Blocked Graph button shows a graphic representation of the possible TL paths and
which ones are administratively blocked.
Figure 1-47: AP List Tool
Before making changes to the network TL properties, click the Regather Data from Access Points button, which
tells the WiDirect to recollect all the latest TL data from all the Access Points in the network. This is a network
intensive task so only run this command when ready to make TL changes on the network. This step also allows the
WiDirect to gather the latest signal strengths for all the neighbor connections.
Once the gather completes, the WiDirect provides a current list of Access Points and their neighbors, which allows
the Administrator to choose which neighbors to block and prefer by clicking on the checkboxes on the page.
Once all the selections are made, generate an output file by clicking the Generate Lists button. The output of that
list can now be cut and pasted into the AP.FTP file in the FTP tab above the AP List Tool Tab. By adding it to the
ap.ftp file, the access points will learn about the new blocking and preferred lists the next time they are restarted.
WARNING: Adding blocking lists requires a bit of thought and planning. If the blocking lists are too intensive, the
risk is higher of orphaning an access point on the mesh. For more information about blocking lists and how they
affect the Nortel mesh, consult the Nortel documentation at http://www.nortel.com
There is also a “CSV Output” button, which generates a Comma Separated Values (CSV) of the blocking lists. This
can be useful for administrators to pull the current blocking lists into an Excel spreadsheet for a more detailed
analysis.
1.8.2 EnGenius
1.8.2.1 Access Point Configuration
The EnGenius Configuration page allows you to configure various settings on the ECB3500 and ECB9500 access
points. For the WiDirect to control these access points they need to be added to the access point database with the
correct MAC address and serial numbers. The type should be set to “EnGenius ECB3500 (Auto Configure)” or
“EnGenius ECB9500 (Auto Configure).”
54
The EnGenius Configuration page is used to configure the access points. Various settings can be set, such as
channel, transmit power, data rate, SSID, WEP, WPA, and VLAN tagging. The access points will be polled at
regular intervals, and if any settings need to be updated then they will be changed. If a new access point is plugged
in with a default configuration, then its IP address and other settings will be updated. A message will be reported in
the Event Viewer when an access point is reconfigured.
Figure 1-48: EnGenius Configuration
The EnGenius configuration page is pictured above in Figure 1-48. Most settings are global and will be set the same
for each access point. At the bottom of the configuration page there are some settings that can be set for individual
access points.
1.8.3 BelAir
1.8.3.1 Access Point Configuration
The BelAir Configuration page allows you to configure various settings on the BA100 and BA200 access points.
For the WiDirect to control these access points they need to be added to the access point database with the correct
Ethernet MAC addresses and serial numbers. The type should be set to “BelAir 100 Auto Configure” or “BelAir 200
Auto Configure.” The BelAir Configuration link will bring you to a page where you the administrator decide which
radios to configure. There are different configuration pages for the BA100 and BA200 access points, as well as
different configuration pages for each of the individual radios.
Figure 1-50: AP and Radio Selection
55
After selecting the access point model and radio to configure, an additional page will be displayed allowing you to
set configuration items for that radio. Both access and backhaul configuration changes can be made. After the
changes are made a confirmation message, along with any error messages, will be placed in the Event Viewer.
Figure 1-51: BelAir Configuration Page
56
1.9 Tools
The Tools section provides the WiDirect administrator with the basic network troubleshooting tools of ping, trace
route, and DNS query.
1.9.1 Ping
Ping allows an administrator to test network connectivity by sending a ping request to another machine on the
network. Enter in the target IP address of the remote machine to test and click the Ping button. The results of the
ping will be displayed.
This example is a successful ping of IP 192.168.20.248:
PING 192.168.20.248 (192.168.20.248) 56(84) bytes of data.
64 bytes from 192.168.20.248: icmp_seq=1 ttl=64 time=0.310 ms
64 bytes from 192.168.20.248: icmp_seq=2 ttl=64 time=0.264 ms
64 bytes from 192.168.20.248: icmp_seq=3 ttl=64 time=0.214 ms
--- 192.168.20.248 ping statistics --3 packets transmitted, 3 received, 0% packet loss, time 2000ms
rtt min/avg/max/mdev = 0.214/0.262/0.310/0.043 ms
1.9.2 Traceroute
Like the Ping command, the Traceroute command tests network connectivity by attempting to find the network
path between the WiDirect and another network device. Type in the target address and click the Traceroute button.
The results of the Traceroute will be displayed after the WiDirect executes the command.
Example output:
traceroute to 10.3.1.50 (10.3.1.50), 30 hops max, 40 byte packets
1 balance (192.168.200.1) 1.875 ms 2.286 ms 2.747 ms
2 73.135.120.1 (73.135.120.1) 81.174 ms 93.181 ms 93.600 ms
3 ge-1-20-ur01.annapolis.md.bad.comcast.net (68.87.136.205) 94.065 ms 94.535 ms 94.514 ms
4 te-9-3-ur02.gambrills.md.bad.comcast.net (68.87.128.150) 94.983 ms 94.957 ms 96.891 ms
5 te-9-1-ur01.gambrills.md.bad.comcast.net (68.87.129.17) 94.858 ms 97.319 ms 97.295 ms
6 te-7-1-ar01.capitolhghts.md.bad.comcast.net (68.87.129.22) 97.265 ms 79.813 ms 80.194 ms
7 12.86.111.5 (12.86.111.5) 81.152 ms 117.899 ms 141.375 ms
8 tbr2.wswdc.ip.att.net (12.122.113.78) 162.803 ms 163.262 ms 163.726 ms
9 cr1.wswdc.ip.att.net (12.122.16.89) 164.194 ms 164.173 ms 164.619 ms
10 cr2.phlpa.ip.att.net (12.122.4.53) 165.089 ms 165.062 ms 165.504 ms
11 tbr2.phlpa.ip.att.net (12.122.20.86) 167.469 ms 167.444 ms 167.894 ms
12 tbr2.cgcil.ip.att.net (12.122.10.93) 166.859 ms 171.816 ms 172.279 ms
13 12.122.99.93 (12.122.99.93) 113.359 ms 105.891 ms 183.838 ms
14 12-215-4-17.client.mchsi.com (12.215.4.17) 321.209 ms 321.622 ms 321.111 ms
15 12-215-8-163.client.mchsi.com (12.215.8.163) 328.543 ms * *
16 10.3.1.50 (10.3.1.50) 338.253 ms 267.762 ms *
1.9.3 DNS Query
The DNS Query command allows an administrator to test DNS connectivity. DNS is very important because the
captive portal uses it to detect a user's initial Internet request. DNS is also used in some services such as FTP.
57
For Domain resolution check, go to the Tools menu and then DNS Query. Then type in a domain name to query, for
example www.google.com, and click the Lookup button. The results will be displayed once the lookup
completes.
DNS look up of www.google.com
Server:
192.168.200.1
Address:
192.168.200.1#53
Non-authoritative answer:
www.google.com canonical name = www.l.google.com.
Name: www.l.google.com
Address: 64.233.161.99
Name: www.l.google.com
Address: 64.233.161.104
Name: www.l.google.com
Address: 64.233.161.103
Name: www.l.google.com
Address: 64.233.161.147
58
2 Command Line Interface
2.1 Secure Shell access
An SSH client is required in order to access the command line interface of the WiDirect. AllCity Wireless
recommends using putty, which is a free download at this website:
http://www.chiark.greenend.org.uk/~sgtatham/putty/
By opening putty, or another SSH client, connect to the IP address of the WiDirect machine. By default, this IP
address is 10.4.1.1 on the ETH1 interface. However, if the IP address of any of the WiDirect's interface has changed,
the new IP address should be the one that used in the SSH connection. If you are accessing from the Internet, you'll
want to use the public IP address of the WiDirect.
Once connected, the system will ask for a login and password. For security reasons, the root username can not be
used. Administrators must use the portal login to gain access. The account awisupport is also available for SSH
logins. If this is a new system, the password will be widirect. Since command line access gives full control over the
WiDirect, including the ability to look up passwords to the web GUI, it is important that a secure password be set.
Once connected, administrators are free to use any of the standard Unix commands to navigate the system. To
perform any advanced configuration changes we strongly suggest using the sudo command instead of switching to
the root user. See the sudo section below for more information.
To exit the command line interface, use the logout command or CONTROL-D.
NOTE: If editing files, consult the VI quick reference guide located in this document.
2.2 Using sudo commands
For security reasons, the WiDirect to allows the portal user to run the sudo process without switching to the root
user, which allows root level access to various parts of the system. Only top-level Administrators should have the
root password.
To use sudo, append the word sudo in front of any command. For example, to edit the iptables file, which is owned
by root, use the following command.
sudo vi /etc/sysconfig/iptables
Sudo prompts for the portal password, not root password. This is done to verify that it's still the person that
originally connected to the SSH process.
Sudo works for any commands that require root access.
2.3 Changing the password
It is a good idea to change the password of the portal user. When logged in as the portal user, use the passwd
command and select a new secure password.
59
There is also an account that is used by the support staff to perform maintenance and monitor for problems. This
password should be set by the support staff to something secure. To change the password on this account, execute
the following command:
sudo passwd awisupport
2.4 Restarting System Services
When changing the IP address of ETH1 a full system restart can be avoided by simply restarting the WiDirect
processes by using the following commands:
sudo /root/AWICP/bin/widirect_stop_all.sh
sudo /root/AWICP/bin/widirect_start_all.sh
sudo /sbin/service dhcpd restart
The process of stopping and starting will take about 45 seconds. When changing the time zone some additional
services need to be restarted in addition to the ones mentioned above:
sudo /sbin/service mysqld restart
sudo /sbin/service httpd restart
Restarting the access point monitoring processes can be done to get up to date data on the access points:
sudo /sbin/service awicp_ap_ping_monitor restart
sudo /sbin/service awicp_ap_snmp_monitor restart
If the WiDirect gets its IP address using DHCP, the following command may be used to get a new IP address:
sudo /sbin/service network restart
2.5 Generate SSL Key and Certificate
It is important to generate a new SSL key and certificate when accepting payments using Authorize.net. To generate
an SSL key, run this command:
sudo openssl genrsa –out localhost.key 2048
To create a self signed certificate, run this command:
sudo openssl req -new -x509 -nodes -sha1 -days 365 -key localhost.key > localhost.crt
Run the following command to create a certificate signing request (CSR) for a third part to generate a key:
openssl req -new -key localhost.key -out localhost.csr
View the contents of those files with these commands:
cat localhost.key
cat localhost.crt
cat localhost.csr
The entire contents of the key and certificate files, including the lines that start with hyphens, can be put on the
certificate page on the WiDirect to update the certificate.
60
2.6 Using Emacs to Edit Files
Emacs is a command line text editor that can be used to view and edit various files on the WiDirect. The following
command can be used to view the system log:
sudo emacs /var/log/messages
Once the editing window is open you can scroll through with the arrow keys on the keyboard. At anytime you can
exit by pressing Control-X, followed by Control-C.
2.7 Configure Port Forwarding
Run this command to modify the internal firewall to configure port forwarding rules:
sudo emacs /etc/sysconfig/iptables
Look for the portion of the file containing the existing NAT rules. You may have to scroll down with the arrow and
page down keys. The NAT rules should look like this:
*nat
:OUTPUT ACCEPT [401:23400]
:POSTROUTING ACCEPT [375:21730]
:PREROUTING ACCEPT [144:12599]
-A POSTROUTING -o eth0 -j MASQUERADE
Add the port forwarding rule. To forward traffic on port 8080 to the local IP 10.4.1.2 on port 80, you would use this
rule:
-A PREROUTING -p tcp -d x.x.x.x --dport 8080 -j DNAT --to-destination 10.4.1.2:80
Replace x.x.x.x with the eth0 IP for the local WiDirect or WiClient. When finished editing the file, exit Emacs by
pressing Control-X, followed by Control-C. Restart the firewall and client by running these commands:
sudo /sbin/service iptables restart
sudo /sbin/service awicp_client restart
Go to the Firewall page in the GUI and add the IP address to the TrustedIPList. If the IP address is not in the trusted
list then the device won’t be able to communicate with the internet unless it is logged in.
2.8 Using Tcpdump to Monitor Traffic
A utility called tcpdump is available for monitoring network traffic. This utility is useful for diagnosing connection
problems, or for monitoring activity on a network interface. This command can monitor traffic for a single user, or
for all traffic on an interface. To exit out of tcpdump at anytime press Control-C. Table 2-1 shows some common
tcpdump commands.
Monitor all traffic on eth1 for all users
Monitor traffic on eth1 for IP 10.4.1.20
Monitor traffic on eth1 for MAC 00:11:22:33:44:55
Monitor DNS requests on eth1
Monitor DHCP requests on eth1
sudo /usr/sbin/tcpdump -ieth1
sudo /usr/sbin/tcpdump -ieth1 host 10.4.1.20
sudo /usr/sbin/tcpdump -ieth1 ether host 00:11:22:33:44:55
sudo /usr/sbin/tcpdump -ieth1 port 53
sudo /usr/sbin/tcpdump -ieth1 port 67
Table 2-1: Common tcpdump commands
Note: Instead of typing “sudo /usr/sbin/tcpdump” on the above commands, run the “su -" command first to get root
access. Then run the tcpdump utility by typing “tcpdump”.
61
2.9 Using Arping to Test a User’s Connection
A common method to test a user’s connection is to ping their computer. Many computers have pings blocked by
default, so this method isn’t always helpful. An alternative method is available, called arping, sends an ARP requests
which cannot be blocked on the user’s computer. ARP requests won’t go through a router though, so to use arping
the computer must be on the same Ethernet subnet as the WiDirect. To run the arping command the IP address and
interface must be specified. This command will ping the IP 10.4.1.20 on the interface eth1:
sudo /usr/sbin/arping 10.4.1.20 -I eth1
The arping command will show the MAC address of the device with the specified IP address. When finished press
Control-C to exit.
2.10 Access SQL database
The WiDirect uses a MySQL database to store configuration information. It is not recommended that you make
changes to the database, but it can be helpful to access for certain tasks. To access the database, run this command
from the SSH session:
mysql –uportal –pannamysql portal
To exit the MySQL client application at any time press Control-C. The following sections will describe how to
perform some basic operations on the database.
2.10.1 Reset failed login attempts
The WiDirect administration pages will block an IP address from logging in after three failed login attempts. If you
are getting the error saying you need to wait 15 minutes to login then you can reset the failed attempt counter by
running the following command in the MySQL client utility:
delete from AdminLoginAttempts;
2.10.2 Recover GUI Administrator Password
The MySQL client utility can be used to recover a lost administrator password. Run this command to view a list of
administrator usernames and passwords:
select username,AES_Decrypt(password, "109a134e99.1900.1800-12a") from admin_users;
2.10.3 Delete Expired Users
You can delete a large group of expired users at one time from the MySQL database. These steps will show how to
delete all expired users who have not logged in for six months. Before making changes it is important to backup the
database. Run this command to do a backup of the database from the SSH command line:
mysqldump -uportal -pannamysql portal >backupFileName
Open the database following the instructions from above, and run these five commands:
delete from connections where userid in (select userid from users where (status = 3 or status = 4) and
lastlogin< date_sub(now(), interval 6 month));
delete from extra_user_macs where userid in (select userid from users where (status = 3 or status = 4) and
lastlogin < date_sub(now(), interval 6 month));
62
delete from emailverify where userid in (select userid from users where (status = 3 or status = 4) and
lastlogin < date_sub(now(), interval 6 month));
delete from tokens where userid in (select userid from users where (status = 3 or status = 4) and lastlogin
< date_sub(now(), interval 6 month));
delete from users where (status = 3 or status = 4) and lastlogin < date_sub(now(), interval 6 month);
If any major mistakes are made when running the above commands, then running this command from the SSH
session will restore the MySQL database:
mysql -uportal -pannamysql portal < backupFileName
2.11 More Information
The WiDirect and WiClient models run on the operating system CentOS. Documentation is available on the CentOS
web site www.centos.org that gives a detailed overview of all the capabilities of the WiDirect product.
63
3 Installation
3.1 Support Services
Support Contact Details
Dedicated Phone Support: +1-443-294-0000
Dedicated e-mail support: [email protected]
Self-support:
www.allcitywireless.com/support
3.2 Example Network Diagram
The following section describes a possible network deployment scenario Figure 3-1 shows the network layout with a
WiDirect server and a client. Each of the clients will have several access points, and will have multiple subnets for
users. This example will assume one subnet is for public WiFi users and the other subnet for business customers.
The network for business customers will be on a VLAN and have different access plans available with different
restrictions. Users on the public network will also have an option to enter a code in for faster access. There will be an
additional subnet used for administering the access points.
The following IP addressing scheme will be used on both WiDirects:
Internet IP
192.168.200.2/24
DNS
192.168.200.1
Default Route
192.168.200.1
Table 3-1: Internet Connection Information
Public WiFi Users
10.4.1.0/24
Business Users
10.5.1.0/24
Table 3-2 Subnets Used
WiDirect ETH1
10.4.1.1
WiDirect ETH1, VLAN 200
10.5.1.1
WiDirect ETH1, subinterface
10.1.1.254
NAP
10.1.1.10
SAP1
10.1.1.11
SAP2
10.1.1.12
SAP3
10.1.1.13
SAP4
10.1.1.14
Table 3-3 Specific IP addresses
64
Figure 3-1: Sample Network Diagram
3.2.1 Basic Setup and Configuration
For the most part, the network diagram that is pictured in Figure 3-1 shows a basic WiDirect setup with a client and
access points. This addressing scheme is only a suggestion and any IP addressing scheme is valid with the WiDirect.
Before configuring, the first step is to login to the admin page of the WiDirect. See Section 1 on how to access the
administration logging page. (By default it is http://10.4.1.1/portal/admin, but can change if the IP addresses
have been modified.)
3.2.1.1 WiDirect Network Configurations
The first step in configuring the same network is to configure the Internet information on the WiDirect. It is
recommended that the IP address of ETH0 be changed from using DHCP to a static IP address.
NOTE: If you change the IP address of the interface that you are connected to, the connection will drop. You'll need
to reconfigure the local IP address of the connecting machine in order to reconnect to the WiDirect. The WiDirect
should be restarted when changing the IP address of the ETH1 interface.
In this example, the ETH1 interface is going to remain the same as the default, which is 10.4.1.1/24. However, the
ETH0 is going to change to a static IP address with a default gateway as shown in Table 3-1. Figure 3-2 shows the
new settings:
65
Figure 3-2: Setting up the Network
This example uses a subinterface to communicate with the access points on the 10.1.1.0/24 subnet. Click the Add
Subinterface button to add the additional IP address on ETH1. The Index ID of 400 is used in the example, but
other numbers, such as 1 or 2, would be valid as well.
Figure 3-3: Adding Subinterface
This example network will also be using a VLAN. Click the Add VLAN button and set the appropriate IP address
and subnet mask for VLAN 200.
Figure 3-4: Configuring VLAN Interface
66
3.2.1.2 Configure Firewall
The firewall will have to be modified to listen on the VLAN interface. If the firewall is not configured to listen on
the VLAN interface, then that traffic will be allowed to the internet without authentication. Open the Firewall page
to add the VLAN interface as a gateway interface by adding the line “GatewayInterface eth1.200” in the location
described in Figure 3-5.
Figure 3-5: Add Gateway Interface
3.2.1.3 Configuring WiClient
The WiDirect Client must be configured with the location of the WiDirect Authorization Server. This setting can be
left alone on the WiDirect Authorization Server. This setting can be accessed on the Firewall page. Find the part of
the file where the hostname of the main WiDirect server is defined. By default it will be “eth1” and it should be
changed to the hostname or IP address of the main WiDirect server.
Figure 3-6: Configure Client with Auth Server Information
3.2.1.4 Configure DNS
Since this example uses a VLAN interface, the WiDirect must be configured to listen to DNS requests on this
interface. The DNS server configuration file can be accessed on the Services->DNS page. Find the section of the file
shown below, and add the line “interface=eth1.200” for the WiDirect to process DNS requests on the VLAN
interface.
67
Figure 3-7: Configure DNS Server
3.2.1.5 Adding Access Points
In this example there are eight access points total. Figure 3-8 shows the page for adding access points. The access
points connected to the WiDirect Client should be added on that server. The five access points connected to the main
WiDirect should be added on that server.
Figure 3-8: Adding Access Point
Figure 3-9 shows the way the access point page should look after all the access points have been added:
68
Figure 3-9: All Access Points Added
3.2.1.6 Verifying DHCPD configuration
Only minor changes need to be made to the DHCP configuration file for this example. The configuration file can be
found on the Services->DHCP page. The subnet section in the DHCP server configuration file needs to be modified
to include the 10.5.1.0/24 subnet. The subnet section of the file should look like this:
# Private Subnet 10.4.1.0/24
subnet 10.4.1.0 netmask 255.255.255.0 {
range 10.4.1.20 10.4.1.254;
option routers 10.4.1.1;
option domain-name-servers 10.4.1.1;
option ntp-servers 10.4.1.1;
option subnet-mask 255.255.255.0;
}
subnet 10.5.1.0 netmask 255.255.255.0 {
range 10.5.1.20 10.5.1.254;
option routers 10.5.1.1;
option domain-name-servers 10.5.1.1;
option ntp-servers 10.5.1.1;
option subnet-mask 255.255.255.0;
}
3.2.1.7 Add Profile
The WiDirect still needs to know about the profile for branding and reporting purposes. By clicking on System
Configuration->Profiles, the profile can be added as in Figure 3-10. For this example there are going to be two
profiles:
69
Figure 3-10: Profile Creation
Rules also have to be created in the firewall to determine which users belong in which profile. Clicking on the
Services->Firewall link will allow you to modify the firewall rules. The 10.4.1.0/24 subnet will be on the
PublicWiFi profile, and the 10.5.1.0/24 subnet will be on the BusinessUsers profile. A default profile will also be
created as an example. Figure 3-11 shows the configuration file with the profile settings applied.
Figure 3-11: Create profiles in Firewall
3.2.1.8 Create Access Plans
For this sample network, two access plans will be created. Figure 3-12 shows the setup for the public plan and
Figure 3-13 shows the setup for the business plan. The time restrictions can be left blank for the default values. To
prevent the plans from being seen by users on the wrong profile, the profile field should be set properly, and the
Default option should be set to No. These settings will make sure that the access plans are only displayed to users on
the proper profile.
70
Figure 3-12: Creating the Public Access Plan
Figure 3-13: Creating the Business Access Plan
71
3.2.1.9 Create Coupons and Payment Gateway
In this scenario users on the public WiFi network are going to have the option to enter a code for faster access. Any user who
knows the code “FastAccess” will be able to enter this code when activating their account to be put on the faster plan. First create
this coupon on the coupon page. The description will be “Public High Speed WiFi Access,” the plan will be the public high speed
plan previously created, and the token will be “FastAccess.” This coupon can be added multiple times so that it can be given to
multiple users.
The payment gateway must also be created so that the user is presented with the option to enter a coupon. On the payment
gateways screen add a payment gateway with the type coupon, and the profile name “PublicWiFi.”
3.2.1.10 Create Administrators
New boxes should have the default administrator password changed and new admin users should be created. See
Section 1.6.11.
3.2.1.11 Setting Profile Preferences
Each profile can have its own configuration values. If a different profile setting is required, such as a different
redirect page, they can be set in the preferences section. See Section 1.4.1.
3.2.1.12 Branding the User Pages
Setting the branding allows administrators to configure the branding of the user facing pages, such as the login page.
If the installation calls for specific graphics and html for these pages, see section 1.4.4.
3.2.1.13 Setting Walled Garden Sites
The walled garden allows access to various sites without login to the WiDirect. These sites vary from depending on
the policies of the local network. To configure the walled garden see Section 1.4.2
3.2.1.14 Configuring the Message of the Day
The message of the day allows a message to be displayed on the login page, which is something that needs to be
tailored for each installation. This page can be left blank if no message is desired. See section 1.4.3 on how to
configure the message of the day.
3.2.1.15 System Check
At this point, all the basic system elements have been configured for this network. Before attempting to login to the
Network, click on the System Check menu to verify that all the services are enabled and PASS the system check.
Also, use this page to verify that the IP address is set properly on the ETH0 interface.
72
Figure 3-14 Running the System Check
3.2.2 Acceptance Testing of Sample Network
For this network, there only two features that are really required to be tested. The first is the AP Status page, which
verifies that the AP's are up and monitored. The second test is to actually associate to an Access Point wirelessly and
test the Internet Connection.
3.2.2.1 Run AP status to see if the Access Points are up
Click on the System Status-> AP Status link and verify that all the Access Points are UP
3.2.2.2 Access the Internet Wirelessly
Using a laptop, physically move to the nearest access point and try to connect to the wireless network. If everything
has been configured properly, after associating to the access point, the WiDirect will provide the laptop with a
DHCP address in the 10.4.1.0/24 subnet.
After an IP address has been provided, open a browser and connect to the Internet. If everything is running properly,
the Captive Portal Login page will be displayed. Register for an account and login to the network.
At this point, the bare network configuration has been completed. For more system checks, see the Administration
and Maintenance section later in this document.
73
4 Special Deployment Scenarios
4.1 Enabling MAC Authentication for Specific Stations
Normally, the WiDirect can only run in MAC based authentication mode for all users at once. In other words, MAC
based authentication is enabled for all hosts or it is disabled for all hosts.
However, there might be certain situations where only a portion of the devices on your network to be MAC based
authenticated. For example, a set of hardware that doesn't have web browsers enabled, such as hand held inventory
scanners. It is still possible to do this by assigning specific addresses to these devices and then opening the firewall
for them. The following steps describe this procedure:
Step 1: Assign a static IP address to each device.
In the DHCPD.conf file (access from the admin page Services->DHCP), you can create an entry for each
device in the Mobile Node IP pool.
For example, a wireless security camera with a MAC of 00:0F:3D:56:03:43. We could assign the IP of
10.8.1.250. In the DHCPD.conf file, add the following line.
host camera2 { hardware Ethernet 00:0F:3D:56:03:43; fixed-address 10.8.1.250; }
In this example, the camera is named "camera2," but any name would have been acceptable as long as the
name is unique among all the entries in the DHCP configuration file.
Step 2: Add the static IP address to the firewall configuration file.
Access the firewall configuration file from the WiDirect Admin page (Services->Firewall)
In this configuration file, there is a line called "TrustedIPList", which allows as many IP addresses as
needed, as long as they are comma separated. Any IP addresses listed in this line are automatically “passed
through" the captive portal without a web based login challenge.
In this example, let's say we had two IP addresses to add 10.8.1.250 and 10.8.1.251.
The configuration file would look like this:
TrustedIPList 10.8.1.250,10.8.1.251
After those two steps have been completed, the devices will be allowed internet access without being restricted by
the captive portal.
4.2 Customizing a Network by Profile
The WiDirect allows you to customize the user's interface and access plan choices based on where they are located
in the network. This is done by creating multiple profiles on the network. Users can be placed on a profile based on
their IP address or which WiClient they are connected on.
4.2.1 Configure the User’s Profile
74
The easiest way to separate the users on multiple profiles is to put them in different IP ranges. With multiple
VLANS available users in one VLAN can be placed in one IP address subnet, and users in another VLAN will be in
a different subnet. Those subnets can then be placed in different profiles. If there are multiple WiClients in the
network then the WiClients can all share a profile, or each WiClient can be on its own profile.
To see the default profile that users are placed on when connecting can be seen in the firewall configuration file. To
view the firewall configuration file, click on Services->Firewall in the WiDirect or WiClient’s menu. The following
shows the default configuration for a profile to apply to users who are not assigned a profile anywhere else:
profile {
name AnnapolisWireless
start 0.0.0.0
end 0.0.0.0
}
You can specify a different range to put people from a different subnet into a different profile:
profile {
name Baltimore-Wireless
start 10.8.1.0
end 10.8.1.254
}
If your access points are supported then you can use get the user's profile from the access point using RADIUS by
changing the getssidfromradius value to be 1 in the firewall configuration file.
4.2.2 Branding
To change the branding for the profiles you will need to first click on the System Configuration->Profiles menu
item. From the profiles page you can aAfter a profile is added you can change the branding by clicking on the
Profile Branding menu option.
4.2.3 Access Plans
Users can be given a different choice of access plan based on which profile they are in. When creating an access
plan, specify the profile in the profile field to show that access to users registering on that profile. Also the default
option must be set to no if the plan should not be displayed to all users. If the default option on the plan page is
enabled, then the plan will be shows to users on all profiles. The access plan may also be marked as restricted which
allows them to only sign in on that profile.
4.3 Configuring VLANs
Configuring VLANs requires changes in a number of different places. First the VLANs need to be created on the
network configuration page. Then the DHCP and DNS server must be properly configured to handle those VLANs.
Finally the firewall must be configured to require that traffic to be authenticated.
4.3.1 Create VLAN
The bottom of the Network Configuration page has buttons to add a VLAN interface. The pages to add a VLAN or
Subinterface are shown in Figures 1-28 and 1-29. To add a VLAN or subinterface you must enter an IP address,
netmask, and an ID number from 1 to 4095.
4.3.2 Configure DNS and DHCP Servers
The DNS and DHCP servers both should be configured to handle the VLAN interface. The DNS server will ignore
DNS requests unless the interface has been specified in the configuration file. The DHCP server needs to be properly
configured to give out IP addresses for the VLAN subnet.
75
4.3.3 Configure Firewall
By default the firewall will only redirect traffic to the captive portal on the eth1 interface. To force users on the VLAN interface
to authenticate with the WiDirect the firewall needs to be told to listen on the VLAN interface.
4.4 Setup Recurring Billing with Authorize.net CIM
This section explains how to configure a WiDirect to automatically charge a user’s credit card when their account is
due to renew. Configuring recurring billing requires careful configuration of the payment gateways so that the
payments are processed properly. Setting up recurring billing also requires
4.4.1 Payment Gateways
You need to add both an Authorize.net payment gateway, and an Authorize.net CIM payment gateway. The regular
Authorize.net payment gateway should have the URL "https://secure.authorize.net/gateway/transact.dll" and the
status should be set to disabled. The status is disabled because it won't show up on the payment option list by
default, but it still may be used internally if a user signs up for a non-recurring plan and chooses not to save their
credit card information. The login and key should be set to the API login and key provided by Authorize.net.
The Authorize.net CIM payment gateway should be added on the payment gateway page with the URL
"https://api.authorize.net/xml/v1/request.api" and the status should be active. There should be no other Authorize.net
payment gateways created.
4.4.2 Access Plans
To make an access plan bill automatically set the "Recurring" option to "Yes" and the number of occurrences to be
the number of times that the plan will bill. Use a large number for the occurrences to make it bill indefinitely.
4.4.3 User Details
Users who have an active Authorize.net profile will have that information listed on their user details page. That
profile must be removed before the user can be deleted.
4.4.4 Branding
There are branding options for the successful and failed payment e-mails. These are currently only pulled from the
"default" profile, so will need to add a profile called "default" to edit them. The payment e-mails will come from the
address specified on "EMAIL_SUPPORT_ADDRESS" option on the preferences page,. The payment emails will
also CC to that address. Emails are only sent for automatic payments, not initial payments.
You can also edit the branding of the account edit page. The account edit page is where a user can update their
account or credit card information. You will want to link to this page from the failed payment e-mail so they can
update their information if their card is declined.
4.4.5 Failed Payments
If a user has an active profile with Authorize.net and their card is declined the failed payment e-mail will be sent.
The user will have an opportunity to update their account information. There will be additional attempts made 24
and 48 hours later. If the payment is still denied on the 3rd attempt then the account will be expired.
4.4.6 Activating Accounts
If there is an old expired account that still has a payment profile with Authorize.net, simply changing the status to be
"Active" will bill the user again. Changing a user's status to Active does not change their registration date. A user on
a regular plan would be automatically expired again. A user on a recurring plan will be billed again.
The proper way to reactivate a user with a new registration date is to use the Change User Plan option at the bottom
of the user details page. This will mark the account active, and will prevent an immediate attempt to expire/charge
the account again.
76
4.4.7 Making a Payment
When signing up for a recurring plan the user is of course forced to save their credit card information. If they are
making a one time payment they have the option of either saving their credit card information or not saving it. If the
user does choose to save their credit card information then the next time they renew they have the option of using
their old credit card.
4.4.8 Update Account
Users can edit their credit card information by going to https://www.widirectdomain.com/update. It would be helpful
to give links to this page from the login page and failed payment e-mails so users know how to update their credit
card information. This is only used for accounts that are active on a recurring plan.
4.5 Turning off External DNS Resolution
In some deployments, if DNS service is unstable, disabling it at the WiDirect allows the mesh to remain up during
DNS server outages. Only the DNS service at the mobile nodes will be interrupted instead of the entire mesh.
To perform this operation, command line access is required on the WiDirect. Login via ssh to the WiDirect.
Step 1: Edit the /etc/nsswitch conf file
Run the command sudo vi /etc/nsswitch.conf. Look for the line that reads “host : files dns” and change it to say
“hosts: files”
Step 2: Edit the /etc/resolv.conf file
Run the command sudo vi /etc/resolv.conf file. Any lines that say “nameserver” add a “#” to the beginning of the
line.
Step 3: Edit the ap.ftp file
Use the gui Admin page and click on Nortel Support->Ftp. Look for entries in the dhcpd file that being with
“domain-name-server”, there should be at least two entries, all of them need to be changed to the IP address of the
upstream DNS server. This is the same IP address that was added in the network configuration window of the
WiDirect.
Step 4: Reboot the mesh
At this point, the entire mesh will need to be restarted for the DNS changes to take effect.
4.6 Hiding Access Plans from Users
Hidden access plans can be created that are not displayed to
users. If a profile is set on an access plan to an unused profile,
and the default option is set to no, then the access plan won’t
be displayed to users.
Figure 4-1: Creating a hidden access plan
77
4.7 Entering Ingress (From Internet) Firewall Rules
The WiDirect software uses iptables to manage the firewall. When the WiDirect starts up, it uses iptables to define
new firewall rules. However, the default firewall rules can be modified by the Administrator. The default iptables
file that is shipped with the WiDirect looks like this:
*filter
:FORWARD ACCEPT [0:0]
:INPUT DROP [0:0]
:OUTPUT ACCEPT [0:0]
-A INPUT -m state --state RELATED,ESTABLISHED -j ACCEPT
-A INPUT -i eth0 -p tcp -m tcp --dport 22 --tcp-flags SYN,RST,ACK SYN -j ACCEPT
-A INPUT -i eth0 -p tcp -m tcp --dport 80 --tcp-flags SYN,RST,ACK SYN -j ACCEPT
-A INPUT -i eth0 -p tcp -m tcp --dport 443 --tcp-flags SYN,RST,ACK SYN -j ACCEPT
-A INPUT -i eth0 -j REJECT --reject-with icmp-port-unreachable
-A INPUT -p tcp -m tcp --dport 8060 --tcp-flags SYN,RST,ACK SYN -j ACCEPT
-A INPUT -p tcp -m tcp --dport 8061 --tcp-flags SYN,RST,ACK SYN -j ACCEPT
-A INPUT -p tcp -m tcp --dport 8062 --tcp-flags SYN,RST,ACK SYN -j ACCEPT
-A INPUT -p tcp -m tcp --dport 20 --tcp-flags SYN,RST,ACK SYN -j ACCEPT
-A INPUT -p tcp -m tcp --dport 21 --tcp-flags SYN,RST,ACK SYN -j ACCEPT
-A INPUT -p tcp -m tcp --dport 22 --tcp-flags SYN,RST,ACK SYN -j ACCEPT
-A INPUT -p udp -m udp --dport 53 -j ACCEPT
-A INPUT -p udp -m udp --dport 67 -j ACCEPT
-A INPUT -p udp -m udp --dport 68 -j ACCEPT
-A INPUT -p tcp -m tcp --dport 80 -j ACCEPT
-A INPUT -p tcp -m tcp --dport 7911 -j ACCEPT
-A INPUT -p udp -m udp --dport 123 -j ACCEPT
-A INPUT -p tcp -m tcp --dport 123 -j ACCEPT
-A INPUT -p udp -m udp --dport 514 -j ACCEPT
-A INPUT -p icmp --icmp-type 0 -j ACCEPT
-A INPUT -i eth1 -p icmp --icmp-type 8 -s 0/0 -m state --state NEW,ESTABLISHED,RELATED -j ACCEPT
-A INPUT -p tcp -m tcp --dport 443 --tcp-flags SYN,RST,ACK SYN -j ACCEPT
-A INPUT -p tcp -m tcp --dport 1813 --tcp-flags SYN,RST,ACK SYN -j ACCEPT
-A INPUT -p udp -m udp --dport 1813 -j ACCEPT
-A INPUT -p tcp -m tcp --dport 1812 --tcp-flags SYN,RST,ACK SYN -j ACCEPT
-A INPUT -p udp -m udp --dport 1812 -j ACCEPT
-A INPUT -i lo -j ACCEPT
COMMIT
# Completed on Sun Jun 4 17:19:16 2006
# Generated by iptables-save v1.3.0 on Sun Jun 4 17:19:16 2006
*nat
:OUTPUT ACCEPT [401:23400]
:POSTROUTING ACCEPT [375:21730]
:PREROUTING ACCEPT [144:12599]
-A POSTROUTING -o eth0 -j MASQUERADE
COMMIT
These rules can be modified as Administrators see fit. (See the Disabling NAT section 4.6 in this document for an
example.) To edit this file, connect to the command line interface and run the following command:
sudo vi /etc/sysconfig/iptables
After editing the file, it is best to reboot the WiDirect for the changes to take effect due to the amount of software
that relies on the iptables file.
For more information on editing the iptables file, consult the netfilter documentation at:
http://www.netfilter.org.
78
4.8 Disabling DHCP Dependency
An often overlooked aspect of the DHCPD configuration file is to disable DHCP service on the ETH0 (Internet
facing) interface. In order to do this, add an entry to the dhcpd configuration file that instructs dhcpd to ignore Eth0's
IP range.
For example, if Eth0's IP and subnet was 192.168.20.2 with a subnet mask of 255.255.255.0. A "blank"
configuration line for this subnet would be needed in the dhcpd configuration file to tell DHCP not to provide
service on this interface. The dhcpd.conf line looks like this
subnet 192.168.20.0 netmask 255.255.255.0 {}
When DHCPD starts up, it sees this as not needing to provide dhcpd to this IP space and will 'disable' DHCP on the
ETH0 interface.
4.9 Disabling NAT (Network Address Translation)
If you want to provide routable IP space to your Mobile Nodes, you can disable NAT on your WiDirect. In order to
do this, you must be familiar with a command line editor such as VI or EMACS. In this example, we'll show the VI
commands.
If you are disabling NAT, you will need a routable subnet on intranet and extranet networks. You can still use
private subnets such as 10.0.0.0/8, as long as it's routable beyond the WiDirect box. The WiDirect is just going to act
as a firewall without NAT enabled.
SSH to the WiDirect and run the following command:
sudo vi /etc/sysconfig/iptables
Use the arrow keys to find this line:
-A POSTROUTING -o eth0 -j MASQUERADE
Comment out this line by adding a "#" in front of it. Save the file and exit the VI editor.
After making those changes run these two commands for the changes to take effect:
sudo /sbin/service iptables restart
sudo /sbin/service awicp_client restart
4.10 Enable Ping on WAN Interface
By default the WiDirect does not respond to pings on the WAN interface. To enable pings you need to modify the
iptables configuration file on the WiDirect.
SSH to the WiDirect and run the following command:
sudo vi /etc/sysconfig/iptables
Use the arrow keys to find this line:
-A INPUT -i eth0 -j REJECT --reject-with icmp-port-unreachable
Above that line add a new line that looks like this:
79
-A INPUT -i eth0 -p icmp --icmp-type 8 -s 0/0 -m state --state NEW,ESTABLISHED,RELATED -j ACCEPT
Save the changes and exit the vi text editor. Then run these two commands for the changes to take effect:
sudo /sbin/service iptables restart
sudo /sbin/service awicp_client restart
4.11 How to Disable Mobile Node Access to the Admin Pages
On some networks, more security might be required for the WiDirect Admin pages. In fact, it's recommended that
this security measure be added anywhere there isn't tight security on the network.
The WiDirect admin page has built in security where three failed login attempts will lock out an IP address for 15
minutes. However, if needed, it is possible to disable admin login page attempts completely from the Mobile
Network. In order to do this, SSH to the WiDirect and run this command.
sudo vi /root/AWICP/www/portal/admin/.htaccess
In this file, add the following lines. changing the IP address as needed.
<Files *>
order allow,deny
allow from all
deny from 10.8.1.0/24
</Files>
Change the 10.8.1.0/24 to be the IP subnet range of your mobile network.
4.12 Login and Logout URL
On some networks, it might be desirable to allow users to completely logoff the WiDirect instead of letting them
timeout. This can be accomplished by providing a Logout button to the users on an external web page on a different
server. If there is a homepage that users have access to, the following URL can be used on that page to create a
Logout button.
http://10.4.1.1:8060/awicp/logout
There may also be instances where you want to give users a link to login, such as when you redirect users to a
landing page instead of the login page. The login page can be accessed at the following URL:
http://10.4.1.1:8060/
In both instances, change the 10.4.1.1 IP address to the IP address of ETH1 interface of the WiDirect. It must be the
ETH1 IP address.
4.13 Sendmail SMTP Configurations
Depending on the deployment, most networks have a special SMTP Relay that email must be sent in order to leave
the network. In other words, the WiDirect will not be able to send output email without relaying through the SMTP
relay host.
80
The email/SMTP controller that runs on the WiDirect is called Sendmail, which is a standard SMTP process that
runs on most servers. In order to configure the Sendmail, an Administrator must SSH to the WiDirect and edit the
Sendmail configuration with the following command:
sudo vi /etc/mail/sendmail.cf
4.13.1 Updating the SMTP domain name
In this file, there are several fields that can be modified. The first setting is the “domain name” of the WiDirect, this
is used to explicitly tell Sendmail what domain to use when addressing outbound email. For example, if the local
network's domain was “companyxyz.com”, find the following lines in the sendmail.cf file:
# my official domain name
# ... define this only if sendmail cannot automatically determine your domain
#Dj$w.Foo.COM
And change it to:
# my official domain name
# ... define this only if sendmail cannot automatically determine your domain
Dj$w.companyxyz.com
4.13.2 Adding an SMTP Relay
If a SMTP email is required on the network, this can be done by adding a DS entry to the sendmail.cf file. Find the
line in the sendmail.cf that looks like this:
# "Smart" relay host (may be null)
DS
If the local SMTP relay was smtp.companyxyz.com, change these lines to read:
# "Smart" relay host (may be null)
DSsmtp.companyxyz.com
4.13.3 Restarting the Sendmail Process
After making changes to the sendmail.cf, Sendmail can be restarted via an init script or simply rebooting the
WiDirect. To restart the process from the CLI, use the following command:
/etc/init.d/sendmail restart
4.14 Hosted WiDirect
The Hosted WiDirect service is available to allow network
operators to quickly deploy a wireless network without
purchasing a WiDirect. A WiClient is placed at each location
and is told to point back to the data center hosted by AllCity
Wireless.
Figure 5-3: Hosted WiDirect Menu
81
The GUI on the Hosted WiDirect is very similar to a regular WiDirect, but several features are removed from the
interface as they are not required. The Services menu is removed since all the services run on the WiClient.
Likewise the pages to add and configure access points are not on the Hosted WiDirect.
4.15 Disable Proceed Page When Using MAC Authentication
When MAC based authentication is used, the users will be brought to a splash page asking them to hit a button
before connecting to the network. The purpose of this page is to give the user a consistent experience, and to avoid
the problems when the user tries to login too many times simultaneously.
If you plan to disable the proceed page then the first thing you need to do is to open the Access Plan page and
increase the number of concurrent logins allowed for each access plan. The default value is one, and you will want to
increase that to a higher number, such as 15.
The next step is to modify the login page to automatically bypass this screen. From an SSH session, run the
following command:
sudo emacs /root/AWICP/www/portal/login/index.php
Scroll down to find this line:
$displayLoginMacAuth = 1;
On that line change the 1 to a 0, and exit by pressing Control-X followed by Control-C. After making the above
changes users will no longer see the proceed page. The users will still have to open a web browser before accessing
the internet.
4.16 Automatically Logout Dead Connections
Sometimes a user’s connection data counters will report no traffic even though the user has been on for a while.
While these connections are not a problem, it makes the active users page look better to have these extra connections
removed. There is a setting to log these connections out quicker than the idle timer if that is desired. Run this
command from the command line:
sudo emacs /root/AWICP/bin/awicp_manager.pl
Look for a line that says “my $MAX_DEAD_SECONDS = 0;” Change the 0 to the number of seconds a connection
with 0 data should be allowed to stay open.
4.17 Increased Customization of Login Page
The WiDirect includes some of the login page branding directly in the login page PHP files by default to make
branding easier. To get full control over the look and feel of the login page, this extra branding code can be removed.
To remove this extra code open the login page PHP file with this command:
sudo emacs /root/AWICP/www/portal/login/index.php
Scroll down to find this line:
$showLoginText = 1;
On that line change the 1 to a 0, and then exit the emacs text editor. The next step will be to modify the login
template. The following code will display the default login template when the regular login branding is disabled:
<html>
<head>
82
<link rel="stylesheet" href="/portal/branding//default//style.css" type="text/css">
</head>
<body background="/portal/branding//default//images/bg_body.jpg">
<br>
<br>
<div id="ctr" align="center"> <div class="login"> <div class="login-form">
<img
src="/portal/images/login.gif" alt="Login">
<div class="form-block">
%%LOGIN_FORM%%
</div>
</div>
<div class="login-text">
<p>Welcome to Network Network</p>
<p>Please enter a valid username and password to access the system.</p>
<br><h3>Need an account?</h3>
<a href="/portal/register/?ssid=%%PROFILE%%&mac=%%MAC%%&ap=%%AP%%&url=%%URL%%">Click
here to register</a></h3>
</p></div>
<div class="clr"></div><p><A
href="/portal/forgot/?ssid=%%PROFILE%%&mac=%%MAC%%&ap=%%AP%%&url=%%URL%%">Forgot
Password?</A></p><p><A
href="/portal/changepassword/?ssid=%%PROFILE%%&mac=%%MAC%%&ap=%%AP%%">Change
Password</A></p>
</div>
</div>
</div>
</body>
</html>
4.18 Enable SNMP Monitoring of the WiDirect
SNMP monitoring is available on the WiDirect to help the administrator monitor functions of the device. The
following commands will install and enable the SNMP server.
yum install net-snmp.i386
service snmpd start
chkconfig snmp on
That will give you basic SNMP information. The SNMP port must be opened on the WiDirect as well. Run this
command to edit the firewall:
emacs /etc/sysconfig/iptables
To open the SNMP port add this line:
-A INPUT -p udp -m udp --dport 161 -j ACCEPT
That line must be added before this line:
-A INPUT -i eth0 -j REJECT --reject-with icmp-port-unreachable
Save and exit the file. Restart the necessary processes with these commands:
service iptables restart
service awicp_client restart
83
The SNMP configuration may be edited by changing the /etc/snmp/snmpd.conf file. When making changes to the
SNMP configuration file restart the SNMP service with this command:
service snmpd restart
4.19 Automatic Login on Multiple Devices
Normally MAC based authentication only works for the last device to login on account. If the user logs in with a
second computer, then only the second computer will automatically login the next time. An administrator can
manually add a MAC address to be automatically authenticated on the user details page. There is a section at the
user details page to add an extra MAC address to an account for automatic login.
The WiDirect can also be customized to automatically add MAC addresses to an account when a user connects. Run
this command on the WiDirect to change that setting:
sudo emacs /root/AWICP/www/portal/login/index.php
Look for a line that says “$autoAddMac = 0;” and change it to read “$autoAddMac = 1;”. The WiDirect can be
configured to automatically delete extra MAC addresses when an account expires. To have the WiDirect
automatically delete the MAC addresses of expiring accounts first run this command:
sudo emacs /root/AWICP/bin/awicp_manager.pl
In that file look for a line that contains “$deleteExtraMacsOnExpire = 0” and change the 0 to a 1. Then run this
command to restart the service:
sudo /sbin/service awicp_manager restart
To automatically delete the MAC addresses when an administrator expires an account, run this command:
sudo emacs /root/AWICP/www/portal/admin/user.php
In that file look for the same “$deleteExtraMacsOnExpire = 0” part and change the 0 to a 1.
4.20 Account MAC Restrictions
In some scenarios it may be beneficial to limit the number of devices that are allowed to be associated with an
account. By default additional connections will simply disconnect the previous connections. The WiDirect allows
the administrator to restrict an account to a certain number of MAC addresses. If the user attempts to login with
additional devices then the login attempt will be denied. To edit this setting first run this command:
sudo emacs /root/AWICP/www/portal/login/index.php
In that file look for the option “$restrictMAC = 0”. The first option should be set to the number of MAC addresses
each account is allowed to use. The second option is the number of days back to check, or 0 to use their last
activation date.
4.21 Enable Refunds
Refunds are disabled by default on the WiDirect. When refunds are enabled payments can be refunded from the
purchase history page. To enable refunds run this command from an SSH session:
sudo emacs /root/AWICP/www/portal/admin/purchase_history.php
84
Once that file is open edit the line “$enableRefund=0” by changing the 0 to a 1. After that change any administrator
will be able to refund Authorize.net payments.
4.22 Failed Login Reports
Failed login reports are available to log failed connection attempts. To enable failed login logs first run this
command:
sudo emacs /root/AWICP/www/portal/login/index.php
In that file look for the line that says “$logLoginFailures = 0” and change the 0 to a 1. Making that change will
enable the logging of invalid usernames and passwords, which is available on the reports page.
4.23 Creating Profile Specific User and Administrator Accounts
One option on a WiDirect network is to permanently associate a user account with a profile. Instead of a regular
username the username will contain “@Profile Name” at the end of it. This functionality allows for additional usage
reports, and for profile specific administrators. A profile administrator is only able to view users and make
customizations for their profile. The table below outlines the changes that need to be made for this functionality.
File
/root/AWICP/www/
/register/index.php
Change From
$profileInUsername=0
Change To
$profileInUsername=1
/root/AWICP/www/portal/admin/adminusers.
php
$showProfileAdminOption
=0
$showProfileAdminOption
=1
/root/AWICP/www/portal/admin/reports/text.
php
$showMoreReports = 0;
$showMoreReports = 1;
/root/AWICP/bin/awicp_manager.pl
$logActiveUsers = 0;
$logActiveUsers = 1;
/root/AWICP/www/portal/classes/Common.p
hp
$hideDeletedUsers = 0;
$hideDeletedUsers = 1;
Notes
Forces the username to
include the profile in the
suffix.
Adds the profile
administrator option on
the admin users’ page.
Shows additional usage
reports broken down by
profile.
Enables the creation of
reports for active user
counts per profile.
Hides deleted users
instead of displaying
them. Enables accurate
active user history logs.
4.24 Multiple WiDirect Hot Standby
In some scenarios it may be advisable to have multiple WiDirect units running side by side in the event that one
fails. In the unlikely event that a WiDirect fails, the other one will perform all the WiDirect functions.
Many of the steps below will require root access to the WiDirect. This command can be run initially to obtain root
access:
su -
4.24.1 Overview
Setting up multiple WiDirects for failover is complicated, but provides benefits in the event one of the units fails.
Only one WiDirect is going to be active at anytime, but the second one will have a constant backup of all the
important data from the first WiDirect. If one WiDirect fails, then the other one is still able to manage the network.
85
Each of the WiDirects is going to have a local IP address on the eth0 and eth1 interfaces. The WiDirects are also
going to have a shared IP address on each interface.
4.24.2 Configure Hostname
It is important for hostnames to be properly set on both WiDirects. Open the network file to edit the hostname by
using this command:
sudo emacs /etc/sysconfig/network
After setting the hostname restart the WiDirect.
4.24.3 Install Packages
A number of packages are required to be installed to configure WiDirect failover. Run this command first:
emacs /etc/yum.repos.d/clusterlabs.repo
Add this text to the text file:
[clusterlabs]
name=High Availability/Clustering server technologies (epel-5)
baseurl=http://www.clusterlabs.org/rpm/epel-5
type=rpm-md
gpgcheck=0
enabled=1
Save the file and run these commands:
yum clean all
wget http://download.fedora.redhat.com/pub/epel/5/i386/epel-release-5-4.noarch.rpm
rpm -i epel-release-5-4.noarch.rpm
yum remove awicp_reloaders
yum install awicp_reloaders_ha drbd83 kmod-drbd83* heartbeat pacemaker
4.24.4 Create Firewall Rules
A number of ports need to be opened for the services to work properly. TCP ports 7788 through 7799 need to be
opened for the shared drive functionality to work. UDP port 694 must be opened for the process monitoring services
to work. Add these lines to the top portion of the iptables file:
-A INPUT -i eth0 -p tcp -m tcp --dport 7788:7799 --tcp-flags SYN,RST,ACK SYN -j ACCEPT
-A INPUT -i eth0 -p udp -m udp --dport 694 -j ACCEPT
4.24.5 Configure Local Services
service mysqld stop
chkconfig mysqld off
service dhcpd stop
chkconfig dhcpd off
service dnsmasq stop
chkconfig dnsmasq off
service httpd stop
86
chkconfig httpd off
rm -rf /etc/rc3.d/*awicp*
4.24.6 Create Shared Drive
Both WiDirects are going to share storage space for data that will be shared between them.
There is empty space available on the hard drive for the shared drive. Run these commands on both WiDirects to
create the partitions:
lvm
lvcreate --size 8G -n LogVol02 VolGroup00
exit
emacs /etc/drbd.conf
Below is an example DRBD configuration file.
resource drbd0 {
protocol C;
handlers {
split-brain "/usr/lib/drbd/notify-split-brain.sh [email protected]";
fence-peer "/usr/lib/drbd/crm-fence-peer.sh";
after-resync-target "/usr/lib/drbd/crm-unfence-peer.sh";
}
startup {
degr-wfc-timeout 120;
wfc-timeout 120;
}
disk {
on-io-error detach;
fencing resource-only;
}
net {
timeout 120;
connect-int 20;
ping-int 20;
max-buffers 2048;
max-epoch-size 2048;
ko-count 30;
cram-hmac-alg "sha1";
shared-secret "MakeThisSecretSecure";
}
syncer {
rate 10M;
al-extents 257;
}
on f1.awi6.net {
device /dev/drbd0;
disk /dev/VolGroup00/LogVol02;
address 10.8.9.123:7788;
meta-disk internal;
}
on f2.awi6.net {
87
device /dev/drbd0;
disk /dev/VolGroup00/LogVol02;
address 10.8.2.224:7788;
meta-disk internal;
}
}
After the configuration file is saved the next step is to create the drive metadata. These commands need to be run on
both WiDirects:
drbdadm create-md drbd0
drbdadm up drbd0
mkdir /shared
service mysqld stop
mkdir /root/AWICP/license
chmod -R a+rw /root/AWICP/license
cp /root/AWICP/etc/awicp.serial /root/AWICP/license
After those commands have been run on both WiDirects, one WiDirect needs to be identified as the initial primary
device. Run these commands to identify the primary WiDirect:
drbdsetup /dev/drbd0 primary -o
mke2fs -j /dev/drbd0
e2fsck /dev/drbd0
mount /dev/drbd0 /shared
mv /var/lib/mysql /shared/mysql
ln -s /shared/mysql /var/lib/mysql
mv /root/AWICP/www/portal/branding /shared/
ln -s /shared/branding /root/AWICP/www/portal/branding
mv /root/AWICP/etc /shared
ln -s /shared/etc /root/AWICP/etc
mv /root/AWICP/logs /shared/
ln -s /shared/logs /root/AWICP/logs
mv /root/AWICP/monitor-data /shared/
ln -s /shared/monitor-data /root/AWICP/monitor-data
mv /root/AWICP/db /shared/
ln -s /shared/db /root/AWICP/db
mv /etc/dhcpd.conf /shared/etc/dhcpd.conf
ln -s /shared/etc/dhcpd.conf /etc/dhcpd.conf
mv /var/lib/dhcpd /shared/
ln -s /shared/dhcpd /var/lib/dhcpd
One more step is required to modify the file locations on the secondary WiDirect:
mv /var/lib/mysql /var/lib/mysql.backup
ln -s /shared/mysql /var/lib/mysql
mv /root/AWICP/www/portal/branding /root/AWICP/www/portal/branding.backup
ln –s /shared/branding /root/AWICP/www/portal/branding
mv /root/AWICP/etc /root/AWICP/etc.backup
ln –s /shared/etc /root/AWICP/etc
mv /root/AWICP/logs /root/AWICP/logs.backup
ln -s /shared/logs /root/AWICP/logs
mv /root/AWICP/monitor-data /root/AWICP/monitor-data.backup
ln -s /shared/monitor-data /root/AWICP/monitor-data
mv /root/AWICP/db /root/AWICP/db.backup
88
ln -s /shared/db /root/AWICP/db
mv /etc/dhcpd.conf /etc/dhcpd.conf.backup
ln -s /shared/etc/dhcpd.conf /etc/dhcpd.conf
mv /var/lib/dhcpd /var/lib/dhcpd.backup
ln -s /shared/dhcpd /var/lib/dhcpd
4.24.7 Configure Services for Failover
The first step on both devices is to create the Heartbeat configuration file. Run this command to edit that file:
emacs /etc/ha.d/ha.cf
Edit that file to contain the following text:
logfile /var/log/ha-log
autojoin none
bcast eth0
warntime 5
deadtime 15
initdead 60
keepalive 2
crm yes
node node1.awi6.net
node node2.awi6.net
The last two lines should be modified for the appropriate hostnames for the WiDirect. Run this command on both
devices to edit the keys file:
touch /etc/ha.d/authkeys
chmod 600 /etc/ha.d/authkeys
emacs /etc/ha.d/authkeys
The following text can be added to create a simple authkeys file:
auth 2
2 sha1 test-ha
A more secure authkeys file can be generated from the command line with the below command. That authkeys file can then be copied to the other WiDirect.
( echo –ne “auth 1\n1 sha1” \
Dd if=/dev/urandom bs=512 count=1 | openssl md5) \
> /etc/ha.d/authkeys
chmod 600 /etc/ha.d/authkeys
(From the Linux High Availability User’s Guide, http://linux-ha.org)
After those files have been updated the Heartbeat service can be started with these commands:
service heartbeat start
chkconfig heartbeat on
The next step will be to configure each of the individual services for failover. Run this command from the command
line to start configuring the services:
crm configure
89
In the crm configuration window run these commands to configure the service for automatic failover:
primitive awicp_ap_ping_monitor lsb:awicp_ap_ping_monitor
primitive awicp_ap_snmp_monitor lsb:awicp_ap_snmp_monitor
primitive awicp_bandwidth_manager lsb:awicp_bandwidth_manager
primitive awicp_client lsb:awicp_client
primitive awicp_client_radius_listener lsb:awicp_client_radius_listener
primitive awicp_clientwatcher lsb:awicp_clientwatcher
primitive awicp_gardencrawler lsb:awicp_gardencrawler
primitive awicp_manager lsb:awicp_manager
primitive awicp_preproxy lsb:awicp_preproxy
primitive awicp_watchdog lsb:awicp_watchdog
primitive dhcpd lsb:dhcpd
primitive dnsmasq lsb:dnsmasq
primitive drbd_mysql ocf:linbit:drbd \
params drbd_resource="drbd0" \
op monitor interval="15s" \
op start interval="0" timeout="240s" \
op stop interval="0" timeout="100s"
primitive fs_mysql ocf:heartbeat:Filesystem \
params device="/dev/drbd0" directory="/shared" fstype="ext3" \
op start interval="0" timeout="60s" \
op stop interval="0" timeout="60s"
primitive httpd lsb:httpd
primitive ip_dhcp ocf:heartbeat:IPaddr2 \
params ip="10.4.1.1" nic="eth1" cidr_netmask="24"
primitive ip_mysql ocf:heartbeat:IPaddr2 \
params ip="10.8.1.10" nic="eth0" cidr_netmask="16"
primitive mysqld lsb:mysqld
group mysql fs_mysql ip_mysql ip_dhcp mysqld dnsmasq httpd dhcpd awicp_client awicp_preproxy
awicp_ap_ping_monitor awicp_ap_snmp_monitor awicp_client_radius_listener awicp_bandwidth_manager
awicp_clientwatcher awicp_gardencrawler awicp_manager awicp_watchdog
ms ms_drbd_mysql drbd_mysql \
meta master-max="1" master-node-max="1" clone-max="2" clone-node="max=1" notify="true"
location drbd-fence-by-handler-ms_drbd_mysql ms_drbd_mysql \
rule $id="drbd-fence-by-handler-rule-ms_drbd_mysql" $role="Master" -inf: #uname ne f2.awi6.net
location prefer-t1 drbd_mysql 50: t1.awi6.net
colocation mysql_on_drbd inf: mysql ms_drbd_mysql:Master
order mysql_after_drbd inf: ms_drbd_mysql:promote mysql:start
property $id="cib-bootstrap-options" \
dc-version="1.0.12-unknown" \
cluster-infrastructure="Heartbeat" \
stonith-enabled="false"
4.24.8 Further Configuration
It is important that the WiClients page be configured correctly when using multiple devices in one network. The
GWID field is typically the MAC address of the eth1 interface on the WiDirect or WiClient with the colons
removed. When using multiple devices the Secondary GWID field should be filled in with the MAC address of eth1
of the second device.
If failover is being used on the primary WiDirect, then it is important to rename the client to something other than
“Local WiDirect.” If the client name is not changed then the primary GWID will be reset to the MAC address of
whichever device is primary when the WiDirect starts up.
90
4.24.9 Failover Recovery
In many instances the two WiDirects will automatically recover, and no manual intervention will be necessary. In
some instances, most notably if both WiDirects think they have been running independently of one another, the
drives will be out of sync, which is known as a split brain condition. To recover from a split brain condition the
administrator must determine which drive has newer data, and overwrite the contents of the drive with the older data.
On the WiDirect with the out of date data, this command should be run:
drbdadm -- --discard-my-data connect drbd0
The other WiDirect should run this command:
drbdadm connect drbd0
If the above commands fail, some additional commands may need to be run on both devices before bringing
everything back up:
service heartbeat stop
service drbd restart
After running the commands to sync the drives again, these commands will restart the failover services:
service drbd stop
service heartbeat start
4.24.10 Software Updates
These instructions do not cover how to handle software updates when running multiple WiDirect in a failover
scenario. Certain functionality may stop working after an update is completed, and some configuration changes may
need to be applied again. AllCity Wireless employees can give instructions on how to update WiDirects that are
being used in a high availability environment.
4.25 Performing a System Backup
In order to backup the WiDirect, SSH to the WiDirect (Section 2.1) and run the following commands:
cd /root/AWICP/bin
sudo ./doBackup.sh
This will create a backup image of the WiDirect. After the backup is complete, the system will prompt:
Would you like to burn this backup directly to a CD[y/n]
If a CD backup is desired you must connect a USB recordable CD drive to the WiDirect, insert a BLANK recordable
CD into a USB CD drive and enter 'y', otherwise type 'n' and Enter.
After the backup is complete, the WiDirect will tell you where the backup tar file is on the WiDirect, which can be
retrieved via SCP to another server.
Dump complete. You can pull the file from /root/backup-XXXXXX.tar.gz
To SCP the backup file to another server, use this command:
scp /root/backup=XXXXXX.tar.gz [email protected]:.
91
(Where username and a.b.c.d are actual hostanames and IP addresses)
Backup files can also be saved to a thumb drive with the following commands:
sudo mount /dev/sdb1 /mnt
sudo cp /root/backup-XXXXXXXX.tar.gz /mnt/.
sudo umount /dev/sdb1
4.26 Performing a System Recovery
In order to restore a backup, SSH to the WiDirect (Section 2.1) and copy the backup file to the WiDirect into the
/tmp directory. This can be done several different ways as described below.
SCP
sudo scp [email protected]:backup-XXXXX.tar.gz /tmp/.
CD-R
sudo mount /dev/cdrom /mnt
sudo cp /mnt/backup-XXXXXX.tar.gz /tmp/.
sudo umount /dev/cdrom
Thumbdrive
sudo mount /dev/sdb1 /mnt
sudo cp /mnt/backup-XXXXXX.tar.gz /tmp/.
sudo umount /dev/sdb1
Once the backup file is run on the WiDirect, perform the backup with the following commands.
1. CD to the tmp directory
cd /tmp
2. Gunzip the file
sudo gunzip /tmp/backup-XXXXXX.tar.gz
3. Untar the file. Use this tar command with the exact options
sudo tar xfP /tmp/backup-XXXXXX.tar
4. Cd to the newly created directory, which will always be /root/backup-XXXXX
cd /root/backup-XXXXXX
5. Run the backup command
NOTE: Run this command from this directory only (as described in step 4)
sudo ./recoverBackup.sh
6. Reboot the WiDirect
sudo reboot
Note: If you are performing a recovery to a new physical WiDirect, a new license will need to be installed after the
recovery. Contact [email protected] for a new license.
92
5 Administration & Maintenance
5.1 Active Users
A list of active users can be displayed. It will provide the locale they are in while accessing, how long they have
been on, how much traffic they have passed, and a button is available to log the user off. Other information
available is current IP address and MAC address of user.
5.2 Event Viewer
Under the Event Viewer various messages are displayed with severity of event and a timestamp. If Access Points
are rebooting or Clients are unresponsive the event viewer would report it, as well as when the last time an
Administrator logged into the WiDirect Management Console. The Event Viewer is also able to be sorted by date,
severity, or event description.
5.3 AP Status and Transit Link Graph
The Transit Link (TL) Graph is a visual representation of Access Points communicating with each other. The TL
graph will show if all APs are connected and the strength of the TL signal between them. If an AP is orphaned, it
will not show a connection to the other access points.
5.4 System Check
By clicking on System Check, the WiDirect displays a list of all the services the WiDirect is running. Green checks
indicate that all systems are functioning properly. If a service is not running it can be forced to restart. Below the
services information portion of the page is information that pertains to connectivity. IP, Time, and routing
information are available on the System Status page.
5.5 System Verification
5.5.1 Verify Processes
Under the Admin page, there is a System Status->System Check button. This page analyzes all the running process
and provides and up/down process. If for any reason a process is disabled, you can click on the Control button next
to each process in order to re-enable it.
As for the WiDirect specific processes, there is an internal watchdog program that will automatically restart any
WiDirect process that should be running.
5.5.2 Verify Captive Portal Features
Once the WiDirect has been setup, verification of the Captive Portal features requires a laptop to be able to associate
to the Wireless mesh. Once connected to an Access Point, try connecting to a web page such as
www.google.com. If the Captive Portal is working probably (and www.google.com is not in the walled
garden), the WiDirect will intercept the web request and present the Captive Portal Login page.
93
5.5.3 Speed Testing
The WiDirect has built in speed monitoring software. To view the output of this program in real time, SSH into the
WiDirect box as user 'portal' and execute this command:
bwm-ng
Another test is to use http://www.speedtest.net while connected to the mesh. This URL allows you to choose a
server that is geographically located close to the network. Click on the server to use and a speed will automatically
run that provides both download and upload speeds.
A utility called iptraf is also available to monitor how much traffic is coming from each user on the WiDirect. Run
the following command from the command line to install the iptraf utility:
sudo yum –y install iptraf
After the iptraf utility is installed it can be run using the
following command:
sudo iptraf
To view the devices currently connected on the wireless
network choose LAN Station Monitor from the first
menu, then choose the interface eth1. The next screen, as
shown in figure 5-1, will show the devices currently
connected along with how much bandwidth each one is
using.
Figure 5-1: Monitoring Bandwidth with iptraf
5.5.4 Ping Test
To verify connectivity to the Wireless Gateway or to an Access point, an Administrator can send a ping from the
WiDirect to the Wireless gateway. Click on Tools->Ping on the Admin page and enter the IP address of an access
point.
5.5.5 DNS
Figure 5-2: Ping Results
Verification
To verify DNS service, use the Tools->DNS Query tool. Try looking up a public web server such as
www.google.com or www.yahoo.com.
94
5.5.6 Verify APs
Clicking on the System Status->Ap Status page will provide a list of all the Access Points that are currently
monitored by the WiDirect. This page provides a quick way to verify the operation of the Access Points.
Figure 5-2: Access Point Status Page
95
6 Software
6.1 Software Upgrades & Patching
Upgrades are available on a remote server for customers on an active support contract. To find more details about
the upgrades available, please contact the support number for this product.
To activate the upgrade:
1) Perform backup as per instructions in section 4.9.
2) Run “sudo yum update awicp*” from the command line.
6.2 Logs and Log Rotation
Via the Systems Configuration menu. Administrators can use the Log Viewer to view and download various system
log files. In addition to viewing a static log, the ability to view log files in real-time is enabled by default to assist in
network performance monitoring and troubleshooting.
All log files are rotated every night automatically. Each log file can be a maximum of 1 Mb in size and only the last
five log rotations are kept.
6.3 Log Location
Most standard logs can be viewed from the Admin interface menu System Configuration -> Logs. However, if you
want more detailed log analysis, SSH to the WiDirect and locate the following log files:
radius /var/log/radius/radius.log
dhcpd /var/log/messages
awicp /root/AWICP/logs/portal.log
awicp-manager /root/AWICP/logs/manager.log
general syslog /var/log/messages
nortel messages /var/log/nortel.log
ftp log
/var/log/xferlog
96
7 Hardware Diagrams
This section shows the physical port layout of the WiDirect. Figure 7-1 shows the front of the WiDirect
Figure 7-1: Front of WiDirect
The front of the WiDirect consists of a power button and a reset button.
The LEDs from left to right are temperature alarm, Eth1 network activity, Eth0 network activity, hard disk activity,
and Power.
Figure 7-2 shows the back of the Base WiDirect ACW 50.
Figure 7-2: Back of the WiDirect
The important ports on the back of the WiDirect are Serial, Eth0, and Eth1. The serial port (green 9 pin) can be used
with a null modem cable (9600 baud) to reach the Command Line prompt.
Eth0 and Eth1 are the network connections on the WiDirect. The Eth0 should be plugged into the Internet side and
the Eth1 should be connected to the “Wireless mesh side” of the network.
Warning: The mouse, keyboard and monitor ports are active and can be used if needed. However, if a keyboard is
plugged into the WiDirect, it should not be removed unless the system is first shut down.
97
Figure 7-3 shows the back of the WiDirect Pro and WiDirect Enterprise.
Figure 7-3: Back of the WiDirect Pro and WiDirect Enterprise
The important ports on the back of the WiDirect Pro and Enterprise are Serial, Eth0, Eth1, Eth2 and Eth 3. The serial
port (green 9 pin) can be used with a null modem cable (9600 baud) to reach the Command Line prompt.
Eth0 and Eth1 are the network connections on the WiDirect. The Eth0 should be plugged into the Internet side and
the Eth1 should be connected to the “Wireless mesh side” of the network.
Warning: The mouse, keyboard and monitor ports are active and can be used if needed. However, if a keyboard is
plugged into the WiDirect, it should not be removed unless the system is first shut down.
Figure 7-4 shows the Front of the WiDirect Micro
Figure 7-4: Front of WiDirect Micro
98
Figure 7-5 shows the back of the WiDirect Micro:
Figure 7-5: Back of WiDirect Micro
The important ports on the back of the WiDirect Micro are Serial, Eth0, and Eth1. The serial port (far left) can be
used with a null modem cable (38,400 baud) to reach the Command Line prompt.
Eth0 and Eth1 are the network connections on the WiDirect. The Eth0 should be plugged into the Internet side and
the Eth1 should be connected to the “Wireless mesh side” of the network.
Figure 7-6 Shows the Back of the WiDirect Carrier:
Figure 7-6 Back of WiDirect Carrier
The important ports on the back of the WiDirect Pro and Enterprise are Serial, Eth0, Eth1, Eth2, Eth3, Eth4, Eth5.
The serial port (green 9 pin) can be used with a null modem cable (9600 baud) to reach the Command Line prompt.
Eth0 and Eth1 are the network connections on the WiDirect. The Eth0 should be plugged into the Internet side and
the Eth1 should be connected to the “Wireless mesh side” of the network.
Warning: The mouse, keyboard and monitor ports are active and can be used if needed. However, if a keyboard is
plugged into the WiDirect, it should not be removed unless the system is first shut down.
99
8 Technical Support
Support Contact Details
Dedicated Phone Support: (443) 294-0000
Dedicated e-mail support: [email protected]
Self-support:
www.allcitywireless.com/support
Corporate Address:
326 First Street Suite 23
Annapolis, MD 21403
100