1
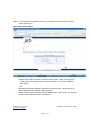
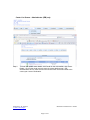
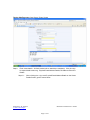
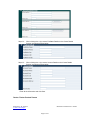
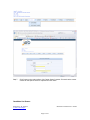
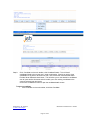
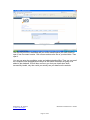
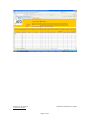
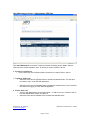
IEB CP Web Application User Manual
Prepared by: R. Viktorin
V-Soft Technologies
Version 2.0.0
Modified on 28/02/2011 2:38 PM
Page 1 of 21
Introduction
IEB-online Web Application is an essential tool for entering candidates, exam
centre and subjects Details into IEB database. Simply follow the steps in this
manual to submit your data-entries to the IEB.
Please Note:
Before attempting to run the IEB Web application please follow the
following steps. If these steps are not followed incorrect data will be
displayed on your web pages.
1. Internet Explorer setting changes
•
•
•
•
•
•
Open Internet Explorer
Click the Tools menu on the main toolbar, click Internet Options…
Under the General Tab, Temporary Internet Files, click the Settings… button
Select the Every visit to the page option under the Check for newer versions of
stored pages.
Click the OK button and then the Apply button.
Close the Window
2. Please change settings to allow pop-up’s on this website
Prepared by: R. Viktorin
V-Soft Technologies
Version 2.0.0
Modified on 28/02/2011 2:38 PM
Page 2 of 21
Getting started on the IEB-ONLINE WEBSITE
IEB Login Page
Step 1:
Open Internet Explorer. Type http://www.ieb-online.co.za in the address bar.
Step 2:
For first time users; click on register and you will be taken to the registration screen.
For registered users: Enter your user name and password and click the ‘Login’
button. Registered users proceed to Step 4 in the user manual.
Prepared by: R. Viktorin
V-Soft Technologies
Version 2.0.0
Modified on 28/02/2011 2:38 PM
Page 3 of 21
Registration Screen
Step 3:
Enter details for the user who will be capturing information for the selected sectors e.g.
NSC, GETC. Select center. Click on the required sector under the available sector,
click on the double arrow >> to move the available sector to the selected sector. To
remove the ‘Selected Sector’ click on the double arrow (<<).
Please note that fields marked with an asterisk are mandatory.
Enter a user name and password and click Save. This information will be sent to the
IEB who will add the user to the system and send you an email confirming registration.
The user will only be able to log into the system once notification has been received
from the IEB (i.e. Wait for response from IEB before you continue to log in to the
system).
Prepared by: R. Viktorin
V-Soft Technologies
Version 2.0.0
Modified on 28/02/2011 2:38 PM
Page 4 of 21
Step 4: If your username and password are correct, you are taken to the Year /Sector / Exam
Screen upon login in.
Year / Sector / Exam Screen
•
•
Select the year, exam and sector from the drop down menus. Users can return to this
screen at any time by clicking Home on the main toolbar or by clicking on Settings,
Year / Sector.
NB.
Note that all information captured will pertain to this specific exam, year and sector e.g.
new candidate capture, candidate subject linking etc.
Should you wish to enter information about a different exam, year or sector, you will need
to return to this screen and make a new selection.
Prepared by: R. Viktorin
V-Soft Technologies
Version 2.0.0
Modified on 28/02/2011 2:38 PM
Page 5 of 21
Center List Screen – Administrator (IEB) only
Step 5:
To enter and update center details, click Center on the main toolbar, click Center
Details. Click on the center name to enter the center details screen. IEB
administrators will only have access to the centers which have been linked to the
current year / sector combination.
Prepared by: R. Viktorin
V-Soft Technologies
Version 2.0.0
Modified on 28/02/2011 2:38 PM
Page 6 of 21
Center details screen Year /Sector / Exam Screen
Step 6:
Enter center details. All fields marked with an asterisk are mandatory. Click plus sign
to expand detail screens e.g. Physical/Postal Address Details, Facilitator and Account
Details.
Step 6.1:
When clicking the + sign next Physical/Postal Address Details on the Center
Details Screen, get the screen below.
Prepared by: R. Viktorin
V-Soft Technologies
Version 2.0.0
Modified on 28/02/2011 2:38 PM
Page 7 of 21
Step 6.2:
When clicking the + sign next to Facilitator Details on the Center Details
Screen, and get the screen below
Step 6.3:
When clicking the + sign next to Account Details on the Center Details
Screen, and get the screen below
Enter all the information and click Save.
Center / Sector Contact Screen
Prepared by: R. Viktorin
V-Soft Technologies
Version 2.0.0
Modified on 28/02/2011 2:38 PM
Page 8 of 21
Step 7:
Click Center on the main toolbar, click Center Sector Contacts. Ensure that the correct
contact for the specific sector is captured and click Save.
Candidate List Screen
Prepared by: R. Viktorin
V-Soft Technologies
Version 2.0.0
Modified on 28/02/2011 2:38 PM
Page 9 of 21
Step 8:
Click Candidate on the main toolbar, click Candidate Details. This will list all
candidates linked to the current year / sector combination. Should you wish to view
candidates for all years or all sectors or both, click the Exclude Year Selected and/or
Exclude Sector Selected check boxes. This will allow you to view details for candidates
over all years and/or all sectors and will enable you to link existing candidates to the
currently selected year and sector.
Click on the candidate surname to open the candidate details screen.
To enter a new candidate,
• Click Candidate on the main toolbar, click New Candidate.
Prepared by: R. Viktorin
V-Soft Technologies
Version 2.0.0
Modified on 28/02/2011 2:38 PM
Page 10 of 21
Candidates Details Screen
Enter candidate details.
• All fields marked with an asterisk are mandatory. Click plus sign to expand detail
screens e.g.
Current Exam/Subject Details:
Prepared by: R. Viktorin
V-Soft Technologies
Version 2.0.0
Modified on 28/02/2011 2:38 PM
Page 11 of 21
Step 10: The Current Exam/Subject Details screen displays exams and subjects to which the
candidate is currently linked for the selected year/sector combination. Click exam (eg.
200612) under Selected Exams and the selected subjects will be displayed.
Click Link Exam/Subjects to link the candidate to other exams and subjects.
Candidate Exam/Subject linking Screen
Step 10.1:Select the exam that you wish to link the candidate to from the Exams drop down
menu. Click on the required subject under the Available Subjects heading, click on the
double arrow >> to move the Available Subject to the Selected Subjects heading.
Repeat until all required subjects have been moved to Selected Subjects. To remove
Selected Subjects, click on the subject and click on the double arrow <<. Click Save.
Prepared by: R. Viktorin
V-Soft Technologies
Version 2.0.0
Modified on 28/02/2011 2:38 PM
Page 12 of 21
Exam/Subject History Details
Step 11: This section is reached by clicking on the plus sign on the candidate details screen
(see Step 9). This information displays the candidate history. Should you wish to
make changes to these subjects, click on Settings, Year/Sector settings and select the
Year & Sector from the drop down menus.
How to generate Reports
Centre \Candidate Report Details Report
Step 1.0 Click Reports on the main Toolbar then click on Centre Candidate Details you
are taken to the reports screen.
Prepared by: R. Viktorin
V-Soft Technologies
Version 2.0.0
Modified on 28/02/2011 2:38 PM
Page 13 of 21
Reports screen.
Step 2.0 You can choose the sectors that will appear in the report, from the Available
Sector list using >> selecting button and unselecting them using the << button
from the Selected List. Then click the submit button
You will get a report that has details for your centre, candidates and subjects.
Prepared by: R. Viktorin
V-Soft Technologies
Version 2.0.0
Modified on 28/02/2011 2:38 PM
Page 14 of 21
How to download Spread sheet Files
NB (This option can only be used by those who can not enter the candidate, centre
exams and subjects details online)
Click on Downloads on the main tool bar and click on File Downloads.
Prepared by: R. Viktorin
V-Soft Technologies
Version 2.0.0
Modified on 28/02/2011 2:38 PM
Page 15 of 21
Click the file you want to download and you will be asked whether you want to save or
open it from its current location. Click on save and save the file on your hard drive. Then
open it.
You can now enter the candidate, centre and subjects details offline. Then you can email
the completed excel spreadsheet document to IEB where the details are going to be
added to the database. IEB will then confirm to you that your details have been
successfully loaded, only then could you actually see your details on the website.
Prepared by: R. Viktorin
V-Soft Technologies
Version 2.0.0
Modified on 28/02/2011 2:38 PM
Page 16 of 21
Prepared by: R. Viktorin
V-Soft Technologies
Version 2.0.0
Modified on 28/02/2011 2:38 PM
Page 17 of 21
How to Maintain Users of the System
1.
To edit currently logged on users
• Select your Center from the Center dropdown menu.
• Click User Maintenance on the Main Toolbar. To update the currently logged on user’s
detail click on the username in the table and check the Change Password box to change
the existing password on the User Details Screen – User Only that pops out
User Details Screen – User Only
Click Save.
Prepared by: R. Viktorin
V-Soft Technologies
Version 2.0.0
Modified on 28/02/2011 2:38 PM
Page 18 of 21
User Maintenance Screen – Administrator (IEB) only
Click User Maintenance on the Main Toolbar to maintain all existing User’s details. Select a
Centre from the Centre dropdown menu, for which you wish to view the user list.
2. To search for a specified user
• Enter a User and click the Search button to Search for a specific User in the list.
3. To enable or disable a user
• Select the Users and click Enable Users to enable the selected Users. This will allow
the Users to log in to the IEB web application.
•
Select the Users and click Disable Users to disable the selected Users. This will restrict
the Users from logging in to the IEB web application.
4. To add or delete a user
• Click on User Maintenance on the main toolbar. To add a new user, click New User on
the User Maintenance toolbar. See Step 13.
• Select the Users and click Delete Users to delete the selected Users.
Prepared by: R. Viktorin
V-Soft Technologies
Version 2.0.0
Modified on 28/02/2011 2:38 PM
Page 19 of 21
New Users Details Screen
:
For a new user fill all the required fields (Note that fields with asterisk are are mandatory)
• Select the User Type the User should be assigned to. This will determine the Users
rights on the Web application.
• Check the Enabled box to enable the User, Un-check the Enabled box to disable the
User.
• Link the User to Sector by clicking on the required sector under the Available Sectors
heading, click on the double arrow >> to move the Available Sectors to the Selected
Sectors heading. Repeat until all required Sectors have been moved to Selected
Sectors.
• To remove Selected Sectors, click on the sector and click on the double arrow <<.
• Check the Change Password box to change the existing password.
• Check the Enforce Password Change box to force the user to change their password
the next they login to the IEB Web Application.
• Click Save.
Prepared by: R. Viktorin
V-Soft Technologies
Version 2.0.0
Modified on 28/02/2011 2:38 PM
Page 20 of 21
How to Log out of the System
Logout Screen
Click Logout on the main toolbar to logout of the IEB Web Application. For Security purposes, if
there is no activity on the Website for 5 minutes the application will log the User out automatically.
Click Logon to go back to the Logon Screen
Prepared by: R. Viktorin
V-Soft Technologies
Version 2.0.0
Modified on 28/02/2011 2:38 PM
Page 21 of 21