1
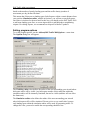
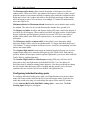
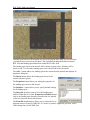
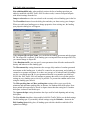
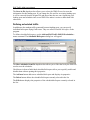
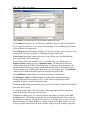
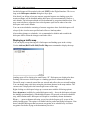
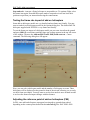
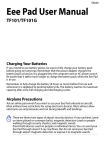
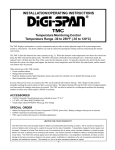
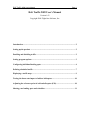
Heli Traffic 2009 User’s Manual
Page 1
Heli Traffic 2009 User’s Manual
Version 1.03
Copyright 2009 Flight One Software, Inc.
Introduction..................................................................................................................... 2
Setting up the product .................................................................................................... 2
Enabling and disabling traffic........................................................................................ 2
Setting program options ................................................................................................. 3
Configuring individual landing spots ............................................................................ 4
Defining scheduled traffic............................................................................................... 7
Displaying a traffic map ................................................................................................. 9
Testing the frame rate impact of add-on helicopters.................................................. 10
Adjusting the reference point of add-on helicopters (FS9)......................................... 10
Sharing your landing spots and schedules................................................................... 11
Heli Traffic 2009 User’s Manual
Page 2
Introduction
Heli Traffic 2009 is a module for Microsoft Flight Simulator X and Microsoft Flight
Simulator 2004 that adds helicopter AI traffic.
Flight Simulator natively supports only fixed-wing aircraft for AI traffic. Heli Traffic
2009 adds the ability to have AI helicopters. With Heli Traffic 2009, you can instantly
bring action to your helipads. You will get various kinds of helicopter traffic using any of
the helicopter models you have installed.
There are excellent customization options allowing you to determine the helicopters used
and the amount of traffic at every individual landing spot. For landing spots, Heli Traffic
2009 uses helipads defined in FS airports. You can also add extra landing spots from
within the program.
In addition to the program-generated random traffic, you can define individual
helicopters flying a fixed schedule.
All Heli Traffic 2009 functions are accessible through the Add-ons menu in FSX and
through the Flight1 menu in FS9. This manual refers to the Add-ons menu. FS9 users
should use the Flight1 menu instead.
Setting up the product
During the installation, a ModuleInstaller window will appear offering to install the FS
modules. You should check the FSX/FS9 paths and click Install Flight Simulator
module(s). This will install the module(s).
To uninstall the program, use the Uninstall command from its Start menu entry.
Enabling and disabling traffic
To enable or disable helicopter traffic generated by Heli Traffic 2009, use the Addons|Heli Traffic 2009|Enabled menu item (Flight1 menu item in FS9).
When you enable traffic, AI helicopters will appear, some of them in the air, others
parked at landing spots. The number of helicopters that appear simultaneously is chosen
Heli Traffic 2009 User’s Manual
Page 3
based on the number of nearby landing spots and the traffic density (number of
movements per day) defined for them.
This means that if there are no landing spots for helicopters within a certain distance from
your position (Simulation radius, settable in Options), you will not see any helicopters,
since there is nowhere for them to land. In this case, you should use the Heli Traffic 2009
to add some landing spots first, or use an airport editor to add helipads to neighboring
airports. For editing airports, we recommend our Airport Facilitator X product.
Setting program options
To set the program options, use the Add-ons|Heli Traffic 2009|Options… menu item.
The Options dialog box will appear.
The Visibility radius value defines the radius of the area surrounding your aircraft where
helicopter traffic will be visible. Any helicopters outside of this radius but within the
simulation radius will be internally simulated, but not be visible (and thus will not affect
the frame rate).
The Simulation radius value defines the radius of the area surrounding your aircraft
where helicopter traffic will be simulated. Do not set it to a very small value, because
only landing spots within the simulation radius will be used for generating traffic. To
change this value, you need to enable the corresponding checkbox first.
Heli Traffic 2009 User’s Manual
Page 4
The Random traffic density slider controls the number of helicopters used for the
random traffic. When set at 100%, the number of helicopters is chosen so that it would
match the number of movements defined for landing spots within the simulation radius.
Reducing it below 100% reduces the traffic to the specified percentage of that number,
while increasing it above 100% increases it accordingly. To disable all random traffic,
move this slider to 0%.
Minimum altitude and Maximum altitude determine the cruise altitude range used by
the random. The values are in feet and determine the altitude above ground level.
The Display text labels checkbox and distance setting (FS9-only) controls the display of
text labels for AI helicopters. When enabled, text labels will appear above AI helicopters
that are within the specified distance from the user aircraft. FSX users can enable or
disable similar labels in the FSX traffic options, there is no separate setting for AI
helicopters.
The Helicopters used for random traffic list box allows you to determine which
helicopter models will be used for the random traffic. To trigger individual checkboxes,
click on them. To trigger multiple checkboxes at once, select the corresponding list items
and use the context menu.
The Airplane flight models button brings up another dialog box allowing you to select
airplane flight models to be treated as helicopters by Heli Traffic 2009. Some add-on
products include AI helicopters with an airplane flight model; you can use them with Heli
Traffic 2009 by enabling them here.
The Standard flight model for all helicopters setting (FSX-only) will force all AI
helicopters to have the flight model of the default Bell 206. Use it for add-on AI
helicopters that fly with non-rotating blades otherwise. Note that you should not change
the user aircraft when helicopter traffic is enabled and this option is active, because
sometimes the user aircraft could receive the Bell 206 flight model too.
Configuring individual landing spots
To configure individual landing spots, make sure Flight Simulator runs in the window
mode (Alt+Enter switches between the full screen and window mode). Enter the slew
mode and switch to the map view and enlarge the map to fill the entire FS window.
Use the Add-ons|Heli Traffic 2009|Edit Landing Spots… menu item. The Edit
Landing Spots dialog box will appear.
Heli Traffic 2009 User’s Manual
Page 5
Landing spots known to the program will now be displayed in the map view as text labels
(you may need to zoom out to see them). This includes both helipads defined in airport
BGL files and landing spots added from within Heli Traffic 2009.
The landing spot closest to the aircraft will be shown in green color, all others will be
shown in red. To select other landing spots, move the aircraft in the slew mode.
The Add… button adds a new landing spot at the current aircraft position and displays its
properties dialog box.
The Delete button deletes the landing spot closest to the
aircraft (shown in green).
The Properties button allows you setting the properties of
the landing spot closest to the aircraft.
The Defaults… button allows you to specify default settings
for all landing spots.
The Show list checkbox opens a list of all landing spots
defined. When the list is open, Properties and Delete buttons
refer to the landing spot currently selected in the list, instead
of the one closest to the aircraft position.
The From file dropdown box allows you to restrict the list to
helipads stored in a specific XML file. It is useful if you have organized your Heli Traffic
2009 settings into several XML files.
Heli Traffic 2009 User’s Manual
Page 6
List added/modified only, when enabled, restricts the list to landing spots that you
added or modified with Heli Traffic 2009. In other words, it removes airport helipads
with default settings from the list.
Jump to selected moves the user aircraft to the currently selected landing spot in the list.
The Close&Save button closes the dialog box and asks you about saving your changes.
When you add a new landing spot or change properties of an existing one, the landing
spot properties dialog box will appear:
Under Airport ID and Spot Name, you can define the landing spot name and the airport
ID. The airport ID is optional. If the landing spot was imported from an airport BGL file,
you cannot change its airport ID.
Under Random traffic, you can specify some parameters that affect the random traffic
density and behavior at this landing spot.
The Movements/day setting determines the average daily number of random generated
movements at this landing spot. A takeoff is counted as one movement, and a landing is
counted as a separate movement. So to have an (average) of 10 takeoffs and 10 landings
per day, you should enter 20. It is not guaranteed that the exact number specified here
will be met. Heli Traffic 2009 will attempt to generate the traffic in a way that satisfies
settings at every landing spot as closely as possible. To prevent the random traffic from
using the landing spot, enter 0.
The Min. parking time and Max. parking time settings allow you to specify the
minimum and maximum parking time, in minutes, for random traffic helicopters. Note
that a parked helicopter may be forced to depart sooner than the setting here if another
helicopter is about to land at this spot.
The Approach slope setting determines the slope used for both departing and arriving
helicopters.
The Use defaults checkbox, when enabled, tells Heli Traffic 2009 to use default settings
for this landing spot. If you modify default settings using the Defaults… button in the
Edit Landing Spots dialog box, all landing spots with this checkbox enabled will be
updated accordingly.
Heli Traffic 2009 User’s Manual
Page 7
The Store in file dropdown box allows you to select the XML file used to store the
information for this landing spot. If you change the file used for an existing landing spot,
it will be removed from the original file and moved into the new one. Organizing your
landing spots and schedules into several XML files makes it easier to share them with
other users.
Defining scheduled traffic
In addition to the random traffic generated between landing spots, you can specify
individual helicopters flying fixed routes. They are called scheduled helicopters in the
program.
To define scheduled helicopters, use the Add-ons|Heli Traffic 2009| Edit schedules…
menu command. The Scheduled Helicopters dialog box will appear.
The Show schedules from file dropdown box allows you to filter the list by the XML file
used to store the schedules.
Checkboxes in front of individual scheduled helicopters allow you to quickly enable and
disable them without opening their properties.
The Add new button adds a new scheduled helicopter and displays its properties.
The Delete button deletes the scheduled helicopter currently selected in the list.
The Edit button displays the properties of the scheduled helicopter currently selected in
the list:
Heli Traffic 2009 User’s Manual
Page 8
Under Model, you should specify the helicopter model to be used.
The Comment field allows you to enter any comment to display in the list of schedules.
It is for your own reference. If you do not enter anything, a list of landing spots included
in this schedule will appear there.
The Callsign defines the helicopter callsign. It is for your reference only and can be used
to identify the helicopter in the list of schedules and on the traffic map.
Cruise speed and altitude settings allow you to specify the cruise speed and altitude
above ground used by this helicopter.
The list below defines the schedule. For every schedule line, you should specify a
departure point (landing spot) and a departure delay. The departure point can be
chosen from a drop-down list of all landing spots. The departure delay determines the
amount of time the helicopter spends parked at the departure point. Note that it may be
forced to depart early if another helicopter needs to use the landing spot. The destination
column will be filled automatically based on subsequent schedule lines.
The Add/Remove buttons allow you to insert and remove schedule lines.
The Helicopter enabled checkbox enables or disables this scheduled helicopter.
Disabled helicopters do not appear in FS. Use this setting to temporarily disable
scheduled helicopters without erasing their data.
The Store in file dropdown box allows you to specify the XML file where this scheduled
helicopter will be stored.
A schedule should consist of 2 or more lines. After departing from the last departure
point, the helicopter will revert to the first one.
In addition to landing spot, you can insert enroute waypoints by clicking on the Add
waypoint button. The current user aircraft position (including altitude) will be used for
the waypoint coordinates. If using the slew mode, you can move the user aircraft around
without closing the schedule dialog box. Simply click on the FS main window title, slew
to the new position and then click on the schedule dialog box again. Enroute waypoints
Heli Traffic 2009 User’s Manual
Page 9
for this helicopter will be marked with a red [WPT] in the Flight Simulator 3D view as
long as the Helicopter schedule dialog box stays open.
Note that if you define at least one enroute waypoint between two landing spots, the
terrain avoidance will be disabled and the helicopter will not automatically climb to a
safe altitude. The helicopter altitude will be determined by waypoint altitudes alone. You
may want to define a waypoint close to the departure spot first in order to have the
helicopter reach a safe altitude.
You can create schedules consisting of enroute waypoints alone. Such helicopters will
always fly the circular route specified and will never land anywhere.
After making changes to schedules, it is recommended to disable and re-enable the
helicopter traffic so that the changes would take effect.
Displaying a traffic map
You can display a map showing all AI helicopters and landing spots in the vicinity.
Use the Add-ons|Heli Traffic 2009|Traffic Map menu command to display the map.
Landing spots will be displayed as small letters “H”. Helicopters are displayed as dots.
Pointing with a mouse at a helicopter or a landing spot shows information about it.
The traffic map is centered around the user aircraft and reflects the user aircraft heading.
You can change map scale factor using the plus/minus buttons in the map window. The
current scale is displayed in the bottom right corner of the map.
Right clicking on a helicopter brings up a context menu with the following options:
Force departure (available for parked helicopters only) – forces the helicopter to depart
the landing spot immediately. Scheduled helicopters will proceed to the next scheduled
stop, while random traffic helicopters will depart to a randomly chosen destination.
Fly to … – opens a submenu allowing you to force the helicopter to fly to one of the
nearby landing spots. This option is available both for parked and flying helicopters. Note
that a scheduled helicopter that has enroute waypoints in its schedule may visit these
waypoints first before flying to the destination you select.
Heli Traffic 2009 User’s Manual
Page 10
Stop and wait – instructs a flying helicopter to stop and hover. To continue flight, select
this menu item again. Note that helicopters made to stop and wait will not leave their
position except when you instruct them using the context menu.
Testing the frame rate impact of add-on helicopters
Some add-on helicopter models are very detailed and not frame rate friendly. You may
want to uncheck such helicopter models in the Options dialog box. The default Bell 206
helicopter supplied with FSX/FS9 is very frame rate friendly.
To test the frame rate impact of a helicopter model, put your own aircraft on the ground
and press Shift+Z several times until the frame rate counter appears in the top left corner
of the window. Then use the Add-ons|Heli Traffic 2009|Frame rate test… menu
command. The following dialog box will appear.
Here, you can select a helicopter model and the number of helicopters to create. These
helicopters will be displayed on the ground in front of the aircraft, allowing you to easily
see their frame rate impact. You may want to use the slew mode to move around in order
to see how the frame rate impact changes with the distance.
Adjusting the reference point of add-on helicopters (FS9)
In FS9, some add-on helicopters can appear hovering above ground when parked,
depending on the contact points defined in their aircraft.cfg files. Heli Traffic 2009
Heli Traffic 2009 User’s Manual
Page 11
allows you to adjust the vertical position of the reference point to ensure that the
undercarriage of parked helicopters appears exactly at the ground level.
To adjust reference points, open the frame rate test dialog box and enable the Adjust
RefPoint checkbox (only available in FS9). After that, the selected helicopter model will
appear parked on the ground in front of the user aircraft. You can enter the correction
value in feet and immediately see it’s effect on the helicopter. To adjust reference points
of other helicopter models, select them in the Model dropdown list and repeat the
procedure. When you close the Frame Rate Test dialog box, you will be prompted
whether to save the changes you made.
These settings are kept in the file called RefPtAdjustments.xml in the folder My
Documents\Heli Traffic 2009\FS9.
Sharing your landing spots and schedules
Your landing spots and schedules are kept in the Heli Traffic 2009 folder under My
Documents. The FSX module stores it’s data directly in this folder, while the FS9
module keeps it in the FS9 subfolder. This allows using the FSX and FS9 versions of
Heli Traffic 2009 with individual data sets.
By default, landing spots and schedules are stored in a single file called HeliTrafficMyData.xml
To better organize your work or to share it with others, you may want to create multiple
files, for example to separate your data by the geographical location. The property dialog
boxes for every landing spot and every scheduled helicopter allow you to select the file
where this item will be stored. Select New file… to create a new file. You can easily
move items between files by changing their “file” setting.
To see landing spots (or schedules) included in a particular file, open the list of landing
spots (or scheduled helicopters) and filter it using the From file dropdown box.
If you want to share landing spots or schedules you created with other Flight Simulator
users, you should move the items you want to share into a new XML file and share this
file. If you share scheduled helicopters, be sure to include all landing spots required for
them. If you added helipads to airports using our Airport Facilitator X product, you may
want to share the BGL files you created too.
To add helipads or scheduled helicopters made by someone else, simply copy the
corresponding XML file(s) into the Heli Traffic 2009 folder under My Documents.