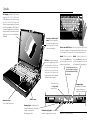
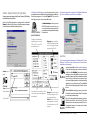
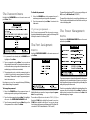
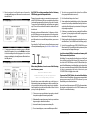
1
Gateway 2000 Liberty User's Guide Copyright © 1994, 1995 Gateway 2000® 610 Gateway Drive North Sioux City, SD 57049 USA All rights reserved This book is protected by copyright and all rights are reserved. No part of it may be reproduced or transmitted by any means or in any form without prior written consent from Gateway 2000. The information in this manual has been carefully checked and is believed to be accurate. However, Gateway 2000 assumes no responsibility for any inaccuracies that may be contained in this manual. In no event will Gateway 2000 be liable for direct, indirect, special, incidental, or consequential damages resulting from any defect or omission in this manual, even if advised of the possibility of such damages. In the interest of continued product development, Gateway 2000 reserves the right to make improvements in this manual and the products it describes at any time, without notice or obligation. Trademark acknowledgments AnyKey, cow spot motif, CrystalScan, Gateway 2000, HandBook, RIDE, Store-On-A-Disc, TelePath, stylized G design, and motto Youve got a friend in the business are registered trademarks of Gateway 2000. ColorBook, EZ Pad, EZ Point, Family PC, Gateway 2000 Duoline, Gateway 2000 Solo, GW2K, Liberty, and Vivitron are trademarks of Gateway 2000. Intel is a registered trademark of Intel Corporation. Microsoft, MS, MSDOS, and Windows are trademarks or registered trademarks of Microsoft Corporation. All other product names mentioned herein are used for identification purposes only, and may be the trademarks or registered trademarks of their respective companies. FCC statement This device complies with part 15 of the FCC Rules. Operation is subject to the following two conditions: (1) This device may not cause harmful interference, and (2) This device must accept any interference received, including interference that may cause undesired operation. This equipment has been tested and found to comply with the limits for a Class B digital device pursuant to Part 15 of the FCC Rules. These limits are designed to provide reasonable protection against harmful interference in a residential installation. This equipment generates, uses, and can radiate radio frequency energy and, if not installed and used in accordance with the instructions, may cause harmful interference to radio communications. However, there is no guarantee that interference will not occur in a particular installation. If this equipment does cause harmful interference to radio or television reception, which can be determined by turning the equipment off and on, the user is encouraged to try to correct the interference by one of more of the following measures: ❑ ❑ ❑ ❑ Reorient or relocate the receiving antenna Increase the separation between the equipment and receiver Connect the equipment into an outlet on a circuit different from that to which the receiver is connected Consult Gateway 2000 or an experienced radio/TV technician for help. Caution: Changes or modifications not expressly approved by the party responsible for compliance could void the user's authority to operate the equipment. To meet FCC requirements, shielded cables and power cords are required to connect this device to a personal computer or other Class B certified device. Cautions and warnings CAUTION:The internal lithium ion battery used in this device can present a danger of explosion or fire if the battery is incorrectly replaced. Do not disassemble, incinerate, or heat above 60°C (140°F). Replace only with the same or equivalent type recommended by the manufacturer. Discard used batteries promptly in accordance with battery manufacturers directions, and keep them away from children. ATTENTION: Il y a danger dexplosion sil y a replacement incorrect de la batterie. Remplacer uniquenment avec une batteries du meme type ou dun type recommande par le constructeur. Mettre rebut les batteries usagees conformement aux instructions du fabricant. CAUTION: This equipment uses a grounded power cable. Do not attempt to defeat the grounding prong. Do not remove the grounding prong. If you use a three-prong adapter, be sure to connect the ground wire to a good ground. Replace the cord if it becomes damaged. U.S. and Canadian replacement cords must be UL-approved (CSA certified in Canada) type SPT-2, 18 AWG, 2-conductor cord with permanently attached NEMA type 5-15P plug at one end and a permanently attached connector body on the other. Cord length may not exceed 15 feet. Outside the U.S. and Canada the cord must be rated for at least 250VAC at 10 amps, and must indicate international safety agency approval. The plug must be a type appropriate for the country of use. Obtain replacement cords at an authorized service center. The replacement must be of the same type and voltage rating as the original cord. WARNING: Always plug the cord into an easily accessible outlet near the equipment so that unpluging the cord is an easy way to shut off power. Do not attempt to disassemble the AC adapter. The AC adapter has no user-replaceable or -serviceable parts inside. The AC adapter has dangerous voltages that can cause serious personal injury or death. Return defective AC adapters to Gateway 2000. The AC adapter is intended for use with a computer. Both must meet EN 60950. Sicherheitshinweise VORSICHT: Explosionsgefahr bei unsachgemäßem Batteriewechsel. Originalbatterien nur durch gleiche oder vom Hersteller empfohlene Batterien ersetzen. Gebrauchte Batterien an Gateway 2000 zurücksenden. CAUTION: DO NOT OPEN. NO USER SERVICEABLE PARTS INSIDE ATTENTION: NE OUVRIER PAS. PARTIS RÉPARABLES UNIQUEMENT Á L'USINE VORSICHT: NICHT ÖFFNEN. ENTHÄLT KEINE VOM BENUTZER ZU WARTENDEN BESTANDTEILE VORSICHT: Diese Ausrüstung verwendet ein geerdetes Netzkabel. Den Erdungskontakt unter keinen Umständen umgehen oder entfernen. Bei Verwendung eines dreipoligen Adapters den Erdungsdraht stets an geprüften Erdungskontakt anschließen. Beschädigte Kabel ersetzen. Ersatzkabel in den USA und Kanada müssen folgende Bedingungen erfüllen: UL-anerkannter (in Kanada CSAzertifizierter) SPT-2 Typ, 18 AWG, 2-Leiter-Kabel mit fest installiertem NEMA-Typ-5-15P-Stecker und fest installierter Anschlußdose am anderen Ende, max. 4,57 m Länge. Außerhalb der USA und Kanada gelten folgende Bedingungen: Kabel für mindestens 250 V Wechselstrom bei 10 A, anerkannt durch internationale Sicherheitsbehörde, landesspezifischer Stecker. Ersatzkabel nur im Fachhandel erwerben. Nur Ersatzkabel des gleichen Typs und für die gleiche Spannung (Voltzahl) wie das Originalkabel verwenden. ACHTUNG: Netzkabel stets in eine gut zugängliche Steckdose nahe der Ausrüstung einstecken, um durch einfaches Ziehen des Steckers jederzeit die Stromversorgung unterbrechen zu können. Den Adapter unter keinen Umständen auseinanderbauen. Der Adapter enthält keine vom Benutzer zu ersetzenden oder zu wartenden Bestandteile. Die Spannung im Adapter kann beim Auseinanderbau zu Verletzungen oder Tod führen. Beschädigte Adapter an Gateway 2000 zurücksenden. Der Adapter ist für den Gebrauch mit einem Computer bestimmt. Adapter und Computer müssen die Norm EN 60950 erfüllen. Environmental considerations Your Gateway 2000 Liberty has been engineered to provide many years of reliable service. However, you should give it the same reasonable care and protection that you would any other electronic equipment. Damage caused by dropping the Gateway 2000 Liberty, impact with another object, or immersion in liquids is not covered by the warranty. Never expose the Gateway 2000 Liberty to rain, snow, or moisture. Avoid locations with high levels of dirt, dust, or smoke. Colophon This manual was created electronically with a Gateway 2000 486DX2/66 computer system, MS-DOS 6.22, Windows for Workgroups 3.11, PageMaker 5.0, CorelDraw 5.0, Adobe Type Manager 3.01, and Adobe Postscript fonts including Stone Sans, Eras Book, Myriad Headline, Insignia, Gill sans, and Giddyup Thangs. In our effort to use natures resources efficiently and wisely, Gateway 2000 prints all manuals on recycled papers that meet the minimum requirements established by the Federal EPA in its guidelines for recycled paper products. Printed in the United States of America Gateway 2000 Gateway 2000 Liberty Users Guide Part # SYSMAN012ADUS 1 10/95 Thank you for purchasing this Factory Service Manual CD/DVD from servicemanuals4u.com. Please check out our eBay auctions for more great deals on Factory Service Manuals: servicemanuals4u s t n e t n Co 3 4 5 6 If you don’t read manuals! Welcome! Specs Where it is, what it does 6 7 8 9 Outside Underside Inside Attachments 10 Using the Gateway 2000 Liberty 10 10 10 1 Your first time . . . Operating modes Restart methods The keyboard 11 11 11 11 12 12 Windows 95 keys Double-use keys Keys with Fn Numeric keypad Cursor-movement keys The EZ Point 12 Using Windows 12 13 13 13 14 14 15 15 15 Customizing Windows The Windows Control Panel The Windows File Manager What’s “File, Run”? Some important programs BattStat Card View Card Power Exiting Windows 18 The Setup settings: 18 18 18 18 Date and time Startup (boot) drive Display Power switch 19 The Password menu 19 If you lose your password. . . 19 The Port Assignment menu 19 The Power Management menu 20 Understanding power management choices 21 The Miscellaneous menu 21 The Keyboard menu 22 Using the PCMCIA software 22 22 23 23 Adding a new PCMCIA device Windows PCMCIA software Card View Card Power 24 Adding memory 24 Installing the memory upgrade 25 Troubleshooting 25 26 27 28 Startup Communications Memory Miscellaneous 30 Index 16 Talking to the outside world 16 16 16 17 17 The floppy disk drive The serial port The IR port The parallel port Using a modem 17 Preventing loss 18 Using the Setup program 18 18 Entering and leaving the Setup program Getting around in the Setup menu We avoided using jargon in this book, but a certain amount is inevitable. If you look in the Gateway 2000 group in Windows, you'll find a dictionary of computer terms and jargon. If you encounter a word in this book that you don’t understand, you can look it up there. 2 If you don’t read manuals! Here are some items that you might not discover for yourself: ❏ You can enter the Setup program at any time by pressing Fn+Esc. (Do so and take a look around.) ❏ You don’t have to shut down the computer when you plug or unplug something. It supports “hot swapping” at every connector. A possible exception is a network PCMCIA card; some cannot be removed and reinserted without losing the connection. (This is a problem with the network, not the unit.) ❏ If you use an external keyboard, you can attach a serial mouse to the serial port and use it at the sametime. If your system has Windows 95: You can use both a serial mouse and a PS/2 mouse simultaneously. ❏ You get the best battery life if you do these: - Fully charge, then discharge the battery (by using it) twice when you first get the system. - Set Power Management (in the Setup program, Fn+Esc) to Maximum Battery Life. - Keep the backlight as dim as possible (the top slider next to the screen all the way down). ❏ Many installation programs don’t work well with power management. When you install an application from a floppy, have the AC adapter connected so the system doesn’t enter Suspend mode. ❏ Look over the “Some important programs” section starting on page 14. ❏ If you want to do file transfers with the IR port, read the section about IR file transfers beginning onpage16. If your system has Windows for Workgroups: If you attach a serial mouse, the system detects it automatically. A serial mouse disables the EZ Point while it is connected. If you connect a PS/2 mouse instead of a keyboard, you can still use the EZ Point with the mouseconnected. I n t r o d u c 3- Welcome! This little computer . . . If you use Microsoft Works as your word processing, spreadsheetnumbercrunching,anddatabasemanagementtool,and if you frequently off-load your files to your desktop system, you’ll probably never outgrow the standard 340MB hard disk, but if you use full-power applications like Microsoft Office Professional, and if the Gateway 2000 Liberty is your main system, you’ll appreciate having a 720MB drive. Whichever Gateway 2000 Liberty you own,use it! Take notes in meetings. When you meet with the same group in the future, there’s nothing like loading the file from the last meeting and checking to see if everybody completed their action items. . . . can improve your life! The Gateway 2000 Liberty was born from the belief that a notebook computer could be small enough to carry anywhere easily and still be able to do whatever you want to use a computer for. We think we made arealcomputer so small and useful that you’ll end up taking it everywhere. In creating this second-generation notebook, we tried to anticipate the needs of real users. Everyone at Gateway 2000 involved with the Gateway 2000 Liberty uses notebook or subnotebook computers in both their work and personal lives, so the product you now hold benefits from the accumulated experience of demanding users with hundreds of thousands of hours of use. We’ve used them in Wall Street board rooms, Alaskan fishing boats, and about everywhere in between. We hope you agree that the Gateway 2000 Liberty achieves exactly the right balance of size and performance. For example, we learned that people tend to expect a mouse on the right, so we put the EZ Point at the right edge where you can put your finger on it and we put the mouse buttons in a natural location under your thumb. So you have the advantage of an intuitive pointing device without having to take your hands away from the keyboard! We also found out that notebooks running Windows 95 or Windows for Workgroups give better battery life if they have more RAM (extra RAM lets Windows do fewer swaps to the power-using hard disk). So all Gateway 2000 Liberty configurations have 8MB standard, and you can triple that if you want to obtain the best possible battery life while running large applications. Here are some more features you should know about: ❏ Crash protection on the road. What do you do if the system files go bad when you don’t have the floppy drive handy? Just enter the Setup program and set Emergency boot! See page 18, upper right corner. ❏ Hard drive removal safety. Lots of portables let you remove the hard drive, but only the Gateway 2000 Liberty prevents damage or data loss by automatically forcing a suspend when you remove the drive. ❏ Better Suspend. You can use your computer right until the battery dies. Then you still have three days to find power before you lose data. If the battery is full, suspend lasts two weeks. Jot down those ideas that come to you at odd moments. You won’t have to clutter your memory with lots of random ideas that may or may not turn out useful. Put that book you’re writing on it. You can write when you havesparemoments. Get a modem, download some magazine articles from CompuServe or America Online, and use your Gateway 2000 Liberty as a book. If your company has a conference room with a large screen monitor or projection panel, you can put your presentation in Power Point, then use the VGA connector to connect to the big screen andreallyhammer home your ideas. Suppose your associate across the table at a meeting has a Gateway 2000 Liberty. You can use the IR feature to communicate silently with each other. The Gateway 2000 Liberty is so small that it isn’t distracting during a meeting like bigger notebooks (and you can play Solitaire when the meeting gets boring—try that with paper and pencil!). On the other hand everyone may want to admire it—so don’t be afraid to show it off! ❏ Real IR connectivity. IR doesn’t do you much good if you have nothing to connect to. We include a connector for your desktop system. ❏ Big screen. Not only is the screen a big 10.4 inches, but it supports resolutions up to 1024 x 768 with a virtual desktop! Seepages 14 and 18. Welcome! 4 Specs (Specs are subject to change without notice or obligation.) Dimensions (W × D × H) 10" × 8" × 1.6" Weight 4.1lbs with Lithium Ion battery; 4.2lbs with NiMH battery Keyboard 78 keys, 94% scale; provides same functions as standard 101-key Windows 95 AT keyboard Screen Vd i eo Backlit DSTN color LCD; 10.4" diagonal (214.2mm x 161.4mm); 800 x 600 x 256 SVGA resolution; Supports virtual screen to 1024 x 768 0.264mm dot pitch; 20:1 contrast ratio 1MB video memory; C&T 65545 controller, VESA local bus with Windows acceleration; Video port supports: 640 x 480 x 16–64K colors 800 x 600 x 16 or 256 colors Mouse/Pointer EZ Point integrated pointer; PS/2-type connector for external mouse CPU Intel SL Enhanced 486DX4-100 Cache 8K in CPU; DX4-100 has additional 256K external cache CPUspeed 100MHz BIOS 128K; includes configuration utility with password security and power management RAMtype 70ns 3.3V low power DRAM RAMcapacity 8MB on board, 4,8, and 16MB modules available Expansion slots Two PCMCIA Type II; stacked to make a Type III slot; supports hot-swapping of most cards when system is in use I/O ports Floppy/EPP/ECP parallel port 16550 serial port PS/2keyboard/mouseconnector videoconnector IR port Floppydiskdrive External 1.44MB 3.5-inch drive option Hard disk drive 340, 540, or 720MB IDE removable drive, depending on system Accessories ACadapter, IR (infrared) module for desktop system, NiMH battery, Lithium Ion battery Leather carrying case, External floppy disk drive with cable PCMCIAoptions 14,4 Kbp or 28.8 Kbp data/fax modem, twisted pair or thin-net (BNC) Ethernet network, token ring network; other cards available from various sources Operatingenv. 5–40°C; 20–80% noncondensing relative humidity Software Windows 95 or MS-DOS 6.22 and Windows for Workgroups 3.11, on-line systemmanual,andadditional applications software preloaded; master diskettes and manuals included for everything except promotional softwarepackages ACadapter Requires 100–240 VAC, 0.3A nominal; adapter powers systemand charges battery simultaneously Batterypack NiMH: 9.6VDC, 1850mAh nickel-metal hydride rechargeable; batteries can be “hotswapped” without rebooting; Recharges in or out of system, system on or off. Lithium Ion: 10.8 VDC rechargable; batteries can be “hot-swapped” without rebooting; Recharges in or out of system, system on or off. Conforms to APM 1.1 Permanent internal Lithium ion battery holds system settings about a day with batterypackremoved. Batterylife NiMH: 17.76 watt/hours; lasts 2.5 to over 4 hours in typical usage under any Windows environment; fully charged battery lasts abouttwo weeks in Suspendmode;yourmileagemayvary. Lithium Ion: 28.8 watt/hours; lasts 4.5 to 6 hours in typical usage under any Windows environment. Chargingcycle Varies depending on battery condition; full charge usually takes about an hour Certification FCC Class B, UL, CSA, TUV (approved to IEC950/EN60950), CE, VCCI Specs 5 Where it is, what it does -- Outside Front.(Shownclosed)pressthebuttontounlatchthelidwhileyouopenit. Powerswitch.Slideitforwardto powerunitonoroff. This switch functionsonlywhen the unit is open or has a keyboard and monitor attached. Leftside. Flip-outfoot. Flipitoutto tilttheunit formore comfort. Rightside. Harddiskdrive. See next page. Battery pack. See next page. PCMCIA door. Flip it down and slide into the unit.Seepage9. Flip-outfoot. Flipitoutto tilttheunitfor more comfort. Back. PS/2 connector. Connect a mouse or keyboardhere. AC adapter. Keyed tofitonlyoneway. Flip-out foot. Shown flipped out.Oneontheotherend,too. Flip-out foot. Shown flipped out.Oneontheotherend,too. IR connector. Functions likeaserialport(COM2). Serial port. Functionslikeaserial port(COM1). Parallelport.Plugthe floppydriveoranyparalleldevicehere. VGA port. Connect any standard moniWhere it is, what it does torhere. 6 Underside These pictures show the underside of the unit with the hinge at the top. Harddrive.(inside). Hard drive release. System automaticallyentersSuspendwhenyou slide the release away from the hinge. Memory compartment. Shown with the coveroff.Don’topenunlessyouareadding memory. Follow the directionselsewhereinthismanualortheinstructions that come with the memory module. Whenyoureinsertadrive,system asksifyouinsertedthesameora differentdrive.Ifyouinserteda different drive, pressF1when prompted.The systemrebootsand you loose any unsaved data. Ifyoureinsertedthesamedrive, pressF3to continue. A warning appears.Ifyoureallydidreinsert the same drive, pressF3again. Both drive and battery pack fit only one way. Reset switch. Press with a pen,toothpickorunbentpaperclip.Usethisresetwhen resettingfromthekeyboard doesn’twork. Battery release. System automaticallyentersSuspendwhenyou slidethereleasetowardthehinge. You can slide the battery out after you release it. You can leave the battery out for about a day without loosing datainmemory. Informationplacard. The exact model number of your Gateway 2000 Liberty and its serial number are markedhere. Whenthebatteryisoutoftheunit,youcan plugtheACadapterintothebatteryhere. Donottellitthatthedriveisthe sameoneifitisn’t. Battery pack. (inside). Where it is, what it does 7 Inside LCD display.A backlit LCD screen displays 800 x 600 x 256 color SVGA; supports virtual screen up to 1024 x 768 x 256. Clean dust from the screen occasionally with a soft cloth; dampen it VERY slightly toremovefingerprints.Avoidtouchingthescreen;itcanscratch,andif you sit on it or hit it hard enough, it’llbreak. Contrast and brightness.Slide to operate. Sliding the upper control down all the way saves some power. EZ Point. Replaces mouse; putyourfingerontopofthe button and push whichever direction you want the pointer to go; the harder you push, the faster the pointermoves.Configurable inMousecontrolpanel. How to use the EZ Point. Put any finger on top of the “eraser”andpushitthewayyouwantthepointertogo. Your thumb falls naturally over the mouse buttons. NumLk.Ifthislightis lit,holddownFnandyou get the numbers on the numerickeypadkeys. PadLk. Ifthislightislit, hold downFnand you get the cursor movement functions of the numeric keypad keys. If both lights are lit, you get the numeric keypad numbers without needing the Fn key. Shows whether theCaps Lock keyisactive. Chargerlight. Green=fullycharged, Orange=charging, Red=looseconnection PCMCIA door. Mouse buttons. Your thumb goes here. Batterylight.Litwhenyou’re usingthebattery.Green=OK, Orange=runninglow, Blinking=verylow. Diskactivitylights.Lit whenthe hardorfloppydriveisinuse Where it is, what it does 8 Attachments Thisendconnectstothecomputerortoabatterypack.It fitsonlyoneway. Lightislitwheneveradapterispluggedin. Power cord. Unplugsfromthe adaptersoyoucanswitchtoa European-stylecordifnecessary. AC adapter. The square plug connects to a Gateway 2000 Liberty battery pack; it can simultaneously power the system and charge the battery in about an hour, or you can charge one battery away from the computer while another one runs the unit. IR module. Attach this to the serial port on a desktop system and put it where the IR port on the back of the Gateway 2000 Liberty can see it. Useitforfiletransfers. The module you get may look different. PCMCIA slots. TwoType II slotsbehinddoor. The AC power cable is removable. As long as you have a power cable with a connector that fits the local wall outlet, you can connect the adapter to any power source between 100 and 240 VAC; the AC adapter adjusts automatically. Drive cable. Connects the drive and parallelport.(Theportautomatically detectsthatit’snotaprinter). Slide button. Ejectsdiskette. PCMCIA cards.Behind this plasticdoorisasocketfortwo Type II or one Type III PCMCIA card. Externalfloppydrive. To open the door, flip the top down and slide it into the unit. Keep it closed when you aren’t using it to keep it clean. Note: Put the PCMCIA card into either socket. The system detects the card automatically in either location. Where it is, what it does 9 Using the Gateway 2000 Liberty Yourfirsttime... 1. The Battery pack may be dead when we ship the system from the factory, so the first time you use the Gateway 2000 Liberty, connect the AC adapter to the computer. Go ahead and use the system while the adapter charges the battery; it charges just as fast whether you use the system or not, taking about an hour (look for the charger light to change from orange to green). The adapter cannot overcharge the battery. We recommend that you run the battery all the way down then fully recharge it twice. The battery gauge software will be more accurate, and battery life will increase greatly. 2. To open the Gateway 2000 Liberty, hold in the button on the front while you lift the front edge of the cover. Adjust the screen for a comfortable viewing angle. Cover Latchon front (push in) 3. The power switch is in the middle of the right side. Slide it toward you to switch the Gateway 2000 Liberty on; slide it toward you again to switch it off. You can set this switch to be a true on-off switch or a suspend-resume switch. Refer to the section about the Setup program. The power switch only operates when the unit is open so you don’t accidentally drain the battery. However there’s an exception to this: If you connect an external keyboard and a monitor, you can use the switch to power up the system without opening it. 4. Watch the screen. You’ll either see your Windows operating system immediately, or assorted messages as the system starts up and then loads Windows. If the screen is dim, adjust the contrast and brightness controls. That’s it—your Gateway 2000 Liberty is ready to use! Operating modes ❏ On (normal operation): We don’t need to explain this, do we? ❏ Standby: If you stop using the keyboard and mouse for a while, the screen goes blank, the hard disk drive spins down, and the leftmost LED is lit. This is Standby mode. Press a key to resume normal operation. After about a minute of inactivity, the Gateway 2000 Libertyautomatically goes from Standby into Suspend mode. ❏ Suspend: When you close the lid (if so configured), slide the power switch, or just wait long enough, the Gateway 2000 Liberty switches to Suspend mode. Suspend mode uses almost no power, but it keeps your work right where you left off for up to three weeks, saving you the inconvenience of rebooting when you are ready to use the Gateway 2000 Liberty again. Restart methods You seldom need these, but you should know how: ❏ Ctrl+Alt+Del: Also known as the three-fingered salute. Press these three keys simultaneously. If it was a typical hang, the computer will restart. ❏ Fn+Alt+Del: This is the equivalent to pressing the reset button on a desktop system. If the system hangs badly enough, you may need to do this. ❏ Reset switch (on bottom of computer): If you don’t realize the computer has hung, you may keep typing until the keyboard buffer doesn’t take any more keystrokes; then Fn+Alt+Del won’t work. If that happens, or if you feel better doing an actual hardware reset, press the reset button on the bottom of the system with a pen, toothpick, or paper clip. Nothing happens at first; then the screen flashes a couple of times. Eventually, a memory test starts and you’re back in business. ❏ Super reset: The reset button doesn’t work if the lid is closed. If you ever want to force a reset no matter what, hold in the reset button and flip the power switch. Resetswitch. The computer also suspends when you move the switch that releases the hard drive or the battery. If the serial port is active, the unit does not suspend even if you shut the lid. This protects file transfers. But it also means you should close (not just minimize) the IR file transfer software when you’re not using it. To leave Suspend mode, slide the power switch. The Gateway 2000 Liberty resumes exactly where you left off. Just to be safe however, we recommend that you always save any data you don’t want to lose before you enter Suspend mode. Youdon’t need to exit your programs. In most Windows applications, just go to the File menu and selectSave. ❏ Total shutdown: You can set the power switch to completely shut off the computer. (In the Setup program, reached by pressing Fn+Esc.) When it is set to ON/OFF, the computer reboots when you switch it on. Powerswitch onrightside(slidetowardyou). Using the Gateway 2000 Liberty 10 The keyboard Numeric keypad The Gateway 2000 Liberty keyboard is not much different from any other computer keyboard you’ve used in the past. However, thereare a few features you should know about. Some regular keys have extra labels on their tops. These keys canfunctionasanumerickeypad. To use the numeric keypad: Windows 95 keys Two keys have been assigned as Windows 95 shortcut keys. Press the key with the Windows logo to automatically click on the start button in Windows 95. Press the key with the menu symbol to access menus within a Windows 95 application. See your Windows 95 documentation for additional information. ❏ Press Fn+Num Lk key so its indicator light is on. Now when you hold down the Fn key, you get what the blue labels on the tops of the keys indicate. ❏ If you want the keys to act as a numeric keypad without having to hold down the Fn key, press Fn+Num Lk and Fn+Pad Lk. (Both lights are lit.) ❏ When either or both lights are lit, you can switch these keys to their other functions with combinations of the Shift and Fn keys. Double-use keys To save space, some keys have more than one function. Esc/Setup key Keys with Fn F3/monitor key Numeric keypad keys F10/Pad Lk key Windows 95 start F9/Num Lk key button key Windows 95 menu buttonkey ❏ Fn: Hold down the Fn key while you press keys with blue labels to access the functions indicated by the blue labels. If the key has blue labels on top and on the front, you get the function on the front. EZ Point.Operate the EZ Point righthanded, with a finger on the top of the “eraser” (the rubber cover is replaceable)andyour thumb on the buttons. Sorry—we don’thaveaversion for lefties! ❏ Esc/Setup: Fn+Esc gets you to the Setup program, described later in this manual. You can do this at any time, during any program except, perhaps, when you are transmitting with a modem or network card. ❏ F1/F11 and F2/F12: Use Fn+F1 or F2 to get F11 or F12, respectively. ❏ F3/monitor: Fn+F3 rotates among the three display options, LCDpanelonly,externalmonitoronly,andboth. ❏ F4/Pause: Fn+F4 accesses the Pause function. Fnkey ❏ F5/Break: Fn+F5 accesses the Break function. ❏ F6/Prt Sc: Fn+F6 accesses Print Screen. Speaker ❏ F7/Sys Rq: Fn+F7 accesses System Request. ❏ F9/Num Lk: Fn+F9 accesses the Num Lock function. Now if you hold down the Fn key while you type a keypad key, you get the function of the blue label on top. ❏ F10/Pad Lk: Fn+F10 changes the keypad keys to their cursor-movement functions. Important: Never try to remove the keyboard keycaps—you’ll break the keyboard. Mouse buttons(left and right) Using the Gateway 2000 Liberty 11 Cursor-movement keys Using Windows The arrow keys expand to page up, page down, home, and end if you hold down the Fn key while you press the appropriate arrow key. Either Microsoft Windows 95 or Microsoft Windows for Workgroups is pre-installed on your Gateway 2000 Liberty and starts automatically when you reset the unit. If Windows does not load automatically, type: You get the cursor movements normally associated with shifted numeric keypad keys by holding downFn while you press the key. win at the C:\> prompt and then press the Enter key. The EZ Point The eraser-shaped button just above the Enter key, called the EZ Point, works like a joystick. Put a finger on it and tilt it the direction you want the pointer on the screen to go. The harder you tilt, the faster it moves. The pointer is that arrow that moves around the screen in Windows when you tilt the EZ Point. The two long diagonal buttons in the front of the keyboard are the left and right EZ Point “mouse buttons.” A lot of firsttime users forget about these buttons—they point at something they want, but then press the Enter key. Usually, the wrong thing happens when you do this. Remember that after pointing at something with the EZ Point, you select it by pressing the left mouse button, not Enter! You can adjust lots of settings for the EZ Point in the Mouse control panel in Windows. There are not many apparent operating differences between the two Windows operating systems. Most of the differences that will effect you are organizational and visual. We will show screens from both Windows packages; the Windows 95 screen first, followed by the Windows for Workgroups screen. See your Windows 95 documentation for additional information. From now on, unless specified, the reference “Windows” applies to either operating system. A lot of things are accomplished in Windows by “doubleclicking.” Double-clicking is when you position the mouse pointer on top of something and then click the left mouse buttontwicequickly,withoutmovingthepointerbetweenclicks. Windows is an electronic desktop. It’s great for organizing files and running programs. Notice that the desktop has severalicons, small pictures that expand into a window if you double-click on them. A window is a framed rectangular region on your screen. Window Desktop Program icon Group icon Inside each window are more icons, each standing for a program or a document. To start a program, move the pointer to its icon and double-click on it. If you double-click on an icon that represents a document, you open the document in the program that goes with that document. One click highlights an icon, but does not expand the window or start a program. Customizing Windows Windows organizes your programs into groups. Each group has its own icon. Your Gateway 2000 Liberty is delivered with a lot of pre-installed software, so you’ll find several groups that organize your software by type. Double-click on a group icon to see what’s in it. You can drag icons (hold down the mouse button while you move the pointer) from one group to another to organize them however you like. You can resize any window by grabbing an edge with the pointer (it changes into a double arrow) and holding down the mouse button while you move the EZ Point. This is one of a zillion ways you can customize Windows. For instructions on how to do more customizing, refer to your Windowsmanual shippedwithyourGateway2000Liberty. Window Group icon Desktop Program icon Using the Gateway 2000 Liberty 12 The Windows Control Panel What’s “File, Run”? An important tool for customizing Windows is the Control Panel. Its icon is in the Settings group in Windows 95, or in the Main group in Windows for Workgroups. Double-click on it and you’ll see an assortment of icons for system settings that you can change. Double-click on an icon and go exploring! However, don’t change anything in the “Enhanced” item unless you know what you’re doing. Manysoftwarediskettes(ortheirlabelsormanuals)mention“File, Run” or some similar phrase in their installation instructions. Sometimes you may need to run a program without an icon. Here’s the solution to both of these situations: In Windows 95, click on the Start button, then simply click Run... . In the main area of Windows for Workgroups (called the Program Manager) and in the File Manager you can see the wordFile near the top left corner—in the menu bar. This is the file menu. Click on the word File and the menu drops down. If you know DOS, you are familiar with the DIR command. Windows for Workgroup’s answer to this command is a powerful program called the File Manager. One of the items in the menu is the word Run... . Click on Run... . The following dialog box appears: The File Manager has an icon in the Main group. Double-click on its icon to open it. In theCommand Line box, type the path and filename of the program you want to run exactly as if you were in DOS. If you use Run... from the Program Manager, you can find the item by clicking the Browse... button and finding the file in the Browse dialog box. Control Panel window (yours may be slightly different) You can see a list of files on a drive by clicking on the drive’s icon in the tool bar. Double-click on a drive icon to open a second window. Choose Tile in the Window menu to place both drive windows next to each other. The Windows File Manager In Windows 95, click on the icon called My Computer to see where your files are located. Explore the different menus or refer to your Windows 95 documentation for additional information. You can scroll around the file listing to see all the files on the drive. Click on a folder (folders are the same as DOS directories) to show the files in the folder. Double-click on an item in the file list just as if it were an icon to run a program. Explore the menus in the File Manager or refer to the Windows manual to see many other things you can do. When you have the correct path and filename in the Run dialog box, click on OK. Using the Gateway 2000 Liberty 13 Some important programs Some programs are shipped with your Gateway 2000 Liberty that deserve special mention. In Windows for Workgroups you also get a video control panel that works in addition to the video setting available in the Setup program. It’s called ChipsCPL. Choose the settings you want, then restart Windows. In the Control Panel group is a control panel icon labeled Power. Double-click on it to open it. Set the power management to Advanced if it is not already there. Icon (in control panel window) To locate the window to change the LCD display in Windows 95, click on Settings, Control Panel, and Display. A virtual desktop is when you see 800 x 600 pixels at a time, but you can scroll around a larger area by moving the pointer against the edge of the screen. Yougetavirtualdesktopwithanysizeover 640 x 480 if the LCD screenisactive. DisplayareaisequivalenttotheDisplayitem in the Setup program orpressingFn+F3. BattStat To locate battery status information In Windows 95, click on Settings, Contol Panel, then Power (see the Power Properties window on this page). An important utility in Windows for Workgroups (it’s in the Startup group, so it runs automatically) is called BattStat. It shows how much battery you have left. It will be most accurate if you fully charge, then fully run down the battery twice when you first get your system. If you don’t want this program to run automatically, drag its icon to another group. To run BattStat (if it’s not in the Startup group) double-click on its icon. Powercontrol panel. Icon(inControl Panelwindow) Set this ON. Thissectionisinactive.The internal power management overridesit. Largefontsareeasier toreadathighresolutionsonamonitor. Smallfonts take up lessspaceatlowresolutions and on the LCD screen. When BattStat is running, you see an icon in the lower left corner of the screen. If the AC adapter is connected, you see a plug. If you’re running with battery power, you see a little battery with a ruler under it. The ruler shows how much power you have left.The icon changes from green to orange to red as battery life decreases. Using the Gateway 2000 Liberty 14 Minimizebutton Exiting Windows In Windows for Workgroups: For Windows 95: 1. Close any programs that are running. 1. Close any programs that are running. 2. Click on the File pull-down menu option in the Program Manager window. The File menu appears. 2. Click on the Start button. The Windows 95 menu appears. 3. Click on the Shut Down... item at the bottom. You are asked if you want to shut down the computer. 4. Click on Yes. A screen appears telling you it is now safe to power down your system. 3. Click on the Exit Windows... item at the bottom. You are asked if you want to end your Windows session. 4. Click on OK. The MSDOS prompt appears, which looks like this: To see an enlarged view of the battery ruler and a few settings, double-click on either icon. If your system starts up with BattStat large like this, click on the Start Minimize button to create the icon. When you plug or unplug the AC adapter, the icon changes after about half a minute, when the software checks the status of the battery. If you ever need to reinstall BattStat (only operational in Windows for Workgroups), copy BATTSTAT.EXE from the Cardpower diskette onto the hard drive, then create an icon for it in the Startup group. C:\> If you are running Windows for Workgroups in conjunction with MS-DOS, when you reset your Gateway 2000 Liberty, it loads DOS. Then the system looks for the CONFIG.SYS and AUTOEXEC.BAT files, and executes the commands it finds in them. For information about these files and how to edit them, refer to theMS-DOS User’s Guidemanual included with your system. If you do something to either of these files that prevents the computer from starting up, you can bypass them by pressing F5 (or step through them by pressing F8) briefly when “Starting MS-DOS. . .” appears on the screen after a reset.When you reset your Liberty Card View Windows for Workgroups has an excellent and easy to use utility called Card View that shows you what PCMCIA cards you have installed, if any. It is described on page 23. Card Power Windows for Workgroups has a utility called Card Power which prevents problems caused by PCMCIA cards wanting to operate when the system wants to enter Suspend. It is described onpage23. Using the Gateway 2000 Liberty 15 Talking to the outside world Slidetheejectswitch toejectafloppy Computer users need to get info out. Here are some ways: ❏ Attach the floppy drive and copy your file onto a floppy; take this floppy disk to another computer. The infrared connector at the back of the Gateway 2000 Liberty is really another serial port, and you use it exactly as if it were an ordinary serial connector. It has a range of just over a yard, strictly line of sight. For the technically oriented, we should mention that we designed it according to IRDA specifications. ❏ Attach a printer to the parallel port; print your work. ❏ Use a serial or parallel cable or the IR connector to connect the Gateway 2000 Liberty to another computer, then use file transfer software to exchange files between the two computers. ❏ Use a PCMCIA modem to communicate with another computer over telephone lines or a cellular phone; you can send your work as a data file or fax it to another computer or fax machine. ❏ Use an Ethernet card to connect the Gateway 2000 Liberty to your office network. ❏ Connect the Gateway 2000 Liberty to an LCD overhead projector panel or video display through the video port. Printing your work is probably easiest, provided your recipient is satisfied with a paper copy. Exchanging files on a floppy disk is the handiest way to move your actual data; a fax/ modem card is a close second. If you do a lot of exchanging of files between your Gateway 2000 Liberty and another computer, we recommend the TranXit file transfer software and the included IR connector. Infrared communication is a new technology that provides wireless file transfer. It should be more convenient and easier to use than cables. You can use a serial or parallel cable, too. If you make a habit of this sort of exchange, consider connecting to your office network with a PCMCIA Ethernet card— this sort of transfer is unbelievably fast. The floppy disk drive Use the floppy disk drive just as you would on any other computer. (Of course, you have to remember to connect it first!) You can connect and remove the drive anytime; you don’t have to shut down the system. The IR port Activitylight Note: Power management doesn’t mix well with many installation programs. When you install an application from a floppy disk, it’s best to have the AC adapter connected so the unit doesn’t enter Suspend mode. The separate IR module is new technology, so it has a range of only about nine inches. Connect it to a serial port on your desktop system and use it to save yourself from having to rummage around at the back of your system every time you need to transfer files. The serial port Windows 95 has a direct cable connection option. Refer to your Windows 95 documentation. If you have a null modem serial cable, you can connect the Gateway 2000 Liberty to another computer through the serial port. You can use Interlnk software (it’s part of DOS) to transfer files, or you can use the supplied file transfer software. For information on using Interlnk, go to the DOS prompt, type: help interlnk and press Enter. For the supplied file transfer software, follow the directions in its manual. The serial port behaves like a serial port on any other computer, which means you can also use it to connect a mouse, ham radio TNC, or any other serial device. We configure the port as COM 1 at the factory; you can change it or disable it in the Setup program (Fn+Esc). If these settings are ever changed, press Fn+Alt+Del after exiting the Setup program to allow the system to fully integrate the new settings. IR module Most of the information you need for using the IR feature is in the manual that comes with the external IR module. However, here are a few tips: Attach the IR module to the serial port on the desktop system. Place the business end of the IR module about 6–9 inches from the IR connector on the back of the Gateway 2000 Liberty, and facing it. Always insert a diskette label side up (up on the drive is the side with the eject switch). Don’t remove it when the activity light is lit. If you have one, you can use the floppy drive from a HandBook486. However, you need to use your unit’s cable. Talking to the outside world 16 On the Gateway 2000 Liberty: Run TranXit, in the TranXit group. When the program opens, choose the Setup item in the Connection menu, Choose Infrared and Turbo Mode, then click on Change Connection Settings. If you ever need to reinstall TranXit on your Gateway 2000 Liberty, insert its diskette into the floppy drive and use File, Run to run A:\ setup. You can find detailed reinstallation instructions in the Software Reinstallation Guide. The parallel port Parallel ports are most often used for connecting to a printer. You can also connect a parallel data cable for very fast file transfers between the Gateway 2000 Liberty and another computer. ❏ If not already there, add the following to the end of the EMM386 line in your CONFIG.SYS file (does not apply if you have Windows 95), all on the same line, separated by spaces: noems x=c800-cbff x=d000-dfff x=ec00-efff ❏ If the modem still doesn’t work, see the troubleshooting communications section near the end of this book. If you connect a scanner or other two-way device to the parallel port, make sure the port is set for bidirectional operation. Bring up the Setup program by holding down the Fn key and then pressing the Esc key. Then go to the Port Assignment section and set Parallel Port Type to Bi-Directional. In the Infrared Settings dialog box that appears, chooseGateway Liberty for the Model, Fixed Mode, 115200 Baud Rate, and whatever COM port, Base I/O address and IRQ is set for the IR port in the Setup program. (To find out, press Fn+Esc to enter the Setup program, then choose Port Settings.) Click on OK twice to return to the main TranXit window. On a desktop system: If you haven’t already, install TranXit on the system. (Use File, Run to run its setup program.) Open it and choose the same settings as you did on the Gateway 2000 Liberty, EXCEPT: ❏ Choose Extended Systems instead of Generic for the Model,and ❏ Choose the appropriate settings for the serial port the IR module is connected to, which may be different from the Gateway 2000 Liberty’s port setting. Connection is automatic. You are ready to go! Using a modem Amodemisapracticalandversatilewaytoexchangedataand files with fax machines and computers at remote locations. Just plug in a PCMCIA modem, load your communications software,andawayyougo! Note: Do not use your PCMCIA modem on a digital phone line! Modems convert digital signals into analog signals that are sent on normal, analog telephone lines. If you attempt to use a line that is already digital, the modem will not work and could blow a fuse and become unusable. If you are in doubt about the type of line you have, ask your phone service supplier. OK, so it’s not always quite that simple. Here are some tips: ❏ When you plug in the modem, you should hear two beeps that ascend in pitch. This is called the “happy beep.”Ifyoudon’thearthis,somebodymayhavechanged the PCMCIA software we loaded at the factory. Run CONFIG (does not apply if you have Windows 95) as described onpage22. A dependable, fast, and inexpensive PCMCIA modem Preventing loss If you are a portable computer user, you probably already know this, but we’re going to mention it anyway: 1. Make backup copies of your data files. 2. Store backups in a safe place. 3. Be careful about where you keep your Gateway 2000 Liberty, so it won’t get stolen. 4. If you travel, encrypt your data files. If it gets stolen, they still can’t get your data. Strange but true: Our technicians field phone calls from time to time for support of what turns out to be a stolen computer. Sometimes the culprit actually identifies himself and gives a valid address! We suggest, therefore, that you notify Gateway 2000 as soon as possible if your Gateway 2000 Liberty is ever lost or stolen. We might be able to help. Talking to the outside world 17 Using the Setup program The Setup program is built right into your Gateway 2000 Liberty, in a part called the ROM BIOS. You use it to make changes that affect the way the Gateway 2000 Liberty works. The Setup settings: Some of the things you can change or adjust with the Setup menu: This item is highlighted when you enter the Setup program. Date and time ❏ The system password 1. Press the Spacebar to move to the time editing area. ❏ Powermanagementsettings 2. Type the time you want or use the Right and Left Arrow keys to move to a specific number you want to change. ❏ Serial and parallel port assignments ❏ The system date and time. Entering and leaving the Setup program 3. Press Enter when the time is what you want. 4. Setting the date works the same way. (Use the Arrow to move to the word Date first.) You can enter the Setup program while running most programs (don’t run it while you’re using the modem). Then: ❏ To enter the Setup program, hold down theFn key and press the Esc key. The main menu appears. ❏ To leave the Setup program, press Esc one or more times, until a message appears asking if you want to save the changes. Then press F10 to save and exit, or Esc to exit without saving. When changing port settings, press Fn+Alt+Del to reboot the system. This allows the system to fully integrate the new settings. (You can set this with Fn+F3, too.) Set this item to enable or disable the video connector at the back of the system.CRT means you have to connect a monitor to see anything. It tells the system to allow you to use the power switch with the lid closed. LCD & CRT is for when you want to see the screen while you use a monitor. LCD disables the video port at theback. You can set the power switch (on the right side of the unit) to operate as a true on-off switch (in which case you boot up when you start up) or as a suspend-resume switch (you resume right where you left off.) If you start with a full battery, the system lasts about two weeks in Sus- ❏ Press an Arrow key or the tab key to move the highlight from item to item. ❏ Press Esc to back out one menu level. Display Power switch The Setup program shows all the instructions you need to get around in it at the bottom of the screen, but if you need a little help getting started, here are some tips: ❏ Press Enter to move one level deeper into a series of related menus. However, if there is no deeper menu level available from the menu on the screen, pressing Enter moves you backoutone level. ❏ EMERGENCY—The Gateway 2000 Liberty boots from a floppy or from a hidden partition that contains DOS file recovery files, identified as drive C:. The normal drive C: becomes drive D:. Even though the screen itself shows “only” 800 x 600, you can set it to a virtual screen as large as 1024 x 768 (see page 14). Any attached monitor shows the same virtual screen. However, if you set the Display to CRT, the monitor shows the whole desktop. Getting around in the Setup menu ❏ If an item has two or more choices, press theSpacebar to rotate the choices until the desired choice is highlighted. (The choices rotate the other way if you press the BkSp key.) ❏ HDD—The Gateway 2000 Liberty starts from the hard drive without trying the floppy drive first. This is the best choice for normal operation. Startup (boot) drive pend mode. Set this to ON/OFF when you upgrade the memory. Highlight the Boot Drive item. Press the Spacebar to select one of three choices: ❏ FDD/HDD—The Gateway 2000 Liberty looks for a floppy to boot from, and if it doesn’t find one, it looks for the hard drive. Using the Setup program 18 The Password menu Highlight the PASSWORD item on the main menu and press Enter. Then: To disable the password: 1. Select the DISABLE item on the password menu. A window appears for you to type the old password. 2. Type the password and press Enter. You return to the mainmenu. If you lose your password. . . Don’t forget your password! The only way to remove a forgotten password and regain access to your Gateway 2000 Liberty is to return it to Gateway 2000. The parallel port is always LPT1, but you may set its type to AT (normal) or Bi-Directional (ECP/EPP). The parallel port also functions as a floppy disk drive port. The port automatically switches to that function when you connect the floppy drive. The Power Management menu Highlight the POWER MANAGEMENT item on the main menu and press Enter. The Port Assignment menu 1. If a password is not already set, the ENABLE item is highlighted. Press Enter. Highlight PORT ASSIGNMENT on the main menu and press Enter. 2. Type a password and press Enter. You can enter as many as eight characters. The characters donotshow up on the screen when you type them. Passwords are case sensitive (upper- and lowercase matters). 3. The system asks you to enter the password again to confirm it. If you enter the same password both times, the message “Password Accepted” appears and you return to the main menu. The power management menu has four preset battery power settings that cover most situations. However, you may be able to significantly improve battery life by customizing the settings for your particular needs. From here on, you can’t access your Gateway 2000 Liberty without first entering the password. To change the password: 1. Select the CHANGE item in the password menu. A window appears for you to type the old password. Highlight the item you want to change and press the spacebar to change the setting. 2. Type the old password and press Enter. The highlight moves to the ENTER NEW PASSWORD field. The serial and IR ports can be set to COM 1, 2, 3, 4, or Disabled. COM 1 is the default for the serial connector; COM 2 is the default for the IR port. You cannot change from the standard memory addresses and IRQs. (Serial devices in the PCMCIA slots default to COM 3 and 4.) 3. Type the new password, then press Enter. Retype the new password to confirm it. Press Enter. To select a preset setting, highlight the desired setting in the upper section of the screen and press Enter. The setting is selected and you return to the main menu. PressEsc to exit withoutkeepinganychanges. Using the Setup program 19 To customize the power control settings, highlight whichever of the User Settings items you want and press Enter. You have two options: one for the settings for when the computer is plugged into the AC adapter, and the other for when the battery is in use. Understanding power management choices ❏ Video Timer: Sets the number of minutes of inactivity that elapse before the light behind the screen shuts off. ❏ Hard Disk Timer: Determines how long the hard disk motor runs before shutting down. The longer it runs, the less often you wait for the hard disk to spin up when you access it. However, running the motor consumes power. If your software makes frequent hard disk accesses, set the spin-down to a longer time. It takes less power to keep the disk going than to spin it up frequently. For accesses that are typically two minutes or more apart, set spin-down to 30 seconds. For accesses less than two minutes apart, set spin-down to one minute. ❏ CPU Performance: The faster the computer runs, the more power it consumes. - Maximum Power Savings runs the CPU at its slowest, power-saving speed at all times. 1. Move the highlight to the item you wish to change. 2. Press the Spacebar or BkSp key until the desired setting is highlighted. Not all choices may be available. - Good Power Savings runs the CPU at a moderate speed during use and at its lowest speed during periods of inactivity. 3. Move to the next item. When you finish, press Enter or Esc. You return to the power management menu. Press Esc again to return to the main setup menu. - Good Performance runs the CPU at full speed during use and at its lowest speed during periods of inactivity. To disable the Power Manager: 1. Enter the Control Panel under Program Manager in Windows. 2. Double-click on the Power icon to open the Power Management utility window. 3. Click on the Enable APM option once to remove the X and disable the Power Management feature. ❏ Suspend Timer: Determines whether computer enters Suspend mode automatically. If you set it to Enable, Suspend starts automatically about a minute after Standby begins. Suspend shuts off the screen entirely, spins down the hard drive, saves the contents of memory, and powers down the CPU. Once the system is in Suspend mode, the only way to turn it back on is to press the power switch. ❏ Brightness: Determines how much power is consumed by the backlight lamp. Even though it is as efficient as current technology can make it, it consumes a lot of power compared to a computer chip. The dimmer, the less power it uses. ❏ Lid Closed: Determines what happens when you shut the lid. Suspend saves the most power, but you must press the suspend-resume button to reactivate the computer when you open the lid. Standby only requires you to press a key. Backlight Off saves the least power, but allows the computer to continue whatever it is doing, such as printing, performing a large calculation, or downloading. If you have the power switch set to ON/OFF and Lid Closed set to Suspend, you can still use the power switch to resume when you first open the lid. The rest of the time it is an on-off switch. - Maximum Performance runs the CPU at full speed at all times. ❏ Standby Timer: Determines how long the keyboard and other input and output must be inactive before it automatically enters Standby mode. Standby shuts off the screen backlight and spins down the hard drive. If you make infrequent entries but want to have the computer ready instantaneously (for example, taking notes at a meeting), set the Standby timer to a longer time. Using the Setup program 20 The Miscellaneous menu The Keyboard menu To use the Miscellaneous menu, highlight the MISCELLANEOUS item on the main menu and press Enter. To use the Keyboard menu, highlight the KEYBOARD item on the main menu and press Enter. ❏ Low Battery Beep: When enabled causes the system to beep at you when the battery gets low. This is a good safetymeasure. Press the Spacebar to exchange the function of the Ctrl and Caps Lock keys. When you have the setting you want, press Enter or Esc. You return to the main menu, and the Caps Lock and Ctrl keys assume the positions you set. Press the Up or Down Arrow key to access the lower part of the screen. ❏ Wake Up Alarm: Starts the unit at the time you set and makes it beep. This enables you to use your computer as a very expensive alarm clock, but it is also handy if you need to automaticallytransmitfiles at a certain time. The unit shuts down automatically after a certain period of inactivity. ❏ Keyboard Type: Toggles between USA and Europe. ❏ Typematic Delay: Lets you choose how long you must hold down a key before it begins to repeat. ❏ Typematic Rate: Sets how fast a key types when it is repeating. Important: Never try to remove the keys from the keyboard—you’ll break the keyboard. Using the Setup program 21 Using the PCMCIA software The advantage of a PCMCIA connector is that you get the power of the latest in technology—you can use and swap little cards that perform any of a wide variety of tasks that make your computing life easier. The disadvantage is that the software that sets up the PCMCIA connector is not yet easy to use. We did our best to set up your Gateway 2000 Liberty so you will never have to mess with the PCMCIA software. You just plug in your card and go. So, unless you know what you’re doing, we strongly recommend that you don’t change this software. If the PCMCIA stops working after you change your system, look at the section on the next page “When you change your system” before you reinstall. If you ever do need to reinstall the PCMCIA software, you can find detailed instructions in the Software Reinstallation Guide. Adding a new PCMCIA device The Windows 95 operating system supports “Plug and Play” hardware. Refer to your Windows 95 documentation for additional information about new hardware installation. When you first get a new card, try to use it without running third party installation software. If the card works, don’t install the third party software. The drivers we install at the factory work with most modem, network, and SRAM cards. If you're installing a network card, use the network driver supplied with the card, but not the PCMCIA software supplied with the card. The following information applies only to Windows for Workgroups users. To enable drivers for new devices: 1. Use any editor to open the CONFIG.SYS file. You will see several lines that start with “REM DEVICEHIGH.” 2. Delete the “REM” from whichever lines apply to your new device. Refer to the following descriptions. This list explains the PCMCIA lines in the CONFIG.SYS, including the ones that we didn’t put “REM” in front of: 2. Choose Edit Configuration from the File menu. A list of card types appears. ❏ SSCIRRUS.EXE: Enables the system to communicate with the socket. This file is always necessary! 3. Choose the card type that most closely matches your card. A screen appears in which you can set applicable parameters. Choose settings that agree with the information supplied with your card. Avoid choosing settings that conflict with the system’s configuration. In other words, if a COM port, IRQ, or I/O address is already in use by another device, don't try to assign it again. Look in the system menu to see which resources are already in use. ❏ CSALLOC.EXE: Manages card IRQ, memory, and address. This file is always necessary! ❏ ATADRV.EXE: Generic hard disk driver. Only necessary if you use an ATA hard drive card. ❏ MTAA.EXE: For AMD Type A flash memory card. ❏ MTAB.EXE: For AMD Type B flash memory card. ❏ MTI1.EXE: For Intel Series 1 flash memory card. 4. Save the settings and exit. Reboot the system. Try the card. It should work. If not, back up your current files and install their software. ❏ MTI2P.EXE: For Intel Series 2 or 2 plus flash memory card. ❏ MTATM.EXE: For an AMTEL flash memory card. ❏ MTSRAM.EXE: Generic RAM card driver. Necessary only if you use an SRAM card. ❏ MTDDRV.EXE: Necessary only if you use a flash or an SRAM card. PCMCIA card ❏ SSMSFLSH.SYS: Necessary only if you use a flash card. ❏ CARDID.EXE: Identifies the card to the system. This file is always necessary! 3. Save and exit the editor; reboot. Now your new PCMCIA device should work. But if the new card still doesn’t work, don’t install the third party softwareyet.Youmayhaveanunusualsoftwareconfiguration,and youmaybeabletosolveyourproblembyrunningCONFIG.EXE. This allows you to modify certain system settings in the PCMCIA software by modifying a file called CARDID.INI. (We run CONFIG.EXE at the factory for the cards we sell, so this is not necessaryforcardsyoubuyfromus.) To run CONFIG.EXE: Windows PCMCIA software You need this software to insert, remove, or change PCMCIA devices while in Windows for Workgroups. The software allows you to plug and unplug the device while Windows is in operation. Do not change PCMCIA cards while in Windows if the Windows PCMCIA software is not installed. We installed this software at the factory. However, if you reinstall Windows, you also need to reinstall the Windows PCMCIA software. Note: Put the PCMCIA card into either socket. The system detects the card automatically in either location. 1. From the CARDSOFT directory, type: config and press Enter. Press Enter again to get past the title screen. Using the PCMCIA software 22 1. Remove any PCMCIA device that may be in the PCMCIA socket. Put the Gateway 2000 Liberty system diskette is in the floppy drive. 2. Run Windows and open the Program Manager. Insert the fourth system diskette, labeled Card View/Card Power into the floppy drive. If the system starts up with CardViewfullsize as shown, open theOptions menu and chooseRun Minimized. 3. Select Run from the File menu. 4. Type a:setup Some PCMCIA cards require constant power to retain their settings. Hence, the system does not shut down power to the PCMCIA socket when a card is in the socket. Card Power allows the system to disconnect power to the PCMCIA slot without causing problems. An added benefit is that it restores a modem’s settings when you resume from Suspend mode. and click on OK. Press Enter at each dialog box to choose the defaults. 5. If you run EMM386, add the following address range to the EMMExclude= line in the [386enh] section of your SYSTEM.INI file. Create the line if it doesn’t exist. Click on Viewand you get even more details. The program has an extensive and useful help function. emmexclude=d000-dfff 6. When the installation is finished, exit and restart Windows before you use a PCMCIA device. If you ever need to reinstall Card View, insert its diskette into the floppy drive and use File, Run to run A:\setup. Detailed instructions on reinstallation are in the Software Reinstallation Guide. When you start Windows, Card Power appears full size. If the settings are what you want, press Enter to minimize it. Card View Card View is a Windows program that tells you what PCMCIA cards you have installed, if any. Keep its icon in the Startup group if you ever use a PCMCIA card. If you don’t use the PCMCIA features, or don’t need to be shown what you have installed, you can drag the icon into another group. When Card View is running, you have an icon in the lower left corner of the screen that shows what is in each PCMCIA slot. Double-click on this icon to enlarge it to a window and see more details about the PCMCIA card, as illustrated at the top of the next column. If you ever need to reinstall Card View, insert the Card View diskette into the floppy drive and useFile,Run to runA:\setup. Detailed instructions on reinstallation are in the Software Reinstallation Guide. Card Power If you don’t use PCMCIA cards, you can drag Card Power’s icon out of the Startup folder. If you ever need to reinstall Card Power, run the Setup program on System disk 4 that came with your Gateway 2000 Liberty. Detailed instructions on reinstallation are in the Software Reinstallation Guide. Card Power appears automatically whenever you start Windows. It manages the power requirements of PCMCIA cards when the system is in Suspend mode. Using the PCMCIA software 23 Adding memory 4. Close the unit and turn it over. 5. Disconnect the AC power and remove the battery (see page7). 6. Remove the memory expansion socket cover on the bottom of the unit to expose the socket. Memory module You can easily upgrade the memory in your Gateway 2000 Liberty. There are lots of good reasons to add more memory: some programs simply won’t work at all without more than 4MB, while others show a noticeable performance improvement with 8MB or more. You will enjoy slightly better battery life under Windows with 8MB or more of RAM, since Windows doesn’t have to swap to the power-hogging hard disk as often. Depending on your system, you can add a single 4MB or 16MB SIMM to the existing memory. Installing the memory upgrade IMPORTANT INFORMATION! You MUST turn the power off EXACTLY as described below, or you WILL destroy your RAM upgrade when you install it. 7. Make sure you are grounded to the computer by touching the metal part of the parallel or serial port. 8. Carefully insert the memory module into the socket. It goes in only one way. 9. Replace the memory socket cover. 10. Reinstall the battery and reconnect the AC power. 11. Turn the computer right side up and open the lid. Push the power switch. The Gateway 2000 Liberty restarts and automatically recognizes the new memory. If the memory test during start-up shows errors, or if the setup program shows the wrong amount of memory, repeat the installation steps; remove and replace the memory card. If the problem persists, contact Gateway 2000 for repair or replacement. Opening for memory module (yoursmaylookdifferent) 1. Enter the Setup program (Fn+Esc) and set the power switch to ON/OFF. 2. Exit, saving the change (Esc, then F10). 3. Slide the power switch to shut down the system. Underside of system; hinge at top. Adding memory 24 Troubleshooting If your Gateway 2000 Liberty is misbehaving, read through this section before you call Gateway 2000 Customer Support. The problem may be something simple that you can quickly solve yourself, and you may save yourself some time on hold. If nothing here helps you, call us! The Warranty supplied with your Gateway 2000 Liberty describes several ways to contact us, from a traditional voice telephone call to a message on CompuServe or AOL. lL Startup The system is dead. Battery light is not lit, no whirring noise from hard disk. Indicator lights below the screen are not lit. ❏ Is the battery charged? Plug in the AC adapter. The computer does work if the battery is dead. ❏ Is there power at the outlet? Plug something you know works into the outlet. If it doesn’t work, suspect a faulty wall outlet or blown circuit breaker or fuse. ❏ Could something have damaged the power cable, such as a big yank or getting caught in something? ❏ Is the AC adapter functioning?Plug in the AC adapter. If the indicator on the AC adapter itself (not the one on the battery) lights up, the adapter is getting AC. If the battery indicator doesn’t glow green or orange, try another battery. If it doesn't work either, the AC adapter is defective. If just one of your batteries doesn’t glow green or orange when connected to the AC adapter, that battery is defective. The AC outlet, AC adapter, and battery check out OK, but the Gateway 2000 Liberty is still dead. I changed my AUTOEXEC.BAT or CONFIG.SYS file, and now the computer won’t restart. Try pushing the reset button on the bottom of the computer with a toothpick or unbent paper clip. (A ball point pen works, but it may gum up the switch with ink.) After resetting, be sure to wait for a full boot cycle; it can take a long time. ❏ If you have a floppy drive, you can boot with it and the MS-DOS disk shipped with your Gateway 2000 Liberty. The system is hung when I attempted to reactivate with power switch. ❏ If this problem happens very rarely, it might be caused by a static electricity discharge. There’s not much you can do about this; the unit is very well protected against static electricity, but any computer will hang or reboot if it gets zapped. This is inconvenient, but as long as you remember to save your work before closing the lid or operating the power switch, you’ll never lose anything. Screen is blank, but the light on the battery is green, and the drive lights blinked. ❏ Try adjusting the brightness and contrast controls. ❏ Give the system enough time to fully boot, to be sure the screen really is blank. The only thing on the screen might be the C:\> prompt, which is inconspicuous. ❏ Press F8 briefly when the “Starting MS-DOS. . .” appears on the screen after a reset. This allows you to step through the items in CONFIG.SYS and AUTOEXEC.BAT and choose whether to run or skip each item. ❏ Or you can bypass these files entirely by pressing F5 briefly when “Starting MS-DOS. . .” appears on the screen after a reset. Then use the Edit program to correct the file. ❏ Another approach is to use the Emergency Boot Drive option. PressFn+Esc to enter the Setup program. Change the Boot Drive option to EMERGENCY. Exit saving changes. When the system reboots, your C: drive is a special 2MB partition with several backup files and utilities. Your normal drive C: is drive D:. Now you can copy or edit your system files to recover the drive. Be sure to enter the Setup program when you are done change the boot drive option back to its former setting. ❏ Finally, call Gateway 2000 Customer Support. The system boots from floppy disk, but doesn’t boot from hard disk. The hard disk boot track may have been scrambled. It was probably caused by a transient problem such as static electricity or physical shock. Try reinstalling the system files with the SYS command as described in your MS-DOS manual. If the hard disk still won’t boot, but you can read data and other files, back up the files and then reformat the drive as described in the DOS manual. Restore your data and applications. Troubleshooting 25 lL Communications When I resume, the screen lights up and Windows is OK, but the modem doesn’t work any more. This often occurs with communications programs like WinCIM and AOL. After turning the computer back on, pop the modem out and put it back in again. You’ll hear two beeps (the “happy beep”). Restart the software. Now the software should work. If the software still doesn’t recognize the modem, exit the program and restart the system by pressing Fn+Alt+Del. When I use Windows Terminal or another communications application, it can’t find my modem. Remove and reinsert the modem, listening for the “happy beep.” If you hear this, the modem is probably working OK— check your software and make sure it is set for the right COM port. As shipped from the factory, the modem is configured for COM 3. Somewhere in your program is an option to configure the COM port. Make sure it is set for COM 3. Sometimes I have a problem transmitting faxes with my Gateway 2000 Liberty and a PCMCIA modem. You may have better success if you disable the Power Management feature on your computer. 1. Enter the Control Panel under Program Man- ager in Windows. 2. Double-click on the Power icon to open the Power Management utility window. 3. Click on the Enable APM option once to remove the X and disable the Power Management feature. 4. Complete your fax transmission. You don’t need to reboot windows before faxing. The change in the Power Management utility automatically takes effect. 5. After completing your fax, return to the Power Management utility and click once on the Enable APM option to enable the Power Management feature. If you continue to experience problems, contact Gateway 2000 Portables Technical Support. Sometimes when I try to send a fax, it can’t find my modem, even though I just used it a couple of minutes ago with another program. Doyouhaveanothercommunicationsprogramloaded?Communications programs tend to seize complete control of the system’s COM port when you load them. When the next communications program (say, your fax application) comes along, the first program won’t let go of the COM port. In technical terms, we call this “device contention.” My PCMCIA card stopped working. Did you make any changes to the PCMCIA software? If so, you may need to reconfigure the PCMCIA software. If you know this isn’t the problem, you may have simply changed your system configuration. Each time you change system configuration, such as making a change to your EMM386 settings, you need to run CONFIG (only applies to Windows for Workgroups users) again. To run CONFIG: 1. Restart the system by pressing Fn+Alt+Del. 2. If necessary, exit Windows; type: cd\cardsoft and press Enter. 3. At the DOS prompt type: config and press Enter. 4. Choose Edit Configuration. . . from the File menu. A list of types of cards appears. There is no elegant solution to this problem. The easiest thing to do is to close all communications programs before you try to send a fax. Some communications programs are written to coexist peacefully with fax software. You might try one of these. I can’t make my PCMCIA modem work. Be sure the regions C800-CBFF, D000-DFFF, and EC00-EFFF are excluded in the EMM386 line in CONFIG.SYS. (Look in the file and see if the EMM386 line has X=C800-CBFF etc. in it.) If you purchased a PCMCIA device with your Gateway 2000 Liberty, this has already been done. Note: Do not use your PCMCIA modem on a digital phone line! Modems convert digital signals into analog signals that are sent on normal, analog telephone lines. If you attempt to use a line that is already digital, the modem will not work and could blow a fuse and become unusable. If you are in doubt about the type of line you have, ask your phone service supplier. Troubleshooting 26 5. Select your type of card from the menu. A screen for changing settings appears. The screen for a modem card is shown below. My PCMCIA card stops working after the Gateway 2000 Liberty goes into Suspend mode. ❏ Try not to open groups that have lots of icons. (Make more groups with fewer icons each.) This may happen when using communication programs such as WinCIM in Windows. After tyou press the resume button (and enter the password if you have one) if you don’t hear the “happy beep” indicating that the card has been recognized, eject the card then reinsert it. Restart the software. Now it should work. ❏ Don’t load fonts that you don’t need. Network cards are a different matter. Configure your Gateway 2000 Liberty power management so it never goes into Suspend mode. You may have to reboot to access the network. Remember to re-enable Suspend when you remove thecard. If you keep the Card Power icon in your Startup group, most of these problems will go away(doesn’t effect network cards). 6. Change parameters as necessary to remove conflicts with the rest of the system. You can pressFn+Esc at any time to See the settings in the Setup program. You can also view many settings by choosing Resource Allocation from the Utility menu. lL Memory When using Windows, I receive one of the following out of memory errors: Application Execution Error Insufficient memory to run this application There is not enough memory available. We wish there was a simple solution we could give you. Unfortunately, these error messages could be caused by one of any number of problems, and you may have to try quite a few things before you discover the solution. All we can do is point you in the right direction: ❏ Some applications (usually older ones), don’t give system resources back until you restart Windows. If you have an application like this, keep it open instead of closing and reopening it many times. ❏ Optimize conventional memory, using the MemMaker program. Try changing the order in which programs or drivers load: Put bigger ones first. ❏ Disable applications that start automatically when you start Windows. (Check WIN.INI and the Startup group). ❏ Use the Program Manager (PROGMAN.EXE) as your Windows shell. Other shells from third parties may take morememorythanProgramManager. I only have about 540K of conventional memory left. This causes a lot of problems. No kidding! You may simply be loading too much stuff, and the only thing to do is get rid of some of it. However, if you don’t use the PCMCIA slots, run the DOS MemMaker program.MemMakerismagic,andifanythingcanbedonetofree up more conventional memory, it will do it. If MemMaker fails to help, try rearranging the order of devices in your CONFIG.SYS file. Put bigger devices first. If you use the PCMCIA slots, do not run MemMaker. For the technical: MemMaker changes or removes excluded memory areas used by the PCMCIA drivers. If you run MemMaker, protect these exclusions. If you don’t need the memory and PCMCIA at the same time, try using two configurations, one for PCMCIA sessions, one for lots of conventional memory. ❏ Close one or more applications. In general, you should keep as few applications running as possible. ❏ Minimize seldom-used groups and make open windows large enough to eliminate scroll bars. ❏ Increase the size of your permanent swap file. ❏ Do not use wallpaper, or use a small bitmap and tile it. Troubleshooting 27 lL Miscellaneous The EZ Point mouse moves too fast (or too slowly). You can adjust pointer acceleration (and a lot of other interesting things) in the Mouse Manager program, which you can get to by clicking on Control Panel in the Windows Main program group, and then clicking on Mouse. Notice that you can make the pointer bigger or smaller, make it reverse, and make it snap to the default button in a dialog box (very handy!). The system date says January 1, 1980. The internal battery that keeps the clock/calendar going ran completely down. This can happen if you leave the battery pack out of the Gateway 2000 Liberty for a day or more. To correct the problem, reset the date in the Setup program or in the Date/Time control panel. Plug the AC adapter into the computer first and leave it attached for an hour or so. The system clock loses time when it is in Suspend mode. Make sure the file PMEXT.SYS is in the CONFIG.SYS file and that the file itself has not been deleted from the hard drive. The line may look something like one of these: DEVICE=c:\UTILS\PMEXT.SYS Why doesn’t the DOS manual have a command reference anymore? Those huge DOS manuals that most of you never read were making a big dent in the tree supply. So we put the same information that was in the paper manual on disk instead. Go to the DOS prompt and type HELP. You can take it from there. I just deleted my CONFIG.SYS and AUTOEXEC.BAT files. No problem. We stored backups of the files in theC:\BACKUP directory. Just copy them into the C:\ directory, and you’re back in business. Of course, keep in mind that the files are set up at the factory—any changes you made since you got the Gateway 2000 Liberty are history. You might still get lucky, though. Look in the C:\ directory for backup copies of the files made when you installed a new option or application. They’ll be named something like AUTOEXEC.OLD, AUTOEXEC.001, CONFIG.BAK, CONFIG.002. Rename them to AUTOEXEC.BAT and CONFIG.SYS. An error message appears on the screen: General Failure reading drive C: Try rebooting a couple times. Be sure the unit isn’t too cold. If nothing works, call Gateway 2000 Customer Support. Non-system disk or disk error reading drive A: You have a non-bootable disk in drive A: (the external floppy disk drive). Remove it and press any key. Bad command or file name You may have mistyped a DOS command or there may be a bad command in the AUTOEXEC.BAT file. Retype the command. If you know what you’re doing, edit the AUTOEXEC.BAT to correct the error. Or press F8 during the boot and step through the boot commands. If you don’t know anything about theAUTOEXEC.BAT file, find someone who can help you. For information on other error messages, refer to the DOS or Windows manuals. All of a sudden, the system won’t accept my password. Check the indicators for Caps Lock, Num Lk, and Pad Lk. If any of them are on, turn them off. (You can do this before entering the password.) Then try retyping the password. I forgot my password. Try to prevent this! We made the password feature very secure and there isno easy way to erase a forgotten password. You have to return your Gateway 2000 Liberty to Gateway 2000 for a time-consuming repair. Call Gateway 2000 Customer Support. Or think until you remember it. I bought this thing because I wanted great performance. I’m not impressed. Before you give up, remember that most notebooks are set up to provide a reasonable compromise between battery life and performance. Your computer is loaded with power management software that extends the amount of time you can work off of the battery. There’s no free lunch though; that extended battery life comes at the expense of performance. We tried to choose settings that give the best compromise, and we tested these settings on heavy-duty programs like Excel and PageMaker. But if our settings don’t work for you, you can customize the degree of power management your Gateway 2000 Liberty uses by changing the power management settings in the system Setup program (described elsewhere in this book). You don’t have to completely disable power management to improve performance—try moderate changes at first. Also, remember that the system Setup program lets you select separate settings for battery and AC operation. There’s no reason not to completely disable all the power management features when running with AC. I bought the Gateway 2000 Liberty because I wanted great battery life. I’m not impressed. Fully discharge the battery twice when you first get it. (Give it afullchargebeforeeachdischarge.) Youcandoseveraladditionalthingstosavebatterylife,although theymightcostyoualittleintermsofperformance.Youmaynever noticetheperformancedifference—experiment! Troubleshooting 28 Things that improve battery life: My screen looks a little dark in Windows. ❏ Accessing the hard drive and powering the backlight take the most power. The more you reduce these, the longer your battery lasts between charges. This is often caused by someone changing the Color settings in the Windows Control Panel. ❏ Use the Suspend mode often. It doesn’t take long or use much power to reactivate, and Suspend saves battery power. To change color settings in Windows 95, double click on the the Display icon in the Control Panel. Click on the Appearance tab. Select the option labeled Windows Standard. ❏ You may have heard about using POWER.EXE for power management—don’t!The power management features built into the unit work better than POWER.EXE. To change color settings in Windows for Workgroups, doubleclick on the Color icon in the Control Panel. (It looks like three crayons.) Select the option labelled Windows Default from the drop-down list. (It’s usually first in the list.) ❏ Go the Power option in the Windows control panel. Make sure that power management is set to Advanced. I can’t install new software from the floppy disk drive— the computer keeps hanging. ❏ In Windows, the fewer applications you have open, the fewer disk accesses the system makes. Don’t get in the habit of automatically opening every possible application you might use—just open the ones you need. Power management doesn’t mix well with Windows setup programs. When you install a new application from a floppy disk, it’s best to have the AC Adapter connected. ❏ Consider using Microsoft Works instead of Word and Excel. The files are compatible, and Works requires fewer memory swaps to the hard disk, reducing disk accesses andsavingpower. ❏ DOS and Windows consume the same amount of power. However, because DOS in a window has bettermemory management than regular DOS, you can sometimes reduce disk accesses by running DOS programs in a DOS window within Windows, instead of directly from DOS. (Disk accesses take lots of power, so anything that reduces them lengthens battery life.) ❏ Use the Contrast, not the Brightness control to adjust the screen. Keep the brightness control set low. I hooked up a scanner to the parallel port and installed its software, but I can’t make it work. The parallel port is probably not set for bidirectional mode, which is required for many scanners. Bring up the Setup program by holding down the Fn key and then pressing the Esc key. Then go to the Port Assignment section and set the parallel port to Bi-Directional. The battery indicator glows bright red when I plug in the AC Adapter. The adapter has detected a fault condition. Ususally a plug is loose. Unplug all three plugs and then plug them in again. The indicator should glow orange now. I don’t like the EZ Point! Be honest now, how much time have you spent using it? OK, now how long did it take you to learn how to ride a bicycle? Seriously, give it a chance! It takes most people several hours to get it, but once they do, they like it. Troubleshooting 29 Index A C E H L O ACadapter 3, 6, 8, 9, 10, 16, 20, 25, 28 AOL 26 arrow keys 12 ATA hard drive 22 AUTOEXEC.BAT 15 autoexec.bat 25 Caps Lock 8, 28 Card Power 15, 23, 27 card services 22 CardView 15, 23 CardID 22 CARDID.INI 22 cardsoft 26 Charger light 8 ChipCRT 18 ChipsCPL 14 Cirrus Socket Services 22 COM 1 19 COM 2 19 COM port 17, 22 com port 26 COM ports 19 COM1 16 COM3 26 CONFIG.SYS 15, 28 config.sys 25, 27 Contrast 8, 29 contrast 25 contrast control 10 Control Panel 13, 29 conventional memory 27 CPU 20 CPU performance 20 CRT 18 CSALLOC 26 CSALLOC.EXE 22 Ctrl+Alt+Del 10 cursor 12 ECP/EPP 19 EMERGENCY 18 Emergency boot 4 Emergency Boot Drive 25 EMM386 23, 26 Esc 18 Ethernet 16 exchanging files 16 external keyboard 3, 10 EZ Point 8, 11, 12, 28 ham radio TNC 16 HandBook486 16 hard disk 4 Hard disk drive 6 hard disk timer 20 Hard drive 7 HDD 18 hot-swapping 3 large screenTV 4 LCD 11, 18 LCD & CRT 18 LCD display 8 LCD overhead projector panel 16 lid closed 20 LPT1 19 on-off switch 6, 10 I M F I/O address 22 icons 12 Interlnk 16 IR 4, 16, 19 IR connector 6, 16 IR module 9, 16 IR port 3, 16, 17, 19 IRDA 16 IRQ 22 IRQs 19 MemMaker 27 Memory 7 memory 24 memory expansion socket 24 memory test 24 modem 16, 17, 18, 26, 27 monitor 10, 16 Mouse buttons 8 mouse buttons 11, 12 MTAA.EXE 22 MTAB.EXE 22 MTATM.EXE 22 MTDDRV.EXE 22 MTI1.EXE 22 MTI2P.EXE 22 MTSRAM.EXE 22 B back-up copies 17 backlight 29 Battery 7, 19, 28 battery charger 8 battery life 4 Battery light 8 Battery pack 6, 7 BattStat 14 Baud Rate 17 BkSp 18 boot problems 25 Break 11 Brightness 29 brightness 8, 25 D database 4 desktop 12 device contention 26 Disk activity lights 8 DOS 13, 25 double-clicking 12 Drive cable 9 F10 18, 24 F5 15, 25 F8 15 fax 26 FDD/HDD 18 File Manager 13 File, Run 13 file transfer 16 flash memory card 22 floppy disk drive 16 floppy drive 19 Fn key 11 Fn+Alt+Del 10, 26 Fn+Esc 11, 24 Fn+F3 11, 14 Fn+F4 11 Fn+F5 11 Fn+F6 11 Fn+F7 11 fonts 27 foot 6 G groups 12 J joystick 12 K keyboard 10, 11 Windows 95 11 keyboard menu 21 keycaps 11 N network card 22 Network cards 27 network PCMCIA card 3 notebook 4 nul modem 16 Num Lk 8, 11, 28 Num Lock 8, 11 numeric keypad 8, 11 Index P Pad Lk 8, 11, 28 pad Lock 8 pagedown 12 pageup 12 parallel cable 16 Parallel port 6, 17 parallel port 9, 19, 29 password 19, 28 change 19 disable 19 Pause 11 PCMCIA 6, 9, 16, 17, 26 PCMCIA cards 23 PCMCIA connector 22 PCMCIA door 8 PCMCIA modem 17 PMEXT.SYS 28 Power 29 power cable 25 Power control panel 14 powermanagement 14, 19, 28 Power switch 6 power switch 10, 18 POWER.EXE 29 printer 16 ProgramManager 13, 15, 27 projection panel 4 PS/2 connector 6 PS/2 mouse 3 30 R T RAM 4 reinstall Card View 23 reinstallTranXit 17 Reset 10 Reset switch 7, 10 ROM BIOS 18 Technical Support 25 tic electricity 25 tool bar 13 TranXit 16 troubleshooting 25 typematic functions 21 S V scanner 17 serial port 16 serial cable 16 serial mouse 3 Serial port 6 serial port 19 setup menu 17, 18, 29 entering 17, 18, 29 leaving 18 selecting items 18 Setup program 18 spacebar 18 Speaker 11 Specs 5 spreadsheet 4 SRAM 22 SRAM card 22 SSMSFLSH.SYS 22 Standby 10, 20 standby timer 20 Startup group 27 static electricity 24, 25 subnotebook 4 Suspend 10 suspend 18, 20 suspend timer 20 suspend-resume switch 18 VGA 8 video 18 video control panel 14 Video port 6 video timer 20 W WIN.INI 27 WinCIM 27 Windows 4, 12, 22 Windows 95 4, 5, 12, 13, 15, 22 keys 11 word processing 4 Index 31 32