1
County Justice Information Exchange Project
~
(CJIEP)
Implementation Manual
March 5, 2008
Implementation CD Version History
03/05/2008
•
Added new AOPC schema to JBOSS file
•
Added new mapping to DA system
10/24/2007
•
Docket ID Translation Maintenance
o
Added clarifying instructions
•
Data Validation Criteria
o
Added the data validation criteria for the Adult Probation, District Attorney and Jail records
management systems to the User Manual section.
9/27/2007
File Changes:
o
Changed the bridge’s config.xml file to point to the correct “InMessages” location. No changes
necessary at the county.
Document Changes:
o
Corrected typo in 8/31/2007 version history note (changed “fun” to “run”)
o
Added clarification to not include the .jws extension when registering the web services in the UDDI.
o
Added additional steps to configure database if JBOSS is being installed on a port other than 8081.
o
Added missing quotes around the command used to stop and start the Apache Tomcat service when
setting up the Scheduled Tasks (new screenshots).
9/14/2007
File Changes:
o
Added CJIEPAPCreate.sql. This file is located in the Installation – Web Services directory of the CD
and will create the Adult Probation database package.
Document Changes:
o
Added instructions for running the above script
o
Added configuration instructions for rolling system into production.
8/31/2007
File Changes:
o
Fixed the script that creates the CJIEP database due to a missing field. This script is the
CJIEPFullCreate.sql file located in the Installation – Web Services\CJIEP-Temp directory and will
need to be run again. It is recommended that you use Oracle’s Enterprise Manager to remove all
objects in the existing CJIEP Database prior to running the script.
o
Fixed typo in ServiceAgent.exe.config file. This file is located in the Installation – ServiceAgent
directory of the CD. Please replace the existing file (located at c:\Program Files\CJIEP ServiceAgent)
with the new one and repeat the steps at the bottom of page 27 (entering the county and jurisdiction
ids).
o
Replaced JDK 1.4.2_02 with 1.4.2_13. It is recommended to install 1.4.2_13 to keep consistency
across counties, and this document was referencing 1.4.2_13 in several places (including setting the
java_home variable and setting up the JBOSS service). However, 1.4.2_02 will work if the county
already has that version installed and working correctly with the system.
o
Made a minor change to the JBOSS-3.2.6 file to remove a value from Lancaster County that was in
the Email notification configuration file. No changes by the counties are necessary, as this value
would be overwritten during the install.
Document Changes:
o
Pages 7, 8, 9: Added screenshots of the JAVA install process
o
Pages 11 – 14: Added Screenshots to the Tomcat installation for clarification purposes.
o
Pages 16 – 21: Due to JNET changes that timeout the connection, it was necessary to add additional
steps to create scheduled tasks to periodically restart the Tomcat Service to reset the connection.
o
Pages 22 – 28: Added Screenshots to the MySQL installation for clarification purposes.
o
Page 30: Changed JUDDI script name typo from create_database.sql to create_juddi_database.sql
o
Pages 30, 31: Added instructions for modifying JUDDI password to the Install JUDDI section.
o
Page 36: Added missing screenshot to the Service Agent setup.
o
Pages 42, 43: Clarified using SQL Plus for the CJIEP database creation and added screenshots.
o
Page 44: Added instructions on how to find the TNS name for the database connection.
o
Page 45: Added step in the Email Configuration for specifying the SMTP server.
8/09/2007
Rollout of AOPC new schema (1.0.6J). This change is included in the .ear file contained in the JBOSS 3.2.6 zip
file. No changes to this document necessary
Updated JUDDI install
o
All information included in one .war file, which eliminates two steps.
1
o
Code for Tomcat’s server.xml is now in a text file to make copying and pasting it into the file easier.
8/05/2007
Redesign of This Installation Document (layout changes, screenshots, consolidation of instructions, etc)
Added instructions for adding JAVA_HOME environment variables during the JAVA SDK install.
Corrected several typos and paths to files.
Corrected juddi password in Server.xml edit (from “juddi” to “123456” to match the script.
Corrected the juddi password in the juddi.users file on the CD to match the script.
Modified some files to remove references to county-specific names, and replace with instructions (for example,
removed a server name and put in “YOUR SERVER NAME HERE”). This will make it clearer what sections to
change in the file.
8/02/2007
Corrected several typos
Added MdbEjb.jsp to the JBOSS deployment file
7/27/2007
Updated jUDDI database creation script
Updated jUDDI zip file to include some files to eliminate a few installation steps.
Updated jUDDI installation instructions
Updated the CJIEP database creation script
Updated the JBOSS zip file to correct java IncompatibleClassChange Error
7/20/2007
Updated Implementation Manual to clarify Juddi Installation.
Added JUDDI database creation script to Supporting Software/Juddi directory.
Clarified several other points in the Implementation Manual related to installation directories.
Corrected several files related to the JBOSS installation.
7/19/2007
Updated Implementation Manual to reflect correct JUDDI version (0.8.0).
2
TABLE OF CONTENTS
I. INSTALLATION PREPARATION ...................................................................... 5
Introduction ....................................................................................................... 5
Infrastructure Requirements: Hardware and Software Specifications .............. 5
Installation Assumptions .................................................................................... 5
II. INSTALLATION OF PRE-REQUIRED SOFTWARE ......................................... 6
Introduction ....................................................................................................... 6
JAVA SDK 1.4.2_13 .......................................................................................... 7
Tomcat 5.0 ...................................................................................................... 11
MySQL 4.1 ...................................................................................................... 24
jUDDI 0.8.0 ...................................................................................................... 32
III. INSTALLATION OF SERVICE AGENT ........................................................ 34
Introduction ..................................................................................................... 34
Installation Steps ............................................................................................. 34
IV. INSTALLATION OF BRIDGE COMPONENT ................................................ 40
Introduction ..................................................................................................... 40
Installation Steps ............................................................................................. 40
V. INSTALLATION OF WEB SERVICES AND GUI ........................................... 42
Introduction ..................................................................................................... 42
Preparation ...................................................................................................... 42
JBOSS Installation .......................................................................................... 42
Create CJIEP Database .................................................................................. 44
Create Adult Probation Package ..................................................................... 46
Modify DA system ........................................................................................... 47
Configure Database Connections.................................................................... 48
Email Configuration (Optional) ........................................................................ 49
Register the Web Services in the UDDI .......................................................... 50
Access the Application .................................................................................... 51
VI. CONFIGURING FOR PRODUCTION ........................................................... 52
Overview ......................................................................................................... 52
Notify JNET ..................................................................................................... 52
Connect to the JNET Production Queue ......................................................... 52
Configure Legacy System Connections .......................................................... 52
Create Adult Probation Package ..................................................................... 53
Modify DA system ........................................................................................... 54
VII. CJIEP USER’S MANUAL ............................................................................. 55
Overview ......................................................................................................... 55
CJIEP Web Application – User Acceptance Module ....................................... 55
Login Screen................................................................................................ 56
Message List Page ...................................................................................... 57
Message Detail Page................................................................................... 59
Administration Page..................................................................................... 60
3
Maintain Translation Table ............................................................................... 61
Docket Id Translation Maintenance ................................................................. 62
Setup Processing Switches .............................................................................. 63
Reports................................................................................................................. 64
List Failed Messages ......................................................................................... 65
Target Application Finalization ........................................................................ 65
OMS – Jail System ...................................................................................... 65
Adult Probation System ............................................................................... 66
District Attorney System (PMS) ................................................................... 66
Web Service Reference .................................................................................. 66
Glossary .......................................................................................................... 67
VII. TROUBLESHOOTING QUICK-REFERENCE GUIDE .................................. 69
Overview ......................................................................................................... 69
Log Files .......................................................................................................... 69
Services .......................................................................................................... 70
Symptoms and Resolutions ............................................................................. 70
APPENDICES ...................................................................................................... A
APPENDIX 1: ARCHITECTURAL SOLUTIONS AND TECHNICAL
REQUIREMENTS ............................................................................................ A
APPENDIX 2: COUNTY INFORMATION EXCHANGE SERVICE ORIENTED
ARCHITECTURE STANDARDS ...................................................................... A
APPENDIX 3: DETAILED SYSTEM DESIGN ................................................. A
APPENDIX 4: CJIEP PILOT WEB SERVICE PROVIDER DESIGN................ A
APPENDIX 5: UML AND SERVICE SEMANTICES FOR CJIEP PILOT
SCOPE ............................................................................................................. A
APPENDIX 6: INFRASTRUCTURE REQUIREMENTS – HARDWARE AND
SOFTWARE SPECIFICATIONS ...................................................................... A
4
I. INSTALLATION PREPARATION
Introduction
This implementation document was developed as part of the County
Information Exchange Pilot (CJIEP) Project.
Infrastructure Requirements: Hardware and Software
Specifications
Prior to implementation, your county was required to complete a
Readiness Assessment Document (RAD). The evaluation of this
completed document determined your county’s readiness, which
included in part the infrastructure. A section of the RAD, which
contains the infrastructure requirements with the hardware and
software specifications, has been included as an appendix of this
implementation manual.
Installation Assumptions
It is assumed that the server where the CJIEP application is to be
installed has the following:
500Mb Free space (5Gb or greater preferred).
Appropriate Oracle client installed.
o Scripts provided with this install have been tested using
Oracle 9i. Other versions may require some minor
changes to the database creation scripts due to
differences in syntax.
5
II. INSTALLATION OF PRE-REQUIRED SOFTWARE
Introduction
In this section we will install pre-required software packages. These
are included on the installation CD in Supporting Software Folder and
consist of:
•
JAVA SDK 1.4.02
•
Tomcat 5.0
•
MySQL 4.1
•
jUDDI 0.8.0
6
JAVA SDK 1.4.2_13
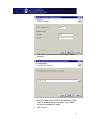
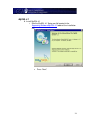
Install JAVA SDK version 1.4.2_13
o Run the j2sdk-1_4_2_13-windows-i586-p.exe file located
in the Supporting Software\JAVA 1.4.02 folder of the
installation CD.
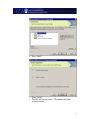
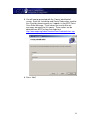
o Check “I accept the terms in the license agreement”
o Press “Next”
7
o Press “Next”
o Press “Install”
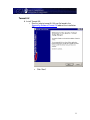
o The JDK will start to install. This process will take
several minutes.
8
o Press “Finish”
9
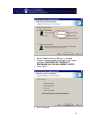
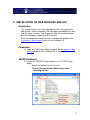
Set the JAVA_HOME environment and path variables.
o Right click on My Computer and choose Properties
o Click on the Advanced Tab
o Click on Environment Variables
o Under System Variables, click New…
o Enter the following variables
o Click OK
o Under System Variables, edit the Path variable
o Add the highlighted text to that beginning of the Path
variable.
o Verify correct version of JAVA is running
Open a command prompt and type in java –version.
The version should be 1.4.2_13.
10
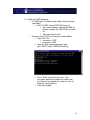
Tomcat 5.0
Install Tomcat 5.0
o Run the jakarta-tomcat-5.0.30.exe file found in the
Supporting Software\Tomcat 5.0 folder of the installation
CD.
Click “Next”
11
Click “I Agree”
12
Uncheck “Examples” to save server space
Click “Next”
Click “Next”
13
Click “Next” (you may enter an admin password if
you wish)
Verify the path to the JAVA Virtual Machine (JVM).
If you’ve followed these instructions, you should
not have to change this value.
Click “Install”
14
Tomcat will begin the installation process.
Uncheck “Show Readme”
Click “Finish”
Modify the Tomcat service to start automatically.
o Go to Start -> Run -> Services.msc
o Right click on the Apache Tomcat service and change
the Startup Type to Automatic
15
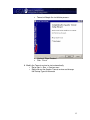
Start the Apache Tomcat service.
o Right click on the Apache Tomcat service and choose
Start.
Verify Tomcat is running.
o Open a browser and go to http://localhost:8080.
o Ensure the Apache Tomcat screen opens successfully:
16
17
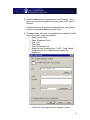
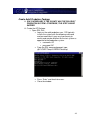
Create scheduled tasks to periodically restart Tomcat. This is
necessary due to the bridge disconnecting from JNET due to
timeouts.
It will be necessary to create a scheduled task to stop Tomcat,
and then a second scheduled task will start it.
The below steps will create a scheduled task to stop the service
every 15 minutes, starting at midnight.
o Open Control Panel
o Open “Scheduled Tasks”
o Click “File”
o Click “New”
o Click “Scheduled Task”
o Name the new scheduled task “CJIEP – Stop Tomcat”
o Double-click on the scheduled task to open the
properties.
o In the “Run” field, type net stop “Apache Tomcat”
18
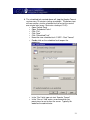
o In the “Run as” field, enter a username which has
permissions to run task on the server. Typically this
would be the administrator
o Click on the “Schedule” tab.
o Run the task “Daily” starting at midnight (12:00 AM)
19
o Click on “Advanced”
o Check the “Repeat task” checkbox
o Repeat the task every 15 minutes for a duration of 24
hours.
o Click “OK”
o Click “Apply”
o You will be prompted for password which corresponds to
the user you chose to run the task as above. Type this
in and press “OK”
o Test the scheduled task by right-clicking on the name,
and choosing “run”
The Apache Tomcat Service should stop, which
you can verify by going to Start -> Run and typing
in “Services.msc”
20
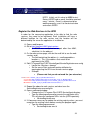
The scheduled task created above will stop the Apache Tomcat
service every 15 minutes starting at midnight. The below steps
will now create a similar scheduled task to restart the service
one minute later (every 15 minutes starting at 12:01).
o Open Control Panel
o Open “Scheduled Tasks”
o Click “File”
o Click “New”
o Click “Scheduled Task”
o Name the new scheduled task “CJIEP – Start Tomcat”
o Double-click on the scheduled task to open the
properties.
o In the “Run” field, type net start “Apache Tomcat”
o In the “Run as” field, enter a username which has
permissions to run task on the server. Typically this
would be the administrator
21
o Click on the “Schedule” tab.
o Run the task “Daily” starting at (12:01 AM)
22
o Click on “Advanced”
o Check the “Repeat task” checkbox
o Repeat the task every 15 minutes for a duration of 24
hours.
o Click “OK”
o Click “Apply”
o You will be prompted for password which corresponds to
the user you chose to run the task as above. Type this
in and press “OK”
o Test the scheduled task by right-clicking on the name,
and choosing “run”
The Apache Tomcat Service should start, which
you can verify by going to Start -> Run and typing
in “Services.msc”
23
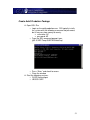
MySQL 4.1
Install MySQL 4.1
o Run the MySQL 4.1 Setup.exe file located in the
Supporting Software\MySQL 4.1 folder of the installation
CD.
Press “Next”
24
Press “Next”
Ensure “Typical” is checked
Press “Next”
25
Press “Install”
The wizard begins the installation
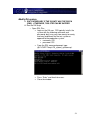
Check the “Skip Sign-Up” radio button.
Press “Next”
26
Ensure the “Configure the MySQL Server now”
checkbox is checked.
Press “Finish”
Press “Next”
27
Select “Standard Configuration”
Press “Next”
Ensure “Install As Windows Service” is checked
Press “Next”
28
Ensure “Modify Security Settings” is checked.
Choose a root password and retype it in the space
provided. TAKE NOTE OF THE ROOT’S
PASSWORD, AS YOU WILL NEED IT LATER!
Press “Next”
Press “Execute”
29
Press “Finish”
30
Install MySQL driver
o Locate the mysql-connector-java-3.1.10.zip file located in
the Supporting Software\MySQL 4.1\MySQL connector
folder of the installation CD.
o Extract the contents of mysql_connector-java-3.1.10.zip
to the root C: drive. Ensure that you include folder
names when extracting the files:
Copy the mysql-connector-java-3.1-bin.jar file
from
c:\mysql-connector-java-3.1.10
to
c:\Program Files\Apache Software
Foundation\Tomcat 5.0\common\lib
31
jUDDI 0.8.0
Preparation
o Copy the JUDDI folder located at Supporting
Software\jUDDI 0.8.0 to C:\
Prepare Apache Tomcat
o Copy the C:\JUDDI/juddi.war file to C:\Program
Files\Apache Tomcat Foundation\Tomcat 5.0\webapps\
o Edit C:\Program Files\Apache Tomcat
Foundation\Tomcat 5.0\conf\server.xml
Copy the code found in C:\JUDDI\juddi_server.xml.txt
and paste it into the server.xml file immediately above
the closing </Host> tag.
By default, JUDDI is installed with a password of 123456. If this
needs to be changed, modify the following line in the server.xml
file:
<parameter><name>password</name><value>123456</value></parameter>
Prepare MySQL
o Copy the C:\JUDDI\juddi_mysql.ddl file to C:\Program
Files\MySQL\MySQL Server 4.1\bin
Create the jUDDI database
o If changing the default JUDDI password, edit the script
located at c:\JUDDI\create_juddi_database.sql and
modify the following line:
Password = PASSWORD('123456'),
o Go to Start -> Programs -> MySQL -> MySQL 4.1 ->
MySQL Command Line Client.
o Enter your MySQL root password
o Enter \. C:\JUDDI\create_juddi_database.sql
o Press Enter again, and the script will run. Check for any
errors. Note that you may see several warnings due to
attempted drops of non-existing tables. These warnings
can be ignored.
32
If Changing the default JUDDI password, there are two other
locations where the value needs to be changed:
o Edit C:\Program Files\Apache Software
Foundation\Tomcat 5.0\webapps\juddi\WEBINF\classes\juddi.properties and modify the following line:
juddi.jdbcPassword=123456
o Edit C:\Program Files\Apache Software
Foundation\Tomcat 5.0\webapps\juddi\WEBINF\classes\juddi.users and modify the following line:
<user userid="juddi" password="123456" />
Check your work
o Restart the Apache Tomcat service.
o Open a browser and navigate to
http://localhost:8080/juddi
o Click on “Validate” and scroll for errors noted in red.
o If you see any errors in your jUDDI installation, rework
these instructions.
Cleanup
o If jUDDI is installed and working correctly, it is safe to
delete the C:\JUDDI directory.
33
III. INSTALLATION OF SERVICE AGENT
Introduction
This chapter outlines the steps required to setup and configure the
Service Agent Component which will distribute the Court Case Event
Messages to the web services.
Installation Steps
Run the ServiceAgentSetup.msi file located in the Installation –
ServiceAgent folder of the installation CD.
Press “Next”
34
In the next window, select the installation directory where you
would like the Service Agent to be installed and also select the
radio button next to “Everyone” at the bottom of the following
screen:
Press “Next”
35
You will now be presented with the “County Identification”
screen. Enter the Jurisdiction and County Code values used for
the <PartyId> element exactly as it appears in the AOPC Court
Case Event Message. These values are used to filter out
messages not meant for this county. These values can be
obtained from AOPC or from their website at
http://www.aopc.org/Index/CommonPleas/Judicialdistricts.asp
Press “Next”
36
The next screen is the “UDDI Configuration” screen. On the
configuration screen, change the password to “123456”. If
jUDDI was installed on a different server and/or port number or
with a different user name and password, modify these values
appropriately.
Press “Next”
37
The next screen will specify logging.
It is recommended that the logging level be set to “1”
(full logging). This value can be changed to a “4” if
full logging is not necessary. After the install, this
value is contained in the c:\Program Files\CJIEP
ServiceAgent\ServiceAgent.exe.config file in the
following section:
<switches>
<add name="ServiceAgent" value="1" />
</switches>
Specify where you want the logging file to reside
Press “Next”
38
You will now be presented with the “Confirmation” screen shown
below.
Press “Next”
Press “Close” on the final window and the Service Agent
installer will run.
Stop the CJIEP ServiceAgent service
o Start Go to Start -> Run -> Services.msc
o Right-Click on the CJIEP ServiceAgent service and press
“Stop”
Modify Service Agent
o Copy the ServiceAgent.exe.config file from the
Installation – ServiceAgent directory of the Installation
CD to C:\Program Files\CJIEP Serviceagent
o Edit the C:\Program Files\CJIEP
Serviceagent\ServiceAgent.exe.config file and modify the
following elements:
<CountyID>YOUR COUNTY ID</CountyID>
<JurisdictionID>YOUR JURISDICTION ID</JurisdictionID>
o It may also be necessary to modify the following element
if jUDDI is installed on a different port than 8080.
<UDDI_URL>http://localhost:8080/juddi/inquiry</UDDI_URL>
Restart the CJIEP ServiceAgent service.
39
IV. INSTALLATION OF BRIDGE COMPONENT
Introduction
This chapter outlines the steps required to setup and configure the
CJIEP Bridge Component that will make the connection to the JNET
queue to receive AOPC’s court case event messages.
Installation Steps
Copy the file cjiep.bridge.1.0.war, which is located in the
Installation – JNET Bridge directory, to C:\Program
Files\Apache Software Foundation\Tomcat 5.0\webapps
Restart the Tomcat Service
o Start -> Run -> services.msc
o Right click on the Apache Tomcat service and choose
restart
Locate the 2007-04-30 Updated Jar Files LIB.zip file located in
the Installation – JNET Bridge folder of the installation CD.
o Unzip all files to C:\Program Files\Apache Software
Foundation\Tomcat 5.0\webapps\cjiep.bridge.1.0\WEBINF\lib directory, replacing any existing ones.
Locate the 2007-06-04 Updated Jar Files ENDORSED.zip file
located in the Installation – JNET Bridge folder of the installation
CD.
o Unzip all files to C:\Program Files\Apache Software
Foundation\Tomcat 5.0\common\endorsed directory,
replacing any existing ones.
Restart the Tomcat Service
o Start -> Run -> services.msc
o Right click on the Apache Tomcat service and choose
restart
40
Edit C:\Program Files\Apache Software Foundation\Tomcat
5.0\webapps\cjiep.bridge.1.0\WEB-INF\classes\config.xml
o Locate the <ProducerProperties> element within the
<JNETtoCJIEPBridge> element
o Edit the following elements with information provided by
JNET. As of this writing, the contact at JNET is Craig
Barnhart ([email protected]).
<Property key="topic.connector.mq.hostname">JNET PROVIDED IP ADDRESS</Property>
<Property key="topic.connector.mq.port">JNET PROVIDED PORT NUMBER</Property>
<Property key="topic.connector.mq.queuemanager">JNET PROVIDED QUEUE NAME</Property>
o Locate the <ConsumerProperties> element within the
<JNETtoCJIEPBridge> element
o If the Service Agent was installed to a different location
than the default, it will also be necessary to edit the
following element to point to the InMessages folder
where the CJIEP Service Agent is installed.
<Property key="consumer.file.directory">C:\Program Files\CJIEP ServiceAgent\InMessages</Property>
Restart the Tomcat Service
o Start -> Run -> services.msc
o Right click on the Apache Tomcat service and choose
restart
At this point the county should be able to receive messages
from AOPC. The county will need to coordinate testing with
AOPC and JNET to test.
o AOPC Contact:
Mark Whitworth ([email protected])
o JNET Contact:
Craig Barnhart ([email protected])
o Contact JNET and ensure they see a durable subscriber
created and listening on the queue.
o Stop the CJIEP ServiceAgentService
Start -> Run -> services.msc
Right click on the CJIEP ServiceAgent service and
choose stop
Have AOPC send a handful of test messages to
the county.
The messages should appear in the C:\Program
Files\CJIEP ServiceAgent\InMessages folder.
41
V. INSTALLATION OF WEB SERVICES AND GUI
Introduction
This chapter outlines the steps required to install and configure the
web services, which will process the messages and populate the data
into the legacy systems. This chapter will also set up and configure
the User Acceptance Module, or GUI interface.
All of the components needed for this installation are located in the
Installation – Web Services folder of the installation CD.
Preparation
Copy the CJIEP-Temp folder located in the Installation – Web
Services folder of the installation CD to the root C:\.
JBOSS Installation
Locate the JBOSS-3.2.6.zip located in the C:\CJIEP-Temp
folder.
o Extract the contents of this file to C:\
Ensure that you include folder names when
extracting the files:
42
Port Configuration (optional)
o The default JBOSS installation is configured to run on
port 8081. If there is another application using this port,
JBoss can be reconfigured to run on a different port. The
places that the port number needs to be changed are:
C:\jboss-3.2.6\server\all\deploy\jbosswebtomcat50.sar\server.xml
C:\jboss-3.2.6\server\all\deploy\httpinvoker.sar\META-INF\jboss-service.xml
Configure JBOSS to run as a service.
o Open a command window.
o Change the directory to C:\jboss-3.2.6\bin\
o Copy the command contained in the file C:\CJIEPTemp\Jboss-Service.txt and paste it into the command
window (click on the symbol in the upper-left, then edit ->
paste)
NOTE: Assuming you have followed these
instructions, no changes will need to be made to
the command. However if JAVA or JBOSS have
been installed at different directories, or if a
different version of JAVA has been used, changes
may need to be made.
o Test your work
Start -> Run -> Services.msc
• Ensure there is a service called JBOSSCJIEP and it is started.
• If the service is not started, and it will not
start:
o Uninstall the service by running the
following at the command prompt:
JBossService.exe -uninstall
JBOSS-CJIEP
o Check the command used above to
ensure all versions and paths are
correct.
o Reinstall the service by following the
above instructions.
• NOTE: When restarting the JBOSS
service, it can take up to 1 minute for it to
start completely.
43
Create CJIEP Database
Create a CJIEP User
o Open SQL Plus
The path may vary, depending on the version of
the Oracle Client, but it should be similar to, Start
-> Programs -> Oracle -> Application
Development -> SQL Plus
Login as a user with Admin access.
From the SQL command prompt, type:
@C:\CJIEP-Temp\CJIEPUserCreate.sql;
Press “Enter” and check for errors.
Close the window
44
Create the CJIEP database
o If JBOSS was installed on a port other than the default
(port 8081).
Edit C:\CJIEP-Temp\CJIEPFullCreate.sql.
• Do a search/replace and change 8081 to
the port number that JBOSS was installed
on.
• Save and close the file.
o Connect to the CJIEP user that was created above.
Open SQL Plus
• username: CJIEP
• password: CJIEP
From the SQL command prompt, type:
@C:\CJIEP-Temp\CJIEPFullCreate.sql;
Press “Enter” and check for errors. Any
messages pertaining to tables or indexes not
existing may be ignored (the script first tries to
drop any existing tables).
Close the window
45
Create Adult Probation Package
ONLY NECESSARY IF THE COUNTY HAS THE DSI ADULT
PROBATION SYSTEM. OTHERWISE, THIS STEP CAN BE
SKIPPED.
Create the AP Package
o Open SQL Plus
Login as the adult probation user. DSI typically
installs the system with the following username
and password, but it may vary from county to
county and may be different for the test system as
opposed to the production system.
• username: AP
• password: AP
From the SQL command prompt, type:
@C:\CJIEP-Temp\CJIEPAPCreate.sql;
Press “Enter” and check for errors.
Close the window
46
Modify DA system
ONLY NECESSARY IF THE COUNTY HAS THE DSI DA
(PMS). OTHERWISE, THIS STEP CAN BE SKIPPED.
Run the DA Script
o Open SQL Plus
Login as the DA user. DSI typically installs the
system with the following username and
password, but it may vary from county to county
and may be different for the test system as
opposed to the production system.
• username: CDI
• password: CDI
From the SQL command prompt, type:
@C:\CJIEP-Temp\ DA_system_updates.sql;
Press “Enter” and check for errors.
Close the window
47
Configure Database Connections
There are several files that need to be configured to connect to the
databases. Depending on the systems used at the county, not all
connections may be needed.
o oracle-ds.xml – Connection to the CJIEP database
created above (required).
o da-oracle-ds.xml – Connection to legacy DA
o oms-oracle-ds.xml – Connection to legacy OMS
o prob-oracle-ds.xml – Connection to legacy AP
Edit C\jboss-3.2.6\server\all\deploy\oracle-ds.xml
o Modify the following elements:
<connection-url>jdbc:oracle:thin:@SERVER NAME:1521:TNS NAME</connection-url>
The TNS Name can be found in the tnsnames.ora
file, which is on the Oracle server in a location
similar to (depending on the Oracle version)
c:\oracle\ora92\network\admin\
• There will be an entry similar to the
following. The TNS name is the
SERVICE_NAME
ORCL =
(DESCRIPTION =
(ADDRESS_LIST =
(ADDRESS = (PROTOCOL = TCP)(HOST = ccapbiztalk)(PORT = 1521))
)
(CONNECT_DATA =
(SERVER = DEDICATED)
(SERVICE_NAME = ORCL)
)
)
Edit C\jboss-3.2.6\server\all\deploy\da-oracle-ds.xml
o Modify the following elements:
<connection-url>jdbc:oracle:thin:@SERVER NAME:1521:TNS NAME</connection-url>
<user-name>DA SYSTEM USER NAME</user-name>
<password>DA SYSTEM USER PASSWORD</password>
Repeat the above step for
o C\jboss-3.2.6\server\all\deploy\oms-oracle-ds.xml
o C\jboss-3.2.6\server\all\deploy\prob-oracle-ds.xml
48
Email Configuration (Optional)
The system can be configured to send an email notification of the
message counts awaiting manual approval.
Edit C:\jboss-3.2.6\server\all\conf\properties\CJIEP.Properties
o Modify the following sections:
messageReportFromEmailAddress
• Email address that the email notification
will be from.
messageReportToEmailAddresses
• Email address to send the notification to.
To send to multiple people, separate email
addresses with a comma.
messageReportEmailBody
• The body of the email. This section
contains a server URL for the login
message that will need to be changed to
reflect the server name.
Edit C:\jboss-3.2.6\server\all\conf\properties\EmailConfig.properties
o Modify the following sections:
mail.smtp.host
• The name of the SMTP server to use
mail.smtp.user
• The user id of the email account used to send
the email
mail.smtp.password
• The password for the email account being used
to send the email
Edit C:\jboss-3.2.6\server\all\deploy\emailscheduler-service.xml
o Modify the following section:
InitialStartDate
• Enter a valid date in this field. The scheduler
will calculate occurrences based on the
date/time entered. For example “03/01/2006
8:00 am” will cause emails to be sent at 8:00.
SchedulePeriod
• This variable determines the time between
emails and is stored in milliseconds. 24 hours is
equivalent to 86400000 milliseconds. This can
be adjusted if the user wants to receive emails
more frequently than once per day.
49
NOTE: Initially set this value to 60000 to test.
Restart JBOSS and an email should be received
every 1 minute. Once it is determined to be
working correctly, reset it to the desired value
and restart JBOSS.
Register the Web Services in the UDDI
In order for the consuming application to be able to find the web
services, they need to be registered. Each installation will have a
different location for the web service and the location will be
determined by the server the application is installed on.
Open a web browser
Go to http://localhost:8081/cjiep/services
o (if JBOSS was configured on a port other than 8081,
substitute it in the address)
On the web services page, click on the wsdl link to see the web
services wsdl.
o The field containing the address is: <wsdlsoap:address
location= >. This is the address that needs to be
registered in the UDDI.
Edit C:\ProgramFiles\CJIEP ServiceAgent\ServiceRegistrator.exe.config
o Locate the <Services> element
o Set the accessPoint and wsdlLocation attributes by
copying/pasting the URL from the web services page.
o Example
(Please note that you do not need the .jws extension):
<Service name="CJIEP_4_66_07_BindCaseOverService"
accessPoint="http://localhost:8081/cjiep/services/CJIEP_4_66_07_BindCaseOver"
wsdlLocation="http://localhost:8081/cjiep/services/CJIEP_4_66_07_BindCaseOver?wsdl"
tModelName="CJIEP_4_66_07_BindCaseOverServiceInterface" />
Repeat the above for each service, and close/save the
ServiceRegistrator.exe.config file.
Open a command window.
o Change to the C:\Program Files\CJIEP ServiceAgent directory.
o Type the following command to execute the registrator utility.
This will place the configured URLs into the jUDDI repository.
ServiceRegistrator.exe
If it becomes necessary to update the existing registry values, you must
unregister the existing values before running the program again.
o Type the following command:
ServiceRegistrator.exe /d
50
Access the Application
At this point, the installation is complete. To test you work and access
the application.
Open a web browser.
Go to http://localhost:8081/cjiep
o To connect to the application from other workstations,
replace “localhost” with the name of the server the
application resides on.
Refer to the user manual on the following pages to test the
application and your work.
51
VI. CONFIGURING FOR PRODUCTION
Overview
Once testing is complete, there are several things that need to be done to
configure the system for production.
Notify JNET
JNET needs a minimum of a week’s notice prior to a go-live
date, and has expressed a preference that a Wednesday would
be a preferred day.
Connect to the JNET Production Queue
Stop the CJIEP ServiceAgent and JBOSS-CJIEP Services
Edit C:\Program Files\Apache Software Foundation\Tomcat
5.0\webapps\cjiep.bridge.1.0\WEB-INF\classes\config.xml
o Locate the <ProducerProperties> element within the
<JNETtoCJIEPBridge> element
o Edit the following elements with information provided by
JNET. As of this writing, the contact at JNET is Craig
Barnhart
([email protected]).
<Property key="topic.connector.mq.hostname">JNET PROVIDED IP ADDRESS</Property>
<Property key="topic.connector.mq.port">JNET PROVIDED PORT NUMBER</Property>
<Property key="topic.connector.mq.queuemanager">JNET PROVIDED QUEUE NAME</Property>
Restart the Apache Tomcat Service.
Verify messages are being received at c:\Program Files\CJIEP
ServiceAgent\InMessages.
Configure Legacy System Connections
Edit C\jboss-3.2.6\server\all\deploy\da-oracle-ds.xml
o Modify the following elements:
<connection-url>jdbc:oracle:thin:@SERVER NAME:1521:TNS NAME</connection-url>
<user-name>DA SYSTEM USER NAME</user-name>
<password>DA SYSTEM USER PASSWORD</password>
o Repeat the above step for
C\jboss-3.2.6\server\all\deploy\oms-oracle-ds.xml
C\jboss-3.2.6\server\all\deploy\prob-oracle-ds.xml
52
Create Adult Probation Package
Open SQL Plus
o Login as the adult probation user. DSI typically installs
the system with the following username and password,
but it may vary from county to county.
username: AP
password: AP
o From the SQL command prompt, type:
@C:\CJIEP-Temp\CJIEPAPCreate.sql;
o Press “Enter” and check for errors.
o Close the window
Start the following services:
o CJIEP ServiceAgent
o JBOSS-CJIEP
53
Modify DA system
ONLY NECESSARY IF THE COUNTY HAS THE DSI DA
(PMS). OTHERWISE, THIS STEP CAN BE SKIPPED.
Run the DA Script
o Open SQL Plus
Login as the DA user. DSI typically installs the
system with the following username and
password, but it may vary from county to county
and may be different for the test system as
opposed to the production system.
• username: CDI
• password: CDI
From the SQL command prompt, type:
@C:\CJIEP-Temp\ DA_system_updates.sql;
Press “Enter” and check for errors.
Close the window
54
VII. CJIEP USER’S MANUAL
Overview
This chapter is intended to show how to use DSI’s CJIEP Web Application, the
User Acceptance Module, and outline what subsequent steps are required in the
target systems (Adult Probation, District Attorney, Jail) to complete record
imports.
CJIEP Web Application – User Acceptance Module
The web application, User Acceptance Module, is the portion of the system that
receives the messages, displays them to the user for approval, processes the
messages, and inserts the information into the target system. The application
consists of the following screens:
•
•
•
•
Login
Administration
Message List
Message Details
55
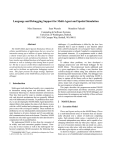
Login Screen
When starting up the CJIEP application, the Login Screen is where the user
begin. The user will enter their userid and password, and then select
application (Adult Probation, Jail / OMS, District Attorney) with which they
work. When the application has been selected and the user clicks Login,
user is then directed to the Message List page.
will
the
will
the
56
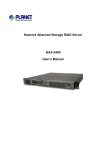
Message List Page
The Message List page provides a list of all of the messages that are queued up
and waiting to be processed into the selected target system. The messages are
grouped by message type; i.e., Bind case over, Report Probation Sentence,
Noncompliance Sentence Modification and Sentence Modified.
On this screen, the user may choose to accept (A), reject (R), skip (S) or view
details (Show Details) for one, many, or all of the messages. This screen
provides basic information about the message, such as the offender’s name, and
whether that offender was found in the target system; i.e., Match vs. No Match.
A message is considered either a Match or a No Match based upon the following
data validation criteria established for each records management system.
1. Adult Probation and Parole System
a. SID (State Identification Number)
b. Last Name + Date of Birth (DOB)
c. Last Name + Social Security Number (SSN)
d. CPCMS Docket Number
57
2. District Attorney System
a. CPCMS Docket Number
b. SID (State Identification Number)
c. Last Name + Social Security Number (SSN)
d. Last Name + Date of Birth (DOB)
3. Jail System
a. SID (State Identification Number)
b. Last Name + Social Security Number (SSN)
c. Last Name + Date of Birth (DOB)
58
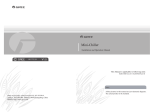
Message Detail Page
The Message Detail page is intended to provide the user with more detailed
information regarding what is contained in the message. The presentation of the
information contained on this screen will vary depending on the target
application. From this page, the user can Accept the message (process the
message), Reject the message, Skip the message (select no action at all) and
59
view the next message selected for detail viewing by selecting Next. The user
also has the option to Return to the Message List screen or to Log Out of the
application.
Finally, if the user knows that the current offender is in the target system, but the
message appears as a No Match, the user can modify four of the following match
criteria – Last Name, Social Security Number, SID and/or Date of Birth. The user
can then click the Relink button to have the system run the matching algorithms
again; and the system will then indicate a Match.
Administration Page
This page is used to configure the CJIEP application. The links on this page are
as follows:
60
Maintain Translation Table
This screen allows the user to set up translations for differences in codes
between the CPCMS system and the target system. Items that are frequently
used in this table include race codes, disposition codes and grade codes.
61
Docket Id Translation Maintenance
This screen is used to define the format in which the Docket Id is presented.
Changing the format of the Docket Id from what is provided in the CPCMS
message allows the application to properly match Docket Ids with the format in
the target application. Please note that this must be defined for all 3 agencies –
AP, DA and Jail. In addition, even if the respective agency uses the full CPCMS
Docket ID Number, this must be defined as well.
62
Setup Processing Switches
The processing switches determine what is done with a message when it is
received. There are 3 options for message processing.
•
•
Automatic processing: If this option is selected, messages that have
been matched to a record in the target system are automatically
processed and the information entered into the target system. If the
message is not matched to a record, the message will be put into the User
Acceptance Module for manual intervention and processing. The
exception to this rule is the BindCaseOver message. This message will
be processed regardless of whether the offender record has been
matched or not.
Manual processing: In this option, none of the messages will be
processed automatically.
They will all be entered into the User
Acceptance Module for user review and acceptance.
63
•
Discard: All messages of this type are discarded. This would be used
when the user wants to temporarily disable reception of messages or if the
user does not have the target system for which the message is intended
Reports
There are several reports available from this screen.
following:
•
•
•
These include the
Count of Message by Status,
Processed Messages, and
Rejected Messages.
64
List Failed Messages
This screen shows the list of messages that failed to be entered into the target
database and what the reported error was. If applicable, there will be an option
to “re-process the message”.
Target Application Finalization
After a message has been processed through the CJIEP User Acceptance
Module, there may be additional steps required in the target application. Listed
below are the additional steps required for DSI’s three target applications (AP,
Jail/OMS, DA).
OMS – Jail System
When a BindCaseOver message is processed from the User Acceptance
Module into the OMS application, the data goes to different places depending on
whether the offender has already been entered into the target system or not. If
the message found a match in the OMS system, then the existing record will be
65
updated and there are no additional steps required. If the message was not
matched to a record in the OMS, the offender information is entered into the
Pre-book Module of the application. In order to view the information in the prebook module, select Xmodules > Pre-Book Inmates from the top menu. This will
provide a list of the inmates queued up in the Pre-book Module of the
application. To import an inmate from the Pre-book Module, start at the
booking screen and click the Add button. The user will be presented with the list
of inmates in pre-book. The user can select the inmate from the list and import
the information for that inmate.
Adult Probation System
The Adult Probation system receives information from three web services.
These services are BindCaseOver, Report Probation Sentence and Sentence
Modified (modify probation sentence). When a BindCaseOver is received, the
information contained in the message is entered into the system. If there is a
matching offender, blank fields are updated. If there is no match, a new record is
entered. When a Report Probation Sentence or Modify Probation Sentence
message has been processed, the user needs to bring up the offender’s record
in the Adult Probation system and go to the sentencing screen. After
reviewing the sentences, the user needs to order and/or group the sentences
appropriately. Note: When the record is saved the auto calculate function will
run and fill in the calculated dates.
District Attorney System (PMS)
The DA system will receive information from two web services. The first service
is the BindCaseOver service. When a message is processed through the
BindCaseOver service, the charges are entered into the DA system as MDJ
charges and need to be accepted by the user on the charges screen. When a
NonCompliance Sentence Modified message is processed, there is no further
user action required.
Web Service Reference
For details regarding the specific fields to be updated by each web service, and
the rules that they adhere to, please reference Appendix B of the document titled
‘County Justice Information Exchange Project (CJIEP) Web Service
Provider Design.’
66
Glossary
Term
Description
AOPC Court Case Event
Message
Message generated by AOPC’s CPCMS system
containing criminal justice information.
Bind Case Over Message
BindOver
This is a message that indicates that an offender was
bound over to court.
Synonym for Bind Case Over Message
CJIEP
County Justice Information Exchange Pilot Project The project to which this document refers.
Message
AOPC’s Court of Common Pleas Criminal Court Case
Management System that will supply the information
to be used for the exchanges identified for this pilot.
District Attorney
Justice Information Exchange Model – Model
describing the flow of justice information between
criminal justice agencies.
These are the criteria used to determine whether a
message has a match in the target system. See the
design documentation for a listing of the match
criteria.
Packet of information received by the web service,
providing information related to the case.
Message Type
NonCompliance
The type of the message received. In the context of
this document, a message type is determined by the
web service that received it.
Synonym for NonCompliance Sentence Modification
NonCompliance Sentence
Modification
Offender
OMS
This is a message containing sentencing information
for non-compliance of a probation sentence.
The person who is the subject of a message.
Offender Management System.
Pre-Book Module
ProbationSentence
Staging area in the OMS application used to store
offender information for offenders who have not yet
been entered into the OMS application.
Synonym for Report Probation Sentence Message
CPCMS
DA
JIEM
Match Criteria
67
Term
Description
Report Probation Sentence
Message
This is a message that contains probation sentencing
information for an offender.
The mechanism responsible for packaging the
exchange message, identifying the specified service
provider for the exchange, and for accessing the
provider’s web service to exchange the message.
The DSI system that will receive the message
information. The target systems included in this pilot
are Adult Probation (AP), District Attorney (DA), and
Offender Management System (OMS).
Service Agent
Target System
User Acceptance Module
Web Services
This is the screen that the user utilizes to process
messages into the target application.
Web Services encompasses a collection of protocols
and technologies allowing a standardized exchange of
data.
68
VII. TROUBLESHOOTING QUICK-REFERENCE GUIDE
Overview
This chapter is meant to be a reference guide for troubleshooting issues that may
occur with the CJIEP implementation. It provides several areas of the system to
check, as well as the appropriate action(s) to take.
Log Files
There are three separate log files that may aid in troubleshooting. In addition to
these log files, the system event log may show other information not available in
the log.
1) Apache Tomcat logs
a. View this log to troubleshoot problems related to the bridge or
receiving messages from JNET. Symptoms of Apache Tomcat
problems include (but are not limited to)
i. Messages not being received
ii. User Acceptance Module (GUI) not displaying.
b. Located at c:\Program Files\Apache Software Foundation\Apache
Tomcat 5.0\logs
2) Service Agent Logs:
a. View this log file to troubleshoot any problems related to the service
agent. Symptoms of Service Agent problems include (but are not
limited to)
i. Messages not being received from the JNET queue.
ii. Messages being received, but not filtering correctly.
b. Located at c:\Program Files\CJIEP ServiceAgent\ServiceAgent.log
3) JBOSS logs:
a. View this log file to troubleshoot problems related to the web
services. Symptoms of JBOSS problems include (but are not
limited to)
i. Messages being received, but not distributed to the web
services.
ii. Messages not showing up in the User Acceptance Module
(or GUI) or in the legacy/target system.
iii. User Acceptance Module not able to be accessed.
b. Located at c:\Jboss-3.2.6\server\all\log\server.log
69
Services
There are several services that may need to be restarted depending on the
problem. These services are:
1) Apache Tomcat
2) CJIEP ServiceAgent
3) JBOSS
Symptoms and Resolutions
This section will detail some problems we have encountered and the resolution.
Please note that this is not an all-inclusive list.
1) Messages not being Received from JNET
a. Symptoms:
i. No recent messages in the folders under e:\Program
Files\CJIEP ServiceAgent\
b. Possible problem(s) and solution(s):
i. No new messages to process
1. Verify that messages should have been received.
ii. The bridge to connect to JNET is down.
1. Restart the Apache Tomcat service, wait a couple of
minutes to see if messages are received.
2. Contact JNET to see if:
a. The queues are up and running
b. There are messages in the queue
c. If JNET can see the CJIEP bridge connected to
the queue.
i. If not, verify with JNET that the settings
in Program Files\CJIEP
ServiceAgent\Service Agent.exe.config
are correct.
iii. No messages sent from AOPC
1. Contact AOPC to see if messages have been sent.
2) Messages being received but not being sent to web services.
a. Symptoms:
i. Messages are in the INMESSAGES folder, but not being
distributed to the other folders.
ii. Messages have been distributed, but are not being moved
from the folders.
b. Possible problem(s) and solution(s):
i. Service Agent is turned off
1. Verify the Service Agent service is started.
ii. JBOSS is not functioning
1. Restart the JBOSS service
70
3) User Acceptance Module (GUI) is unavailable
a. Symptoms:
i. “Page cannot be displayed” error when attempting to view
the User Acceptance Module.
b. Possible problem(s) and solution(s):
i. JBOSS is down
1. Restart the JBOSS service. Wait approximately 2
minutes and reattempt to view the User Acceptance
Module.
4) All messages are being rejected
a. Symptoms:
i. All
messages
are
being
moved
to
the
REJECTEDMESSAGES folder
b. Possible problem(s) and solution(s):
i. Messages are not for your county
1. View messages and verify the COUNTYID and
JURISDICTIONID elements.
ii. Messages are being filtered off
1. Messages are filtered based off of
the
ActionTypeText. View messages and verify that they
will pass the filters set up in the Program Files\CJIEP
ServiceAgent\ServiceAgent.exe.config file.
iii. Messages are invalid
1. Ensure schema has not changed. If it has, contact
AOPC.
5) Messages not showing up on User Acceptance Module.
a. Symptoms:
i. Messages are flowing, and being moved to the
ACCEPTEDMESSAGES folder, but not showing up on GUI
b. Possible problem(s) and solution(s):
i. Connection information is not correct.
1. Verify that the connection information is correct, and
the systems are up and running.
Connection
information can be found in:
a. JBOSS-3.2.6\Server\all\deploy\
i. oracle-ds.xml
ii. prob-ds.xml
iii. da-ds.xml
iv. oms-ds.xml
71
APPENDICES
APPENDIX 1: ARCHITECTURAL SOLUTIONS AND
TECHNICAL REQUIREMENTS
APPENDIX 2: COUNTY INFORMATION EXCHANGE
SERVICE ORIENTED ARCHITECTURE STANDARDS
APPENDIX 3: DETAILED SYSTEM DESIGN
APPENDIX 4: CJIEP PILOT WEB SERVICE PROVIDER
DESIGN
APPENDIX 5: UML AND SERVICE SEMANTICES FOR
CJIEP PILOT SCOPE
APPENDIX 6: INFRASTRUCTURE REQUIREMENTS –
HARDWARE AND SOFTWARE SPECIFICATIONS
A