1
Seagate Personal Cloud 2-Bay User
Manual
Model SRN21C Seagate Personal Cloud 2-‐Bay User Manual © 2014 Seagate Technology LLC. All rights reserved. Seagate, Seagate Technology, the Wave
logo, and Seagate Media are trademarks or registered trademarks of Seagate Technology LLC, or one
of its affiliates. iPod, iPad, iPhone, Time Machine, Safari, and Mac are trademarks or registered
trademarks of Apple Computer, Inc. and used to indicate compatibility. All other trademarks or
registered trademarks are the property of their respective owners. When referring to hard drive
capacity, one gigabyte, or GB, equals one billion bytes and one terabyte, or TB, equals one thousand
billion bytes. In addition, some of the listed capacity is used for formatting and other functions, and
thus will not be available for data storage. Quantitative usage examples for various applications are for
illustrative purposes. Actual quantities will vary based on various factors including file size, file format,
features, and application software. Seagate reserves the right to change, without notice, product
offerings or specifications.
Seagate Technology LLC
10200 S. De Anza Blvd.
Cupertino, CA 95014
USA
Seagate Personal Cloud 2-Bay User Manual
2
Table of Contents
Seagate Personal Cloud 2-‐Bay User Manual 1 Welcome to Your Personal Cloud 2-‐Bay System Requirements What’s in the Box? Hardware Requirements Software Requirements Internet Requirements Connect Your Personal Cloud 2-‐Bay 5 6 7 7 7 7 8 Owner Setup Set Up Your Owner Account 9 9 Adding and Managing Users Open the Users page Add users Manage remote access for an existing user Edit a user Delete a user 11 11 11 12 12 12 Public and Private Folders What’s the difference? Which folder to use Public folder Private folder 14 14 15 15 15 Media Library Create and maintain your media library Stream media content Stream media at home Stream media away from home 16 16 16 17 18 Back up Back up your computer and mobile devices 21 21 Sync with Your Cloud Service 24 Downloading Large Files Open the Download Manager Download large files Manage download settings 25 25 25 25 Seagate Personal Cloud 2-Bay User Guide
3
Passwords How are Personal Cloud 2-‐Bay passwords used? Change your private folder password If you are the Personal Cloud 2-‐Bay owner If you are a user 26 26 26 26 26 Owner Administration Open the Device Manager LED Behavior Personalize your Personal Cloud 2-‐Bay Reset your Personal Cloud 2-‐Bay Changing Device Services Start and stop a service Re-‐index a media service Control remote access for all users Conserve power usage Connect your device to an uninterruptible power source Notifications Storage usage Network Settings Change the IP configuration Configure a proxy server Configure port forwarding 27 27 27 27 28 28 28 28 29 29 29 30 31 31 31 32 32 Appendix A: Compliance and Safety Regulatory Compliance FCC DECLARATION OF CONFORMANCE FCC Class A Information FCC Caution IMPORTANT NOTE: FCC Radiation Exposure Statement Industry Canada IMPORTANT NOTE for mobile device use NOTE IMPORTANTE pour l'utilisation de dispositifs mobiles Europe -‐ EU Declaration of Conformity Safety Guidelines Power Source Safety Handling Safety 38 38 38 38 38 39 39 39 39 40 42 42 42 43 Seagate Personal Cloud 2-Bay User Manual
4
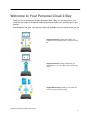
Welcome to Your Personal Cloud 2-Bay
Thank you for purchasing the Seagate Personal Cloud 2-Bay. You and everyone in your
household can create a centralized media library and safeguard your important files in one
location.
With Seagate’s free apps, your content is safe and available to you no matter where you are.
Seagate Dashboard—Create backup plans to effortlessly and automatically back up content from your
PC.
Seagate Dashboard—Create and maintain your
media library on your PC or Mac with the Smart Copy
feature.
Seagate Mobile Backup—Back up your mobile devices to your Personal Cloud 2-Bay.
Seagate Personal Cloud 2-Bay User Guide
5
Seagate Media—Stream your media library to your
mobile devices, Smart TVs, and other media devices.
Backup Manager—Back up to the cloud and sync
with cloud services.
Backup Manager—Back up your backups to USB
attached storage or another network attached storage
device.
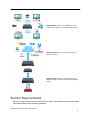
System Requirements
Before you begin setting up your Personal Cloud 2-Bay, read through these instructions and
specifications and review the safety guidelines.
Seagate Personal Cloud 2-Bay User Manual
6
{Link “safety guidelines” to the Safety Guidelines section.}
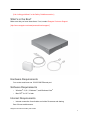
What’s in the Box?
Make sure that you have these items. If not, contact Seagate Customer Support.
{http://www.seagate.com/www/personalcloud-support/}
Hardware Requirements
Your router must have one 10/100/1000 Ethernet port.
Software Requirements
•
Windows® 10, 8.1, Windows 7, and Windows Vista®
•
Mac OS® X v10.7 or later
Internet Requirements
•
Internet connection for activation and online file access and sharing
One of these web browsers:
Seagate Personal Cloud 2-Bay User Guide
7
•
Internet Explorer® 9.x or later
•
Firefox® 5.x or later
•
Chrome 11.x or later
•
Safari® 5 or later
Connect Your Personal Cloud 2-Bay
1. Using the supplied Ethernet cable, connect your Personal Cloud 2-Bay to your Wi-Fi
router.
2. Attach the power adapter to the Personal Cloud 2-Bay power port, and plug the adapter
into a power outlet.
While powering up, the LED on the top of the device quickly flashes white. When the LED
is a solid white, the device is connected to the Internet and ready to use. For more information about the LED behavior, see LED Behavior.
{Link “LED Behavior” to LED Behavior}
Seagate Personal Cloud 2-Bay User Manual
8
Owner Setup
When you set up your Personal Cloud 2-Bay, you also create the owner account. The owner
adds users, manages the devices services, such as iTunes, and manages device settings,
such as power management.
If you followed the quick start guide and were successful setting up your device and adding
your owner account, you can start adding users.
{Link “adding users” to Adding and Managing Users}
Set Up Your Owner Account
1. Access your Personal Cloud 2-Bay.
•
PC—In Windows or File Explorer under Networks, click PersonalCloud.
•
Mac—In Finder under Shared, click PersonalCloud.
Note: If your computer does not detect your Personal Cloud 2-Bay , see the
Troubleshooting section for guidance. {Link “Troubleshooting” to Troubleshooting}
2. Double-click the Public folder on the right side, and then double-click Personal Cloud
2-Bay.
The Welcome screen opens in your web browser.
Note: You can also access your Personal Cloud 2-Bay through the Seagate Dashboard
desktop icon. Learn more about the Seagate Dashboard. {Link Seagate Dashboard to
http://www.seagate.com/services-software/apps/seagate-dashboard-software/}
3. Accept or change your storage settings.
By default, your Personal Cloud 2-Bay is configured for maximum protection. This means
that all of the data you copy to your device is stored on one disk, and a copy of that data
is stored on the second disk. This configuration provides the greatest protection, but does
reduce the total capacity of storage on your drive. In the event of a disk failure, you can
replace the failed disk and continue to use your Personal Cloud 2-Bay.
To use all of storage available on your device, select Maximum capacity. This option
allows you to use all available storage (8 TB), but offers no data protection.
Note: If you change the configuration of your Personal Cloud 2-Bay after you have created
your media library or backed up computers in your home, you will lose your data. You’ll need
to copy all data offline before you reconfigure your device to a different storage setting.
3. Enter your email address and create a password.
If you have registered with Seagate before, you can use the same email address and
password.
Seagate Personal Cloud 2-Bay User Guide
9
Your Personal Cloud 2-Bay creates your:
•
Username, which allows you to access your private folder, manage users, and
manage device settings
•
Private folder where you can store personal content
•
Seagate Access account, which allows you to access your Personal Cloud 2-Bay
remotely and enable remote access for other users
A message is sent to your email account with the confirmation code needed to activate
your Seagate Access account.
Note: Check your spam folder if you don’t find an email in your Inbox.
4. Enter the confirmation code and complete your owner information.
You also need to confirm your Seagate Access account before you can give other users
remote access.
5. Click Finish.
The Personal Cloud 2-Bay Welcome tour opens. Take a moment to complete the tour to
learn about Personal Cloud 2-Bay features.
The Personal Cloud 2-Bay management page opens.
6. You are now ready to:
•
Add user accounts. {link entire line to Users}
•
Begin building your media library {link entire line to Media Library}
•
Protect your important documents {link entire line to Backup}
•
Manage your Personal Cloud 2-Bay {link entire line to Owner Administration}
Seagate Personal Cloud 2-Bay User Manual
10
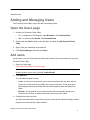
STORAGE FLOW
Adding and Managing Users
The Personal Cloud 2-Bay owner can add and manage users.
Open the Users page
1. Access your Personal Cloud 2-Bay.
•
PC—In Windows or File Explorer under Networks, click PersonalCloud.
•
Mac—In Finder under Shared, click PersonalCloud.
2. Double-click the Public folder on the right side, and then click My Personal Cloud
2-Bay.
3. Sign in with your username and password.
4. Click Device Manager and then click Users.
Add users
As the owner, you can invite people at home and outside of your home network to use your
Personal Cloud 2-Bay.
1. Open the Users page.
{Link entire line to Open the Users page}
Note: If you want to enable remote access and you haven’t confirmed your Seagate
Access account, do so now by clicking Confirm Email.
2. Click Add user.
You can add two types of users:
•
Local—A user who has access to your home network and can also have remote
access to your Personal Cloud 2-Bay when away from home. A local user has a
password-protected private folder that can be accessed at home and away from
home.
•
Remote—A user outside of your home network who can remotely access your
Personal Cloud 2-Bay. A remote user does not have a private folder.
3. Complete the New User form.
An email with instructions is sent to the new user. Users should check their Spam folder if
they have not received their email invitation.
Seagate Personal Cloud 2-Bay User Guide
11
Manage remote access for an existing user
The owner can manage remote access on a user-by-user basis. Remote access allows users
to access content while away from home.
You can also control remote access for all users.
{Link “control remote access for all users” to Control remote access for all users}
To manage remote access for a specific, existing user:
1. Open the Users page. {link entire line to Open the Users page}
Note: If you want to enable remote access and you haven’t confirmed your Seagate
Access account, do so now by clicking Confirm Email.
2. Click the dot under Seagate Access.
Seagate Access is on
The owner has invited a user to create a Seagate Access, but the process is not
complete.
Seagate Access is off
A yellow dot indicates a pending status. You have invited the user to create a Seagate
Access account and the Personal Cloud 2-Bay is waiting for the user to complete the
process.
Edit a user
Only the Personal Cloud 2-Bay owner can change a user’s username and email address.
Both the owner and user can change the user’s private folder password, as described in
Passwords. (link “Passwords” to Passwords)
1. Open the Users page. (link entire line to Open the Users page)
2. Click the item you want to change.
•
Username—Changing the username also changes the user’s private folder name.
•
Password—Changes only the user’s private folder password. The Seagate Access
password used to remotely access your Personal Cloud 2-Bay does not change.
•
Email address—The email address is the user’s Seagate Access ID, which is used to
remotely access your Personal Cloud 2-Bay.
Delete a user
The Personal Cloud 2-Bay owner can delete all user accounts. Deleting a user account also
deletes the user’s private folder and its contents.
Seagate Personal Cloud 2-Bay User Manual
12
If the user has created backup plans through the Backup Manager, the backups are also
deleted. For more information, see Backups. (link “Backups” to Backups)
1. Open the Users page. (link entire line to Open the Users page)
2. Place the cursor to the right of the Seagate Access column in the user’s row, and click the
X.
Seagate Personal Cloud 2-Bay User Guide
13
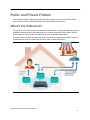
Public and Private Folders
Your Personal Cloud 2-Bay has a Public folder that anyone can use and a private folder
where each local user can store personal content that others cannot see.
What’s the difference?
Everyone on your home network can access the Public folder. Anyone who has been given a
Seagate Access account to the storage device can also access the Public folder. Use the
Public folder for files you want to share and for your centralized media library.
A private folder is created for each local user account and is password protected. Use your
private folder to back up content that you don’t want to share with others.
Seagate Personal Cloud 2-Bay User Manual
14
Which folder to use
Public folder
Create your media library in the Public folder and copy any data that you want to share to the
Public folder so that you and others can access it. See Media Library. (link “Media Library” to
Media Library)
Private folder
Back up your content to safeguard against computer malfunctions. Content backed up to the
Public folder can be viewed by anyone who has access. No one but you can view content
backed up to your private folder. You can back up your computer and mobile devices using
Seagate Dashboard software and Seagate Mobile Backup apps. You can also back up your
backups by creating backup and sync plans in the Personal Cloud 2-Bay with Backup
Manager
For information on Seagate Dashboard and Mobile Backup apps, visit the Seagate
Dashboard page. (link “Seagate Dashboard” to
http://www.seagate.com/services-software/apps/seagate-dashboard-software/
For information on backing up your backups, see Backing Up and Syncing Content.(link
“Backing Up and Syncing Content” to Backing Up and Syncing Content)
Seagate Personal Cloud 2-Bay User Guide
15
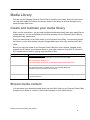
Media Library
You can use your Seagate Personal Cloud 2-Bay to centralize your media. Everyone with access
can copy their media to the library and stream content in the library on devices throughout your
home and away from home.
Create and maintain your media library
Music, movies, and photos—you and other household members probably each have media files on
multiple devices. You can consolidate your media in one place on your Personal Cloud 2-Bay for
sharing and easy maintenance.
Copy your media library to the Public folder on your Personal Cloud 2-Bay. You can easily stream
the content on your other devices using the Seagate Media app, which only accesses the Public
folder.
Before you copy your media to your Personal Cloud 2-Bay from your computer, Seagate recommends that you connect your computer directly to your router instead of using a Wi-Fi connection.
Wi-Fi speeds are not ideal for copying large quantities of files.
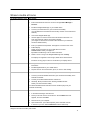
To copy content from your
Computer
You need to
Install Seagate Dashboard on your computer, and create a Smart Copy plan that
continuously updates your media library on your Personal Cloud 2-Bay.
link “Install Seagate Dashboard” to
http://www.seagate.com/services-software/apps/seagate-dashboard-software/.
Mobile device
Install Seagate Media on your mobile device from your app store, and set up Auto Up Upload.
Auto Upload is located in the Settings menu of the Seagate Media app.
It backups up photos and videos only over Wi-Fi.
External device
Plug the device in to the USB port on your Personal Cloud 2-Bay, and drag and drop content from
your external device.
Stream media content
You can stream your centralized media library from the Public folder on your Personal Cloud 2-Bay
throughout your home on a variety of devices and remotely on your mobile devices.
Seagate Personal Cloud 2-Bay User Manual
16
Stream media at home
To stream content to your
Apple TV
You need to
The DLNA service is turned on by default on your Personal Cloud 2-Bay.
1.
Ensure that the DLNA service is turned on through Device Manager >
Services.
2.
Install the Seagate Media app on your mobile device.
3.
Connect your mobile device to your Personal Cloud 2-Bay.
(Your mobile device and Personal Cloud 2-Bay must be on the same home
network.)
4.
Launch the Seagate Media app.
5.
Use the Apple TV remote to select the local network from the list or to
enter local network's name if the network is hidden.
(Your Apple TV must be on the same home network as your Personal
Cloud and mobile device.)
6.
Enter your password if requested. The Apple TV connects to the router.
7.
Enable Airplay.
Swipe up from the bottom of your mobile device to access
Control Center. Select your Apple TV.
Tip: Make sure Mirroring is off for Videos and Music.
8.
Select a movie or song in the Seagate Media app and click Play.
The Airplay icon appears on the far right, beside the "Forward" button.
The movie or song plays on the TV connected to your Airplay device.
Chromecast
DLNA Certified device
1.
Configure Chromecast on your TV and Wi-Fi per the manufacturer's
instructions.
2.
Install Seagate Media on your mobile device.
3.
Tap the cast icon and choose video, photo, or music to start casting.
The DLNA service is turned on by default on your Personal Cloud 2-Bay.
1.
Connect your DLNA Certified device and your Personal Cloud 2-Bay to the
same Wi-Fi network.
2.
Consult your DLNA Certified device's instructions.
3.
Generally, DLNA provides a menu showing available devices.
Select your Personal Cloud 2-Bay.
Your DLNA Certified device loads the content it is able to play from your
Personal Cloud 2-Bay.
iTunes
Turn on the iTunes service.
1.
In the Device Manager, click Services.
2.
Place your mouse over the iTunes service. Click the Edit menu that
appears, and then click Start.
3.
Start iTunes on your computer.
4.
Open Preferences. (On a Mac keyboard, press command+comma.
In iTunes on your PC, select Preferences from the Edit menu).
Seagate Personal Cloud 2-Bay User Guide
17
5.
Click the General tab and ensure that Shared Libraries is checked.
6.
Open the menu sidebar (View > Show Sidebar)
7.
Under Shared, select PersonalCloud
To learn how to copy your iTunes library to your Personal Cloud 2-Bay, visit the
Seagate Personal Cloud 2-Bay support page.
{link “Seagate Personal Cloud 2-Bay support page” to
http://www.seagate.com/www/personalcloud-support/}
LG TV
Roku
Samsung Smart TV
1.
Turn on your LG TV.
2.
Connect your LG TV and your Personal Cloud 2-Bay to the same Wi-Fi
network.
3.
Install the Seagate Media app on your mobile device.
4.
Connect your mobile device to your Personal Cloud 2-Bay.
5.
Tap the cast icon and choose video, photo, or music to start casting.
There are two ways to enjoy content on Roku.
1.
Install Roku Media Channel from the Roku app store and connect to
your Personal Cloud 2-Bay through the app.
2.
Install the Seagate Media app on your mobile device. Connect your
Roku device and Personal Cloud 2-Bay to the same Wi-Fi network.
Tap the cast icon and choose video, photo, or music to start casting.
Install Seagate Media from the Samsung app store and connect to your
Personal Cloud 2-Bay through the app.
Stream media away from home
To remotely stream content to your
You need to
Seagate Personal Cloud 2-Bay User Manual
18
iOS or Android media device
Install the Seagate media app.
Seagate recommends that you install the Seagate Media
app on your mobile device for optimal access and viewing
of your media. The Seagate Media app contains a remote
access module that allows you to sign in to your Seagate
Access account and access your Personal Cloud 2-Bay
media library.
Note: You must create your Seagate Access account on
your Personal Cloud 2-Bay before you can sign in through
the Seagate Media app.
Seagate Personal Cloud 2-Bay User Guide
19
Mac and PC computer
Install Sdrive, an application that you use to access content on your Personal Cloud 2-Bay.
1. Go to the Sdrive home page and install the Sdrive
client on your computer.
{Link “Sdrive home page” to
http://nassupport.seagate.com/CSO_sdrive_Homepage }
2.
Open Sdrive.
3.
Create a new account.
Sdrive sends an email confirming the account.
4.
Launch the Sdrive application and sign in.
5.
Open the Sdrive application:
3.
•
Windows: Right-click the Sdrive icon in the system tray.
•
Mac: Left-click the Sdrive icon in the menu bar.
Select your Personal Cloud and select Add to Sdrive.
Enter your Personal Cloud 2-Bay username and password.
Seagate Personal Cloud 2-Bay User Manual
20
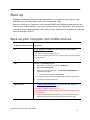
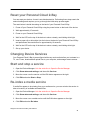
Back up
Seagate provides several ways to protect your content. You can back up your computer, your
mobile devices, your DSR camera, and your Personal Cloud 2-Bay.
Before you back up your computer to your Personal Cloud 2-Bay, Seagate recommends that you
connect your computer directly to your router instead of using a Wi-Fi connection. Wi-Fi speeds are
not ideal for copying large quantities of files. After you have created your first backup, you can back
up future changes over Wi-Fi.
Back up your computer and mobile devices
To back up content from your
You need to
PC
Install Seagate Dashboard on your computer, and create a
backup plan.
link “Install Seagate Dashboard” to
http://www.seagate.com/services-software/apps/seagate-dashb
oard-software/.
Mac
Set up a Time Machine plan.
1.
Open System Preferences and select Time Machine.
2.
Select Select Backup Disk.
3.
Select your Personal Cloud 2-Bay:
the list of backup options.
4.
5.
Mobile device
PersonalCloud TM BACKUP from
Once the drive is selected, click Use Disk.
If prompted, enter your Personal Cloud 2-Bay username and password.
6.
Complete your backup preferences.
1.
Install Seagate Dashboard on your PC or Mac, and sign in to the
Mobile Backup section in Dashboard.
link “Install Seagate Dashboard” to
http://www.seagate.com/services-software/apps/seagate-dashb
oard-software/.
2.
Install the Seagate Mobile Backup app on your mobile device from your
app store and create a backup plan as instructed in the app’s help.
Seagate Personal Cloud 2-Bay User Guide
21
Mobile or DSR camera
Install Seagate Media on your mobile device from your app
store, and set up Auto Upload. Auto Upload is located in the
Settings menu of the Seagate Media app. It backs up photos
and videos only over Wi-Fi.
Personal Cloud 2-Bay
Use the Personal Cloud 2-Bay Backup Manager. Link to Backing Up Your Personal Cloud 2-Bay
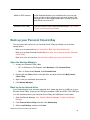
Back up your Personal Cloud 2-Bay
You can protect the content on your Personal Cloud 2-Bay by backing it up to another
storage option.
Back up to an external drive (link entire line to Back up to an external drive)
Back up to another Personal Cloud 2-Bay (link entire line to Back up another Personal
Cloud 2-Bay)
Back up to your cloud service (link entire line to Back up to your cloud service)
Open the Backup Manager
1. Access your Personal Cloud 2-Bay.
•
PC—In Windows or File Explorer under Networks, click PersonalCloud.
•
Mac—In Finder under Shared, click PersonalCloud.
2. Double-click the Public folder on the right side, and then double-click My Personal
Cloud 2-Bay.
3. Sign in with your username and password.
4. Click Backup Manager.
Back up to an external drive
If you are backing up to an externally attached drive, attach the drive to a USB port on your
Personal Cloud 2-Bay. There are two USB ports available: USB2 and USB3. The USB3 port
is on the right-hand side of your Personal Cloud 2-Bay; the USB2 port is on the back
1. Open the Backup Manager. Link “Open the Backup Manager” to Open the Backup
Manager.
2. Click Personal Cloud 2-Bay, and then click Add backup.
3. Select Local Backup, and then click Next.
Seagate Personal Cloud 2-Bay User Manual
22
4. Select the folder of the content you want to back up.
5. Select the destination folder, or in the External ports section, select the externally
attached drive.
6. (Optional) Create a new folder to organize your backups.
7. Choose a backup mode, manual, scheduled, or automatic.
Back up to another Personal Cloud 2-Bay
You can back up your Personal Cloud 2-Bay to another Personal Cloud 2-Bay or a Personal
Cloud 2-Bay.
1. Open the Backup Manager. Link “Open the Backup Manager” to Open the Backup
Manager.
2. Click Personal Cloud 2-Bay, and then click Add backup.
3. Select Network Backup, and then click Next.
4. Select the folder of the data that you want to back up.
5. Select NAS OS device as your destination, and then click Next.
6. Select a device from the list and complete your backup job.
Back up to your cloud service
To back up content to a cloud service, you must have an account on the service and an
existing destination folder that you can use for your backup.
1. Open the Backup Manager. Link “Open the Backup Manager” to Open the Backup
Manager.
2. Click Personal Cloud 2-Bay, and then click Add backup.
3. Select Network Backup, and then click Next.
4. Select your cloud service as your destination, and then click Next.
5. Sign in to the cloud service and type the name of the destination folder.
6. In Advanced parameters, securely transferring data is the default. You can change this
selection.
7. (Optional) Select to never delete files on the destination folder when they are deleted
from the source.
8. Select a backup mode: manual or scheduled.
9. Create a name for your backup job.
Seagate Personal Cloud 2-Bay User Guide
23
Sync with Your Cloud Service
You can protect the content on your Personal Cloud 2-Bay by synchronizing it with your cloud
service. Syncing also lets you access your content from anywhere. This two-way sync
guarantees that the Personal Cloud 2-Bay content that you choose to save to the cloud
service stays up to date when you make changes in the cloud service or on your Personal
Cloud 2-Bay.
Personal Cloud 2-Bay sync supports Google Drive and Dropbox. You must have an account
on the cloud service and an existing destination folder to use for your sync.
1. Open the Backup Manager. Link entire line to Open the Backup Manager.
2. Click Sync, and then click Add sync.
3. Select a cloud service.
4. Accept the conditions presented from the cloud service.
Your account information displays next to Account.
5. Click Next.
6. Select the folder you want to sync, and then click Next.
7. Set a schedule.
8. Click Finish.
Seagate Personal Cloud 2-Bay User Manual
24
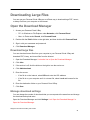
Downloading Large Files
You can use your Personal Cloud 2-Bay as an efficient way to download large PDF, torrent,
or binary files from your computer or the Internet.
Open the Download Manager
1. Access your Personal Cloud 2-Bay.
•
PC—In Windows or File Explorer under Networks, click PersonalCloud.
•
Mac—In Finder under Shared, click PersonalCloud.
2. Double-click the Public folder on the right side, and then double-click PersonalCloud.
3. Sign in with your username and password.
4. Click Download Manager.
Download large files
You can download torrent files from your computer to your Personal Cloud 2-Bay and
download PDF, binary, and torrent files from the Internet.
1. Open the Download Manager. Link entire line to Open the Download Manager.
2. Click Jobs.
3. If the service is off, click the slider on the right to turn the service on.
4. Click Add download.
5. Enter the source.
•
If the file is on the Internet, select URL and enter the URL address.
•
If the file is on your computer and it is a torrent file, select Local and browse for the
file.
6. Enter the destination folder on your Personal Cloud 2-Bay.
7. Click Save.
Manage download settings
You can change the number of downloads that you can request at the same time and change
the download and upload rates.
Open the Download Manager and click Settings. Link “Open the Download Manager” to
Open the Download Manager
Seagate Personal Cloud 2-Bay User Guide
25
Passwords
Passwords are often required to access a Seagate device, application, or web page.
How are Personal Cloud 2-Bay passwords used?
Passwords are used to:
•
Access your private folder on your Personal Cloud 2-Bay
•
Remotely access your Personal Cloud 2-Bay with a Seagate Access account or by
installing the Sdrive client or app on your computer or mobile device.
•
Back up your mobile content to your Personal Cloud 2-Bay.
Important: These passwords are independent of each other. If you change one password,
the other passwords do not change.
Change your private folder password
You use your private folder password to access your private folder on your Personal Cloud
2-Bay. When you change your private folder password, your Seagate Access
password—used to remotely access your Personal Cloud 2-Bay—does not change.
If you are the Personal Cloud 2-Bay owner
1. Open the Device Manager. (link entire line to Open the Device Manager)
2. Click Users.
3. Click your device password or a user’s device password and make your change.
If you are a user
1. Open the Device Manager. (link entire line to Open the Device Manager)
The Settings page opens.
2. Place the cursor over your password and click the pencil icon.
3. Change your password.
Seagate Personal Cloud 2-Bay User Manual
26
Owner Administration
Your Personal Cloud 2-Bay has been configured with standard default settings. The Personal
Cloud 2-Bay owner can modify the settings, such as the device name, time zone, and the
services used.
Open the Device Manager
1. Access your Personal Cloud 2-Bay.
•
PC—In Windows or File Explorer under Networks, click PersonalCloud.
•
Mac—In Finder under Shared, click PersonalCloud.
2. Double-click the Public folder on the right side, and then double-click Personal Cloud
2-Bay.
3. Sign in with your username and password.
4. Click Device Manager.
LED Behavior
Your Personal Cloud 2-Bay LED is on the top of your device. When your device is starting up,
the LED blinks white. When the LED is solid white, your Personal Cloud 2-Bay is ready to
access over your Wi-Fi network.
If you reset your device, the LED begins blinking red, and then blinks white.
Personalize your Personal Cloud 2-Bay
You can personalize your device by changing its name, the language, time zone, and more.
Note: Changing the device name does not affect local or remote access.
1. Open the Device Manager. Link the entire line to Open the Device Manager
2. Click Settings and make your changes.
You can change settings that have an on and off button or display a pencil icon when you
place the cursor over the setting. Click the pencil icon to make a change.
Note: If you want to change the time zone, and you have enabled Synchronization, turn it
off before changing the time zone and then turn it back on.
Seagate Personal Cloud 2-Bay User Guide
27
Reset your Personal Cloud 2-Bay
You can reset your device. A reset is not data-destructive. Performing these steps resets the
network settings and requires you to go through the initial setup process again.
The reset button is inside the casing on the back of your Personal Cloud 2-Bay.
1. Power off your Personal Cloud 2-Bay using the power button on the back of the device.
2. Wait approximately 15 seconds.
3. Power on your Personal Cloud 2-Bay.
4. Wait for the LED on the top of the device to show a steady, non-blinking white light.
5. Insert a paper clip or slim object into the hole on the back of your Personal Cloud 2-Bay
and press down the reset button for approximately 10 seconds.
6. Wait for the LED on the top of the device to show a steady, non-blinking white light.
7. Set up your device.
Changing Device Services
Your Personal Cloud 2-Bay is preconfigured with many services that allow you to stream to a
TV, use iTunes, download and upload files to your computer, and manage remote access.
Start and stop a service
1. Open the Device Manager. Link the entire line to Open the Device Manager
2. Click Show advanced settings, and then click Services.
3. Move the cursor over the service until the Edit button appears on the right.
4. Click Edit and select Start or Stop.
Re-index a media service
If media files appear to be missing from your media service, you can re-index the service to
take an inventory of available multimedia files.
1. Open the Device Manager. Link the entire line to Open the Device Manager
2. Click Show advanced settings, and then click Services.
3. Move the cursor over a media service until the Edit button appears on the right.
4. Click Edit and select Re-index.
Seagate Personal Cloud 2-Bay User Manual
28
Control remote access for all users
By default, anyone with a Seagate Access account on your Personal Cloud 2-Bay can
access content on the storage drive while away from home. You can disable this ability for all
accounts. If you want to disable this ability for a specific user, see Manage remote access for
an existing user. Link “Manage remote access for an existing user” to Manage remote access
for an existing user.
1. Open the Device Manager. Link the entire line to Open the Device Manager
2. Click Show advanced settings, and then click Services.
3. Move the cursor over Sdrive until the Edit button appears on the right.
4. Click Edit and select Enable remote access or Disable remote access.
A green circle indicates that the service is enabled.
Conserve power usage
You can save energy by turning off hard drives and powering off your device after a specified
interval of inactivity. When you turn off the hard drive, it still remains active to receive network
commands from other devices.
1. Open the Device Manager. Link the entire line to Open the Device Manager
2. Click Show advanced settings, and then click Power.
3. To turn the hard drive off after a specified interval, select a value from the pull-down
menu.
4. To turn power saving mode on or off, slide the button.
Connect your device to an uninterruptible power
source
Connecting your Personal Cloud 2-Bay to an uninterruptible power source (UPS) ensures a
continuous power supply.
1. Confirm that no one is accessing your Personal Cloud 2-Bay and power it off.
2. Connect a supported UPS device to a USB port on your Personal Cloud 2-Bay.
Note: If you plan to often copy data from an external device to your Personal Cloud
2-Bay, you might want to connect the UPS to the USB 2.0 port on our device. The USB
3.0 port provides greater transfer speeds.
3. Power on your Personal Cloud 2-Bay.
1. Open the Device Manager. Link the entire line to Open the Device Manager
Seagate Personal Cloud 2-Bay User Guide
29
2. Click Show advanced settings, and then click Power.
If your UPS device information does not display in the UPS management section, click
Add a network UPS server and select your UPS type from the pull-down menu.
3. Set the battery threshold level.
If your Personal Cloud 2-Bay reaches the threshold, it will automatically enter stand-by
mode.
The UPS's status is provided within UPS Management:
—The power cable is supplying power.
—The power cable is not supplying power.
Important: Seagate cannot guarantee that all UPS devices are compatible with your
Personal Cloud 2-Bay UPS management.
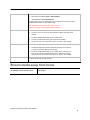
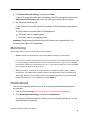
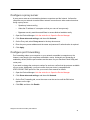
Monitoring
Monitoring provides a summary of your Personal Cloud 2-‐Bay: •
System. Review the overall health, the CPU and RAM consumption, and processes. If you see an issue with the temperature, check the placement of your NAS to make certain that it is not receiving an abnormal amount of heat from external sources (e.g. sun from a window, heating duct, exhaust from other electronics, etc.). If you receive a drive error, select the Drive tab to review the status of the hard drives. •
Drive. Review basic information for each hard drive, including the model number, capacity, temperature, and SMART status. SMART stands for Self-‐Monitoring, Analysis and Reporting Technology. SMART status should be used for informational purposes only, specifically when diagnosing hard drives. To run a SMART test, select Autotest. Notifications
You can monitor device activities, such as when a user was added and when the drive
synchronized.
1. Open the Device Manager. Link the entire line to Open the Device Manager
2. Click Show advanced settings, and then click Notifications.
You can filter notifications based on warning, errors, or show all notifications. You can
also download the system log.
Seagate Personal Cloud 2-Bay User Manual
30
Storage
You can check how much storage is available on your Personal Cloud 2-Bay and format your
drive.
1. Open the Device Manager. Link the entire line to Open the Device Manager
2. Click Show advanced settings, and then click Storage.
-
Overview. Review the total device storage and the status of internal and external
volumes (USB attached devices).
-
Network Drives. Format (erase all data) but keep the volume or Delete (remove
the volume). The Personal Cloud 2-Bay has one volume on each disk.
Important: Formatting your drive erases all data. Before formatting the drive, back up your
data to another drive.
Network Settings
Usually, you do not need to change your Personal Cloud 2-Bay network settings. If you are
having issues with network connectivity, changing the settings might solve the problem.
Note: Changing network settings requires some understanding of networking and your
specific setup.
Change the IP configuration
By default, the IP configuration uses DHCP, a standard networking protocol that dynamically
selects IP addresses for interfaces and services.
If you are having issues with network connectivity, you might want to use a fixed IP address.
1. Open the Device Manager. Link the entire line to Open the Device Manager
2. Click Show advanced settings, and then click Network.
3. On the Connections tab, click Edit.
4. Click either the IPv4 or IPv6 tab.
Note: Not all devices support IPv6. Go to test-ipv6.com to determine if IPv6 is supported.
5. (IPv4). Select Manual or Automatic (DHCP) from the pull-down menu, and then click
Save.
6. (IPv6). Select an option from the pull-down menu, and then click Save.
Seagate Personal Cloud 2-Bay User Guide
31
Configure a proxy server
A proxy server acts as an intermediary between computers and the Internet. It allows the
computers on your network to make indirect network connections to other network services.
Using a proxy server:
•
Speeds up Internet surfing
•
Hides the IP address of a computer so that you can surf anonymously
•
Bypasses security restrictions and filters to access blocked websites easily
1. Open the Device Manager. Link the entire line to Open the Device Manager
2. Click Show advanced settings, and then click Network.
3. On the Proxy tab, select Proxy server in the drop-down menu.
4. Enter the proxy server address and the name and password if authentication is required.
5. Click Apply.
Configure port forwarding
Port forwarding makes your computer on your network accessible to computers on the
Internet, even though your computers are behind a router. Automatic port forwarding is
enabled by default, and the port numbers are the same for your Personal Cloud 2-Bay and
router ports.
If you need to change the router port number for services, confirm that the ports are available
on your router. Additionally, you must confirm that your router is compatible with
UPnP-IGD/NAT-PMP protocols. See your router's user manual for details.
1. Open the Device Manager. Link the entire line to Open the Device Manager
2. Click Show advanced settings, and then click Network.
3. On the Port Forwarding tab, move the cursor over the service until the Edit button
appears on the right.
4. Click Edit, and then click Enable.
Seagate Personal Cloud 2-Bay User Manual
32
Hard Drive Maintenance
If a drive on your Seagate Personal Cloud 2-Bay fails, and you have configured your device
for maximum protection, you can replace it; your content is safe on the other drive.
Important: Refer to the warranty before performing hardware repairs or maintenance not
described in this manual. (link “Warranty” to
http://www.seagate.com/support/warranty-and-replacements/limited-consumer-warranty)
Precautions Link entire line to Precautions
Remove a hard drive Link entire line to Remove a hard drive
Install a hard drive Link entire line to Install a hard drive
Precautions
•
Except for replacing a hard drive, performing maintenance within the enclosure is not
supported and can void your product's warranty.
•
During operation, the drives should remain in place for optimal airflow.
•
Observe all conventional ESD precautions when handling the Personal Cloud 2-Bay’s
parts. Avoid contact with backplane components and module connectors, etc.
•
Replace an existing or faulty hard drive with a hard drive of equal capacity.
•
When handling hard drives, make sure that they are placed (and stored) on a cushioned
surface.
Remove a hard drive
Disconnect power from the device before removing a hard drive.
Seagate Personal Cloud 2-Bay User Guide
33
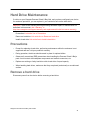
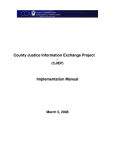
1. Push the button on the back of your Personal Cloud 2-Bay.
2. Remove the cover from the enclosure.
Seagate Personal Cloud 2-Bay User Manual
34
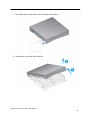
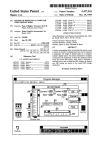
3. Remove the two screws that hold the disk in place.
4. Pull the disk forward to disconnect it from its plug and then lift the disk up to remove it
from the enclosure.
Install a hard drive
Disconnect power from the device before installing a hard drive.
Seagate Personal Cloud 2-Bay User Guide
35
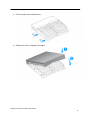
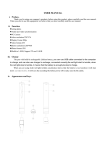
1. Attach the screws provided with your Personal Cloud 2-Bay to one side of the drive.
2. Guide the hard drive so that the rear screw fits into its slot, and then slide the drive into its
plug.
Seagate Personal Cloud 2-Bay User Manual
36
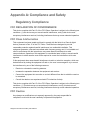
3. Fix the screws to the outside holes.
4. Replace the cover, snapping it into place.
Seagate Personal Cloud 2-Bay User Guide
37
Appendix A: Compliance and Safety
Regulatory Compliance
FCC DECLARATION OF CONFORMANCE
This device complies with Part 15 of the FCC Rules. Operation is subject to the following two
conditions: (1) this device may not cause harmful interference, and (2) this device must
accept any interference received, including interference that may cause undesired operation.
FCC Class A Information
This equipment has been tested and found to comply with the limits for a Class A digital
device, pursuant to Part 15 of the FCC Rules. These limits are designed to provide
reasonable protection against harmful interference in a residential installation. This
equipment generates, uses and can radiate radio frequency energy and, if not installed and
used in accordance with the instructions, may cause harmful interference to radio
communications. Operation of this equipment in a residential area is likely to cause harmful
interference in which case the user will be required to correct the interference at his own
expense.
If this equipment does cause harmful interference to radio or television reception, which can
be determined by turning the equipment off and on, the user is encouraged to try to correct
the interference by one of the following measures:
•
Reorient or relocate the receiving antenna.
•
Increase the separation between the equipment and receiver.
•
Connect the equipment into an outlet on a circuit different from that to which the receiver
is connected.
•
Consult the dealer or an experienced radio/TV technician for help.
This device complies with Part 15 of the FCC Rules. Operation is subject to the following two
conditions: (1) This device may not cause harmful interference, and (2) this device must
accept any interference received, including interference that may cause undesired operation.
FCC Caution
Any changes or modifications not expressly approved by the party responsible for
compliance could void the user's authority to operate this equipment.
Seagate Personal Cloud 2-Bay User Manual
38
IMPORTANT NOTE: FCC Radiation Exposure Statement
This equipment complies with FCC radiation exposure limits set forth for an uncontrolled
environment. This equipment should be installed and operated with minimum distance 20cm
between the radiator & your body. This transmitter must not be co-located or operating in
conjunction with any other antenna or transmitter.
The availability of some specific channels and/or operational frequency bands are country
dependent and are firmware programmed at the factory to match the intended destination.
The firmware setting is not accessible by the end user.
Note to US model owner: To comply with US FCC regulation, the country selection function
has been completely removed from all US models. The above function is for non-US models
only.
Industry Canada
This device complies with RSS-210 of the Industry Canada Rules. Operation is subject to the
following two conditions: (1) This device may not cause harmful interference, and (2) this
device must accept any interference received, including interference that may cause
undesired operation.
Ce dispositif est conforme à la norme CNR-210 d'Industrie Canada applicable aux appareils
radio exempts de licence. Son fonctionnement est sujet aux deux conditions suivantes: (1) le
dispositif ne doit pas produire de brouillage préjudiciable, et (2) ce dispositif doit accepter tout
brouillage reçu, y compris un brouillage susceptible de provoquer un fonctionnement
indésirable.
IMPORTANT NOTE for mobile device use
Radiation Exposure Statement:
This equipment complies with IC radiation exposure limits set forth for an uncontrolled
environment. This equipment should be installed and operated with minimum distance 20cm
between the radiator & your body.
NOTE IMPORTANTE pour l'utilisation de dispositifs mobiles
Déclaration d'exposition aux radiations:**
Cet équipement est conforme aux limites d'exposition aux rayonnements IC établies pour un
environnement non contrôlé. Cet équipement doit être installé et utilisé avec un minimum de
20 cm de distance entre la source de rayonnement et votre corps.
Seagate Personal Cloud 2-Bay User Guide
39
Europe - EU Declaration of Conformity
This device complies with the essential requirements of the EMC Directive 2004/108/EC. The
following test methods have been applied in order to prove presumption of conformity with
the essential requirements of the EMC Directive 2004/108/EC:
•
EN 60950-1:2006/AC:2011: Information technology equipment - Safety - Part 1: General
requirements
•
EN 55022: 2010/AC:2011: Information technology equipment - Radio disturbance
characteristics
•
Limits and methods of measurement
•
EN 55024: 2010: Information technology equipment - Immunity characteristics - Limits
and methods of measurement
Česky [Czech]
Seagate tímto prohlašuje že tento Desktop NAS je ve shodě se
základními požadavky a dalšími příslušnými ustanoveními
směrnice 2004/5/ES.
Dansk [Danish]
Undertegnede Seagate erklærer herved at følgende udstyr
Desktop NAS overholder de væsentlige krav og øvrige relevante
krav i direktiv 2004/5/EF.
Deutsch [German]
Hiermit erklärt Seagate, dass sich das Gerät Desktop NAS in
Übereinstimmung mit den grundlegenden Anforderungen und
den übrigen einschlägigen Bestimmungen der Richtlinie
2004/5/EG befindet.
Eesti [Estonian]
Käesolevaga kinnitab Seagate seadme Desktop NAS vastavust
direktiivi 2004/5/EÜ põhinõuetele ja nimetatud direktiivist tulenevatele teistele asjakohastele sätetele.
English
Hereby, Seagate, declares that this Desktop NAS is in compliance with the essential requirements and other relevant provisions of Directive 2004/5/EC.
Seagate Personal Cloud 2-Bay User Manual
40
Español [Spanish]
Por medio de la presente Seagate declara que el Desktop NAS
cumple con los requisitos esenciales y cualesquiera otras disposiciones aplicables o exigibles de la Directiva 2004/5/CE.
Ελληνική [Greek] ΜΕ ΤΗΝ ΠΑΡΟΥΣΑ Seagate ΔΗΛΩΝΕΙ ΟΤΙ Desktop NAS ΣΥΜΜΟΡΦΩΝΕΤΑΙ ΠΡΟΣ ΤΙΣ ΟΥΣΙΩΔΕΙΣ ΑΠΑΙΤΗΣΕΙΣ ΚΑΙ ΤΙΣ ΛΟΙΠΕΣ ΣΧΕΤΙΚΕΣ ΔΙΑΤΑΞΕΙΣ ΤΗΣ ΟΔΗΓΙΑΣ 2004/5/ΕΚ. Français [French] Par la présente Seagate déclare que l'appareil Desktop NAS est conforme aux exigences essentielles et aux autres dispo-‐
sitions pertinentes de la directive 2004/5/CE. Italiano [Italian] Con la presente Seagate dichiara che questo Desktop NAS è conforme ai requisiti essenziali ed alle altre disposizioni per-‐
tinenti stabilite dalla direttiva 2004/5/CE. Latviski [Latvian] Ar šo Seagate deklarē, ka Desktop NAS atbilst Direktīvas 2004/104/EK būtiskajām prasībām un citiem ar to saistīta-‐
jiem noteikumiem. Lietuvių [Lithuani-‐
an] Šiuo Seagate deklaruoja, kad šis Desktop NAS atitinka es-‐
minius reikalavimus ir kitas 2004/104/EB Direktyvos nu-‐
ostatas. Nederlands [Dutch] Hierbij verklaart Seagate dat het toestel Desktop NAS in overeenstemming is met de essentiële eisen en de andere relevante bepalingen van richtlijn 2004/104/EG. Malti [Maltese] Hawnhekk, Seagate, jiddikjara li dan Desktop NAS jikkon-‐
forma mal-‐ħtiġijiet essenzjali u ma provvedimenti oħrajn relevanti li hemm fid-‐Dirrettiva 2004/104/EC. Magyar [Hungarian] Alulírott, Seagate nyilatkozom, hogy a Desktop NAS megfelel a vonatkozó alapvetõ követelményeknek és az 2004/104/EC irányelv egyéb elõírásainak. Polski [Polish] Niniejszym Seagate oświadcza, że Desktop NAS jest zgodny z zasadniczymi wymogami oraz pozostałymi stosownymi postanowieniami Dyrektywy 2004/104/EC. Seagate Personal Cloud 2-Bay User Guide
41
Português [Portu-‐
guese] Seagate declara que este Desktop NAS está conforme com os requisitos essenciais e outras disposições da Directiva 2004/104/CE. Slovensko [Sloveni-‐
an] Seagate izjavlja, da je ta Desktop NAS v skladu z bistvenimi zahtevami in ostalimi relevantnimi določili direktive 2004/104/ES. Slovensky [Slovak] Seagate týmto vyhlasuje, že Desktop NAS spĺňa základné požiadavky a všetky príslušné ustanovenia Smernice 2004/104/ES. Suomi [Finnish] Seagate vakuuttaa täten että Desktop NAS tyyppinen laite on direktiivin 2004/104/EY oleellisten vaatimusten ja sitä koskevien direktiivin muiden ehtojen mukainen. Svenska [Swedish] Härmed intygar Seagate att denna Desktop NAS står I överensstämmelse med de väsentliga egenskapskrav och övriga relevanta bestämmelser som framgår av direktiv 2004/104/EG. Safety Guidelines
Important: Refer to Warranty before performing any hardware repairs or maintenance that
is not described in this manual. Link Warranty to
http://www.seagate.com/support/warranty-and-replacements/limited-consumer-warranty
Power Source
Caution: Use the product with the provided power supply only.
Note: To protect your data, always follow the safe removal procedures for your operating
system when disconnecting your product.
Safety Handling
To comply with applicable safety, emission, and thermal requirements, install all drives and
empty drive trays according to the instructions in Hardware Maintenance. Link “Hardware
Maintenance” to Hardware Maintenance chapter
Permanently unplug the unit if you think that it has become damaged in any way.
Seagate Personal Cloud 2-Bay User Manual
42
You must shut down and disconnect power from the Personal Cloud 2-Bay before
maintenance or physical troubleshooting is performed on the device.
Shut down and unplug the unit before moving it.
Safety
Power Supply
The Personal Cloud 2-Bay must only be operated from a power supply input voltage range of
100 - 240 VAC, 50 to 60 Hz.
The drive’s power supply is not serviceable or replaceable. If Seagate technical support has
determined that the power supply is faulty or has failed and the unit is under warranty, return
the Personal Cloud 2-Bay to Seagate per the instructions provided by the Seagate
technician.
Environment
Make sure that the electrical connection to the power cord is grounded.
Provide a suitable power source with electrical overload protection to meet the requirements
of the technical specification.
Never expose your device to rain, use it near water, or use it in damp or wet conditions.
Never place objects containing liquids on the enclosure, because liquid could spill into its
openings. Doing so increases the risk of electrical shock, short-circuiting, fire, or personal
injury.
Always unplug the device from the electrical outlet if there is a risk of lightning or if it will be
unused for an extended period of time.
Do not use the Personal Cloud 2-Bay as a shelf to support any other object.
Personal Cloud 2-Bay Placement
Place your Personal Cloud 2-Bay on a surface that is capable of supporting its weight,
including the hard drives and accessories attached to the Personal Cloud 2-Bay ports. Make
sure the Personal Cloud 2-Bay is placed securely and cannot tip or be pushed over. Do not
stack items on it. Doing so can prevent proper airflow and affect operation.
The maximum ambient temperature during operation is 40°C or 104°F.
The power connection must have a safe electrical distribution system and provide
overcurrent protection.
The power supply unit has a ground leakage current of 3.5mA. The design of the electrical
distribution system must take into consideration the total ground leakage current from all the
power supplies in all the units.
Seagate Personal Cloud 2-Bay User Guide
43
Data Security
Any loss, corruption, or destruction of data while using a Seagate hard drive or a hard drive
system is the sole responsibility of the user. Under no circumstances will Seagate be held
liable for the recovery or restoration of this data. To help prevent the loss of your data,
Seagate highly recommends that you keep TWO copies of your data: one copy on your
Personal Cloud 2-Bay, and a second copy on one of the following:
•
Direct-attached storage (DAS)
•
Another NAS device
•
Cloud storage
•
Some form of removable storage or archival media
Important: 1GB = 1,000,000,000 bytes. 1TB = 1,000,000,000,000 bytes. After the drive is
formatted, the available storage capacity varies depending on your operating environment
(typically 10%-15% less).
Seagate Personal Cloud 2-Bay User Manual
44