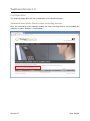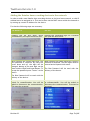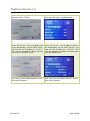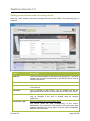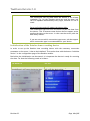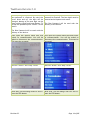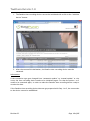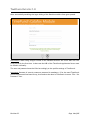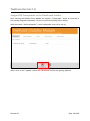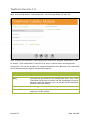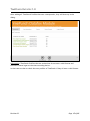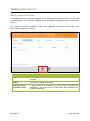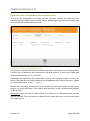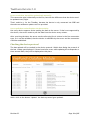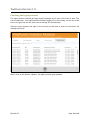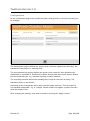
1
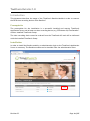
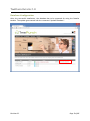
TimePunch
TimePunch
Datafox 1.8
User Manual
TimePunch15.10.2015
KG, Wormser Str. 37, 68642 Bürstadt
Document Information:
Document-Name
User Manual, TimePunch Datafox 1.8
Revision-Number
19
Saved at
15.10.2015
Number of Pages
25
Publisher:
TimePunch KG
Wormser Str. 37
68642 Bürstadt
TimePunch15.10.2015
KG, Wormser Str. 37, 68642 Bürstadt
TIMEPUNCH DATAFOX 1.8
Table of contents
Introduction ..............................................................................................4
Prerequisite ............................................................................................4
Installation .............................................................................................4
Database-Configuration ..............................................................................5
Configuration .............................................................................................6
Administration of the Datafox time recording devices ..........................................6
Adding the Datafox time recording devices to the network ....................................7
Adding a new Datafox time recording device .....................................................9
Initialization of the Datafox time recording device ............................................ 10
Administration ......................................................................................... 13
Starting the TimePunch Datafox Module Client ................................................ 13
Assign RFID Transponder to the TimePunch Profiles ........................................... 15
How to create Info Texts .......................................................................... 18
Uploading the transponder data and info-texts ................................................ 20
Device sends data and will updated daily: ................................................... 20
Device sends data, but will be updated only manually: .................................... 21
Server polls data and will update the device daily: ......................................... 21
Checking the device protocol ..................................................................... 21
Checking the logon protocol....................................................................... 22
Configuration ........................................................................................ 23
Configuration entries.................................................................................. 24
Revision 23
Page 3 of 25
TIMEPUNCH DATAFOX 1.8
Introduction
This document describes the usage of the TimePunch Datafox Module in order to connect
the RFID time recording devices from Datafox™
Prerequisite
The prerequisite for the installation is a successful installed and running TimePunch
Application Server and at least one time recording device (e.g. PZE-Master IV) from Datafox™
with an installed TimePunch Setup.
The time recording device must be ordered from the TimePunch KG and will be delivered
with the installed TimePunch Setup.
Installation
In order to install the Datafox module, an administration login to the TimePunch Application
Server is necessary. The Datafox module can be installed from the administration area.
Revision 23
Page 4 of 25
TIMEPUNCH DATAFOX 1.8
Database-Configuration
After the successful installation, the database has to be prepared for using the Datafox
Module. The update gets started with the command “Update Database”.
Revision 23
Page 5 of 25
TIMEPUNCH DATAFOX 1.8
Configuration
The following pages describe the configuration of the Datafox Module.
Administration of the Datafox time recording devices
After the installation of the Datafox module the time recording devices can be added and
modified in menu “Datafox / Configuration”.
Revision 23
Page 6 of 25
TIMEPUNCH DATAFOX 1.8
Adding the Datafox time recording devices to the network
In order to add a new Datafox time recording devices to the local area network, a valid IP
address has to be assigned to it. This can be done via the DHCP server within the network or
by setting up a static IP-Address for the device.
For that the following steps are necessary.
PZE Master IV
PZE Evo
Pressing the up and down arrow Pressing the TimePunch logo for 5 seconds
simultaneously will open the device bios. will open the device bios.
When opening the system menu bios, the
bios password is required. By using the
arrow down and up, the digit can be
changed. Moving to the next digit can be
done with the Logoff and Logon Button. To
accept the password press “return” at the
device.
When opening the system menu bios, the bios
password is required. The four digits must be
entered and accepted with return.
The Bios Password will be send with the
delivery of the device.
The Bios Password will be send with the
delivery of the device.
Then open the system menu bios and
switch to communication. You will be
asked to disconnect the communication.
This must be accepted.
Revision 23
Then open the system menu bios and switch
to communication. You will be asked to
disconnect the communication. This must be
accepted.
Page 7 of 25
TIMEPUNCH DATAFOX 1.8
Now choose the interface TCP/IP and then Now choose the interface LAN or WLAN and
open the menu „TCP/IP“.
then open the menu „lanparameters“.
At this point the static IP address of the
device can be set. If the IP address shall
be set dynamically via the DHCP Server,
one must set the IP address to “0.0.0.0”.
The concrete assigned IP address must be
looked up at the DHCP Server.
At this point the static IP address of the
device can be set. If the IP address shall be
set dynamically via the DHCP Server, one
must set the IP address to “0.0.0.0”. The
concrete assigned IP address must be looked
up at the DHCP Server.
After that, exit all dialogs with ESC and re- After that, exit all dialogs with ESC and restart the PZE Master.
start the PZE Master.
Revision 23
Page 8 of 25
TIMEPUNCH DATAFOX 1.8
Adding a new Datafox time recording device
With the “Add” button new time recording devices can be added. The following input is
required.
Name
Description
Serial Nr.
That’s the serial number of the time recording device. The serial
number can be found on the back of the device and is used to
identify the device.
Channel ID
A unique identifier of the device beginning with 1.
Description
A free text description in order to allow more easy identification
of the device.
IP-Adresse
The IP address of the device. The IP address can be set
dynamically via the DHCP or static directly at the device itself.
Port
That is the used port. It’s set up default at port 8000 and should
only be changed if the port is already used for another
application.
Connection-Type
Device sends data and will updated daily:
The device sends the data automatically to the server.
Additionally this connection type defines that the device gets
updated automatically every night with the valid transponder
data and time accounts.
Revision 23
Page 9 of 25
TIMEPUNCH DATAFOX 1.8
Device sends data, but will be updated only manually:
This connection will be used when the device is not always
reachable. E.g. for the Timeboy which can send the data, but
can’t be updated automatically every night, because it’s not in
reach.
Server polls data and will update the device daily:
This connection type will force the server to poll the data from
the device. This is because some devices do not support active
sending the data to the server. In this case the server polls the
data every minute.
If you are not sure which connection type to use, ask the support
which connection type is recommended for your device.
Initialization of the Datafox time recording device
In order to set up the Datafox time recording device with the necessary connection
parameter to the server, it has to be initialized. This can be done with the button “Initialize
device” in the configuration page of the Datafox module.
But before the initialization can be started, it is important the device is ready for receiving
the data. For that the following needs to be done.
PZE Master IV
PZE Evo
Pressing the up and down arrow Pressing the TimePunch logo for 5 seconds
simultaneously will open the device bios. will open the device bios.
Revision 23
Page 10 of 25
TIMEPUNCH DATAFOX 1.8
When opening the system menu bios, the
bios password is required. By using the
arrow down and up, the digit can be
changed. Moving to the next digit can be
done with the Logoff and Logon Button. To
accept the password press “return” at the
device.
When opening the system menu bios, the bios
password is required. The four digits must be
entered and accepted with return.
The Bios Password will be send with the
delivery of the device.
The Bios Password will be send with the
delivery of the device.
Then open the system menu bios and
switch to communication. You will be
asked to disconnect the communication.
This must be accepted.
Then open the system menu bios and switch
to communication. You will be asked to
disconnect the communication. This must be
accepted.
Now set “active” and “http” to NO.
Now set “active” and “http” to NO.
After that, exit all dialogs with ESC and re- After that, exit all dialogs with ESC and restart the PZE Master.
start the PZE Master.
Revision 23
Page 11 of 25
TIMEPUNCH DATAFOX 1.8
1. The Datafox time recording device can now be initialized with a click to the “Initialize
device” button.
2. After the successful initialization, the Datafox time recording device must be
restarted.
Information:
If the connection type gets changed from “automatic update” to “manual update” or vice
versa, the time recording device needs to be initialized again. For that the points 1 to 3
needs to be executed again, in order to make the Datafox time recording device ready to
receive the data.
If the Datafox time recording device does not get prepared with Step 1 to 3, the connection
to the device cannot be established.
Revision 23
Page 12 of 25
TIMEPUNCH DATAFOX 1.8
Administration
After successfully finishing the hardware configuration, the TimePunch Profiles can be
assigned to the used RFID transponder. Prerequisite for that is, that the TimePunch Profiles
has already been created in TimePunch.
Starting the TimePunch Datafox Module Client
The TimePunch Profiles and transponder data can be administrated with the TimePunch
Datafox Module Client. This application can be started with the time recording device symbol
in the right upper menu of the TimePunch Application Server.
Revision 23
Page 13 of 25
TIMEPUNCH DATAFOX 1.8
After successfully installing the logon dialog of the Datafox module client gets opened.
Information: When using Google Chrome as the standard browser the server URL won’t be
filled correctly the first time. In that case the URL of the TimePunch Application Server must
be filled in manually.
The user and password must be filled accordingly to the profile settings in TimePunch.
Important: Because of security reasons a password is mandatory. If for the used TimePunch
profile no password has been set up, this needs to be done in TimePunch in menu “File / Set
Password” first.
Revision 23
Page 14 of 25
TIMEPUNCH DATAFOX 1.8
Assign RFID Transponder to the TimePunch Profiles
After starting the Datafox Client Module the register “Transponder” shows an overview of
the already assigned transponder. At the first start this dialog will be empty.
With the button “Add transponder” a new transponder chip can be set up.
With a click to the “Update” button the TimePunch Profiles are getting updated.
Revision 23
Page 15 of 25
TIMEPUNCH DATAFOX 1.8
After a click to the button “Add transponder” the following dialog will show up.
After choosing the employee a valid transponder id has to be assigned. Additionally it can
be chosen, if the transponder is valid for all or only for special time recording devices.
Information: This can be necessary for integrated entrance rules. Because it can controlled
which employee has the right to use special entrances.
Button
Description
OK
The data will be stored and the dialog gets closed.
Apply
The data will be stored but the dialog stays open. Now a new
TimePunch Profile can be chosen and the transponder Id can be
assigned. With this approach one can quickly add all employees
without leaving the dialog.
Cancel
The dialog gets closed without saving.
Add Info-Text
A new dialog gets opened in which a new info text for the
employee can be created.
Revision 23
Page 16 of 25
TIMEPUNCH DATAFOX 1.8
After adding all TimePunch Profiles that own a transponder, they will show up in the
dialog.
Information: TimePunch Profiles that are stroked out do not own a valid license and
therefore cannot logon at the time recording device.
In that case one has to check the user profiles in TimePunch if they all own a valid license.
Revision 23
Page 17 of 25
TIMEPUNCH DATAFOX 1.8
How to create Info Texts
It is possible to show a welcome message to the employee every time he logs on to the time
recording device. This welcome-message can be the same for all employees or different for
each.
For example it would be possible to wish every employee a good start of the day, or to
inform them about a fire alarm.
Button
Description
Add user-info
This button opens a new dialog in that a new info text can be
created.
Update
This button updates the dialog.
Only show active
information texts
If this check box is activated, only the current info-texts are
displayed. If the check box is not activated, also outdated infotexts are displayed.
Revision 23
Page 18 of 25
TIMEPUNCH DATAFOX 1.8
After clicking the “Add Info-Text” button a new dialog will be opened.
In the display text input field the welcome-message can be defined. Additionally the valid
time range can be defined, as well as the message can be restricted to various TimePunch
profiles.
By using the “ok” button the info text gets stored in database.
Revision 23
Page 19 of 25
TIMEPUNCH DATAFOX 1.8
Uploading the transponder data and info-texts
As soon as the transponders are added and the info-texts created, the data has to be
transferred to the Datafox time recording device. Depending on the chosen connection type
there are different possibilities to do this.
Device sends data and will updated daily:
The automatic update should be the standard case when the Datafox time recording device
has been set up stationary and connected to the local network. In that case all data gets
updated automatically at 10 o´clock pm.
Additionally the update can be invoked with a click to the “Upload” button in front of the
device. Alternatively all connected devices can be updated with a click to the menu “Update
all connected devices” in the “…” menu.
Datafox time recording devices that are set up with the automatic update will send every
minute a so called alive ping. That ensures that the device is still connected and available
in the network.
Information: After the click to “data upload” it can take one to two minutes until the data
transfer finished. This is because the update service waits until the next alive ping before
the update starts.
Revision 23
Page 20 of 25
TIMEPUNCH DATAFOX 1.8
Device sends data, but will be updated only manually:
This connection type is identically to the first, but with the difference that the device won’t
be updated every night.
That’s useful e.g. for the TimeBoy, because the device is only connected via GPRS and
therefore an automatic update can’t be provided.
Server polls data and will update the device daily:
Not every device supports active sending the data to the server. If that’s not supported by
the device, the server needs to poll the data from the device every minute.
After receiving the data, the server sets the alive ping like it is done in the first connection
type. So it can be validated, that the device is reachable by the server and the connection
could be established.
Checking the device protocol
The data upload will be tracked in the device protocol. Within that dialog the protocol of
the last 14 days gets displayed. If there have been errors while updating the transponder or
time-account data, they will be displayed at this place.
With a click to the button “Update” the device protocol gets updated.
Revision 23
Page 21 of 25
TIMEPUNCH DATAFOX 1.8
Checking the logon protocol
The logon protocol contains all logon/logoff messages for all users of the last 14 days. This
can be important, if an employee has not been logged off in the evening. So the not closed
time entry gets lost and the work-time is missing for the employee.
Using the logon protocol the login in the morning can be used in order to reconstruct the
missing time entry.
With a click to the button “Update” the logon protocol gets updated.
Revision 23
Page 22 of 25
TIMEPUNCH DATAFOX 1.8
Configuration
At the configuration page of the module the basic settings used for the time recording can
be changed.
The working time project defines the project that is used for regular time recording. The
standard for this project is “working-time”.
The short business trip project defines the project that is used for short business trips.
Additionally it is possible in TimePunch to define several tasks that can be used to distinct
the short business trips, e.g. customer meeting or public authority.
The recording precision defines the rounding that is used for the time recording. The
standard is exact to the minute.
Depending on the transponder that is used, the key length may vary. The key length for
our standard transponder, e.g. is 13 digits. Please contact our support if you are not sure
what key length to use.
After changing the settings, they must be saved by clicking the “Apply” button.
Revision 23
Page 23 of 25
TIMEPUNCH DATAFOX 1.8
Configuration entries
The file “TimePunch.ini” that is stored in the directory “C:\ProgramData\TimePunch”
contains additional technical settings.
Changing these settings should only be done by the Support Team of TimePunch. These
settings can have direct effect on the ability-to-run the Datafox Module.
All Datafox relevant settings are below the [Datafox] section.
Entry
Default
HOST_ADDRESS
Description
In case the host address has not been set, it will
be evaluated dynamically. That’s the default.
LISTENER_PORT
8001
The port that is used for the active connections.
ACTIVEMODE_TIMEOUT
5000
Timeout of the active connections in Milliseconds.
ALIVEPING
45
Amount of seconds after that an alive-ping will be
send.
MAX_CONNECTIONS
20
Amount of the maximum connections that can
accessed simultaneously by TimePunch.
UPDATE_INTERVAL
60
Amount of seconds after that TimePunch check,
if the Datafox device needs an update.
MAX_OFFSET_MINUTES
20
Max. Amount of the minutes that the Datafox
device is allowed to wait before the time-entry
must send to the TimePunch Host. If the Datafox
device is not connected or not fast enough, a new
time entry gets created, instead of starting the
active time recording.
REQUEST_TIMEOUT
5000
Timeout that is used for the communication with
the Datafox time-recording device.
MAX_DURATION_HOURS 16
Max. Duration of a recorded time entry.
IP_TIMEOUT
5000
Network Time-out in milliseconds.
DEVICE_UPDATETIME
22:00
Daily update time of the Datafox module. That’s
the time when the daily data upload takes place.
MAX_SEARCH_RESULTS
500
Amount of the maximum search entries that are
displayed in the logon protocol. If the search
exceeds the maximum search entries, the user
has to refine his search in order to get a more
specific search result.
Revision 23
Page 24 of 25
TIMEPUNCH DATAFOX 1.8
End of the Document
Revision 23
Page 25 of 25