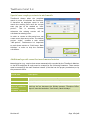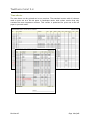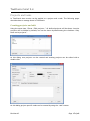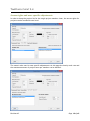
1
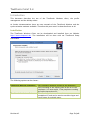
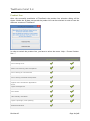
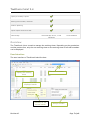
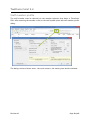
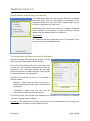
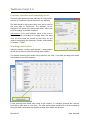
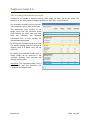
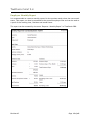
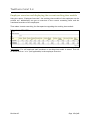
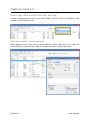
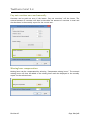
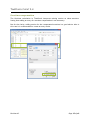
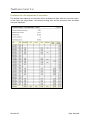
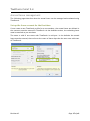
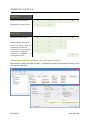
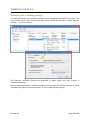
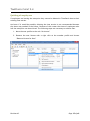
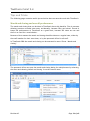
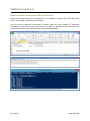
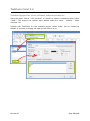
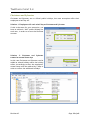
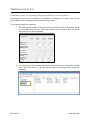
TimePunch TimePunch Client 2.4 User Manual TimePunch14.02.2014 KG, Wormser Str. 37, 68642 Bürstadt Document Information: Document-Name User Manual, TimePunch Client 2.4 Revision-Number 62 Saved at 14.02.2014 Number of Pages 42 Publisher: TimePunch KG Wormser Str. 37 68642 Bürstadt TimePunch14.02.2014 KG, Wormser Str. 37, 68642 Bürstadt TIMEPUNCH CLIENT 2.4 Table of contents Introduction ..............................................................................................5 Installation .............................................................................................5 Product line ............................................................................................6 Overview ..................................................................................................7 User Interface .........................................................................................7 Staff member profile ....................................................................................8 Employment and holiday calculation...............................................................9 Working time settings and annual holidays .......................................................9 Previous overtime and remaining leave ......................................................... 10 Working time models ............................................................................... 10 The working time model in detail ................................................................ 11 Employee Monthly Report.......................................................................... 12 Employee overview and displaying the current working time models ...................... 13 Enter new time-entries and edit existing .......................................................... 14 Edit time-entries / create new one .............................................................. 14 Special case: employee starts in mid-month.................................................... 15 Additional special-cases that need manual entries ............................................ 15 Time sheets .......................................................................................... 16 Projects and tasks ..................................................................................... 17 Creating projects and edit ......................................................................... 17 Access rights and user specific adjustments .................................................... 18 Common Tasks ....................................................................................... 19 Detailed Project Accounting ...................................................................... 19 Project calculation ................................................................................. 20 Flexitime calculation .................................................................................. 21 At the following pages the flexitime calculation will be described. Also it will be shown how the calculation can be corrected, if needed. ............................................. 21 Showing the current month data ................................................................. 21 Analysing the overtime in the current month................................................... 21 Limit overtime in month ........................................................................... 22 Overtime gets paid automatically ................................................................ 23 Pay-out overtime once and manually ............................................................ 24 Missing hour compensation ........................................................................ 24 Revision 63 Page 3 of 42 TIMEPUNCH CLIENT 2.4 Overtime compensation ............................................................................ 25 Evaluate the development of overtime .......................................................... 26 Annual leave management ........................................................................... 27 Set-up the leave account for the first time ..................................................... 27 How to enter annual leave ........................................................................ 28 Take remaining leave into the upcoming year .................................................. 29 Reporting ............................................................................................... 30 Menu „Reports“, Reporting Options .............................................................. 30 Report export........................................................................................ 30 Permission management .............................................................................. 31 TimePunch Profiles ................................................................................. 31 Assigning staff members to a role ................................................................ 31 Permissions .......................................................................................... 32 Amending employee profiles in TimePunch Profiles ........................................... 33 Amending the recording settings ................................................................. 34 Quitting of employees .............................................................................. 35 Tips and Tricks ......................................................................................... 36 Month end closing and overall performance .................................................... 36 Import of time entries from Microsoft Excel .................................................... 37 Standard project for leave, sickness, taken overtime etc. ................................... 38 Christmas and Sylvester ............................................................................ 39 Automatic time-recording without possibility to manipulate ................................ 40 Revision 63 Page 4 of 42 TIMEPUNCH CLIENT 2.4 Introduction This document describes the use of the TimePunch Windows client, the profile management and the holiday editor. As further documentations there are user manuals of the TimePunch Watcher and the synchronization assistant available. Therefore this parts won’t be described here at all. Installation The TimePunch Windows Client can be downloaded and installed from our Website http://www.timepunch.de. The installation will be done with our TimePunch Setup executable. The following options can be chosen: Option TimePunch Watcher Installation TimePunch Studio Installation Revision 63 Beschreibung Der TimePunch Watcher is used for the automatic time recording of the working time at the PC of the employee. It’s most useful, if the people are working the most time at their PC. TimePunch Studio is a software that runs at a standalone PC and can be used to track the logon and logoff times for multiple users. Page 5 of 42 TIMEPUNCH CLIENT 2.4 Product line After the successful installation of TimePunch the product line selection dialog will be shown. Within the 30 days test period the product line can be switched in order to test the different versions of TimePunch. In order to switch the product line, you have to select the menu “Help / Choose Productline …” TimePunch PRO for enterprises TimePunch ONE for self-employed Time-tracking at PC Mobile time-tracking with smartphone Time-Tracking at a terminal PC Time-Tracking with RFID transponder Support of the TimePunch Application Server Project management Time sheets Public holiday calculation Project reportings / Cost splitting Staff administration Revision 63 Page 6 of 42 TIMEPUNCH CLIENT 2.4 Employee monthly reports Working time models / flexitime accounts Vacation planning Export reports to Excel or PDF Data storage Microsoft SQL Server / Local Local Database Database Overview The TimePunch client is used to manage the working times. Depending on the permissions and the product line, only the own working times or the working times of all staff members can be displayed. User Interface The user interface of TimePunch looks like that: Member selection Display the working times Selection of the displayed month Summary of the current month Revision 63 Analyse window Page 7 of 42 TIMEPUNCH CLIENT 2.4 Staff member profile The staff member must be selected via the member selection drop down in TimePunch PRO. After selecting the member a click to the staff symbol opens the staff member profile dialog. The dialog consists of three areas – the work contract, the working time and the defaults. Revision 63 Page 8 of 42 TIMEPUNCH CLIENT 2.4 Employment and holiday calculation The employment defines if overtime and flexitime calculation shall take place. This will only happen for employees. Selfemployed people can only track their working times, but no flexitime calculation will take place. Additionally the country and region for holiday calculation can be defined. If your country or region is missing, it can be added using the Holiday-Editor of TimePunch. Information: In TimePunch ONE the employment can’t be changed. It can only be used in Self-Employed mode. Working time settings and annual holidays Using the working time settings the regular working time and the annual holiday can be defined. Even if the staff member will start in the mid of the current year, the complete annual holiday must be entered in here. Using the defaults (on the right hand) the amount of holidays that are currently left for the current user can be entered. Optional the overtime can be cut if it exceeds a defined amount. “Monthly” means that the user can only do a limited overtime per month, but in total without a limitation. “Cumulative” means that the user can do overtime until the given limit is reached. The working time that exceeds the limitation will be either cut or paid if the checkbox “overtime is getting paid” marked. Important: The weekly-hours the user has to work will be calculated by the “working time model” and can therefore not be changed in here. Revision 63 Page 9 of 42 TIMEPUNCH CLIENT 2.4 Previous overtime and remaining leave Overtime and remaining leave that has its origin before the use of TimePunch can be entered in the defaults. The data needs to be entered only once and is used as the start data of TimePunch. The defaults can be changed if no month end closing took place. After that point no change is possible anymore. Information: If the staff member starts in the mid of the month with recording his working time, the days until the start must be marked so that they are not used for calculating the flexitime. Further informations in chapter: “TODO” Working time models Using the button “working time models” a dialog opens which can be used to edit the working time models. The default working time model will be used all the time, if no other working time model is available for the staff member. A new working time model only needs to be created, if a member changes the contract from full to part time or vice versa. The new working time model will be used starting by the given date. Otherwise the default working time model will be used. Revision 63 Page 10 of 42 TIMEPUNCH CLIENT 2.4 The working time model in detail TimePunch can handle a distinct working time model for each day in the week. The structure of the daily model is always identical for each day - as you will see. The checkbox workday (yes/no) defines, if the employee has to work at this day. The attendance time consists of the target hours and the minimum break time. Setting the start –and end time does not influence the flexitime calculation and is only needed for documentation purposes. By setting the minimum break time, one can define starting from the amount of working time if a break time will be enforced. By setting the extended break time, a longer break can be enforced if the recorded working time exceeds the defined working time. Important: The extended break is not a regular one and will therefore not counted to the target hours. Revision 63 Page 11 of 42 TIMEPUNCH CLIENT 2.4 Employee Monthly Report It’s recommended to create a monthly report for the previous month when the new month starts. This report can then be attached to the personal employee files and can be used as a proof of the working time, flexitime and annual leave. The report can be accessed by the menu “Reports / Monthly Report” in TimePunch PRO. Revision 63 Page 12 of 42 TIMEPUNCH CLIENT 2.4 Employee overview and displaying the current working time models Using the report “Employee Overview” the working time models of the employees can be printed out. Additionally one get an overview of the current remaining leave and the cumulated overtime of the employees. That makes it easier searching for discrepancies regarding the working time models. Information: For self-employed staff members no working-time-model is stored. This will be shown with an “n/a” (not applicable) in the employee overview. Revision 63 Page 13 of 42 TIMEPUNCH CLIENT 2.4 Enter new time-entries and edit existing In order to amend the time-entries of a staff member, one has to select the member in the member list of TimePunch PRO. Edit time-entries / create new one With a double click to a time entry it can be modified. With a right click to it, it opens the context menu in which one can choose a command to create or edit a time entry. Revision 63 Page 14 of 42 TIMEPUNCH CLIENT 2.4 Special case: employee starts in mid-month TimePunch always takes the complete month in order to calculate the flexitime. If therefore an employee starts in midmonth the working time until the current start day has to be marked as “idleperiod”. This is necessary because otherwise the missing entries will be calculated as missing hours. In order to create an idle-period one can create a new time-entry series. The default project “other” contains a task called “idle-period”. Furthermore it’s important to mark those entries as “Paid Leave, Bank Holidays” in order to skip the flexitime calculation. Additional special-cases that need manual entries Manual entries (e.g. entries that cannot automatically recorded by the TimePunch Watcher or the RFID employee ID card) must be created for the following situations. Those entries must be entered by the staff member himself (if he/she has the proper permissions) or by the personnel-office. Special-case Description Annual leave Annual leave must be entered manually. Sick Sick days also need to be entered manually. maternity leave, leave for childbirth, relocation, christmas, sylvester The maternity leave and other special leave cases, normally get paid but do not decrease the holiday amount. Therefore those days off must be booked as “Paid Leave, Bank Holidays”. Revision 63 Page 15 of 42 TIMEPUNCH CLIENT 2.4 Time sheets The time sheet can be printed out in two versions. The standard version with all columns used to print out at a Din A4 paper in landscape mode. And a short version that only contains the most important columns. This version is optimized for print out at Din A4 paper in portrait mode. Revision 63 Page 16 of 42 TIMEPUNCH CLIENT 2.4 Projects and tasks In TimePunch time entries can be applied to a project and a task. The following pages describes how to manage those in TimePunch. Creating projects and edit Using the menu item “Extras / Edit projects…” all defined projects will be shown. Inactive projects will be hidden by default, but can be shown by deactivating the checkbox “Only show active projects”. At this dialog new projects can be created and existing projects can be edited with a double click. At this dialog project specific tasks can be created by using the “add” button. Revision 63 Page 17 of 42 TIMEPUNCH CLIENT 2.4 Access rights and user specific adjustments In order to keep the project list for the single project member clean, the access rights for projects can be handled at user level. The same is also true for user specific adjustments. At this page the hourly work rate and the maximum amount of project hours per member can be defined. Revision 63 Page 18 of 42 TIMEPUNCH CLIENT 2.4 Common Tasks If tasks are used in every project, they can be treated as common tasks in TimePunch. Those tasks are useable in every project and therefore need not be created as a new task within the project. Using the menu “Extras / Common Tasks” the following dialog will be shown. Detailed Project Accounting The report “Detailed Project Accounting” has been designed as a special report for users who need to show the project hours to their customer. The report can be accessed in menu “Reports”.´ Revision 63 Page 19 of 42 TIMEPUNCH CLIENT 2.4 Project calculation For helping the project office we developed the report ‘Project accounting’ and ‘Project accounting per User’. Using this reports; one can evaluate how many hours in total have been booked for a project. In order to show the complete project times, the following settings need to be set up. The checkbox “Selected Users” may not be checked in order to query all users. The project to query must be selected. The Date Selection should be set to “All Time Entries” in order to get all project bookings that have been made so far. Revision 63 Page 20 of 42 TIMEPUNCH CLIENT 2.4 Flexitime calculation At the following pages the flexitime calculation will be described. Also it will be shown how the calculation can be corrected, if needed. Showing the current month data In the current month, the working time, the overtime and the remaining leave will be shown in a separate information window. This window is placed in the middle of the TimePunch Window at the lower border. The working time will be displayed up to the current date. That is also true for the cumulated overtime. It’s important to know that the displayed overtime includes the working time of the current day. Analysing the overtime in the current month The overtime per user can be displayed in the analyse window (lower right). At this place the overtime at the beginning of the month, the overtime within the month and the overtime at the end of the month will be displayed. If a correction took place in form of overtime payment or overtime restriction, the original overtime and also the corrected overtime will be displayed. Revision 63 Page 21 of 42 TIMEPUNCH CLIENT 2.4 Limit overtime in month Additionally to the applied overtime rules of the given user Profile can be amended in every month separately. Using the button “correct” the overtime can be amended. In order to limit the overtime one has to choose “Limit overtime” in the upcoming dialog. Important: The overtime can be limited per month or cumulated (that means in total). “Monthly” means that the user can only do a limited overtime per month, but in total without a limitation. “Cumulative” mean that the user can only do overtime until the given limit is reached. Revision 63 Page 22 of 42 TIMEPUNCH CLIENT 2.4 Overtime gets paid automatically Overtime can be paid automatically if the overtime exceeds the given limit. If wanted, the selection “calculated” needs to be chosen. Important: Overtime can only paid out automatically, if an overtime limitation has been set in order to calculate the difference to it. Revision 63 Page 23 of 42 TIMEPUNCH CLIENT 2.4 Pay-out overtime once and manually Overtime can be paid out once if the button „Pay out overtime” will be chosen. The entered amount of overtime will then be decrease the amount of overtime in total and also be shown in the monthly report for the current user. Missing hour compensation Missing hours can be compensated by selecting “Compensate missing hours”. The entered missing hours will then be added to the missing hours and also displayed in the monthly report for the selected user. Revision 63 Page 24 of 42 TIMEPUNCH CLIENT 2.4 Overtime compensation The flexitime calculation in TimePunch interprets missing entries as taken-overtime. Seeing that adding an entry for overtime compensation is not necessary. But for the clarity, adding entries for the compensated overtime is a good advice. Also in this case it’s recommended to create an entry series. Revision 63 Page 25 of 42 TIMEPUNCH CLIENT 2.4 Evaluate the development of overtime The buildup and reduction of overtime can be evaluated at best with the overtime report. In this report the target hours, the current working time and the therefore done and taken overtime displayed. Revision 63 Page 26 of 42 TIMEPUNCH CLIENT 2.4 Annual leave management The following pages describes how the annual leave can be managed and evaluated using TimePunch. Set-up the leave account for the first time If one create a new TimePunch profile for a new member, the annual leave (as defined in the contract) must be entered in TimePunch. At the defaults section, the remaining-leave must be entered on pro rata base. The same is valid if one starts with TimePunch in mid-year. In the defaults the annual leave must be entered, that refers to the count of leave days that the user owns with start of TimePunch. Revision 63 Page 27 of 42 TIMEPUNCH CLIENT 2.4 How to enter annual leave In order to enter annual leave, choose ‘Edit, Create new entry series …’ from the menu and select ‘Leave’ to specify the entry. The fields ‘start’ and ‘end’ specify the day time where the entry starts and ends. The concrete start and end times will be taken from the working time model. In order that the entry gets calculated properly by TimePunch it’s necessary that the entry is marked as ‘Leave’ at the section ‘Specify your entry’. Revision 63 Page 28 of 42 TIMEPUNCH CLIENT 2.4 Take remaining leave into the upcoming year Remaining leave will be automatically taken over to the New Year. Important for the takeover is the last December. All remaining leave that is shown in this month will be added to the January of the next year. Revision 63 Page 29 of 42 TIMEPUNCH CLIENT 2.4 Reporting The following pages describe the reporting functionality of TimePunch. Menu „Reports“, Reporting Options For each report there are different filters available. This filters won’t change the look, but the data that is displayed. If the account owns administration rights, it is possible to create reports for all user accounts. For most reports it’s also possible to filter projects and tasks, as well as the reporting time frame. Additionally there is an option called “Payment Selection” with that only paid entries or non-paid entries can be filtered. After applying the settings the report will be recreated by using the new filter settings. Report export Each report can be exported as an Excel, PDF or Word file. Microsoft Excel has been established as a standard export. Therefore there’s an direct export for excel implemented in TimePunch, with that the report gets directly opened within a new Instance of Microsoft Excel. Revision 63 Page 30 of 42 TIMEPUNCH CLIENT 2.4 Permission management The following pages describe the permission management in TimePunch PRO. TimePunch Profiles Using the software “TimePunch Profiles” staff members can be assigned to different roles and associated permissions. Assigning staff members to a role Move a staff member via drag & drop to a different role in order to assign the user to that role. Revision 63 Page 31 of 42 TIMEPUNCH CLIENT 2.4 Permissions As a standard every installation owns administration rights. If TimePunch gets installed in an enterprise environment, each user can be assigned to a different role. The role defines the permissions that the user owns. Administrator Full Access Edit Logging only Login x x x x Manage TimePunch Profiles (switch users) x x x x Access to the TimePunch Watcher x x x Change active time entry x x x Change recording settings x x x Access to the active projects x x x Managing the projects x x x x x x Login Permissions Synchronization Access to the Synchronization Wizard of TimePunch Time recording x Project access Send projects using TimePunch Sync Wizard the Receive projects TimePunch Sync Wizard via Revision 63 x x Page 32 of 42 TIMEPUNCH CLIENT 2.4 Task access Access to the active tasks x x x x Managing the common tasks x x Access to the time entries x x x x Modify existing time entries x x x x x x x x Time entries Send time entries using the TimePunch Sync Wizard Receive time entries using the TimePunch Sync Wizard Restricted modification of existing time entries. x Amending employee profiles in TimePunch Profiles With double clicking the staff member in TimePunch Profiles the employee profile of this user can be amended. Revision 63 Page 33 of 42 TIMEPUNCH CLIENT 2.4 Amending the recording settings In TimePunch Profiles the recording settings can be managed centralized for all users. This can be done with a right click onto the user profile. After that the menu “Adjust Watcher Settings …” has to be chosen. The different recording options are described in detail within the user manual of TimePunch Watcher. But it’s important to know, that the settings can be managed centralized. Because if a user only owns the right to record only times, he can’t change those settings. Revision 63 Page 34 of 42 TIMEPUNCH CLIENT 2.4 Quitting of employees If employees are leaving the enterprise they cannot be deleted in TimePunch due to their existing time entries. And even if it would be possible, deleting the time entries is not recommended because the times may needed in the future. Because of this reason the times of employees who left the enterprise can be archived. The following steps are necessary to achieve that. 1. Move the user profile to the role “No Access” 2. Remove the user license with a right click at the member profile and choose “Remove License for User” Revision 63 Page 35 of 42 TIMEPUNCH CLIENT 2.4 Tips and Tricks The following pages contains useful tips and tricks that can ease the work with TimePunch. Month end closing and overall performance The month end closing that can be done in TimePunch has to big benefits. First it prevents deleting previous recorded time-entry accidentally, because they get locked. Second it keeps the performance of TimePunch at a good level, because the times are set and there’s no need for a recalculation. Because of this reasons the month end closing should be done on a regular base, either by the staff member for their own times, or by the personnel office for all staff. In TimePunch PRO the month end closing can be executed in menu ‘Extras / Month-end closing’. The personnel office can open the month-end closing dialog for multiple users by selecting the users and choosing ‘Month-end closing’ from the context menu. Revision 63 Page 36 of 42 TIMEPUNCH CLIENT 2.4 Import of time entries from Microsoft Excel Using the command line tool ‘TpCommand’ it is possible to import excel files that have been created with a defined set of columns. How this can be achieved is described in detail within the user manual of TimePunch Command. At this place we only want to tell you that it is possible in case you need it to import time entries from previous time entry recording systems. Revision 63 Page 37 of 42 TIMEPUNCH CLIENT 2.4 Standard project for leave, sickness, taken overtime etc. Using the menu “Extras / Edit projects” it’s useful to create a standard project called “other”. This project can contain some default tasks like ‘leave’, ‘sickness’, ‘taken overtime’ etc. Starting with TimePunch 2.4 this standard project called ‘other’ will be created by default. If you want to change the tasks you are free to do so. Revision 63 Page 38 of 42 TIMEPUNCH CLIENT 2.4 Christmas and Sylvester Christmas and Sylvester are no official public holidays, but most enterprises offer their employees a half day off. Solution 1: Employees will work a half day at Christmas and Sylvester If this is the same for your enterprise, you have to add such “half” public holidays for each user, in order to correct the flexitime account. Solution 2: Christmas and treated as normal leave days Sylvester In this case Christmas and Sylvester can be added as a bank holiday within the holiday editor. Accordingly to that, the employees’ annual leave must be reduced by 2 days in order to reflect the additional holidays. Revision 63 Page 39 of 42 TIMEPUNCH CLIENT 2.4 Automatic time-recording without possibility to manipulate By knowing how to set up TimePunch it is possible to configure it in a way, that no the staff member can’t manipulate the recorded working time. The following steps are necessary: 1. The working time model of the staff member should contain an automatic break of 30 minutes after 6 hours. With that setting can be ensured, that the break time settings are always applied. 2. As a second the staff member should only have the right to record the working time. With this setting it can be ensured that the working times cannot be amended. Revision 63 Page 40 of 42 TIMEPUNCH CLIENT 2.4 3. Additionally the recording options should be set in a way that the staff member cannot stop the time recording. This prevents a wilful stopping of the recording. Another important point is that the time recording shall be stopped when windows get locked. In order not to track each short break (e.g. toilette) it’s recommended to enter 15 minutes fairness time. 4. In order to make the setting “after locking windows pause time recording” work, the screen saver must be configured accordingly. This can also be done via the domain settings for all domain users. Revision 63 Page 41 of 42 TIMEPUNCH CLIENT 2.4 End of the Document Revision 63 Page 42 of 42