1
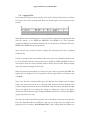
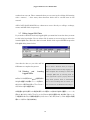
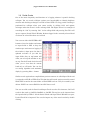
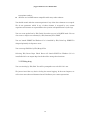
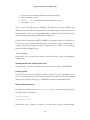
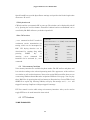
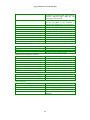
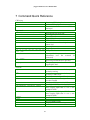
zLog
for Windows
User’s Manual
Version 2.1 Eng.092302
September 2002
© 1997-2002 by Yohei Yokobayashi JJ1MED / AD6AJ
zlog for Windows User’s Manual 2002
1 Introduction
1.1 What is zLog?
Computer logging has become a bare necessity for modern contesters. Yet many of the
popular software still run on DOS-based text consoles and/or ask for a significant
investment on the part of contesting enthusiasts. zLog runs on the latest version of
Windows making the most out of your top-of-the-line PC’s features such as TCP/IP
networking, multi-window interface, and even USB keying interface. Moreover, zLog is
distributed as a completely FREE software that you can download and upgrade
whenever you want.
Although zLog is new to the international community, it has significant history in
Japan and we believe that zLog is the most widely used contesting software among
Japanese contesters. zLog was born in 1992 as a DOS based contest logging program
that supported Japanese domestic contests for the first time. It was developed by a
group of amateurs at the University of Tokyo Amateur Radio Club (JA1ZLO/JA1YWX)
that continues to support the software development and distribution, while the author
(AD6AJ) has continued to serve as the main programmer after his graduation. We are
confident that you will find zLog to be an easy-to-use yet powerful enough to support
serious multi-operator contesting efforts. zLog owes a great deal of its past
improvements to the feedback of users, and we welcome your suggestions and bug
reports.
1.2 Features of zLog
A summary of major features of zLog:
l
Intuitive user interface with standard Windows operations as well as keyboard
shortcuts for experienced users.
l
CW keying via parallel port, serial port, or USB1.
l
Rig control via serial port.
l
Supports major domestic (JA) and DX contests.
l
PacketCluster™ connection via packet radio or telnet.
l
Powerful networking support using Z-Server software.
l
Ability to expand supported contests using configuration files.
1
USB is currently supported by JG5CBR’s USBIF4CW hardware.
1
zlog for Windows User’s Manual 2002
l
ZPRINT for Windows (JE2NHH) for printing logs.
l
ZLIST for Windows(JJG5CBR) allows data analysis, conversion (Cabrillo etc),
editing etc.
2
zlog for Windows User’s Manual 2002
2 Installation
The distributed archives are packed using LHA or ZIP format. Unzip the content into a
single folder and move it into any place you like in your hard drive. z
Log does not alter
registry or touch system folder, so you can easily remove zLog just by removing the
zLog folder. Minor updates only contain ZLOG.EXE which you can overwrite to your
existing folder. README.TXT (Japanese) or README_ENG.TXT (English) should
contain documentations for each updated versions so you should also read these files
before using the software. If you obtain separately distributed ZPRINT or ZLIST
software, they should be placed with zLog to allow excecution of these software from
zLog.
Recommended Working Environment
Windows 95/98/Me/NT/2000/XP。
Screen resolution of 800x600 and up
Pentium II or faster.
64 MB RAM
Supported Rigs for PC-Control
Kenwood:
TS-850, TS-690/450, TS-790
Yaesu:
FT-1000MP, FT-920
ICOM:
IC-706, IC-706MkII, IC-706MkII-G, IC-721, IC-726, IC-731, IC-736, IC-746, IC-750,
IC-756, IC-756PRO, IC-760, IC-760PRO, IC-775, IC-780, IC-820, IC-821, IC-970,
IC-275, IC-375
JRC:
JST-145, JST-245
2.1 Notes for Windows95 users
Version 2.0l and newer will not run on Windows95 due to USB keying support feature.
Separate distributions for Windows95 will be released for major versions that contain
ZLOG.EXE without USB support. This USB-less ZLOG.EXE should also run on newer
versions of Windows and is identical to the main version except for USB keying support.
If you are using Windows95 be sure to download the appropriate distribution.
3
zlog for Windows User’s Manual 2002
2.2 Notes for WindowsNT/2000/XP Users
Users of Windows NT/2000/XP can enjoy almost all features of zLog by executing zLog
from the administrator account. The major exception is the unavailability of parallel
port keying for these versions of Windows due to the restricted access to hardware in
these operating systems. Serial port and USB keying should and have been reported to
work without any problem. Please make sure that you are using the proper distribution
(not Windows95).
4
zlog for Windows User’s Manual 2002
3 Basics
3.1 Starting zLog
After extracting all files provided in the archive, just double click ZLOG.EXE. If you
choose to make a shortcut for ZLOG.EXE, please make sure that the working folder is
assigned to where ZLOG.EXE is located.
3.2 Menu
You will be greeted with the menu below when you start zLog.
Click the contest you want to enter in the Contest box. DX’pedition mode does not
check the validity of received exchange, so it is useful for DX’pedition operation or
other casual logging. If you choose User Defined Contest, you can push the Select…
button and open contest configuration files (.CFG) for various contests that are not
natively supported by zLog.
Check the appropriate buttons in the Band, Operator, and Mode boxes.
5
zlog for Windows User’s Manual 2002
If you choose Multi-Op, you can enter
transmitter number (TX#). You should
also enter your callsign in the Callsign
text box.
Post-contest mode
Checking the Post-contest checkbox at the lower
right corner allows you to start zLog in
post-contest mode. This mode is designed for
Hit OK button when you have completed
the menu.
those wishing to create logs after competitions.
In this mode, time is not renewed automatically
and you can manually enter the time along with
3.3 Opening file
other information.
You will be prompted to open a file after you close the Menu window. You can only open
zLog binary file with .ZLO file extension. If you want to create a new file, just enter
any desired file name and hit Open button.
3.4 Main Window
You can finally start logging! You should now see the main console window as shown
below. This is the main logging window in which you enter logging data, open other
data windows etc.
6
zlog for Windows User’s Manual 2002
Brief descriptions of various features of this window below:
Main Menu
You can access most of the zLog’s functions from the main menu.
Menu Tool Bar
You can access some of the most frequently used functions via the buttons on the tool
bar. Hints for each button are displayed if you place the mouse cursor over the button
for few seconds (also in the status bar). You can also choose not to display the tool bar
by choosing View|Hide Menu Tool Bar from the Main Menu.
CW/Ph Tool Bar
CW/Ph Tool Bar is located below the Menu Tool Bar provides access to CW keying and
voice memory functions. The tool bar switches automatically according to the current
mode. Pushing the small numbered buttons will transmit corresponding stored
messages. Alternatively, function keys on the keyboard will result in the same
operation. The three CQ buttons provides similar but subtly different ways of
7
zlog for Windows User’s Manual 2002
transmitting CQ message. The leftmost button will transmit only once, the middle
button will repeat CQ transmission until interrupted by ESC key, the right button will
repeat until you enter anything in the callsign editor.
Log Window
Log window displays the logged contacts in chronological order.
Input Field
The input field at the button of the window is where you enter log data as you make
contacts. You can switch between the callsign and exchange field with space bar. Other
fields such as the band and mode can be changed from the menu that is displayed by
right clicking appropriate fields for keyboard shortcuts (SHIFT+B for band, SHIFT+M
for mode). Time is updated automatically. You can log the data by hitting ENTER. You
will be warned and the data cannot be logged if you enter invalid exchange. By hitting
SHIFT+ENTER, you can force zLog to accept exchanges that is not valid.
Status Bar
Status Bar at the bottom displays various information such as hints, dupe QSO data,
warnings, messages from networked zLog etc. It is important to keep you eyes on this
bar while using zLog.
3.5 Options Window
You will need to set some preferences before start logging. Most of the preferences can
be set in the Options Window that can be opend by Windows|Options menu or the
button on the tool bar. Options Window consists of multiple pages which can be
selected by the tabs on the top. Lets first select Categories page and check if the CQ
zone is correct. Sent field should display “$Z” which indicates that the exchange sent is
CQ zone entered above. Multi-Op stations should enter operator names in this page so
you can record the operators for each QSO. Operator names are stored in ZLOG.OP file
so you can copy this file to other computers to avoid entering operator lists at every
operating position.
Don’t forget to hit Save before exiting Options Windows. Otherwise, the settings will be
lost.
8
zlog for Windows User’s Manual 2002
3.6 Logging QSOs
Let’s start by entering a callsign. Set the cursor to the callsign field and enter a callsign.
Press space bar to the exchange field. Here you should input a valid exchange for the
contest.
Mode, Band, and transmitting power can be changed by right clicking appropriate field
with the mouse, or by SHIFT+M, SHIFT+B, and SHIFT+P on your keyboard,
respectively. RS(T) sent is 59(9) by default, but you can edit it by clicking the field or by
SHIFT+R or SHIFT+S from your keyboard.
Space bar will let you switch between callsign and exchange fields. Time is updated
automatically.
If zLog is started in Post-contest Mode at the menu, time is not updated automatically.
It can be edited by directly entering the time or CTRL+O, CTRL+P. SHFIT+T will set
current time. Date can also be edited by double clicking the time field. Double clicking
again will return the display back to time.
When all pertinent information are entered, log the contact by pressing ENTER. The
logged data are displayed in the log window and the input fields are cleared for the
next QSO.
Next, enter the same callsign and hit space bar. Because the callsign has been logged
before, the cursor does not move to exchange field. Instead, the data from the first
contact is displayed on the status bar. By defauld, zLog does not accept duplicate QSO
data to be logged. You can change the setting by clicking the “Allow to log dupes”
checkbox on the Preferences page of Options Window. If this box is checked, the QSO is
logged with point set to zero.
The font size of the input and log window can be changed by selecting View|Increase
Font Size from Main Menu or CTRL+S. You can also change the row height of the
logging screen by entering “,HEIGHT##[ENTER]” in the callsign field where ## is any
9
zlog for Windows User’s Manual 2002
number from 18 to 40. These commands that you can enter in the callsign field starting
with a comma ( , ) have many other functions which will be covered later in this
manual.
ALT+C,ALT+N,ALT+M,ALT+R are shortcuts to move directly to callsign, exchange,
memo, and RST fields, respectively.
3.7 Editing Logged QSO Data
If you need to edit data of already logged QSOs you must first locate the data you want
to edit in the log window. You can either click by mouse or use arrow keys to select the
intended QSO data. When the data is located, double click or press ENTER to open the
Edit QSO dialog shown below.
Just edit the data as you wish and hit
Editing multiple data
OK button to complete the process.
There is often a situation when you forget to
change the band or mode and kept logging for a
3.8 Deleting
and
Logged QSOs.
Inserting
number of QSOs. You can change a certain field
of multiple QSO data by selecting them by
mouse, right click to open a pop-up menu and
ログウインドウに表示されたQSO を削除するに
change band, operator, mode, or transmitting
は QSO を選択した状態で Delete を押すか、 power at once. If editing after the contest, it is
右クリックして表示されるポップアップメニュー more convenient to use ZLIST to make changes.
からDelete QSO を選択します。
ある位置に QSO を挿入したい場合は挿入したい場所の 1 つ後になるQSO を選択し、Insert を
押すか、右クリックしてポップアップメニューからInsert QSO を選択します。また単に入力フィール
ドで通常どおりに入力し(
時間は直接入力)
メインメニューから File|Sort by Time を選んで時間
順にソートするという方法もあります。
10
zlog for Windows User’s Manual 2002
3.9 Partial Checks
One of the most frequently used functions of a logging software is partial checking
callsigns. You can search callsigns against your logged QSOs to identify duplicate
stations and checking exchanges received in other bands. In zLog, partial checking is
performed for callsigns when your cursor resides in callsign field, and against
exchanges when the cursor is in the exchange field. The Figure below is an example of
searching for “JA1” by entering “JA1” in the callsign field and pressing F10. This will
open a separate Partial Check Window. Stations logged in the currently selected band
are shown in color while others are in black.
You can now either hit ENTER or OK
button to close the window and return
to input fields or ESC to keep the
window open and return to logging. If
the window is kept open, the data is
updated real-time as you edit the
input fields. Stay on top button will
allow you to keep the window to stay
on top. Check all bands check box will
allow you to view data for current
band only or all bands. You can also
set sorting algorithm and maximum
display by pressing More… button.
Similar search against data compiled from previous contests is called Super Check and
is assigned to ALT+E or CTRL+F10. This function will search against a text file named
ZLOG.SPC located in the same folder as ZLOG.EXE and can easily be created by text
editors. ZLIST can convert ZLO files into SPC data as well.
You can use wild cards for Partial and Super Check searches. For instantce, JA.Z will
result in hits such as JA1ZLO, JA2ZLO, or JA1ZZZ. The top hit can be imported into
the input fields by CTRL+I. If both Partial Check and Super Check Windows are open,
Partial Check hit is imported. You can also import any of the search results by double
clicking.
11
zlog for Windows User’s Manual 2002
3.10 Score and Multiplier Windows
You can view real-time scores and multipliers by opening Score and Multiplier
Windows,
respectively.
These
windows
are
opened
by
Windows|Score
or
Windows|Multipliers, or from the buttons on the tool bar.
3.11 Other Windows
Check Call Window
Selecting Windows|Check Call from
Main Menu displays a windows that
shows the data of the currently
editing stations contacted in other
bands, which comes in handy when
you want to request the station to
QSY to other bands.
Check Multi / Check Country / Check Zone Windows
These windows provides similar information as Check Call Window for the multiplier
of the currently edited station. This window shows if the multiplier is needed in other
bands. For contests such as CQWW in which there are two classes of multipliers (i.e.
Zones and Countries) Check Country and Check Zone Windows are provided.
QSO Rate Window
This Window shows the real-time calculated rates for the last 10 and 100 QSOs as well
as a graph that illustrates the contact rate.
3.12 Submitting Logs
Many contest organizers now accept electronic logs via e-mail. Many of them may also
accept generic zLog text outputs that can be created by File|Export from Main Menu.
You can choose among four different text formats by selecting from the drop down list
in the dialog box displayed after selecting File|Export.
l
TXT files compatible with DOS versions of zLog. Some information may be lost for
DX contests.
l
ALL files contain all information and is the generic text format of zLog for
Windows.
l
TX files are same format as ALL files but exported in separate files for each
12
zlog for Windows User’s Manual 2002
transmitter number.
l
ADI files are in ADIF format compatible with many other software.
You should consult with the contest organizers if any of the above formats are accepted.
We do not guarantee which if any of these formats is accepted by any contest
organizers and assume no responsibilities for rejection or disqualification of your logs.
You can create prefix lists by File|Prefix List when you are in CQ WPX mode. You can
also create a simple score summary by File|Summary File (.ZSM)
You can launch ZPRINT for Windows if it is installed by File|Print Log. ZPRINT is
designed primarily for Japanese users.
You can merge ZLO files by File|Merge Files.
Selecting File|Create Dupe Check Sheet will launch ZLIST for Windows (if it is
installed) which can output dupe check sheet files among other functions.
3.13 Exiting zLog
You can exit zLog by File|Exit. You will be prompted to save the file if it is not.
We just reviewed the very basics of zLog for contest logging. In the next chapters, we
will review more advanced features that will facilitate your contest opereations.
13
zlog for Windows User’s Manual 2002
4 Advanced Features
4.1 General usage
Frequently used operations have keyboard shortcuts assigned (refer to later chapter for
summary). The shortcuts are usually combinations of a SHIFT or ALT key and an
alphabet and should not be affected by CAPS status.
zLog also features string commands which may be easier to remember than keyboard
shortcuts. These commands are strings starting with a comma ( , ) and there are two
ways to execute them.
l
Input the command to the callsign field and press ENTER.
l
Open Command Console by Windows|Console or Alt+Q and input command +
ENTER.
The latter method can be used without the leading comma.
4.2 Setting Options
The Options Window can be
opend by Windows|Options
and you can set most settings
in zLog in this window. The
window
is
comprised
of
following seven pages.
Preferences
You can check bands that you
can operate in the Active
bands box. Unchecked bands
will
be
skipped
when
changing band by SHIFT+B.
You can log dupes as zero
point QSO if you check Allow
to log dupes checkbox.
zLog will save log data after every QSOs designated in Save every … combo box.
14
zlog for Windows User’s Manual 2002
Back up path specifies the path where backup logs are saved.
If you check Display exchange on other bands, zLog will automatically import exchange
data if the station you are working has been contacted previously on other bands. It is
recommended to uncheck this option for contests that use serial numbers.
Save when not sending CW check box allows you to save logs only when CW is not being
sent. This feature is useful if your PC’s CW keying is interrupted when hard drive is
running.
If you check J-mode check box, zLog will automatically insert “J” when entering
callsign field any characters other than “7”. Only useful for Japanese contests.
So called “10 min rules” for many M/S operations can be monitored by checking 10 min
count down check box. Ten minute countdown timer starts following the first QSO after
band change and is displayed on the status bar. The display will read [QSY OK] when
10 min passes and zLog will display a warning message when band change is
attempted before 10 min timer has expired.
QSY count/hr lets you set the number of QSY 00 and 59 min of every hour (e.g. ARRL
DX) and will display the number of band change on the status bar. It cannot be used at
the same time as 10 min countdown timer.
Automatically enter exchange from SuperCheck check box, if checked, will automatically
import matching station’s exchange data from Super Check data. If Partial Check data
also give a hit, that data will be imported instead.
Categories
You can create an operator list using Operators section. The list is saved as ZLOG.OP
file which can be copied to zLog running in other PCs to share the same operator list.
Prov/State($V) should contain your local province/state code. This entry is used when
$V macro appears in CW messages. (c.f. CW keying functions)
City($Q) should contain other local identification codes. This entry is reflected in macro
$Q. Similarly enter appropriate codes for CQ Zone and ITU Zone sections.
Sent section should contain the exchanges to be sent excluding RS(T). This part should
be automatically modified for most contests. For example, for CQWW Contest, the
entry should be $Z for CQ zone, or simply enter your zone number.
Multi Station check box is only meaningful for M/S mode. The status of the box
determines weather zLog is running in multiplier station or running station mode.
These modes can be set using ,MULTI and ,RUN commands as well.
15
zlog for Windows User’s Manual 2002
CW/RTTY
Messages contain the text for the CW and RTTY messages for transmission. Refer to
CW keying function section below.
CQ repeat interval should contain the interval between repeated CQ transmissions.
Speed and Weight sets the default CW speed (WPM) and weight (%).
Paddle enabled should be checked when a paddle is connected via parallel port. zLog
may produce endless CW dots or dashes if you have this option checked and not have
the paddle connected.
Paddle reverse check box allows you to swap the dot and dash of the connected paddle.
Side tone sets weather or not to use PC side tone.
Queue messages check box determines how messages are sent when you press
Function keys multiple times. If checked, sequential inputs are queued and
transmitted serially after the end of the first message. Otherwise, the late key press
will immediately interrupt any messages being transmitted and start sending the new
message.
Tone pitch sets the frequency of PC side tone.
CQ max sets the maximum CQ iterations.
Abbreviation(019) contains the abbreviations for numbers 0, 1, and 9 appearing in CW
message macros such as $Q and $S.
Switch TAB/; with CW bank: Refer to CW keying function section.
Voice
Messages section is where you designate WAV files to be transmitted for each Function
key. Push the Select button next to each Function key number and choose an
appropriate WAV file. Text you enter in the memo field appears as a hint when you
place mouse cursor over the tool bar buttons.
Hardware
PacketCluster combo box sets how you want to connect to a PacketClustr™ node. For
traditional packet radio connection using a TNC, choose COM ports and push COM
port setting button to set baud rate and other settings. You can connect to telnet cluster
nodes via internet if you choose TELNET. Push TELNET settings buttons to set host
name etc.
Z-link sets how you network multiple zLog over a network. It used to contain an option
for serial port network but zLog currently supports TCP/IP network using Z-Server
16
zlog for Windows User’s Manual 2002
software only. Please select TELNET for this option and push TELNET settings button
to enter host name etc.
Rig 1 / Rig 2 section is where you specify which COM port to use for rig 1 and rig 2
control. Choose COM port number and select your rig model from the list. XVT check
box is useful when using a transverter. When this option is checked, you can set the
offset of the frequency data sent from the rig to reflect the actual operating frequency.
CW port is where you choose which interface you use for CW keying functions.
CW PTT control settings are used for controlling external PTT line for linear amplifiers.
Check Enable PTT control check box to use PTT control and set the delay times in
milliseconds in Before TX… and After TX fields.
Rig Control
Band Data specifies which rig’s band data to be output as the band data in parallel port.
CW parallel port has four assigned pins (DATA4~DATA7) as the band data. Selecting
Active band will result in outputting currently operated band.
Clear RIT after each QSO check box should be checked to clear RIT after logging every
QSO (supported rigs only).
By checking Do not allow two rigs to be on same band check box, you can prohibit two
zLog clients over the nework to be on the same band.
If Record rig frequency in memo check box is checked, rig frequency data are recorded in
the memo field.
Send current freq every... sets the interval with which zLog will broadcast current
operating frequency over the network. This option is only valid when rig control is
being used. Setting value zero will result in inactivating periodic broadcast.
Misc
Start search after... section specifies the number of entered characters after which you
want zLog to start searching Super Check data. You can set this number to 2 or 3 to
avoid unnecessary delays in searching and finding too many matches with the first
input.
Max super check search allows you to set the maximum number of matches you would
like to have displayed in Super Check. Setting this number low may also improve
response.
Delete band scope data after... sets the expiration time of the band scope data.
By checking Update using thread check box, recalculation of the score after editing
logged QSOs will be performed on a separate thread, thus avoiding delay when
processing a large log on a slow PC.
17
zlog for Windows User’s Manual 2002
4.3 CW keying
Settings
You can select among parallel port, serial port, or USB to key external transmitter.
Windows NT/2000/XP does not allow parallel port keying and Windows 95 cannot be
used for USB keying. You must select the appropriate port at Hardware page of
Options Window. If you connect a paddle (parallel port) also check Paddle enabled
check box. Remember to hit Save to keep the changes.
Keying interface
Parallel port interface
Parallel port interface for CW keying should be compatible with most other software.
zLog keys STRB pin and PTT control line (e.g. for linear amplifiers) uses DATA3
(counting from DATA0 for LSB).
Parallel port keying is not available with port extenders that uses USB because zLog
keys the parallel port via direct hardware access. For the same reason, parallel port
keying is not available in Windows NT/2000/XP.
Example of parallel port keying I/F
Example of paddle I/F for parallel port
18
zlog for Windows User’s Manual 2002
Parallel port pin assignment (DSUB-25)
SLCT IN
STRB
GND
AUTO FD
SEL
PE
17
1
18-25
14
13
12
Serial port interface
Keying is accomplished by DTR pin of the serial port and RTS pin is used for PTT
control. The keying should be possible with RS232C/USB extenders since zLog uses
Windows API for keying.
USB interface
zLog is the only contest logging software to support USBIF4CW by JG5CBR. Refer to
http://ww4.et.tiki.ne.jp/~nksg/ham/usbif4cw/ for details.
Message memory
CW messages in zLog are stored in two separate banks (A and B) and each bank can
store eight messages. Each message can be edited in Options Window’s CW/RTTY page.
Messages can be sent by pressing green numbered buttons on the CW tool bar or
pressing F1 ~ F8 key. Messages can contain normal text and macros described below.
Macros are converted into appropriate word(s) just prior to transmission. Banks A and
B can be toggled by SHIFT+F. The unselected bank messages can be sent by
SHIFT+Function key. The main purpose of having two banks is to use one bank for
messages used while running stations and the other for S&P.
macro
$C
$B
$L
$E
$M
$P
$X
definition
Callsign field text
Similar to $C except that the transmitted
callsign does not reflect the changes made
after pressing button.
Callsign of the last logged station
Converted to an empty string if there was no
changes to the callsign after TAB was pressed
and message sent. If there was a change, $E is
converted to the edited callsign. If the callsign
field is empty, $E is treated as $L.
Your own callsign entered in Menu Window
Transmitted Power (P, L, M, H ) for JA
contest.
Exchange sent (excluding RST)
19
zlog for Windows User’s Manual 2002
$F
$R
$S
$Q
Exchange received (excluding RST)
RST sent
Serial number
QTH code
For example “$C TU” is converted to [station’s callsign] + TU.
Five of the eight messages in bank A are reserved for special situations.
Message
F1
F2
F3
F4
F5
Reserved operation
Sent when CQ button, SHIFT+Z, CTRL+Z are pressed. Set
your CQ message here.
Sent when TAB is pressed. Usually store $C [exchange].
Sent when ?, +, or ; is pressed. Usually store TU [your
callsign]
Sent when TAB is pressed and the station is a dupe. QSO
B4.
Sent when ?, +, or ; is pressed and the exchange entered
is invalid. Usually store NR?.
This will leave only three messages F6、F7、F8 that you can edit freely#. By default,
these reserved operations refer to messages stored in bank A regardless of the
currently selected bank. So bank B can be set freely. However, if you check “Switch
TAB/; with CW bank” checkbox in Options Window’s CW/RTTY page, current bank’s F2
and F3 messages are referred at reserved operations. This option allows you to operate
when you a calling stations to first use TAB to call a running station and ?, +, or ; to
log the station if you set bank B’s F2 message to $M and F3 message to TU.
If you set alternate CQ message in CQ3 and CQ3 fields, repeated CQ messages after
fifth round will randomly send one of the three patterns.
Typical operating sequence when you are running your station will be as follows.
1.
Press Ctrl+Z to repeat CQ.
2.
Start entering callsign when you are called. CQ repeat is interrupted. Press
TAB when the station calling you finishes transmission.
3.
Complete callsign if not finished.
By editing [CW] section of ZLOG.INI file, you can also assign messages to F11 and
F12 keys.
#
20
zlog for Windows User’s Manual 2002
4.
Cursor moves to exchange field after sending the callsign.
5.
Enter exchange received.
6.
Press ?, +, or ; when finished. Acknowledgement is sent.
7.
Sent CQ by Ctrl+Z.
You can also send CQ repeat by SHIFT+Z. The difference between CTRL+Z and
SHIFT+Z is that the latter is interrupted only when ESC is pressed. This allows you to
perform partial checks or edit logged QSOs while sending CQ. CW transmission can
also be interrupted by pushing stop button on CW tool bar.
CW speed can be adjusted by SHIFT+Y, SHIFT+U or with the slide bar on CW tool bar.
PC side tone can be turned on/off from the tool bar button. Other settings such as
weight, tone pitch, maximum CQ repeat, abbreviations for numbers can be modified
Options Window’s CW/RTTY page.
Finer CW tuning
zLog allows you to perform finer tuning of your CW keying to suit your equipment
configuration.
Inserting a blank with a length equal to a dot
An underscore (_) will insert a blank with a length equal to a dot. (e.g. DE JE6MI_I)
Changing speed
You can increase or decrease CW speed within a single message by embedding ¥+n or
¥-n (n > 0) in your message. Please make sure that the speed is set back to the original
setting at the end of the message. (e.g. TEST DE CQ TEST DE ¥-3JJ1MED¥+3 TEST)
Blanks between characters
By editing the variables below in ZLOG.INI [CW] section, you can change the length of
the blanks between characters.
SpaceFactor=100
EISpaceFactor=100
SpaceFactor can be changed in integers in % with 100% being the default length.
21
zlog for Windows User’s Manual 2002
SpeceFactorEI can override SpaceFactor settings and specifies the blank length after
characters “E” and “I”.
CW Keyboard mode
CW keyboard lets you transmit CW as you type. The window can be displayed by Alt+K
or by pressing the tool bar button. Characters buffered and not transmitted can be
cancelled by BS. ESC will move you back to input field.
Other CW functions
,TUNE command or Ctrl+T results in
continuous carrier transmission for
tuning, which can be interrupted by
ESC. CW keying function can be
deactivated by starting zLog while
pressing
entering
SHIFT
,CWOFF
key
command.
or
CW
functions can be activated by ,CWON
command.
Special codes
Special codes such as •? •? •(
[AR])can be sent both in
messages and CW keyboard.
Code
Message
CW Keyboard
•? •? •
[AR]
SHIFT+A
? •••?
[BT]
dash
? •? ? •
[KN]
SHIFT+K
•••? •?
[SK]
SHIFT+S
? •••? •?
[BK]
SHIFT+B
4.4 Voice memory functions
Voice memory functions are available for phone modes. The CW tool bar and phone tool
bar switch according to the selected operating mode. The appearance of the tool bars
are similar as well as their functions. You need to assign WAV sound files that you can
create using Windows Sound Recorder in Options Window’s Voice page. You can play
these WAV files by pressing the tool bar buttons or Function keys. Press CTRL+Z and
SHIFT+Z to repeat CQ. Pressing TAB key will play F2 message and ?, ;, or + will
trigger F3 message. Duplicate callsigns trigger F4 message.
PTT line control is active while using voice memory functions. ¥ key can be used to
toggle PTT line to be used instead of a foot switch.
4.5 RTTY functions
TO BE TRANSLATED
22
zlog for Windows User’s Manual 2002
4.6 Rig control
TO BE TRANSLATED
4.7 Networking
TO BE TRANSLATED
4.8 PacketCluster™ Connection
TO BE TRANSLATED
4.9 QTC transmission in WAEDC
TO BE TRANSLATED
4.10 Other functions
TO BE TRANSLATED
23
zlog for Windows User’s Manual 2002
5 Frequently Asked Questions
TO BE TRANSLATED
24
zlog for Windows User’s Manual 2002
6 Keyboard Shortcuts Quick Reference
Logging shortcuts
SHIFT+B
SHIFT+M
SHIFT+R
SHIFT+S
SHIFT+P
Alt+O
Editing shortcuts
Alt+C
Alt+N
Alt+M
Alt+R
Ctrl+A
Ctrl+E
Ctrl+B
Ctrl+F
Ctrl+D
Ctrl+H
Ctrl+J
Ctrl+W
Ctrl+K
Ctrl+U
Ctrl+G
Enter
SHIFT+Enter
Band change
Mode change
Changing R(ST)
Changing (R)S(T)
Changing transmitted power (ARRL)
Operator change
Move to callsign field
Move to exchange field
Move to Memo field
Move to RST field
Move to the top of the field
Move to the end of the field
Move cursor to the left
Move cursor to the right
Delete
Backspace
Delete characters right of the cursor
Delete field
Delete callsign and exchange fields
Push the input field data into temporary
memory (max 5).
Pull
the
temporarily
saved
data
(CTRL+U) back into input fields.
Log QSO or execute command
Force logging duplicate QSO or invalid
exchange
Shortcuts for editing logged data
?
?, -, Ctrl+P
?, +, Ctrl+N
Home
End
Enter
Delete
Insert
ESC
CW keying and voice memory shortcuts
Ctrl+Z
SHIFT+Z
TAB
Move to the log window
Move one QSO up
Move one QSO down
Move to the top of the log
Move to the end of the log
Edit currently selected QSO
Delete currently selected QSO
Insert a QSO at the current position
Move back to input field
Repeat CQ (F1 message). Interrupted by
any key input.
Repeat CQ. Interrupted only when ESC is
pressed.
Send callsign and exchange (F2 message),
25
zlog for Windows User’s Manual 2002
SHIFT+Y
SHIFT+U
Ctrl+R
F1∼F8
SHIFT+F1∼F8
SHIFT+F
Ctrl+T
ESC
Alt+K
and move to exchange field. If the callsign
indicates duplicate QSO, “QSO B4” (F4
message) is sent instead.
Send TU + your own callsign (F3 message)
and log the QSO. If the exchange is
invalid, NR? (F5 message) is sent instead.
QRQ. Increase WPM
QRS. Decrease WPM.
Invert paddle input
Send pre-stored message
Send the message in the unselected bank
Toggle between message bank A and B
Continuous carrier transmission
Interrupt transmission
Touch-coder mode
Rig control shortcuts
Alt+T
SHIFT+X, Alt+.
SHIFT+V
Ctrl+N
Display Rig Control Window
Switch rig
Toggle VFP
Manually enter bandscope data
Shortcuts for information displays
F10
Alt+E, Ctrl+F10
Ctrl+I
F9
Alt+P
Alt+Z
Alt+Q
Alt+S
Display Partial Check Window
Display Super Check Window
Import Partial or Super Check data
Analyze multiplier (status bar)
Display PacketCluster™ Window
Display Chat Window (network)
Display command console
Display Scratch Sheet
Shortcuts for post-contest mode
Ctrl+O
Ctrl+P
SHIFT+T
Decrement time by 1 min
Increment time by 1 min
Reset time field to current time
?, +, ;
Other shortcuts
Ctrl+S
@
¥
Ctrl+Q
Alt+B
Change font size
Register new prefix (CQWW etc)
Manually toggle PTT line
Send QTC (
WAEDC)
External back up file (c.f.
Window)
26
Options
zlog for Windows User’s Manual 2002
7 Command Quick Reference
CW keying
,CWOFF
,CWON
,TUNE
Deactivate CW keying function
Activate CW keying function
Transmit continuous carrier (ESC to
interrupt)
Rig control
,B300 ,B1200 ,B2400 ,B4800 ,B9600 Set baud rate for serial port
,RESET
Reset rig control
,VA ,VB
Select VFO A/B
,TV
Toggle VFO A/B
,RC
Clear RIT (Kenwood)
,MAXRIGn
Set maximum number of rigs (n>=3 are
virtual rigs)
,Rn
Select rig # n
,TR
Toggle rig #1 and #2
,19 ,3 ,7 ,10 ,14 ,21 ,24 ,28 ,50 Change band
,144 ,430
,freq
Go to specified frequency and transmit the
information over the network (if
connected).
,LF ,LASTF
Move back to the previous frequency after
QSY using PacketCluster™ spot info.
,L ,LQ
Change frequency and mode to the last
logged QSO’s data.
Network
,CQ
,SP
,CQ?
,SF
,RUN
,MULTI ,MULT ,MUL
,MULTWARNOFF ,MULTWOFF ,MWOFF
,MULTWARN
,TXNRn
,TXNR
,PCNAME/name
,PCNAME
,WANTEDmulti
Broadcast over the network that you are
currently running.
Broadcast over the network that you are
currently in S&P mode
Check if you are in CQ or SP mode
Read frequency from the rig and broadcast
over the network
Set zLog to RUN station (for M/S)
Set zLog to MULTI station (for M/S)
Turn off warning dialog in MULTI station
when logging QSO that is not a new
multiplier (M/S)
Turn pn warning dialog in MULTI station
when logging QSO that is not a new
multiplier (M/S)
Set transmitter # to n
Display the transmitter #
Set PCNAME to name
Display the PCNAME setting
Boradcast over the network that your
27
zlog for Windows User’s Manual 2002
,DELWANTEDmulti
,SYNCSERIAL
,SYNCSERIALOFF
Others
,MMTTY
,T
,HEIGHTnn
band really need multiplier multi
Cancel the wanted multiplier broadcast
Synchronize serial numbers over the
network
Desynchronize serial numbers over the
network
Start MMTTY
Move to RTTY Console
Change row heights to nn (nn=18 to 40)
28
zlog for Windows User’s Manual 2002
8 Concluding Remarks
8.1 Distribution and Disclaimer
zLog for Windows is a copyrighted software by Yohei Yokobayashi (AD6AJ/JJ1MED).
Other related software including but not limited to ZPRINT and ZLIST are also
copyrighted by respective authors. The authors and the supporting parties will not
assume any responsibilities for any loss or damages resulting from the use of the
software. Please use at your own risk.
zLog for Windows versions 0.xx to 2.xx are freewares. It can be freely distributed
without the authors’ consent as long as no monetary or other compensations are
involved. It must be distributed in its originally distributed archive. Please contact the
authors if you wish to include this software in commercial CD-ROMs etc.
8.2 Support
Support is provided through following media:
WWW
http://www.zlog.org/ Click English link to reach our support BBS. BBS is preferred
over E-mail as many users can share previous troubleshoots.
E-mail
[email protected]
8.3 Acknowledgement
Hundreds of users’ feedback literally made zLog what it is. We greatly appreciate the
users and hope that they will continue giving us good suggestions and bug reports.
A superb team of programmers and support staffs of current and previous members of
The University of Tokyo Amateur Radio Club, including Yuichi Mano (JN2MRJ), Yoichi
Kato (JE2NHH), Junta Ohsone (7L1ETP), Tsuyoshi Sakama (7N3PZJ), Takaya Ogawa
(7L3CQP), and Mutsuhiro Nakashige (JG5CBR) are graciously acknowledged for their
invaluable skills and volunteer spirit which made zLog into Japanese contesters’
premier choice.
Yohei Yokobayashi AD6AJ/JJ1MED
Pasadena, CA, Summer 2002
29
zlog for Windows User’s Manual 2002
Table of Contents
1 Introduction......................................................................... 1
1.1
1.2
What is zLog? ............................................................................................. 1
Features of zLog ......................................................................................... 1
2 Installation .......................................................................... 3
2.1
2.2
Notes for Windows95 users ........................................................................ 3
Notes for WindowsNT/2000/XP Users ........................................................ 4
3 Basics ................................................................................. 5
3.1
3.2
3.3
3.4
3.5
3.6
3.7
3.8
3.9
3.10
3.11
3.12
3.13
Starting zLog ............................................................................................... 5
Menu ........................................................................................................... 5
Opening file ................................................................................................. 6
Main Window............................................................................................... 6
Options Window .......................................................................................... 8
Logging QSOs............................................................................................. 9
Editing Logged QSO Data......................................................................... 10
Deleting and Inserting Logged QSOs........................................................ 10
Partial Checks ........................................................................................... 11
Score and Multiplier Windows ................................................................ 12
Other Windows ...................................................................................... 12
Submitting Logs ..................................................................................... 12
Exiting zLog ........................................................................................... 13
4 Advanced Features .......................................................... 14
4.1 General usage........................................................................................... 14
4.2 Setting Options.......................................................................................... 14
4.3 CW keying................................................................................................. 18
Settings ........................................................................................................... 18
Keying interface............................................................................................... 18
Message memory ............................................................................................ 19
i
zlog for Windows User’s Manual 2002
Finer CW tuning............................................................................................... 21
CW Keyboard mode ........................................................................................ 22
Other CW functions ......................................................................................... 22
4.4 Voice memory functions ............................................................................ 22
4.5 RTTY functions.......................................................................................... 22
4.6 Rig control ................................................................................................. 23
4.7 Networking ................................................................................................ 23
4.8 PacketCluster™ Connection ..................................................................... 23
4.9 QTC transmission in WAEDC.................................................................... 23
4.10
Other functions....................................................................................... 23
5 Frequently Asked Questions............................................. 24
6 Keyboard Shortcuts Quick Reference .............................. 25
7 Command Quick Reference ............................................. 27
8 Concluding Remarks ........................................................ 29
8.1
8.2
8.3
Distribution and Disclaimer........................................................................ 29
Support...................................................................................................... 29
Acknowledgement ..................................................................................... 29
ii