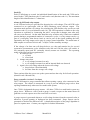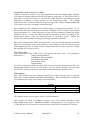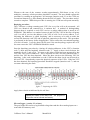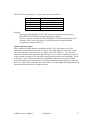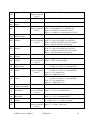
1
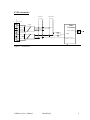
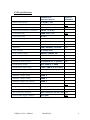
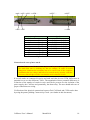
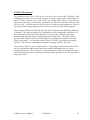
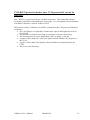
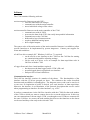
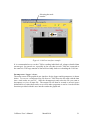
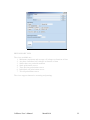
CellSense FC --------generation 2-------User’s Manual Cell Voltage Monitor (CVM) March 2010 Contents Introduction Safety notice Application Technology CVM schematics CVM specifications Installation Choosing a location Connecting the power supply Connecting the CAN bus Connecting the LED digital output Connecting the relay output Connecting an SD card Connecting additional analog inputs Allocating a Node number Connecting the stack Connections in case of more stacks Basic settings Number of cells in a stack Message type: detailed or summary Advanced settings and possibilities Offsets Message content (not in version 2.0) Fixed cycle time Stack ID Alarms by LED and relay outputs Purge controller (not in version 2.0) Connectivity check User access rights Time counters Baptizing procedure SD card logger (not in version 2.0) Additional analog inputs CVM/CAN protocol CVM/RS232 protocol Software Communication interface Decompresssor / logger / viewer References Protocol table Certifications CellSense User’s Manual 2 2 3 4 5 5 6 6 6 7 7 7 7 7 8 9 10 11 11 11 12 12 12 13 13 13 13 13 14 14 15 16 17 18 19 20 21 22 Addendum Addendum March2010 1 Introduction Cell Voltage Monitor (CVM) has been designed to measure all individual cell voltages of a fuel cell stack. The measurements are processed into a summarizing message, that is sent over a serial connection to a system controller, allowing to react on decreasing cell voltages. The measurements can also be used to generate digital output signals for alarm or purge purposes. The CVM also has the ability to acquire additional analog data like temperature, current or hydrogen concentration and retransmit these over the CAN interface. Safety notice Fuel cells can generate dangerous voltages. In order to avoid dangerous situations, installation and maintenance must be carried out when the stack has no voltage. Work must be carried out by skilled persons able to detect this safe situation. Fuel cells connected in series can generate dangerous voltages, even if the stack that one is working on, has no voltage. In order to avoid dangerous situations, installation and maintenance must be carried out when the complete installation has no voltage and must be carried out by persons with the necessary knowledge to make sure that the work situation is safe. Remember that fuel cells use hydrogen as a fuel. Even small concentrations of hydrogen in air can easily be ignited. Hydrogen burns without a visible flame. CellSense User’s Manual March2010 2 Application CellSense is meant to be part of a control and monitoring circuit of a commercial fuel cell stack. The accuracy and the rate of the measurements are based upon this target, resulting in a significant cost reduction compared to classic cell voltage measuring systems. The performance of the system allows to obtain polarisation curves of individual cells or to detect low cell voltages in an early stage. Detection of low voltages can be followed by e.g. increasing gas flows, or in worse cases, switching off the load. Possible advantages: lower gas stochiometry (lower λ) higher availability and better quality of electric power less chance of damage increased life expectancy fast diagnosis in case of damage increased safety Optionally, the CVM can be equipped with a long term logger on an SD memory card. A dedicated user interface allows easy retrieval and interpretation of this data to evaluate accidents or normal degradation. The user interface is specifically targeted towards fuel cell applications. CellSense is equipped with three analog inputs for sensors as coolant temperature, stack current or hydrogen concentration and with digital outputs for alarms or for controlling a purge valve. CellSense also has a patent pending Connectivity Check function. This allows quick and easy verification of the physical connections between Fuel Cell stack and CVM. CellSense User’s Manual March2010 3 Technology A detailed description of the technology can be found in the patent text. The system consist of two different components : the voltage scanning unit and the central unit. The voltage scanning unit (VSU) measures the voltages of 4 cells. Any number of VSUs are connected through a galvanic isolation to a common data bus and a voltage supply line and to the central unit. The central unit takes care of the data communication with the VSUs, the power supply to the VSUs, acquires additional analog inputs and handles the communication to the outside world via CAN bus and digital outputs. It can pre-process the measured data, so that only relevant data will be sent, limiting the data stream on the communication bus and by that also the work load on the receivers of the data. The pre-processing is completely implemented in software and therefore it can be adapted according to the application either by setting parameters or by a custom defined firmware. The preprocessing sends a CAN message with the maximum, the minimum and the average cell voltage and the corresponding numbers of the cells where the maximum and minimum voltage occur and it controls two digital outputs pointing out an alarm status. CAN messages can be generated containing analog input data or alarms triggered by these inputs. CellSense User’s Manual March2010 4 CVM schematics Data bus Power bus Stack VSU Main Controller COM PORT PWM Internal comm. port Figure 1 : Schematics CellSense User’s Manual March2010 5 CVM specifications CellSense FC Standard device Options available power requirement < 8 mW / cell power supply 18..32 V DC yes number of cells (hardware) 48, 96, 144 yes conversion accuracy / resolution 10 mV / 2.5 mV conversion rate 1000 cells / sec conversion time 0.3 ms cell voltage range -0.15 .. 1.1 V measurement method quasi simultaneous cell voltage input impedance 10 kΩ yes Interface CAN, 500kbps, 11 bit ID yes relay outputs 1 change over relay contact rating 30VDC, 250VAC, 8A open collector outputs 1 isolated open collector output rating 50VDC, 150mA additional analog inputs 1 temperature, 2 general temperature sensor NTC 10kΩ, β = 4000 temperature input range -20°C..100°C, 0.5°C resol. senor power supply 0.1 A @ 5V, 0.2 A @ 24V isolation voltage (power) 1500 V isolation voltage (CAN) 2500 V isolation voltage (relay) 2500 V isolation voltage (OC output) 2500 V ambient temperature -20..80 °C weight (excl. housing) < 10 g / cell housing 160 x 134 x 75 or 45 cell connection interface D25 connector per 24 cells yes internal data logger capacity max 2GB yes yes yes yes yes Table 1: Specifications CellSense User’s Manual March2010 6 Installation Firmware programming connector Aanlog inputs CAN bus Relay connections SD card slot Stack connector (cell 120 to 144) Stack connector (cell 49 to 72) Stack connector (cell 25 to 48) Stack connector (cell 1 to 24) figure 2 : connector locations Fuel cells can generate dangerous voltages. In order to avoid dangerous situations, the assembly must be carried out when the stack has no voltage. The assembly has to be carried out by skilled persons able to detect this safe situation. These aspects must be considered when installing the CVMs * radiation/reception of EMI, also via cables * mechanical stress and vibration * contact or electric shock * isolation failure in case of high voltages, especially when connecting more stacks in series Choosing a location The CVM is designed to operate inside the fuels cell system. If a CVM without housing is used, it can be mounted directly on the stack inside the stack’s housing. If a CVM in a housing is used it should be installed close to the stack, thereby limiting the length of the wires connecting it to the cells. CellSense User’s Manual March2010 7 Connecting the power supply The system is powered by 20..30 VDC via the CAN connector. Once the system is powered up, it can run on a supply voltage of 18 VDC. The supply is internally isolated so, in case more than one fuel cell stack is connected in series, there is no requirement for isolating the power supplies of the different CVMs. The power supply line should be kept to a length lower than three meters. The CVM’s power lines are not fused internally, a 0.2A fuse should be installed close to the power source. Connecting the CAN bus The CAN bus is connected by a DB9 connector. The connections are according to the recommendations CiA DS 102. The power supply of the galvanic isolation of the CAN bus can not be passed from an external source over this connector. It is powered internally. Figure 3 :DB9 CAN bus connector 1 2 3 4 5 6 7 8 9 CAN_L CAN_GND output collector CAN_SHLD output emitter CAN_H power power + Connecting the LED digital output A LED indicates the state of this output. The output is also an open collector NPN transistor available on the CAN connector. Observe polarity when connecting this output. Current should flow in the collector and out of the emitter pin. Refer to the specifications for maximum current and voltage ratings of this output. Connecting the relay output 1 NC contact The NO and NC contacts of the 1 2 3 2 common output relay can be connected via 3 NO contact the relay connector. The alarm relay can be set to operate in Figure 4 :relay connector different modes. It can be set to be normally excited or normally unexcited. It can be set as a cell voltage alarm, a direct analog input alarm, an internal malfunction alarm or as a purge valve control. In case it is set to a voltage or direct analog input alarm, it can be set to switch after only a predefined number of consecutive cycles. For details on setting these parameters, refer to the advanced settings. Connecting an SD card An SD memory card can be used to log detailed measurements of the CVM. Insert it in the SD card slot of the CVM when power is off. Before use, the card should be formatted with a FAT16 file system e.g. on a standard PC. Use only SD cards with a capacity lower or equal to 2 GB. Do not use SDHC cards. The card’s speed class should be 2 (2MB/sec) or higher. Check that the card is operated within its temperature range. Connecting additional analog inputs CellSense User’s Manual March2010 8 Three additional analog inputs are available. These inputs are not isolated from the main processor. 1 2 3 4 5 6 7 8 9 +5V power GND GND GND +5V power Temperature input Current input Concentr. input +24V power The temperature input has a 10kΩ pull-up resistor to +5V. Figure 5 :DB9 The processor will rescale the Analog input voltage on this input to a connector temperature presuming a 10kΩ NTC sensor is connected between this input and a GND line. If the CVM has an internal temperature sensor, this input should not be connected and the CVM’s internal temperature will be reported. If no internal sensor is fitted, and external NTC (10kΩ, β= 3770) can be connected to this input. The two remaining inputs are 0..5V general purpose inputs. They are measured with 10 bit resolution. The +5V and +24V lines can be used to power sensors. Refer to the specifications table for current supply capability. Allocating a Node number The CVM communicates over a CAN bus with its own protocol that can coexist with CANOpen. This allows connecting several participants (nodes) on the bus, such as other CVM’s, invertors, PLCs, sensors, etc.. Every participant (node) receives a node number between 1 and 127. In order to adjust the node number of the CVM, a point to point CAN connection has to be made and the node number has to be adjusted following the CVM/CAN protocol. Refer to the protocol table to see which data should be sent to perform tis operation. As soon as the CVM has received its node number it can be connected to a CAN bus. The supplied LabView interface can be used to adjust the node number. Connecting the stack The individual cells are connected through two DB25 connectors. The connecting cables should be as short as possible. If their length exceeds 0,5 meter, they should be shielded over the major part of their length. The connectors’ pinout enables the use of isolation displacement flat cables to be used to connect the individual cells. The pinout for the cells 49 to 144 have a similar layout CellSense User’s Manual March2010 9 -stack +cell2 +cell4...+cell24.... +cell1 +cell3 +cell25 ... . +cell47 + cell48 pin left connector pin 1 left connector pin 14 left connector pin 2 left connector pin 15 left connector pin 25 right connector pin 1 right connector pin 12 right connector pin 25 right connector pin 13 Figure 6 :stack signal - of cell 1 +of cell 1 = - of cell 2 +of cell 2 = - of cell 3 +of cell 3 = - of cell 4 +of cell 24 = - of cell 25 +of cell 25 = - of cell 26 +of cell 47 = - of cell 48 +of cell 48 no connection connections Connections in case of more stacks Fuel cells connected in series can generate dangerous voltages, even if the stack that one is working on, has no voltage. In order to avoid dangerous situations the assembly has to be carried out if the complete installation has no voltage and has to be carried out by persons with the necessary knowledge to make sure that the work situation is safe. If several stacks are connected in series and each stack has its own CVM, differences in potential occur over the different CVM’s. The magnitude of these potential differences is a function of the number of stacks in series and can be present over the isolation of the power supply, the CAN bus and, potentially, the alarm relay. The user should take care of proper connections an wiring. Verification of the physical connections between Fuel Cell Stack and CVM can be done by using the patent-pending Connectivity Check. (see further in this document). CellSense User’s Manual March2010 10 Basic settings To set parameters in the CVM a CAN message is sent containing the new settings. The 11 bit ID of this message is (600 + the CVM’s node number). The first byte of the message is a function code specifying what parameters are described in the remaining data bytes of the message. The protocol table lists all available function codes and parameters that can be set or read. Number of cells in a stack Before doing the first test at least the number of cells for a stack (function code 1) and the offset voltage of the A/D converters in the VSU’s (function code 6) have to be set. In case of a stack with 50 cells, send the following CAN message to the CVM. If the CVM’s node number is 1, use ID = 601h. ID = 600 + NN set cell count func.code 01h data 1 0 data 2 32h data 3 0 data 4 4 data 5 0 Table 2 : set the number of cells via the CAN bus This message also sets the cycle time of the measurements to 250 msec (4 cyles/sec). The factory setting for the number of cells is equal to the number of installed hardware channels. The supplied LabView interface can be used to set the number of cells in the ‘Setup’ tab. Message type: detailed or summary The CVM measures all cell voltages almost simultaneously (within less than 300 µsec). The measurements are then read from the VSU’s. As soon as all measurements have been read (one cycle) a CAN message is sent with ID=180+node number containing the minimum, maximum and average cell voltage and the cells in which the minimum and maximum voltages occurred. It is also possible to obtain a detailed picture of all cell voltages by programming the CVM to send a message with all individual cell voltages after reading each VSU (function code 1). These messages have a lower priority, ID=280+node number. Retrieving these details slows down the system and generates a lot of data traffic on the CAN bus. For this reason it is possible to select the transmission of one set of detailed data once every so many cycles. CellSense User’s Manual March2010 11 Advanced settings and possibilities The accompanying LabView interface can be used to interactively read or modify all parameters described in this section. Offsets Each A/D converter has an offset voltage that allows measuring negative voltages. This voltage is in principle 400 mV, but can vary slightly between different VSU’s. Therefore this offset can be individually programmed per VSU. The offsets are calibrated in during production. The CVM can be instructed to calculate the individual offsets. To do this it is required that all cell voltage inputs are at the same potential. If the CVM is equipped with cell shunt resistors, this can be achieved by leaving the terminals unconnected. In the other case all terminals should be shorted to each other. It is necessary to wait 10 seconds for the cell voltage inputs to stabilize at 0V. Then the CAN message can be sent to instruct the CVM to calculate and store the offsets. Instruct the CVM to automatically calculate all individual offsets by sending following CAN messages to the CVM ID = 600 + NN calculate offsets func.code. 06h data 1 FDh data 2 data 3 Table 3 : Set offsets via the CAN bus Offsets can also be set manually. This is explained in more detail in the description of the protocol. Message content (not in version 2.0) The content of the summary message can be changed by setting the data object configuration parameter. The maximum and average cell voltage and the cell number where the maximum occurs can be replaced by the values of the analog inputs. The data object configuration is a bitmap of the combinations supported. Refer to the protocol description table for detailed information. Table 2 shows how to set the data configuration to its default state: data byte 5 is set to 0. For example, to replace the cell number with the highest voltage by the measured temperature, set data byte 5 to 04h. Fixed cycle time In order to limit CAN bus traffic or to slow down the conversion rate of the CVM, the CVM can be programmed to perform a fixed number of measurements per seconds. This value should be set to 1..25. If set to a sufficiently low value, the CVM will always be able to send a summarizing message within the programmed time, whatever the workload. The cycle timer triggers the acquisition of cell voltages. The messages are sent as data is read from the VSUs and as the external data bus is available. This feature can be used to reset a watchdog in the main controller. Note : when logging is enabled, cycle times may vary. Refer to the logger’s description for more details. CellSense User’s Manual March2010 12 Stack ID Each CVM belongs to a stack. An individual identification of the stack and CVM can be stored in the CVM (function code 12) and can be read (function code 11). The maximum length of this identification is 7 characters. Alarms by LED and relay outputs A red LED and a relay are provided for detecting low cell voltages. The red LED is also connected to an optocoupler with an NPN transistors open collector output. The operation mode and the cell voltage for switching the LED and the relay can be set each (function code 15) or read (function code 14). The LED operation is similar to the relay operation as explained in “connecting the stack” except that it changes state after only one error was detected. On the other hand the relay switches only if and error condition persists during a programmed number of consecutive cycles. A relay contact can be e.g. part of a emergency shut down circuit or can be part of the signal enabling the load. Optionally, the relay output can be part of a purge control algorithm. The actual state of both outputs are reflected in bit 6 and 7 of byte 0 of the summary message. If the voltage of at least one cell drops below a set value and remains low for several consecutive measurement cycles (function code 14h and 15h) the relay will switch. A NO (normally open) and NC (normally closed) contact are available. The operating mode of the relay can be programmed to : 1. be exited in case a. of fault b. of no fault 2. change state when a. a cell voltage becomes low only b. a cell voltage becomes low and an internal fault was detected 3. signal a low cell voltage when the lowest cell voltage a. drops below a fixed threshold b. deviates from the average cell voltage These options allow the user to set up the system and use the relay for fail-safe operation. (function code 14h and 15h). Purge controller (version 2.2 or later) The CVM features a purge controller that allows opening a purge valve connected to the relay output. The control is structured in a way to prevent multiple purge valves from opening simultaneously when used in a multi-stack system. One CVM is designated the purge master. All other CVMs in a multi-stack system are purge slaves. Whenever a slave needs a purge, it sends a request to the master that will grant the received requests on a first come first serve basis. A purge request is generated whenever a cell voltage deviates from the expected value or whenever a preset quantity of hydrogen has been consumed. Purge request can be generated or blocked for different cells. A detailed description of the purge algorithm is part of a separate note. Contact your supplier for further information. CellSense User’s Manual March2010 13 Connectivity check (version 2.2 or later) CellSense features a relatively low input impedance at the cell voltage inputs allowing cell voltage to balance whenever the fuel cell stack is shut down. A side effect of this is that when a connection between a cell and the CVM should be interrupted the input impedances constitute a voltage divider for the disconnected input. The voltage measured by the CVM will in that case be the average of the voltages at both neighboring cells, which is also the case during normal operation. The connectivity check integrated in CellSense allows to diagnose this situation. To use this function, have the stack operate at normal conditions (all cell voltages almost equal and greater than 0.5 V). Send a message over the CAN bus starting a connectivity check (function code 4). A reply will follow stating all connection are okay or pointing to the connection to check. Only one connection error is reported at a time. During the connectivity check normal cell voltage measuring can not be performed. Due to the voltage divider effect described earlier, one can conclude that the connection between a cell and the CVM is okay whenever a cell voltage deviates from the average of both neighboring cells. A single cell low voltage alarm can never be caused by a single unconnected cell, except for cell 1. User access rights Some parameters of the CVM can be protected by an access code. The parameters protected are : voltage alarm thresholds analog input alarm thresholds hour counter thresholds hour counter values logger settings To switch on protection send a message with a new access code (function code 03h). To subsequently unlock access you will need to send an unlock message with the same access code. Locking with access code 00 00 00 00 permanently unlocks access. Time counters The CVM includes two time counters counting the seconds that the stack is operated under open circuit conditions and under load condition. These conditions are recognised by comparing the average cell voltage to two thresholds. condition Ucel_average > Uopen_circuit_threshold Uoperation_threshold < Ucel_average < Uopen_circuit_threshold Ucel_average < Uoperation_threshold counter berhaviour the open-circuit counter increments the in-operation counter increments no counter increments table 4 : counter behaviour The counters can be reset or preset via the CAN bus interface. The counters are saved in permanent memory every 256 seconds counted or when Ucel_average drops below Uoperation_threshold. Interrupting the power supply to the CVM while the fuel cell stack is in operation may cause loss of maximum 256 seconds. CellSense User’s Manual March2010 14 Whenever the sum of the counters reaches approximately 5000 hours or any of its multiples, a memory refresh procedure should be executed. The user should request this procedure by sending an appropriate CAN message (function code 21) to the CVM at a convenient moment (e.g. after shutting down the fuel cell stack). The procedure needs 1 second to complete. While this procedure is running, the CVM can not operate normally. Baptizing procedure The CVM uses a voltage scanning unit (VSU) for every four cells to be measured. All VSUs are identical and connected to a common bus. A method of distinguishing between them is required so each VSU receives a unique address that is stored in it’s EEPROM. This address is a number between 0 and 220. The VSU of the first cell group (cell 1 to cell 4), receives the address 0, the VSU of cells 5 to 8 receive address 1, etc. Adjusting the addresses is called ‘baptizing’ and is necessary to be able to make the correct link between each VSU and its physical connection to the stack. This procedure is performed in the factory before shipping the CVM to reflect the conventional topology of a fuel cell stack. It can be altered by the user if the stack topology requires this or if for some reason the VSU’s EEPROM should be erased. Start the baptizing procedure by clearing all existing addresses in the VSU’s (function code 7), then start the baptizing (function code 7). Apply a short circuit between the terminals of cell 3 and cell 4. As soon as this short circuit has been measured by the VSU, this VSU receives address 0. This is reported over the CAN bus (function code 7), and the first VSU has been baptized. Move the short circuit to the following VSU for baptizing. After each confirmation over the CAN bus the short circuit can be moved to the next VSU. Scrupulously respect the physical sequence of the VSUs. If the last VSU has been baptized, the baptizing procedure should be stopped (function code 7) and one can start connecting the stack. figure 7 : baptizing the VSUs Apply short circuits as indicated by the red lines. The accompanying LabView interface can be used for baptizing the VSU’s in the ‘Setup’ tab. The progress of the process can be followed interactively. SD card logger ( version 2.1 or later) The goal of the SD card is to log detailed voltage data and the direct analog inputs on a removable SD memory card. CellSense User’s Manual March2010 15 Before use the SD card should be formatted with a FAT16 directory on a PC. (note: this means that SDcards of 4GB and above will not be used entirely) CellSense will add a metafile in the root directory and log files are added in the subdirectory \log\. The first and oldest file is named cvm00001.dat. The data in these files is compressed using a Huffman compression algorithm. Depending on the cycle rate of the CVM, the number of cells in the stack, the log frequency the variation in the data and the capacity of the SD card, data of many thousand of hours can be logged. For example, a 1 GB SD card can hold data of a fuel cell stack with 80 cells, logged once per second during 7000 hours of stationary operation. This is a suitable tool to evaluate long term cell degradation. Logging is started and stopped by sending a message over the CAN bus (function code 40h and 41h). Two parameters are sent : the log frequency expressed in multiples of the number of cycles per second: If you have set the CVMs cycle rate to 5 cycles per second, setting this value to 10 will result in one log record every two seconds (n_log). Setting n_log to 0 stops the logger, setting it to a value larger than 0 starts the logger. A new file is created every time the logger is started. the file timestamp : This is the date and time of the log file creation in FAT16 timestamp format. This timestamp is used to reconstruct exact time information for individual log records. The CVM does not keep track of calendar time so a new timestamp should be included in each message starting the logger. Every 256 records buffered data is effectively written to the SD card and file information is updated. Setting n_log to 0 disables logging and saves any buffered data to the SD card file. It is safe to eject the SD card or to shut down the CVM when logging is disabled. Logging is disabled at power on. Logging is also disabled whenever a logger error occurs, the CVM than resets n_log to 0. The error cause is transmitted in a status message over the CAN bus. When the SD card is full and a new file is created, the oldest log file will be deleted in order to create space for the new log file. This may destroy valuable information so it is preferable to swap SD cards by stopping the logger, inserting a formatted card and restarting the logger. The filenames will continue to increment. If you want to reset the file names, you should cycle the CVM’s power with a blank formatted card inserted. Accessing the SD card uses up system resources. As a result the maximum cycle time will be lower when logging than when not logging. Also the time required to access the SD card may vary greatly possibly resulting in cycle time violations in particular when creating files, i.e. when starting the logger. You should verify that the system is capable of performing according to expectations. The actual cycle time can be monitored in the supplied LabView front end. Note that record timestamps are calculated from the file timestamp, the number of CVM cycles per second (cps) and the number of CVM cycles per log record (n_log). If you change any of these two during logging, it will be impossible to restore correct timestamps for individual records. If you need to change cps or n_log, stop the logger, apply the changes and restart the logger. A new file is created with consistent time information. CellSense User’s Manual March2010 16 The FAT16 file timestamp is a 32 bit value encoded as follows : bit31:25 bit24:21 bit20:16 bit15:11 bit10:5 bit4:0 Year from 1980 (0..127) Month (1..12) Day in month(1..31) Hour (0..23) Minute (0..59) Second / 2 (0..29) Remark: The logging functionality of the CVM has been tested with various types a SDcards and mini-Sdcards (using an appropriate adapter). However ,on rare occasions we have found that a certain Sdcard will not work with the CVM. In that case please try a different type or brand of Sdcard (remember to format as FAT16). Additional analog inputs Three additional analog inputs are available on the CVM. One input is set up for temperature measurement with an NTC sensor. The other inputs are labelled “current” and “concentration” and convert a 0..5V signal to a 0..1023 numeric. The converted values are reported when requested (function code 13h) or can be continuously reported in the summary message if the data object configuration has been set accordingly. Refer to Message content and the protocol description table (function code 01h) for details. Alarm thresholds can be associated to any of these additional inputs (function codes 14h and 15h). Input values under the lower threshold or over the higher threshold generate an alarm and the transmission of a status message. CellSense User’s Manual March2010 17 CVM/CAN protocol The protocol used by the CVM on the CAN bus can coexist with CANOpen. With CANOpen each node in the network requires an unique node number (NN) between 1 and 127. This is also the case for the CVM. The message IDs used by a CAN node, are derived from the NN (see next table). In addition one fixed message ID is used to set the NN of a node. Therefore this can only be done in a point-to-point connection. Refer to the protocol table corresponding to your firmware version for a detailed description. The messages with ID-180+NN and 280+NN can be compared with the PDOs defined in CANOpen. The other messages, 580+NN and 600+NN are comparable with SDOs. In these messages the first byte of the data block is reserved for a function code, that determines the contents of the remaining bytes of the data block. The protocol table specifies what function codes are defined and how to interpret the contents of the data block. Rows with <-- as direction (from CVM to PC or PLC) are related to messages with ID = 580+NN, the remaining are related to messages with ID = 600+NN. Note that the CVM uses two reception buffers. Depending on the data sent to the CVM, up to several milliseconds can be required to treat this information and free up the reception buffers for a new reception. Avoid sending more than two messages at a time. This should normally not be a problem as during normal operation no or very little data is sent to the CVM. CellSense User’s Manual March2010 18 CVM/RS232 protocol (obsolete since CVM generation2, strictly for reference) Note : RS232 is a point to point byte oriented connection. This means that software overhead is required to reassemble bytes to message. As a consequence the performance of an RS232 interface is inferior to that of CAN. The protocol used by CellSense over RS232 is identical to the CAN protocol with these exceptions : The CAN ID byte is replaced by a header byte equal to the high 8 bits of the 11 bit CAN ID A data block is always 8 bytes long so a message is always 9 bytes long The bus properties are set to 38400 baud, 8 bits, no parity, 1 stop bit A pause of more than one CVM cycle signals a block delimiter for reception at the CVM A pause of more than 10ms signals a block delimiter for transmission by the CVM There is no error checking CellSense User’s Manual March2010 19 Software The CVM contains following software : microcontroller firmware on each VSU : o converts individual cell voltages o communicates with the main controller o stores individual voltage offset values microcontroller firmware on the main controller of the CVM o communicates with de VSUs o processes the data of the VSUs into easily interpretable information o communicates on the CAN bus o holds and/or logs all measurements o acquires additional analog inputs o drives digital outputs The source code of the main routine of the main controller firmware is available to allow specific functions to be implemented by system integrators. Contact your supplier for terms and conditions. LabView driver example (PC, Windows, LabView 7.1 required) o can be used as a user interface to the CVM over the CAN bus for starting up, commissioning and for adjusting settings o can be used as a driver or as an example for data-acquisition code in LabView with the CVM Logger front-end (Java virtual machine required) o decompresses the data logged on the CVM’s SD card o presents logged data in a graphical user interface o analyses fuel cell stack behaviour Communication interface The LabView interface consists of a number of tab sheets. The functionalities of the interface with the CVM are grouped per sheet. The relation to the earlier described functions and possibilities is unambiguous. The diagram (source code) can be used as-is or can serve as inspiration to build, if desired, your own interface or data-acquisition. Moreover the interface is an illustration of the protocol description that can be useful when programming an interface for other hardware, e.g. a PLC. In order to communicate via the LabView interface with the CVM, first the node number of the CVM to which you want to connect, has to be set on the main screen. In this way one can communicate with one single CVM, even though several CVMs are connected to the same CAN bus. As soon as the node number has been set the functions on the sheets can be used and they relate only to the selected CVM. CellSense User’s Manual March2010 20 Selecting the node number Figure 8 : LabView interface example It is recommended not to set the CVM to sending individual cell voltages (detailed data stream type) for general use, especially in the case that several CVMs are connected to the same bus. The large amount of data will inevitably lead to overloading the CAN bus. Decompressor / logger / viewer The main screen of the graphical user interface for the logger and decompressor is shown below. To recover a compressed log file from a CVM, insert the SD card with the data into a card reader on your PC. Start the decompressor and select the file you want to decompress or view as input file. The output file will then be created as an ascii space delimited list of values that can be recovered in other programs or can be viewed with the functions provided with this user interface under the graphs tab. CellSense User’s Manual March2010 21 PRELIMINARY INFO The views available are : 1. Minimum, maximum and average cell voltages as function of time 2. Any three individual cell voltages as function of time 3. Stackvalues at a particular moment 4. Stack polarisation curves 5. Time-division polarisation curves 6. Individual cell polarisation curves 7. 3D cell polarisation curves The views support interactive zooming and panning. CellSense User’s Manual March2010 22 References [1] NI-CAN Hardware and Software Manual, National Instruments Using CAN in LabView [2] http://www.can-cia.org/ Official CANOpen standards [3] http://atlas.web.cern.ch/Atlas/GROUPS/DAQTRIG/DCS/CANINFO/canproto.html Practical CANOpen standards [4] Controller Area Network, a Serial Bus System – Not Just for Vehicles, ESD gmbh CAN bus documentation: principle and operation [5] http://en.wikipedia.org/wiki/Huffman_coding Description of the Huffman coding algorithm CellSense User’s Manual March2010 23 Cell Voltage Monitor Protocol for firmware 2.0 and 2.1 CAN ID message name 0 system 180 + NN (hex) summary 280 + NN (hex) detail 580 + NN (hex) status 600 + NN (hex) configure table 1 : CAN ID mapping direction Content length RX Byte 0 : 10(hex) : program node nummer 2 bytes Byte 1 : new NN TX Byte 0 bit 7 : relay status 8 bytes Byte 0 bit 6 : LED status Byte 0 bit 0..3 : lowest voltage MSbs [mV] Byte 1 : lowest voltage LSbs [mV] Byte 2 : cel number with lowest voltage Byte 3..4 : highest voltage [mV] Byte 5 : cel number with highest voltage Byte 6..7 : average voltage [mV] TX Byte 0 : cellgroup number 8 bytes Byte 1..6 : cell voltages as 4 x 12bits [mV] (2 complement) TX Byte 0 : function code 8 bytes Byte 1..7 : see next table RX Byte 0 : function code 8 bytes Byte 1..7 : see next table CellSense User’s Manual March2010 24 table 2 : Content for messages with CAN ID = 580 + NN Function code CVM Content of byte 1..7(padded with 00s) (Byte 0) PLC <-0 status message <-Byte 1 : error code (2) as required Byte 2 : cellgroup with last error Byte 3 : number of VSUs read Byte 4 : number of errors found 1 request cell count, --> datastream type, cycle frequency 1 reply cell count, <-Byte 1..2 : number of cells in system (1..880) datastream type, reply to function Byte 3 : 0 = send only min/max. cycle frequency code 1 n > 0 = send data from all cells every n cycles Byte 4 : cycle frequency (1..20) Byte 5 : data object configuration (1) 2 set cell count, --> Byte 1..2 : number of cells in system (1..880) datastream type, Byte 3 : 0 = send only min/max. delay n > 0 = send data from all cells every n cycles Byte 4 : cycle frequency (1..25) Byte 5 : object 180 configuration (1) 3 Lock/unlock with Byte 1 : 0 = unlock, 1 = lock PIN code Byte 2..5 : PIN code 4 Request Byte 1: 1 = request connectivity check Connectivity check 4 Reply Connectivity Byte 1: Number of errors Check Byte 2: Address of last error (high byte) Byte 3: Address of last error (low byte) 5 request RAM from --> byte 1 : VSU number VSU 5 reply RAM from <-byte 1 : VSU number VSU reply to funtion Byte 2..3 : Voffset in mV code 5 Byte 4 : VSU software version nummer 6 set Voffset --> Byte 1 : VSU nummer (5) Byte 2..3 : Voffset in mV 7 baptize VSUs --> Byte 1 : 0 = stop procedure 1 = start procedure Byte 1..4 : AA 55 33 CC(hex) = reset all VSUs to default 7 baptized VSU <-Byte 1 : Number of baptized VSU after detecting batizing condition 11 request stack ID --> 0Bh CellSense User’s Manual March2010 25 11 0Bh reply stack ID 12 0Ch 13 0Eh 13 0Eh set stack ID 14 0Eh 14 0Eh request voltage alarm settings reply voltage alarm settings 15 0Fh set voltage alarm settings 16 10h 16 10h request firmware version reply firmware version 17 12h 17 12h request analog input alarms reply analog input alarms 18 12h set analog input alarms 19 13h 19 13h request hour counter thresholds reply hour counter thresholds 20 14h 21 15h 21 15h set hour counter thresholds request hour counter reply hour counter request analog inputs reply analog inputs <-Byte 1..7 : ID in ASCII reply to function code 11 --> Byte 1..7 : ID in ASCII --> <-Byte 1 : internal supply voltage [V] = Byte1/10 +10 reply to function Byte 2 : temperature [°C] = Byte2/2 -20 code 13 Byte 3..4 : channel 2, current (0..1023) Byte 5..6 : channel 3, concentration (0..1023) --> <-Byte 1..2 : min cell voltage for LED [mv] reply to function Byte 3..4 : min cell voltage for relay [mv] code 14 Byte 5 : number of faults for relay to switch Byte 6 : operation mode of alarms (4) --> Byte 1..2 : min cell voltage for LED [mv] Byte 3..4 : min cell voltage for relay [mv] Byte 5 : number of faults for relay to switch Byte 6 : operation mode of alarms (4) --> <-Byte 1 : major version number reply to function Byte 2 : minor version number code 16 --> Byte 1 : input channel number (0=Vsupply, 1=temp, 2=current, 3= concentration) <-Byte 1 : input channel number (0=Vsupply, reply to function 1=temp, 2=current, 3= concentration) code 17 Byte 2..3 : low alarm level Byte 4..5 : high alarm level --> Byte 1 : input channel number (0=Vsupply, 1=temp, 2=current, 3= concentration) Byte 2..3 : low alarm level Byte 4..5 : high alarm level --> <-Byte 1..2 : Vopencircuit threshold [mV] reply to function Byte 3..4 : Voperation threshold [mV] code 19 --> Byte 1..2 : Vopencircuit threshold [mV] Byte 3..4 : Voperation threshold [mV] --> Byte 1 : counter number 1 = counter OC, 2 = counter operation <-Byte 1 : counter number reply to function Byte 2..5 : counter value [sec] code 21 CellSense User’s Manual March2010 26 22 16h 64 40h 64 40h set hour counter value request SD card parameters reply SD card parameters 65 41h set SD card parameters --> Byte 1 : counter number Byte 2..5 : counter value [sec] --> <-Byte 1 : n_log = 0 = do not log reply to function n_log > 0 = log all data every n_log cycles code 64 (0..256 cycles) Byte 4..7 : timestamp as FAT time --> Byte 1 : n_log = 0 = do not log n_log > 0 = log all data every n_log cycles (1..255 cycles) Byte 4..7 : timestamp as FAT time (1) Data object configuration The data object configuration parameter defines the content of the summary message (CAN message with ID = 180+NN) and the source for the stack current value used for purge control. It is bit mapped. bit 0..1 00 : byte 3..4 of summary message = highest cell voltage 01 : byte 3..4 of summary message = current 10 : byte 3..4 of summary message = concentration 11 : byte 3..4 of summary message = lowest but one cell voltage bit 2 0 : byte 5 of summary message = cell with highest voltage 1 : byte 5 of summary message = temperature bit 3..4 00 : byte 6..7 of summary message = average voltage 01 : byte 6..7 of summary message = current 10 : byte 6..7 of summary message = concentration (2) These error codes are defined : 00h – no error internal errors : 01h – no presence pulse 02h – data line always high 03h – data line always low 04h – no data received or faulty data 05h – internal supply voltage too low 06h – temperature too high 07h – CAN controller in bus-off 08h – SD card error external errors : 10h - Vmin too low (according to operation mode of LED) 11h - Vmin too low (according to operation mode of relay) 12h - Temperature low alarm 13h - Temperature high alarm 14h - Concentration low alarm 15h - Concentration high alarm 16h - Current low alarm CellSense User’s Manual March2010 27 17h - Current high alarm (3) Cell groups are numbered 0 to 219 (00h tot DBh). (4) bit 0 : 0=relay normally unexcited, 1=relay normally excited bit 1 : 0=relay switches with external error, 1=relay switches with internal and external error bit 2 : 0=external error if Vmin < Vrelais, 1=external error if Vmin < Vavg -Vrelais bit 3 : 1=relay is used as purge signal bit 4 : 0=LED normally on, 1=LED normally off bit 5 : 0=LED toggles with external error, 1=LED toggles with internal and external error bit 6 : 0=external error if Vmin < Vled, 1=external error if Vmin < Vavg -Vled (5) Voffset is set per VSU. By specifying VSU number FEh all individual VSUs are referenced collectively. Sending VSU number FDh, triggers the calculation and setting of all Voffset values simultaneously presuming all inputs are at 0V. CellSense User’s Manual March2010 28 CellSense FC Fuel Cell Stack Cell Voltage Monitor Declaration Mol, 12-11-2007 Vito Boeretang 200 2400 Mol Belgium tel : +32 14 33 55 11 fax : + 32 14 32 11 85 www.vito.be certifies that the product CellSense FC with protective metal housing has been designed according to the following directives and standards : LV Directive 73/23/EEC : EN 61010-1 : Safety requirements EMC Directive 89/336/EEC : EN 61000-4-2 : Contact electrostatic immunity EN 61000-4-3 : Radiated immunity and GSM immunity EN 61000-4-4 : Fast transient/burst immunity CellSense User’s Manual March2010 29