1
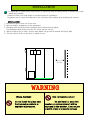
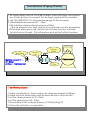
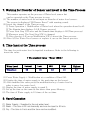
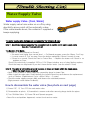
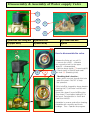
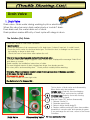
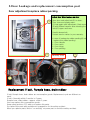
USER’S MANUAL(HS-9033)
HWA SUNG WASHING MACHINE CO.
INSTALLATION
It is important to follow these instructions on electricity and the piping works to operate the Fresh
safely and properly.
Please contact your local dealer or professionals for installation.
Engineer have to return this Manual to the customer after reading and studying this manual..
INSTALLATION
1. Unload the Pants Press out of the box.
2. Remove plastic wrappings on the equipment
3. Plumbing and electricity work should be done efficiently and safely.
The diagram below shows how the the Fresh can be set up.
4. When locating the La fresh, find an area where the ground is leveled and firmly built.
5. Set the Anchor bolts on the floor to make secure
50 Cm
WARNING
<Place Avoided>
Do not install the place near
the flammable subjects or
explosive substances.
<Do not install outdoor>
Do not install or store this
washer on outdoor where it will be
exposed to the weather. It can cause
electric shock or property damage.
Installation
1. Pipe Size- The pipes for the water supply manifold must be 15A (1/2B) or larger.
Use either the copper pipe or PVC pipe.
2. Steam Supply- Use 15A (1/2B) the copper pipe and stopping valve.
3. The suitable pressure of steam is 57~95 psi. Adjust the pressure with reducing valve when
high pressure. (If it is high pressure, it can occur noise when steam)
4.Install the pipe over 2 inches for drain. To reduce the water resistance, Install a pipe as short
as possible. Be placed the drain pipe lower than machine‟s drain.
!
WARNING
Leakage Check
•Tighten the any loose pipes to stop water leakage.
•Operate the machine after checking the leakage from pipes. Because the machine has a high
pressure and high voltage, Leakage could be occur electric shock.
• Keep the pipes warm with insulating material while winter season.
• After installing the air pipes, detach the pipes from the machine, let air blow run through. This
will get rid of dusts and lint within the pipes
•Dusts and dregs within the pipes can cause the stream trap work inappropriately
Installation (Piping Works)
1. Air supply pipes must be 10A 3/8B or larger, either gas pipes or iron pipes.
Use 10 mm air tubes to connect the air supply pipes and the machine
2. Use 10A 3/8B STOP V/V and pressure gauge for the air supply.
3. Standardized air pressure is57 ~ 95psi.
•This machine works under air pressure of 85psi
If the air pressure is too high, reduce it by small amount with air regulator
•After all air pipes are set up, detach the air tubes from the machine.
Let air blow run though. This will remove dusts and lint within the pipes.
Main Valve
Machine connect 57~ 95psi
Air tube - 10mm(external)
Reducing
Valve
Pressure
Gauge
Compressor
Filter
[Test Working Guide]
1. Make sure electricity, steam supply, air supply are properly installed.
2. Make sure that steam pipes and air pipes are free of dust and lint.
3. Set the steam pressure to 57~ 95psi.
4. Set the air pressure to57~ 95psi.
This machine works under air pressure of 0.5MPa (5kg/㎠)
5. Follow the instruction on operation.
ELECTRICAL CONNECTION
Read the following for efficient and safe electrical connection
Only qualified personnel with valid electrical license should perform
the electrical
connection.
❶ POWER
Install a disconnect switch or circuit breaker for this machine; electrical
current 30mA, current time less than 0.1. Electricity
3pi 380V/50Hz, Sensibility electric current - 11.0A.
Rated Current - 12.0A
Use the electric wire enough to stand as electric load For the main
Power as above.
❷ The Earth (Grounding)
To prevent the electrical shock and thunder,
the grounding is required in installing this machine
Do Not Grounding as following place.
➀ Water pipe... If there are the pipe made from P.V.C, the effects
of grounding is not expected.
➁ Gas pipe ... It may occur explosion or fire.
➂ Telephone line or lightning rod.
<Warning> The Grounding is the duty on the Law. Must be
grounded.
Power cord for the machine is composed of 4 wires. To minimize
possible shock hazard ,do grounding after connect with circuit
breaker (MMCB) and the cord must be plugged into a mating
grounding (earth)-type wall receptacle.
Do not install or connect where it be exposed heat, It may occur fire
or machine damaged
Stopper Position
※ Please Take out The Stopper Marked In
The Picture Before Use.
70kg (Washer)
CLEAR
CLEAR
CLEAR
How to use the Washing M/C
1
Prologue
This manual refers to how to operate the machine, program guide, part list and
troubleshooting guide for beginners . It also has Installation instructions, basic program guide
for sales agents.
Using following instructions can keep best condition of machine and get best functions.
Read all instructions before using the Washer.
To minimize the risk of fire, explosion or electric shock and to prevent the personal injury or
the loss of life, we recommend to follow this manual.
There are some different point according to Model, Design, Option.
If you have some problems, contact and consult your local agency.
2
Safety Instructions
1) Repairing the washing machine must be carried out by qualified person only.
2) Check the function of cover, safety S/W .
3) Do not put something on top of the machine.
4) Repair or Move the machine after turning off the power
5) Keep the best conditions around the machine.
(The best conditions is Temp.20~30C( 68F.~86F). and Humidity 60~80%.)
6) Take simple wear and take a hat (cap) – It prevents from being dragged into the machine
during the operation .
7) Check around machine if there is obstacles or not.
(It can prevent safety accidents)
Name of Operation
3
1
6
2
4
7
5
NO.
Description
1
Operation Program
2
Power S/W
3
Emergency S/W
4
Jog S/W( Fwd)
5
Door Lock System
6
LED Light
7
Soap Inlet
프로그램 설명
3
1
11
2
8
4
5
6
7
10
9
1
Power/Operation/Pre wash
7
Set up/Display Dry time & Process
next step
2
Choose Program
8
Set up/Display Water level
3
Display whole Washing Process
9
Set up/Display Spin speed
4
Display & Input Temperature
10
Hand operation & Automatic Set up
5
Set up/Display Wash time & Choose
Mid Dry
11
Modify Program & Choose Wet
cleaning
6
Set up/Display Rinse time & Choose
Mid Dry
1. Instructions for Operation Panel
1) Power S/W : Power on of panel and supply power to inverter
2)Operation S/W : Start automatic process
3)Stop S/W: Press once during operation ⇨ Pause / Press twice ⇨ Stop
4)① ~ ④ S/W: Operate automatically according to the program
5) WET S/W : Wash as WET Cleaning
6) Pre wash S/W : Used for only textile needed pre wash not for the general wash
7) Remain time : Display the whole process time
8) Mid dry : Used it if Mid dry is needed. (Dry for one minute)
9) Next step S/W: If Next step S/W is used during the operation, the speed will be
faster as twice as normal. During automatic operation, press Stop S/W once and
then move to next process.
10) Regulate water level: Classified 5 steps
11) Speed of wash: Regulated the spin speed as 3 steps while Wash/Rinse processes.
12) Speed of dry: Regulated the speed as 3 step while Dry process.
13) Hand operation key: Used to be hand operated for the processes of Water supply,
Drain, Wash and Dry.
14) Hot water and steam key: Used when it is equipped as option and can be
hand operated.
15) Modification: Used to change the set time and memories.
16) Detergent 1, Detergent 2: Put detergent manually or automatically during
the washing.
2. Automatic Operation
1) Power ON.
2) Choose Program (Automatic no.) and operate.
3. Instructions to input automatic program
1) Choose Program no.
2) Press Modification key.
3) When F1 is flickered on the screen of remain time set up water level, speed,
time for wash, rinse and dry and the frequency of them. Then set up functions of
cold/hot water, steam, detergent, temperature.
As pressing Next stem S/W, F2 is flickered on the screen of remain time and set
up water level for rinse, spin speed, cold/hot water, detergent then press
Modification S/W.
(For Pre wash, press pre wash key and F0 is flickered on the screen of remain
time set up the program as the above.)
4. Choose Mid dry
(1) Do not choose Mid dry
After wash or rinse process is finished, drain process is started.
After the drain process is finished and sensed the installation after this,
drained 40 sec. longer then process next step.
(2) Choose Mid dry after wash
1) After finished wash time, drain and balance process are started at the same time.
2) After sensed the lowest water level, speeded up of dry for 40 sec. and progress Mid
dry for 1 min.
3) Speeded down for 1 min and move to next step.
After 40 sec. sensed the lowest water level, speeded up of dry for 1 min.
and then speed down to stop.(3) Choose Rinse Mid dry
After wash, progressed as the same as Mid dry. When rinse frequency become once,
it move to the final dry process.
5. Set up Steam function
1) Steam function is option and controls the output according to the set temperature.
2) Display the temperature when the sensor temperature is adhered only.
When the sensor temperature is not adhered, displays the set temperature for
Stop or Pause and display F- or f- for Spin.
3) The standard temperature is 40℃. Outputted under the set temperature and stopped
At the set temperature. Steamed output at the temperature 4℃ lower then it. Also,
the screen of temperature is off with warning sound if the temperature goes up more
than 15℃ of the set temperature.
4) Steam outputs till the end of wash spin and can be hand operated during the wash.
5) Steam do not hand operate during the drain and the dry.
6) The lowest set temperature is 20℃ and the highest temperature is 99℃.
6. WET function
1) AIR spray wash is option. Press WET key for AIR spray wash.
2) Press WET key for 2 sec. the light on the wash LED is turned on
and diverted WET wash channel.
3) WET wash is made up 10 min. for wash, twice of 3 min for rinse and 5 min.
for dry. The speed is high, water level is low and dry is fast.
The AIR is sprayed after spin.
7. Warning for Disorder of Sensor and Invert to the Time Process
This washer operates as the process of Water level sensor but
can be operated as the Time process in case.
(1) The number of water level do not input as disorder of water level sensor.
The screen is displayed “SE(Sensor Error)” with warning sound.
(2) Invert the channel to the Time process.
① Press Operation + Modification of Water level when the operation board is off.
② The Remain time displays S-LE (Sensor process)
③ Press Next Step S/W once and the Remain time displays t-LE(Time process)
④ Whenever press The Next Step S/W, it changed.
⑤ After choose t-LE, press Modification S/W to invert the Time process.
(3) After A/S for Water Level sensor or replace it, use as the Sensor process.
8. Time Input at the Time process
The time for each water level is inputted in advance. Refer to the following to
invert the value.
< The standard value - Water 15KG >
Water Level
Lowest
Time(Sec)
06
Low
08
Mid
12
High
15
(1) Press Water Supply + Modification at a condition of Panel Off.
(2) Display the time of water supply to the wash time as the lowest.
(3) After modified the value press the modification key of water level in
order to move low water level.
(4) Display the time of water supply to wash 2.
(5) Set up the time as the same as the above then press Memory.
(6) The time of Water supply is 10 times of the set time.
9. Hand Operation
(1) Water Supply ⇨ Supplied to the set water level.
(2) Wash ⇨ The time is 60 min basically and can be input to 99 min.
(3) Dry ⇨ The time is 9 min and the time can be modified.
Highest
17
10. Input of Detergent
Detergent 1,2 ⇨ Detergent 1,2 is input as the set time after the water supply of
wash process.
Modification of the input time ⇨ When the Panel is off, press Detergent
1 or 2 + Modification and modify the wash time and press the Modification S/W.
11. Main Function keys and the warning message
1) Water Level ⇨ Press Water Level key for 3 sec.
2) Memory of the water level ⇨ (Panel OFF) Water Level + Modification ⇨ Modification
3) Invert the time at the Time Process ⇨ (Panel OFF)
Water Supply + Modification ⇨ Modification
4) Modification of Detergent time ⇨ (Panel OFF) Detergent 1 or2
Modification ⇨ Modification 2
5) Initialization ⇨ Operation + Stop
6) SE (Sensor Error) ⇨ Disorder or Water Level Sensor or
Warning of Contact badness
7) LE (Limit Error) ⇨ Warning of over vibration
12. Directions
1)
2)
3)
4)
5)
6)
7)
Use Main power as AC220V or 380V circuit breaker (Circuit breaker is mandatory )
Must be grounded.
Do not use to be exceed of capacity.
Do not open the slot of high speed dry.
Do not use improper fuse.
Be notice to do not water in motor or relay board
Do not alter or repair free.
(Head Office do not have any responsibility for the obstacle caused
the remodeling or repair free. If you need to repair, turn off the main power
first and contact us.
Electric Steam Valve
1.Electric Steam Valve
Steam valve turns steam on or off by using electricity
Arrow points at the automatic valve
If the valve breaks down, the steam isn’t sprayed or
keeps spraying
The Steam Valve damage can be caused by the following 2 ways
Error 1. Electrical problem caused by the excessive heat of electric coil in steam valve
(See the Troubleshoot List)
The Solution (Fix) Guide
(1) Power On. (Select Manual on Screen)
→ Set the temperature higher than current temp. → On Manual program, press the ‘Steam’.
→ It comes sound of ‘Tick’ as snap. Press the button repeatedly If doesn’t sound of snap.
→ If there is no sound, Check the Fuse in Control Box. → Replace the steam coil if there is no
problem on Fuse.
Check if the electricity is supplied 220V or 110V (Expect whether error of relay) before replace.
Check the lamp on relay board if you don’t have electric tester. (see the electric Chart)
Error 2. The valve is not working properly because of dregs and dusts within the steam pipes.
( When the steam keeps spraying)
• Steam leakage could damage seriously to laundry, be attention and fix carefully.
• Most of the Steam leakages are caused by dregs in steam Pipe.
.• When Install steam pipe, Read carefully the Install instructions and observe the replacement
cycle of Strainer. (Replacement Cycle : within 6 Mon. ~ 3 years)
• Check the steam Pressure daily and observe the standard pressure.
(High pressure could makes Problems).
•When the current temperature is 10 F. over heated than Set Temp because of steam leakage,
the Program will be abort and sound the alarm. And be displayed Warning. High Temp. on screen.
• when the set Temp. is 10 F. less than current temp, Be alarm on.
In this case as fault , Adjust the set temp.over than the current temp.
•In case of Using Warm water and Cool water simultaneously, we recommend to set temp. 104 F.
No need be careful when didn’t select steam function.
To avoid damage of the laundry, Do not set high temp. (Factory Pre-set temp. 104 F.)
Disassembly & assembly of Steam Valve
When The Error caused by dregs and dusts
within the steam pipes.
Steps in disassembling the steam valve,
(1) Close the steam valve (2) Cool off
(3) Disassemble the valve
Release Bolt
Release Bolt
Do Stretch the spring
CAUTION ! : Be
careful from hot temp,
Do Disassembly after
close & cool the
valve .
Remove dregs
Rejoin
(4)Run the machine after reassembly. (5) If it still doesn’t work after cleaning ,the
steam valve has to be replaced.
Water Supply Valve
Water supply Valve (Cool, Warm)
Water supply valve turns water on or off by using
electricity arrow points at the automatic valve.
If the valve breaks down, the water isn’t supplied or
keeps supplying.
The water supply valve damage can be caused by the following 2 ways
Error 1. Electrical problem caused by the excessive heat of electric coil in water supply valve
(See the Troubleshoot List)
The Solution (Fix) Guide
(1) Power On. (Select Manual on Screen)
→ Set water level higher than current level. → On Manual program, press the „Warm, Cool‟ key.
→ It comes sound of „Tick‟ as snap. Press the button repeatedly If doesn‟t sound of snap.
→ If there is no sound, Check the Fuse in Control Box. → Replace the steam coil if there is no
problem on Fuse.
Check if the electricity is supplied 220V or 110V (Expect whether error of relay) before replace.
Check the lamp on relay board if you don‟t have electric tester. (see the electric Chart)
Error 2. The valve is not working properly because of dregs and dusts within the steam pipes.
( When the steam keeps spraying)
• Most of the troubles of water supply are caused by dregs in steam Pipe.
.• When Install the water pipe, Read carefully the Install instructions and observe the replacement
cycle of Strainer. (Replacement Cycle : within 6 Mon. ~ 3 years)
• Check the water supply pressure daily and observe the standard pressure.
(High pressure could makes Problems).
How to disassemble the water valve (See photo on next page)
1) Power OFF. 2) Turn OFF the main water valve.
3) Disassemble as photo. 4) Assemble in reverse order after removing dregs inside the pipes.
5) Turn ON Main Valve. 6) Power ON and Operate program.
• Same Error and problem happened, contact local service center.
Disassembly & Assembly of Water supply Valve
1
2
3
5
4
1) Electron coil Fixing Nut
2)Electron coil
3)Connection bolt
4) Upper body
5)Lower body
6)Disk
8
How to disassemble the valve
6
7
5
Release the fixing nut on coil(1),
→ remove the coil(2). →Release
the connection bolt on the upper
body(3)→ disassembled.
→Remove dregs inside (7) lower body(5).
→Check status of Disk(6) and small
pin hole (8) (Breathing hole).
*Breathing Hole’s function ;
water gets in and out through this hole
when the valve‟s ON/OFF to help
the operation.
If this hole(8)is clogged by dregs despite
cleaning the (7),the valve couldn‟t work
smoothly.
Some user doesn‟t know its(8)function,
They clean (7) and adjust spring(6).It‟s
Not good. Pay attention to check and
clean this Hole(8).
Assemble in reverse order after cleaning.
Assemble with carefully and check
Leakage . Then Operate the program.
Drain Valve
1. Drain Valve
Drain valve : Drain water during washing by Air or electrically.
When this valve has error ,drain water slowly or couldn’t drain.
Even drain well, the water drain out of drum.
Drain problem makes difficulty of next cycle with dregs in drum.
The Solution (Fix) Guide
There are 2 kinds of Drain valve‟s problem.
• Electrical Error :
Check the pressure of air compressor for Air drain type. If doesn‟t input air, It couldn‟t work.
Check the coil in valve for electrical drain type. The electric short or leakage can be caused
by humidity or dregs in drain hole.
Check the fuse in control box after replace the coil.
•The Error caused by dregs and dusts within the drain valve
It couldn‟t drain when dregs clogged in valve. At this time, Displayed the message „Drain Error‟
with alarm on screen.
Read carefully the installation instructions of drain.
The most biggest reason of drain clogged are dregs from laundry pocket.
Ex) coins, pens, and something else. Check pocket certainly before washing.
Otherwise, When level sensor couldn’t detect minimum water level, it become a problem .
At this case, Do drain as manual.
Disassembly guide
Drain valve located on lower right side.
See below photo for disassembly .
3
1
2
Drain Valve
Disassembly Valve
This is photo of drain valve and disassembly
When drain valve has problem,
Cylinder type : Drain by force exchanging
the air hose which connected on cylinder.
Electrical type :Drain by force with moving
the drain hose by hand.
Must be Power OFF before disassembly.
1. Release 3 bolts(1).
2. Separate upper body.
3. Remove dregs inside body(2).
4. Replace rubber packing(3) when has problem.
Assemble in reverse order and operate program.
If you exchange the air hose, return to the former
Condition.
Air hose connection Inlet
2.Door Leakage and replacement consumption part
Door adjustment & replace rubber packing
Adjust door When leakage on door .
3
Open door and adjust bolt(2) to down,
Then close and supply water.
If it leak again after adjustment, Beat around
(3) with Rubber hammer after releasing the
bolts(3) upper and lower.
Careful release bolt.
Contact service center to your warranty.
In case of leakage by rubber packing(4) old,
→replace this rubber packing.
1- Door Handle.
2- Door catch.
3- Door hinge.
4- Door packing
1
2
Laundry Inlet
4
1
Replacement V belt, Rumple hose, drain rubber
V belt, Rumple hose, drain rubber are consumption goods. Replacement cycle are different on
each.
V belt – Normally within 6 months to 2 years.
Rumple hose, drain rubber – approx. within 2 years.
User can replace this consumption goods.
Keep safety and turn OFF when you replace this parts.
Do replace this parts with assistance in preparation for the safety accident
When you replace parts, Notice “ on working” on power part to avoid the safety accident.
Noise & Maintenance Guide
Noise Check point
It‟s difficult to explain on sentence about Machine Noise part.
But If you check the noise as following this instructions, you will find the solutions.
Check point – Extraction (spin)
1. If makes noise on shock absorber, body or spring when you extract with laundry decline,
Check and adjust the vibration sensor distance.
and check the location of machine if the ground is leveled or not. In that case, It makes noise.
2. Check the status of fasten bolts on body cover.
If the bolts was fasten loosely, The noise will be made.
3. Check V belt status whether it is old or not. – It can make noise from V belt when It‟s old.
4. Check the bolts status on main motor (pulley). – It can make noise from bolts when the bolts
fasten loosely.
5. Check the shock absorber status.
Check Damage on absorber or Anti-vibration rubber on absorber.
Check oil leakage from absorber. It could makes noise when the oil pressure of absorber is low.
6. Check the status of coil spring - when less grease on coil spring, It could makes noise.
Put grease enough to a coil spring.
7. Check the bearings on motor. – If has damage on bearings, it could makes noise.
When check the bearing, Do spin without V-belt. If there is no noise, the bearing is OK.
8. Check the main bearing. – Do spin basket manually without V-belt after checking
Motor bearing. If it makes noise, the main bearing was damaged.
Contact local service center when it is difficult for you to find solutions.
Maintenance
In order to keep this machine well, Use machine after read carefully this Manual.
Using as instructions will reduce your washing time and prevent the safety accidents and
the error of your machine.
Keep clean all the time and observe the laundry capacity of washer.
When you have lots of laundry, wash twice for safety of your machine.
Replacement consumption units on time makes your machine life prolong.
Turn OFF the power while stop over. (Recommended)
It can cause the electricity consumption - Inverter and Cooling Fan are still working on
even though the machine stops.
Proper maintenance of your washer can extend its life.