1
Catweasel
User Manual
last update: 05/11/2008 - Catweasel MK3, MK4 and MK4plus software update V 2.6.0.0
for the most recent version of this document, please check http://www.icomp.de
Contents
Hardware Installation...........................................................................................................................3
preparing the card............................................................................................................................3
Audio-connector..............................................................................................................................5
Connecting an Amiga Keyboard......................................................................................................5
Connecting disk drives.....................................................................................................................6
choosing a Drive .............................................................................................................................6
using 40 Track drives.......................................................................................................................7
using 8” Disk Drives........................................................................................................................7
reading 100tpi Disks........................................................................................................................8
using 100tpi Disk Drives.................................................................................................................8
reading Extended Density Disks......................................................................................................8
reading Flip Disks............................................................................................................................9
Driver Installation...............................................................................................................................14
Windows........................................................................................................................................14
uninstall the old Driver.............................................................................................................14
install new Driver......................................................................................................................15
Linux..............................................................................................................................................16
Amiga.............................................................................................................................................16
configuring the Software....................................................................................................................17
General settings..............................................................................................................................17
Floppy Drive related settings.........................................................................................................17
Examples...................................................................................................................................21
3.5" drive, 300 rpm, 80 tracks (standard PC drive)...................................................................21
5.25" drive, 360 rpm, 80 tracks (standard PC HD drive)..........................................................21
5.25" drive, 300 rpm, 40 tracks (standard PC DD drive)..........................................................22
SID related settings........................................................................................................................23
Joystick/Mouse/Paddles related settings........................................................................................24
Amiga Keyboard related settings...................................................................................................25
using cwconfig....................................................................................................................................26
using the Imagetool............................................................................................................................27
Disk Tab.........................................................................................................................................28
Signal Tab......................................................................................................................................28
Data Tab.........................................................................................................................................29
supported disk formats...................................................................................................................30
supported image formats................................................................................................................31
plain...........................................................................................................................................31
d64 with error information........................................................................................................31
atr..............................................................................................................................................31
request a new format......................................................................................................................31
choosing media..............................................................................................................................32
Hub rings...................................................................................................................................32
Frequently Asked Questions...............................................................................................................33
Developer Information.......................................................................................................................36
known Bugs........................................................................................................................................37
how to report Bugs.............................................................................................................................37
3rd Party Software..............................................................................................................................39
Technical Data....................................................................................................................................40
Last Words..........................................................................................................................................41
Credits.................................................................................................................................................41
Fine print............................................................................................................................................42
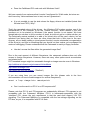
Hardware Installation
preparing the card
Before you put the card into your computer, you should make sure to set the jumpers
properly. The jumpers are only for the SID chips, so if you're not planning to use a SID on
your Catweasel, this step can be skipped.
These jumper settings attach the capacitors to the SIDs that Commodore has
recommended. The sound is nearly identical to the original computers C64 and C128. It's
more common that statistical spreading between SID chips cause sound differences than
capacitor tolerances, but we have chosen to use low-tolerance capacitors anyway.
Note: The parts C39 and R5 are not assembled intentionally.
3
4
Audio-connector
The output of the SID chips can be routed from the internal audio-connector to the line-in
or the CD-audio input of your sound card. The internal audio connector on the Catweasel
MK4plus follows the de-facto standard of CD rom drives, so a standard CD-rom audio
cable should work. Unlike the previous version of the Catweasel MK4, there is no audio
cable included with the Catweasel MK4plus. Instead, we have added an external audio
connector with a 3.5mm stereo jack, which is commonly used in PC audio applications.
Connecting an Amiga Keyboard
The external PS2 jack can be used to connect an Amiga 4000 Keyboard.
●
Can I connect an A2000/A3000 keyboard to the Catweasel MK4plus?
Yes, this is possible with an off-the-shelve PS2 adapter for older AT-keyboards. These
adapters are available commercially in PC-stores and mailorder-shops.
●
Can I connect a CDTV keyboard to the Catweasel?
The CDTV keyboard uses the same connector, but a different pinout for the connector.
You will need to solder an adapter to connect the black CDTV keyboard.
●
Can I connect an A1000 keyboard to the Catweasel?
The A1000 uses a totally different connector, a 4-pin WD-modular, also known as a phone
jack or RJ11 connector. The protocol of the keyboard is the same as for other keyboards,
so the A1000 keyboard will also work with the Catweasel MK4plus with an adapter. These
adapters are not available commercially, so you will have to make one yourself, if you
have the necessary skills and tools.
Pin
A4000
CD32
CDTV
1
KB_Data
/KB_Data
GND
2
-
/TxD
/KB_Data
3
GND
GND
/KB_Clock
4
+5V
+5V
+5V
5
KB_Clock
/KB_Clock
-
6
-
/RxD
-
Pin
A2000/A3000
Pin
A1000
1
KB_Clock
1
+5V
2
KB_Data
2
KB_Clock
3
-
3
KB_Data
4
GND
4
GND
5
+5V
5
Connecting disk drives
Two cables and one adapter are included with the controller. You might not need all of
them.
The easiest way of installation is to „insert“ the Catweasel between the on-board-floppy
controller and the disk drive(s). Unplug the floppy cable from the on-board controller, and
connect it to the black connector of the Catweasel MK4plus. Now take the cable with the
black and the white connector to make a connection between the on-board-FDC of your
computer and the white connector of the Catweasel MK4plus. The floppy cable with three
connectors is not used in this setup.
If your PC doesn't have a disk drive, connect drives with the included floppy cable (three
connector-cable). A connection between the on-board FDC and the Catweasel is of course
only possible if your board has a floppy controller. Should this not be the case, or if you
just don't want to use the on-board-controller, you can leave the white connector of the
Catweasel MK4plus unused.
To connect a 5.25“ drive, we have included an adapter. The red signal line has been cut
on that adapter in order to be compatible with auto-eject drives on the same cable. This
cut has been made intentionally, it is not a fault!
Auto-eject drives are 3.5“ drives that don't have an eject button. You might know them
from Apple Macintosh computers. Ejecting is initiated by a pulse that's generated by the
floppy controller. The Catweasel MK4plus can only generate this pulse properly if both
drives on the cable are either compatible, or they have been made compatible by cutting
the red signal line.
choosing a Drive
If you have problems writing Amiga disks, please check that you're really using DD disks
(or at least put Scotch tape over the HD-hole), and of course to use good floppy drives:
We recommend Teac (not Teac OEM, for example with integrated flashcard readers!), but
Panasonic, Sanyo, Matsushita, Nec, Sony, Chinon, and most other brands also work fine.
Currently four drives are known to be incompatible with the Catweasel line of controllers:
●
●
●
●
Mitsumi D359 series ("Newtronics", bad head alignment on new drives, interface
flaws)
Teac drives with integrated flashcard reader (obviously no Teac mechanism)
Citizen floppy drives as used in Compaq computers (interface flaws)
Samsung SFD-321B (no DD disk support)
In case you have problems writing DD disks, please make sure that your drive is actually
DD capable (one possibility to identify a non DD capable drive is to look into the slot, you
should see the switch for the DD hole on the right side).
6
The Catweasel MK4plus even lets you write Amiga-DD disks with HD-only drives like the
Samsung SFD-321B. You cannot read Amiga-disks in such a drive, but writing those disks
is mostly possible. However, we suggest to double-check if a disk drive is a true dualmode drive by taking a close look at the slot where you insert the disk. You should see
three switches: One for the HD-hole of the disk, another for the write-protect slider, and the
third is a presence-detect switch (the disk change switch). Only if these three switches are
present, the drive is a dual-mode drive.
using 40 Track drives
while developing the required features (and testing them) we noticed that 40 Track drives
appear to be a little bit problematic, so keep the following hints in mind:
●
most of these drives can not be simply connected to a floppy controller without
further configuration (usually by setting jumpers). There is a lot that can go wrong
here, and unfortunately it is hard to give general advice on configuration. If nothing
works, there is a high chance that the drives jumper settings are simply wrong, play
with them! If you have documentation, try to set the drive to "select 1" (not select 0!)
and to put the disk change signal on pin 34.
●
start with having only the 40 Track drive connected to the Catweasel and make it
work first, then connect a second drive and do further testing (sometimes the 40
track drives confuse the other drive, which might again be caused by the wrong
jumper settings).
It is generally desirable to use a 40-track drive for original 40-track disks, as the head gap
on these drives suits the low capacity of the disks much better than the small head gap of
80-track drives.
using 8” Disk Drives
●
Does the Catweasel work with Shugart SA851 8" drives? I'd like to read various CP/
M formatted disks.
That requires an 8" floppy adapter. There is a compatible one made by dBit (check
http://www.dbit.com/fdadap.html ), they are also the makers of the Ersatz-11 emulator for
7
PDP-11 machines. If you are capable of building an adapter yourself you may want to
have a look at the CP/M FAQ (http://www.faqs.org/faqs/CPM-faq/).
Most CP/M formats can already be read with the Imagetool, but others require special
software. We're always glad to help with new disk formats, but at this point, we don't have
an 8" setup here, so support will be very limited until we have extended our lab equipment
to also access 8" disks.
reading 100tpi Disks
●
Will the catweasel ever support a way to be able to reliably
disks? or does it perhaps have a way to do so already
documentation? if so, what type of drive do i have to hook up
100tpi disks? and if a special drive is not needed, what type of
be able to read them?
read old SFD-1001
that is not in the
in order to read the
drive do i choose to
The Catweasel software already supports reading SFD1001 disks, but since the drives
had a slightly higher density stepping motor, not all tracks can be retrieved with a standard
1.2M drive. You truly need a 100tpi drive, or loosen the stepper and fiddle around with it
while reading the disk (might be OK for a single disk, but not for a whole stack).
using 100tpi Disk Drives
Unfortunately 100tpi Drives are extremely rare and thus hard to get. For some hints on the
topic look at this document:
http://www.retrotechnology.com/herbs_stuff/tandon_commodore_stein.txt
reading Extended Density Disks
To read/write extended density formats, such as the CMD FD-4000 format, you need one
of the rare 2.88MB ED drives developed by Toshiba. Reading these formats with a regular
1.44MB drive is not possible.
8
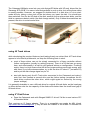
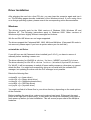
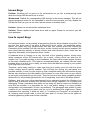
reading Flip Disks
On the C-64, it was common use to flip the disk in order to double it's space. This was
even possible with disks that have been sold as "single-sided" disks. A simple cut in the
right place has removed the write-protection of the reverse side, and the 1541 was able to
make use of the flipside. Today, the diskdrives need one more hole to check if the disk is
spinning or not, and that is the index hole. Back in the 80's when the C-64 was popular,
special disks have been sold that have this additional hole (red arrow marks that reverseside index hole):
The normal disks (the following picture shows the SX-64 test/demo disk) only have one
index hole.
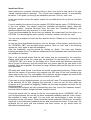
If you flip the disk, the index hole is in the wrong position, and the drive cannot tell wether
the disk is spinning or not. Since there are no index pulses, the drive assumes that the
disk is not spinning, and therefore the data lines to the Catweasel controller are disabled.
The problem why you cannot read the reverse sides is not located in the Catweasel
controller, but in the 5,25 inch drive. Some hardware patching is necessary to work around
this.
9
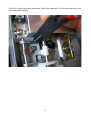
First of all, locate the photo-resistor that "sees" the index hole. Cut the two wires that come
out of the photo-resistor:
10
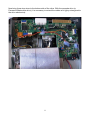
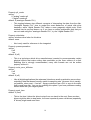
Now bring these two wires to the bottom side of the drive. With the example drive (a
Panasonic/Matsushita drive), it is necessary to extend the cables a bit (grey wires glued to
the drive electronics):
11
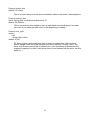
The next step is a bit tricky and you may need some time until you find the correct position
for the magnet and the reed-contact. Some combinations of magnet and reed work fine on
the first try, and others need some adjustment until you find the best distance between
magnet and reed.
After glueing the reed to the position you chose, it is strongly recommended to check it's
function with a multimeter. Although you may hear a clicking sound on every rotation, the
two wires are not electrically connected when the magnet is near. This has happened with
a number of reed-contacts from one batch, but it doesn't mean that a different vendor does
not provide better quality. Since testing only takes a few seconds, you should take that
time.
In no case can the magnet harm the health of your disks. It's magnetic field is so low and
so far away from the surface of the inserted disks, that you don't have to fear anything for
your disks.
After you made sure that the two contacts of the reed are connected when the magnet is
near, and after soldering these two contacts to the two wires that initially came out of the
photo-resistor, your drive can also read the reverse sides of 1541 disks.
12
●
Why is the hack necessary, my drive is double-sided!
Yes, your drive is double-sided, but the positions of the two heads are slightly shifted in a
way that the upper head (which would read the reverse side) starts at track 4 instead of
track 1, so you would not have the chance to read the whole disk. Another problem is that
the head is not exactly at track 4, so only a few disks may be readable. We decided not to
support reverse sides in double- sided drives, because it would only cause confusion:
Disks that work fine on the 64 may cause problems in that mode, and you would not have
access to all the files. Maybe we will publish a tool that displays the directory of the
reverse side with an unmodified drive, so you can check if it's worth the effort of hacking
your drive or not.
13
Driver Installation
After plugging the card into a free PCI slot, you can close the computer again and turn it
on. The following pages describe installation of the Windows drivers. If you're using Linux
or an Amiga operating system, please consult the corresponding online documentation.
Windows
The drivers currently work for the 32bit versions of Windows 2000, Windows XP and
Windows NT. The following instructions apply to Windows 2000. Other versions of
Windows might have slightly different messages and buttons.
Win 9x and Win ME drivers are no longer supported.
The drivers support the Catweasel MK1, MK3, MK4 and MK4plus. (Catweasel ISA code is
not removed, please report if you have a system where you can test this!)
uninstall the old Driver
If you still have an old Catweasel driver installed (pre 2.4.0.0), you have to remove it
manually before installing a newer one.
The driver directory for Win2000 is <drive letter>:\WINNT\system32\drivers
The driver directory for Win XP is <drive letter>:\windows\system32\drivers
For WinXP, it will be necessary to switch off some safety measures, otherwise you cannot
delete the files. You might be successful by doing an un-install with the software/PnP
manager, but updating the driver with the PnP manager is not possible.
Delete the following files:
catwea2k.sys (base driver)
catdri2k.sys (floppy drive driver)
catkey2k.sys (Amiga keyboard driver)
catsid2k.sys (SID chip driver)
catjoy2k.sys (Joystick driver)
You might not find all of these files in your driver directory, depending on the used options
of the controller.
Before installing the new driver, make sure to make a hard-reset. Either push the reset
button at the right time (experts only), or shut down the computer completely and make a
fresh power-up before you start installation. This will ensure proper reset of the MK4plus
hardware.
14
install new Driver
Upon starting the computer, Windows tells you that it has found a new card of the type
„simple communications controller“. The „Found new hardware wizard“ is automatically
launched - it will guide you through the installation process. Click on „next“ now.
In the next window, choose the option „search for a suitable driver for my device“ and click
on „next“.
If you're installing the drivers from the supplied CD-ROM, tag the option „CD-ROM drives“
in the next window. You should untag the (probably pre-selected) option „Microsoft
Windows Update“, because Microsoft does not know the Catweasel MK4plus, and
therefore doesn't have any drivers for it on their servers.
If you have downloaded the driver from our website, the wizard can't find the driver on a
CD-ROM. You should tag the option „specify a location“ instead, and click on „next“.
You are now prompted to insert the disc with the drivers. Please do so, and specify the
drive letter.
In case you have downloaded the driver, click on „browse“ in that window, and look for the
file "CATWEASL.INF" from the MK4 drivers archive. Click on „next“ and in the following
window on „next“ again to start the installation.
After the installation, end the wizard by clicking on „finish“. You have only finished
installing the base driver! The different subsystems of the Catweasel also need drivers that
are installed on demand.
First of all, the wizard should find the disk drives that are connected to the controller.
Please install the drivers the same way as described for the base driver, and choose
"CATDRIVE.INF" as a driver for the floppy drive. Please mind that Windows copies this
file to it's own inf-directory, and will choose that as a source path for the next driver to be
installed. Don't be surprised if the wizard is using a different path and file than the one you
have specified!
SID chips also need drivers. Just follow the wizard as described previously. Please mind
that the first version of this driver only supports one SID chip: It's the one located at the
upper edge of the card. The next update of the software will also support the second SID
socket. You will also have to install a driver for that second SID.
If you want to use an Amiga keyboard, you can connect it now. The computer doesn't have
to be switched off for that, plugging the keyboard in and out can be done while the
computer is on (so-called hot-plugging). Please use the lower keyboard connector for the
Amiga-keyboard.
Connecting the keyboard will also automatically open the „found new hardware wizard“,
because a device called „Amiga keyboard“ has been found.
Follow the wizard until it's asking for the file, and install the driver "CATKEYBD.INF" for
your Amiga keyboard. As soon as you have completed installation with the „finish“ button,
the keyboard is ready to be used. You can even use this keyboard to enter the login
information on the next reboot. Please mind that certain software (SID-players, emulators)
might talk to the Catweasel hardware directly and de-activate the driver. In that case, the
keyboard will not work until that software has been closed, so you should have an
alternative keyboard handy.
15
We apologise for the inconvenience - we're working on an improved installation process!
Linux
There are several drivers for linux available, please refer to their respective
documentation:
●
cwfloppy (http://www.soundtracker.org/raw/cwfloppy/index.html) – a block device
driver
●
cw (http://www.unusedino.de/cw/) - a floppy driver
●
CatWeasel (http://llg.cubic.org/cw/) - SID, Joystick and Amiga Keyboard driver
●
hardsid (http://hardsid.sourceforge.net/) - SID driver
●
hardsid-catweasel (http://www.bel.fi/~alankila/blog/2005/12/30/HardSID-Catweasel
%200.01.html) – another SID driver
Amiga
●
I want to use the Catweasel MK4plus in my Amiga. I have PCI slots and OpenPCI
installed. What software do I need?
The directory “amiga” on the driver CD contains the LHA-packed driver disk for the
Catweasel MK2 anniversary edition. This includes the latest multidisk.device V3.65, which
also recognizes the Catweasel MK4(plus) in an OpenPCI slot.
For such an installation, the full Amiga manual applies. The multidisk.device can also be
used in emulators that allow access from the emulator to the PCI cards (WinUAE has an
option for that). Again, for such an installation, the Amiga manual will give valuable
answers. Please read:
http://siliconsonic.de/t/catman0.html
16
configuring the Software
cwconfig.ini contains all kinds of settings related to the catweasel controller. It will be
used by the imagetool for its default configuration (however all related settings can still be
modified in the imagetool itself) and the cwconfig tool. This file must reside in the same
directory as the imagetool and the cwconfig tool.
Right now not all of the settings in this file are actually used, and some others will always
be overridden by whatever the driver detects when it starts up. These settings will be used
for sanity checks by the cwconfig tool in the future, so it's a good idea to fill them out
accordingly.
If you want to apply these settings automatically after bootup, put a link to the cwconfig
tool into your "autostart" folder.
Generally every setting consists of a Section enclosed in square brackets, one or more
properties and several possible values per property, each of which is outlined below.
[Section]
property=value
General settings
Section: [controller]
Property: version
values:
1 catweasel mk1 (isa)
2 catweasel mk2 (amiga, not supported)
3 catweasel mk3 (pci flipper)
4 catweasel mk4 (pci) (also for MK4plus)
default: automatically detected by the driver. Value in the inifile is only for reference and/or
sanity checks.
Floppy Drive related settings
Section: [floppy]
Property: drives
values:
0 no drive connected
1 one drive connected
2 two drives connected
default: automatically detected by the driver. Value in the inifile is only for reference and/or
sanity checks.
17
Section: [driveX]
Property: type
values:
0 3.5" drive
1 5.25" drive
2 8" drive
default: 0 (3.5” drive)
Property: doublestep
values:
0 drive has 40 physical tracks (48tpi)
1 drive has 80 physical tracks (96tpi)
2 drive has 80 physical tracks (100tpi)
default: 1 (80 physical tracks; 96tpi)
–
this must be set to 0 to read 40 Tracks formats (such as C64 disks) on 40 Tracks
drives. Since it is impossible to detect the kind of drive which is connected via
hardware, make sure to set this correctly when using 40 Tracks drive, the drive may
go out of alignment or even get permanently damaged when trying to step too far,
therefore we have not implemented the "boot up floppy seek" method, used by
many older BIOSs.
Property: rpm
values:
300 (common for 3.5" pc drives)
360 (common for 5.25" pc HD drives)
default: 300 RPM
–
most 40 Track 5.25” drives run at 300rpm (and not 360rpm like 80 Track 5.25”
drives), so if you are using one, you most probably need to enable this as well.
Property: diskchange
values:
0 ignore diskchange signal
1 use diskchange signal
default: 1
–
most 40 Track drives either do not generate the "disk change" signal at all, or use
the "disk change" line for the "ready" signal. Enable this option if your drive behaves
funny, for example a "no disk in drive" is reported as soon as the imagetool wants to
start reading.
Property: diskready
values:
0 ignore diskready signal
1 use diskready signal
Proper support for the "ready" signal will be implemented later (needs further investigation
and testing).
18
Property: pll_mode
values:
0 "analog" reader pll
1 "digital" reader pll
default: 0 (analogue Reader PLL)
–
This toggles between two different concepts of interpreting the data from the disk.
"analogue Reader PLL" tries to model the exact behaviour of actual disk drive
hardware, while "digital Reader PLL" takes a more pragmatic digital route. Each
method has its ups and downs, so if you have a certain problematic disk that you
can not read using the "analogue Reader PLL", try the "digital Reader PLL".
Property: driveletter
values: windows drive letter for this drive
default: none.
–
this is only used for reference in the imagetool
Property: precompensation
values:
0 off
1 on
default: 0 (off)
–
This is a technique which drive manufacturers invented to precompensate certain
physical effects that make writing data unreliable on the inner sectors of a disk.
Enabling this is strongly recommended, many disk formats can not be written
properly without it.
Property: write_error_diffusion
values:
0 off
1 on
default: 0 (off)
–
Like all digital applications the catweasel introduces small quantization errors when
outputting data that doesn't exactly match its sampling rate. However this is usually
no problem, since most – if not all – floppy controllers use a PLL to sync to the data
that is read from disk. You can try enabling this option if you have problems reading
written disks with your target system.
Property: seek_time
default: 3 (3ms)
–
This is the time it takes the drive to step from one track to the next. Some modern
drives might be able to step faster, but more importantly some old drives (especially
8” drives) might need more time.
19
Property: settle_time
default: 15 (15ms)
–
This is an extra delay to let the drive mechanics settle on the track it has stepped to.
Property: spinup_time
value: spinup time in milliseconds divided by 10
default: 50 (500ms)
–
This is the time the drive needs to spin up and reach its nominal speed. Increase
this value if you often get read errors at the beginning of reading.
Property: tick_type
values:
0 off
1 Amiga Style clicks
default: 0 (off)
–
PC floppy drives need to step one track in order to update their “disk inserted”
status. Amiga Users know this behavior from the frequently “clicking” drive. The
driver tries to work around this by default, but if you experience problems like the
imagetool reporting “no disk” even when there is one inserted into the drive, set this
option to 1.
20
Examples
3.5" drive, 300 rpm, 80 tracks (standard PC drive)
type=0
doublestep=1
rpm=300
diskchange=1
diskready=0
pll_mode=1
driveletter=A
precompensation=1
write_error_diffusion=0
seek_time=3
settle_time=15
spinup_time=50
tick_type=0
5.25" drive, 360 rpm, 80 tracks (standard PC HD drive)
type=1
doublestep=1
rpm=360
diskchange=1
diskready=0
pll_mode=1
driveletter=B
precompensation=1
write_error_diffusion=0
seek_time=3
settle_time=15
spinup_time=50
tick_type=0
21
5.25" drive, 300 rpm, 40 tracks (standard PC DD drive)
type=1
doublestep=0
rpm=300
diskchange=0
diskready=0
pll_mode=1
driveletter=B
precompensation=1
write_error_diffusion=0
seek_time=3
settle_time=15
spinup_time=50
tick_type=0
22
SID related settings
Section: [sid]
Property: sids
values:
0 no sid installed
1 one sid installed
2 two sids installed (MK4 and MK4plus only)
default: automatically detected by the driver, this value is only used for reference and/or
sanity checks.
Section: [sidX]
Property: type
values:
0 "old" sid, 6581
1 "new" sid
default: automatically detected by the driver, this value is only used for reference and/or
sanity checks.
23
Joystick/Mouse/Paddles related settings
Section: [joystick]
Property: joyports
values:
number of joystickports
default: automatically detected by the driver, this value is only used for reference and/or
sanity checks.
Section: [joyX]
Property: type
values:
0 none
1 c64/amiga joystick
2 c64/atari paddle (requires SID)
3 amiga mouse (*)
4 atari mouse (*)
5 C64 mouse (1531) (requires SID)
*) most mice do not have a proper pullup resistor at their buttons, and as a result their right
button can not work reliably when a SID is intalled.
Property: emubits
values:
0x20 paddle emulates mouse (requires SID)
0x10 paddle emulates joystick (n/a)
0x08 mouse emulates paddle (n/a)
0x04 mouse emulates joystick (n/a)
0x02 joystick emulates paddle (n/a)
0x01 joystick emulates mouse
–
add values to enable several options at once
Property: autofire1
values:
autofire frequency for button 1, 0=no autofire
default: 0 (disabled)
Property: autofire2
values:
autofire frequency for button 2, 0=no autofire
default: 0 (disabled)
24
Amiga Keyboard related settings
Section: [keyboard]
Property: keymap
values:
name of the keymap, currently predefined are:
keymap_old_qwerty (standard US layout)
keymap_old_qwertz (standard german layout)
default: qwertz (german) layout
[keymap_old_qwerty]
; ??? 1 2 3 4 5 6 7 8 9 0 - = \ ??? ???
n00=41,2,3,4,5,6,7,8,9,10,11,12,13,0xc5,0,82
; q w e r t y u i o p ( ) ??? ??? ??? ???
n01=16,17,18,19,20,21,22,23,24,25,26,27,0,79,80,81
; a s d f g h j k l : @ ??? ??? ??? ??? ???
n02=30,31,32,33,34,35,36,37,38,39,40,43,0,75,76,77
; ??? z x c v b n m , . / ??? ??? ??? ??? ???
n03=86,44,45,46,47,48,49,50,51,52,53,0,83,71,72,73
; SPC <- TAB ??? RET ESC ??? ??? ??? ??? ??? ??? ??? ??? ??? ???
n04=57,14,15,156,28,1,0xd3,0,0,0,74,00,0xc8,0xd0,0xcd,0xcb
; F1 F2 F3 F4 F5 F6 F7 F8 F9 F10 ??? ??? ??? ??? ???
n05=59,60,61,62,63,64,65,66,67,68,69,70,0xb5,55,0,0xd2
; LSFT RSFT LOCK CTRL LALT RALT LAMI RAMI
n06=42,54,58,29,56,0xb8,0xdb,0xdc,0,0,0,0,0,0,0,0
n07=0,0,0,0,0,0,0,0,0,0,0,0,0,0,0,0
[keymap_old_qwertz]
n00=41,2,3,4,5,6,7,8,9,10,11,12,13,0xc5,0,82
n01=16,17,18,19,20,44,22,23,24,25,26,27,0,79,80,81
n02=30,31,32,33,34,35,36,37,38,39,40,43,0,75,76,77
n03=86,21,45,46,47,48,49,50,51,52,53,0,83,71,72,73
n04=57,14,15,156,28,1,0xd3,0,0,0,74,00,0xc8,0xd0,0xcd,0xcb
n05=59,60,61,62,63,64,65,66,67,68,69,70,0xb5,55,0,0xd2
n06=42,54,58,29,56,0xb8,0xdb,0xdc,0,0,0,0,0,0,0,0
n07=0,0,0,0,0,0,0,0,0,0,0,0,0,0,0,0
25
using cwconfig
cwconfig is a small command line tool to configure various things in the driver, and
cwconfig.ini is its config file - which is also used by the imagetool. Please have a look at
cwconfig.ini for the available options. The cwconfig tool is meant for the autostart drawer of
Windows, so certain settings are loaded without having to open the Imagetool. The
primary use for this tool is to enable the Amiga Mouse HID device for use within windows
itself, you do not need this tool if you only want to use the Imagetool.
26
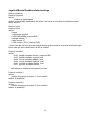
using the Imagetool
After installing the floppy drivers, you can use the Imagetool to read and write Disk
Images.
●
“Read Disk” will prompt for a filename and then create an image of the disk in the
selected drive in the selected image format.
●
“verify Disk” will compare the content of an image with the disk in the drive.
●
“Read Next” is ment for mass transfers, subsequent numbers will be added to the
current filename.
●
“Write Disk” writes an Image to the disk in the drive. The “verify” checkbox lets you
enable (default, highly recommended) or disable automatic verify.
●
“Erase Disk” will erase the disk in the drive completely by writing a high frequency
noise pattern. Use this if you have problems writing to disks that have been
formatted in a different format than you are trying to write (for example when writing
C64 images to MSDOS preformatted disks). Please notice that this button does
NOT format the disk, nor create a filesystem. To do this simply write an empty disk
image to the disk.
●
last not least the abort button will cancel any operation.
27
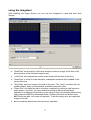
Disk Tab
here you can select which Drive to use, what Format the Disk is in, and what kind of Image
Format should be used.
The detect button will make the Imagetool read a few
Sectors from the Disk in the selected Drive and
present you with a selection of disk formats that might
fit.
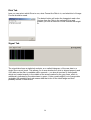
Signal Tab
The signal tab shows a statistical analysis, a so called histogram, of the raw data in a
single (the current) track. This allows you to see whether the drive is aligned properly and
if the data on the disk is readable within seconds – you should see two or three peaks
which are located exactly in the middle of the areas marked by the grey lines, which is
additionally indicated by the data drawn in green. Yellow means slightly out of range data
(probably still readable) and red means data that is far off the ideal range and thus
probably results in read errors.
28
Data Tab
This Tab allows you to preview the data of a given sector in the buffer.
29
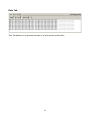
supported disk formats
ID: 24
Atari 800 XL SmartDOS DD 190k
(bin) (read and write)
ID: 23
Atari 800 XL SmartDOS ED 130k
(bin) (read and write)
ID: 16
Commodore 1541 GCR
(g64) (read and write)
ID: 50
HP 4145 HD 300rpm 616k
(bin) (read and write)
ID:
Amiga DD 880k
(adf) (read and write)
ID: 19
Amiga 5.25" DD 880k
(adf) (read and write)
ID:
Amiga HD 1760k
(adf) (read and write)
ID: 22
Apple 2e
(bin) (readonly)
ID: 10
Apple Mac 400k
(bin) (readonly)
ID:
Apple Mac 800k
(bin) (readonly)
ID: 13
Archimedes DD 720k
(bin) (read and write)
ID: 14
Atari ST DD 11sec 913k
(bin) (read and write)
ID: 15
Atari ST HD 22sec 1826k
(bin) (read and write)
ID: 26
Atari Falcon HD 1440k
(bin) (read and write)
ID: 30
Atari 810 90k
(bin) (read and write)
ID: 31
BBC Micro 100k
(bin) (read and write)
ID: 32
Canon AXI 128 16sec 70k
(bin) (read and write)
ID: 41
Casio Sampler FZ-1 1280k
(bin) (read and write)
ID: 16
Commodore 1541,51,70
(d64) (read and write)
ID: 25
Commodore 1541,51,70(40T)
(d64) (read and write)
ID: 33
Commodore 1571
(d71) (read and write)
ID: 47
Commodore 8250,SFD 1001
(d82) (read and write)
ID: 48
Commodore 8050
(d80) (read and write)
ID:
Commodore 1581
(d81) (read and write)
ID: 53
CMD FD-1000
(d81) (read and write)
ID: 54
CMD FD-2000
(d2m) (read and write)
ID: 55
CMD FD-4000
(d2m) (read and write)
ID: 45
HP Logikanalyzer A16500 800k
(bin) (read and write)
ID: 50
HP 4145 616k
(bin) (read and write)
ID: 27
MHS Bootdisk 320k
(bin) (read and write)
ID: 44
Montorfano GE-10 640k
(bin) (read and write)
ID: 42
NEC PC-9801 CNC HD 1248k
(bin) (read and write)
ID: 43
NEC PC-9801 CNC DD 720k
(bin) (read and write)
ID:
2
PC DD MSDOS 720k
(bin) (read and write)
ID:
3
PC HD MSDOS 1440k
(bin) (read and write)
ID: 34
PC DD MSDOS 160k
(bin) (read and write)
ID: 21
PC DD MSDOS 180k
(bin) (read and write)
ID: 46
PC DD MSDOS 320k
(bin) (read and write)
ID: 49
PC DD MSDOS 320k 1024byte sec
(bin) (read and write)
ID: 18
PC DD MSDOS 360k
(bin) (read and write)
ID: 20
PC DD MSDOS 720k
(bin) (read and write)
ID: 17
PC HD MSDOS 1200k
(bin) (read and write)
ID: 11
PC FM 128 16sec 320k
(bin) (read and write)
0
1
9
6
30
ID: 12
PC DD 256 16sec 640k
(bin) (read and write)
ID: 35
RDOS DD 360k
(bin) (read and write)
ID: 28
SAM Coupe Elite DD 800k
(bin) (read and write)
supported image formats
plain
extensions: .bin,.d64,.d71,.d81,.adf,.xfd
This is a plain image of the decoded sectors, in side/track/sector order. This is usually the
preferred method for data recovery, especially when custom tools for extracting
filesystems must be written. Also many emulators of classic computers support this kind of
images, and tools to extract files from those images often exist.
d64 with error information
extensions: .d64
This is an extension of the plain d64 format, which has additional error information
attached to the plain sector data. Use this format for reading C64 disks.
atr
extensions: .atr
This type of image is commonly used by emulators of the classic 8-bit Atari Computers.
request a new format
If you have a disk that is not yet supported by the Catweasel, we will be happy to
implement it in one of the next imagetool updates. For adding a new format, the best
method is to send a sample disk to us. (And, if you can, also create or give us pointers to
an Image of exactly that Disk.) Please make sure that the sample disk is fully formatted by
the target system and does not contain any data from other computers/drives. Ideally, the
disk is new and never used before when you format the disk with your target system.
In many cases, the old computer is not available any more. In such cases, you will need to
send an original disk to us that may contain important data. We cannot guarantee that the
data can be retrieved, and we also cannot guarantee that the disk won't be damaged, as
parcel services tend to take less care for parcels these days. We'll do our best to send the
disk(s) back to you in the same condition as it has reached us.
If you require the disk(s) back, please write your address (both eMail and postal address)
on the disk itself, not just the envelope. This will help us keeping disks and documentation
together when they pass through the different offices and the lab.
Also, please include as much information as possible about the disk format: Name of the
machine, capacity, number of sides and sectors and the operating system of the original
machine. If you have any documentation, please include it with your shipment, or give us
pointers to the documentation on the net. No matter how insignificant the information may
be, anything can be of help: Even schematics of the controller, chip markings, photos or
software (rom dumps) can be of help to the engineer when approaching a new disk format.
31
Any paper documentation should be copies, as it would be a waste of time and postage to
send this back to you.
The service of adding a new disk format to the drivers is free of charge. We do not
guarantee any time frame or the inclusion of a format, as the success in analysis of new
disk formats is not predictable.
choosing media
Although disks with different densities have been interchanged in the past, they do have
differences that affect the data safety:
3.5 inch disks without the HD-hole also have a different magnetic surface that allows
storing information in a different layer of the surface. Please do not drill a hole into DDdisks in order to format them as HD-disks, because the different magnetic surface cannot
store information in the required density. Even if a verify works at first, you will most
probably experience errors with such disks as it gets older.
3.5 inch disks with the HD-hole have a much thinner magnetic surface than DD-disks,
which is geared towards the higher data density. These disks cannot be turned into DDDisks by just putting Scotch tape over the HD-hole, because the drive will try to write the
data to a non-existing magnetic layer with increased head current. Even if a verify works at
first, you will most probably experience errors with such disks as it gets older, or when
trying to read it with a real DD drive.
5,25 inch floppy disks are even more delicate, because they cannot be distinguished by
their casing. Using HD-disks for any lower density format such as C64 or Apple will not
work, because the difference of the magnetic surfaces is even larger than on 3,5 inch
disks. Sometimes the colour of the surface can give hints on the type of magnetic coating:
The darker the colour, the higher the density. However, this is not a reliable indicator, you
should always check any papers that came with the media.
Hub rings
5,25 inch disks were often sold with an added feature called the hub ring. This was only
introduced because a large batch of bad disk drives that was available back in the 80s
would not turn the disks properly. The hub ring must be considered as a workaround for
bad disk drives by a certain vendor that did not apply enough pressure to the centre hub.
Good disk drives do not require the ring. The ring often causes new problems if it is not
applied exactly to the centre of the disk. HD media was never delivered with a hub ring, so
the presence of a hub ring can be considered as an indicator for a DD or an SD disk. This
indicator cannot be used the other way round: The absence of a hub ring is NOT an
indicator for HD media, as later productions of SD and DD media was not geared to badly
produced drives any more.
32
Frequently Asked Questions
●
I am trying to read different disks with the Catweasel installed but not configured
yields apparently normal action with PC formatted disks. However, Amiga disks are
not recognized, and Windows offers to format them.
This sounds like you're trying to access with the explorer through a drive letter. This is not
what the Catweasel offers. The pass-through on the card is only meant for normal PC disk
access with the onboard floppy controller, but if you want to use the special functions of
the Catweasel, you will need to run specialized software like the Imagetool.
The Imagetool is the center of the Catweasel user interface. It lets you generate image
files of disks that contain all data stored on a disk. Such image files can be used in
emulators. The other direction is also possible: If you download an image file from the
internet, you can write it back to a disk and use it in the original machine.
File access to "foreign formats" is NOT what the Catweasel offers. This step must be taken
with emulators or other specialized data recovery software. Real operating systems like
Amiga OS and Linux have very good interfaces for using foreign filesystems like MacFS,
C64, Amiga, DOS (=FAT), but the Windows operating system is stuck with FAT and NTFS
with no real way of installing support for other filesystems.
●
I get a bluescreen in my Windows when I use the Catweasel. Are the drivers faulty?
We are doing in-depth tests with the Catweasel driver before it's released. However, no
software is truly error free, so we're open to bug reports. Before you report a bug
(especially a BSOD), please make sure that all other software that is installed on your
system is working correctly. Please note that many security measures of the operating
system are not working on the low level where the drivers are running, so the Catweasel
driver can potentially be disturbed by another driver in the system, without Windows being
able to detect such a "misbehaviour".
Microsoft has provided a nice little tool for verifying all your system's drivers. In essence, it
fires at all drivers with all kinds of possible and impossible requests that need to be
covered by kernelmode drivers. Read a little about it here:
http://support.microsoft.com/kb/244617/en-us
Also note that many drivers - even Microsoft-signed drivers - don't pass this verifyer. If you
don't use this tool from the very start (and hardly anyone does!), it takes many months to
debug an existing driver. We went this route, so now we're sure that the current driver
does not cause a bluescreen any more.
We're sorry if this looks like a lot of work (it is!), but you need to de-install all drivers that
may cause problems in your system before we can retrieve reliable information from your
setup. Take your time for this process, make sure to have lots of tea and relaxing music :-)
33
●
Does the CatWeasel PCI card work with Windows Vista?
We have reports from customers that it works if configured for 32-bit mode, but since we
don't have any Vista machines here to test, we can't guarantee it.
●
It is not possible to use the sids unless the floppy drivers are installed (latest Acid
64 beta uses FIFO). Why?
That's the cascaded nature of the drivers - the Windows PnP system requires one of the
functionalities of the controller to be the "mother function", which results in the subfunctions not to be started by Windows if the parent function is not started. We have
thought about a solution to this a number of times, but did not get to a viable solution yet.
The technically easiest method is to add a 3rd virtual drive at the user's choice, but we
refrained from doing that, as there are other ideas that look a little nicer to the user.
Anyway, all our ideas (adding a virtual parent function) require substantial re-organization
of the driver(s), and this is something that you should not start unless you're prepared for
weeks of debugging. Please understand that the Catweasel is mainly a floppy controller.
●
How do I access the files within the generated image files?
Due to the vast amount of different filesystems, the catweasel software does not offer
access to foreign filesystems. However, there are many other options such as emulators
and related tools.
FAT formatted images might be accessable through an image mounter even in Windows:
http://chitchat.at.infoseek.co.jp/vmware/vfd.html#beta
http://www.winimage.com/
http://www.acc.umu.se/~bosse/ ("FileDisk")
If you are using linux you can mount images like this (please refer to the linux
documentation on how to enable support for various filesystems):
mount -o loop <image.bin> <mountpoint>
●
Can I use the card in a PCI-X or a PCI-express slot?
Please note that PCI-X and PCI-express are substantially different. PCI-express is not
compatible with the Catweasel MK4plus. PCI-X is backwards-compatible with the
"standard" PCI, where the only requirement is that the card shall support 3.3V PCI
signalling. The Catweasel MK4plus is compatible with the low-voltage signalling on the
PCI bus, so yes, it is compatible with PCI-X slots.
34
●
What additional Hardware and Software do I need to transfer my Amiga Disks to the
PC as .adf files ?
You only need a 1.44MB Disk Drive, preferably one manufacturerd by TEAC. All needed
Software is included. Creation of a .adf images from amiga disks is the job of the
imagetool, which you can also find in the free update archives for the controller.
●
I desperately need a solution to write Amiga disks with my PC, or a working
Workbench 2+ on an Amiga diskette. Can you send me disks or the ADF images?
The Catweasel MK4plus can write Amiga-disks in a normal PC. However, workbenchdisks are still copyrighted, and you can buy them for little money. Our reseller Vesalia
offers Workbench 3.1 disks for a very good price:
http://www.vesalia.de/d_workbench31.htm
35
Developer Information
Developers: Please look in the devel subdirectory of the latest driver package, further
information can be found in the header- and text files placed there.
cwhardware_usr.h – main header file with all lowlevel hardware related defines and
information. Read and use this if you are planning to write your own driver, or software that
uses the hardware directly (on operating systems that let you do that)
catweasl_usr.h – General driver functions
cwfloppy_usr.h – Floppy drive related driver functions
cwjoystick_usr.h – Joystick port related driver functions
cwkeyboard_usr.h – Keyboard related driver functions
SID6581_usr.h – SID related driver functions
removed_ioctls.txt – Describes all obsolete functions that are no more present in the
current driver.
Please understand that, since both the driver and the imagetool are under constant
development, the header files will be updated without notice. You should always use the
most recent ones from the driver package (or equivalent if you are using a different
programming language than C). We also recommend to encapsulate all IOCTLs into a
simple wrapper, so they can be replaced by a common wrapper for both the windows- and
linux driver(s) in the future.
36
known Bugs
Problem: Windows will no more run it's screensaver nor go into a powersaving mode
when the Amiga HID Mouse Driver is active.
Workaround: Disable the corresponding HID devices in the device manager. This will not
prevent programs written for the catweasel to read the mouse status, but only disable the
HID device itself (so you can no more use the mouse in windows itself).
Problem: Arjuna can not access the catweasel drive
Solution: Please update to the latest driver and try again. Please let us know if you still
have problems.
how to report Bugs
As mentioned earlier, we are taking all precautions that any driver release is bug-free. The
one tool that finds most of the bugs is Microsoft's driver verifier, as mentioned earlier.
Before you report any bug, please make sure that your system works fine without the
Catweasel driver installed, but with the driver verifier running and all options enabled. We
have found that the majority of drivers offered with other products (even those that are
signed by Microsoft!) do not pass this driver verifier.
A hardware driver is running on a very low level of the operating system, where many
safety measures of the OS cannot work. As a result, a faulty driver can work fine for
months, but if you add anything to the installation, the faulty driver harms proper function
of the newly installed driver. This leads to misunderstandings, as it seems like the newly
installed driver is at fault, but in reality, an older driver that has been sitting in your system
for a long time is the cause.
Therefore, we're kindly asking to make sure that your system runs fine with the driver
verifier running and all options enabled. This will help you finding the real cause of a
possible problem. It took us quite a while to find a computer setup with all-errorfree drivers
that we can develop on, but the stability of the system is a very nice return on your efforts,
so we highly recommend to go this route. Those of you who have been complaining about
Windows a lot, will probably get back the fun of computing, even with a Windows system!
Software- and even more driver-development for an operating system like Windows is a
tedious and errorphrone process that, besides other things, requires a lot of testing and
debugging. Please understand that while we are doing our best to make our Software as
error free as possible, it is impossible for us to test and/or debug it on every possible
configuration and combination of hard- and software. This paragraph was written to make
it easier for our Customers to report, and for us to fix problems that might occur. Please
understand that reporting "it does not work" or "it crashes my Computer" is not helpful at
all. Keeping some simple rules in mind will save both of us time that can be spent on
actual programming rather than further requests.
37
Information that we need (bug reports without this info can not be processed in any useful
way):
●
General description of your setup, meaning
●
what operating system do you use, including service packs, patch level and
whatever else you feel could be useful info.
●
what hardware do you use, especially motherboard and other extension
cards.
●
what other drivers are installed
●
what catweasel revision are you using, and how exactly is it configured (are
SIDs installed? how many drives are connected, and which kind and brand?
did you connect the on-board pass through cable? are you using an amiga
keyboard or mouse with it?)
●
If you are experiencing crashes (aka the "blue screen of death") Please write down
exactly what is printed on the Blue screen, even if the Info might seem cryptic and
useless it might contain some useful hints on where exactly the problem originates
from.
●
Please try to explain in every possible detail, step by step, what you did to make the
problem occur. Try to replicate it starting with a clean reboot and the least possible
amount of different actions. It is very important for us to be able to replicate the
problem you have. If we can't, its close to impossible for us to find out how to fix it.
further things you can do to help (usually we can handle these internally):
●
install other/older releases of the driver and see if the problem remains. If you
experience problems with the most recent release that do not show in an earlier
release, try to find the most recent version that does not show the problem and tell
us which version that is. If you are using a public beta release of the drivers, also
test the most recent stable release.
●
uninstall all drivers that you don't need to operate your computer, and remove all
hardware that isn't needed for basic operation and usage of the catweasel. We are
aware of the fact that not everyone is willing (or even able) to do this, but it could
however help to locate conflicts with other hard- or software. Since this is a rather
radical step, we will ask you to do it as a last resort when we think it might be
helpful. In other words, don't do it unless asked for, or if you are ripping apart your
pc regularly anyway :)
●
install a kernel debugger (available at the Microsoft website for free,
http://www.microsoft.com/whdc/devtools/debugging/installx86.mspx) locally, or if
you have a second pc and a null modem cable handy remotely, request a debug
build of the driver and send us the log file of the debug messages. Since this step
requires a certain technical understanding and effort on your side and isn't trivially
explained unless you are a software developer familiar with these tools, don't
consider doing it. Again, if we feel we are unable to fix a problem reported by you
without additional info gathered in a debug session, we will contact you.
38
3rd Party Software
We're currently aware of these projects that make use of the Catweasel Controller:
●
●
●
Acid 64 (http://www.acid64.com) - SID player
Arjuna (http://arjuna.sourceforge.net/) - Transfer Software
Linux drivers for floppy, keyboard, joysticks and SID
●
cwfloppy (http://www.soundtracker.org/raw/cwfloppy/index.html) – a block
device driver
●
cw (http://www.unusedino.de/cw/) - a floppy driver
●
CatWeasel (http://llg.cubic.org/cw/) - SID, Joystick and Amiga Keyboard
driver
●
hardsid (http://hardsid.sourceforge.net/) - SID driver
●
hardsid-catweasel
(http://www.bel.fi/~alankila/blog/2005/12/30/HardSIDCatweasel%200.01.html) – another SID driver
●
Amiga OS 4 native PPC-drivers (http://www.os4depot.net/?
function=showfile&file=driver/storage/cwfloppy.lha)
●
AROS drivers (http://www.aros.org)
●
Mac OS X drivers for floppy, joysticks and SID (
http://sourceforge.net/projects/catweasel-osx/ )
●
VICE (http://www.viceteam.org/) - Commodore 64 Emulator
●
Micro64 (http://micro64.de/) - Commodore 64 Emulator
●
UAE (http://www.winuae.net/) - Amiga Emulator
●
Goattracker (http://cadaver.homeftp.net/) - SID Tracker
●
cw2dmk (http://www.tim-mann.org/catweasel.html) – Transfer Software
Please understand that we are not responsible for proper function of the above software. If
you experience problems, please contact the respective authors first. We're always glad to
help, but please understand that some things go way beyond the scope of our product
support.
If you know of more/other projects which are not listed here, please let us know!
39
Technical Data
Subject to change without notice.
Floppy controller part:
– up to two drives at a time
– shugart standard, driver sink current max. 80mA per line
– pass-through for standard floppy controller
– 128KBytes buffer memory
– variable data rate between 0.1 kBits/Sec and 7 Mbits/Sec
– software controllable low-level codecs for FM, MFM, GCR, bit-stuffing and vendorproprietary codecs.
– Support for soft- and hard-sectored disks, read and write
– Support for variable-speed disk formats in fixed-speed drives
Audio part:
– up to two SID chips, any combination of 6581, 6582 or 8580.
– internal audio connector AMP 4-pin standard, raster 2,54mm, pinout LGGR.
– External audio connector 3.5mm stereo jack, lime green
– mono jumper
– SID clock selectable 0,985MHz or 1,023MHz (identical for both chips)
– voltage individually selectable: 9V or 12V
– LC-filtered DC-DC converter for high 9/12V voltage
– selectable filter capacitors: 470pF or 22000pF
HID part:
– compatible with Amiga-standard keyboards, glitch-tolerant serial interface
– up to two digital joysticks following the Atari-standard (two-axis, max. 3 buttons)
– Quadrature-mouse support with hardware-counters selectable for Amiga or Atari pinout
– paddle support with SID chip(s) installed
Printed circuit board:
– 4-layer multilayer board
– white silkscreen print
– two black solderstop layers
– size 138.13 x 93.9 mm
– number of drills: 487
– number of drill diameters: 5
– hard gold surface connector, gold area: 438 mm²
electrical/digital
– single 5V voltage input
– local generation of 3.3V IO-voltage, 2.5V core voltage , 9V and 12V audio voltages
– re-configurable FPGA design, 1728 logic cells (up to 119000 system gates)
– dual-voltage PCI bridge, 8-bit wide local interfacing
– circuit power consumption <2.5W plus SID and HID power
40
Last Words
If you have questions or suggestions, please use the email form on our website
http://www.icomp.de. Please make sure that you're specifying a valid email address,
otherwise we can't answer! We usually answer all email requests within 48 hours on
regular working days. If you don't get an answer, please check your spam filter, as our
answer might have been marked as unwanted eMail (so-called false-positive).
Credits
The Catweasel hardware would be nothing without many programmers and contributors
who have helped since 1996 to make it a working product. Although it's Jens Schönfeld
who has developed all the different versions of the Catweasel hardware, the fame for this
product belongs to everyone who contributed. The names have no special order:
Achim Dahlhoff, Tobias Haustein, Tim Mann, Tobias Korbmacher, Helmut Schöttner,
Daniel Frey, Thomas Lewandowski, Thorsten Schaaps, Stephan Kanthak, Michael König,
Dr. Colin Hirsch, Michael Krause, John Selck, Christian Bauer, Martin Korndörfer, Holger
Schupp, Chris Hülsbeck, Dierk Ohlerich, Jeremy Moskowitz, Tobias Seiler, Alan
Redhouse, Oliver Achten, and last not least, Vera Henkelmann.
41
Fine print
The Catweasel line of controllers is not designed, authorized or warranted to be suitable
for use in life-support devices or systems or other critical operations. Inclusion of the
product in such applications is understood to be fully at the customer's risk.
Names and other trademarks referred to within this manual are the property of their
respective trademark holders. None of these trademark holders are affiliated with
Individual Computers.
Windows® is a registered trademark of Microsoft Corporation in the United States and/or
other countries.
For updates and further information visit http://www.icomp.de
Individual Computers Jens Schönfeld GmbH
Im Zemmer 6
52152 Woffelsbach
Germany
42
good hardware for good computers.