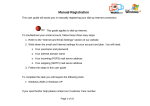
1
How do I configure my iPhone in order to access the Internet and read my e-mails?
Note: There are 2 ways of connecting to the Internet:
Via the mobile telephony 3G network: national coverage of the Proximus network;
Via the Wi-Fi network: wireless connection to a local network, therefore coverage is
often limited to a building or neighborhood. Your mobile must of course be equipped
with Wi-Fi (see the user's guide of the iPhone).
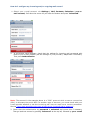
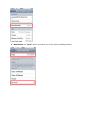
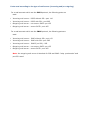
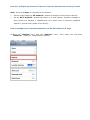
How to configure your Internet connection via the 3G network in 3 steps
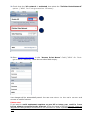
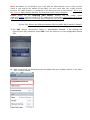
1. Select the "Settings" icon, then the "General" menu. Then select the sub-menu
"Network" ("Edge" for first-generation iPhones).
2. Check that the 3G network is activated, then select the "Cellular Data Network"
o p t i o n ( " A P N " f o r f i r s t - g e n e r a t i o n i P h o n e s ):
a
b
3. Enter internet.proximus.be in the "Access Point Name" field ( " A P N " f o r f i r s t g e n e r a t i o n i P h o n e s ). Leave the two other fields empty.
Your changes will be automatically saved. You can now re turn to the main screen and
connect to mobile Internet.
Please note!
If you want to avoid unpleasant surprises on your bill and stop y o u r m o b i l e f r o m
b e i n g always connected to the Internet, follow the steps in the FAQ "How do I stop my
iPhone from being always connected to the Internet to avoid unpleasant surprises on my
bill?"
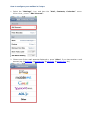
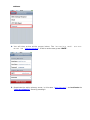
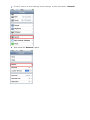
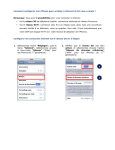
How to configure your mailbox in 5 steps
1
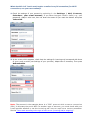
Select the "Settings", icon, and then the "Mail, Contacts, Calendar" menu.
A f t e r t h a t , p r e s s " A d d Account":
2
Choose one of the e-mail accounts displayed or press "Other" if you have another e-mail
account (e.g. @skynet.be; @proximus.be; @telenet.be, @hotmail.com, etc.)
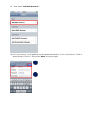
3. Then select "Add Mail Account":
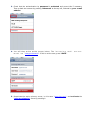
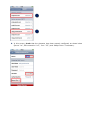
4. Fill in your name, e-mail address and the password linked to it. The "Description" field is
automatically filled in. Then press "Save" at the top right.
b
a
5. If the account is valid (after an automatic check of the most popular e-mail accounts),
the following screen will appear, with the account you created. Your e-mail is now
configured on your iPhone. If this is not the case, go to step 6:
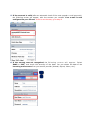
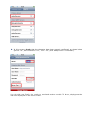
6. If the account was not recognized, the f o l l o w i n g s c r e e n w i l l a p p e a r . Select
IMAP or POP 1 and check the accuracy of the data. You can obtain the data of the
incoming mail servers from your service provider (Hotmail, Skynet, Yahoo, etc.).
b
Note: We advise you to configure your e-mail with the IMAP protocol if your e-mail provider
allows it (see note at the bottom of the page). For this, check with your e-mail provider
whether the IMAP protocol is activated in the options of your e-mail account. H e r e a r e
t h e m a i n e-mail providers and their incoming mail server name in Belgium.
Please note! For the outgoing mail server, always use the server name
"relay.proximus.be" with the server port "25". Adapt them if necessary. (See steps 4 to 6 of the
FAQ "How do I configure my incoming and/or outgoing mail server?) Then press Save.
1
See the FAQ "What's the difference between POP and IMAP? Which should I choose?"
7. The SSL (secure connection) option is automatically selected. If the settings are
incorrect with SSL activated, press YES if you are asked to try the configuration without
SSL:
8.
After a new check, the following screen will appear with your mailbox added if the data
was correctly entered:
What should I do if I can't send/receive e-mails via my 3G connection (for Wi-Fi
connections, see your user manual)?
1. Check the settings of your account by selecting it via Settings / Mail, Contacts,
Calendars / your e-mail account). If you have c h a n g e d c e r t a i n d a t a ( e . g . your
password), adapt it also here, then roll down the screen till you reach the bottom and press
"Advanced".
2. In the screen which appears, check that the settings for incoming mail correspond with those
of your e-mail provider (see settings of your provider). Adapt them if necessary. Then press
Authentication.
Note: The account in the example above is a "POP" account with a secu re conn ection
(SSL). In this case, the port is 995. For another type of account, you must check with your
e-mail provider whether or not the i n com i n g m ai l serv e r r eq u i r e s a s ecu r e connection.
See the "Ports used according to the type of mail server (incoming and/or outgoing)".
3. Check that the authentication by password is activated and correct this if necessary.
Then go back two screens by pressing "Advanced" at the top left, followed by your e-mail
address.
4. You will then arrive at the screen below. The i n c o m i n g m a i l
m u s t b e "relay.proximus.be". If this is not the case, press "SMTP".
server
5. Deactivate the active primary server, in this case "smtp.live.com", and activate the
"relay.proximus.be" server by pressing it.
6. In this screen, check that the elements have been properly configured, as shown below
(Server “on”, SSL connection “off”, Port "25") and adapt th em if necessary.
You sh ou l d n ow fi n all y b e read y t o send and receive e-mails. To do so, simply press the
mail icon displayed on the main screen.
a
b
How do I configure my incoming and/or outgoing mail server?
1. Select your e-mail account via Settings / Mail, Contacts, Calendars / your email account). Roll down the screen till you reach the bottom and press "Advanced".
2.
In the screen which appears, check that the settings for incoming mail correspond with
those of your e-mail provider (see the settings of your provider). Adapt them if necessary.
Then press Authentication.
Note: The account in the example above is a "POP" account with a secu re conn ection
(SSL). In this case, the port is 995. For another type of account, you must check with your
e-mail provider whether or not the i n com i n g m ai l serv e r r eq u i r e s a s ecu r e connection.
See the "Ports used according to the type of mail server (incoming and/or outgoing)".
3
Check that the authentication by password is activated and correct this if necessary.
Then go back two screens by pressing "Advanced" at the top left, followed by your e-mail
address.
4. You will then arrive at the screen below. The i n c o m i n g m a i l
m u s t b e "relay.proximus.be". If this is not the case, press "SMTP".
server
5. Deactivate the active primary server, in this case "smtp.live.com", and activate the
"relay.proximus.be" server by pressing it.
6. In this screen, check that the elements have been properly configured, as shown below
(Server "on", SSL connection "off", Port "25") and adapt th em if necessary.
a
b
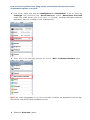
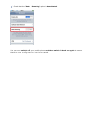
How do I stop my iPhone from being always connected to the Internet to avoid
unpleasant surprises on my bill?
First of all, make sure that the Notifications are deactivated. To do so, press the
"Settings" icon, a n d t h e n t h e " N o t i f i c a t i o n s " m e n u . Deactivate the Push
mode (this mode al l ow s y o u t o b e s e n t , o r "pushed", the latest information about an
application, even if it is closed, on your mobile phone).
Then, still in the setting s op tion s, g o t o th e "Mai l , Contacts, Calendars" menu.
Note: this menu only appears i f you h a v e al r ea d y i n st al l ed an application from the App
Store which uses APPLE's Push notification service.
Select the "New data" option.
a
b
Deactivate the "Push" option and select one of the options displayed below.
To end, retu rn to th e set tin g s m enu an d g o t o th e sub -m enu "General".
Then select the "Network" option.
Check that the "Data
Roaming" option is deactivated.
You can now switch off your mobile phone and then switch it back on again to ensure
that t h e n e w c o n f i g u r a t i o n h a s b e e n saved.
What is the difference between POP and IMAP? Which should I choose?
The POP and IMAP protocols are access protocols which allow you to access your mailbox
via an e-mail client (e.g. Webmail, Outlook, Thunderbird, your mobile, etc.).
The POP protocol connects to your mail server (Hotmail, Gmail, Yahoo, Telenet, etc.) and
looks for messages to send to your mobile or PC. The messages are then erased from the
server, unless you activated the option with your e-mail provider which allows you to keep a copy
of the messages on the server.
The POP protocol is therefore useful if you access your messages from a single point, i.e.
your PC or mobile phone.
The IMAP protocol gives you an overview of the messages on the server and synchronizes
with the server all the actions you carry out on your messages via your mobile phone. It is
therefore more effective if you access your mailbox from different peripheral devices.
If you check your e-mails at work, on your mobile, then again at home, the IMAP protocol
guarantees that all messages are accessible from any peripheral device, at any time. As with
the POP protocol, you have to activate the IMAP in the configuration of your mailbox on the
server. This protocol leaves all your messages on the server and synchronizes all your actions.
For example, if you move a message to another file in your mailbox, the synchronization with
the server is done in real time. If you delete a message, it will also be deleted on the server,
and so on.
We advise you to use the IMAP protocol to configure your mailbox with an Internet on
GSM Comfort subscription (you already have an Internet on GSM Comfort subscription
at €10/month, for 100 MB of download volume, which should be more than enough for
normal usage).
Ports used according to the type of mail server (incoming and/or outgoing)
For e-mail accounts which use the POP3 protocol, the following ports are
used:
Incoming mail server - POP3 without SSL: port 110
Incoming mail server - POP3 with SSL: port 995
Outgoing mail server - non-secure SMTP: port 25
Outgoing mail server - secure SMTP: port 465
For e-mail accounts which use the IMAP protocol, the following ports are
used:
Incoming mail server - IMAP without SSL: port 143
Incoming mail server - IMAP with SSL: port 585
Incoming mail server - IMAPS (on SSL): 993
Outgoing mail server - non-secure SMTP: port 25
Outgoing mail server - secure SMTP: port 465
Note: the outgoing mail server is identical for POP and IMAP: "relay. proximus.be" and
port 25 is used.