1
Viewmaster
™
80
User's Manual
A DIVISION OF AE RESEARCH CORPORATION
v4.4
Applied Engineering
Telephone Numbers
Technical Support
(214) 241-6069
9 AM to 12:30 PM & 1:35 to 5 PM (CST)
Monday through Friday
Do not return any
product for service without a
Retum Material Authorization (RMA) number.
An RMA number can be obtained by calling Technical Support.
Sales
(214) 241-6060
9 AM to ll PM (CST) 7 days
Viewmaster
™
80
User's Manual
Federal Communications Commission
Radio Frequency Interference Statement
The equipment described in this manual generates and uses radio frequency energy. If it is not
installed and used properly, that is, in strict accordance with these instructions, it may cause
interference to radio or television reception.
FCC I.D. Number: EYW5QGVIEWMASTER
This equipment has been type tested and found to comply with the limits for a Class B computing
device in accordance with the specifications in Subpart I of Part 15 of the FCC Rules. These rules
are designed to provide reasonable protection against radio and television interference in residential
installation.
However, there is no guarantee that interference will not occur in a particular installation. If this
equipment does cause interference to radio or television equipment off and on, the user is
encouraged to try to correct the interference by one or more of the following measures:
Reposition the receiver's antenna. Also make sure the antenna
wires are making good electrical contact.
Use a roof-mounted antenna rather than a "rabbit-ear" antenna
❏
or an antenna mounted in the attic.
Make sure that all electrical connections on the computer are
❏
secure and any shielded I/O cables are properly fastened.
Move the computer away from the receiver.
❏
Plug the computer and receiver into separate electrical circuits.
❏
If necessary, the user should consult the dealer or an experienced radio/television technician for
additional suggestions. The user may find the following booklet prepared by the Federal
Communications Commission helpful:
❏
"How to Identify and Solve Radio-TV Interference Problems"
This booklet is available from the U.S. Govemment Printing Office, Washington, D.C, 240402,
Stock No. 004-000-00345-4.
Warning: This equipment has been certified to comply with the limits for
Class B computing device, pursuant to Subpart J of Part 15 of FCC Rules.
Only peripherals (computer input/output devices, terminals, printers, etc.)
certified to comply with the Class B limits may be attached to this
computer. Operation with non-certified peripherals is likely to result in
interference to radio and TV reception.
Applied Engineering® is not responsible for any radio or television interference caused by
unauthorized modifications to this equipment. It is the responsibility of the user to correct such
interference.
Limited Warranty & Disclaimer
Applied Engineering warrants the Viewmaster card against defects in material and workmanship for a period of 5 years
from the date of original retail purchase. Applied Engineering also warrants that, under normal use, the magnetic media
on which the included Æ software is stored is free from defects in materials and workmanship for a period of 30 days
from the date of original purchase. Any misuse, abuse, or non authorized alteration, modification and/or repair to the
Applied Engineering product will void the warranty. This warranty will also be void if you use the IE product for any other
purpose than its intended use. If you discover a defect, Applied Engineering will, at its option, repair or replace only the
Applied Engineering product, provided you return the product during the warranty period, transportation prepaid, to
Applied Engineering.
This warranty applies to the original retail purchaser only, Therefore, please include a copy of the original invoice or
a small service charge may be applied. lf the product is to be sent to Applied Engineering by mail, the purchaser will
insure the package or assume full responsibility for loss or damage during shipping. Prior to returning the product for
warranty consideration, call Applied Engineering Technical Support for a Return Material Authorization (RMA) number
and shipping instructions.
Even though Applied Engineering has tested the software and reviewed the documentation, Applied Engineering makes
no warranty or representation, either express or implied, with respect to the manual or the software; their quality,
performance, merchantability, or fitness for a particular purpose. As a result, the software and manual are sold "as is",
and you, the purchaser, are assuming the entire risk as to their quality and performance.
ln no event will Applied Engineering be liable for loss or damages of any kind caused either directly or indirectly by the
use or possession of its products, even if advised of the possibility of such damages. The Applied Engineering Warranty
is for the Applied Engineering Product itself. In particular, Applied Engineering shall have no liability for any other
equipment used in conjunction with Applied Engineering products nor for programs or data stored in or used with Applied
Engineering products, including the costs of recovering such equipment, programs, or data.
The warranty and remedies set forth above are exclusive and in lieu of all others, oral or written, express or implied. No
Applied Engineering dealer, agent, or employee is authorized to make any modification, extension, or addition to this
warranty.
Some states do not allow the exclusion or limitation of implied warranties or liability for incidental or consequential
damages, so the above limitation or exclusion may not apply to you. This warranty gives you specific legal rights, and
you may also have other rights which may vary from state to state.
This manual and the software (computer programs) described herein are copyrighted by Applied Engineering with all
rights reserved. Under the copyright laws, this manual or the programs may not be copied, in whole or in part, without the
written consent of Applied Engineering, except in the normal use of the software or to make an archival copy. This
exception does not allow copies to be made for others, whether or not sold, but all of the materials purchased(with all
archive copies) may be sold, loaned, or given to another person. Under the law, copying includes translating into another
language or format. You may use this software on any computer owned by you but extra copies cannot be made for this
purpose.
Applied Engineering cannot guarantee that you will receive notice of revisions to the software, documentation, or
products described in this manual. Be sure to check with your dealer or Applied Engineering for information on possible
updates. However, Applied Engineering reserves the right to make any improvements to Applied Engineering products
without any responsibility toward upgrading previously released products.
Apple is a registered trademark of Apple Computer, Inc. AppleWorks, AppleWriter, DOS 3.3, and ProDOS are trademarks
of Apple Computer, Inc.
Applied Engineering is a registered trademark of Applied Engineering. Viewmaster, Viewmaster 80, Z-80 Plus, and AW 2
Expander are trademarks of Applied Engineering.
Franklin Ace is a registered trademark of Franklin Computer Corporation. CP/M is a registered trademark of Digital
Research, Inc. Videoterm is a trademark of Videx, inc. Microsoft and Softcard are trademarks of Microsoft Corporation.
Radio Shack is a registered trademank of Tandy Corporation.
©Copyright 1988, Applied Engineering
Applied Engineering
P.O. Box 5100
Carrollton, Texas 75011
Sales: (214) 241-6060 9 AM - 11 PM (CST) 7 days
Technical Support: (214) 241-6069 9 AM - 12:30 & 1:35 - 5 PM (CST) Monday - Friday
(The Technical Support telephone lines cannot be accessed through the Sales department.)
Table Of Contents
INTRODUCTION - GETTING STARTED
iii
iii
iii
About the Viewmaster 80
System Requirements
CHAPTER ONE - INSTALLING THE VIEWMASTER 80
1
CHAPTER TWO - USING THE VIEWMASTER 80
3
3
4
4
5
5
5
6
Adjusting the Video Screen
Software Compatibility
In General...
CP/M Software
Pascal Software
Hardware Compatibility
What’s Next...
CHAPTER THREE - SPECIAL KEYBOARD CHARACTERS
7
7
8
8
Alternate Keyboard Characters
Lowercase Characters
Optional Shift Key Hardware Modification
APPENDICES
10
11
13
15
15
15
16
17
19
19
20
21
21
22
A: Video Troubleshooting Guide
B: Automatic Graphics Override
C: For Programmers Only...
Activating the Viewmaster 80 from BASIC
Screen Editing Commands
Controlling the Display from Applesoft BASIC
Display Control Commands
Cursor Positioning
Custom Cursor Shape
Viewmaster 80 Graphics Display
Hardware Control of Viewmaster 80
40 Column Override
Light Pen Support
Table of Contents
i
ii
D: A Brief ProDOS Tutorial
Operating System
Naming Volumes
Root Directory and Subdirectory
Pathname
System Files
Additional Resources
E: Getting Help
Returning a Product
Include
When You Ship
When We Receive
ViewMaster 80
23
23
23
23
24
24
25
26
27
27
28
28
INTRODUCTION
Getting Started
This chapter tells you a little about the Viewmaster 80™ and what
you need to install it.
About the Viewmaster 80
The best way to describe the Viewmaster 80 is to list some of its
many features:
-
Super sharp 7 x 9 dot character matrix with true descenders
-
Capable of both normal and inverse video character display
Full 80 columns by 24 lines
Fully compatible with all Apple® programming languages
-
Highest compatibility with existing 80 column software
Power and input connector for light pen
-
Programmable cursor shape
All Apple II on-screen editing commands supported
Fully Videoterm™ compatible
-
Compatible with both 60 and 50 Hertz power
Very low power consumption (CMOS technology)
-
High speed scroll rate (18 MegaHertz)
Compatible with Apple ][, ][ Plus and Franklin Ace® computers
System Requirements
Here’s what you need to install your Viewmaster 80:
-
An Apple ][, Apple ][ Plus or Franklin Ace (1000 series)
computer
-
At least one disk drive
A composite video monitor capable of 80 column display (NTSC
composite video).
Intro. - Getting Started
iii
Most monochromatic computer monitors are capable of 80 column
display. Most TV sets, on the other hand, are not. Televisions are only
acceptable for programs which use a 40 column display. The
narrower 80 column characters tend to blur and are very difficult to
read when displayed on a TV screen.
iv
ViewMaster 80
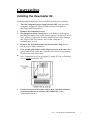
CHAPTER ONE
Installing the Viewmaster 80
Nothing complicated here. Just read these instructions carefully.
1.
2.
Turn the computer power supply switch OFF, but leave the
computer plugged in (This provides an electrical path to
discharge static electricity).
Remove the computer's cover.
3.
Discharge any static electricity on your body or clothing by
touching the metal case of the power supply. Go ahead, it won't
hurt. And it is important! A static shock can seriously damage
the chips on the Viewmaster and on the computer’s
motherboard as well.
4.
Remove the Viewmaster 80 from its anti-static bag. Do not
touch its gold edge connector.
Line up the gold fingers of the edge connector with slot 3 then
gently and firmly insert the connector into the slot by pressing
down on the top of the card.
5.
❖
Note: Expansion slot 3 in an Apple ][, Apple ][ Plus, or Franklin
Ace is fourth from the LEFT.
6.
Connect one end of the short video cable, included with the
Viewmaster 80, to the bottom video connector on the
Viewmaster 80 card.
Ch. 1 - Installing the ViewMaster 80
1
7.
8.
9.
Route this cable out the back of the computer and connect the
other end to the computer's video output connector.
Connect the video cable coming from your monitor to the top
video connector on the Viewmaster 80 card.
Replace the cover.
10. Congratulations! Installation is complete.
2
ViewMaster 80
CHAPTER TWO
Using the Viewmaster
Adjusting the Video Screen
Once the Viewmaster 80 is installed in your computer, the monitor
may need to be readjusted to provide the optimum 80 and 40 column
displays.
Although many of the adjustments and controls are different on the
various brands of monitors, they all basically do the same things.
Read the owner's manual that came with your monitor to find out
how to adjust the video display. If you're not sure what a particular
adjustment knob adjusts, experiment. Turn it slightly in one
direction. If it doesn't adjust what you want it to, return it to its
original position. Adjusting a monitor is similar to adjusting a
television set. But don’t just start twisting knobs!
Here’s basically what you need to do:
1.
2.
3.
Turn the computer on. Boot your system disk. You should be in
40 column mode.
Perform the 40 column video adjustments (Brightness, Contrast,
Focus, Vertical, and Horizontal adjustments).
Adjust the brightness, contrast, and focus controls (if available)
so that the characters are legible and clear and the background is
dark. Too much brightness may cause the background "raster"
lines to appear. Too much contrast or brightness may cause fuzzy
characters. Too little contrast or brightness may result in dim
characters.
Use the horizontal controls to adjust the width of the display.
Then use the vertical controls to adjust the height of the display.
While still in 40 column mode, enter the following video display
program:
10
20
30
40
50
60
70
PRINT CHR$(12)
FOR J = 32 TO 127
PRINT CHR$(J);
NEXT J
C = C + 1
IF C = 17 THEN END
GOTO 20
Ch. 2 - Using the ViewMaster 80
3
4.
Activate the 80 column mode and tune the 80 column video
display.
Activate the 80 column mode by entering PR#3 and pressing
Return. Type RUN to execute the video display program. The
screen should fill with characters.
lf necessary, readjust the display controls as you did for the 40
column mode in step 2.
5. Switch back to 40 column mode and recheck video alignment.
Enter Control-Z and then 1 (Press the Z key while holding down
the CTRL key then press 1). This is the command to deactivate
the 80 column mode and return to 40 column display (The @
symbols on the screen are normal). RUN the program again. You
may need to repeat steps 4 and 5 until the video display is
acceptable in both 40 and 80 column modes.
Something not right? See the Video Troubleshooting Guide in
Appendix A.
Software Compatibility
In General...
The Viewmaster 80 will support virtually all 80 column application
software written for the Apple ][ or ][ Plus. Most software written
specifically for 80 column display will usually activate the 80 column
mode automatically or give you a menu option to select either 40 or
80 column display. Some earlier programs, however, were written
before there was an established standard for interfacing with 80
column display cards. These programs may require a "preboot"
program to activate the Viewmaster 80 and make the necessary
modifications to enable the software to use the 80 column display.
Older versions of AppleWriter ][ and VisiCalc are examples of
programs which may require a preboot disk to work properly with
the Viewmaster 80 (or any 80 column card). Usually the publisher of
the software will provide the preboot program or an updated
program which will support the Viewmaster 80. Many useful
programs for making earlier 40 column software compatible with 80
column cards are available in the public domain. Please check with
the software publisher, your dealer, or local Apple user's group about
preboot utilities or updates.
4
ViewMaster 80
❖
Note: Most 40 column software does not automatically
deactivate an 80 column card. If you try to run a 40 column
program while the Viewmaster 80 is in 80 column mode, nothing
will appear on the screen. Use the "Control-Z 1" command to
deactivate the 80 column mode or boot your program disk using
the computer's power switch.
CP/M® Software
Booting the CP/M operating system automatically initializes the
Viewmaster 80. The Viewmaster 80 is compatible with both the
Applied Engineering® Z-80 Plus™ card and the Microsoft®
Softcard™. Other Z-80 processor cards which use a non-standard
version of the CP/M operating system may not be completely
compatible with Viewmaster 80.
Pascal Software
The Viewmaster 80 is fully compatible with Pascal and is
automatically initialized whenever the Pascal operating system is
booted.
The Escape codes used to generate the alternate characters not
available on the Apple ][ Plus keyboard (described in Chapter 3 )
may interfere with Pascal. To overcome this, Applied Engineering
has developed an enhanced console driver utility to enable the
alternate characters to be entered from the Apple ][ Plus keyboard
without conflicting with Pascal in any way. The Pascal Enhanced
Console Driver utility disk is available from Applied Engineering
Sales. The instructions are contained in a Pascal text file on the disk.
Hardware Compatibility
The Viewmaster 80 was designed to provide Apple ][ and Apple
][ Plus computers with 80 column display capability.
Most video monitors are compatible with Viewmaster 80’s video
output. A very small percentage of monitors may exhibit an
annoying flickering when the 80 column display is active. The Apple
Monitor ///, originally designed for the Apple /// computer, is one
of these monitors. The screen flickering can be eliminated by the
substitution of one of the ROM (Read Only Memory) chips on the
Viewmaster 80 card. Please refer to Appendix A for details.
Ch. 2 - Using the ViewMaster 80
5
What's Next...
Now that you have successfully installed the Viewmaster 80 and
adjusted the monitor to provide the optimum display in both 40 and
80 column modes, what you do next depends on how you wish to
use your Viewmaster 80.
If you wish to modify AppleWorks to run on your Apple ][ Plus, refer
to the AW 2 Expander Instructions manual.
Regardless of how you intend to use your Viewmaster 80, read
Chapter 3. It covers some very important information about using
Viewmaster 80's special characters.
6
ViewMaster 80
CHAPTER THREE
Special Keyboard Characters
Many of the programs written for the Apple //e and //c use
features not available on a standard Apple II Plus. This chapter deals
with some of the differences between the earlier and the more recent
Apple computers and how the Viewmaster 80 can emulate many of
the display features of the //e and //c.
Alternate Keyboard Characters
The Apple ][ and Apple ][ Plus do not have many of the special
character keys available on the Apple //e keyboard. The AW 2
Expander Instructions list some substitute keys you can use within
AppleWorks. Some of these same keys can be used in other
applications. The Viewmaster 80 is internally programmed to
recognize certain unique keyboard command sequences, enabling it
to display these special characters on the screen. The chart, below,
shows the Apple //e keyboard characters and their equivalent Apple
Il keystroke sequence. Since these characters are stored in Read Only
Memory (ROM) on the Viewmaster 80 card, they are only available
when the Viewmaster 80 is active (80 column mode).
Apple //e Keyboard Apple ll Plus Equivalent
Tab
Cursor Up
Cursor Down
Delete
|
_
\
[
]
{
}
Control-I
Control-K
Control-]
Esc #
Esc !
Esc Esc /
Esc <
Esc >
Esc (
Esc )
You can get a reverse apostrophe by typing Esc ' (apostrophe). There
is no reverse apostrophe on an Apple //e.
Ch. 3 - Special Keyboard Characters
7
Lowercase Characters
When Viewmaster 80 is activated with a PR#3 from BASIC, it
automatically enters uppercase mode. To toggle this shift lock feature
between uppercase and lowercase, use Control-A (Press the A key
while holding the CTRL key down). For this feature to work within a
commercial application program, the program must support this
lowercase display feature. Some application programs (e.g.
AppleWriter ][) use a different method to support upper and
lowercase character display.
Optional Shift Key Hardware Modification
This is an easy to install, one-wire modification for the Apple ][ Plus
which will enable you to use the lowercase feature of Viewmaster 80
and use the Shift key as a real shift key. If you are running an
Applesoft BASIC program or AppleWorks, this relieves you of
toggling Control-A every time you wish to change case (Control-A
will still function as a shift-lock).
No cutting or soldering is required. The only part needed is readily
available at your local Radio Shack® store. It is called a "Mini Clip
Lead" and the part number is 278-016.
This modification requires a newer style keyboard used on revision 7
or later Apple ][ Plus computers. Contact your authorized Apple
dealer for an upgrade to the latest revision main logic board &
keyboard.
Here’s how to apply the shift key modification to an Apple ][ Plus:
8
1.
Turn the computer OFF and remove the cover.
2.
Attach one of the lead's spring loaded clips to pin 1 of the
74LS251 integrated circuit "chip, " which is just forward of the
Game I/O connector (toward the keyboard). See drawing
following.
3.
Connect the other end of the mini clip wire to pin 24 of the
keyboard encoder connector. This connector is a row of 25
parallel wires extending between the keyboard and the keyboard
encoder circuit card suspended below it. Pin 1 of this connector
is nearest the power supply; pin 25 is nearest the right side of the
computer (...pin 24 is second from the right).
4.
Replace the cover; installation is complete.
ViewMaster 80
Ch. 3 - Special Keyboard Characters
9
APPENDICES
The following appendices are included for further reference and
reading enjoyment:
10
A --
Video Troubleshooting Guide
B --
Automatic Graphics Override
C --
For Programmers Only...
D --
A Brief ProDOS Tutorial
E --
Getting Help
Appendices
APPENDIX A
Video Troubleshooting Guide
If you're having difficulty obtaining an acceptable video image,
here's a list of video display symptoms and recommended solutions:
No Video
Check the simple things first; don’t overlook the obvious. Is the
computer plugged in? Is the monitor plugged in and turned on?
Are the monitor and Viewmaster 80 video cables properly and
securely connected? (See Chapter One). Is the monitor adjusted
properly (eg. brightness, contrast, etc)? Is the Apple ll’s videolevel potentiometer, near the I/O Game port, turned fully
clockwise? (See Figure B-3 on page 14)
Unstable Display
This problem is usually caused by an improperly adjusted
monitor. Adjust the monitor's vertical and horizontal controls
until you get an acceptable display. Also, check the
troubleshooting guide in the monitor's owner's manual.
If you are experiencing a quivering display on an Apple
Monitor ///, call Applied Engineering Technical Support! A
special ROM chip for the Viewmaster 80, available from
Applied Engineering, will eliminate this problem.
Weak 40 Column Display
This problem is usually associated with the video-level A
potentiometer on the Apple ll main logic board. Make sure that
it is adjusted to near-maximum output, fully clockwise (See
Figure B-3 on page 14). Also check the cables and the video
brightness and contrast controls on the monitor.
App. A - Video Troubleshooting Guide
11
Unacceptable Screen Dimensions
Try adjusting the monitor's vertical and horizontal controls. If
you turn any of the controls fully one direction or the other and
still cannot achieve the desired result, you may need to take the
monitor to a service technician who can adjust the video
alignment controls inside the monitor. DO NOT remove the
monitor's cover yourself! There are extremely high and
dangerous voltages waiting inside!
No 80 Column Display
If you have an acceptable 40 column display, but no 80 column
display when the Viewmaster 80 is activated (PR#3), first check
to see that the Viewmaster 80 is actually installed in slot 3. Next,
turn the computer off, remove the Viewmaster 80, verify that all
of the integrated circuit "chips" on the card are securely seated,
and reinstall it, making sure that it is fully seated in expansion
slot 3.
12
ViewMaster 80
APPENDIX B
Automatic Graphics Override
This is a one-wire modification which will enable the Viewmaster 80
to switch to graphics mode automatically when a graphics command
is issued. The only part required is a "Mini-Clip Test Lead”, available
at your local Radio Shack store. The Radio Shack part number is
278-016 (This is the same part used for the Shift Key modification).
No cutting or soldering is required. Here’s all you have to do:
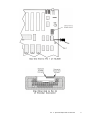
1.
2.
Turn the computer OFF and remove the computers cover.
If your Viewmaster has three resistors directly below the crystal,
connect one of a Mini-Clip Test Lead's spring loaded hooks to
the right side of the resistor immediately below the crystal on the
Viewmaster 80 (See Figure B-1).
If your Viewmaster has four resistors directly below the crystal,
connect one of a Mini-Clip Test Lead's spring-loaded hooks to
the right side of the second resistor below the crystal on the
Viewmaster 80 (See Figure B-2).
3.
Connect the other end of the Mini-Clip Test Lead to pin 4 of the
9334 chip at location F14 (See Figure B-3).
Replace the cover. That's all there is to it.
4.
Figure B-1
App. B - Automatic Graphics Override
13
Figure B-2
Figure B-3
14
ViewMaster 80
APPENDIX C
For Programmers OnIy...
Application programs, written for 80 column display, will
automatically activate the Viewmaster 80 and its operation will be
completely transparent to the user. If you're a programmer and want
to control the Viewmaster 80 features from within your own
program, this appendix contains the information you will need. You
don’t have to be an experienced programmer, but you should be
familiar with the Applesoft BASIC programming language and the
operating system you will be using, either DOS or ProDOS.
Activating the Viewmaster 80 from BASIC
To activate, or initialize, the Viewmaster 80 directly from the
keyboard (immediate mode), enter PR#3 at the Applesoft BASIC ( ] )
prompt. Once either DOS 3.3 or ProDOS has been loaded into
memory, the Viewmaster 80 can be activated from within a BASIC
program (deferred mode). This is accomplished through this
program statement:
10 PRINT CHR$(4);"PR#3"
The command to deactivate the Viewmaster 80 is a "Control-Z"
followed by a "1". From the immediate (keyboard) mode this would
be entered as: "Control-Z 1". From the deferred (program) mode:
10 PRINT CHR$(26); CHR$(49)
This will disable the Viewmaster 80's 80 column display and return
to the Apple-generated 40 column display. The inverse @ symbols
displayed on the screen when the Viewmaster 80 is deactivated are
normal. Issuing the HOME command after deactivating the
Viewmaster 80 will clear the 40 column screen and home the cursor.
Screen Editing Commands
Pressing the Escape key while programming in Applesoft BASIC will
put the computer into an "altered state" called the Escape mode.
While in the Escape mode, some keys define special editing
functions.
App. C - For Programmers Only...
15
Some keys will execute a certain function then exit the Escape mode;
other keys allow the Escape mode to remain active until canceled by
the user. The Escape mode provides control of the Apple video
display and allows you to edit BASIC program statements. For a
more detailed explanation of the editing features please refer to the
Applesoft BASIC Programmer's Reference Manual.
The Escape codes recognized by the Viewmaster 80 are the same as
the ones used to edit the Apple's 40 column mode display. For your
convenience, these Escape codes are summarized in Table C-1.
Table C-1 Escape Codes
Escape Sequence
Function
Esc @
Esc A
Esc B
Esc C
Esc D
Esc E
Esc F
Esc I
Esc J or left arrow
Esc K or right arrow
Esc M
Clears screen and homes cursor
Moves cursor right one space
Moves cursor left one space
Moves the cursor down on line
Moves the cursor up one line
Clears from cursor to end of line
Clears from cursor to bottom of screen
Moves the cursor up one line
Moves the cursor left one space
Moves the cursor right one space
Moves the cursor down one line
Notes
*
*
*
*
*
*
**
**
**
**
**
*
These keys perform their function, then exit the Escape Mode.
**
These keys perform their functions and remain in the Escape Mode. The
suggested method for exiting Escape mode is to press the SPACE bar once.
Controlling the Display from Applesoft BASIC
When programming in Applesoft BASIC, some Viewmaster 80
features can be accessed by using control codes. These codes are
actually invisible ASCII characters which have a special meaning to
the computer and Viewmaster 80 (ASCII is an acronym for American
Standard Code for Information Interchange). Control codes are
entered by holding the CTRL key down while pressing another
character key. Another way to issue a control code is from within a
BASIC program. Please refer to the Applesoft BASIC Programmers
Reference Manual for more details on control codes and their uses.
16
ViewMaster 80
Table C-2 presents a summary of control codes and their functions.
Note that some codes can be entered both from the keyboard and
from within a program.
Table C-2 Control Codes
Control DecimalFunction
Character Code Name
Function
Control - A 1
Shift lock
Toggles uppercase/lowercase
Control - G
Control - H
Control - I
Control - K
Control - L
Control - M
Control - N
Control- O
Control- S
Control - X
Control - Y
Control - \
Control - ]
Control - ^
Control - Z
0
1
2
3
Bell
Backspace
Line feed
Clear EOS
Clear
Return
Normal
Inverse
Stop list
Clear line
Home
Forward
Clear EOL
GOTO XY
Lead In code
Initialize
Quit
Normal Video
Inverse Video
keyboard input.
Speaker tone for 100 mS.
Lower tone than the Apple's speaker.
Cursor moves one space left.
Cursor down one line.
Clears from cursor to end of screen.
Homes cursor and clears screen.
Same as pressing RETURN key.
Sets the NORMAL display mode.
Sets the INVERSE display mode.
Stops listing until another key pressed.
Clears current line only.
Homes cursor (Does not clear screen).
Cursor moves one space right
(Does not clear the character passed over).
Clears from cursor to end of line
(Does not clear the character passed over).
Uses next two characters, plus 32
as XY cursor coordinates.
Precedes one of the following numbers:
Sets Viewmaster 80 defaults; clears screen.
80 Column mode off.
Same as NORMAL command.
Same as INVERSE command.
7
8
10
11
12
13
14
15
19
24
25
28
29
30
26
48
49
50
51
Notes
1.
Codes available only when Viewmaster 80 is active.
2.
Codes will work only in the immediate mode (keyboard)
3.
4.
Codes will work only in the deferred mode (program)
No key to enter the code is available on the Apple II keyboard; must use
PRINT CHR$
1,2
2
1,3
1
1
1
2
2
1
4
4
1
1
Display Control Commands
If you're not sure what the commands listed below do or how to use
them, please refer to the Applesoft Tutorial or Applesoft
Programmer's Reference Manual.
App. C - For Programmers Only...
17
HOME - Regardless of whether the Viewmaster 80 is active or inactive,
the HOME command will clear the screen to black and move the
cursor to the upper left corner of the screen. If the HOME command
is issued when the Viewmaster 80 is active and the display mode is
INVERSE, the screen will still clear to a dark display, but subsequent
characters will be inverse.
None of the other expansion-slot 80 column cards support the
HOME command. Because of this, some compatibility problems may
arise with existing BASIC software. This is not a problem unless the
software uses a "Control-L" to clear the screen and home the cursor.
Since the Viewmaster 80 supports both HOME and "Control-L,"
programs can be modified by replacing all instances of HOME with
PRINT CHR$(12). In some cases, as with certain very early DOS 3.3
preboot disks, the HOME command itself must be disabled. This can
easily be done by booting DOS 3.3 and running the following prepreboot program:
10 PRINT CHR$(4);"PR#3": PRINT CHR$(12)
20 PRINT CHR$(26); CHRS (49)
30 POKE 1912,0
After running this program, insert the preboot disk and enter PR#6.
The HOME command will now home the cursor, but it will not clear
the screen. To reactivate the HOME command, use the same
program, except POKE a "1" into location 1912.
INVERSE - Issuing this command from either the immediate or
deferred mode will cause the Viewmaster 80 to switch to inverse text
mode, displaying black characters against a white character block
background, instead of the normal white characters on a black
background. Only output to the screen is inverse; keyboard input is
normal. Using the "Control-Z 3" command has the same effect as
INVERSE, except that the keyboard input is also displayed inversely.
NORMAL - This command switches the inverse text mode back to the
normal display. The "Control-Z 2" command will cancel the inverse
text mode, but the NORMAL command will not cancel the effect of
the "Control-Z 3" command.
FLASH - This command is not supported by the Viewmaster 80.
18
ViewMaster 80
HTAB - This command was originally intended for use with a 40
column display only. Trying to HTAB beyond 40 columns will not
work. To position the cursor anywhere on the 80 column line, use the
POKE 36,n command ("n" is the column number between 0 and 79).
The program statements shown below demonstrate the use of the
HTAB command.
10 PRINT CHR$(12)
20 VTAB 10
30 POKE 36, 55: PRINT "APPLE II FOREVER! "
Cursor Positioning
Expansion-slot 80 column cards, including Viewmaster 80, do not
support text windowing (POKE 34,T and POKE 35,B), but you can
use the "Control-^ XY" cursor positioning command to emulate the
windowing feature. Please refer to Table C-2 and the following
BASIC program, which illustrates the use of this command.
10
20
30
40
50
PRINT CHR$(4);"PR#3"
INPUT "COLUMN COORDINATE: X = ";X:REM range 0 to 79
INPUT "LINE COORDINATE: Y = ";Y:REM range O to 23
PRINT CHR$(30); CHR$(X + 32); CHR$(Y + 32);
GOTO 20
The POS(0) command, used to return the cursor's current column
position, can be emulated by the PEEK 1403 command. PEEK 1531
will return the cursor's current line number.
Custom Cursor Shape
Upon initialization, the Viewmaster 80 cursor defaults to a solid,
slowly blinking rectangular shape. Both the cursor's blink rate and its
vertical size and position can be controlled from within a BASIC
program. This example program shows how the cursor shape and
blink rate can be altered.
10
20
30
40
50
60
70
80
90
99
PRINT CHR$(4);"PR#3"
VM = 49328
BLINK = 0
FIRST = 2
LAST = 5
POKE VM,10
POKE VM + 1,BLINK + FIRST
POKE VM, 11
POKE VM + 1, LAST
END
App. C - For Programmers Only...
19
Remember: This program only modifies the Viewmaster 80 cursor.
The 40 column cursor is generated by the computer and is merely
"passed through" the Viewmaster 80 (Statement 10 of the program
ensures the Viewmaster 80 is activated).
The Viewmaster 80 cursor is actually made up of 9 rows of horizontal
lines. These rows are numbered 0 through 8, starting at the top.
Statements 40 and 50 in the example program determine the
beginning (FIRST) and ending (LAST) rows to be displayed. In the
program example shown, the cursor becomes a small square block,
consisting of rows 2 through 5. Rows 0, 1, 6, 7, and 8 are blank. This
is illustrated in the picture following.
The Viewmaster 80 cursor blink rate can be varied from steady to
fast, or turned off entirely by changing the "BLINK =" value in
statement 30. The allowable values and their functions are:
BLINK = 0
BLINK = 32
BLINK = 64
BLINK = 96
Steady; non-blinking cursor
Cursor OFF
Fast blinking cursor
Normal blinking cursor
ViewMaster 80 Graphics Display
When the Viewmaster 80 is active, the 80 column text display is
generated by the Viewmaster 80, not by the Apple's 40 column video
circuitry. But the graphics displays, accessed via the GR, HGR, and
HGR2 commands, are generated by the Apple and must be passed
through the Viewmaster 80. In 40 column mode this is done
automatically. In Viewmaster 80 mode, all graphics display routines
must be preceded with a POKE 49330,0 to flip the graphics display
soft switch on the Viewmaster 80, allowing the graphics to pass
through. Any subsequent character output to the Viewmaster 80 will
automatically flip the soft switch back to 80 column text mode.
20
ViewMaster 80
The Automatic Graphics Override modification, described in
Appendix B, will enable the Viewmaster 80 to switch to graphics
display mode without the POKE 49330,0 command. Some older
programs, which combine the use of 80 column text and graphics,
may not be able to switch to graphics mode correctly. This override
modification should solve the problem and should not interfere with
the more recent software.
To switch from text to the high resolution (Hi-Res) screen while in the
Pascal environment, a special firmware location on the Viewmaster
80 must be accessed. This is accomplished by including the following
lines in your Pascal program:
var
hires : integer ; (* any hires variable of type
integer *)
function PEEK (address : integer): integer;
type byte = 0..255;
var
memref : record case integer of
1 : (addr : integer);
2 : (ptr : ^byte);
end;
begin
memref.addr :=address;
PEEK := memref.ptr^ div 256;
end; (* function PEEK *)
To turn on the Hi-Res display, execute this line:
hires :=PEEK (-16206);
The high resolution display will remain active until a character is
printed to the text screen. The d
isplay will then switch to the text
display until the next PEEK(-16206) command is executed.
Hardware Control of Viewmaster 80
40 Column Override
There are four holes on the Viewmaster 80 card located between the
two video jacks. If the two upper holes, marked "40 CO" and “GND"
are shorted together, the Viewmaster 80 will switch to 40 column
mode, ignoring any software commands to activate the Viewmaster
80’s firmware. This feature essentially disables the Viewmaster 80. A
remote toggle switch (Single Pole, Single Throw) can be wired to
these points.
App. C - For Programmers Only...
21
Light Pen Support
The largest integrated circuit chip on the Viewmaster 80 is a very
sophisticated device, called a CRT Controller (CRT stands for
Cathode Ray Tube). This chip, which is actually the heart of the
Viewmaster 80's video display circuitry, is capable of supporting
compatible light pens. The lower two holes of the four holes between
the Viewmaster 80 video jacks provide access to the light pen feature.
These holes are marked "L.PEN" and "+5V".
Before you purchase a light pen, check with the light pen
manufacturer to make sure that it is compatible with the Viewmaster
80 and that there is software to support it. The light pen should be
capable of providing a low-going pulse of at least 1 µsec duration
whenever it senses a "hit" on the video screen. The response time of
the lightpen should be faster than 500 nanoseconds if it is to respond
with one character position on the screen. The light pen must also be
capable of sinking 2 mA.
22
ViewMaster 80
APPENDIX D
A Brief ProDOS Tutorial
This is a brief explanation of the Professional Disk Operating
System, ProDOS, for those who are completely new to it. All of this
information and more is included in your Apple Owner’s Guide, but
we have provided it here for your convenience.
Operating System
ProDOS is one of several operating systems for the Apple. Others
include DOS 3.3 and Pascal. Operating systems, as defined in the
Apple Owner’s Guides, are programs that control how information is
loaded into memory, how the computer handles the information,
how the information is stored on a disk, and how the computer
communicates with the printer and other peripherals.
Naming Volumes
ProDOS must have a way to locate which disk (often called
"volume") you want to access. Instead of typing in the location of the
disk as in DOS 3.3 (ex: S6,D1), you simply type in the name of the
disk (the volume name). Some rules for volume names are:
1.
Name can include letters, numbers, or periods but not spaces
2.
3.
Name must begin with a letter
Name can be up to 15 characters long
These rules also hold true for subdirectory names.
Root Directory and Subdirectory
The main directory of the volume is called the root directory. The
root directory uses the same name as your disk. Subdirectories are
ProDOS’ way of organizing information on a disk.
Think of the root directory as a file drawer and the subdirectories as
folders within the drawer. You can
1.
Put files directly into the root directory like putting documents
straight into the file drawer
App. D - A Brief ProDOS Tutorial
23
2.
3.
Put files within subdirectories like putting documents in folders
Put subdirectories within subdirectories like putting folders
within folders.
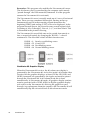
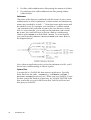
Pathname
The name of the directory combined with the names of one or more
subdirectories is called a pathname. Volume names and subdirectory
names are preceded by a slash, "/" (Note that some applications add
the slash for you). For example, you could have a volume named
/MY.DISK and a file called MY.FILE on the root directory of that
disk. To access that file, you would use the pathname /MY.DISK/
MY.FILE. You could also have a file JUL.DEC in a subdirectory
(folder) called PHONE on a disk called /BILLS. To access that file,
you would use the pathname /BILLS/PHONE/JUL.DEC. Refer to
the diagram below:
Now when an application asks you for the pathname of a file, you'll
have a basic understanding of what it expects.
System Files
A system file is a ProDOS file that starts an application. Typically,
these files have the suffix .SYSTEM (e.g. /APLWORKS.SYSTEM, /
ACCOUNT.SYSTEM [see above], etc.). When you boot ProDOS, it runs
the first system file listed in its directory. So, if BASIC.SYSTEM is the
first system file on your ProDOS boot disk, ProDOS will boot and
then put you in BASIC.
24
ViewMaster 80
Additional Resources
The following books are available through most book stores:
Apple II Owner's Manual (Apple Computer, Inc.) Supplied with
your Apple Computer. Take the time to read it.
Basic Programming with ProDOS (Addison-Wesley Publishing)
Gives a detailed explanation of how to use ProDOS from AppleSoft
Basic.
Beneath Apple ProDOS (Quality Software) Provides information
about ProDOS for both the novice Apple user and the advanced
programmer.
ProDOS Inside and Out (TAB Books) Very good book for both the
beginning and advanced BASIC Programmer.
ProDOS User’s Manual (Apple Computer, Inc.) Provides an
overview of ProDOS and explains how to use the ProDOS User’s
Disk.
App. D - A Brief ProDOS Tutorial
25
APPENDIX E
Getting Help
If you have a technical question relating to your Viewmaster 80 card
or any other Æ card that is not covered in the manual, please contact
the dealer from whom you purchased the card. If you are
experiencing difficulties with one particular program, contact the
program’s author or publisher.
In the event that the dealer or the publisher’s support personnel
cannot answer your question, call Applied Engineering Technical
Support. The support representatives are experienced in the
applications and uses of Applied Engineering products, but in order
to provide a quick and effective answer to your question, they will
need to know as much as possible about the hardware and software
specifically related to your question. Please provide the technical
support representative with the following information:
♢
The Applied Engineering product related to your question and
its revision number.t
♢
The original and current memory configuration of the card (if
applicable).
The model and revision of your computer.
♢
♢
♢
♢
What peripherals are being used and what cards are in each slot.
The name, version, and revision level of the software with which
you are experiencing problems.
The results of any test programs, diagnostics, or troubleshooting
done by you, your dealer, or your software publisher’s support
department.
Applied Engineering
Technical Support
(214) 241-6069
9 AM to 12:30 PM & 1:35 PM to 5 PM(CST)
Monday Through Friday
(Please call only the number above for technical support. Our sales
office cannot transfer calls to the support lines)
26
ViewMaster 80
Returning a Product
Include
If your product needs to be returned, the technical support
representative will give you a Return Material Authorization (RMA)
number.
❏
❏
❏
Record the RMA number for your own records.
Write the RMA number on the outside of the package you send
to us.
Write the RMA number at the top of the return form included
with your product package.
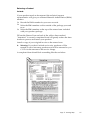
Fill out the Return Form on back of the yellow sheet marked
"Attention!" A correctly completed form will greatly reduce the time
it takes to process and return your product.
Attach a copy of your original invoice to the return form.
❖
Warning: If you don’t include an invoice, products will be
treated as out of warranty products and will be returned to you
C.O.D. for the amount of the service charge.
A completed form should look something like the one below.
App. E - Getting Help
27
When You Ship
If you don't have the original packing material, wrap the board in
anti-static material (preferably the anti-static bag in which the card
was originally shipped; however, aluminum foil will work fine). Pack
it in a sturdy box cushioned with wadded papers (i.e. used computer
paper or newspaper).
❖
Warning: If your product is damaged due to inadequate
packing, your warranty will be void.
Include the return form and invoice.
Send the package, shipping prepaid, to:
RMA#_ _ ? _ _
Applied Engineering
Technical Support
3210 Belt Line Road, Suite 154
Dallas TX 75234
You should insure your package. Æ will not assume any
responsibility for inadequate packing or loss or damage during
shipping.
When We Receive
Our service department will use your completed form in an attempt
to duplicate the problem.
If it is determined that your product is defective due to a
manufacturing defect, your card will be repaired or replaced at Æ’s
option.
Any misuse, abuse, or non-Æ authorized alteration, modification,
and/or repair to the Applied Engineering product will void the
warranty. This warranty will also be void if you use the Æ product
for any purpose other than its intended use.
Your product will be fully tested before it is shipped back to you,
transportation prepaid, via UPS regular delivery.
Once your product is received by Technical Support, it will be
processed and delivered to our shipping department within 7 to 10
working days.
28
ViewMaster 80


![取扱説明書[PDF:774.2KB]](http://vs1.manualzilla.com/store/data/006689674_2-aca49fe43eb7dd179675271ad81a417a-150x150.png)