1
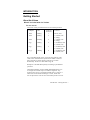
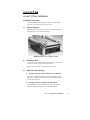
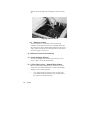
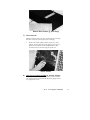
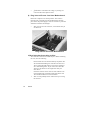
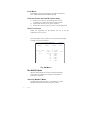
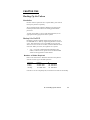
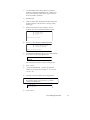
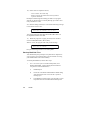
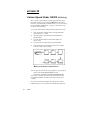
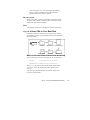
Table Of Contents
INTRODUCTION - GETTING STARTED
V
About the Vulcan
What’s Included with the Vulcan
The Vulcan’s Fan
The Power Supply
v
v
vi
vi
CHAPTER ONE- IIGS INSTALLATION
1
Installation Procedure
What Now?
1
7
CHAPTER Two - //E AND ][ PLUS INSTALLATION
9
Installation Procedure
9
What Now?
15
CHAPTER THREE - THE PARTITION MANAGER
17
First...
About the Partition Manager
Running the Partition Manager
From the Finder (CS and / /e retrofit Only)
Other Launchers
The MODIFY Mode
Entering MODIFY Mode
Locking/Unlocking Partitions
Partition Names
Setting the Partition Size
Turning Partitions On or Off
Selecting the Operating System
Selecting the Boot Partition
Leaving MODIFY Mode
Canceling/Saving Changes
17
17
17
18
18
18
18
19
19
20
22
23
24
25
25
Table of Contents I
Formatting
Print
Quit
Final Check
Quitting
CHAPTER FOUR - PRODOS 8, DOS 3.3, PASCAL, AND CP/M
ProDOS 8
DOS 3.3
Recognizing Vulcan under DOS 3.3
29
29
29
29
Booting from a Vulcan DOS 3.3 Partition
30
Patched DOS 3.3 Notes
30
Volume Sizes
30
Copying Files to the DOS 3.3 Partition
30
Other DOS 3.3 Goodies
34
CP/M
34
Pascal
34
CHAPTER FIVE - BACKING UP THE VULCAN
Introduction
Backup II for ProDOS
Number of Disks Required
Suggested Backup Schedule
Before You Back Up
ii
26
26
27
27
27
Vulcan
35
35
35
35
36
36
Running Backup II
36
Backup Entire Hard Disk
Backup Modified Files
Listing Files
Restore Individual Files
36
38
39
40
APPENDICES
A: Trouble Shooting
If you can’t boot
ProDOS Can’t Find All Four Vulcan Partitions
Eight Total Drive Devices
Two Drive Devices per Slot
43
45
45
45
45
45
B: Vulcan Speed Under GS/OS (IIGS Only)
47
C: The Vulcan Classic Desk Accessory (IIGS Only)
48
Accessing the Desk Accessory
Set Boot Partition
Write Protect Partition
Park Heads
About Vulcan...
Quit
Copy the Vulcan CDA to Your Boot Disk
D: Hardware
48
49
49
49
50
50
50
51
Switches
What They Do
How To Set Them
Remote Light Jack
51
51
51
52
E: A Brief ProDOS Tutorial
53
Operating System
Naming Volumes
Root Directory and Subdirectory
Pathname
System Files
Additional Resources
F: Getting Help
Returning a Product
RMA Number • “Attention” Sheet, and Invoice
When You Ship
When We Receive
53
53
53
54
54
55
56
57
57
58
58
Table of Contents
iii
Æ
iv
Vulcan
INTRODUCTION
Getting Started
About the Vulcan
What's Included with the Vulcan
On the Vulcan
The Vulcan comes preformatted and set into ProDOS partitions.
Computer
Size
IIGS
IIGS
20Meg
40Meg
#of Preset
Partitions
1
2
IIGS
l00Meg
4
//e,][+
20Meg
2
//e,][+
40Meg
2
//e, ][+
I00Meg
4
Contents
GS/OS, Utils
1) GS/OS, Utils
2) Empty
1) GS/OS, Utils
2) Empty
1) ProDOS 8, Utils
2) GS/OS, Utils
1) ProDOS 8, Utils
2) GS/OS, Utils
1) ProDOS 8, Utils
2) GS/OS, Utils
We’ve included GS/OS version 4.0 on the first partition of the
IIGS Vulcan. Included in the System Drivers folder is Vulcan’s
native mode driver which speeds up Vulcan’s access time
dramatically. The driver is described in App. B.
Backup II is a ProDOS backup utility for backing up the ProDOS
partitions.
The Partition Manager program (PART.MANAGER) allows you
to configure the Vulcan in up to 16 different segments. Any
partition can be set up to run under ProDOS, DOS 3.3, Pascal, or
CP/M. Also use the Partition Manager to resize, format and
activate partitions as well as select from which partition to boot.
Introduction - Getting Started
V
Also the ProDOS 8 version provided on the Vulcan and the
floppy disks has been patched to allow ProDOS 8 to use four
ProDOS partitions from the Vulcan instead of only two.
The Separate Disks
The 3.5” disk is a backup of the files necessary to boot GS/OS. It
also contains the Vulcan’s utilities such as the native mode
driver, partition manager, Backup II, and a modified ProDOS 8.
If you want to reconfigure your partitions, you won’t have to
backup our utilities.
The 5.25” disk is two sided. The front side contains Vulcan’s
ProDOS 8 utilities including Backup II, Partition Manager, Park
Heads, and ProDOS patcher. The back side has the DOS 3.3
system and various DOS 3.3 utilities including Æ’s version of
FID, which support the Vulcan. (For a more complete list, see p.
34.)
The Vulcan's Fan
The Vulcan’s fan keeps the power supply and hard drive cool. If
you have several powerful cards in your computer however,
strongly consider a separate cooling fan for your system.
The Power Supply
The Vulcan’s built-in power supply replaces your computer’s
power supply. Applied Engineering designed Vulcan’s power
supply to be both more compact and more powerful than the
one included with your computer.
Features
FCC Certified
Light-weight aluminum case
Externally accessible fuse with spare.
110/220 VAC, 50/60 Hz
Built-in Fan
Cool Running
- 40˚C w/fan
- 60˚C w/o fan under full load
Power components heatsinked to case
70 full watts w/o fan
Adjustable 5 Volts DC
vi
Vulcan
CHAPTER ONE
IIGS Installation
Installation Procedure
You’ll need no special tools to install the Vulcan. Simply follow
the instructions below.
1)
Open Computer
Press in the two latches at the rear of the case with your
forefingers while using your thumbs to push the lid up and
towards you. (See picture following.)
Remove the IIGS cover
2)
Remove Power Supply
i)
Remove slot one card.
If you have a card installed into slot 1, you’ll need to remove it to
give yourself room to reach the internal power plug. Refer to
your slot 1 card’s manual for proper removal.
ii) Unplug external cord from back of computer.
This is the cord that runs from the back of the computer to the
wall socket. Unplug it from the back of the computer and from
the wall socket as well.
iii) Unplug internal cord from motherboard.
The internal power cord is the multi-wire cord running from
the power supply toward the back of the motherboard. Pull up
firmly on the white plastic part of the plug.
Ch. 1 - IIGS Installation
Unplug Internal Cord
iv)
Gently pull back on tab at bottom front of power supply.
A small flatblade screwdriver may keep you from breaking a
nail.
Pull Back Tab
v)
Lift out power supply.
You may want to store the power supply in the Vulcan’s box.
3)
Remove Vulcan from Packing.
4)
Check Voltage Setting
The switch setting on back of the Vulcan must be set to the
proper voltage (115 in the United States).
2
Vulcan
5)
Insert Vulcan
i) Insert bock end first.
Align the three holes in the back of the Vulcan with the three
prongs in the back of the computer.
ii)
Snap down Into front tab.
Push down on the front of the Vulcan until the plastic tab on the
computer case snaps into the hole at the bottom front of the
Vulcan. You should hear the tab snap into place.
Snap Vulcan Into Front Tab
6)
Plug Internal Power Cord Into Motherboard.
The Vulcan’s internal power cord plugs into the motherboard in
the same place as the old power supply’s cord. The connector’s
tab should be toward the right side of the computer.
•
Note: Do not force the connector; it will plug in easily
in one direction.
Plug Internal Cord Into Motherboard
Ch.I - IIGS Instollation
3
7 ) Set Switches According to Slot
The Controller Card will work from any slot. However,
there are a few conditions of which you need to be aware.
Do n o t install the card into the Memory Expansion slot.
We recommend installing the controller card into slot 6 or
7.
Check the switches on the card. The switch block is the red
rectangular box toward the bottom right of the card. The
switches should be set as shown below. (You’ll probably
need to remove the tape covering the switches first.)
•.
Note: For a complete description of the functions of the
switches, refer to App. D.
Use a small, pointed object, like a wooden toothpick or
bent-out paperclip to change a switch setting.
The circle on each switch represents the end that should be
pressed for a standard IIGS setup.
Switch Setting
1
OPEN
2
CLOSED
3
CLOSED
4
OPEN
Default Switch Setting
Slot 7 Exception (Pseudo-Slotting)
If your slot 7 does not have a card in it, but is blocked, you
can install the card into another slot and make it appear to
be in slot 7. This is most valuable if you have slot 3, 4, or 5
unoccupied. You can leave the slot containing the card is
set to that slot’s function. This leaves slot 3 free for its 80
column function, slot 4 free for mouse control, or slot 5 free
for Smart Port (disk drive control). This process is called
pseudo-slotting.
If you want to pseudo-slot the card, you’ll need to make a
simple adjustment to the card first.
4
Vulcan
1)
2)
3)
Locate the switch block on the controller card.
If a piece of tape is covering the switches, remove it.
Set the switches in the position shown below.
Switch
1
2
3
4
Setting
OPEN
CLOSED
CLOSED
CLOSED
Switches Set for Pseudo-SlottIng
8)
Insert Card Into Slot
Align the gold “fingers” of the controller cards edge
connector with the slot; then use the heel of one hand to
push the card down into the slot and seat it firmly.
Insert Controller Card into Slot
9)
Connect Cable from power Drive to Controller Card
Attach the wide flat cable from the hard drive to the connector
on the controller card. The connector and socket are keyed so
that they will attach in only one way.
Make sure that the cable connector is firmly seated in the
controller card socket.
Ch. 1 - IIGS Installation
5
1 0 ) ReInstall Any Cards Removed
Replace any cards you have removed for the installation
following those cards’ installation instructions.
• WARNING! IF YOU HAVE A CARD IN SLOT 1, use
the insulator card (2” x 6”) included with the Vulcan
package. Applied Engineering will not be responsible
for damage to any other products so be careful when
reinstalling your cards.
1 1 ) Close Computer
Replace the lid by sliding the front of the lid in first, lowering the
back edge into place and then pushing gently and firmly on the
back corners of the lid until it pops into place.
1 2 ) Plug In External Power Cord
This is the same cord as your original power supply used.
Connect it to the back of the Vulcan and then plug it into the
wall socket.
1 3 ) Boot Computer and Set Slots
You must set the slot containing the controller card to “Your
Card” under Slots option of the Control Panel. Refer to your IIGS
owner’s manual for more information on setting the slot.
Slot 7 Exception (Pseudo-Slotting)
If you want the card to appear to be in slot 7 even though
it’s installed into another slot (as mentioned earlier) you’ll
need to set your slots as follows:
1) Leave the slot in which the controller card is
installed set to that slot’s function (i.e. not “Your
Card”)
2) Set slot 7 to “Your Card.”
•
Note: Make sure that you’ve set the switches on
the card to the proper position.
1 4 ) Set to Boot from the Vulcan
The Vulcan is preformatted and ready to boot into GS/OS. If you
want to boot from the Vulcan, set the Startup Slot under the
Slots option to the slot that your Vulcan is in. (If you’re pseudoslotting, set Startup Slot to 7.)
Hardware installation is complete. Congratulations!
6
Vulcan
What Now?
Using G S / O S
You may want to use only the GS/OS operating system on the
Vulcan. If that’s the case, you’re already set to go. The Vulcan is
formatted with GS/OS installed in the first partition.
Dividing the Partitions
If you’d like to set up the hard drive so that it appears to be
several separate disks, refer to the next chapter.
Loading Different Opewting Systems
If you’d like to use your Vulcan under Pascal, CP/M or DOS 3.3
you’ll need to read Chapters 2 and 3.
Ch. - 1 - IIGS Installation
7
Æ
Vulcan
8
Vulcan
CHAPTER Two
//e and ][ Plus Installation
Installation Procedure
You’ll need Phillips screwdriver to install the Vulcan. When
you have one, follow the instructions below.
1)
Open Computer
Pull up on the two tabs at the rear of the case lifting the lid up
and towards you. (See picture following.)
Remove the //e or ][ Plus cover
2)
Remove Cards
If you have card( installed into the expansion slot, you’ll need
to remove them to give yourself room to work.
Refer to your slot cards’ manuals for proper removal.
3)
Remove Power Supply
i)
Unplug external cord from bock of computer.
This is the cord that runs from the back of the computer to the
wall socket. Unplug it from the back of the computer and from
the wall socket as well.
ii)
Unplug internal cord from motherboard.
The intemal power cord is the multi-wire cord running from
the power supply toward the back of the motherboard.
Ch. 2 - //e and ][ Plus Installation
9
Squeeze the left and right side of the plug to release, then pull
up.
Unplug Internal Cord
iii)
Remove screws.
Turn the computer on its left side. On the bottom of the
computer you will find four screws in a rectangular pattern the
size of the power supply. While firmly holding onto the power
supply, remove the four screws. When all four are removed, lift
the power supply out of the case.
4 ) Remove Vulcan from Packing.
5 ) Check Voltage Setting
The switch setting on back of the Vulcan must be set to the
proper voltage (115 in the United States).
6 ) ][ Plus Users Only -- Attach Riser Plates
The two metal plates (included) must be attached to raise the
Vulcan over the ] [ Plus motherboard. Use four of the included
Phillips screws to attach the plates.
*
10
Vulcan
Note: Attach the plate so that the screws are to the side
of the female stand-offs toward the long straight edge of
the Vulcan (see picture following).
Attach Riser Plates (][ Plus Only)
7)
Insert Vulcan
With the computer still on its side, turn the Vulcan at an angle
and insert it into the opening left by the old supply.
•
If Plus Note: Some speakers will be in the way, others
will not. If you need to move the speaker, pry it up (it is
glued not screwed) and use the included adhesive strip
to reattach it in an out of the way part of the case.
Insert Vulcan
8)
Use four screws provided to secure Vulcan.
Align the holes on the bottom of the Vulcan and the computer
case. Do not use the screws from the old power supply. Do not
over-tighten the screws.
Oh. 2 - //e and ][ Plus Installation
11
•
][ Plus Note: If the holes don’t align, try turning one
or both of the bottom plates around.
9 ) Plug Internal Power Cord Into Motherboard.
Return the computer to its normal position. The Vulcan’s
internal power cord plugs into the motherboard in the same
place as the old power supply’s cord. The connector’s push tabs
should be toward the left and right.
•
Note: Do not force the connector; it will attach easily in
one direction.
Plug Internal Cord Into Motherboard
10)Set Switches According to Slot
The Controller Card will work from any slot. Before installing
the card, note the following:
◊
Do n o t install the card into the Memory Expansion slot.
◊
We recommend installing the controller card into slot 7.
The //e and ][ Plus will look for a boot source starting at
slot 7 and working down. If you want to boot from the
Vulcan, it will need to be in a higher slot than your
other drives.
◊
Check the switches on the card. The switch block is the
red rectangular box toward the bottom right of the card.
The switches should be set as shown below.
*
Note: You’ll probably need to remove the tape covering
the switches.
12
Vulcan
Switch 3, ][+ Boot Enable
Leaving this switch open allows a II+ or an unenhanced
//e to boot directly from the hard disk. The Vulcan still
must be the first drive device encountered (usually slot
7). If the hard disk is not to be the boot device in these
systems, this switch should be dosed. In a / /e retrofit or
an enhanced / /e, this switch should also be closed.
Switch 3 Set to Boot Enable for
][ Plus and Unenhanced lie
Switch 3 Setting for
//e Retrofit and Enhanced //e
•
Note: For a complete description of the functions of the
switches, refer to App. D.
Use a small, pointed object, like a wooden toothpick or
bent-out paperclip to change a switch setting.
The circle on each switch represents the end that should be
pressed for a standard ][+ and unenhanced / /e setup.
Slot 7 Pseudo-Slotting
If your slot 7 does not have a card in it, but is blocked, you
can install the card into another slot and make it appear to
be in slot 7. This process is called pseudo-slotting.
If you want to pseudo-slot the card, you’ll need to set switch
2 to Open and 4 to Closed.
Switches Set for Pseudo-Slotting
Ch. 2 - //e and ][ Plus Installation
13
If you want the card to appear to be in the slot in which it is
installed, set switch 4 to Open. Switch 2 can be Open or
Closed.
11)Insert Card Into Slot
Align the gold “fingers” of the controller cards edge connector
with the slot; then use the heel of one hand to push the card
down into the slot and seat it firmly.
Insert Controller Card into Slot
12)Connect Cable from Vulcan to Controller Card
Attach the wide flat cable from the hard drive to the connector
on the controller card. The connector and socket are keyed so
that they will attach in only one way.
Make sure that the cable connector is firmly seated in the
controller card socket.
13)ReInstall Any Cards Removed
Replace any cards you have removed for the installation
following those cards’ installation instructions.
*
14
Vulcan
WARNING! IF YOU HAVE A CARD IN SLOT 1, use
the insulator card (2” x 6”) included with the Vulcan
package. Applied Engineering will not be responsible
for damage to any other products so be careful when
reinstalling your cards.
14) Close Computer
Replace the lid by sliding the front of the lid in first, lowering the
back edge into place and then pushing gently and firmly on the
back corners of the lid until it pops into place.
15) Plug In External Power Cord
This is the same cord as your original power supply used.
Connect it to the back of the Vulcan and then plug it into the
wall socket.
Hardware installation is complete. Congratulations’
What Now?
Retrofit lIe Users
If you have a retrofit //e (a //e with a IIGS motherboard
upgrade), you may want to boot into the GS/OS operating system
on the Vulcan’s second partition. If that’s the case, use the
Partition Manager to set the Vulcan to boot from partition 2.
(Refer to the next chapter.)
/ / e and ][ Plus Users
If you’re not using a retrofit / /e, you can delete the GS/OS files
from the second partition by using the Partition Manager to
reformat the partition.
Dividing the Partitions
If you’d like to set up the hard drive so that it appears to be
several separate disks, refer to the next chapter.
Loading Different Operating Systems
If you’d like to use your Vulcan under Pascal, CP/M, or DOS 3.3,
you’ll need to read chapters 3 and 4.
Ch. 2 - //e and ][ Plus Installation
15
Æ
Vulcan
16
Vulcan
CHAPTER THREE
The Partition Manager
First...
The first thing you should know about the Partition Manager
(PM) is that it is a formatting utility. Modifications to the size of
a partition and switching operating system change the basic
structure of the disk and will destroy any data currently within
the partitions you are resizing. So, before using the Partition
Manager, save any data that you want to keep and restore it after
re-partitioning.
*
Note: Make ProDOS backups with Backup II, included
on the Vulcan drive. Make DOS 3.3 backups with FID
included on Vulcan’s DOS 3.3 disk. Backup Pascal and
CP/M with whatever programs you currently use for
copying files under these systems.
About the Partition Manager
The Partition Manager is a ProDOS program that lets you
segment the hard disk. You can use these segments, or
partitions, as if they were large floppy disks. Each can have its
own name, hold its own files, even run under any one of four
different operating systems.
The Partition Manager allows a maximum of 16 separate
sections. ProDOS and CP/M operating systems can both have up
to four partitions turned on at the same time. DOS 3.3 and
Pascal allow for only 2 sections active at the same time. You
could set up all 16 partitions as ProDOS, for example, but only
four of these can be accessed (turned on) at one time.
*.
PC Transporter users: You can also use the hard disk as
an MS-DOS storage device. Follow the directions in the
PC Transporter manual for using a hard disk.
Running the Partition Manager
From Disk
Boot the 5.25” ProDOS Utilities disk and choose Partition
Manager from the menu.
Ch. 3 - The Partition Manager
17
From Basic
From BASIC, set your current prefix to the VULCAN disk and
enter -PART.MANAGER at the BASIC prompt.
From the Finder (GS and lIe retrofit Only)
1)
2)
3)
With your 3.5” drive set as the startup device, insert
your Vulcan 3.5” disk into it and boot your computer.
Double-dick the disk icon to open its window.
Double-click the icon PART MANAGER to run the application.
Other Launchers
Follow the instructions for the launcher you use to run the
application PART MANAGER.
Once the program is run, you’ll see the current partition settings.
A sample screen is shown below:
AE VULCAN PARTITION MANAGER
MODIFY
LOCK
NAME
1
AE.1
2
AE.2
3
4
5
6
7
...
FORMAT
PRINT
SIZE
ON SYSTEM
32767.5K * PRODOS
9460.0K * PRODOS
.0K
CLEAR
.0K
CLEAR
.0K
CLEAR
.0K
CLEAR
.0K
CLEAR
(V x.x)
QUIT
BOOT
•
The PM Menu
The MODIFY Mode
While in modify mode you can enter the partition manager
options table to configure your hard drive into different
partitions or segments.
Entering MODIFY Mode
Use the left and right arrow keys (or J and K keys) to select
MODIFY from the top menu bar then press <return>.
18
Vulcan
While in MODIFY mode, the Partition Manager is set up like a
spread sheet. Use the arrow keys to move from cell to cell.
T o m o v e t h e cursor
up
down
left
right
Use
“I” or up arrow
“M” or down arrow
“ J ” or left arrow
“K” or right arrow
LockIng/Unlocking Partitions
Locking a partition protects that partition from being written to,
reformatted, erased or resized. A locked partition functions the
same as a write protected disk.
To lock or unlock a drive, while in MODIFY mode:
1)
Move the cursor to the LOCK column of the partition
you want to lock or unlock. Locked partitions are
marked with an asterisk (*).
2)
Press the <return> key to toggle between locked and
unlocked.
Partition Names
Each partition can have its own name. The name you assign a
partition is an easy way for you to keep track of which partition
is which when setting the boot drive and active partitions.
The operating systems will not actually use these names except
as defaults when formatting. So, you could name a ProDOS
partition “BETH” under the Partition Manager, format the
partition using the default, BETH, then,under the Finder you
can rename it BETHS.STUFF.
Name Rules
Partition names basically follow the rules of ProDOS names.
These rules are:
1)
Name can include letters, numbers, or periods but not
spaces
2)
Name must begin with a letter
3)
Name can be up to 10 characters long.
•
Note: ProDOS actually allows names to be 15 characters
long, however, the PM allows only 10.
Ch. 3 -The Partition Manager
19
Name the PartitIon
To name a partition, while in MODIFY mode:
1)
Move the cursor to the NAME column of the partition
you want to name.
2)
Press <return>.
3)
Type in the name for the partition. (Refer to Name
Rules above for acceptable names.)
4)
Press <return>
Canceling Rename
While in the ENTER NAME mode, if you want to leave the
name as it was, press <esc>.
Setting the Partition Size
When we shipped your disk, we allotted the maximum
allowable space to the first partition with a ProDOS system
installed. ProDOS allows a maximum of 32 Megabytes per
drive. Any available disk space above the maximum is shifted
to the next partition(s).
If you decide to resize the partitions remember this important
guideline:
BACK UP!
When you enlarge a partition, you're taking space away from
another partition. The space you take away may be the portion
that contains important files or applications. Backup copies of
the partitions let you correct any slips you might make.
The partition you have selected will give space to or take space
from the next partition(s) down.
Sizing Rules
When sizing, keep in mind the following rules:
1)
You must have the operating system of both the
partition you are resizing as well as the partition next in
line set to CLEAR.
2)
Any sequential files that are also set to CLEAR may also
be modified.
ProDOS allows a maximum partition size of 32 Meg.
3)
20
Vulcan
4)
DOS 3.3 allows a maximum partition size of 32 Meg
made up of a number of either 140K or 400K volumes
(set in the FORMAT option).
5)
Pascal allows a maximum partition size of 16 Meg
(16,383.5K -- $7FFF).
6)
CP/M allows a maximum partition size of 8 Meg
(8192.0K -- $4000).
Sizing the Partition
*
IMPORTANT: If you currently have files within the
partitions you are resizing, you could lose these files.
Back up the partitions that will be involved in resizing
before making any changes.
When resizing a partition, you’ll need to:
1)
Unlock the partitions that will be involved in resizing.
Refer to “Locking/Unlocking Partitions” above.
2)
Set the partition to CLEAR
This allows you to take space away from one partition and
distribute it to others.
To set the SYSTEM to CLEAR, while in MODIFY mode:
i)
Move the cursor to the SYSTEM column of the
partition you want to resize.
ii)
Press <return>.
iii) Use the arrow keys to toggle through the system
options until you reach CLEAR.
iv) Press <return>
3)
Set the partition size.
To select the size for a partition:
i)
Move the cursor to the SIZE column of the
partition you want to change.
ii)
Press <return>.
iii) Select the size for the partition using the same keys
that move the cursor.
Ch. 3. The Partition Manager
21
To
Use
increase size by 32K
decrease size by 32K
increase size by 0.5K
decrease size by 0.5K
“1” or up arrow
“M” or down arrow
“K” or right arrow
"J" or left arrow
iv) Press <return>
The sizes are dependent upon the total available space. All of
the hard disk memory must be allocated to one partition or
another. When you shift space from any partition, it will affect
the space of the next partition.
Allot the sizes to higher number partitions in a “trickle down”
method; pass memory from the lower numbered partitions to
the higher numbered.
LOCK
1
2
3
4
5
6
7
NAME
SIZE
ON
SYSTEM
20000.0K
CLEAR
5000.0K
CLEAR
5000.0K
CLEAR
5000.0K
CLEAR
2500.0K
PASCAL
2500.0K
CP/M
.0K
BOOT
CLEAR
In the example above, partitions 1-4 would be the only ones
affected by a SIZE change because 5 and 6 are not clear.
*
Important: After changing the size of the partition,
you’ll need to reset the SYSTEM and FORMAT.
Turning Partitions On or Off
Although you can segment the drive into 16 partitions, due to
the restrictions imposed by the various operating systems, all 16
cannot be active at once. You can have four active partitions at
one time under ProDOS and CP/M. DOS 3.3 and Pascal
however, allow only two partitions at one time.
You can decide which partition you want to use during a
particular session by turning them ON (*) or OFF (blank). When
a drive is off (inactive), it will not be recognized by the computer
but all data stored within that partition is saved. It’s like saving
files to a disk and then pulling the disk out of the drive.
22
Vulcan
Because ProDOS can recognize only 8 online volumes, you may
want to have less than four drives active depending on your
system’s setup.
For example: if you have two 5.25” drives, two 3.5” drives and a
RAM disk, you would only want three Vulcan partitions active.
If you have four turned on, one drive unit will not show up
properly.
Another example: teachers can use the partition to store
different classes’ files. They can turn off all the partitions except
for the current class.
To turn the partition ON or OFF while in the MODIFY mode:
1)
Move the cursor to the ON column of the partition you
want to turn ON or OFF.
2)
Press <return> to toggle between the ON setting (*) and
the OFF setting (blank).
•
Note: If you have the maximum number of partitions
for the operating system turned ON, when you attempt
to turn another one ON, the PM will beep and not let
you.
3)
Use the arrow keys to move to your next option or press
<esc> to return to the main menu.
Selecting the operating System
Under the SYSTEM option, the Partition Manager gives you five settings
from which to choose. These are:
PRODOS
PASCAL
DOS 3.3
(TIM
CLEAR
•
IMPORTANT: If you currently have files within the
partitions for which you are changing the SYSTEM
setting, you’ll lose these files. If there is information
that is valuable to you on these partitions, back them up
before making any changes.
When selecting an operating system, while in the MODIFY
mode you’ll need to:
1)
Unlock the partitions for which you want to chose a
system. Refer to “Locking/Unlocking Partitions” above.
Oh. 3 - The Partition Manager
23
2)
Move the cursor to the SYSTEM column of the partition
you want to resize.
3)
Press <return>.
4)
Use the arrow keys or I, J, K, M keys to toggle through
the system options until you reach the desired system.
5)
Press <return>.
6)
Changing systems automatically turns off that partition
so turn on the partition if you want it active.
After you’ve selected a system, you’ll still need to format the
partition by using the FORMAT option before you can actually
use the partition for file storage and booting.
Selecting the Boot Partition
The boot flag tells the computer which partition to go to at
startup.
Booting Rules
When selecting a boot partition keep the following rules in
mind:
◊
You can have only one partition set to boot.
◊
The partition you set to boot can be any of the four
operating systems.
◊
The boot partition does not have to be the first partition
of that operating system.
◊
The boot partition must have the boot files required for
that system copied into the partition.
◊
Under DOS 3.3, the first volume of the boot partition
must contain the boot files.
IIGS Only
24
Vulcan
◊
To boot from a Vulcan partition, you’ll need to have the
Startup Slot set to the slot containing the Vulcan’s
controller card or to slot 7 if you’re pseudo-slotting the
card. (Refer to Ch. 1, Slot 7 Exception, for information
about pseudo-slotting.)
◊
If you do not set the Startup Slot to the Vulcan’s drive,
the computer will ignore the Partition Manager’s boot
flag.
Set Boot Partition
To set the boot partition, while in MODIFY mode:
1)
If there is not already an asterisk in the boot column of
the partition you want to boot from, move the cursor to
that column.
2)
Press <return>.
The asterisk will be removed from its current position and will
appear in that column you currently have selected.
Leaving MODIFY Mode
Before Leaving
Before you leave MODIFY mode, make sure your settings
are the way you want them.
◊
Have you set the partition to the system you want?
◊
Are the partitions you want active turned ON?...
How To Leave
To leave the MODIFY mode and return to the top of the
menu, press <esc>. If you have made any changes to the
partitions, you will be asked if you want to save (UPDATE)
or cancel (UNDO) the modifications. (See below.)
Canceling/Saving Changes
When you leave the MODIFY mode, you’re asked if you want to
UPDATE or UNDO the changes you have made.
To
Save modifications
Cancel modifications
Return to MODIFY mode
Press
Y
N
<esc>
Updating the changes will save the changes you have made and
leave you in the main menu. You’ll need to format any
modified partitions to make them useable.
Undoing the modifications will reset the partition table to the
settings it had before you last entered the MODIFY mode and
leave you in the main menu.
<esc> will return you to the last position you were in on the
partition table with all recent modifications unchanged.
Ch. 3 - The Partition Manager
25
Formatting
*
Note: Formatting will completely erase everything that
may still reside on the partition being formatted. You
should have all important files backed up by this time.
Once you have your partitions set to the desired size and
operating system, you’ll want to format the partitions for their
particular system so they can be written to and read from.
*
Note: You don’t need to alter the partitions to reformat;
you can leave the partitions unmodified and still use
the format command.
To format a partition:
1)
While in the top part of the menu, select FORMAT.
2)
Press <return>.
A selection bar will appear over the partition rows.
3)
Use the arrow keys to select the partition you want to
format.
4)
When you have the selection bar over the desired
partition, press <return>.
The PM will format the partition according to the system you
have chosen for that partition.
*
Note: In DOS 3.3, you can set up several different
volumes per drive. You’ll be asked how many small
volumes (140K) you want. The rest of the space will be
used for large volumes (400K). As you select how many
140K drives you want, the format table will update the
number of 400K drives to be formatted and tell you how
much disk space is unused. You’ll need at least one
140K drive if you want to boot from that DOS partition.
5)
Select another partition to format or press <esc> to
return to the main menu.
Print
The PRINT option lets you print the current PM screen if you
have a printer online. You may want to print after making
modifications to the PM to remind you of your current settings.
To print the current setup, select PRINT from the top part of the
menu, type in the slot number of your printer (or <esc> to
cancel) and then press <return>.
26
Vulcan
Quit
When you're ready to leave the Partition Manager, use the QUIT
option.
Final Check
Before you leave the PM, check your settings to make sure they
are as you want them.
◊
◊
◊
Have you formatted the resized and new partitions?
Are the partitions you want active turned on?
Do you have the boot flag set to the proper partition?
Quitting
You can leave the PM by selecting QUIT from the top part of the
menu followed by <return>.
Once you’ve saved the modifications and formatted the
partitions, you can copy files to the active partitions or restore
files from the backups.
Oh. 3 - The Partition Manager
27
Æ
Vulcan
28
Vulcon
CHAPTER FOUR
ProDOS 8, DOS 3.3, Pascal, and CP/M
*
Note: You must be within a partition’s operating
system before you can copy files to it. For example, you
can’t copy to the DOS 3.3 partitions while in ProDOS.
Only the partitions that are currently ON and contain
the system currently booted will be recognized.
ProDOS 8
The ProDOS 8 we’ve included on the Vulcan and the 3.5” disk is
a modified version which allows ProDOS 8 to recognize more
than two Vulcan partitions. If you’re booting from other
ProDOS disks, copy this version of ProDOS to them.
The first two ProDOS partitions which are ON will be drives 1
and 2 fo the Vulcan’s slot. If you have more than 2 on, the
other(s) will show up as drives in another slot (probably 1). This
doesn’t interfere with any other device you have in that slot.
DOS 3.3
We’ve included several DOS 3.3 programs to help you use your
DOS partitions effectively.
Recognizing Vulcan under DOS 3.3
After you’ve set aside some of the hard disk space by setting up
one or two DOS 3.3 partitions, you’ll need to inform the
computer where these drives are located.
1)
Set up the DOS 3.3 partition(s) as described in the
previous chapter.
2)
Inform the DOS 3.3 operating system where drives are.
i)
Boot Vulcan’s DOS 3.3 floppy disk.
ii)
Choose Quit from the menu. (You’ll get two cursors
on the screen.)
iii) Type IN#n (where n is the slot number containing
the Vulcan).
Now, if you’ve formatted the volumes under the Partition
Manager and turned ON the partition(s), all the volumes are set
up to copy to and read from.
Ch. 4 - ProDOS 8, DOS 3.3, Pascal. and CP/M
29
Booting from a Vulcan DOS 3.3 Partition
To boot from a DOS 3.3 partitions, follow these steps:
1)
Follow the steps in the previous section.
•
Note: The first volume must be 140K; you cannot boot
from a 400K volume.
2)
Initialize Volume 1 to make it a bootable device. The
procedure is the same as initializing a standard DOS 3.3
disk with the addition of a volume number as in the
following example: INIT HELLO, S7,D1,V1
3)
Copy the DOS 3.3 disk to VI. (See the section on FID for
copy instructions.)
Patched DOS 3.3 Notes
The version of DOS you’ve installed with the INIT HELLO
command is a patched version. The patched version allow DOS
to accept lowercase letters, reduces loading time, and corrects an
error in the append command.
Do not use this version to INIT floppy disks. The patched
version will look for a Vulcan and will not boot if it cannot find
one. Instead, use the unmodified version of DOS 3.3 included
on the floppy disk to INIT other floppy disks.
If you change slot, you’ll need to repeat the process detailed in
the two sections above. The patched version expects to find the
Vulcan in a particular slot. If you switch slots, DOS won’t be able
to find the Vulcan until you repeat the necessary steps.
Volume Sizes
The sizes of the DOS 3.3 volumes depend upon the sizes you
chose while in the Partition Manager. Use the chart below to
determine the maximum number of files each of your DOS 3.3
volumes will hold.
Partition Size
140K
400K
Maximum Files
105
217
Copying Files to the DOS 3.3 Partition
Non copy-protected DOS 3.3 files can be copied to the DOS 3.3
partition(s) using Æ’s own version of Apple File Developer
program (FID) included on the Vulcan’s DOS 3.3 floppy disk.
30
Vulcan
Copying Files with FID
RD is a binary program which will copy DOS 3.3 files and
applications from one disk to another. Apple’s original version
does not recognize hard drives as an option. We’ve modified the
version included on the Vulcan’s DOS 3.3 disk to recognize the
Vulcan’s DOS 3.3 partitions and allow you to copy files to
them.
To execute AE FlU,
Either:
1)
2)
Boot Vulcan’s DOS 3.3 floppy disk.
Select AE FID from the main menu.
1)
Run BASIC.
2)
Type BRUN AEFID at the BASIC prompt ( ] ) with
Vulcan’s DOS 3.3 floppy disk in an on-line drive.
OR
Once the program is running, follow the steps below to copy files
to your DOS 3.3 partition(s).
*
Note: The following instructions assume that you’ve
already formatted the volume you’re copying to and that
you are copying from your Slot 6, Drive 1 5.25”
drive to a Vulcan partition in Slot 7.
You can exit from most parts of the program by pressing <esc>.
Type (followed by <return>
1
6 (or floppy drive slot)
1
7 (or Vulcan’s Slot)
1
1
Result
Selects option 1 (Copy Files)
from the AE FID main menu.
Specifies slot 6 as the source
slot.
Specifies drive 1 as the source
drive.
Specifies slot 7 (or whichever
slot Vulcan is set up for) as the
destination slot.
Specifies drive I as the
destination drive
Specifies volume I as the
destination volume.
Oh - 4 ProDOS 8. DOS 3.3. Pascal, and CP/M
31
AE.FID (or=)
Specifies filename of first file to
copy. The equal sign (=) is a
wild card character meaning
“copy all”.
Repeat the above steps for each file you want copied or, if you’ve
pressed “=“, you won’t need to repeat the steps for individual
file copying.
S
(or any key)
9
CATALOG
Returns you to the AE FID
menu.
Quits and returns you to the
BASIC prompt.
Lists the directory of the
destination disk.
The Rest of FID
Following is a description of each of AE FID’s menu options.
<1> COPY FILES
As in the instructions above, this command lets you
transfer files from source to destination. Use “=“ (equal
sign) for “copy all.” You can also use it to copy all files with
certain letters. For example, =FX= will copy all file with FX
in the name.
Prompting will list each file and wait for you to type “Y” to
copy or “N” to skip to the next file.
<2> CATALOG
This command gives you a directory listing of the DOS
volumes currently online.
The first time you select this option in a session, you’ll be
asked to specify the slot, drive, and volume. The
subsequent times, you’ll be returned to the volume last
chosen. To view a different volume, use <7> RESET SLOT
AND DRIVE before pressing <2> again.
<3> SPACE ON DISK
Use this command to show the amount of space (sectors)
free and used for each volume,
140K volumes will have 528 sectors free after initializing.
400K volumes will have 1536 sectors free. If you use INIT
to write a boot image to volume 1, you’ll have 490 sectors
free. (V1 must be a 140K volume).
32
Vulcan
The first time you select this option in a session, you’ll be asked to specify
the slot, drive, and volume. The subsequent times, you’ll be returned to the
volume last chosen. To view a different volume, use <7> RESET SLOT AND
DRIVE before pressing <3> again.
<4> UNLOCK FILES
To unlock individual files, use this command.
The first time you select this option in a session, you’ll be asked to specify
the slot, drive, and volume. The subsequent times, you’ll be returned to the
volume last chosen, To work with a different volume, use <7> RESET SLOT
AND DRIVE before pressing <3> again.
Use "="(equal sign) for “unlock all.” This is most often easier than trying to
remember specific filenames.
When you use “=“ you’ll be asked if you want prompting. Prompting will list
each file and wait for you to type “Y” to unlock or “N” to skip to the next
file.
<5> LOCK FILES
Same as above but for Locking instead of Unlocking individual files.
<6> DELETE FILES
Permanently erases files from the disk. DELETE uses the same operation
method as LOCK and UNLOCK.
<7> RESET SLOT & DRIVE
Use this command to reset the slot, drive, and volume selection of options
1-6 and 8. After selecting this option, the other options will again ask you
to specify the slot, drive, and volume numbers.
<8> VERIFY FILES
This option makes sure that the files are as they should be. Same operation
method as UNLOCK.
<9> QUIT
The QUIT option exits FID and returns you to the main menu or to the BASIC
prompt.
Ch. 4 - ProDOS 8, DOS 3.3, Pascal, and CP/M
33
Other DOS 3.3 Goodies
We’ve included some other helpful utilities on the DOS 3.3 disk.
Run Volume 2 Hello - Runs Hello program on V2 of the
same partition.
Park Heads - Moves hard drive’s heads to safe place. Use just
before shut down.
C a t a l o g A l l V o l u m e s - complete listing of all DOS 3.3
volumes in active partition. (Press any key for next
volume, <return> or <esc> for main menu.)
Edit Volume Names - allows you to changes names of
volumes.
AE FID - utility that enables you to copy, lock, unlock, delete,
and verify files and more.
Partition Manager - DOS version of Vulcan’s Partition
Manager.
Remove Vulcan Patch - removes patch described below. Use
before formatting floppy disks.
Install Vulcan Patch - program that patches DOS when you
boot included disk and enter INIT HELLO command.
Allows DOS 3.3 to accept lower case characters, loads
system faster, and fixes bug in APPEND command.
Boot ProDOS Partition - Boots first active Vulcan ProDOS
partition. BRUN from main directory.
CP/M
Once you’ve set up and formatted your CP/M partitions and
have one or two turned ON (as described in the previous
chapter) the partitions are ready to initialize. Use the programs
that came with your liscenced version of CP/M to initialize.
To boot from a Vulcan CP/M partition, the partition from which
you want to boot must be set up as the A> drive.
Pascal
*
Note: You must use Pascal 1.3 with the Vulcan.
Once you’ve set up and formatted your Pascal partitions and
have one or two turned ON (as described in the previous
chapter), the partition is ready to use. Copy to it from your Pascal
disks as you would to a floppy. Be sure to copy the necessary
system files to the boot partition. Keep in mind that Pascal has a
maximum file limit of 77 files.
34
Vulcan
CHAPTER FIVE
Backing Up the Vulcan
Introduction
Because Vulcan’s partitions act as separate disks, you'll need to
backup the partitions separately.
We’ve included Apple Computer’s Backup IL program on the
ProDOS partition of the Vulcan for backing up the ProDOS
partitions.
To back up the DOS 3.3, Pascal, and CP/M partitions, use an
appropriate backup program for those systems.
Backup II for ProDOS
Backup II is Apple’s ProDOS volume backup program. It uses
the full 800K of 3.5” disks by segmenting the files to conserve
space. This means that if it is in the middle of copying a file
when it runs out of room on one disk, it finishes that file on the
next disk. When you restore, the segments are rejoined.
*
Note: If you don’t understand what pathnames, files,
folders, or directories are, please refer to A Brief ProDOS
Tutorial in the appendices of this manual.
Number of Disks Required
Refer to the chart below to determine about how many disks it
will take to back up your ProDOS partitions.
To back up
20 Meg
40 Meg
100 Meg
Requires
25 800K disks
50 800K disks
125 800K disks
Or
143 140K disks
286 140K disks
714 140K disks
If the drives are not completely full, it will take fewer disks for the backup.
Ch. 5 - Backing Up the Vulcan
35
Suggested Backup Schedule
If you use your computer constantly, we recommend that you
use make a backup of the entire hard disk on a weekly basis and
back up individual modified files daily. If you don’t use your
computer that much, a bimonthly or even monthly full backup
may be all you need. But always back up any important
documents after creating or modifying them.
Before You Back Up
You should have plenty of disks and labels ready as well as a
marker to label the backups.
*
Note: Format the disks first. While Backup II will
format the disks, it will run quite a bit faster and require
you to answer less prompts if you format first. Backup II
gives the disks its own sequence of names so it does not
matter what you call them when you format.
Running Backup II
To run Backup II, double-click the Backup II icon on the finder.
You can also run the program from any other program selectors
that you use. Select BACKUP II.
Once in the program, you’ll be given three options as shown
below:
B — BACKUP FILES
R — RESTORE FILES
Q - QUIT
PLEASE SELECT AN OPTION
Backup Entire Hard Disk
If you use your computer heavily, you should backup your
entire hard disk weekly. Light users may feel comfortable with
making backups bimonthly or even monthly.
To backup the entire contents of the Vulcan, follow these steps:
36
Vulcan
*
Note: Remember that it’s much quicker to preformat
the disks instead of letting Backup II do it. Refer to the
chart at the beginning of this chapter to get an idea of
how many disks to preformat.
1)
Run Backup II.
2)
Label one of the blank formatted disks /BU1 along with
the date and insert it into the drive to which you’ll be
backing up.
3)
While in the main menu, press the B key on your
keyboard. This selects the BACKUP FILES option.
B — BACKUP FILES
R - RESTORE FILES
Q - QUIT
PLEASE SELECT AN OPTION
4)
Press "P” to select BACKUP MODIFIED FILES.
M - BACKUP MODIFIED FILES
P — BACKUP BY PATHNAME
SELECT AN OPTION OR <ESC>:
5)
At the BACKUP FROM prompt, type in a slash followed
by the name of your Vulcan partition. Ex:
BACKUP FROM
(/VULCAN1
--
This will backup the entire contents of the partition.
6)
Press <return>.
7)
At the TO THE DEVICE -- prompt, type in the slot
number of your floppy drive (usually “5” for 3.5” and
"6" for 5.25").
8)
Now type in the drive number of your floppy drive.
•
Warning!: If you’re booting from a RamKeeper, the 3.5”
drive number will be 2. If you enter 5,1, you'll be
writing to the RamKeeper
TO THE DEVICE -(SLOT 5 DRIVE 1)
9)
Press <return>.
Ch. 5 - Booking Up the Vulcan
37
10) Select where to output the file list;
◊ Press <return> for screen only
◊ Press P-<return> for printer and screen if you have
a printer connected.
Backup II will then begin the backup procedure. The program
will tell you which disk it is currently backing up as well as how
many total disks it needs.
As it finishes filling each disk, it will send the following message
to the bottom of the screen:
REPLACE WITH THE NEXT BACKUP VOLUME
PRESS SPACE. TO CONTINUE. <ESC> To EXIT
The program names the disks /BACKUP.VOLUMEn where n is
the sequential number of the disk.
11) While the program is copying one disk, write the label
of the next disk(/BU2 (date), /BU3 (date}).
When it’s done, the program will send you the message
OPERATION COMPLETE,
PRESS SPACE TO CONTINUE
Keep the file listing with the set of backup disks.
Backup Modified Files
You should always keep backups of any data that is important to
you. If you use your computer daily, get into the habit of saving
your modified files at the end of each day.
To backup modified files, follow these steps:
*
36
Note: Do not use your set of main backup disks; use a
blank formatted disk. (Again, Backup II will format but
it is quicker to format beforehand.)
1)
Run Backup II.
2)
Label one of the blank formatted disks /MOD1 along
with the date and insert it into the drive you’ll be
backing up to.
3)
From Backup II’s main menu, press the B key on your
keyboard. This selects the BACKUP FILES option.
Vulcan
B — BACKUP FILES
R — RESTORE FILES
Q - QUIT
PLEASE SELECT AN OPTION
4)
Press “M” to select BACKUP MODIFIED FILES.
M — BACKUP MODIFIED FILES
P - BACKUP BY PATHNAME
SELECT AN OPTION OR <ESC>:
5) At the BACKUP FROM prompt, type in a slash followed
by the name of your Vulcan partition. Ex:
BACKUP FROM -(/VULCAN1
6)
Press <return>.
7)
At the TO THE DEVICE -- prompt, type in the slot
number of your floppy drive (usually “5” for 3.5” and
“6” for 5.25”).
8)
Now type in the drive number of your floppy drive
(usually 1, if you’re booting from a RamKeeper
however, the 3.5” drive number will be 2).
9)
Press <return>.
10) Select where to output the file list;
*
Note: We recommend keeping a printed list of the
disks contents if you’re able.
◊
◊
Press <return> to send the list to the screen only
Press P-<return> to send the list to the printer and
screen if you have a printer connected.
Backup II will then begin the backup procedure. The program
will tell you which disk it is currently backing up as well as how
many total disks it needs.
11) While the program is copying one disk, write the label
of the next (/MOD2 (date), /MOD3 (date)).
Listing Files
To get a printout of the backup disk contents at any time, follow
these steps:
Oh. 5 - Backing Up the Vulcan
39
1)
Run Backup II.
2)
Insert the disk from which you want a listing into the
proper floppy drive.
3)
From Backup H’s main menu, press the R key on your
keyboard. This selects the RESTORE FILES option.
B — BACKUP FILES
R — RESTORE FILES
Q — QUIT
PLEASE SELECT AN OPTION
4)
Press L to select LIST FILES.
V - RESTORE VOLUME
P - RESTORE BY PATHNAME
L - LIST FILES
SELECT AN OPTION OR <ESC>:
5)
At the LIST... prompt, type in the slot number of your
floppy drive (usually “5” for 3.5” and “6” for 5.25”).
6)
Now type in the drive number of your floppy drive
(usually 1, however, the 3.5” drive number will be 2 if
you’re booting from a RamKeeper).
LSIT THE TABLE OF CONTENTS FROM
(SLOT 5 DRIVE 1)
7)
—-
Select where to output the list;
◊
◊
Press <return> to send the list to the screen only
Press P-<return> to send the list to the printer and
screen if you have a printer connected.
Restore Individual Files
If a particular file or group of files gets corrupted, lost, stolen, etc.,
you can restore that file or group from a backup by doing the
following:
40
*
Note: If you’re restoring a file or folder that already
exists, the existing file or folder will be replaced by the
restored version.
1)
Run Backup II.
2)
Insert the disk containing the file you’ll be restoring into
the proper floppy drive.
Vulcan
•
Note: If you don’t have a list of what files are on what
disks, you can list the contents of each disk following the
instructions under the Listing Files section above.
3)
From Backup II’s main menu, press the R key on your
keyboard. This selects the RESTORE VOLUME option.
B - BACKUP FILES
R - RESTORE FILES
Q - QUIT
PLEASE SELECT AN OPTION
4)
Press P to select RESTORE BY PATHNAME.
V - RESTORE VOLUME
P - RESTORE BY PATHNAME
L - LIST FILES
SELECT AN OPTION OR <ESC>:
5)
At the RESTORE FROM -- prompt, type in the slot
number of your floppy drive (usually “5” for 3.5”
drives.)
6)
Now type in the drive number of your floppy drive
(usually 1, however, the 3.5” drive number will be 2 if
you’re booting from a RamKeeper).
RESTORE FROM -(SLOT 5 DRIVE 1)
7)
You’ll then be given the pathname of the disk in the
floppy drive, ex:
RESTORE FROM ——
(/BACKUP .VOLUME11/
8)
Enter the pathname of the file or directory you want to
restore, ex:
RESTORE FROM -(/BACKUP .VOLUME11/MY.FILES
In this example, if MY.FILES was a directory, the entire
directory would be restored.
9)
Press <return>.
Ch. 5 - Backing Up the Vulcan
41
10) At the TO THE DIRECTORY — prompt, type in the name
of the directory (and the pathname if so desired) to
which you’ll be restoring the file or files, ex:
TO THE DIRECTORY
——
(/VULCAN1
11) Select where to output the restored file list;
◊
Press <return> to send the list to the screen only
◊
Press P-<return> to send the list to the printer and
screen if you have a printer connected.
Backup II will then begin the restore procedure. The program
will tell you which file is currently being restored. When it’s
done, it will give you the message,
OPERATION COMPLETE,
PRESS SPACE TO CONTINUE
42
Vulcan
APPENDICES
The following appendices are included for further reference and
reading enjoyment:
A
- - Trouble Shooting
B
- - Vulcan Speed Under GS/OS
C
- - Hardware
D
- - A Brief Pro DOS Tutorial
E
- - Getting Help
Appendices
43
Æ
Vulcan
44
Vulcan
APPENDIX A
Trouble Shooting
If you can't boot
◊
◊
◊
◊
◊
Check the switch settings (refer to chapters 1 and 2).
Check which drive is set to boot under the Partition
Manager.
Is the boot partition turned ON under the Partition
Manager?
Does the partition set to boot contain the necessary boot
files?
Turn off the computer then see if the controller card and cables are
correctly installed.
IIGS Only
◊
Make sure the Startup Device is set to the Vulcan’s slot in the Slots
option of the Control Panel.
ProDOS Can’t Find All Four Vulcan Partitions
Eight Total Drive Devices
ProDOS can access a maximum of eight drive devices. If you
have more than eight drive devices under ProDOS (a RAM disk,
two 3.5” disk drives, two 5.25” disk drives and four ProDOS
Vulcan partitions), one of the drives will not be recognized.
You’ll need to either turn off one of the Vulcan partitions or
disable one of the other drive devices.
Two Drive Devices per Slot
ProDOS 8 has a limit of two drive devices per slot (except for Slot
5). For ProDOS 8 to recognize three or four active partitions,
you’ll need to copy the patched version of ProDOS included on
the Vulcan’s first ProDOS partition (as shipped) and on the
Vulcan’s 3.5” and 5.25” ProDOS disk. Use the included program,
PRODOS.PATCHER, to patch ProDOS 8 on your boot drive.
*
Note: GS/OS users will need to patch P8, not PRODOS.
Run the program and enter the ProDOS pathname of the disk
you want to modify.
Ex:
/YOUR.DISK/SYSTEM/P8 (for GS/OS) or
/YOUR.DISK/PRODOS (for ProDOS 8 disks)
App. A - Trouble Shooting
45
APPENDIX B
Vulcan Speed Under GS/OS
(IIGS Only)
We’ve written a special driver to speed up the Vulcan’s access
time under GS/OS. If you’re booting GS/OS from the Vulcan
this driver is automatically installed. However, if you’re booting
from a RAM disk, ROM disk or 3.5” drive, you’ll need to copy
the driver to the boot disk.
To copy the Vulcan Driver using the Finder follow these steps:
1)
Open the Vulcan’s System folder (or the System folder
of the Vulcan’s 3.5” disk).
2)
Open the Vulcan’s Drivers folder (located within the
System folder).
3)
Open the System folder of the disk from which you
want to boot.
4)
Locate the Drivers folder within the System folder.
5)
Drag the file VULCAN from the Vulcan’s Drivers folder
to the boot disk’s Drivers folder.
AE1
SYSTEM
DRIVERS
VULCAN
BOOT DISK
SYSTEM
DRIVERS
Where to Put the Vulcan Driver
You can also use your favorite copy program to copy the driver.
Source: /AE1 /SYSTEM/DRIVERS/VULCAN
Destination: /YOUR.BOOT.DISK/SYSTEM/DRIVERS
where /AE1 is the name of your Vulcan GS/OS partition and
/YOUR.BOOT.DISK is the name of the disk to which you’re
copying.
Now when you boot from the disk, the Vulcan driver will be
installed and your access speed will be dramatically improved.
45
Vulcan
APPENDIX C
The Vulcan Classic Desk Accessory (IIGS Only)
Included in the System folder on the first Vulcan partition is a
Classic Desk Accessory that allows you to set the boot partition,
write protect individual partitions, or park the Vulcan’s heads.
Accessing the Desk Accessory
Access the Classic Desk Accessories menu by holding down the
OA and <control> keys while pressing <esc>. Pressing these
three keys will display a Desk Accessories menu much like the
one shown below (appearance may vary according to which Desk
Accessories you have loaded).
Desk Accessories
Control Panel
Alternate Display Mode
AE Vulcan
Quit
Classic Desk Accessories Menu
Use the up and down arrow keys to highlight the Vulcan option.
Press <return>.
The Vulcan main menu will appear as shown below:
Vulcan (TM)
Set Boot Partition
Write Protect Partition
Park Heads
About Vulcan...
Quit
Vulcan V-Copyright (c) 198Applied Engineering
Select
Open
Vulcan Main Menu
App. C - The Vulcan Classic Desk Accessory
47
Again, use the up and down arrow keys to select the option. The
different options and their functions are described below.
Set Boot Partition
Choose this option to select from which partition you want to
boot. A check mark appears next to the partition currently set to
boot.
To change the boot partition, follow these steps:
1)
Use the up or down arrow keys to highlight the partition
you want to set as the boot partition.
2)
Use the left or right arrow key to move the check mark
to the highlighted partition.
3)
Press <return> to return to the Vulcan main menu or
<esc> to leave the boot partition as it was.
*
Note: You must set the Startup Slot (in the Slots option
of the Control Panel menu) to the Vulcan’s slot before
the partition boot setting will be active.
Write Protect Partition
Activating the write protect feature is the same in function as
write protecting a floppy disk. You will not be able to store new
information to the write protected partitions.
To write protect a partition, follow these steps:
1)
Use the up or down arrow keys to highlight the
partition you want to write protect.
2)
Use the left or right arrow key to put an asterisk beside
any partition you want to protect.
3)
Press <return> to return to the Vulcan main menu or
<esc> to leave the Write Protection menu as it was.
•
Note: You must reboot before the write protection can
take effect.
Park Heads
Parking the heads moves the read/write heads to a more durable
part of the hard disk to reduce the risk of damaging the drives
when the hard disk is being moved. You don’t really need to
park the heads unless you plan to move your computer.
48
Vulcan
•
Note: If you press <esc> after selecting the Park Heads
option, you’ll be returned to the Vulcan main menu
and the heads will no longer be parked.
About Vulcan...
About Vulcan tells you the version number of the Vulcan Desk
Accessory, tells you who created the Vulcan, and gives you the
numbers for Sales and Tech Support.
Quit
Selecting Quit returns you to the Desk Accessories main menu.
Copy the Vulcan CDA to Your Boot Disk
If booting from a disk other than AE1, you’ll need to copy the
Vulcan desk accessory to the boot disk’s Desk Accessory folder in
the System folder.
AE1
SYSTEM
DESK.ACCS
VULCAN.CDA
BOOT DISK
SYSTEM
DESK.ACCS
Where to Put the Vulcan Classic Desk Accessory
You can also use your favorite copy program to copy the driver.
Source:
/AE1/SYSTEM/DESK. ACCS/VULCAN. CDA
Destination:
/YOUR . BOOT.DISK/SYSTEM/DESK. ACCS
where /AE
1 is the name
/YOUR. BOOT .DISK is the
of your Vulcan GS/OS partition and
name of the disk to which you’re
copying.
Now when you boot from the disk, the Vulcan Classic Desk
Accessory will be loaded.
App. C - The Vulcan Classic Desk Accessory
49
APPENDIX D
Hardware
Switches
The controller card has a block of four switches located in the
lower right hand corner.
What They Do
Switch 1, Interrupt Enable - This switch must be closed in
order for any interrupts generated by the Hard Drive to
pass through to the Apple. (Interrupts are not used at
this time.)
S w i t c h 2 , P S E n a b l e - When pseudo-slotting in the Apple
IIGS, this switch must be closed. When pseudo-slotting
in a //e or ] [ + , this switch must be open.
S w i t c h 3 , ] [ + B o o t E n a b l e - Leaving this switch open allows a
II+ or an unenhanced / / e to boot directly from the hard
disk. If the hard disk is not to be the boot device in these
systems, this switch should be closed. In a IIGS or an
enhanced / / e, this switch should also be closed.
S w i t c h 4 , P s e u d o - S l o t E n a b l e - When this switch is closed,
the controller card will show up in slot 7, no matter
which slot it is in. With it open, the card uses the slot in
which it is placed.
How To Set Them
To change the switch settings, use a small, pointed object,
like a wooden toothpick or bent-out paperclip. The circle
on each switch represents the end that is pressed.
Push down on
number side to
close (ON)
Push down on
side marked “OPEN”
to open (OFF)
Side View
Side View
(from right end)
(from right end)
Flipping the Switches
50
Vulcan
Remote Light Jack
In addition to the on-board LED, there is a two pin connector for
a remote drive activity indicator LED.
Applied Engineering offers an LED extension option. Call Æ
Sales to order at (214) 241-6060.
If you’re so inclined, you can make an extension light to run
from the connector and attach it under the front panel next to
the green LED. Make sure that no wires are exposed; any
exposed wires may short out the motherboard.
*
Warning: Applied Engineering is not responsible for
any damage resulting from modifications to your
computer.
The connector is wired as follows:
Pin 1
(the right pin when facing the board from the chip
side right side up) Anode of the LED
Pm 2
Cathode of the LED
With the lid off, remove the front panel by releasing the three
tabs under the front edge of the computer.
Note the “pocket” in back of the clear window on the underside
of the front panel where the green LED shines through. It is
possible to fit an LED into this pocket.
App. D - Hardware
51
APPENDIX E
A Brief ProDOS Tutorial
This is a brief explanation of the Pro Disk Operating
S ystem, ProDOS, for those who are completely new to it. All of
this information and more is included in your Apple Owner’s
Guide, but we have provided it here for your convenience.
Operating System
ProDOS is one of several operating systems for the Apple.
Others include DOS 3.3 and Pascal. Operating systems, as defined
in the Apple Owner’s Guides, are programs that control how
information is loaded into memory, how the computer handles
the information, how the information is stored on a disk, and
how the computer communicates with the printer and other
peripherals.
Naming Volumes
ProDOS must have a way to locate which disk (often called
“volume”) you want to access. Instead of typing in the location
of the disk as in DOS 3.3 (ex: S6,DI), you simply type in the name
of the disk (the volume name). Some rules for volume names
are
1) Name can include letters, numbers, or periods but not
spaces.
2)
Name must begin with a letter.
3)
Name can be up to 15 characters long.
These rules also hold true for subdirectory names.
Root Directory and Subdirectory
The main directory of the volume is called the root directory.
The root directory uses the same name as your disk.
Subdirectories are ProDOS’ way of organizing information on a
disk.
Think of the root directory as a file drawer and the subdirectories
as folders within the drawer. You can
1)
52
Put files directly into the root directory like putting
documents straight into the file drawer.
Vulcan
2)
3)
Put files within subdirectories like putting documents in
folders.
Put subdirectories within subdirectories like putting
folders within folders.
Pathname
The name of the directory combined with the names of one or
more subdirectories is called a pathname. Volume names and
subdirectory names are preceded by a slash, “1”. (Note that some
applications add the slash for you.) For example, you could have
a volume named /MY . DISK and a file called NY. FILE on the
root directory of that disk. To access that file, you would use the
pathname /MY.DISK/MY.FILE. You could also have a file
JUL . AUG in a subdirectory (folder) called PHONE on a disk called
/BILLS. To access that file, you would use the pathname
/BILLS/PHONE/JUL DEC. Refer to the diagram below.
BILLS (root dir.)
PHONE (subdir.)
JAN. JUN
JUL . DEC
(files)
ELEC . (subdir)
JAN. JUN
JUL . DEC
(files)
ACCOUNT.SYSTEM (file)
GAS
ZIPPY.FUEL
(subdir.)
NITRO.NEDS
(subdir.)
(subdir.)
FAMOUS
(subdir.)
JAN.JUN
(files)
JUL.DEC
JAN.JUN
JUL.DEC (files)
WILD
THE KID
(files)
BO . BAGGINS
ProDOS Directory Structure
Now when an application asks you for the pathname of a file,
you’ll have a basic understanding of what it expects.
System Files
A system file is a ProDOS file that starts an application.
Typically, these files have the suffix . SYSTEM (e.g.
/APLWORKS . SYSTEM, /ACCOUNT. SYSTEM [see above], etc.). When
you boot ProDOS, it runs the first system file listed in its
directory. So, if BASIC.SYSTEM is the first system file on your
ProDOS boot disk, ProDOS will boot and then put you in BASIC.
App. E - A Brief ProDOS Tutorial
53
Additional Resources
The following books are available through most book stores:
Apple II Owner’s Manual (Apple Computer, Inc.) Supplied
with your Apple Computer. Take the time to read it.
Basic Programming with ProDOS (Addison-Wesley
Publishing) Gives a detailed explanation of how to use
ProDOS from AppleSoft Basic.
Beneath Apple ProDOS (Quality Software) Provides
information about ProDOS for both the novice Apple
user and the advanced programmer.
ProDOS Inside and Out (TAB Books) Very good book for
both the beginning and advanced BASIC Programmer.
ProDOS User’s Manual (Apple Computer. Inc.) Provides an
overview of ProDOS and explains how to use the
ProDOS Users Disk.
54
Vulcan
APPENDIX F
Getting Help
If you have a technical question relating to the Vulcan Hard
Drive or any other Applied Engineering product that is not
covered in the manual please contact the dealer from whom
you purchased the product. If you are experiencing difficulties
with one particular program, contact the program’s author or
publisher.
In the event that the dealer or the publisher’s support personnel
cannot answer your question, call Applied Engineering
Technical Support. The support representatives are experienced
in the applications and uses of Applied Engineering products,
but in order to provide a quick and effective answer to your
question, they will need to know as much as possible about the
hardware and software specifically related to your question.
Please provide the technical support representative with the
following information:
◊
The Applied Engineering product related to your
question and its revision number.
◊
The original and current memory configuration of the
card (if applicable).
◊
The model and revision of your computer.
◊
What peripherals are being used and what cards are in
each slot.
◊
The name, version, and revision level of the software
with which you are experiencing problems.
◊
The results of any test programs, diagnostics, or
troubleshooting done by you, your dealer, or your
software publisher’s support department.
Applied Engineering
Technical Support
(214) 241-6069
9 AM to 12:30 PM & 1:35 PM to 5 PM(CST)
Monday Through Friday
(Please call only the number above for technical support. Our
sales office cannot transfer calls to the support lines.)
App. F - Getting Help
55