1
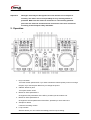
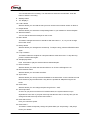
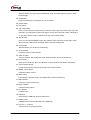
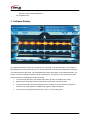
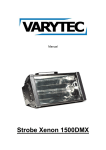
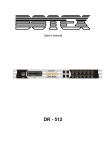
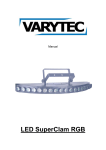
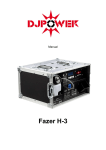
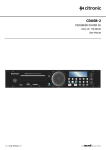
User Manual
DXS-1000 Player
Table of contents
1.
Safety instructions ............................................................................................................................ 3
1.1.
FOR SAFE AND EFFICIENT OPERATION ............................................................................ 3
2.
Operation .......................................................................................................................................... 4
3.
Software Display .............................................................................................................................. 8
2/9
1. Safety instructions
•
This device is suitable for indoor use only.
•
All modifications to the device will void the warranty.
•
Repairs are to carry out by skilled personnel only.
•
Use only fuses of the same type and original parts as spare parts.
•
Protect the unit from rain and humidity to avoid fire and electric shocks.
•
Make sure to unplug the power supply before opening the housing.
1.1. FOR SAFE AND EFFICIENT OPERATION
Be careful with heat and extreme temperature
Avoid exposing it to direct rays of the sun or near a heating appliance.
Not put it in a temperature bellow 32°F /0°C, or exceeding 104°F /40°C.
Keep away from humidity, water and dust
Do not place the set in a location with high humidity or lots of dust.
Containers with water should not be placed on the set.
Keep away from sources of hum and noise
Such as transformer motor, tuner, TV set and amplifier.
To avoid placing on un-stable location
Select a level and stable location to avoid vibration.
Do not use chemicals or volatile liquids for cleaning
Use a clean dry cloth to wipe off the dust, or a wet soft cloth for stubborn dirt.
If out of work, contact sales agency immediately
Any troubles arose, remove the power plug soon, and contact with an engineer for repairing,
do not open the cabinet by yourself, it might result a danger of electric shock.
Take care with the power cable
Never pull the power cable to remove the plug from the receptacle, be sure
to hold the plug. When not using the device for an extended period of time, be sure to
disconnect the plug from the receptacle.
3/9
Important:
Damages caused by the disregard of this user manual are not subject to
warranty. The dealer will not accept liability for any resulting defects or
problems. Make sure the electrical connection is carried out by qualified
personnel. All electrical and mechanical connections have to be carried out
according to the European safety standards.
2. Operation
1. Key Lock button
Turns the master speed on/off. If you have activate the master speed you do not change
the pitch if you use the pitch fader but you change the speed.
2. ON/OFF button for pitch
Turns pitch section on/off.
3. Button for effect parameters 1
Changes the first parameters of the effect, provided you have select one.
4. Button for effect parameters 2
Changes the second parameters of the effect, provided you have select one.
5. Sample Vol button
It sets the recording volume.
6. Loop-in button
With this button you can confirm the starting point for loop recording.
4/9
7. Sample select button
You use this button for recording. Turn the button to select the record folder. Push the
button to start the recording.
8. Standby button
9. TFT Display 7’’
10. Load A button
With this button you can load the title you have chosen in the browser section on Deck A.
11. Playlist button
With this button you select the corresponding folder on your medium to call the Playlists.
12. Waveform button
You can see the waveform analysis on the screen.
13. Menu button
This button changes the screen to interface. With the button 11, 12, 13 you can change
the monitor views.
14. Reloop button
With this button you call again the saved loop. To stop the loop, push the RELOOP button
again.
15. Loop out button
This button marks the endpoint of a loop and starts it at the same time. To stop the loop,
push the LOOP button again.
16. Sample play button
Push this button to play the selected and recorded samples.
17. Effect on button
With this button you switch the selected effect on or off. If the LED lights it is on.
18. Effect selector button
With this button you can select the effect.
19. Sync button
With this button you can synchronize the BPMs to the other Deck. In this case Deck A and
Deck B have to play the same track. Only then it is possible to adapt the songs to the
beats.
20. Pitch button
With this button you can change the pitch range from 6 – 50%.
21. Auto loop button
As soon as you push one of the AUTO LOOP buttons, the system sets the loop in
dependence to the size. If you push 2 the loop has also the size 2. At every time you can
enlarge and reduce the loop sector with LOOP +/-.
22. Pitch slide control
Here you control the speed.
23. Pitch bend +/This button creates a temporary change of speed. While you are pressing + and jumps
back if you release.
5/9
24. Reverse button
With this button you play the track backwards. Push the button again to play the track
forward again.
25. CUE button
Push the CUE button to step back to your Cue point.
26. Pause button
27. Play button
28. Jog mode button
Here you can choose the mode how you want to use the jog wheel. Every time you push
the button you change the mode. If the light is off you are in the pitch mode, if the light is
on you are in search mode, if it flashes you are in the scratch mode.
29. SD card slot
Here you can insert SD/MMC cards. The contacts of the cars have to face down. Card
with more than 4GB are not accepted. SDHC card are unsupported.
30. Control gain
With this button you set the input sensitivity.
31. Channel fader
It sets the volume of the channel.
32. Track encoder
Turn the wheel to leaf through the track. Push the button to see the submenus.
33. Cross fader
Here you can fade from Deck A to Deck B. In center position both Decks are playing.
34. Control booth volume
It controls the volume of the booth output or the monitor output.
35. Master volume button
It sets the master volume.
36. Back button
It activates the browser section and jumps back to the main directory.
37. Mid equalizer
It sets the volume of the mid’s.
38. Bass equalizer
It sets the bass volume.
39. Hi equalizer
It sets the Hi’s
40. USB port
Insert here the USB stick to play tracks from it.
41. Delete button
It deletes tracks from the SD card or the USB stick.
42. Hot Cue 1 – 3 button
It stores the 3 cue points per track.
6/9
43. Touch jog wheel
It is use for scratching or searching.
44. Single A/B button
In the single mode the device plays one track and then stops. If you push the button gain
you will work in the continuous mode as playing all tracks of the medium before stopping.
45. USB port
Insert here the USB stick to play tracks from it.
46. Recording output REC
It is a stereo output to connect a recording device. The recording volume is independent
from master level, booth level, etc.
47. Booth output
Here you can give out and rule individual the monitor signals.
48. Master output unbalanced
Master output unbalanced XLR.
49. Master output balanced
Master output balanced XLR
50. Power on/off
51. AC connection
Use this connection to connect the device with the power supply system. Use only the
included cable.
52. MIC input
¼ ‘’ jack input.
53. MIC button
It regulates the volume of the mic.
54. Cue Control
Here you can set witch signal you want to give out on the headphone output. Left, right or
both in middle position.
55. Cross fader curve
Here you can set the behavior of the cross fader. The left position means gentle fade and
the right position means direct sharp override, e.g. how you need for scratching.
7/9
56. Headphones pot
Sets the volume of the headphones.
57. Headphone out
3. Software Display
The speed and also the beats can be precisely synchronized. If you had done this, it is possible to
fade between the decks back and forth. For visual inspection are both tracks presented in waveform.
The peaks represent the beats. The rectangles below show the position of the measurements in 4/4
stroke. The long rectangles mark the start of measurement. Two tracks are full synchronized if the
peaks an also the rectangles are at the same time.
1. To synchronize the tracks you should at first listen to them on headphone to verify.
2. Start the track and push then the SYNC button to the deck you want to fade.
3. To synchronize then, the long rectangles have to overlap. To do this use the jog wheel in
scratch mode. Press again the SYNC button again to make corrections.
4. You can also use the pitch functions with + and – to correct the speed.
8/9
Importeur:
B & K Braun GmbH
Industriestraße 2
D-76307 Karlsbad
www.bkbraun.com
[email protected]
9/9