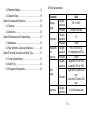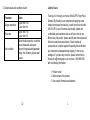
1
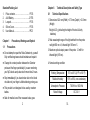
INV-430J/PE Finger Pulse Oximeter User Manual Distributed by: Innovo Groups 406 Sterling Street, Building 2 Camphill, PA, 17011 Phone: +1-858-888-9781 [email protected] http://www.innovogroups.com Innovo Groups 406 Sterling Street, Building 2 Camphill, PA, 17011 Copyright © Innovo Groups 2015. All rights reserved. Innovo Groups owns and reserves all of the rights comprised in the copyright of this document. No part of this document may be changed, excerpted, copied, reproduced, or imitated in any form or by any means without prior written consent of Innovo Groups. 6.3 Storage and Transportation All statements, information, and recommendations in this document are provided "AS IS" without warranties, guarantees or representations of any kind, either express or implied. The information in this document is subject to change without notice. Innovo Groups reserves the right of final interpretation of this document. Version 1.2 Released on May 2015 35 Parameter Pulse rate PI Weak PI Value The greater of ±10% of the preset value and ±5 bpm Min. 0.2% Contents Letter to Users ....................................................................... 1 Standard Packing List ............................................................ 2 Chapter 1 Precautions, Warnings and Symbol......................... 2 1.1 Precautions .............................................................. 2 1.2 Warnings .................................................................. 5 1.3 Symbol ..................................................................... 7 6.2 Chapter 2 About This Product................................................. 9 Safety Type Anti-electric-shock type: internal power supply device 2.1 Overview .................................................................. 9 Anti-electric-shock degree: BF-type application part 2.2 Working Principles and Usage ................................... 9 Running mode: continuous working Waterproof grade: IP22 2.3 Product Features .................................................... 10 2.4 Limitations .............................................................. 11 2.5 Innovative features of the INV-430J/PE .................... 12 Chapter 3 Product Structure Parameter Settings and Operation Steps................................................................................... 13 3.1 Schematic Structural Diagram ................................. 13 3.2 Schematic Diagram of Display ................................. 14 34 3.3 Parameter Settings ................................................. 14 3.4 Operation Steps ...................................................... 19 Chapter 4 Cleaning and Disinfection ..................................... 25 4.1 Cleaning ................................................................. 25 6. Technical parameters Parameter Display range 4.2 Disinfection............................................................. 26 Chapter 5 Maintenance and Troubleshooting ........................ 27 Resolution 5.1 Maintenance ........................................................... 27 5.2 Fault Symptoms, Causes, and Solutions .................. 28 Chapter 6 Technical Description and Safety Type .................. 31 6.1 Technical Specifications .......................................... 31 Measurem ent precision 6.2 Safety Type ............................................................ 34 6.3 Storage and Transportation ..................................... 35 Alert range Alert error Value Oxygen saturation Pulse rate Oxygen saturation Pulse rate Oxygen saturation Pulse rate Oxygen saturation Pulse rate 35% to 100% 25 bpm to 250 bpm 1% 1 bpm ±2% (70% to 100%) No requirement (≤ 69%) ±2 bpm Upper limit: 50% to 100% Lower limit: 50% to 100% Upper limit: 25 bpm to 250 bpm Lower limit: 25 bpm to 250 bpm Oxygen saturation ± 1% of the preset value 33 5. Default values and conditions of alert Parameter Oxygen saturation Pulse rate Alert condition Value Upper limit: 100 Lower limit: 94 Upper limit: 130 Lower limit: 50 When the alert switch is on and the actual measured value goes beyond the preset alert parameter range, the Oximeter gives an alert sound. Letter to Users Thank you for choosing our Innovo INV-430J/PE Finger Pulse Oximeter. By listening to our customers and applying some simple technological innovations, you will come to see that the INV-430J/PE is one of the most user-friendly, reliable and comfortable pulse oximeters that you will ever come to own. Before using this product, please carefully read the manual and follow the instructions stated herein. Check whether all accessories are complete against the packing list and whether any component is damaged during shipping. If there is any damage or if you have any concerns, please contact Innovo Groups at [email protected] or phone: 1-858-888-9781 with the following information: 1. Product model 2. Serial number of the product 3. Your contact information and address 32 1 Standard Packing List Chapter 6 1. 2. 3. 4. 5. 6.1 Pulse oximeter………………………….1 PCS AAA Battery……………………………..2 PCS Lanyard………………………………….1 PCS Silicon Cover……………………………1 PCS User Manual…………………………….1PCS Chapter 1 1.1 Precautions, Warnings and Symbol Precautions Do not attempt to repair the Pulse Oximeter by yourself. Only certified engineers should maintain and repair it. Change the contact position between the Oximeter probe and the finger periodically if you are monitoring your SpO2 levels and pulse rate for more than 2 hours. Stop immediately if you have broken skin or the blood circulation of your finger is affected during prolong use. This product is not designed to be used by newborn babies. Technical Description and Safety Type Technical Specifications 1. Dimensions: 62.0 mm (Width) × 37.0 mm (Depth) × 32.0 mm (Height) Weight: 42.5 g (including the height of the two AAA dry batteries) 2. Peak wavelength range of the light emitted from the probe: red light 660 nm ± 3; infrared light 905 nm ± 5. 3. Maximum optical output power of the probe: 1.2 mW for infrared light (905 nm). 4. Normal working condition Working Temperature 5C to 40C (41F to 104F) Relative Humidity 15% to 80%, non-condensing Atmospheric Pressure 700 hPa to 1060 hPa Rated Voltage DC 3.0 V Seek for medical care if the measured value goes 2 31 Symptom The screen turns off suddenly. beyond the normal range and you are sure that the instrument is not malfunctioning. Possible Cause Solution 1. If the Oximeter does not detect any signal within 10 seconds, it will automatically power off. 1. This is normal. Just turn on the pulse oximeter again. The pulse oximeter uses infrared light (invisible to your 2. Replace the batteries. This pulse oximeter is not a medical device and is not 2. The batteries are empty eyes) to measure your SpO2 levels. Hence, please do not stare at the light-emitting components of the Oximeter, as that could cause harm and/or potentially blind your eyes. intended to diagnose or treat any medical condition or disease. It is intended for non-medical use in healthy people to monitor their pulse and blood oxygen levels during sports and/or aviation only. People who need SpO2 and pulse rate measurements because of a medical condition should not use the INV-430J/PE and should consult with their physician. For details about clinical limitations and contraindications, please carefully consult relevant medical literatures. 30 3 The following factors may affect the accuracy of the measurement: ◆ The Oximeter is used in an environment involving high-frequency devices, such as high-frequency electric knives and CT apparatuses. ◆Ambient light intensity is too bright. Hence, please avoid direct exposure to strong light (such as beams from operating lamps or sunlight) during measurement. ◆The probe of the Oximeter is placed on the same arm that a blood pressure cuff arterial duct or intravenous injection. ◆The user suffers from hypotension, severe vascular atrophy, severe anemia, or low oxygen. ◆ The user is in sudden cardiac arrest or shock state. ◆ The user is wearing nail polish or artificial nails. 4 Symptom Possible Cause The displayed value of the oxygen saturation or pulse rate fluctuates. 1. The finger is not placed properly between the sensor and the OLED. The Oximeter cannot be powered on. 1. The batteries are empty, or are not installed at all. Solution 1. Insert the finger again. 2. Ensure that the user's body is stationary. 2. The user is moving his finger or body. 1. Replace the batteries. 2. The batteries are incorrectly installed. 2. Correctly install the batteries according to the polarity indication. 3. The Oximeter is damaged. 3. Contact the distributor. 29 5.2 Fault Symptoms, Causes, and Solutions Symptom Possible Cause Solution The Oximeter fails to display data about the oxygen saturation and pulse rate. 1. The finger is not placed properly between the sensor and the OLED. 1. Place the finger at the correct position. 2. The user’s blood perfusion is too low to be detected. 2. Make sure nothing is restricting your blood flow 1.2 Warnings Warning: Do not use the Oximeter in an environment with any flammable gases, flammable anesthetic, or other flammable substances. Warning: Keep unit and lanyard away from children as the included lanyard may present an entanglement or choking hazard to small children. Adult supervision required; never leave children unattended with unit or lanyard Warning: Do not throw the batteries into fire, as that could cause an explosion. Warning: Do not attempt to charge the included batteries, as that could cause leakage, fire disaster, or even explosion. Dispose the used batteries in accordance to the local laws and regulations. 28 5 Warning: Do not use the Oximeter in an MRI or CT environment. Caution: Do not operate the Oximeter if it is wet. Avoid moving the oximeter from a cold to a hot and humid environment. Caution: Install the batteries properly before powering on the Oximeter for normal use. Please remove the batteries if you are not planning to use the Oximeter for a long time. Caution: Close the battery cover when the instrument is in use. 6 Chapter 5 Maintenance and Troubleshooting 5.1 Maintenance Remove the batteries from the battery slot and properly store them if you do not plan to use the Oximeter for a long period of time. Replace the batteries if they are low on power. Clean the Oximeter and the fingertip before use to ensure accurate reading. Store the Oximeter between 14 and 122F (–10 to +50C) and at humidity levels no greater than 93%. Periodically check the Oximeter for damage. Avoid using the Oximeter in an environment with flammable gases or using it in an environment where the temperature or humidity is excessively high or low. Check the accuracy of the oxygen saturation and pulse rate readings by using an appropriate calibration apparatus. 27 Attention: Do not allow liquid to flow into the instrument during cleaning. 1.3 Symbol Symbol Attention: Do not immerse any part of the instrument into any liquid. 4.2 Meaning BF-type application part Disinfection Before measurement with the instrument, wipe the silicon finger pad using a piece of dry soft cloth dipped with 75% medical alcohol. Clean the finger to be measured using the medical alcohol for disinfection purposes before and after use. Caution: Please see this manual. %SpO2 Symbol of Oxygen saturation bpmPR Symbol of Pulse rate Do not clean the instrument by using high-temperature / high-pressure disinfecting gas. Manufacture information including the name and address of the manufacturer 26 7 Chapter 4 Symbol Meaning 4.1 Please read the manual carefully. When end users abandon this product, they must send the product to the collection place for recycling. Warning Information that you must learn about possible harm of this product to users Caution Some important information that you must learn Attention Information that is necessary for you to protect this product against damage 8 Cleaning and Disinfection Cleaning Ensure that the appearance of the instrument is clean. To clean the instrument, power off and remove the batteries first. Then clean the outer surface of the instrument (including the OLED screen) using a piece of dry soft cloth dipped with 75% medical alcohol. Do not immerse the unit in alcohol! Caution: Do not use any strong dissolving agent such as acetone. Caution: Do not rub the body of the instrument using materials such as steel wire balls or polished metal objects. Caution: Ensure that there is no any washing liquid on the surface of the instrument. 25 Chapter 2 2.1 About This Product Overview SpO2 stands for peripheral capillary oxygen saturation. Oxygen saturation is defined as the ratio of oxyhemoglobin (HbO2) to the total concentration of hemoglobin (i.e. Oxyhemoglobin + reduced hemoglobin) present in the blood. It is an important physiological parameter involved in respiration and circulation. The Pulse Oximeter feature herein is small, portable, non-invasive and easy to use. The user only needs to insert a finger into the chamber to measure his/her SpO2 and pulse rate. 2.2 Note: Replace the batteries when the batteries run out of power and the symbol flickers on the OLED screen. 24 Working Principles and Usage Oxygenated blood absorbs light Light beams at 660nm (red light), whereas sensor deoxygenated blood absorbs light preferentially at 905nm (infra-red). A pulse oximeter sensor works by passing a beam of red and infrared light through a pulsating capillary bed and then measure the amount of red and infrared light emerging from the tissues via a sensor. To improve 9 accuracy, the INV-430J/PE uses a proprietary algorithm to collect data from pulsatile arterial blood only and ignores local noise from the tissues. The relative absorption of light by oxyhemoglobin (HbO) and deoxyhemoglobin is then processed according to the Beer-Lambert's law and a qualitative measurement of the users’ oxyhemoglobin status i.e. Oxygen saturation level (SpO2) derived. This device is intended for non-medical use in healthy people to monitor their pulse and blood oxygen levels for sports and/or aviation only. Do not use for continuous monitoring. 2.3 Product Features Lightweight, portable and easy to use Huge OLED screen for easy reading Low Battery indicator The device will automatically shut down if no signal is detected after 10 seconds. The device is equipped with two 1.5 V AAA batteries, which will allow the pulse oximeter to operate for approximately 30 hours. 10 to keep your finger still during measurement. It is also not advisable to use this instrument during sports activities as movement may lead to inaccuracies. Once the reading stabilizes, read the measured values of oxygen saturation and pulse rate on the OLED screen. 3.4.5 Switching Off the Power Supply of the Pulse Oximeter The Oximeter will automatically shut down 10 seconds after you remove your finger. 3.4.6 About the Display PRESS (<0.5 sec) the function key in measurement mode to change the display mode. The six different modes are shown in the figure to the right. Choose the mode that is the most convenient for you. 23 2.4 Limitations Spot check pulse oximeter takes 1-2 reading every second and takes an average of 3-6 readings before displaying the result. Hence, you will have to wait at least 3-6 seconds before a result will be displayed on the monitor. If the pulse oximeter fails to detect blood flow for the first few seconds, then the results will be delayed accordingly. Note: Before each test, clean the measured finger and the silicon part of the Oximeter that contacts the finger with medical alcohol. The silicon is non-toxic, soft and hypoallergenic. 3.4.4 Reading Measured Data of Oxygen Saturation and Pulse Rate from the OLED Screen The pulse oximeter does not work for people with naturally small fingers or low peripheral blood flow. This is because the pulse oximeter would not have enough blood to take a measurement. Please note that prolong use of a pulse oximeter, hypotension, vasoconstriction, hypothermia and certain medications can lead to low or restricted blood flow. Nail polish can also impede the pulse oximeter from taking a reading. Finally, it is generally accepted that the saturation percentage is unreliable on the steep part (around 60 mm Hg) of the oxyhemoglobin dissociation curve. The INV-430J/PE pulse oximeter comes with anti-motion technology so that the pulse oximeter can function even if there is finger movement. However, for best results, try 22 11 2.5 Innovative features of the INV-430J/PE The INV-430J/PE attempts to ameliorate some of the above problems by 1) Increasing the sensitivity of the sensor so that it can measure the user’s SpO2 and Pulse Rate (PR) at blood perfusion Index (PI) as low as 0.2%. 2) Comes with anti-motion technology so that the pulse oximeters can still function even when the finger moves. 3) Using a self-adjusting smart spring system to fit the finger snugly but not so tight as to impede blood flow that might lead to a low PI. 4) Using soft, hypoallergenic medical grade silicon in the finger chamber so that the pulse oximeter will not cause discomfort. 5) Using solid ABS plastic to block ambient light from reaching the sensor so that the signal to background ratio and the accuracy of the measurement is dramatically increased. 6) Having a plethysmograph that allows the user to see and gauge the amount of blood detected by the pulse oximeter. This will allow the user to know if the finger is properly inserted into the finger chamber and if the pulse oximeter is taking the measurements properly (See below for details) 12 3.4.3 Switching On the Power Supply of the Pulse Oximeter Stick one finger completely into the finger chamber of the Oximeter. The fingernail should be facing upward. Release the clip and press the power key to power on the Pulse Oximeter. If you do not insert your finger completely into the chamber, measurement will be inaccurate. 21 Chapter 3 Product Structure Parameter Settings and Operation Steps 3.1 Schematic Structural Diagram 3.4.2 Installing the Sling Thread the thin end of the sling through the sling hole, and thread the coarse end of the sling through the thin end of the sling, and tighten the sling. OLED screen Power-on key Battery cover 20 13 3.2 Schematic Diagram of Display The following figure shows the information display on the OLED screen of the Oximeter in normal detection state: 3.4 3.4.1 Operation Steps Installing the Batteries Install the two AAA dry batteries into the battery slot according to polarity indication, and mount the battery cover. Ensure that the batteries are installed with correct polarities so as to avoid damage to the instrument. 3.3 Parameter Settings 3.3.1 Power-On Key/Function Key Operations PRESS (<0.5 sec) the power-on/function key to turn on the pulse oximeter. Once it is turned on, HOLD (>0.5 sec) the power-on/function key to enter into the menu interface. PRESSING (<0.5 sec) on the power-on/function key will allow you to to scroll through options while HOLDING (>0.5 sec) it will select an item. "*" indicates the option you are currently at (Please see 14 19 To change the alarm range settings, HOLD the power-on/function key to enter Menu Interface 1.With the "*" next to Alm Setup, HOLD the power-on key/function key to enter in Menu Interface 2. "*" should be at Sounds Setup. Press the power-on key/function key to move "*" to the option you desire to change. SpO2 Alm Hi and SpO2 Alm Lo refer to the upper and lower limit of the SpO2 levels that you wish the alarm to go off at respectively. PR Alm Hi and PR Alm Lo refer to the upper and lower limit of the Pulse Rate levels that you wish the alarm to go off at respectively. While the "*" symbol stays on the +/- option, hold the function key to set the option to + or -. In + mode, select the corresponding upper or lower limit option and hold the function key to increase the upper or lower limit; in mode, hold the function key to decrease the upper or lower limit. Move "*" to the Exit option, and hold the function key to return to the monitoring interface. 18 figure below). 3.3.2 Alarm Sound Setting To turn the alarm on/off, PRESS the power-on key/function key to move "*" to Alm. HOLD the power-on key/functional key to switch the option from on to off or vice versa. When Alm is set to on and the measured values of the blood oxygen saturation (SpO2) and/or pulse rate (PR) go beyond the stated upper or lower limit (See Alarm Range Setting to set parameters for Alarm), the alarm will go off. When Alm is set to off, the alarm is deactivated. The alarm will not go off regardless of your SpO2 and/or PR values. 3.3.3 Brightness Setting To change brightness, PRESS the power-on key/function key to move "*" to brightness. HOLD the power-on key/function key to set the brightness. There are 5 brightness settings. 5 is the brightest. The factory default setting is 4. Please note that a brighter setting will drain the battery faster. 15 V2.01.E Alm setup Alm Beep Demo Restore Brightness Exit V2.01.E Sounds Setup * SpO2 Alm Hi 100 SpO2 Alm Lo 94 PR Alm Hi 130 PR Alm Lo 50 +/+ Exit * on off off ok 4 Interface 1 Interface 2 Plethysmograph Plethysmograph 16 The INV-430J/PE comes with two invaluable features, the plethysmograph and the perfusion index (PI), that help the user determines if the readings are accurate and reliable. The plethysmograph indicates the amount of blood flow detected by the pulse oximeter and the perfusion index indicates the strength of your pulse. Each wave in the plethysmograph (see above) corresponds to a heartbeat and the wave amplitude corresponds to the amount of blood detected by the pulse oximeter flowing through the blood vessels. The pulse oximeter is optimized when the height of the wave amplitude is consistent throughout as shown in the figure above. That is when you should take the reading. The pulse oximeter can function with a PI reading as low as 0.2. If your PI is below 0.2%, this means that your blood perfusion is too low for a reliable read. Please warm your hands to increase blood flow and retake your measurement to make sure that your finger is positioned right under the OLED lights. Most of the time, a higher PI will give you a more reliable reading. 3.3.4 Alarm Range Setting 17