1
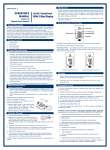
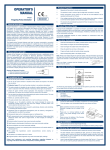
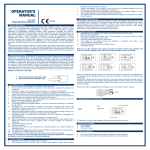
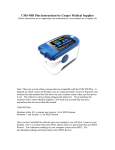
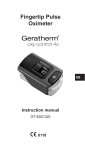
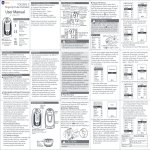
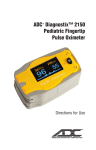
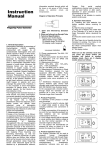
Oxi-Go™ QuickCheck Pro
3.
Press the switch button one time on front panel to turn the oximeter on.
4.
Keep your hands still for the reading. Do not shake your finger during the test. It is
recommended that you do not move your body while taking a reading.
5.
Read data from display screen.
6.
There may be times when the signal strength is to low (see heart rate bar graph
indicator below) for a proper reading. Please switch to another finger or hand and follow
instructions in this manual for low profusion blood flow.
7. When no signal or low signal is detected, the oximeter will power off automatically in 8
seconds.
OPERATOR’S
MANUAL
8.
There are four display modes. After turning on the oximeter, each time you press the
power switch, the oximeter will switch to another display mode, there are 4 display
modes shown as follows:
VER1.0C25
Fingertip Pulse Oximeter
1.
General Description
Thank you for purchasing the Oxi-Go™ QuickCheck Pro pulse oximeter. This oximeter
can be used to measure your Blood Oxygen Saturation (in % SpO2) and your pulse rate. It
should be used for Spot Monitoring only and not for continuous monitoring.
The Oxi-Go™ QuickCheck Pro Finger-Unit spot check oximeter is not a medical device and
should only be used by healthy individuals who are performing non-medical activities such
as sports and aviation. It is ideal for use during sports activities, mountain climbing and
piloting airplanes. It is sold without a prescription only to consumers who do not require a
medical prescription. It is not to be used for wellness applications.
Package Contents
1.
2.
3.
4.
1.
Maintenance
1. Clean the oximeter and sensor with a soft cloth dampened with isopropyl alcohol. Do
not pour or spray any liquids onto the oximeter, and do not allow any liquid to enter any
openings in the device. Allow the oximeter to dry thoroughly before reusing.
(The
rubber inside of the Oximeter is composed of medical grade rubber. It is non toxic and
is not harmful to the skin).
Brief Description of Front Panel
Keep hands still while taking a reading.
Oximeters require sufficient blood flow to obtain proper readings. Poor blood
circulation can result in inaccurate readings. If your hands are cold or you have poor
circulation, Warm your hands by rubbing them together or use another method before
attempting to obtain a reading. A tourniquet, blood pressure cuff or other blood flow
hindrances may also result in inaccurate readings.
3.
Fingernail polish or acrylic nails obstruct the light transmission and may also result in
inaccurate readings.
4.
Your finger must be clean for proper reading.
5.
The Oximeter must be clean for a proper reading.
6.
If a reading is difficult to obtain, switch to another finger or to the other hand.
1.
7.
There are a number of other conditions which may lead to an inaccurate reading
including but not limited to recent medical tests that included an injection of dyes, use
of arterial catheters, a weak pulse, low levels of hemoglobin in the blood, low perfusion
(the quality of your pulse), elevated levels of dysfunctional hemoglobin, the strength
and type of light that you are in while using the Oximeter and the existence of cell
phones, radios, and fixed transmitters within certain ranges of the oximeter during use.
1.
The Oximeter will not alert you if your readings are out of normal range.
Operating Instructions
Battery Installation
1. Install two AAA batteries into the battery compartment. Match the plus (+) and minus
(-) signs in the compartment. If the polarities are not matched, damaged may be
caused to the oximeter.
2. Slide the battery door cover horizontally along the arrow shown as below. Do not
force.
Install batteries in right polarity. Incorrect placement may cause damage to the bracket.
Remove the batteries if the Oximeter will not be used for long periods of time.
3. Battery indicator symbol on front panel display will light when battery voltage is too low
for normal operation of the Oximeter. Replace batteries when indicator symbol lights.
4. Dispose of batteries as per local ordinances.
Using the Oximeter
1. Open the clamp as shown in the picture:
2.
4.
9. When you press the power switch for more than one second, the brightness of the
oximeter will be changed by degrees, there are 10 levels on brightness; the default level is
level four.
2.
8.
3
2. The pulse oximeter requires no routine calibration or maintenance other than
replacement of batteries.
One Oxi-Go™ Pro Oximeter
One lanyard
Two AAA batteries
One user manual
Product Operation Scope
Oximeters are sensitive to motion artifacts.
2
Place one of your fingers into the rubber opening of the
Oximeter (your finger should touch the bottom portion)
before releasing the clamp.
When you put your finger into the Oximeter, your nail must
be facing upward towards the display portion of the oximeter.
The height of the bar graph indicates the intensity of the pulse and signal strength. The bar
should be greater then 30% for a proper reading.
Warnings
Keep the oximeter away from young children. Small parts such as the battery door,
batteries etc. may be hazardous if swallowed.
2. The lanyard may cause strangulation in conditions that may cause it to twist around the
neck.
Precautions for use
Do not use the pulse oximeter in situations where alarms are required. The device has
no alarms.
2. Explosion hazard: Do not use the pulse oximeter in an explosive atmosphere.
3. The pulse oximeter is intended only as a non medical device.
4. Check the pulse oximeter sensor application site frequently to determine the positioning
of the sensor, adequate circulation and skin sensitivity of the user.
5. Do not stretch the rubber while applying the pulse oximeter sensor. This may cause
inaccurate readings or skin blisters.
6. Read the manual carefully before use.
7. The pulse oximeter has no SpO2 alarms; it is not for continuous monitoring, as indicated
by the symbol.
In addition to items described in the Product Operation Scope, inaccurate measurements
may be caused by FACTORS INCLUDING BUT NOT LIMITED TO:
1. Autoclaving, ethylene oxide sterilizing, or immersing the sensors in liquid.
2. Significant levels of dysfunctional hemoglobin (such as carbonxy-hemoglobin or
methemoglobin)
3. Intravascular dyes such as indocyanine green or methylene blue
4. SpO2 measurements may be adversely affected in the presence of high ambient
light such as direct sunlight. In bright light conditions, cover the sensor area if
necessary.
5. Excessive user movement.
6. High-Frequency electrosurgical interference and defibrillators
7. Venous pulsations
8. The user has hypotension, severe vasoconstriction, severe anemia, or
hypothermia.
9. Fingernail polish or false fingernails may cause inaccurate SpO2 readings.
10. Follow local ordinances and recycling instructions regarding disposal or recycling of
the device and device components, including batteries.
Technical Specifications
1.
Symbol Definitions
Display mode: LED.
Measuring range for SPO2: 35-99%
Measuring range for PR: 30-235 BPM
PR display mode: bargraph
Low power indication:
Symbol
Definition
The equipment type is BF
Refer to user manual before application
2.
Battery standard: Two AAA 1.5V Alkaline Battery
3.
Power consumption: Less than 40mA
4.
Resolution: ±1% for SPO2 and ±1BPM for Pulse Rate
5.
Measurement accuracy:
SpO2: 80%--99%, ±2%; 70%--80%, ±3%; ≤70%, no definition.
PR: 30-235 BPM, ±2% or 2 BPM
Ambient Humidity: 15%-80% in operation
<93% in storage
﹪SpO2
Hemoglobin saturation
Heart rate (BPM)
Low power indication
No SpO2 Alarm.
Not for continuous monitoring. Spot measurement only.
Power switch
SN
6.
Automatic power off: The oximeter will power off automatically after 8 seconds when
the finger is removed.
7.
It is best to store the product in a place where ambient temperatures range from –10 to
40C (14-104F).
8.
It is recommended that the product be kept in a dry place. A damp ambient might affect
its lifetime and even might damage the product.
Serial No.
Warranty
Limited 1 year warranty
Manufactured for:
Declaration
EMC of this product comply with IEC60601-1-2 standard
18 Milburn Lane
The materials which user can come into contact with are non toxici and comply with
ISO10993-1,-5,-10.
Roslyn Heights, NY 11577
Guidance and manufacture’s declaration – electromagnetic emissionsfor all EQUIPMENT and SYSTEMS
Guidance and manufacture’s declaration – electromagnetic emission
The Pulse Oximeter is intended for use in the electromagnetic environment specified below.
Emission test
Compliance
Electromagnetic environment – guidance
RF emissions
Group 1
The Pulse Oximeter uses RF energy only for its
CISPR 11
internal function. Therefore, its RF emissions are
very low and are not likely to cause any
interference in nearby electronic equipment.
RF emission
CISPR 11
Class B
The Pulse Oximeter is suitable for use in all
establishments, including domestic
establishments and those directly connected to
the public low-voltage power supply network that
supplies buildings used for domestic purposes.
Possible Problems and resolutions
Problems
Possible reason
SpO2 or PR is not
be shown
normally
1. Finger is not plugged correctly
2. User’s Oxyhemoglobin value is
too low to be measured
1. Retry by plugging the finger
2. Possible oximeter failure.
3. Seek medical attention
SpO2 or PR is
shown unstably
1. Finger might not be plugged
deep enough
2. Finger is trembling or user’s
body is in movement status
1. Power of batteries might be
inadequate or not be there at all
2. Batteries might be installed
incorrectly
3. The Oximeter might be
damaged
1. The product is automatically
powered off when no signal is
detected longer than 8 seconds
2. Power quantity of the batteries
is started being inadequate
1 .Low power
2. Receiving tube being shielded
or damaged together with
broken connector.
3. Mechanical Misplace for
receive-emission tube
4. Amp circuit malfunction.
1. Retry by plugging the finger
2. Try not to move
The Oximeter can
not be powered
on
Indication lamps
are suddenly off
“Error3” or
“Error4” Displayed
on screen
Solution
1. Please replace batteries
2. Please reinstall the batteries
3. Please contact with local customer service
center
1. Normal
2. Replace the batteries
1. Change new battery
2. Please contact with local customer service
center
3. Please contact with local customer service
center
4. Please contact with local customer service
center
Phone: 516 626-6226
Made in China