1
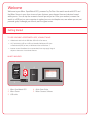
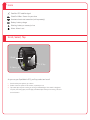
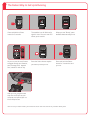
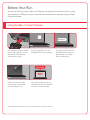
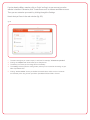
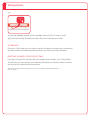
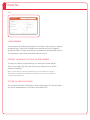
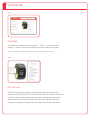
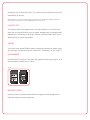
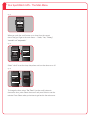
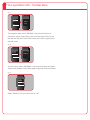
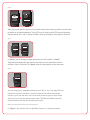
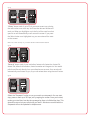
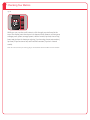
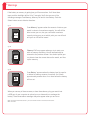
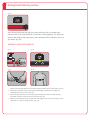
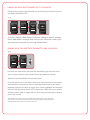
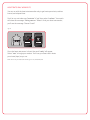
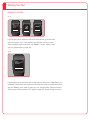
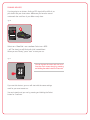
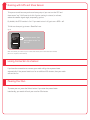
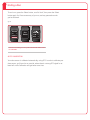
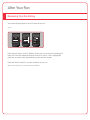
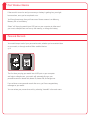
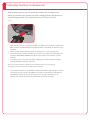
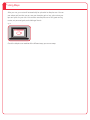
Welcome
Welcome to your Nike+ SportWatch GPS, powered by TomTom. Your watch works with GPS and
the Nike+ Sensor in your shoe to record your distance, pace, elapsed time and calories burned
while you run. You can tap the screen to record laps as you run. After your workout, connect the
watch to a USB port on your computer to upload your runs to nikeplus.com, see where you ran, set
personal goals, challenge your friends, and find great routes.
Getting Started
TO USE YOUR NIKE+ SPORTWATCH GPS, YOU MUST HAVE:
• A Macintosh with built-in USB. Mac OSX v10.4.8 or later or
• A PC with built-in USB or a USB card installed. Windows XP Home
or Professional (SP2) or later, or Windows Vista or Windows 7.
• Internet access. Broadband is recommended; fees may apply. Usage is
subject to the terms of a software license.
WHAT’S INCLUDED
1
clock
run
history
records
stopwatch
2
4
3
1. Nike+ SportWatch GPS
4. Quick Start Guide
2. Nike+ Sensor
5. Nike+ Connect Software
3. USB cable
5
Icons
Satellite: GPS satellite signal
ShoePod: Nike+ Sensor for your shoe
Heartrate: heart rate transmitter (sold separately)
Battery: battery charge
Warning: battery or memory is low
Alarm: Alarm is set
Scroll, Select, Tap
fig. 01
1. Scroll
3. Tap
2. Select
As you use your SportWatch GPS, you’ll tap, select and scroll.
1. Scroll: review your options, up or down.
2. Select: chose an option on the screen, or pause your run
3. Tap: mark laps as you’re running, or turning on the backlight. Your watch is designed
for quick, but strong taps, to avoid light, accidental taps while you’re running. This isn’t
a touch screen.
The Fastest Way to Get Up & Running
Ready
linking
3 sec
start
cancel
cancel
Press and hold the Select
button for 3 seconds.
The satellite icon will blink until a
signal is found. You can’t use GPS
unless you’re outside.
When you see “Ready,” press
the Select button to start your run.
Stat Loop
pace
8 33
0 02
avg pace
/MI
DISTANCE
speed
avg speed
distance
elapsed
MI
lap time
Paused
3.57
mi
continue
end
3 sec
Run
Ended
calories
clock
As you run, use the scroll button
to toggle through your distance,
pace, average pace, elapsed
time, calories or time of day.
Press the Select button anytime
you want to pause your run.
Press and hold the Select
button for 3 seconds to end
your run.
After your run, plug the watch
strap into a USB port on your
computer, and upload your run
info to nikeplus.com
Note: To use your watch indoors, place the shoe sensor under the sock liner of your Nike+ Ready shoe.
Before Your Run
You can run with your watch, right out of the box, but to get the most out of your run, plug
your watch into a USB port on your computer and customize your settings using the Nike+
Connect software.
Using the Nike+ Connect Software
First, plug your watch into a USB
port on your computer. You can
also use the USB cable that
came with your watch.
If you’re using a Mac, click the
SportWatch icon on your desktop.
Double click the icon of the
drive to open it, then double
click the “nikeplus” file.
You’ll automatically be sent to a
website where you can download
the Nike+ Connect software.
Note: Make sure the USB connector is dry before you plug it into your computer.
If you’re using a PC, click the
SportWatch icon located in
My Computer. Or, it might
launch automatically.
Download the Nike+ Connect software to your computer. Each time you
connect your watch to that computer, (fig. 02) the software will automatically
launch, uploading your runs to nikeplus.com, and removing them from the
watch’s memory.
Note: You can down download and install the software to more than one computer.
fig. 02
The Nike+ Connect software allows you to customize your settings, and
automatically saves your info, and closes when you unplug your watch
If you’re already a Nike+ member, click on “login” and log in to your account, once the
website is launched. Otherwise, click “Create an account” to create a new Nike+ account.
Then you can customize your watch by clicking through the Settings.
Here’s what you’ll see in the main window (fig. 03):
fig. 03
1
4
3
1.
2.
3.
4.
5
2
The status area gives you a status report, in real time. For example, “All workouts uploaded.”
Clicking the “nikeplus.com” button takes you to nikeplus.com.
The battery icon shows you the charge level of the battery.
The “settings” button opens the setting drawer, where you can customize the settings on your
Nike+ SportWatch GPS.
5. Clicking “version number” shows you detailed information about which version of software
and firmware you’re using on both your Nike+ SportWatch GPS and Nike+ Connect
Settings Button
fig. 04
settings
To close the “settings” window, click the “settings” button (fig. 04). To open it, click it
again, then click through the tabs on the left-hand side to customize your watch.
GETTING HELP
Clicking on “Help” takes you to the Support section of nikeplus.com, where you can download
the user’s manual, read frequently asked questions, view tutorials and share feedback.
RESETTING THE WATCH TO FACTORY SETTINGS
If you want to reset all the settings back to the original factory defaults, click “Factory Reset.”
This will clear your user settings, time, calibration information and “weekly” distance numbers,
your account info, personal records and history.
Note: When you reset the Factory Settings, the run info you ’ve already uploaded to nikeplus.com
won’t be erased.
Profile Tab
fig. 05
YOUR USERNAME
Your username will automatically appear as “pending” until you login or register
at nikeplus.com. Once you’re a nikeplus.com member, and you’ve logged in
through the Nike+ Connect software, your username will automatically show up.
This username is specifically associated with your watch.
ENTERING YOUR WEIGHT TO TRACK CALORIES BURNED
To track your calories burned while you run, enter your current weight.
Type in your weight, (fig. 05), then use the drop-down menu to choose
pounds or kilograms.
Note: If you don’t enter your weight in the Profile tab, your watch will assume a weight of
150 pounds for calculating calories. Make sure to update this with your current weight for
a more accurate calorie count.
SETTING THE UNITS OF DISTANCE
You can adjust the units of distance to miles or kilometers. This will only affect
the units of measurement on your Nike+ SportWatch GPS.
Time and Date Tab
fig. 06
SETTING THE TIME
Your watch will automatically be set to the current time and date on your
computer, once you plug your watch strap into a USB port. To adjust the time
manually, click on the Time & Date tab (fig. 6), then click “Manually set the time
and date” to make adjustments.
You can also set the time and date on your watch. The “Manually set the time
and date option” will stay selected unless you choose to set the time and date to
your computer’s settings.
Check the box “Use 24-hour time” for 24-hour time mode.
Customize Tab
fig. 07
PACE/SPEED
Your watch can measure your current pace — “Pace” — or how fast you’re
running — “Speed.” Use the drop down box to choose the one you prefer. Note: This change will automatically update the info in your Favorite Stat and Stat Loop.
fig. 08
EDIT STAT LOOP
Check all the metrics you want to see in the upper portion of your watch’s
display as you run (fig. 08). You’ll push the scroll button up or down to review this
info. Your options include: distance, pace or speed, average pace or average
speed, elapsed time, lap time, calories, clock and heart rate. Use the scroll
buttons on the image of the watch to preview what the stat loop will look like
during your run. Choose “Auto Loop” if you want to see your selected stats scroll
automatically as you run.
Note: Heart rate won’t show up here unless your watch has previously been linked to a heart rate
monitor. See more on this in the section “Adding heart rate to your run.”
FAVORITE STAT
Your Favorite Stat is the largest metric you’ll see while you run. Use the drop
down box to choose distance, pace or speed, average pace or average speed,
elapsed time, manual laps or auto laps, calories, clock and heart rate (if you’ve
already linked to a heart rate monitor.
SOUNDS
Your watch uses several different tones to signal key presses, lap marks, alerts
and warnings. Use the menu to turn sounds “on,” “in run only,” or “off.” (fig.07).
RUN REMINDER
Run Reminder: Turn this on if you want your watch to remind you to go for a run
after you haven’t worked out in a while.
fig. 09
8 33
002
/MI
8 33
0 02
/MI
DISTANCE
DISTANCE
MI
MI
INVERTED SCREEN
Inverted Screen: Choose between white text against a black background or
black text against a white background.
Lap & Intervals Tab
fig. 10
You can customize laps and intervals through Nike+ Connect (fig. 09). Select
“off” if you don’t want to keep track of laps. Choose “Manual Laps,” to mark your
laps by tapping the screen on your watch during your run. “Auto Laps” will
automatically mark your laps for you (i.e. every 1 mile, or every).
For Interval Training, simply choose how long or how far you want your run
interval to be (i.e. every 2 minutes) and how long you want to rest (i.e. 1 minute).
Your Run and Rest intervals can be in either distance or time increments.
Note: You can also turn laps and interval training on or off on the watch itself (in the watch
menu, select “run” then “options.”)
Quickstart
It might take a couple of minutes to find a GPS signal. For example, you’re
running in a new location and your watch needs to reestablish a connection with
the satellite.
To start a run before a GPS signal is found, you can use the quickstart feature,
which uses the Nike+ sensor (in your shoe) to track your run info.
Use this option by going to run > Shoe Pod > on > quickstart.
fig. 11
linking
ready
quickstart
cancel
Note: In quickstart workouts, your speed and distance will be recorded by your Nike+ shoe sensor.
Using the Nike+ Sensor
fig. 12
Place the Nike+ Sensor underneath the sock liner of your left Nike+ ready shoe.
The Nike+ sensor will work with your watch to continuously track your run info
when a GPS signal is weak, or when you’re running indoors.
ABOUT THE SHOE SENSOR’S BATTERY LIFE
The sensor contains a non-replaceable battery with a life of more than 1000
active hours. The sensor has a built-in power management system, which only
consumes power when active (that is, when it senses motion).
You can leave the sensor in your shoe when you aren’t working out, but be aware
that the sensor will be active anytime you’re walking or running. If you plan to
wear your shoes for a long time without working out, we recommend replacing
the sensor with the foam insert to save battery life.
Note: You can buy a replacement sensor through nikestore.com or apple.com.
PUTTING THE SENSOR TO SLEEP
fig. 13
Sleep / Wake Button
The sensor is awake and on by default. If you want to store the sensor
for a long period of time or make it stop transmitting, you can put it to
sleep or take it out of your shoe.
To put the sensor to sleep: Use a pen or a paper clip to press and hold the
Sleep/Wake button for three seconds. (fig. 12)
Important: Put the sensor to sleep before taking it
on an aircraft, to comply with applicable government
regulations.
To wake the sensor: Use a pen or a paper clip to press the Sleep/Wake button.
The Nike+ Sensor also works with the Nike+ SportBand, iPod nano, iPod Touch,
and iPhone.
Your SportWatch GPS - The Main Menu
fig. 14
clock
run
history
records
stopwatch
When you push the scroll button up or down from the current
time of day, you’ll get to the main menu — “clock,” “run,” “history”,
“records” and “stopwatch.”
fig. 15
clock
run
history
records
stopwatch
Set Time
Set Date
Set Alarm
Alarm
off
done
Select “clock” to set the time, date, alarm and turn the alarm on or off. fig. 16
Set Time
Set Date
Set Alarm
Alarm
off
09:24 pm
done
To change the time, select “Set Time.” Use the scroll buttons to
choose the hour, press Select then scroll and press Select to set the
minutes. Press Select when you’re done to get back to the main menu.
Your SportWatch GPS - The Main Menu
fig. 17
Set Time
Set Date
Set Alarm
Alarm
Jan 01
2011
off
done
To change the date, select “Set Date.” Use the scroll buttons to
choose the month, press Select, then scroll and press Select to set
the date and the year. Press Select when you’re done to get back to
the main menu.
fig. 18
Set Time
Set Date
Set Alarm
Alarm
06:00 am
off
done
To set an alarm, select “Set Alarm.” Use the scroll buttons and press
Select to set the alarm. Press Select again to get back to the main menu.
fig. 19
Set Time
Set Date
Set Alarm
Alarm
off
done
Select “Alarm” to turn your alarm “on” or “off.”
fig. 20
clock
run
history
records
stopwatch
GPS
Shoe Pod
Heartrate
Options
on
on
off
continue
cancel
“Run” gives you the option to start a run. You can also choose which sensors you want to run with, select
lap options, or set interval preferences. To turn GPS on or off, simply scroll to GPS then push the select
button to choose “on” or “off.” To activate the Nike+ Sensor, go through the same steps for “Shoe Pod.”
fig. 21
GPS
Shoe Pod
Heartrate
Options
on
on
off
continue
cancel
Laps
auto
Intervals on
New Sensor
done
In “Options,” you can change your “laps” preference from “off” to “auto” or “manual.”
“Auto” will automatically mark laps based on the distance or time parameters chosen in
the Nike+ Connect Customize Tab. “Manual” will mark a lap whenever you tap the screen.
fig. 22
fig. 17
Laps
auto
Intervals on
New Sensor
done
You can change your “Intervals” preference from “off” to “on.” Your watch will use
intervals as chosen in the Nike+ Connect Customize Tab. When intervals are
turned on, you’ll see the word “run” on the main screen as your run time counts
down, then you’ll see your interval count down. The “Run” and “Rest” times will
switch back and forth until you’ve reached your goal.
Note: Laps and Intervals can’t be used at the same time.
In “Options,” you can also link to a new Nike+ Sensor, or a heart rate monitor.
fig. 23
clock
run
history
records
stopwatch
done
Dec 17
Dec 15
Dec 15
Dec 10
Dec 03
Nov 30
23 45 56
3.57 mi
7'08" /mi
854 cal
21.23 mi
3.29 mi
3.57 mi
9.66 mi
1.85 mi
1.02 mi
“History” keeps track of up to 50 of your most recent runs, placing
the most recent runs at the top. You’ll see the date and distance of
each run. When you highlight a run in the list, all the stats from that
specific run will automatically scroll across the screen. If you press
the Select button on a highlighted run, you can review all the stats
on that screen.
Note: If it s’ a heart rate only run, you ’ll see calories burned instead of distance.
fig. 24
clock
run
history
records
stopwatch
Fastest
Mile
535
“Records” keeps track of your total miles, fastest mile, fastest km, fastest 5k,
fastest 10k, fastest half marathon, fastest marathon and longest run. Your watch
pulls these Records directly from your nikeplus.com account. Your records will
automatically scroll down for you, or you can review them using the scroll button.
fig. 25
clock
run
history
records
stopwatch
start
cancel
0000
00
Select the “Stopwatch” option to use your watch as a stopwatch. You can start,
stop, pause or mark up to 50 laps just by tapping the screen. Once you’re done,
review your total time, best lap time, average lap time or individual lap time. This
data will be stored on your watch until you reset it. Workouts recorded with the
Stopwatch will not be uploaded to nikeplus.com.
Checking Your Metrics
fig. 26
Stat Loop
pace
8 33
0 02
avg pace
/MI
DISTANCE
speed
avg speed
distance
elapsed
MI
lap time
calories
clock
While you run, use the scroll button to click through your stat loop (at the
top of the display) and check your info: elapsed time, distance, current pace,
average pace, speed, average speed, calories burned, lap time, time of day,
heart rate (as bpm for beats per minute, if you’re using a heart rate monitor),
lap time (if laps are turned on) and Run/Rest counters (if you’re in interval
mode).
Note: You can customize your stats by going to the Customize Tab of the Nike+ Connect software.
Warnings
If the battery or memory is getting low, you’ll hear an alarm. You’ll hear three
tones, and the backlight will be lit for 5 seconds. You’ll also see one of the
following messages: Low Memory, Memory Full and/or Low Battery. Push the
Select button once to dismiss the alarm.
fig. 27
Low
Memory
ok
“Low Memory” appears when the amount of data on your
watch is close to its maximum capacity. You will still be
able to start your run, but you could reach maximum
capacity during your run, at which point your run will end
and your run info will be saved.
fig. 28
Memory
Full
ok
“Memory Full” may appear when you try to start a run
with no memory remaining. You will automatically be
returned to the previous screen. You should upload your
run data to clear the current data on the watch, and free
up the memory.
fig. 29
!
Low
Battery
“Low Battery” appears when the battery level is equal to
or below its memory reserve of one hour. You’ll have
approximately another hour of run time before the battery
will run out.
ok
When you see any of these screens, or hear these alarms, plug your watch into
a USB port of your computer to upload your run data and/or to recharge the
battery. These three alarm messages may also appear when you end a run.
Note: You ’ll only hear these alarms if you have sound turned on in the Customize tab of
Nike+ Connect.
Adding Heart Data to your Run
fig. 30
Transmitter
Electrode
You can track your heart rate with your watch when you link it to a heart rate
monitor (such as the Polar Wearlink+ Transmitter, sold separately). The electrode
areas on the inside of the strap detect your heartbeat, and the monitor sends it to
your watch. (fig. 24)
WEARING A HEART RATE MONITOR
fig. 31
fig. 32
fig. 33
fig. 34
1. Moisten the electrode areas (on the inside) by placing them under running water. (fig. 31)
2. Attach the transmitter to the strap, adjusting the length as needed to fit snugly and
comfortably around your chest. (fig. 32)
3. Place the strap around your chest, adjusting the length just under the chest muscles,
and attach the hook to the other end of the strap. (fig. 33)
4. Make sure the electrode areas are pressed firmly against your skin, with the logos on the
transmitter in a central, upright position. (fig. 34)
LINKING THE HEART RATE TRANSMITTER TO YOUR WATCH
Before using your heart rate transmitter for the first time, you’ll need to link it to
your Nike+ SportWatch GPS.
fig. 35
GPS
Shoe Pod
Options
on
on
continue
cancel
Laps
off
Intervals on
New Sensor
done
Looking
For
Sensor
exit
Sensor
Found!
Go to run > Options > New Sensor. You’ll see a “looking for sensor” message
then a “walk around” message. When the heart rate transmitter is linked, you’ll
see a heart icon, along with the message “Sensor Found.”
RUNNING WITH THE HEART RATE TRANSMITTER AND YOUR WATCH
fig. 36
GPS
Shoe Pod
Heartrate
Options
continue
cancel
on
on
on
ready
ready
ready
start
cancel
Use both your shoe sensor and heart rate transmitter to get the most out of
your run (pace, distance, time, calories burned, and beats per minute).
Wear the Heart Rate Monitor as instructed above.
Go to the main menu on your watch, then go to “run” and make sure your heart
rate transmitter is around your chest. It must have been linked to your watch
previously, before it will show up in your menu. Select “continue” and the watch
will link to the appropriate sensor (GPS, shoe and/or HRM). Once your sensors
are linked, select “start” to begin your run. You’ll see bpm (beats per minute) as
part of your run info.
Note: Detach the connector from the strap and rinse the strap under running water after
every use. Dry and store the strap and connector separately. Wash the strap regularly in a
washing machine at 40c/104f, or at least every fifth use.
HEART RATE ONLY WORKOUTS
You can run with the heart rate transmitter only to get beats per minute, calories
burned, and elapsed time.
Scroll to run, and make sure “heartrate” is “on” then select “continue.” Your watch
will show the messages “linking sensors.” When it finds your heart rate monitor,
you’ll see the message “Sensor Found!”
fig. 37
GPS
Shoe Pod
Heartrate
Options
continue
cancel
off
off
on
seeking
cancel
Once the heart rate sensor is found, the word “ready” will appear.
Select “start” to begin your workout. You’ll see your heart rate in beats
per minute (bpm) as you run.
Note: To turn off your heart rate monitor, go to “run,” “Heartrate,” “off.”
Starting Your Run
RUNNING OUTDOORS
fig. 38
GPS
Shoe Pod
Heartrate
Options
on
off
Ready
off
linking
continue
cancel
cancel
start
cancel
If you’re going to run outdoors without a shoe sensor, go to the main
menu and select “run.” The satellite icon will blink until your watch
finds a satellite signal, then you’ll see “Ready.” Choose “start” to start
your run. (Read more on page 28).
fig. 39
GPS
Shoe Pod
Options
on
off
continue
cancel
If you’re going to run outdoors with a shoe sensor, select run > Shoe Pod > on >
continue. The satellite and shoe icons will blink until a link is established. When
you see “Ready” press “start” to start your run. Using a Nike+ Sensor outdoors
will improve accuracy when a GPS signal is weak (i.e. dense foilage, a tunnel.)
RUNNING INDOORS
If you’re going to run indoors, finding a GPS signal will be difficult, so
you should use your shoe sensor. Make sure you have the sensor
underneath the sock liner of your Nike+ ready shoe.
fig. 40
GPS
Shoe Pod
Options
off
on
continue
cancel
Select run > Shoe Pod > on > continue. Select run > GPS
> off. The shoe icon will blink until a link is established.
When you see “Ready,” press “start” to start your run.
fig. 41
You can bypass the menu and start a run
from the clock screen simply by pressing
and holding the select button for 3 seconds.
3 sec
If you use this shortcut, your run will start with the same settings
used for your most recent run.
You can instantly end your run by pressing and holding the Select
button for 3 seconds.
Running with GPS and Shoe Sensor
To improve overall accuracy and record every step of your run turn the GPS and
shoe sensor “on.” You’ll want to do this if you’re running in a tunnel, or a forest,
where the satellite signal might, temporarily, get lost.
By default, the GPS function is “on.” If you want to turn it off, go to run > GPS > off.
To link to a shoe pod, go to run > Shoe Pod > on.
fig. 42
GPS
Shoe Pod
Options
continue
cancel
on
on
highlight a sensor, then
press select to turn “on
and “off.”
Note: You can link your watch to up to 7 other shoe sensors, and 7 other heart rate monitors.
(Go to run > Options > New Sensor.)
Losing Connection to a Sensor
If you lose the connection to a sensor, your watch will go into a paused state
automatically. If the paused state is on for an additional 30 minutes, then your watch
will end the run.
Pausing Your Run
To pause your run, press the Select button. If you enter the paused state
intentionally, your watch will end your run after 30 minutes.
Ending a Run
To end a run, press the Select button, scroll to “end,” then press the Select
button again. You’ll see a summary of your run, and any personal records
you’ve achieved.
fig. 43
Paused
3.57
mi
continue
end
Run
Ended
23 45 56
3.57 mi
7'08" /mi
854 cal
A shortcut to ending a run is to press and hold the select button
for 3 seconds.
AUTO CALIBRATION
Your shoe sensor is calibrated automatically, using GPS. In order to calibrate your
shoe sensor, you’ll need to run outside, where there’s a strong GPS signal for at
least half a mile. Calibration will get better over time.
After Your Run
Reviewing Your Run History
Your watch displays stats for your 50 most recent runs.
fig. 44
clock
run
history
records
stopwatch
done
Dec 17
Dec 15
Dec 15
Dec 10
Dec 03
Nov 30
21.23 mi
3.57 mi
3.57 mi
9.66 mi
1.85 mi
1.02 mi
23 45 56
3.57 mi
7'08" /mi
854 cal
From the main menu, scroll to “history” to see your runs in reverse chronological
order. You’ll see the date and distance of each run, and, if a run is highlighted,
you’ll see your other stats automatically scroll across the screen.
Press the Select button for a screen summary of your run.
Note: For heart rate only runs, calories will replace distance.
Post Workout Alarms
If the sound is turned on and your memory or battery is getting low, you might
hear an alarm, once you’ve completed a run.
You’ll hear three tones, then you’ll see one of these screens: Low Memory,
Memory Full or Low Battery.
Select “ok” then plug watch into a USB port on your computer to either send
your runs to nikeplus.com and free up the memory, or charge the battery.
Personal Records
Your watch keeps track of your personal records, whether you’ve recorded them
on your watch, or through another Nike+ enabled device.
fig. 45
RECORD
SMASHED
Fastest
Mile
535
The first time you plug your watch into a USB port on your computer
and login to nikeplus.com, your watch will automatically sync your
personal records for: fastest mile, fastest 5k, fastest 10k, and longest run.
If you achieve a new personal record after a run, you’ll see congratulatory
message on your watch.
You can review your personal records by selecting “records” in the main menu.
Uploading Your Runs to nikeplus.com
After recording your run, you can upload your workout info to nikeplus.com,
where you can track your progress, set goals, challenge others, see where you
ran and find great routes. Your watch records up to 15 hours of run info.
fig. 46
After recording your runs, connect your watch to a USB port on a computer installed with
Nike+ Connect software. Make sure the USB connector is dry before you attach it to your
computer.
2. Nike+ Connect will automatically launch and upload your run info to nikeplus.com
3. Your web browser will open automatically, and take you to nikeplus.com. Meanwhile, the
message “All workouts uploaded” will appear in the status bar of the Nike+ Connect
software.
4. At nikeplus.com, you can track your goals, challenge your friends, share your progress
through Facebook and Twitter, and more.
1.
Note: If no Internet connection is detected, the main window will show you the message
“No internet connection.” Click on the Try Again button to reconnect.
5. If an Internet connection is not available, or nikeplus.com doesn’t respond, Nike+ Connect
will queue your runs from your SportWatch for upload at a later time, and will clear your
SportWatch’s memory so you can record more runs. You won’t see these runs on
nikeplus.com until you’ve successfully established an Internet connection.
Using Maps
After your run, your route will automatically be uploaded to nikeplus.com. You can
see where and how fast you ran, see your elevation gain or loss, plus review your
laps and splits for your runs. You can also use nikeplus.com to find great running
routes, set personal goals, and challenge friends.
fig. 47
Check the nikeplus.com website all the different ways you can use maps.
Etcetera
Making Updates
It’s easy to keep your Nike+ SportWatch GPS and Nike+ Connect software up-to-date.
Each time you plug your watch strap into a USB port on your computer, Nike+ Connect
will check for new firmware (updates for your watch) and new software (updates to
Nike+ Connect).
Updating Nike+ Connect
When Nike+ Connect software updates are available, a message will say, “A newer
version of Nike+ Connect is available. Would you like to download and install it now?”
Clicking the Update button will update the software.
Updating your Watch
When new updates to the Nike+ SportWatch are available, a message will prompt you
to make an update.
You can make updates when you see they’re available, or at a later date.
To refresh your watch’s connection to a GPS satellite, frequently plug your watch into a
computer installed with the Nike+ Connect software. The latest satellite data will
automatically be updated to your watch through the software.
Resetting the Nike+ SportWatch
fig. 48
You can reset all your settings using the Nike+ Connect software. Just plug your
watch into a USB port on your computer and click on “Factory Reset,” in the main
screen. This will clear the user settings, time, calibration information and
“weekly” distance numbers from your SportWatch.
Note: The stats you ’ve already uploaded to nikeplus.com will not be affected.
If you’re wearing your watch and it isn’t responding, you can try doing a “soft
reset.” Press and hold the both the scroll up and select button for 5 seconds.
The display will show the latest firmware version, then the current time of day.
All your run info will be saved.
Note: If you reset the watch while you r’ e running, the recording will automatically stop, but
your workout info will still be stored in your watch.
Note: You can’t reset your watch if it s’ connected to a USB port on your computer.
About the Memory
Your watch stores up to 15 hours of run info. Read more about the memory
and battery states in the Alarms section of this manual.
Charging the Battery
It takes approximately 2 hours for the battery to fully charge. You can charge
your watch by connecting it to your computer’s USB port. The battery will last for
up to 9 hours of run time before it needs to be recharged.
Another way to check the battery is to look at the icon on your watch’s time of
day display. The battery icon will change from empty to full, to indicate the
amount of charge left on the battery.
You can also check the battery level any time using Nike+ Connect. Simply look
at the icon in the lower-left corner of the main window.
About Specifications
NIKE+ SPORTWATCH SPECIFICATIONS
Your watch uses a rechargeable lithium polymer battery. In standby, from fullcharge, the battery will last for up to 70 days, or up to 9 hours of run time with
GPS and the sensor turned on.
• Water resistant up to 5 ATM.
• The temperature range for typical product usage is -20C to +60C.
Warning: the sensor is a potential choking hazard. Keep it away from children
under three years of age.
Important: Do not attempt to open the sensor,
disassemble it, or remove the battery. No userserviceable parts are inside.
TOMTOM GPS
GPS SYSTEMS