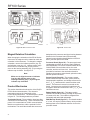
1
RF100 Series
Instruction Manual
Form 5661
February 2006
RegFloTM RF100 Series Pressure
and Flow Instruments
Contents
Specifications . . . . . . . . . . . . . . . . . . . . . . . . . . . . . . . . . .
I/O Board Specifications . . . . . . . . . . . . . . . . . . . . . . . . .
Introduction . . . . . . . . . . . . . . . . . . . . . . . . . . . . . . . . . . . .
Principle of Operation . . . . . . . . . . . . . . . . . . . . . . . . . . .
Hazardous Area Product Approval for North America
Common Standards . . . . . . . . . . . . . . . . . . . . . . . . . . . . . . . . .
Approval Agencies . . . . . . . . . . . . . . . . . . . . . . . . . . . . . . . . . .
Locations Where Types of Protection Are Used . . . . . . . . . . .
Hazardous Area Classifications . . . . . . . . . . . . . . . . . . . . . . . .
Temperature Code . . . . . . . . . . . . . . . . . . . . . . . . . . . . . . . . . .
Explosion-Proof Technique . . . . . . . . . . . . . . . . . . . . . . . . . . .
Nonincendive Technique . . . . . . . . . . . . . . . . . . . . . . . . . . . . .
Instrument Repair . . . . . . . . . . . . . . . . . . . . . . . . . . . . . . . . . .
2
3
3
4
6
6
6
6
7
7
8
8
9
W8196
TYPE RF110
PRESSURE
INSTRUMENT
RF100 Series Installation . . . . . . . . . . . . . . . . . . . . . . . . . 9
Installation Requirements . . . . . . . . . . . . . . . . . . . . . . . . . . . . 9
All Installations . . . . . . . . . . . . . . . . . . . . . . . . . . . . . . . . . . . . 10
Type RF110 Pipestand Mounting . . . . . . . . . . . . . . . . . . . . . . 13
Retrofitting A Type RF100 . . . . . . . . . . . . . . . . . . . . . . . . . . . 13
Wiring . . . . . . . . . . . . . . . . . . . . . . . . . . . . . . . . . . . . . . . . 14
14
14
14
14
15
15
15
15
Analog Inputs . . . . . . . . . . . . . . . . . . . . . . . . . . . . . . . . . . . . .
Analog Outputs . . . . . . . . . . . . . . . . . . . . . . . . . . . . . . . . . . .
Discrete Input . . . . . . . . . . . . . . . . . . . . . . . . . . . . . . . . . . . . .
Discrete Output . . . . . . . . . . . . . . . . . . . . . . . . . . . . . . . . . . .
16
16
16
16
Analog Inputs . . . . . . . . . . . . . . . . . . . . . . . . . . . . . . . . . . . . .
Pressure Sensors . . . . . . . . . . . . . . . . . . . . . . . . . . . . . . . . .
Travel Sensor . . . . . . . . . . . . . . . . . . . . . . . . . . . . . . . . . . . . .
System Configuration . . . . . . . . . . . . . . . . . . . . . . . . . . . . . .
Sample Interval . . . . . . . . . . . . . . . . . . . . . . . . . . . . . . . . . . .
Log Interval . . . . . . . . . . . . . . . . . . . . . . . . . . . . . . . . . . . . . .
Regulator Parameters (Type RF100 only) . . . . . . . . . . . . . . .
Communication Ports . . . . . . . . . . . . . . . . . . . . . . . . . . . . . .
Modbus Configuration . . . . . . . . . . . . . . . . . . . . . . . . . . . . . .
Alarms . . . . . . . . . . . . . . . . . . . . . . . . . . . . . . . . . . . . . . . . . .
Logic Alarms . . . . . . . . . . . . . . . . . . . . . . . . . . . . . . . . . . . . .
History Log . . . . . . . . . . . . . . . . . . . . . . . . . . . . . . . . . . . . . . .
Security . . . . . . . . . . . . . . . . . . . . . . . . . . . . . . . . . . . . . . . . .
18
18
18
19
19
19
19
20
20
20
20
21
22
W8379
Input/Output Termination Points . . . . . . . . . . . . . . . . . . 16
Calibration and Configuration . . . . . . . . . . . . . . . . . . . . 18
Battery Module . . . . . . . . . . . . . . . . . . . . . . . . . . . . . . . . 22
I/O Board Power Consumption . . . . . . . . . . . . . . . . . . . 22
I/O Board Current Draw Example . . . . . . . . . . . . . . . . . . . . . 22
Solar Panel and Battery Sizing Example . . . . . . . . . . . . . . . . 23
Battery Module Installation and Replacement . . . . . . . . . . . . 24
W8162
TYPE RF100 FLOW AND
PRESSURE INSTRUMENT
MOUNTED ON A
TYPE 1098-EGR REGULATOR
TYPE RF100 FLOW AND
PRESSURE INSTRUMENT
MOUNTED ON A
TYPE EZR REGULATOR
Figure 1. RF100 Series Pressure and Flow Instruments
Startup and Operation . . . . . . . . . . . . . . . . . . . . . . . . . . 24
Assembly and Maintenance . . . . . . . . . . . . . . . . . . . . . 25
Unit Assembly . . . . . . . . . . . . . . . . . . . . . . . . . . . . . . . . . . . .
Printed Wire Board (PWB) Cup . . . . . . . . . . . . . . . . . . . . . . .
Pressure Sensor Replacement . . . . . . . . . . . . . . . . . . . . . . .
Travel Indicator Assembly Maintenance . . . . . . . . . . . . . . . .
RTD Interface Wiring Schematics . . . . . . . . . . . . . . . . .
RTD Installation Instructions . . . . . . . . . . . . . . . . . . . . .
Magnet Rotation Orientation . . . . . . . . . . . . . . . . . . . . .
Product Electronics . . . . . . . . . . . . . . . . . . . . . . . . . . . .
Parts Ordering . . . . . . . . . . . . . . . . . . . . . . . . . . . . . . . . .
Parts List . . . . . . . . . . . . . . . . . . . . . . . . . . . . . . . . . . . . .
US Patent Number 6441744
Other US and Foreign Patents Pending
R
www.FISHERregulators.com
25
25
26
26
29
30
32
32
34
35
D102767X012
Terminal Wiring Connections . . . . . . . . . . . . . . . . . . . . . . . . .
Connecting Communications Wiring . . . . . . . . . . . . . . . . . . .
Available Communications Ports . . . . . . . . . . . . . . . . . . . . . .
Operator Interface Port—LOI . . . . . . . . . . . . . . . . . . . . . . . . .
Host Ports . . . . . . . . . . . . . . . . . . . . . . . . . . . . . . . . . . . . . . .
Connecting Input Voltage . . . . . . . . . . . . . . . . . . . . . . . . . . . .
Connecting Main Power Wiring . . . . . . . . . . . . . . . . . . . . . . .
Connecting Ground Wiring . . . . . . . . . . . . . . . . . . . . . . . . . .
RF100 Series
Specifications
Available Configurations
• Type RF100 Flow and Pressure Instrument
• Type RF110 Pressure Instrument
Security
15 users with passwords and 3 levels of access
Alarms
• Hi, Hi/Hi, Low, and Low/Low on all analog inputs
• Logic alarms
• 240 logs in alarm log
Sensor and Pressure Ranges(1)
See table 1
Instantaneous Flow Estimation Accuracy
See tables 2 and 3 and the Instantaneous Flow
Estimation Accuracy section.
Travel Sensor Accuracy
± 1 % of span
Log Interval
LOG
INTERVAL,
MINUTES
STANDARD HISTORY
CAPACITY, DAYS
(840 LOGS STORED,
ALL VERSIONS)
EXTENDED HISTORY CAPACITY,
DAYS (8640 LOGS STORED,
AVAILABLE ONLY FOR
FIRMWARE VERSION 2.xx)
1
2
3
4
5
6
10
12
15
20
30
60
0.6
1.2
1.8
2.3
2.9
3.5
5.8
7.0
8.8
11.7
17.5
35.0
6
12
18
24
30
36
60
72
90
120
180
360
Daily Log
35 days of daily values (average, accumulated,
minimum and maximum)
Sample Intervals
1, 10, and 30 seconds; 1, 2, 5, 10, and 30 minutes
Power
Battery Input: 3.6 Vdc; Input Power: 10 to 28 Vdc
Battery Information
Lithium Ion, 3.6 Vdc, 19.0 amp-hours
Diagnostics
Board Temperature, Power Input,
Logic/Battery Voltage
Processor Memory
Flash: 128 Kbytes
EEProm: 32 Kbytes
Static RAM: 128 Kbytes
Real Time Clock
• Hr : Min : Sec
• Day : Month : Year
• Battery Backed
Communication Ports
Operator Interface: RS-232 (RX, TX, RTS);
ROC protocol only
COM1: RS-485; ROC and Modbus protocol
COM2 (Optional): RS-232 or V-22 BIS Modem;
ROC and Modbus protocol
Environmental(1)
Operating Temperature: -40° to 167°F (-40° to 75°C)
Storage Temperature: -58° to 185°F (-50° to 85°C)
Operating Humidity: 5% to 95% non-condensing
Vibration: Meets SAMA PMC 31.1
Electromagnetic Interference: Designed to meet
requirements of IEC 61326 Electrical Equipment
for Measurement, Control, and Laboratory Use
Radiated Emissions: FCC Part 15 Class A
Approvals
CSA Class I, Division 1, Explosion-Proof, Gas
Groups C and D; Class I, Division 2, Nonincendive
groups C and D; Certified to Canadian and
U.S. Standards
Connections
Electrical: Housing has 2 1/2-inch 14 NPT conduit
connections for wiring
Process: Sensors have 1/4-inch 18 NPT
process connections
Vents: Vent connections are tapped with
1/4-inch 18 NPT threads for use with piping in
pit installations
1. The pressure/temperature limits in this manual and any applicable standard or code limitation should not be exceeded.
Table 1. Sensor and Pressure Ratings, and Accuracy
SENSOR RANGE,
PSIG (bar)
MAXIMUM OPERATING PRESSURE,
PSIG (bar)
MAXIMUM EMERGENCY PRESSURE,
PSIG (bar)
2.5
1.0
1.0
9 (0,62)
45 (3,10)
85 (5,86)
300 (20,7)
475 (32,8)
475 (32,8)
0.5
0.5
1.0
1.0
185 (12,8)
585 (40,3)
475 (32,8)
1500 (103)
0 to 500 (0 to 34,5)
0 to 1000 (0 to 68,9)
0.5
0.5
1.0
1.0
985 (67,9)
1500 (103)
1500 (103)
1500 (103)
0 to 1500 (0 to 103)
0.5
1.0
1500 (103)
1500 (103)
-40° to 167°F
(-40° to 75°C)
1.5
0.5
0.5
0 to 100 (0 to 6,90)
0 to 300 (0 to 20,7)
0 to 30-inches w.c. (0 to 75 mbar)
0 to 15 (0 to 1,03)
0 to 35 (0 to 2,41)
2
ACCURACY, % OF SPAN
-4° to 122°F
(-20° to 50°C)
RF100 Series
I/O Board Specifications (optional)
Available Channels
1 - Dedicated Analog Input (AI)
2 - Selectable Analog Input (AI) or Output (AO)
3 - Dedicated Discrete Input (DI)
4 - Selectable Discrete Input (DI) or Output (DO)
5 - Dedicated Discrete Output (DO)
Configurations (Selectable)
• 1-AO, 1-AI, 2-DI, 1-DO
• 1-AO, 1-AI, 1-DI, 2-DO
• 2-AI, 2-DI, 1-DO
• 2-AI, 1-DI, 2-DO
Classification
FCC Class A and CISPR 22 computing device
Analog Input
Quality/Type: Single-ended, voltage-sense analog
inputs (current loop if scaling resistor is used).
Signal: 1 to 5 Vdc, software configurable.
4 to 20 mA, with 250W resistor installed across
“+” and “-” terminals.
Terminals
• AI1 or AI2 (+) Positive Input
• ACOM (-) Negative Input (common)
Accuracy: 0.5% over -40 to 149°F
(-40 to 65°C) range.
Isolation: None
Input Impedance: 1MW
Filter: Single pole
Resolution: 10 bits
Conversion Time: 200 µs
Sample Period: 1.0-second minimum
Analog Output
Quality/Type: 0 to 2 Vdc output or 4 to 20 mA current
Terminals
• AO (+) Positive Output
• ACOM (-) Negative Output (common)
Resolution: 8 bits
Accuracy: 0.5% of full-scale output
Reset Action: Output goes to last value (software
configurable) on power-up (warm start) or on
watchdog time-out
Discrete Input
Quality/Type: Contact-sense discrete input or
voltage sourced 3.3 to 24 Vdc
Terminals
• DI1 or DI2 (+) Positive Input
• DCOM (-) Negative Input (common)
Current Rating: 35 µA in the active (on) state,
0 µA in the inactive (off) state
Isolation: None
Frequency: 0.5 Hz maximum
Sample Period: 1.0 second minimum
Discrete Output
Quality/Type: Solid-state switch
Terminals
• DO1 or DO2 (+) normally-open contact
• DCOM (-) common
Switch Rating: 24Vdc @ 12 mA maximum or
12 Vdc @ 10 mA maximum
Environmental
Meets the Environmental specifications of the
RegFlo units in which the board is installed.
RTD Interface (optional)
RTD Input
Quantity/Type: Single input for a 2, 3 or 4-wire
RTD element with alpha of 0.00385
Sensing Range: -40 to 167°F (-40 to 75°C)
Introduction
Scope of Manual
This instruction manual provides generalized guidelines
for successful installation and operation of the
RegFlo RF100 Series flow and pressure instruments.
Planning helps to ensure smooth installation. Be sure
to consider location, ground conditions, climate, and site
accessibility as well as the suitability of the application
when planning an installation. Refer to the appropriate
Accuracy: ±1.0°F (-18° to -17°C) over sensing
range (includes linearity, hysteresis, repeatability).
Resolution: 16 bits.
Sample Period: 1 sec minimum.
instruction manuals when installing and maintaining
regulators and other equipment used with the
RF100 Series instruments.
Product Description
The RF100 Series pressure and flow instruments are
devices which measure and archive flow and pressure
data. The Type RF110 instrument is used as a standalone pressure recorder. The Type RF100 instrument
is mounted on a regulator, such as a Type EZR and
3
RF100 Series
to the Type EZR Bulletin, 71.2:EZR
(D102626X012) capacity tables for the
maximum flow of the regulator. The
maximum flow is related to inlet pressure
and outlet pressure of the regulator.
can also estimate flow rates as well as record valve
plug travel. Other parameters such as minimum and
maximum values are also stored. Alarms may be
configured to signal abnormal or emergency conditions.
Specifications
Field data shows that the RegFlo Type RF100 has the
ability to estimate hourly flow rates within ± 5% of the
actual flow and daily rates within ± 2% of the actual
when the Type EZR regulator is operating at or above
mid-range of capacity.
Specifications for the RF100 Series instruments are
found on page 2. Regulators and other equipment
used with the RF100 Series instruments, such as the
Type EZR regulator, have their own instruction
manuals. Refer to the appropriate manual for
installation and operation of additional equipment.
Type 1098-EGR
The instantaneous flow estimation accuracy of the
RegFlo Type RF100 instrument is related to the
percentage of travel through the Type 1098-EGR
regulator. As the flow rate through the regulator
increases, the instrument’s flow estimation becomes
more accurate. The typical flow estimation accuracy
for each Type 1098-EGR cage is shown in table 3.
Instantaneous Flow Estimation Accuracy
Type EZR
The instantaneous flow estimation accuracy of the
RegFlo Type RF100 instrument is related to the
percentage of flow through the Type EZR regulator.
As the flow rate through the regulator increases, the
instrument’s flow estimation becomes more accurate.
The typical flow estimation accuracy for each
Type EZR body size is shown in table 2.
The accuracy is improved at higher pressure drops. The
data in table 3 is representative of a 5 to 10 psi (0,34 to
0,69 bar) pressure drop. Accuracy of the pressure sensor
at lower pressure drops also has an impact.
Note
Principle of Operation
The percent of flow is not equivalent
to percent of travel. The Type EZR
regulator does not exhibit a linear valve
characteristic. The regulator in most
cases will not start to flow through
the main valve until the percentage of
travel reaches 10% of full open. Refer
The main function of RegFlo RF100 Series
instruments is the acquisition and storage of pressure,
travel, and flow data from the regulator installation. It
also provides alarm and diagnostic functions relative to
pressure, travel and flow.
The flow algorithm uses upstream and downstream
pressure measurements along with travel to calculate
an instant and accumulate flow rate. The travel and
pressure sensors are integral to the module. It is also
available with an optional third pressure sensor. The
module may also be mounted remotely and used only
to monitor line pressures.
Table 2. Type EZR Instantaneous Flow Estimation
Typical Accuracy
PERCENTAGE OF ACTUAL FLOW
DIAPHRAGM
MATERIAL
3 and 4-Inch
(DN 80 and 100)
2-Inch (DN 50)
For 20 to
30% of
Maximum
Flow
For 30 to
100% of
Maximum
Flow
For 20 to
30% of
Maximum
Flow
For 30 to
100% of
Maximum
Flow
17E97 Nitrile
±15
±10
±20
±10
17E67 Nitrile
±20
±15
±20
±15
Data storage will be provided in the unit. That data
may be accessed via a local interface or remotely.
The remote connection may be via dial-up phone or
Table 3. Type 1098-EGR Instantaneous Flow Estimation Typical Accuracy
CAGE TYPE
PERCENTAGE OF ACTUAL FLOW
For 5 to 10% of Travel
For 10 to 20% of Travel
For 20 to 30% of Travel
For 30 to 40% of Travel
Linear or Quick Opening
± 30
± 20
± 15
± 10
± 10
Whisper Trim®
± 20
± 17.5
± 15
± 10
± 7.5
Note: The accuracy of the flow estimation is dependant on pressure drop and pressure sensor range.
4
For 40 to 100% of Travel
RF100 Series
radio. The communications ports will support ROC and
Modbus protocols. The unit is designed to meet Class 1
Division 1 explosion proof requirements and be
submersible. It is DC powered by an internal battery or
external source.
Type RF100 Flow and Pressure Instrument
The Type RF100 instrument measures valve plug
travel, inlet pressure, and outlet pressure. A third
pressure sensor is available as an option to measure
an auxiliary pressure. An algorithm estimates the flow
through the regulator and archives pressure, travel,
and flow data in the history log. It also records other
parameters such as battery output, minimums and
maximum values, etc. Alarms may be configured to
signal abnormal or emergency conditions.
The Type RF100 flow and pressure instrument is
available for the 1, 2, 3, 4, and 6-inch (DN 25, 50, 80,
100, and 150) Type EZR and the 2, 3, 4, and
6-inch (DN 50, 80, 100, and 150) Type 1098-EGR
body sizes. The flow estimation is not available for
the 1-inch (DN 25) Type EZR. It is also not available
for the 6-inch (DN 150) Type EZR when the differential
pressure exceeds 175 psi (12,1 bar).
Type RF100 Pressure and Travel Indication
The Type RF100 instrument is available for the 1, 3,
and 6-inch (DN 25, 80, and 150) Type EZR body sizes
as a pressure and travel indicator. The instantaneous
flow estimation capability for these sizes is currently
not available. Instantaneous flow estimation capability
will be added when development of the required Flow
Estimation Algorithm is completed. A field installable
software update will be available to add the Flow
Estimation Algorithm. The unit will not have to be
removed from its installation to install the update.
Until the software update is installed, the instrument
will display the value of zero for the Estimated Flow,
Accumulated Flow, and Accumulated Travel values.
FCC Approvals
Note
The RF100 Series instruments have
been tested and found to comply with
the limits for a Class A digital device,
pursuant to part 15 of the FCC Rules.
The RF100 Series instrument’s limits
are designed to provide reasonable
protection against harmful interference
when these instruments are operated
in a commercial environment. The
RF100 Series instruments generate,
use, and can radiate radio frequency
energy and, if not installed and used
according to the instruction manual,
may cause harmful interference to
radio communications.
Operation of the RF100 Series instruments
in a residential area is likely to cause
harmful interference, in which case
the user will be required to correct the
interference at his/her own expense.
User Instructions
This equipment complies with Part 68 of the FCC
rules. On the RF100 Series housing assembly is a
label that contains the FCC certification number and the
Ringer Equivalence Number (REN). If requested, this
information must be provided to the telephone company.
Registration No. US: FSRMR00BI00, REN 0.0B
Registration Holder: Fisher Controls International, Inc.
This instrument is designed to be connected to
the telephone network or premises wiring using a
compatible modular jack that is Part 68 compliant. See
the Installation section for details.
The REN is used to determine the quantity of
devices that may be connected to the telephone line.
Excessive RENs on the telephone line may result in
the devices not ringing in response to an incoming
call. Typically, the sum of the RENs should not exceed
five (5.0). To be certain of the number of devices that
may be connected to a line (as determined by the total
RENs), contact the local telephone company.
If the RF100 Series Modem causes harm to the
telephone network, the telephone company will notify
you in advance that temporary discontinuance of service
may be required. If advance notice is not practical, the
telephone company will notify you as soon as possible.
Also, you will be advised of your right to file a complaint
with the FCC if you believe it necessary.
The telephone company may make changes to its
facilities, equipment, operations, or procedures that
could effect the operation of the RF100 Series Modem.
If this happens, the telephone company will provide
advance notice so you can make the necessary
modifications to maintain uninterrupted service.
For RF100 Series repair or warranty information,
please contact your local Fisher Sales Representative
or Sales Office. If the RF100 Series Modem is causing
5
RF100 Series
harm to the telephone network, the telephone company
may request that you disconnect the modem until the
problem is resolved.
Hazardous Area Product Approval
for North America
This section contains standards, classifications,
techniques, enclosure ratings, and approvals used in
hazardous area considerations. The information in this
document is primarily for educational purposes and
should not be used in place of the source documents.
The specifications and requirements stated in this
document constitute minimum information. For more
detailed explanations, refer to reference documents or
call your Fisher Sales Office or Sales Representative.
Common Standards
Canadian Electrical Code (CEC), 1994, Part I,
Section 18—Defines hazardous locations by class,
division, and group, and provides installation criteria.
Canadian Standards Association (CSA) C22.2
No. 0-M91—General Requirements—Canadian
Electrical Code, Part II.
CSA C22.2 No. 30-MI 986—Explosion-Proof
Enclosures for Use in Class I Hazardous Locations.
CSA C22.2 No. 94-1991—Special Purpose Enclosures.
CSA C22.2 No. 142-M1987—Process Control Equipment.
CSA C22.2 No. 157-92—Intrinsically Safe and
Nonincendive Equipment for Use in Hazardous Locations.
CSA C22.2 No. 213-MI 987—Nonincendive Electrical
Equipment for Use in Class I, Division 2
Hazardous Locations.
National Electric Code (NEC), Article 500, 1996—
Defines the hazardous area classes, divisions, hones,
groups, and provides installation criteria.
National Electrical Manufacturer’s Association
(NEMA) Standard 250, 1985—Enclosure for Electrical
Equipment (1000 Volts Maximum). Describes
definitions and standards for electrical enclosures for
U.S. installations.
National Fire Protection Association (NFPA) 497M,
1991—Classification of Gases, Vapors, and Dusts for
Electrical Equipment in Hazardous (Classified) Locations.
6
Table 4. Hazardous Areas Where Types of Protection
May Be Used
TYPES OF
PROTECTION
CLASS I, DIVISION 1
CLASS I, DIVISION 2
Explosionproof (XP)
X
X
Nonincendive (NI)
----
X
Note
The following information is provided as
an example of the information listed in
the National Electrical Code (NEC). Do
not use the information in this document
in place of the NEC.
Approval Agencies
There are three main approval agencies in North
America: Factory Mutual (FM) and Underwriters
Laboratories (UL) in the United States, and Canadian
Standards Association (CSA) in Canada. The RegFlo
RF100 Series instruments are approved by CSA.
Types of Protection
The RegFlo instruments are certified as explosion proof
and nonincendive. It is not certified as intrinsically
safe. See following definitions.
Explosion-Proof (XP)—A protection concept that
requires electrical equipment to be capable of
containing an internal explosion of a specific flammable
vapor-in-air mixture, thereby not allowing the release of
burning or hot gases to the external environment which
may be potentially explosive. Also, the equipment
must operate at a safe temperature with respect to the
surrounding atmosphere.
Intrinsically Safe (IS)—A protection concept that
requires electrical equipment to be incapable of
releasing sufficient electrical or thermal energy to
cause ignition of a specific hazardous substance under
“normal” or “fault” operating conditions.
Nonincendive (Nl)—A type of protection which
requires electrical equipment to be nonsparking and
incapable of releasing sufficient electrical or thermal
energy to cause ignition of a specific hazardous
substance under “normal” operating conditions.
Locations Where Types of Protection
Are Used
The various types of protection can be used in the
locations designated in table 4.
RF100 Series
Nomenclature
Approval agencies within North America classify
equipment to be used in hazardous locations by
specifying the location as being Class I or II; Division 1
or 2; Groups A, B, C, D, E, F, or G; and Temperature
Code T1 through T6. These designations are defined
in the National Electrical Code (NEC) in the
United States and the Canadian Electrical Code
(CEC) in Canada. They are also defined in the
following paragraphs.
Hazardous Area Classifications
Hazardous areas in North America are classified by
class, division, and group.
Class
The class defines the general nature of the hazardous
material in the surrounding atmosphere.
Class I—Locations where flammable gases or vapors
are, or may be, present in the air in quantities sufficient
to produce explosive or ignitable mixtures.
Division
The division defines the probability of hazardous
material being present in an ignitable concentration in
the surrounding atmosphere.
Division 1—Locations where the probability of the
atmosphere being hazardous is high due to flammable
material being present continuously, intermittently,
or periodically.
Division 2—Locations presumed to be hazardous only
in an abnormal situation.
Note
Any RegFlo instrument approved for
Division 1 is automatically approved for
Division 2 for the same class and group.
Group
The group defines the hazardous material in the
surrounding atmosphere. The specific hazardous
materials within each group and their automatic
ignition temperatures can be found in Article 500 of the
National Electrical Code (NEC) and in NFPA 497M.
Groups A, B, C, and D apply to Class I; Groups E, F,
and G apply to Class II locations.
Group A—Atmospheres containing acetylene.
30 percent hydrogen by volume, or gases or vapors of
equivalent hazard such as butadiene, ethylene oxide,
propylene oxide, and acrolein.
Group C—Atmospheres such as ethyl ether, ethylene,
or gases or vapors of equivalent hazard.
Group D—Atmospheres such as acetone, ammonia,
benzene, butane, cyclopropane, ethanol, gasoline,
hexane, methanol, methane, natural gas, naphtha,
propane, or gases or vapors of equivalent hazard.
Group E—Atmospheres containing combustible metal
dusts, including aluminum, magnesium, and their
commercial alloys, or other combustible dusts whose
particle size, abrasiveness, and conductivity present
similar hazards in the use of electrical equipment.
Group F—Atmospheres containing combustible
carbonaceous dusts, including carbon black, charcoal,
coal, or coke dusts that have more than 8 percent total
entrapped volatiles, or dusts that have been sensitized by
other materials so that they present an explosion hazard.
Group G—Atmospheres containing combustible dusts
not included in Group E or F, including flour, grain,
wood, plastic, and chemicals.
Temperature Code
A flammable gas, vapor-in-air mixture, dust, or fiber
may be ignited by coming into contact with a hot
surface. The conditions under which a hot surface
will ignite a material depends on surface area,
temperature, and the concentration of the gas.
The approval agencies test and establish maximum
temperature ratings for the different equipment
submitted for approval. Equipment that has been
tested receives a temperature code that indicates
the maximum surface temperature attained by the
equipment. For intrinsically safe and nonincendive
equipment, the temperature classification marking also
applies to surfaces other than those of the enclosure.
Table 5 lists the maximum surface temperature for the
different temperature codes.
The NEC states that any equipment that does not
exceed a maximum surface temperature of 212°F
(100°C) [based on 104°F (40°C) ambient temperature]
is not required to be marked with the temperature code.
Field measurement instruments that do not exceed a
maximum surface temperature of 212°F (100°C), will
normally not have a temperature code rating on the
nameplate. When a temperature code is not specified
on the approved apparatus, it is assumed to be T5.
Group B—Atmospheres containing hydrogen, fuel
and combustible process gases containing more than
7
RF100 Series
Table 5. Temperature Code Maximum Surface Temperature
TEMPERATURE
CODE
MAXIMUM SURFACE TEMPERATURE
°F
°C
T1
842
450
T2
T2A
T2B
T2C
T2D
572
536
500
446
419
300
280
260
230
215
T3
T3A
T3B
T3C
392
356
329
320
200
180
165
160
T4
T4A
275
248
135
120
T5
212
100
T6
185
85
CSA Enclosure Rating
CSA enclosure ratings are defined in CSA C22.2,
No. 94. They are now similar to the NEMA enclosure
ratings; however, CSA does not have Types 1, 7, 8, 9,
and 10.
Explosion-Proof Technique
This technique is implemented by enclosing all
electrical circuits in housings and conduits strong
enough to contain any explosion or fires that may take
place inside the instrument.
All electrical wiring leading to the field instrument must
be installed in threaded rigid metal conduit, threaded
steel intermediate metal conduit, or Type Ml cable.
Advantages of this Technique
Installation Requirements
1. The user has responsibility for following proper
installation procedures (refer to local and national
electrical codes).
2. Installation requirements are listed in Article 501 of
the National Electrical Code (NEC) or article 18-106 of
the Canadian Electrical Code (CEC).
3. All electrical wiring leading to the field instrument
must be installed using threaded rigid metal conduit,
threaded steel intermediate metal conduit, or
Type Ml cable.
4. Installation drawings are not required for
explosion-proof instruments, but the equipment must
be installed per the NEC or CEC, as appropriate.
5. Conduit seals may be required within 18-inches
(457 mm) of the field instrument to maintain the
explosion-proof rating and reduce the pressure piling
effect on the housing.
Nonincendive Technique
This technique allows for the incorporation of circuits in
electrical instruments which are not capable of igniting
specific flammable gases or vapor-in-air mixtures
under normal operating conditions.
Advantage of this Technique
1. Uses electronic equipment which normally does
not develop high temperatures or produce sparks
strong enough to ignite the hazardous environment.
1. Users are familiar with this technique and
understand its principles and applications.
2. Lower cost than other hazardous environment
protection techniques because there is no need for
explosion-proof housings or energy limiting barriers.
2. Sturdy housing designs provide protection to the
internal components of the instruments and allows
their application in hazardous environments.
3. Permits using wiring methods suitable for wiring in
ordinary locations (as allowed by the NEC exception).
3. An explosion-proof housing is usually weatherproof.
Disadvantage of this Technique
Disadvantage of this Technique
1. This technique is only applicable to
Division 2 locations.
2. Opening of the housing in a hazardous area voids
all protection.
2. Places constraint on control room to limit energy
to field wiring (normal operation is open, short or
grounding of field wiring) so that arcs or sparks under
normal operation will not have enough energy to
cause ignition.
3. Generally requires use of heavy bolted or
screwed enclosures.
3. Both the field instrument and control room device
may require more stringent labeling.
1. Circuits must be de-energized or location rendered
nonhazardous before housing covers may be removed.
8
RF100 Series
Instrument Repair
Approved instruments can be field repaired under
certain limitations as follows:
1. Any replacement of electrical components must be
with components specifically designated by Fisher. No
substitution of type or vendor is allowed.
2. No machining of explosion-proof instruments
which will alter or affect thread engagements, flame
paths, minimum wall thickness, gaps, etc. is allowed.
3. No machining of dust-ignition-proof instruments
which will alter or affect thread engagements, gaps,
etc. is allowed.
4. Nameplates for approved instruments can be
changed in the field only by Fisher personnel and under
the direct supervision of an FM or CSA representative.
Each instrument must have specific approval from a
testing agency in order to qualify as nonincendive.
RF100 Series Installation
!
WARNING
Personal injury, equipment damage, or
leakage due to escaping gas or bursting
of pressure-containing parts may result if
this device is overpressured or is installed
where service conditions could exceed
the limits given in the Specifications
section on page 2, or where conditions
exceed any ratings of the adjacent piping
or piping connections.
To avoid such injury or damage, provide
pressure-relieving or pressure-limiting
devices (as required by the appropriate
code, regulation, or standard) to prevent
service conditions from exceeding limits.
Additionally, physical damage to the
regulator could break the pilot off the
main valve, causing personal injury and
property damage due to escaping gas.
To avoid such injury and damage, install
the regulator in a safe location.
Installation Requirements
This section provides generalized guidelines for
successful installation and operation of the
RF100 Series instruments. Planning helps to ensure
a smooth installation. Be sure to consider location,
ground conditions, climate, and site accessibility as
well as the suitability of the instrument application
while planning an installation.
The versatility of the RF100 Series instruments
allows them to be used in many types of installations.
For additional information concerning a specific
installation, contact your Fisher Sales Representative.
For detailed wiring information, refer to Wiring section.
The Installation Requirements section includes:
• Site Requirements
• Grounding Installation Requirements
Note
The RF100 Series instruments have been
tested and found to comply with the
limits for class A digital device pursuant
to part 15 of the FCC Rules.
These limits are assigned to provide
reasonable protection against harmful
interference when the instruments are
operated in a commercial environment.
These instruments generate, use, and
can radiate radio frequency energy. If
not installed and used in accordance
with this instruction manual, these
instruments may cause harmful
interference to radio communications.
Operation of these instruments in a
residential area is likely to cause harmful
interference, in which case the user will
be required to correct the interference at
his/her own expense.
Site Requirements
Careful consideration in locating the instrument on the
site can help prevent future operational problems. The
following items should be considered when choosing
a location:
• Local, state, and federal codes often place restrictions
on monitoring locations and dictate site requirements.
Examples of these restrictions are distance from pipe
flanges and hazardous area classifications.
• Locate the instrument to minimize the length of
signal and power wiring.
• When using solar-power, orient solar panels to
face due South (not magnetic South) in the Northern
Hemisphere and due North (not magnetic North) in the
9
RF100 Series
Southern Hemisphere. Make sure nothing blocks the
sunlight from 9:00 AM to 4:00 PM.
• Antennas equipped for radio communications
must be located with an unobstructed signal path. If
possible, locate antennas at the highest point on the
site and avoid aiming antennas into storage tanks,
buildings, or other tall structures. Allow sufficient
overhead clearance to raise the antenna.
• To minimize interference with radio
communications, locate the instrument away from
electrical noise sources such as engines, large electric
motors, and utility line transformers.
• Locate the instrument away from heavy traffic
areas to reduce the risk of being damaged by vehicles.
However, provide adequate vehicle access to aid in
monitoring and maintenance.
Grounding Installation Requirements
Ground wiring requirements for line-powered equipment
are governed by the National Electrical Code (NEC).
When the equipment uses line power, the grounding
system must terminate at the service disconnect. All
equipment grounding conductors must provide an
uninterrupted electrical path to the service disconnect.
The National Electrical Code Article 250-83 (1993),
paragraph c, defines the material and installation
requirements for grounding electrodes.
The National Electrical Code Article 250-91 (1993),
paragraph a, defines the material requirements for
grounding electrode conductors.
The National Electrical Code Article 250-92 (1993),
paragraph a, provides installation requirements for
grounding electrode conductors.
The National Electrical Code Article 250-95 (1993),
defines the size requirements for equipment
grounding conductors.
Proper grounding of the instrument helps to reduce the
effects of electrical noise on the unit’s operation and
protects against lightning. A surge protection device
installed at the service disconnect on line-powered
systems offers lightning and power surge protection
for the installed instrument. You may also consider
a telephone surge protector for the dial-up modem
communications card.
All earth grounds must have an earth to ground rod
or grid impedance of 25 ohms or less as measured
with a ground system tester. The grounding conductor
should have a resistance of 1 ohm or less between the
instrument case ground lug and the earth ground rod
or grid.
10
The grounding installation method for the instrument
depends on whether the pipeline has cathodic
protection. Pipelines with cathodic protection do not
require grounding, the instrument can “float.”
Electrical isolation can be accomplished by using
insulating flanges upstream and downstream on the
distribution system. In this case, the instrument could
be flange mounted or saddle-clamp mounted directly
on the distribution system and grounded with a ground
rod or grid system.
On pipelines without cathodic protection, the pipeline
itself may provide an adequate earth ground and the
instrument could mount directly on the distribution
piping. Using a ground system tester, test to make sure
the pipeline to earth impedance is less than 25 ohms.
If an adequate ground is provided by the pipeline, do
not install a separate ground rod or grid system. All
grounding should terminate at a single point.
Isolate the instrument installation and install a ground
rod or grid grounding system, if the pipeline to earth
impedance is greater than 25 ohms.
All Installations
The robust design of the RF100 Series instrumentation
allows this device to be installed indoors or outdoors.
When installed outdoors, the RF100 Series instrument
does not require protective housing. This device is
designed to withstand the elements.
The Type RF100 instrument is installed on the
regulator in place of the indicator fitting. The
Type RF110 instrument is mounted to a pipe stand or
wall remote from the regulator.
When installed indoors, remote venting of the
atmospheric vent and mounting adaptor vent is
required. This instrument can also be installed in a
pit that is subject to flooding by venting the housing
atmospheric vent and mounting adaptor vent
above the maximum possible flood level. Any other
atmospheric reference points, such as a pilot spring
case, must also be installed above flood levels.
Note
When installed in a hazardous area,
appropriate techniques are required.
Refer to the Hazardous Area Product
Approval section of this manual.
The unit is CSA Class I DIV I explosion-proof and CSA
Class I DIV II nonincendive.
RF100 Series
OPTIONAL P3 (AUXILIARY)
P1
P2
BLOCK
VALVE
BLOCK VALVE
STATION
INLET
STATION
OUTLET
SUPPLY PRESSURE LINE
E0680_A
CONTROL LINE
RESTRICTOR
PILOT
2A—Single Regulator Installation with 2 or 3 Pressure Sensors Used in the Type RF100 Instrument
[Installation Type: Single Cut (Two or Three Sensors)]
OPTIONAL P3 (AUXILIARY)
P2
P1
MONITOR
REGULATOR
BLOCK VALVE
STATION
INLET
SUPPLY
PRESSURE
LINE
WORKING REGULATOR
BLOCK VALVE
STATION
OUTLET
INTERMEDIATE
PRESSURE
HAND VALVE
SUPPLY PRESSURE LINE
RESTRICTOR
E0680_B
PILOT
EXHAUST
RESTRICTOR
CONTROL
LINE
PILOT
PILOT
CONTROL LINE
2B—Upstream Wide-Open Monitoring System Installation with 2 or 3 Pressure Sensors Used in the Type RF100 Instrument
[Installation Type: Downstream RegFlo (Two or Three Sensors)]
OPTIONAL P3 (AUXILIARY)
P2
P1
BLOCK VALVE
STATION
INLET
SUPPLY
PRESSURE
LINE
E0680_C
DOWNSTREAM REGULATOR
UPSTREAM
REGULATOR
BLOCK VALVE
STATION
OUTLET
INTERMEDIATE
PRESSURE
RESTRICTOR
SUPPLY PRESSURE
LINE
CONTROL LINE
MONITOR PILOT
RESTRICTOR
WORKING PILOT
PILOT
CONTROL LINE
2C—Working Monitoring System Installation with 2 or 3 Pressure Sensors Used in the Type RF100 Instrument
[Installation Type: Downstream RegFlo (Two or Three Sensors)]
Figure 2. RF100 Series Typical Installations
11
RF100 Series
P3 (AUXILIARY)
P1
P2
MONITOR REGULATOR
WORKING
REGULATOR
BLOCK VALVE
STATION
INLET
BLOCK VALVE
STATION
OUTLET
INTERMEDIATE
PRESSURE
SUPPLY
PRESSURE
LINE
SUPPLY PRESSURE LINE
RESTRICTOR
RESTRICTOR
PILOT
EXHAUST
PILOT
PILOT
E0680_D
CONTROL
LINE
CONTROL LINE
2D—Downstream Wide-Open Monitoring System Installation with 3 Pressure Sensors Used in the Type RF100 Instrument
[Installation Type: Upstream RegFlo (Three Sensors)]
P3 (AUXILIARY)
P1
P2
BLOCK VALVE
DOWNSTREAM REGULATOR
UPSTREAM
REGULATOR
STATION
INLET
BLOCK VALVE
STATION
OUTLET
INTERMEDIATE
PRESSURE
SUPPLY
PRESSURE LINE
E0680_E
RESTRICTOR
SUPPLY PRESSURE
LINE
MONITOR PILOT
CONTROL LINE
WORKING PILOT
RESTRICTOR
PILOT
CONTROL LINE
2E—Working Monitoring System Installation with 3 Pressure Sensors Used in the Type RF100 Instrument
[Installation Type: Upstream RegFlo (Three Sensors)]
Figure 2. RF100 Series Typical Installations (continued)
Only personnel qualified through training and
experience should install, operate, and maintain a
regulator. Also, make sure that all tubing and piping
are clean and unobstructed.
Note
If the gas contains continuous particles,
upstream filtration is recommended.
An RF100 Series instruments may be installed in any
orientation. In order for the Type RF100 instrument
to estimate flow, inlet pressure (P1) must be piped to
the inlet connection and outlet pressure (P2) must be
piped to the outlet pressure connection of the regulator.
12
When changing the orientation of the RF100 Series
instrument, refer to the Magnet Rotation Orientation
section to properly align the magnet.
Note
Accuracy depends on sensor location.
Pressure sensors should be placed 5 to
10 pipe diameters from the valve body
with no piping obstructions between the
sensing location and the valve body.
P1 and P2 are upstream and downstream
of the RegFlo regulator.
RegFlo instrumentation accuracy requires
the regulator to fully stroke during
RF100 Series
calibration. Consideration of this during
installation will improve the calibration
process. One possible installation
would include a means for blocking off
the regulator pilot’s supply and control
lines. Then, by bleeding the loading
pressure, the regulator would
stroke wide-open.
!
WARNING
A regulator may vent some gas to the
atmosphere. In hazardous or flammable
gas service, vented gas may accumulate
and cause personal injury, death, or
property damage due to fire or explosion.
Vent a regulator in hazardous gas service
to a remote, safe location away from
air intakes or any hazardous location.
Protect the vent line or stack opening
against condensation or clogging.
A clogged atmospheric vent may cause incorrect
pressure to be recorded. To keep this vent from being
plugged or collecting rain, point the vent down. To
remotely vent this connection, remove the vent and
install obstruction-free tubing or piping into the
1/4-inch NPT vent tapping. Provide protection on the
remote vent by installing a screened vent cap onto the
remote end of the vent pipe.
Type RF110 Pipestand Mounting
Key numbers are referenced in figure 34.
1. Mount the bracket (key 46) on a 2-inch (50,8 mm)
pipestand using the muffler clamps (key 48) provided
or mount the bracket to a wall or panel.
2. To assemble, insert the spacer (key 47) through the
column of the RegFlo housing (key 1) and place it into
the bracket. Insert the carriage bolt (key 49) through the
bracket and spacer from the top, securing the unit.
3. Position the unit and tighten using a washer
(key 50) and nut (key 51).
4. Connect pressure lines to pressure sensors
(key 26) using 1/4-inch NPT fittings (not supplied).
Note
Pressure sensors are factory calibrated.
If further calibration is required, refer to
the Calibration section of this manual or
to the RegLink Software Manual
(Form 5669, PN D102780X012)
CAUTION
Guard against overpressuring the
sensor assemblies. (Maximum
pressures are listed in table 1, page 2)
Retrofitting A Type RF100 To An Existing
Type EZR or Type 1098-EGR Regulator
Type RF100 instrument key numbers are referenced in
figures 32 and 33.
!
WARNING
Avoid personal injury or damage
to property from sudden release
of pressure or uncontrolled gas or
other process fluid. Before starting
to disassemble, carefully release all
pressures according to the Shutdown
procedure. Use gauges to monitor inlet,
loading, and outlet pressures while
releasing these pressures.
1. Remove inlet and bleed pressure from the
regulator. Refer to the Type EZR or Type 1098-EGR
instruction manual for proper procedure.
2. Remove the travel indicator assembly from the
regulator bonnet on the Type EZR or remove the
indicator fitting from the bonnet on the Type 1098-EGR.
3. Remove the spring protector (if provided) from the
Type RF100. Lubricate the O-ring and threads on the
mounting adaptor (keys 28 and 10) for Type EZR or
the lower indicator fitting (keys 35 and 8) for Type 1098
and thread the Type RF100 into the regulator bonnet.
4. Loosen the indicator housing (key 17) to allow
housing to rotate freely on the shuttle sleeve (key 34).
5. Position the housing assembly (key 1) and tighten
indicator housing (key 17).
6. To set the travel indicator washer (key 14), hold
the indicator cover (key 15) next to the indicator
housing (key 17). Screw the hex jam nuts and the
indicator washer (keys 20 and 14) down on the
indicator stem (key 18) until the washer is even with
the lowest marking on the indicator cover. Lightly
lubricate the indicator cover threads and install.
Replace the indicator protector (key 16).
Note
Make sure vent (key 39) points down.
13
RF100 Series
TB1
Note
TB2
POWER
CAUTION
Guard against overpressuring the
sensor assemblies. (Maximum
pressures are listed in table 1, page 2)
9. Calibrate the travel (zero and span) of the
Type RF100 instrument. Refer to the Calibration
section of this manual or to the RegLink Software User
Manual (Form 5669, PN D102780X012).
Wiring
Terminal Wiring Connections
The field terminations are accessed by removing
the cover. The termination board connectors use a
removable connector that accommodate wiring up to
#14 AWG (American Wiring Gauge) in size. The
connections are made by baring the end of a copper
wire [1/4-inch (6,35 mm) maximum], inserting the
bared end into the clamp beneath the termination
screw, and then securing the screw. The wire should
be fully inserted with a minimum of bare wire exposed
to prevent short circuits.
To make connections, unplug the connector from its
socket, insert each bared wire end into the clamp
beneath its termination screw, secure the screw, and
then plug the connector back in. The inserted wires
should have a minimum of bare wire exposed to
prevent short circuits. Allow some slack when making
connections to prevent strain on the circuit board and
to provide enough clearance to unplug connectors.
The following connectors are used on the Termination
Board (Refer to figure 3):
• TB2—Input Power (not used with battery option)
• TB1—I/O Board (not used with battery option)
• TB3—Communications LOI, COM1, COM2
• P1—Battery Terminal Connection (no wiring
required, not shown)
14
LOI
TB3
COM1
RTS
TX / RING
NC
B
A
RTS
TX
RX
BATTERY MODULE
COM
Pressure sensors are factory calibrated.
If further calibration is required, refer to
the Calibration section of this manual or
to the RegLink Software User Manual
(Form 5669, PN D102780X012)
6 7 8
DO1
DCOM
5
DI1
4
DI2/DO2
AI1
GND
ACOM
8. Align magnet as described on page 32, Magnet
Rotation Orientation and figure 12.
1/O
2 3
AI2/AO
1
RX / TIP
7. Connect the pressure lines to pressure sensor
assembly (key 26) using a 1/4-inch (6,35 mm) fitting
(not supplied).
COM2
COMMUNICATIONS
SHOWN WITH BATTERY MODULE
OPTION. TB1 IS NOT USED
WITH THIS OPTION.
E0687
Figure 3. Wiring Label
Connecting Communications Wiring
The RegFlo RF100 Series instruments have the
flexibility to communicate to external devices using
different protocols. Communications take place either
through the local operator interface port (LOI) or the
Host port (COM1). An optional Host Port (COM2) is
also available. Wiring for the Host port is connected
using screw terminals on the TB3 termination board.
(See figure 3.)
Available Communications Ports
The RegFlo controller provides three communication ports:
• EIA-232 Operator interface port —LOI
• EIA-485 Host Port—COM1
• Dial-Up Modem or EI-232 Host Port—COM2 (optional)
Operator Interface Port—LOI
The Operator Interface port, also called the Local
Operator Interface (LOI) port, provides direct
communications between the instrument and the serial
port of an operator interface device such as an IBM
compatible computer.
The interface allows you to access the RegFlo
RF100 Series instruments (using the RegLink
software) for configuration and transfer of stored data.
The LOI terminal on the Termination Board provides
wiring access to a built-in EIA-232 serial interface
and is capable of up to a 19.2k baud rate. The
operator interface port supports only ROC protocol
communications. The LOI also supports the log-on
security feature of the instrument.
RF100 Series
The configuration device is typically an IBM-compatible
computer. A prefabricated interface cable is available
as an accessory from Fisher.
The LOI port is how the instrument normally
communicates with the RegLink software. This port
is compatible with RS232 signals. An RTS terminal
is provided on the Termination Board and is intended
for future applications. The following table shows
the signal routing between the Termination Board
terminations and the 9-pin serial connector:
(LOI) TERMINATION BOARD
TX
RX
COM
9-Pin Serial
2
3
5
CAUTION
Local configuration or monitoring of the
instrument through its LOI port must be
performed in a nonhazardous area.
Note
If desired or required, the LOI port may
be wired to a more convenient location.
Due to the EIA-232 specifications, the
location must be within 50 feet (15,2 m)
of the RegFlo device.
Host Ports
Host ports are used to monitor or alter the RegFlo
instrument from a remote site using a host
configuration software. It also supports the log-on
security feature of the RegFlo instrument.
The host port is capable of initiating a message in
support of Spontaneous Report by Exception (SRBX
or RBX). Refer to RegLink Software User Manual.
Note
Due to the small enclosure, the radio
must be mounted outside of the RegFlo
instrument housing.
The communications cards available for the
RegFlo instrument allow the options of serial data
communication and modem communications. The
RegFlo instrument is supplied with an EIA-485 Host
Port as standard.
The EIA-485 port is COM1. COM2 is optional and is
available as an EIA-232 port or a dial-up modem.
COM1: EIA-485 post connections: A, B
COM2: EIA-232 port connections: RX, TX, RTS
Dial-Up Modem Connections: TIP (green wire),
RING (red wire)
Connecting Input Voltage
The following sections describe how to connect the
RegFlo RF100 Series instruments to power and
ground. RegFlo instruments may be powered with a
10 to 28 Vdc source or an optional battery. Use the
following recommendations and procedures to avoid
equipment damage.
The terminal designations are printed inside the cover.
Refer to figure 3.
CAUTION
Always turn the power to the
RF100 Series off before you attempt any
type of wiring.
To avoid circuit damage when
working with the unit, use appropriate
electrostatic discharge precautions,
such as wearing a grounded wrist strap.
Connecting Main Power Wiring
It is important that good wiring practice be used when
sizing, routing, and connecting power wiring. All wiring
must conform to state, local, and NEC codes. The TB2
POWER terminal block can accommodate up to
14 AWG wire. Input power is monitored by diagnostic
Analog Input Point A8.
To make power connections (Refer to figure 3):
1. Unplug the connector from its socket located at
TB2 on the Termination Card.
2. Connect the DC power source (DC power supply)
to the “+” and “-” terminals. Insert each bared wire end
into the clamp beneath its termination screw. Make
sure the hookup polarity is correct.
3. Secure the screw.
4. Plug the connector back into the socket at TB2.
CAUTION
It is important to check the input power
polarity before turning on the power. No
damage will occur if polarity is reversed,
however, the unit will not operate.
Connecting Ground Wiring
The RegFlo instrument and related components should
be connected to an earth ground if any wires enter the
enclosure. The National Electrical Code (NEC) governs
ground wiring requirements for all line-powered devices.
15
RF100 Series
There is a ground bar located inside the enclosure at
the right-hand side (key 22, figure 34). This ground
screw is electrically bonded to the enclosure and
provides a screw compression to connect shields from
other device earth grounds as needed.
An external lug on the bottom outside of the enclosure
(key 23, figure 34) provides a place to connect an
earth ground to the enclosure.
It is recommended that 14 AWG wire be used for
the ground wiring. Make sure the installation has
only one ground point to prevent creation of a ground
loop circuit. A ground loop circuit could cause erratic
operation of the system.
The electronics are electrically connected to ground
screw via the ground wire and ring terminal. The
enclosure must be grounded from the ground lug
(key 23, figure 34).
Input/Output Termination Points
This section shows how to connect wiring to the I/O.
For more detail, see I/O Board Specification sheet on
page 3 and Product Electronics on page 32 for direction
on modifying the type of I/O on selectable channels.
Analog Inputs
The Analog Input (AI) monitors current loop and
voltage input devices. The A/D signal input range is
1 to 5 volts with 10-bit resolution. The terminals for
connecting analog input wiring include:
Analog Outputs
The Analog Output (AO) provides either a 0 to 2 volt
signal or a 4 to 20 mA current control. The analog
outputs use an 8-bit D/A converter with A/D values of
0 and 255. The Analog Output provided on the I/O
termination board connects as follows (see figures 6
and 7):
• AO (+) Positive or control Current
• ACOM (-) Common
Discrete Input
The Discrete Input (DI) monitors the status of relays,
solid-state switches, or open collector devices. DI
functions support discrete latched inputs and discrete
status inputs. The discrete input connects as follows:
• DI1/DI2 (+) Positive
• DCOM (-) Common
The Discrete Input operates by providing a closed
contact across terminals “+” and “-” (see figure 8).
When a field device, such as a relay contact or open
collector is connected across “+” and “-”, the closing of
the contacts completes the circuit which causes a flow
of current between VS and ground at terminal “-”. This
current flow activates and is sensed in the DI circuitry
that, in turn, signals the RegFlo electronics indicating
that the relay contacts have closed. When the
contacts open, current flow is interrupted and the DI
circuit signals to the RegFlo electronics that the relay
contacts have opened.
CAUTION
• AI1/AI2 (+) Positive Input
• ACOM (-) Negative Input (common)
The “+” terminal is the positive signal input and the
ACOM terminal is the signal common. These
terminals accept a voltage signal in the 1 to 5 volt
range (see figure 4). Because the ACOM terminal
is internally connected to common, the analog input
channels function as single-ended inputs only.
Current inputs of 4 to 20 mA can be used with the
addition of a 250-ohm resistor across the input
terminals. When wiring a 4 to 20 mA current signal,
leave the 250-ohm resistor installed between the “+”
and ACOM terminals (see figure 5).
Note
When connecting the analog input
channel to a voltage device, be sure to
remove the 250-ohm resistor from the
analog input terminal block.
16
The Discrete Input is designed to
operate only with non-powered discrete
devices, such as “dry” relay contacts,
open collector devices, or isolated solid
state switches. Use of the DI channel
with powered devices may cause
improper operation or damage.
Discrete Output
The Discrete Output (DO) provides a solid-state switch
to control relays and power small electrical loads (see
figure 9). The DO connects as follows:
• DO1/DO2 (+) positive
• DCOM (-) Common
The Discrete Output channel is an open collector
output. The Discrete Output is a solid-state switch
enabled by individual signals from the processor I/O
lines and capable of handling 24 Vdc @ 12 mA
maximum or 12 Vdc @ 10 mA maximum.
RF100 Series
AI
EXTERNAL POWERED DEVICE
(LOW-POWER VOLTAGE
OUTPUT SENSOR)
AI#
ACOM
+SIGNAL = 1 TO 5 VDC
Figure 4. Voltage Signal on Analog Input
AI
4 TO 20 mA TRANSMITTER
AI#
EXTERNAL POWER
250 OHM
ACOM
+SIGNAL = 4 TO 20 mA
Figure 5. Current Signal on Analog Input
AO
4 TO 20 mA CURRENT DEVICE
AO
EXTERNAL POWER
CONTROL
ACOM
Figure 6. 4 to 20 mA Analog Output Current Control
AO
VOLTAGE SIGNAL IN
EXTERNALLY POWERED
DEVICE
CONVERTER
FROM 0 TO 2V TO
EXTERNAL DEVICE
0 TO 2V OUTPUT
COMMON
CONTROL
AO
ACOM
Figure 7. 0 to 2 Volts Analog Output Voltage Control
DI
VS
DI#
DISCRETE DEVICE
DCOM
Figure 8. Discrete Input
17
RF100 Series
DO
INDUCTION LOAD (SOLENOID OR
RELAY) USING A SNUBER DIODE
IS HIGHLY RECOMMENDED
DO#
EXTERNAL POWER
CONTROL
DCOM
Figure 9. Solid State Relays - Discrete Output
The Discrete Output on the I/O termination board can
be used in:
• Toggle mode
• Latching mode
• Timed mode
Calibration and Configuration
All field/process inputs must be calibrated to the full
range input of the installed sensors.
Analog Inputs
Analog Input calibration routines support a 2-point
calibration. The low-end or zero reading (Set Zero) is
calibrated first, followed by the high-end or full-scale
reading (Set Span). The calculated and diagnostic
analog inputs, such as instantaneous flow,
accumulated flow, barometric pressure, input voltage,
Board temperature, and Logic voltage, are not
designed to be field calibrated.
Supported inputs with the 2-point calibration are:
• P1 Inlet pressure
• P2 Outlet pressure
• P3 Auxiliary pressure
• Travel
• I/O Board AI1
• I/O Board AI2
A brief description of the calibration procedure for
these inputs is described below.
Refer to the RegLink Software User Manual for
additional information.
Pressure Sensors
The pressure sensors are factory calibrated for their
full scale rated pressure. Routines support a two point
calibration at zero (open to atmosphere) and at full
scale pressure. The general procedure is:
1. Select Tools>Configure Device to display the
Configuration window. Select the AI point and select
the AI Calibration tab.
18
2. Click the calibrate button.
3. Calibrate the zero value for the pressure input.
This can be done by referencing the sensor to
atmospheric pressure. Enter the tester value (in
engineering units) and click the Set Zero button. In
this case the tester value would be “0”.
4. To calibrate the span value (100% of full scale
range) for the pressure input, apply pressure to the
sensor for the full scale range. Enter the Tester Value
(actual pressure in engineering units) and click the Set
Span button. Be sure to allow enough time for the
Live Reading to update and stabilize.
5. Confirm that the Live Reading is correct and click
Accept or Cancel. If the Live Reading is not correct,
select cancel and repeat the procedure.
6. Repeat for each sensor.
Travel Sensor
The travel sensor on the Type RF100 must be
calibrated to the travel of the regulator. Routines
support a two point calibration at zero (regulator
closed) and at full scale (regulator wide open). The
general procedure is:
1. Select Tools>Configure Device to display the
Configuration window. Select the AI point for travel
and select the AI Calibration tab.
2. Click the Calibrate button.
3. Calibrate the zero value (0% of range) for the
Travel. This should be with the regulator pressurized
and in lock up. Enter “0” for the tester value and click
the Set Zero button.
Note
Full stroke of the regulator must be
achieved and should be verified to
insure RegFlo instrument accuracy.
RF100 Series
4. To calibrate the span value (100% of full scale range)
for the travel input, stroke the regulator to full open.
• 30 second
• 1 minute
For a Type EZR, this can be done by closing the
upstream and downstream block valves in addition
to any valves on the control line and pilot supply line.
Once valves have been closed, exhaust the loading
pressure above the diaphragm of the Type EZR. Enter
“100” for the Tester Value and click the Set Span
button. Be sure to allow enough time for the Live
Reading to update and stabilize.
Periodic Log Interval
For a Type 1098-EGR, open the control line to
atmospheric pressure. The valve plug should travel
to the wide-open position. Enter the appropriate
value for the Tester Value and click the Set Span
button. This value is “100” when travel stops are
not used. When restricted trim is used this may be
another value depending on how you have configured
the instrument. Refer to the RegLink Software User
Manual for additional information.
CAUTION
When stroking the regulator wide open,
be sure to protect the pressure sensors
from overpressure.
5. Confirm that the Live Reading is correct and click
Accept or Cancel. If the Live Reading is not correct,
select cancel and repeat the procedure.
System Configuration
Several parameters under the Configure, System
menu require input and confirmation prior to startup.
The System options allow customization and set the
parameters for the flow estimation application and
Logic Alarms.
Sample Interval
The System screen under Configure Device allows
you to configure the Sample Interval. The Sample
Interval is how often a sample is taken of Analog Input
values. The RF100 Series instrument electronics will
go into a low power mode between samples. This
allows the power consumption to be minimized. The
more frequent the RF100 Series instrument samples
the Analog Inputs, the more power is consumed, or the
shorter the battery life. The default Sample Interval
is 1 minute unless the I/O board is installed in which
case the Sample Interval is 1 second. See table 6 to
determine power requirements for the device. The
following selections for Sample Interval are provided:
• 1 second
• 2 minute
• 10 second
• 5 minute
• 10 minute
• 30 minute
The System screen under Configure Device allows
you to configure the Log Interval for Periodic and
Extended History files. The Log Interval is the rate
sampled values are logged to the History file. For
example, if a 60 minute Log Interval is selected, the
History log will include a log record for every 60 minute
interval. The selection of Log Intervals influences
the memory capacity of the History log. The Periodic
History log will store 840 of the most current records
and the Extended History log will store 8640 of the
most current records. See the product Specifications
on page 2 for further information. The following
selections for the Periodic Log Interval are provided.
• 1 minute
• 10 minute
• 2 minute
• 12 minute
• 3 minute
• 15 minute
• 4 minute
• 20 minute
• 5 minute
• 30 minute
• 6 minute
• 60 minute
Log intervals for the Extended History log include the
above plus 10, 20, and 30 seconds.
Regulator Parameters (Type RF100 only)
Use the Regulator screen under Configure, System
to configure parameters relative to the regulator type,
size, material, and construction. Other parameters,
such as specific gravity and temperature of the gas
must also be specified. The user has the option to use
a different temperature for each month of the year in
the flow calculation.
The user may also configure the type of regulator
installation. The Installation Type is used for setting
the default Logic Alarms.
Single Cut (2 or 3 sensors) — Refer to figure 2A.
The Type RF100 is installed on a single pressure cut
and the unit in measuring the inlet and outlet pressure
of the regulator. An optional third pressure could
measure another pressure at the installation.
Downstream RegFlo Instrument (2 sensors) —
Refer to figures 2B and 2C. In an Upstream Wide-Open
System, it is recommended that the RegFlo instrument
be installed on the working (downstream) regulator.
In a Working Monitoring System, the Type RF100 may be
installed on either regulator. In this case, it is installed on
the downstream regulator. The inlet pressure (P1) sensor
is monitoring the pressure between the two regulators
(intermediate pressure) and the outlet pressure (P2)
sensor is monitoring the station outlet pressure.
19
RF100 Series
Downstream RegFlo Instrument (3 sensors) —This
is the same as the Downstream RegFlo instrument
(2 sensors) with the additional auxiliary (P3) sensor
monitoring the station inlet pressure.
For further details of the Modbus functionality, refer
to the RegLink Software User Manual (Form 5669,
D102780X012), September 2005.
Upstream RegFlo Instrument (3 sensors) — Refer
to figures 2D and 2E. In a Downstream Wide-Open
System, it is recommended that the RegFlo instrument
be installed on the working (upstream) regulator. In a
Working Monitoring System, the Type RF100 may be
installed on either regulator. In this case, it is installed
on the upstream regulator. The inlet pressure (P1)
sensor is monitoring the station inlet pressure and the
outlet pressure (P2) sensor is monitoring the pressure
between the two regulators (intermediate pressure).
The auxiliary (P3) sensor is monitoring the station
outlet pressure.
Alarms
Custom — Any other installation type not defined above.
This selection will clear all of the default Logic Alarms.
Communication Ports
The RegFlo communication ports provide a data link to
the RegLink software and host systems. Configuration
of the RegFlo communications ports can be performed
by selecting Comm Ports under the Configure menu.
This screen configures the Comm Ports available for
the RegFlo device and not the personal computer you
are using. Available Comm Ports are as follows:
• Local Operator Interface (LOI) — EIA-232 for use
with RegLink (Standard)
• COM1 (Host) — EIA-485 Serial
Communications (Standard)
• COM2 (Host) — Dial up modem or EIA-232 Serial
Communications (Optional)
Alarms may be set for each of the Analog Inputs
(listed below). High, Low, Hi/Hi, and Lo/Lo alarms are
available. Each Analog Input alarm may also be set
for RBX alarming. A record of the alarms is stored in
the Alarm Log. The Alarm Log stores 240 of the latest
alarms. See table 6.
Logic Alarms
The Logic Alarms can be accessed from the Configure
Device window and are used to set alarms that link
multiple parameters and conditions together. Inlet
pressure (P1), outlet pressure (P2), auxiliary pressure
(P3), travel and flow are the available parameters.
Conditions of greater than, less than, or not applicable
may be set for each parameter to compare the
parameter to an entered value. A default list of Logic
Alarms is displayed if the Installation Type has been
configured on the System screen. Up to 10 different
alarms may be configured per device.
Each Logic Alarm may also be set for RBX alarming.
A record of the alarms is stored in the Alarm Log.
The Alarm Log stores 240 of the latest alarms. The
following is a description of the default alarms by
installation type:
Table 6. Modbus Register Assignments
MODBUS
REGISTER
POINT
NUMBER
TYPE
7001
0
AI
P1 inlet pressure
7002
1
AI
P2 outlet pressure
7003
2
AI
P3 auxiliary pressure
7004
3
AI
Travel
7005
4
AI
Instantaneous flow
7006
5
AI
Accumulated flow
7007
6
AI
Barometric pressure
7008
7
AI
Input voltage
7009
8
AI
Board temperature
7010
9
AI
Logic (battery) voltage
7011
16
AI
I/O Board AI1 Filtered EUs
Modbus Configuration
7012
17
AI
I/O Board AI2 Filtered EUs
7013
18
AO
I/O Board AO EUs
The RegFlo instrument supports Modbus Function
Codes 3 and 16 over communications ports COM1
and COM2. All RegFlo values are read or written
as Floating-point values. See table 6 for the default
assignments and descriptions for Function Code 3.
7014
19
DI
I/O Board DI1 Status
7015
20
DI
I/O Board DI2 Status
7016
21
DO
I/O Board DO1 Status
7017
22
DO
I/O Board DO2 Status
The Local Operator Interface port supports Fisher
ROC protocol. The Host ports support Fisher ROC
and Modbus protocols on the same channel. Refer
to the RegLink Software User Manual (Form 5669,
D102780X012) for further information.
The COM2 host port also supports Spontaneous Report
by Exception (RBX). The feature allows the RegFlo
instrument to call-in to a host computer when an alarm
occurs. This is also configured with the CommPort
screen by enabling the RBX alarming radio button.
20
DESCRIPTION
Note: If an I/O Board channel does not exist, a value of 0.0 is returned.
RF100 Series
Single Cut or Downstream RegFlo
(2 Sensors) Installation Type
Shutoff — Alarm is set when the travel of the regulator is
less than or equal to zero (closed) and the outlet pressure
(P2) is above the lockup pressure of the regulator or
station. It is set to acknowledge that the regulator is still
allowing gas to pass through the orifice or pilot. User must
input the appropriate lock up pressure.
Capacity — Alarm is set when the travel of the
regulator is greater than zero (open) and the outlet
pressure (P2) is below the setpoint and offset of the
regulator. It is set to acknowledge that the regulator
is not satisfying the demand of the system. User must
input the appropriate setpoint and offset pressure.
Closed — Alarm is set when the travel of the regulator
is less than or equal to zero (closed) and the outlet
pressure (P2) is below setpoint and offset of the
regulator. It is set to acknowledge that the regulator
is in the closed position and not opening to satisfying
the demand of the system. User must input the
appropriate set point and offset of the regulator.
Open — Alarm is set when the travel of the regulator
is greater than zero (open) and the outlet pressure
(P2) is above the lockup pressure of the regulator or
station. It is set to acknowledge that the regulator is
in the open position and not closing to respond to the
decreased demand of the system. User must input the
appropriate lock up pressure.
Downstream RegFlo Instrument (3 sensors)
Installation Type
Shutoff—Same as the Downstream RegFlo instrument
(2 sensors) Installation Type
Capacity—Same as the Downstream RegFlo instrument
(2 sensors) Installation Type
Closed—Same as the Downstream RegFlo instrument
(2 sensors) Installation Type
Open—Same as the Downstream RegFlo instrument
(2 sensors) Installation Type
Monitor—Alarm is set when the travel of the regulator
is greater than zero (open) and the RegFlo instrument
inlet pressure (P1) or station intermediate pressure
is below the normal operating range. In addition,
the alarm is monitoring the station inlet pressure (P1)
to ensure that it is at or above the normal operating
range. It is set to acknowledge that the station is
being controlled by the Monitor regulator or pilot and
that the worker has failed in the open position. User
must input the appropriate normal operating pressures
for station inlet and station intermediate.
Upstream RegFlo Instrument (3 sensors)
Installation Type
Shutoff — Alarm is set when the travel of the regulator
is less than or equal to zero (closed) and the auxiliary
pressure (P3) is above the lockup pressure of the regulator
or station. It is set to acknowledge that the regulator is still
allowing gas to pass through the orifice or pilot. The user
must input the appropriate lock up pressure.
Capacity—Alarm is set when the travel of the regulator
is greater than zero (open) and the auxiliary pressure
(P ) is below the setpoint and offset of the regulator. It
3
is set to acknowledge that the regulator is not satisfying
the demand of the system. The user must input the
appropriate setpoint and offset pressure.
Closed—Alarm is set when the travel of the regulator
is less than or equal to zero (closed) and the auxiliary
pressure (P3) is below setpoint and offset of the
regulator. It is set to acknowledge that the regulator
is in the closed position and not opening to satisfying
the demand of the system. The user must input the
appropriate set point and offset of the regulator.
Open—Alarm is set when the travel of the regulator
is greater than zero (open) and the auxiliary pressure
(P3) is above the lockup pressure of the regulator or
station. It is set to acknowledge that the regulator is
in the open position and not closing to respond to the
decreased demand of the system. The user must
input the appropriate lock up pressure.
Monitor—Alarm is set when the travel of the regulator
is greater than zero (open) and the RegFlo outlet
pressure (P2) or station intermediate pressure is below
the normal operating range. In addition, the alarm is
monitoring the station inlet pressure (P1) to ensure that
it is at or above the normal operating range. It is set
to acknowledge that the station is being controlled by
the Monitor regulator or pilot and that the worker has
failed in the open position. The user must input the
appropriate normal operating pressures for station inlet
and station intermediate.
History Log
Data is recorded and stored in the History Log. The
user can view this file from an on-line device or from
a disk file with RegLink software. History files may
21
RF100 Series
be converted to common spreadsheet and database
formats. There are three types of History files in the
RF100 Series. One file is used to store the points on a
daily basis. The daily history file stores 35 days of data.
TB1 TERMINATION
STRIP (REMOVED)
JUMPER (SHOWN
IN OFF POSITION)
The Periodic file, the second type of history file, is
used to store the points for the log interval selected in
the System screen. The Periodic file stores 840 logs
of 20 history points. The type of history stored in the
Daily and Periodic files can be configured by the user.
Minimum and maximum values are stored in the
same History file as the other points. A minimum and
maximum value for specific parameters is recorded for
each base time record.
The third type of History file is the Extended History file.
This file stores 8640 logs of ten history points. This is
equivalent to 30 days of five minute increments. The
points and log interval can be configured by the user.
Security
The RF100 Series instrument has security features
to limit access. The device may include up to 15
unique users and passwords. Access levels may be
specified to control who is allowed access to menus
and screens in the RegLink software.
Figure 10. Battery Module
temperatures. It cannot be used in conjunction with
external power or I/O Board; and it is not rechargeable.
Table 8a shows the life expectancy of the battery in
months for the different configurations. The Average
Current Draw shown in table 8b can be used to size
external power systems or batteries.
I/O Board Power Consumption
Battery Module
This new and improved battery module design extends
battery life and ensures sufficient voltage at low
Table 7 and the following directions can be used to
calculate the incremental current draw for the I/O
board. The outcome should be added to the value
shown in the 1 second sample rate column in table 8b
to determine the total power requirements.
Table 7. Input / Output Board Average Current Draw
CONFIGURATION TYPE
(SELECT ONE)
QUANTITY
IA (mA)
IB (mA)
DUTY CYCLE %
POWER SUPPLY
(VOLTAGE)
POWER REQUIREMENT
SUBTOTAL
2-AI, 2-D1, 1-DO
1
0.340
0.340
100%
12
4.08
2-AI, 1-D1, 2-DO
0
0.320
0.320
100%
12
0
1-AO, 1-AI, 2-D1, 1-DO
0
0.690
0.690
100%
12
0
1-AO, 1-AI, 1-D1, 2-DO
0
0.685
0.685
100%
12
Subtotal (Base I/O card)
INDIVIDUAL MODULES
QUANTITY
IA (mA)
IB (mA)
DUTY CYCLE %
POWER SUPPLY
(VOLTAGE)
SUBTOTAL
AI1
1
0.0050
0.005
25%
12
0.06
0.15
AI
1
0.015
0.005
25%
12
AO1
0
0.020
0.110
0%
12
0
DI12
1
0.000
0.475
25%
12
1.425
DI22
1
0.000
0.275
25%
12
0.825
DO12
1
0.000
0.315
25%
12
0.945
DO22
0
0.000
0.315
0%
12
1
1. Duty Cycle is % of time at 50% or above.
2. Duty Cycle is % of time in Closed State.
22
0
4.08 mW
0
Subtotal (Individual Modules)
3.405 mW
Total
Average Current Draw
7.485 mW
0.624 mA
RF100 Series
I/O Board Current Draw Example
divide by the power supply voltage to get average
current draw.
1. Fill in shaded areas. Select one configuration
type then fill in the appropriate quantity of individual
modules of the configuration.
8. Add the result of step 7 to the appropriate value in
table 8b. The sample rate is 1 second when I/O board
is installed. This is your total average current draw.
2. Calculate the requirements for the base I/O board
configuration (Duty Cycle is always 100%):
Solar Panel and Battery Sizing Example
The two important elements in a solar installation
are solar panels and batteries. Solar panels and
batteries must be properly sized for the application
and geographic location to ensure continuous,
reliable operation. To determine solar panel output
requirements, first determine the Average Current
Draw for the devices being powered and the solar
insolation for your geographic area. Average current
draw can be found in table 8b. The example uses the
Average Current Draw for a 1 minute sample interval,
the Scheduled Auto Answer modem available for
Quantity * IB * Power Supply Voltage = Power Requirements
3. Subtotal the consumption for the base I/O board.
4. Fill in the Duty Cycle of the Individual Modules.
5. Calculate the requirement using the Duty Cycle of
each channel.
Duty Cycle = Active Time / (Active Time + Inactive Time)
= 15 secs / 60 secs = 0.25 = 25%
Quantity * [IA * (1-Duty Cycle) + IB * Duty Cycle]
* Power Supply Voltage = Power Requirements
6. Subtotal the consumption for the Individual Modules.
7. Add the values from steps 3 and 6 together and
Table 8a. Battery Life Expectancy
MONTHS OF BATTERY LIFE(1)
COMMUNICATIONS MODE
Sample Interval(2)
10 seconds
30 seconds
1 minute
2 minutes
5 minutes
10 minutes
30 minutes
Base Consumption(3)
9
22
35
49
66
74
81
Scheduled Auto Answer (30m)(4)
8
17
24
30
35
38
39
28
Scheduled Auto Answer (10m * 8hr)
7
14
19
23
26
27
Scheduled Auto Answer (Full Time)(6)
2
3
3
3
3
3
3
Power up on Ring Modem(7)
8
19
27
35
43
46
49
Only RS232 Card(7)
8
20
30
40
50
54
58
Only RS485 Card
8
17
24
29
35
37
38
7
14
19
23
26
27
28
(5)
(7)
Powered Modem and RS485 card(7)
1.
2.
3.
4.
5.
6.
7.
Assumes usable battery capacity is 80 percent (allows for operating temperature and shelf life).
The battery should not be used with a 1 second sample interval.
Base Consumption assumes no Host communications and one connection (15 minute) with local RegLink once per week.
Scheduled Auto Answer (30m) assumes that modem is active for 30 minutes per day and has a 5 minute phone connection per day.
Scheduled Auto Answer (10m * 8 hr) assumes that the modem is active for 80 minutes per day and has a 5 minute phone connection per day.
Scheduled Auto Answer (Full Time) assumes that the modem is active all of the time to receive a communication.
Assumes a 5 minute connection per day.
Table 8b. Average Current Draw excluding I/O
AVERAGE CURRENT DRAW (mA)(1)
COMMUNICATIONS MODE
Base Consumption(2)
Sample Interval
1 second
10 seconds
30 seconds
1 minute
2 minutes
5 minutes
10 minutes
30 minutes
11.779
1.426
0.659
0.468
0.372
0.314
0.295
0.282
11.974
1.621
0.854
0.663
0.567
0.509
0.490
0.477
Scheduled Auto Answer (10m * 8hr)(4)
12.182
1.829
1.062
0.871
0.775
0.717
0.698
0.685
Scheduled Auto Answer (Full Time)(5)
17.579
7.226
6.459
6.268
6.172
6.114
6.095
6.082
Power up on Ring Modem(6)
11.883
1.530
0.763
0.572
0.476
0.418
0.399
0.386
Only RS232 Card(6)
11.881
1.528
0.761
0.570
0.474
0.416
0.397
0.384
Only RS485 Card(6)
12.107
1.754
0.987
0.796
0.700
0.642
0.623
0.610
Powered Modem and RS485 card(6)
12.178
1.834
1.067
0.876
0.780
0.722
0.703
0.690
Scheduled Auto Answer (30m)
1.
2.
3.
4.
5.
6.
(3)
Average Current Draw when device is externally powered.
Base Consumption assumes no Host communications and one connection (15 minute) with local RegLink once per week.
Scheduled Auto Answer (30m) assumes that modem is active for 30 minutes per day and has a 5 minute phone connection per day.
Scheduled Auto Answer (10m * 8 hr) assumes that the modem is active for 80 minutes per day and has a 5 minute phone connection per day.
Scheduled Auto Answer (Full Time) assumes that the modem is active all of the time to receive a communication.
Assumes a 5 minute connection per day.
23
RF100 Series
communications full time and 1.5 hours of insolation.
Calculate the amount of current (Iarray) required from
the solar array per day using the following equation.
Iarray = [Average Current Draw (6.268 mA)
x 24 (hrs)] ÷ 1.5 hrs of Insolation = 100.3 mA
Convert this value to amps by dividing by 1000 (1 amp
is equal to 1000 mA).
Iarray = 100.3 mA ÷ 1000 = 0.1003 amps
Finally, the output current of the panel (Ipanel) is used
to calculate the number of solar panels required using
the following equation:
Number of Panels = Iarray amps ÷
(Ipanel amps/panel) = _____ panels
For our example, if Iarray equals 0.1003 amps, and Ipanel
equals 0.29 amps for a 5-watt panel (typical), then the
number of panels required equals 0.35, which would be
rounded up to 1. The “Ipanel” value varies depending on
the type of solar panel installed. Refer to the vendor’s
specifications for the solar panel being used.
Batteries are used to supplement both line-powered and
solar-powered installations. When used in line-powered
installations, the batteries serve as backup in case of
line power failure. When used in solar installations, they
provide power for the instrument when the solar panels
are not generating sufficient output.
Typical battery configurations use a 12-volt, sealed,
lead-acid battery. These configurations typically
provide 7 amp-hours of capacity. Batteries can
be connected in parallel to achieve more current
capacity. The amount of battery capacity required
for a particular installation depends upon the power
requirements of the equipment and days of reserve
(autonomy) desired.
Battery reserve is the amount of time that the batteries
can provide power without discharging below 20 percent
of their total output capacity. For solar-powered units,
a minimum reserve of five days is recommended, with
ten days of reserve preferred. Add 24 hours of reserve
capacity to allow for overnight discharge.
To determine the battery capacity requirements, multiply
the Average Current Draw by the amount of reserve
time required. The Average Current Draw is shown in
table 8b. The value is shown in mA and needs to be
converted to amps for use in the following equation:
System Requirement = Average Current Draw
(amps) x Reserve hrs = _____ amp-hrs
Continuing with our example. The Average Current
Draw would be 0.006268 amps. Using 11 days
(264 hours) of reserve capacity, the system requirement
would be 1.7 amp-hrs. In this case, a battery with any
more than 1.7 amp-hours would meet the requirements.
24
Battery Module Installation and
Replacement (refer to figure 10)
1. To activate the battery power output, remove the
jumper from the battery module and replace it over
the center pin and pin marked I (on position). The
pin marked 0 (off position) will not be covered by
the jumper. The battery should be stored in the off
position to maintain life expectancy.
2. Remove the TB2 External Power Connector and
TB1 I/O Termination Strip.
3. Remove the four screws and washers that hold
the Electronics Module in place.
4. Plug the battery into the electronics module and
replace the four screws and washers to hold the
assembly in place.
Startup and Operation
Before starting the instrument, perform the following
checks to ensure the unit is properly installed.
• Be aware of the grounding requirements of
your installation.
• Check the field wiring for proper installation.
• Make sure the input power has the correct polarity.
• Make sure the input power is fused at the
power source.
CAUTION
It is important to check the input power
polarity before turning on the power. No
damage will occur if polarity is reversed,
however, unit will not operate.
When installing equipment in a
hazardous area, ensure that all
components are approved for use in
such areas. Check the product labels.
Startup
Apply power to the instrument by plugging the input
power terminal block into the connector labeled
POWER or installing the battery.
Operation
Once startup is successful, it is necessary to
configure the instrument to meet the requirements of
the application. The Calibration and Configuration
section details the procedure for configuring the
recorder and calibrating the I/O. Once the recorder
is configured and calibrated, it can be placed into
operation. Refer to the RegLink Software Users
Manual for additional information.
RF100 Series
CAUTION
Local configuration or monitoring of the
recorder through its LOI port must be
performed only in an area known to
be nonhazardous.
During operation, the instrument can be monitored (to
view or retrieve current and historical data) either locally
or remotely. Local monitoring is accomplished by using
RegLink software on a PC connected through the LOI
port. Remote monitoring is performed through the Host
port (COM1) or COM2 (optional) of the instrument,
using either RegLink or Host software. Refer to the
RegLink Software User Manual for more information.
Assembly and Maintenance
Unit Assembly
Note
Ensure that the assembly is performed
at a nonmagnetic workstation.
When removing tubing fittings from the
RF100 Series pressure sensors, hold the
sensor flats in place with a wrench while
removing the fitting. Failure to do so
may result in damage to the electronics
assemblies inside the enclosure.
Printed Wire Board (PWB) Cup
PWB Assemblies-to-PWB Cup
Refer to figure 31 for components board layout.
1. Remove the two self-tapping screws and the PWB
retainer exposing the PWBs. The following boards are
included in this assembly:
• Sensor Board
• Processor Board
• Communication Board (optional)
• RAM Backup Board
• I/O Board (optional)
Note
The notched side of the cable assembly
should be aligned with the silkscreening
on the printed circuit board. Insert the
board into the slot nearest the cable
assembly until firmly seated into the
terminal board connector.
2. Install the metal PWB retainer with gasket by
aligning the PWB tabs and cup bosses with the slots
and holes in the retainer. Attach the retainer with selftapping screws, taking care not to overtighten.
INDICATOR
ARROW
PIN 1
RED WIRE
ATTACHED
TO PIN 1
CAUTION
The assembly of the PWB cup must be
done at a workstation that has adequate
antistatic protection. Assembly
personnel must wear antistatic
protection while handling printed circuit
boards used in this assembly.
Removing PWB Cup Assembly from Housing
(figures 32, 33 and 34)
1. Loosen the cover lock screw (key 7) and remove
the cover (key 5). Remove the PWB cup assembly by
disconnecting any external wiring and removing the
four screws (key 42). Carefully rotate the PWB cup
assembly counterclockwise while gently pulling the
cup out of the housing, exposing the sensor wires in
the rear of the cup.
2. Unplug the pressure sensor wiring from the sensor
board and remove the PWB cup assembly (key 25).
(NOTE: THERE IS AN
ARROW DENOTING PIN 1
ON THE CIRCUIT BOARD)
Mounting PWB Cup Assembly in Housing
Install the cup gasket (key 43) on the end of the cup
assembly (key 25) with retainer attached. Placing a
small amount of lubricant on the gasket face will aid
in future removal. Position the PWB cup assembly
over the die-cast housing (key 1). Plug the sensor
connectors into the appropriate headers on the sensor
board. TB2 is used for the P2 and P3 sensors and TB3
for the P1 sensor. Align pin 1 on the sensor connectors
with pin 1 on the header.
Note
P3 sensor connector attaches next to the
PWB surface. P2 connector plugs into
the top row of pins on TB2.
25
RF100 Series
TRAVEL
INDICATOR
HOUSING (KEY 1)
INDICATOR
STEM (KEY 17)
LOWER O-RING
(KEY 33)
SHUTTLE SLEEVE
(KEY 34)
MOUNTING ADAPTOR
(KEY 10)
LOWER BACKUP RING (KEY 12)
O-RING (KEY 36)
TOP O-RING
(KEY 33)
VENT
(KEY 39)
O-RING
(KEY 36)
LOWER BACKUP RING (KEY 12)
SPRING SEAT (KEY 13)
INDICATOR
WASHER
(KEY 1)
STEM (KEY 9)
INDICATOR
COVER (KEY 15)
HEX NUTS
(KEY 20)
W8163_1
MAGNET
SHUTTLE
ASSEMBLY
(KEY 24)
O-RING
RETAINER
JAM
(KEY 11)
NUT
(KEY 20)
UPPER BACKUP RING (KEY 12)
SPRING
(KEY 19)
O-RING (KEY 36)
UPPER BACKUP RING (KEY 12)
Figure 11. Type EZR Travel Indicator Parts
CAUTION
When inserting the PWB cup assembly
(key 25), take care not to pinch the wires
between the PWB cup assembly and the
housing (key 1).
Once all sensor cables are connected, rotate the cup
one or two turns clockwise to twist the wires together.
Then, lower the assembly into the housing and firmly
press into position. Attach the cup assembly to the
die-cast housing with four machine screws and lock
washers (keys 41 and 42). Reattach the ground wire.
Pressure Sensor Replacement
CAUTION
Do not remove pressure sensor before
unplugging from PWB Cup Assembly.
Due to a temperature compensation procedure
performed at the factory on each pressure sensor,
sensors should not be changed out in the field. If you
require a different range, please contact your local
Fisher Sales Representative or Sales Office.
Travel Indicator Assembly Maintenance
Type EZR (figure 11)
This procedure is necessary to change out the stem
O-rings (key 36) or backup rings (key 12) or if the
Type EZR main valve spring needs to be changed.
Note
Perform maintenance at a nonmagnetic
(i.e. no metal surfaces) workstation.
26
Removal
1. Remove inlet and bleed pressure from the
Type EZR. Refer to the Type EZR instruction manual
for proper procedure.
2. Remove Type RF100 from Type EZR by removing
adaptor mounting (key 10) from the valve bonnet.
3. Remove indicator protector (key 16), and cover
(key 15) then remove the indicator jam nuts (key 20)
and washer (key 14).
4. Remove the indicator housing (key 17) and the
top O-ring (key 33). Slide the housing (key 1) off the
shuttle sleeve (key 34) and remove the lower O-ring
(key 33). Carefully remove the shuttle sleeve (key 34)
from the mounting adapter (key 10).
CAUTION
Take care not to bend the valve stem
once the shuttle sleeve is removed.
Magnet shuttle should not come in
contact with magnetic tools or surfaces.
5. Carefully compress the valve spring (key 19) and
loosen the jam nut (key 20) on the lower end of the
magnet shuttle assembly (key 24) and remove the
shuttle assembly observing orientation.
CAUTION
Magnet shuttle should be guarded
against any direct impact or dropping.
Note
Magnet shuttle must be reassembled with
the arrow pointing towards the regulator.
RF100 Series
The magnet shuttle assembly is factory
sealed and not field repairable.
6. Remove the jam nut and O-ring retainer (key 11)
and pull the stem (key 9) from the mounting adapter.
3. Remove the indicator housing (key 17) and the
top O-ring (key 33). Slide the housing (key 1) off the
shuttle sleeve (key 34) and remove the lower O-ring
(key 33). Carefully remove the shuttle sleeve (key 34)
from the mounting adapter (key 10).
CAUTION
CAUTION
Removing the stem with the O-ring
retainer installed can damage the O-rings.
7. The spring and O-rings will now be free. If
necessary, use the stem to remove the O-rings and
backup rings from the mounting adapter.
Replacement
Care take not to bend the valve stem
once the shuttle sleeve is removed.
Magnet shuttle should not come in contact
with magnetizable tools or surfaces.
4. Loosen the flanged nut (key 61) on the lower end
of the magnet shuttle assembly (key 24) and remove
the shuttle assembly.
CAUTION
Lubricate all O-rings, backup rings, and threads.
1. Place spring (key 19), spring seat (key 13) lower
backup rings (key 12) and O-ring (key 36) on the stem
(key 9) then insert the stem through the mounting
adapter (key 10).
2. Place the upper backup rings (key 12) and O-ring
(key 36) on the stem then replace the O-ring retainer
(key 11) and tighten firmly.
3. Place the jam nut (key 20) on the stem and thread
down all the way, compressing the spring.
4. Replace the magnet shuttle assembly (key 24) on
the stem until tight, making sure to replace with the
arrow pointing towards the regulator.
5. While compressing the spring, thread the jam nut
against the shuttle assembly and tighten. Replace the
remaining parts in reverse order of removal.
Magnet shuttle should be guarded
against any direct impact or dropping.
Removing the stem with the O-ring
retainer installed can damage the O-rings.
Note
Magnet shuttle must be reassembled with
the arrow pointing towards the regulator.
The magnet shuttle assembly is factory
sealed and not field repairable.
5. Remove the flanged nut (key 61) and upper O-ring
retainer (key 59). Remove the mounting adapter
(key 10). Remove the backup rings (key 12) and stem
O-rings (key 27) from the top of the mounting adapter
(key 10) and from the stem (key 9).
Type 1098-EGR (figure 33)
Replacement
This procedure is necessary to change out the stem
O-rings (key 27) or backup rings (key 12). If access or
maintenance to the main valve spring is required, refer
to the Accessing the Main Valve Spring section.
Lubricate all O-rings, backup rings, and threads.
Note
Perform maintenance at a nonmagnetic
(i.e. no metal surfaces) workstation.
Removal
1. Remove inlet and bleed pressure from the
Type 1098-EGR. Refer to the Type 1098-EGR
instruction manual for proper procedure.
2. Remove indicator protector (key 16), and cover
(key 15), then remove the indicator jam nuts (key 63)
and washer (key 14).
1. Slide the first set of backup rings (key 12) and
stem O-ring (key 27) on to the stem (key 9) until they
contact the lower O-ring retainer (key 60). Install the
mounting adapter O-ring (key 30) onto the mounting
adapter (key 10). Install the mounting adapter into the
lower fitting (key 8). Slide the second set of backup
rings and stem O-ring on the stem. Install the upper
O-ring retainer (key 59).
2. Place the flanged nut (key 61), flanged side facing
upward, on the stem and thread down all the way.
3. Install the magnet shuttle assembly (key 24) on
the stem until tight, making sure the direction arrow is
facing toward the regulator.
27
RF100 Series
66
CAUTION
Magnetic shuttle assembly must be
tightened firmly against the stem first,
before contacting the flanged nut, in
order to insure proper RegFlo function.
4. Thread the flanged nut against the magnetic
shuttle assembly and tighten. Replace the remaining
parts in reverse order of removal.
To Access Type 1098-EGR Main Valve Spring
This procedure is necessary if access to the main
valve spring (key 19) and associated components,
including optional travel stop (key 64), is required.
Note
Ensure that the maintenance is performed
at a nonmagnetic (i.e. nonmagnetizable
surfaces) workstation.
Replacement
The stem assembly (key 9) is a
permanent assembly and must be
replaced as an assembly.
1. Install the lower fitting assembly, which includes
the lower fitting (key 8), lower O-ring retainer (key 60),
mounting adapter (key 10) and upper O-ring retainer
(key 59), over the stem (key 9). Install the flanged nut
(key 61), flanged side facing down, pushing on the
lower fitting assembly if necessary to provide sufficient
stem thread exposure.
Removal
1. Refer to steps 1 through 5 of the Travel Indicator
Assembly Maintenance section for removal of the
RegFlo housing (key 1) and associated parts.
2. Replace the mounting adapter (key 10) and upper
O-ring retainer (key 59) making certain NOT to replace
the O-rings (key 27) and backup rings (key 12), which
may be damaged by the stem (key 9). Install the jam
nut (key 61), with the flanged side facing downward,
turning it only until the threads of the stem (key 9)
protrude from the top.
3. Remove the entire Spring/Mounting Assembly
from the valve body, which includes the flanged nut,
upper O-ring retainer, mounting adapter, lower O-ring
retainer (key 60), lower indicator fitting (key 8), spring
(key 19) and stem assembly, by removing the lower
indicator fitting.
4. Since some compression is left in the spring,
carefully remove the flanged nut.
5. Slide the remaining assembled parts off the stem
to expose the spring and travel stop, if applicable.
Note
The stem assembly (key 9) is a
permanent assembly and must be
replaced as an assembly.
28
Figure 12. Proper Magnet Rotation Orientation
Lubricate all O-rings, backup rings, and threads.
2. Install this entire Spring/Mounting Assembly onto
the Type EGR body flange. To aid this process, the
spring may be compressed further by turning the
flanged nut down on the stem until sufficient lower
fitting thread engagement is reached.
3. Remove the flanged nut, upper O-ring retainer,
and mounting adapter.
4. Slide the first set of backup rings (key 12) and
stem O-ring (key 27) on to the stem (key 9) until they
contact the lower O-ring retainer (key 60). Install
the mounting adapter O-ring (key 30) and mounting
adapter (key 10). Slide the second set of backup rings
(key 12) and stem O-ring (key 27) on the stem (key 9).
Replace the upper O-ring retainer (key 59).
5. Install the flanged nut (key 61), flanged side facing
upward, on the stem and thread down all the way.
6. Install the magnet shuttle assembly (key 24) on
the stem, turning until tight, making sure to replace
with arrow pointing towards the regulator.
7. Thread the flanged nut against the magnetic
shuttle assembly and tighten. Replace the remaining
parts in reverse order of removal, which was described
in the Removal portion of the Travel Indicator
Assembly and O-ring Maintenance section.
RF100 Series
RTD Interface Wiring Schematics
2 JUMPERS
LIGHT WIRE
RTD
ELEMENT
1
2
3
4
TYPE RF110 RTD
INTERFACE
DARK WIRE
Figure 13. 2-Wire RTD
1 JUMPER
LIGHT WIRE
RTD
ELEMENT
1
2
3
4
TYPE RF110 RTD
INTERFACE
DARK WIRE
Figure 14. 3-Wire RTD
LIGHT WIRE
RTD
ELEMENT
1
2
3
4
TYPE RF110 RTD
INTERFACE
DARK WIRE
Figure 15. 4-Wire RTD
29
RF100 Series
RTD Installation Instructions
Figure 16. Removing RTD Interface Cover
Figure 18. RTD Wiring Terminal Block (Unlabeled)
Figure 17. Inserting Wires through RTD Cover
Figure 19. Inserting Wires to the RTD Wiring Terminal Block
1. Remove RTD Interface Cover (key 26) from
bottom of Type RF110 housing (figure 16).
2. Insert RTD wires through the Cover (key 26)
(figure 17).
orange tab will lock the wire to
green housing.
3. Note numbering orientation for RTD wire interface
(figure 18).
The Type RF110 RTD Interface will accept a 2, 3, and
4-wire RTD input as shown in following figures. Slots 1
and 2 are interchangeable with each other. Slots 3 and
4 are also interchangeable with each other.
Note
Note
Actual RTD interface housing is
not labeled.
4. Wire insertion method is to depress orange tab
with small tool (figure 19), e.g., ballpoint pen, and
then insert RTD wire into the corresponding slot while
depressing orange tab.
Note
RTD wires are to be inserted into the
larger of the two hole arrays, located
closest to the orange tabs. Releasing
30
Using the RTD Interface will change the
Approval Classification of the unit to
CSA Class 1, Division 2.
2-WIRE RTD
When using a 2-wire RTD, e.g. one dark and one light
colored wire; install one of the wires into Slot 1 or 2,
and the other wire into Slot 3 or 4. Install two jumpers
to bridge the adjacent, unused slots (figure 20).
Jumpers can be made by using standard RTD wire,
similar gage insulated wire, or similar.
RF100 Series
Figure 20. 2-Wire RTD with TWO required jumpers
Figure 23. Thread cover onto RTD Interface sleeve
Figure 21. 3-wire RTD with ONE required jumper
Figure 24. Completed RegFlo RTD Interface and Wiring
3-WIRE RTD
When using a 3-wire RTD, install the alike colored
wires into Slots 1 and 2. Install the oppositely colored
wire into Slot 3 or 4. Install a jumper to bridge the
adjacent, unused slot (figure 21).
4-WIRE RTD
When using a 4-wire RTD, install the light colored
wires into either Slots 1 and 2 or Slots 3 and 4. Install
the dark colored wires into the remaining slots. No
jumpers are required when a 4-wire RTD is used.
Figure 22. 4-wire RTD
5. Tighten cord grip around RTD wire, by twisting in a
clockwise manner, in order to create a snug, watertight
seal around the RTD wiring (figure 24).
31
RF100 Series
DOC0390B
E0690
Figure 25. Main Processor Card
Magnet Rotation Orientation
When changing the orientation of the RF100 Series
instrument, the magnet must be rotated to match the
orientation of the instrument. To change the magnet
orientation, remove the indicator protector (key 16)
and indicator cover (key 15). Using a wrench, align
the arrow on the indicator cap (key 66) with the
arrow on the housing assembly (key 1) by turning the
indicator cap clockwise. See figure 12.
Note
Make sure to align the arrow on Indicator
Cap (key 66) with the arrow on the
Housing Assembly (key 1) by turning the
indicator cap clockwise.
Product Electronics
This section describes the electronics of the RegFlo
RF100 Series instrumentation. The electronic
components support the functionality of the
RF100 Series instruments. The board layout is shown
in figure 25. The following boards are provided:
Termination Board—The termination board provides
connections to the field wiring. These connections are
power, LOI communications, COM1 communications,
Modem communications, and the optional I/O field
terminations. The termination board also serves as a
32
Figure 26. Sensor Card
backplane with connectors and signal routing between
boards for the Processor board, Sensor board,
Optional communications board (Modem or RS-232
driver), and the optional I/O board.
Processor Board (figure 25)—The processor board
contains the processor, all memory (static RAM and
serial EEPROM), LOI RS-232 communications driver,
COM1 RS485 communications driver, the reset
controller, and the real time clock. Connections are
provided for interface to the termination board for
signals to the pressure sensor board, optional modem,
and the optional I/O board.
Sensor Board (figure 26)—The pressure sensor
board contains the A/D converters, power switches,
instrumentation amplifiers, and voltage references for
the P1, P2, P3, and barometric sensors and the travel
sensor. The barometric sensor is mounted on this
board. Connectors are provided for interface to the
termination board and connection to the P1, P2, P3, and
Hall Effect sensors.
Battery Module (figure 10)—The battery module
contains a D-size lithium battery providing 19 amp-hours
of current at 3.6 volts. The module is designed to be
intrinsically safe and is field replaceable.
RAM Backup Board (figure 27)—This board contains
a 3.6 volt, 0.4 amp-hour lithium battery which provides
backup power to the RAM and real-time clock on the
processor board.
RF100 Series
DOC0395B
Figure 27. RAM Backup Card
E0691
Figure 28. RS-232 Comm Card
Figure 30. I/O Board
DOC0394B
Figure 29. Modem Card
33
RF100 Series
SELF-TAPPING
SCREWS
PWB RETAINER
TERMINATION BOARD
RAM BACKUP BOARD
MODEM OR
RS-232 BOARD
PROCESSOR
BOARD
I/O BOARD
SENSOR BOARD
P2
P3
P1 SENSOR
E0700
Figure 31. Electronic Components Board Layout
RS-232 Comm Board (Optional) (figure 28)—The
RS-232 communications board provides an additional
serial interface for the Type RF100 products and is
designated COM2.
Modem Board (Optional) (figure 29)—The modem
board is a state of the art 2400-baud modem with
capacitive isolation and onboard DAA interface. The
modem interfaces to the processor board and utilizes
a standard Hayes protocol command set for modem
configuration and dialing commands.
I/O Board (Optional)—This board provides additional
I/O for the Type RF100 products. The I/O Board can
be configured in one of the following ways:
• 1-AO, 1-AI, 2-DI, 1-DO
• 1-AO, 1-AI, 1-DI, 2-DO
• 2-AI, 2-DI, 1-DO
• 2-AI, 1-DI, 2-DO
34
Changes can be made in the field to switch to a
different configuration. Two of the five channels
are selectable (refer to figure 30). Switches labeled
S1, S2, and S3 are provided. Switch S3 will select
whether pin 6 is a DI or DO. Switch S1 will select
whether pin 4 is an AO or AI. If pin 4 is selected as an
AO, switch S2 will select whether it is a voltage
(0 to 2V) or current (4 to 20 mA) output.
Parts Ordering
When corresponding with your Fisher Sales Office or
Sales Representative about this equipment, reference
the equipment serial number or FS number found on a
nameplate. When ordering parts, reference the eleven
digit part number of each part as found in the parts list.
RF100 Series
Parts List
Types EZR and RF110 (figures 32 and 34)
Key
Description
1
2
3
4
5
6
7
9
Housing Assembly
Warning Label
Nameplate
Drive Screw (8 required)
Cover
Cover O-Ring
Hex Socket Set Screw
Stem
1 or 2-inch (DN 25 or 50) main valve body
3 or 4-inch (DN 80 or 100) main valve body
6-inch (DN 150) main valve body
Mounting Adaptor
1 or 2-inch (DN 25 or 50) main valve body
3 or 4-inch (DN 80 or 100) main valve body
6-inch (DN 150) main valve body
Upper O-Ring Retainer
1 or 2-inch (DN 25 or 50) main valve body
3 or 4-inch (DN 80 or 100) main valve body
6-inch (DN 150) main valve body
Backup Ring (4 required)
1 or 2-inch (DN 25 or 50) main valve body
3 or 4-inch (DN 80 or 100) main valve body
6-inch main (DN 150) valve body
Upper Spring Seat
1 or 2-inch (DN 25 or 50) main valve body
3 or 4-inch (DN 80 or 100) main valve body
6-inch (DN 150) main valve body
Indicator Washer
1 or 2-inch (DN 25 or 50) main valve body
3, 4, or 6-inch (DN 80, 100, or 150)
main valve body
Indicator Cover (with indicator)
1 or 2-inch (DN 25 or 50) main valve body
3 or 4-inch (DN 80 or 100) main valve body
6-inch (DN 150) main valve body
Indicator Protector (with indicator)
1 or 2-inch (DN 25 or 50) main valve body
3, 4, or 6-inch (DN 80, 100, or 150)
main valve body
Indicator Housing
Indicator Stem (with indicator)
1 or 2-inch (DN 25 or 50) main valve body
3 or 4-inch (DN 80 or 100) main valve body
6-inch (DN 150) main valve body
Spring
1-inch (DN 25) main valve body
White
Light Blue
Black
2-inch (DN 50) main valve body
Green
Red
Yellow
3-inch (DN 80) main valve body
Yellow
Light Blue
Black
4-inch (DN 100) main valve body
Green
Red
6-inch main (DN 150) valve body
Yellow
Green
Black
Jam Nut (4 required) (with indicator)
1 or 2-inch (DN 25 or 50) main valve body
3, 4, or 6-inch (DN 80, 100, or 150)
main valve body
10
11
12
13
14
15
16
17
18
19
20
Part Number
29B1935X012
--------------------1E953028982
38A5251X032
T1205106562
18B5516X012
T14337T0012
T14338T0012
T14339T0012
Key
Description
21
22
23
24
Shuttle Cap, without Indicator
Wire Retainer
Wire Retainer
Magnet Shuttle Assembly
1 or 2-inch (DN 25 or 50) main valve body
3 or 4-inch (DN 80 or 100) main valve body
6-inch (DN 150) main valve body
PWB Cup Assembly
Type RF100
Type RF110
Pressure Sensor Assembly
Inlet, Outlet, and Auxiliary Pressure Sensors
0 to 30-inches w.c. (0 to 75 mbar)
0 to 15 psig (0 to 1,03 bar)
0 to 35 psig (0 to 2,41 bar)
0 to 100 psig (0 to 6,90 bar)
0 to 300 psig (0 to 20,7 bar)
0 to 500 psig (0 to 34,5 bar)
0 to 1000 psig (0 to 68,9 bar)
Pressure Sensor Plug
Used in place of pressure sensor assembly
O-Ring
1 or 2-inch (DN 25 or 50) main valve body
Nitrile (NBR)
Fluoroelastomer (FKM)
3 or 4-inch (DN 80 or 100) main valve body
Nitrile (NBR)
Fluoroelastomer (FKM)
6-inch (DN 150) main valve body
Nitrile (NBR)
Fluoroelastomer (FKM)
Pressure Sensor O-Ring
Shuttle Sleeve O-Ring (2 required)
Shuttle Sleeve
O-Ring (2 required)
1 or 2-inch (DN 25 or 50) main valve body
Nitrile (NBR)
Fluoroelastomer (FKM)
3 or 4-inch (DN 80 or 100) main valve body
Nitrile (NBR)
Fluoroelastomer (FKM)
6-inch (DN 150) main valve body
Nitrile (NBR)
Fluoroelastomer (FKM)
Battery Module
Communication Card
RS-232
Dial Up Modem
Vent (2 required)
Pipe Plug, 1/4-inch NPT
Pan Head Machine Screw (4 required)
Lock Washer (4 required)
Cup Gasket
Pipe Plug, 1/2-inch NPT (2 required)
Protective Cap (not shown)
1 or 2-inch (DN 25 or 50)
3 or 4-inch (DN 80 or 100)
6-inch (DN 150)
Termination Label
Interface Cable (not shown)
Serial Cable (not shown)
Indicator Cap
1 or 2-inch (DN 25 or 50) main valve body
3, 4, or 6-inch (DN 80, 100, or 150)
main valve body
Input/Output Board
25
26
39B1955X012
39B1956X012
T40633T0012
29B1964X012
29B1951X012
29B1951X012
1N659106242
1J418806992
1J418806992
26
28
18B2129X012
18B5968X012
29B0764X012
18B2138X012
18B8503X012
T14188T0012
19B2270X012
19B4691X012
24B1301X012
31
33
34
36
29B2269X012
39B1960X012
19B1978X012
19B1402X012
19B1402X012
19B2399X012
19B2400X012
19B2401X012
18B2126X012
18B5955X012
19B0951X012
T14184T0012
19B0781X012
19B0782X012
18B8501X012
18B8502X012
37
38
39
40
41
42
43
44
45
19B0364X012
19B0366X012
19B0365X012
52
54
60000410X12
66
1L286338992
67
Part Number
29B1954X012
14B3147X022
17B7757X022
19B1963X012
19B1963X022
19B1963X032
29B1041X032
29B1041X022
W30339X0012
39B1973X012
39B1973X062
39B1973X022
39B1973X032
39B1973X042
39B1973X052
29B1397X012
18B3438X012
1N430306382
10A8931X012
10A8931X052
10A3800X012
1R727606382
1N955306562
1D2620X0072
29B1965X012
1H2926X0032
1H2926X0022
1D191706992
1N423906382
1D191706992
1N423906382
W38230X0012
W38174X0012
W38223X0012
27A5516X012
1C3335X0012
19B1398X012
19B1399X012
39B1940X012
1H5137X0022
29B1418X012
29B1437X012
T21123T0012
29B1406X012
19B1434X012
19B1435X012
T14423T0012
T14424T0012
W38164X0012
35
RF100 Series
Type 1098-EGR (figure 33)
Key
Description
1
2
3
4
5
6
7
8
Housing Assembly
Warning Label
Nameplate
Drive Screw (8 required)
Cover
Cover O-Ring
Hex Socket Set Screw
Lower Indicator Fitting
1-inch (DN 25) main valve body
2, 3, and 4-inch (DN 50, 80, and 100)
main valve body
6-inch (DN 150) main valve body
Stem Assembly
Use with full capacity trim
1-inch (DN 25) main valve body
2-inch (DN 50) main valve body
3-inch (DN 80) main valve body
4-inch (DN 100) main valve body
6-inch (DN 150) main valve body
Use with restricted trim
2-inch (DN 50) main valve body
3-inch (DN 80) main valve body
4-inch (DN 100) main valve body
6-inch (DN 150) main valve body
Mounting Adaptor
Backup Ring (4 required)
Indicator Washer
Indicator Cover
1-inch (DN 25) main valve body
2-inch (DN 50) main valve body
3-inch (DN 80) main valve body
4-inch (DN 100) main valve body
6-inch (DN 150) main valve body
Indicator Protector
1 or 2-inch (DN 25 or 50) main valve body
3, 4, or 6-inch (DN 80, 100, or 150)
main valve body
Indicator Housing
Indicator Stem
1-inch (DN 25) main valve body
2-inch (DN 50) main valve body
3-inch (DN 80) main valve body
4-inch (DN 100) main valve body
6-inch (DN 150) main valve body
Spring
1-inch (DN 25) main valve body
0 to 60 psig (0 to 4,14 bar)
60 to 125 psig (4,14 to 8,62 bar)
125 to 400 psig (8,62 to 27,6 bar)
2-inch (DN 50) main valve body
0 to 20 psig (0 to 1,38 bar)
0 to 60 psig (0 to 4,14 bar)
60 to 125 psig (4,14 to 8,62 bar)
125 to 400 psig (8,62 to 27,6 bar)
3-inch (DN 80) main valve body
0 to 20 psig (0 to 1,38 bar)
0 to 60 psig (0 to 4,14 bar)
60 to 125 psig (4,14 to 8,62 bar)
125 to 400 psig (8,62 to 27,6 bar)
4-inch (DN 100) main valve body
0 to 20 psig (0 to 1,38 bar)
0 to 60 psig (0 to 4,14 bar)
60 to 125 psig (4,14 to 8,62 bar)
125 to 400 psig (8,62 to 27,6 bar)
6-inch (DN 150) main valve body
0 to 20 psig (0 to 1,38 bar)
0 to 60 psig (0 to 4,14 bar)
60 to 125 psig (4,14 to 8,62 bar)
125 to 400 psig (8,62 to 27,6 bar)
Shuttle Cap (not shown)
Wire Retainer
9
10
12
14
15
16
17
18
19
21
22
36
Part Number
29B1935X012
--------------------1E953028982
38A5251X032
T1205106562
18B5516X012
Key
Description
23
24
25
Wire Retainer
17B7757X022
Magnet Shuttle Assembly
19B1963X042
PWB Cup Assembly
Type RF100
29B1041X032
Type RF110
29B1041X022
Pressure Sensor Assembly
Inlet, Outlet, and Auxiliary Pressure Sensors
0 to 30-inches w.c. (0 to 75 mbar)
W30339X0012
0 to 15 psig (0 to 1,03 bar)
39B1973X012
0 to 35 psig (0 to 2,41 bar)
39B1973X062
0 to 100 psig (0 to 6,90 bar)
39B1973X022
0 to 300 psig (0 to 20,7 bar)
39B1973X032
0 to 500 psig (0 to 34,5 bar)
39B1973X042
0 to 1000 psig (0 to 68,9 bar)
39B1973X052
Pressure Sensor Plug
Used in place of pressure sensor assembly
29B1397X012
Stem O-Ring (2 required)
Nitrile
1E472706992
Fluoroelastomer
1N430406382
Mounting Adaptor O-Ring
Nitrile
18B3438X012
Fluoroelastomer
1N430306382
Pressure Sensor O-Ring
1N955306562
O-Ring (2 required)
1D2620X0072
Shuttle Sleeve
29B1965X012
Fitting O-Ring
1-inch (DN 25) main valve body
Nitrile
10A8931X012
Fluoroelastomer
10A0811X012
2, 3, or 4-inch (DN 50, 80, or 100) main valve body
Nitrile
10A3800X012
Fluoroelastomer
1R727606382
6-inch (DN 150) main valve body
Nitrile
1F262906992
Fluoroelastomer
1F2629X0012
Battery Module
W38230X0012
Communication Card
RS-232
W38174X0012
Dial Up Modem
W38223X0012
Vent
1-inch (DN 25) main valve body (2 required)
27A5516X012
2, 3, 4, or 6-inch (DN 50, 80, 100, or 150)
main valve body
27A5516X012
(requires both part numbers)
T14340T0012
Pipe Plug, 1/4-inch NPT
1C3335X0012
Pan Head Machine Screw (4 required)
19B1398X012
Lock Washer (4 required)
19B1399X012
Cup Gasket
39B1940X012
Pipe Plug, 1/2-inch NPT (2 required)
1H5137X0022
Termination Label
29B1406X012
Interface Cable (not shown)
19B1434X012
Upper O-Ring Retainer
1-inch (DN 25) main valve body
T14330T0012
2-inch (DN 50) main valve body
T21119T0012
3-inch (DN 80) main valve body
T14329T0012
4-inch (DN 100) main valve body
T21116T0012
6-inch (DN 150) main valve body
T21116T0012
Lower O-ring Retainer
T14276T0012
Jam Nut (2 required)
14A5693X022
Locknut
T21159T0012
Upper Hex Nut (2 required)
1L286338992
Travel Stop (not shown)
2-inch (DN 50) main valve body
70% Capacity
14A9676X012
30% Capacity
14A9677X012
3-inch (DN 80) main valve body
40% Capacity
14A9671X012
4-inch (DN 100) main valve body
40% Capacity
14A9670X012
6-inch (DN 150) main valve body
40% Capacity
14A9682X012
Indicator Cap
T14424T0012
Input/Output Board
W38164X0012
26
T21117T0012
T21107T0012
T21120T0012
T21170T0012
T21170T0022
T21170T0032
T21170T0042
T21170T0062
T21171T0022
T21171T0032
T21171T0042
T21171T0062
T40630T0012
1K786806992
18B8503X012
14A6759X012
14A5678X012
14A5662X012
14A5647X012
14A5647X012
24B1301X012
29B2269X012
39B1960X012
T21152T0012
T21153T0012
T21155T0012
T21156T0012
T21156T0012
14A9687X012
14A9680X012
14A9679X012
14A6768X012
14A6626X012
14A6627X012
14A6628X012
14A6771X012
14A6629X012
14A6630X012
14A6631X012
26
27
30
31
33
34
35
37
38
39
40
41
42
43
44
52
58
59
60
61
62
63
64
14A6770X012
14A6632X012
14A6633X012
14A6634X012
15A2253X012
14A9686X012
14A9685X012
15A2615X012
29B1954X012
14B3147X022
66
67
Part Number
RF100 Series
16
7
17
5
2
42
1
41
19
10
E0681
E0683
TYPE RF100 INTERNAL PARTS ASSEMBLY FOR TYPE EZR
E0682
TYPE RF100 EXTERNAL PARTS ASSEMBLY FOR TYPE EZR
Figure 32. Type RF100 Parts Assembly for Type EZR
37
RF100 Series
1934_3
TYPE RF100 INTERNAL PARTS ASSEMBLY FOR
TYPE 1098-EGR
1934_3
TYPE RF100 EXTERNAL PARTS ASSEMBLY FOR
TYPE 1098-EGR
Figure 33. Type RF100 Parts Assembly for Type 1098-EGR
38
RF100 Series
E0686
TYPE RF110 EXTERNAL PARTS ASSEMBLY
TYPE RF110 INTERNAL PARTS ASSEMBLY
Figure 34. Type RF110 Parts Assembly
Type RF110 Mounting Parts (figure 34)
Key
Description
46
47
48
49
50
51
Bracket
Spacer
U-Bolt (2 required)
Carriage Bolt
Lock Washer (5 required)
Nut (5 required)
Part Number
39B1421X012
19B1420X012
19B1433X012
19B1422X012
1C225728982
1A352724122
39
RF100 Series
Industrial Regulators
Natural Gas Technologies
Industrial/High Purity
USA - Headquarters
McKinney, Texas 75050 USA
Tel: 1-800-558-5856
Outside U.S. 1-469-293-4201
USA - Headquarters
McKinney, Texas 75050
Tel: 1-800-558-5856
Outside U.S. 1-469-293-4201
Asia-Pacific
Shanghai, China 128461
Tel: +65 6777 8211
Asia-Pacific
Singapore, Singapore 128461
Tel: +65 6777 8211
TESCOM
Elk River, Minnesota 55330 USA
Tel: 1-763-241-3238
Selmsdorf, Germany 23923
Tel: +49 (0) 38823 31 0
Europe
Bologna, Italy 40013
Tel: 39 051 4190611
Europe
Bologna, Italy 40013
Tel: 39 051 4190611
Gallardon, France 28320
Tel: +33 (0)2 37 33 47 00
For further information visit www.emersonprocess.com/regulators
The Emerson logo is a trademark and service mark of Emerson Electric Co. All other marks are the property of their prospective owners. Fisher is a mark owned by Fisher Controls, Inc., a
business of Emerson Process Management.
The contents of this publication are presented for informational purposes only, and while every effort has been made to ensure their accuracy, they are not to be construed as warranties or
guarantees, express or implied, regarding the products or services described herein or their use or applicability. We reserve the right to modify or improve the designs or specifications of such
products at any time without notice.
Emerson Process Management does not assume responsibility for the selection, use or maintenance of any product. Responsibility for proper selection, use and maintenance of any Emerson
Process Management product remains solely with the purchaser.
©Fisher Controls International, Inc., 2002, 2006; All Rights Reserved