1
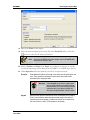
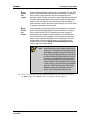
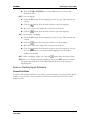
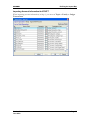
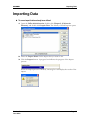
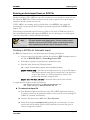
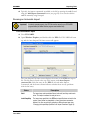
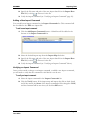
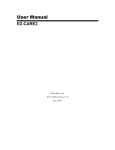
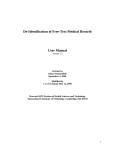
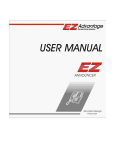
EZ2-Import Guide
EZ-CARE2
SofterWare, Inc.
EZ-CARE2 Version 7
June 2009
EZ-CARE2
Table of Contents
Table of Contents
EZ2-Import Overview ..........................................................................................3
Ordering and Activating the EZ2-Import Module ....................................................................................3
Workflow.....................................................................................................................................................3
Preparing the Import Data File...........................................................................4
Import Data File Formats ..........................................................................................................................4
Topics in Import Data Files.......................................................................................................................4
FAMILIES Import Data Files..................................................................................................................................... 4
STAFF Import Data Files ............................................................................................................................................ 5
CHILDREN Import Data Files.................................................................................................................................. 6
LEDGER TRANSACTIONS Import Data Files .................................................................................................... 6
Defining the Import Map.....................................................................................7
Creating a New Import Map......................................................................................................................7
Notes on Creating Import Definitions..................................................................................................................... 11
Copying an Import Map........................................................................................................................... 14
Editing an Import Map ............................................................................................................................ 14
Deleting an Import Map .......................................................................................................................... 15
Importing Data...................................................................................................16
Running an Auto-Import from an .EZ2 File ........................................................................................... 17
Creating a .EZ2 File for Automatic Import............................................................................................................. 17
Running an Automatic Import .................................................................................................................................. 18
Version 7
June 2009
Page 2
EZ2-Import Overview
EZ-CARE2
EZ2-Import Overview
The EZ2-Import module is an optional module of EZ-CARE2 that allows you to import
data from external files into EZ-CARE2.
Ordering and Activating the EZ2-Import Module
The EZ2-Import module of EZ-CARE2 is included with the basic installation of EZCARE2, but is not enabled by default. In order to enable the module, you must purchase
and register it.
Please contact your SofterWare representative to purchase a license for this module.
Once you purchase a license for the module, you will be given a new registration code that
you can use to activate the module. See “Registering New Modules” in the “Office
Administration” chapter of the EZ-CARE2 User Manual for details.
Workflow
The EZ2-Import process consists of the following steps:
1. Preparing the import data file to be imported.
2. Setting up the import map by specifying the import data file, and mapping the
fields in the import data file to EZ-CARE2 file cabinet fields.
3. Importing the data into EZ-CARE2.
Version 7
June 2009
Page 3
Preparing the Import Data File
EZ-CARE2
Preparing the Import Data File
Import Data File Formats
The data file can be in either of the two following formats:
•
Comma Separated Value (CSV) file – It must conform to the following
specifications:
}
One line per record.
}
The data fields in each line are separated by commas:
Value 1,Value 2,Value 3,Value 4,Value Last
•
}
Quotation marks are not required to be placed around fields.
}
Data in the fields may be upper or lower case, and may contain spaces,
hyphens, or dashes. Fields may not contain commas, quotation marks, or
hard returns.
}
The first line contains a header record with the field names of the source
information. The data begins in the second line.
}
We recommend you set the file extension to .CSV.
MDB or Microsoft Access Database file – Relationships between tables are
included in the MDB to support the EZ-CARE2 import using multiple source
tables like family and child.
Note: If you’re including any picklist items in the import data file, they can only be up to 35
characters in length. Items longer than 35 characters will be truncated, and will cause
duplicated records in the picklist table.
Topics in Import Data Files
Data can be imported into EZ-CARE2 in many different combinations. The four primary
types of input (called “Topics”) are FAMILIES, CHILDREN, STAFF, and LEDGER
TRANSACTIONS.
FAMILIES Import Data Files
Importing FAMILIES: When importing families, each record of the source input file may
contain the following information:
•
Family Data (destined for the Family or Ledger tabs)
•
Family Contacts (destined for a Family Contacts superfield)
•
Family Notes (destined for a Family Notes superfield)
Version 7
June 2009
Page 4
Preparing the Import Data File
EZ-CARE2
•
Family Checklist (destined for a Family Checklist superfield)
•
A/R Transactions (destined for the A/R Ledger)
•
EFT Account Information
The information for a single family can be contained in multiple records, including
“transactional” data such as ledger data, contacts, notes, etc. Represented in columnar form,
an import might include the following sample information:
PARENT 1 Data
Contact Data
STATUS
P1-LAST
NAME
P1FIRST
CITY
STATE
P1PHONE#
NAME
ACTIVE
Doliff
Chris
Arlington
VA
356-8732938
Brian
Doliff
ACTIVE
Berry
Robert
Dresher
PA
ACTIVE
Berry
Robert
Dresher
ACTIVE
Johnson
Sean
ACTIVE
Johnson
ACTIVE
PHONE#
A/R
CATEGORY
CATEGORY
TYPE
AMOUNT
DEPOSIT
R
100
215-6432934
DEPOSIT
R
200
PA
215-6432934
PAYMENT
P
-100
Chicago
IL
312-4893294
Erica
Borden
312-8842332
BAL FWD
R
500
Sean
Chicago
IL
312-4893294
Ella
Smith
312-8567290
DEPOSIT
R
150
Johnson
Sean
Chicago
IL
312-4893294
Maria
Alonzo
312-7249876
ACTIVE
Patterson
Martin
St. Paul
MN
612-5367652
ACTIVE
Moore
Paula
St. Paul
MN
612-4430431
James
Rent
612-7873636
DEPOSIT
R
200
ACTIVE
Moore
Paula
St. Paul
MN
612-4430431
PAYMENT
P
-100
Although a single source record may contain data from different tables (for example,
Contacts and A/R transactions), there is no association between those pieces of information.
For example, the second record for Sean Johnson has a contact name of Ella Smith and an
A/R deposit transaction of $150; Ella Smith has nothing to do with the $150. For Sean
Johnson, three contacts and two A/R transactions are imported.
In general, it may be easier to set up separate import files for the different types of data, even
though that will mean importing the data in several “passes.”
STAFF Import Data Files
STAFF files are very similar to FAMILIES files, except for the following details:
•
STAFF files do not contain Accounts Receivable transactions.
•
STAFF files may contain fields from the Class table.
•
Staff Contacts (Destined for the Staff Contacts superfield)
•
Staff Notes (destined for the Staff Notes superfield)
Version 7
June 2009
Page 5
Preparing the Import Data File
EZ-CARE2
•
Staff Checklists (destined for the Staff Checklist superfield)
CHILDREN Import Data Files
Importing CHILDREN: Similarly, when importing children, each record of the source
input file may contain the following information:
•
Family Data (destined for the Family tab)
•
Child Data (destined for the Child tab)
•
Child Contacts (destined for a Child Contacts superfield)
•
Child Notes (destined for a Child Notes superfield)
•
Child Checklist (destined for a Child Checklist superfield)
LEDGER TRANSACTIONS Import Data Files
This topic is primarily used to import Click-To-Pay transaction information to the Ledger
tab.
Unlike the FAMILY topic, the LEDGER TRANSACTIONS topic requires that you use the
Ledger ID field as a key.
When importing ledger transactions, each record of the source input file may contain the
following information:
•
Family Data (destined for the Family tab)
•
Ledger Data (Destined for the Ledger tab)
•
EFT Data (destined for the Ledger tab)
•
Family Contacts (destined for a Family Contacts superfield)
•
Family Notes (destined for a Family Notes superfield)
•
Family Checklist (destined for a Family Checklist superfield)
Version 7
June 2009
Page 6
Defining the Import Map
EZ-CARE2
Defining the Import Map
Once you’ve created your input file, you must define your import map. The import map
determines how the information is to be transferred from your input (source) file to the EZCARE2 cabinet. To specify the mapping, create a Saved Import in Office Administration.
You can do this either by creating a New import or by editing (or duplicating) an existing
one, in the Library of Saved Imports.
Creating a New Import Map
To create a new import map
1. Open the Office Administration, double-click Chapter 2 (Cabinets &
Drawers), and double-click Import Data. The Library of Saved Imports opens:
2. Click the New button. The Step 1 screen of the Import Wizard appears:
Version 7
June 2009
Page 7
Defining the Import Map
EZ-CARE2
3. Specify the Name of the import.
4. Enter the name and path of the source file in the From File field, or click the
button to select the file name and location.
Note: When using an MDB file a new line appears under the From File field,
and will ask for the Main Table.
5. Select a Cabinet and Topic. The Topic of your import is the type of records
you will be importing (see the discussion of FAMILY vs. CHILD topics above).
6. Under Operation select the method you will use to import records :
Overwrite
Erase (delete and remove) all records in the cabinet prior to importing the new
ones. Then, generate a new record for each source record, with values
prescribed by the mapping of fields.
Warning!
Append
Version 7
June 2009
Using Overwrite is only done in certain cases,
such as initially installing your data. It removes
all data specified in your topic including Zipcodes
and classes which may cause a problem with
other topics using those tables. Use with caution.
Generate a new record for each source record, as described in the mapping.
Even if a record with the same information already exists in the cabinet, it
imports the new record anyway. It creates new records for all records in the
file, even if there is a match. (This operation is rarely used.)
Page 8
Defining the Import Map
EZ-CARE2
Merge append
new
records
Uses the selected key field(s) to find records in the destination. For each initial
match, replace the destination fields with values as described in the mapping.
When no match is found, generate a new record and append it to the
destination cabinet. This must be used if you want to keep existing classes and
zip codes (note that these tables are also used in the staff and other drawers;
therefore, if you overwrite them, they will be removed from those tables). If
there are multiple records in the source with the same key, only the first record
is merged or appended; the rest are ignored.
Merge discard
new
records
Use the selected key field(s) to find records in the destination. For each initial
match, replace the destination fields with values as defined in the mapping.
When no match is found, DO NOT generate a new record, but report a
mismatched key (for example, a record that doesn’t exist in the destination
cabinet and therefore can’t be updated). If the system finds keys that do not
match, a report is generated that details the non-matched keys. If there are
multiple records in the source with the same key, only the first record is
merged, unless you check the Update all records matching key criteria
option on step 2 of the Import Wizard.
Note: Merge/Discard allows you to update multiple records
using a “key.” This is useful if you are updating school
name, address, and district using the school code as
the key. During the mapping process, you must check
the option to update all records matching key criteria.
This allows you to update all the related information
for the record just based on the key, so that you do
not have to type the other information into the system.
In order to do this, you’ll need to set up a spreadsheet
saved as a .CSV file with the names of the schools,
addresses, and any other information; when you
import it, you’ll use the school code as the key.
7. When you are ready to proceed with the definition of the import map, click on
the Next button. The Step 2 screen of the Import Wizard appears:
Version 7
June 2009
Page 9
Defining the Import Map
EZ-CARE2
Step 2 is where you match up the source fields in the import data file with the
destination fields in your file cabinet database. The mappings will be set up in the
List of Field Operations.
8. You may click the Auto-map Fields button to allow the system to automatically
match fields with the same names. The names must be an exact match in both
the source and destination field (i.e. Source Field: First Name, Destination
Field: Child: First Name).
9. To map a field from the import data file to a field in the database:
a. Select a Source Field. These are the fields that appear in the import data file.
b. Select an Operation:
Operation
Description
OVERWRITE The data from the source field will replace the data in the destination field,
if any.
APPEND
The data from the source field will be added onto the end of the data in
the destination field, if any.
Example:
This is useful when it is necessary to concatenate first name and last
name into a single name field.
c. If desired, check the button in the Key column to specify that this is a key
field. Key fields are used to match records (for example, to create one family
for multiple children you could specify the home phone # as a key). Each
key must be unique.
d. Select a Destination Field. These are the fields in your file cabinet database.
The data from the Source Field will be written into this field.
Version 7
June 2009
Page 10
Defining the Import Map
EZ-CARE2
e. Press the TAB or ENTER key to enter additional sets of source and
destination fields.
10. To copy a mapping:
a. Check the M column for the mapping you want to copy. This will mark the
column.
b. Click the
button from the main toolbar to copy the mapping.
c. Move the cursor to the empty line at the bottom of the list.
d. Click the
button from the main toolbar to paste the mapping.
11. To cut and paste a mapping:
a. Check the M column for the mapping you want to copy. This will mark the
column.
b. Click the
button from the main toolbar to cut the mapping.
c. Move the cursor to the empty line at the bottom of the list.
d. Click the
button from the main toolbar to paste the mapping. You can
also use this feature to cut and paste field mappings from one import
definition to another.
12. To delete a mapping, simply cut it with the
button from the main toolbar.
13. When you are finished defining mappings, click on the OK button to complete
the import map definition. Your import map will be listed in the Library of
Saved Imports.
Notes on Creating Import Definitions
Parent/Child Fields
In order to link multiple children to one family, you must identify a key such as home phone
number. If you choose to have one family record for each child record, do NOT mark a
family key field.
Version 7
June 2009
Page 11
Defining the Import Map
EZ-CARE2
A/R Transaction Fields
The following (source) fields are required fields for A/R transaction importing (required Key
fields as marked):
•
Category (Marked as Key)—cannot be longer than 25 characters
•
Family ID (Marked as Key field and linked to a character type Family field)
•
Date (May be used as a Key field to prevent duplicate records)
•
Amount(May be used as a Key field to prevent duplicate records)
You can also include any of the following fields:
•
Comment
•
Child Name
Note: When an imported record includes an A/R category that does not currently exist, that
category is added to the cabinet.
Warning! Category entries can be no longer than 25 characters long. If they are longer they
will cause duplicate categories to be created.
Importing Ledger Transactions from Click-to-Pay
When importing ledger transactions from Click-to-Pay, in Step 1, you must set Topic to
Ledger Transactions.
Version 7
June 2009
Page 12
EZ-CARE2
Defining the Import Map
Importing Account Information for EZ-EFT
When importing account information, in Step 1, you must set Topic to Family or Ledger
Transactions.
Version 7
June 2009
Page 13
Defining the Import Map
EZ-CARE2
Copying an Import Map
You can often save time when creating a new import map by making a copy of a similar map
and then editing it, instead of creating a new map from scratch.
To create a copy of an import map
1. Open the Office Administration, double-click Chapter 2 (Cabinets &
Drawers), and double-click Import Data. The Library of Saved Imports opens:
2. Select the Import Name for the import map that you want to copy.
3. Click the Duplicate button. The Import Wizard will open, and all of the settings
for the original import map will be selected. By default, the Name of the new
import map will be Copy of [original name].
4. Make any changes needed, then click the OK button to save the copy of the
import map.
Editing an Import Map
To edit an import map
1. Open the Office Administration, double-click Chapter 2 (Cabinets &
Drawers), and double-click Import Data. The Library of Saved Imports opens.
2. Select the Import Name for the import map that you want to edit.
3. Click the Edit button. The Import Wizard will open, and all of the settings for
the import map will be selected.
4. Make any changes needed, then click the OK button to save the changes.
Version 7
June 2009
Page 14
Defining the Import Map
EZ-CARE2
Deleting an Import Map
To delete an import map
1. Open the Office Administration, double-click Chapter 2 (Cabinets &
Drawers), and double-click Import Data. The Library of Saved Imports opens.
2. Select the Import Name for the import map that you want to delete.
3. Click the Delete button. A confirmation screen appears:
4. Click the Yes button to delete the import map, or click No to cancel deletion.
Version 7
June 2009
Page 15
Importing Data
EZ-CARE2
Importing Data
► To run an import that has already been defined
1. Open the Office Administration, double-click Chapter 2 (Cabinets &
Drawers), and double-click Import Data. The Library of Saved Imports opens:
2. Select the Import Name for the import that you want to run.
3. Click the Import button. A progress bar indicates the progress of the import
process:
When the import process is finished, a message box will display the results of the
import:
Version 7
June 2009
Page 16
Importing Data
EZ-CARE2
Running an Auto-Import from an .EZ2 File
During installation, EZ-CARE2 sets up a file association in your operation system with the
file extension .EZ2. Files with this extension can be used to specify one or more import
operations that the system can carry out.
If EZ-CARE2 is not running, and you double-click on an .EZ2 file, the system will
automatically start up and run the EZ-Import operations specified in the .EZ2 “autoimport” file.
This function is particularly useful for users of Click-to-Pay and/or WebLink, as both of
these SofterWare products will output the .EZ2 file for you, allowing you to easily import
transaction data and/or family and child information.
Note:
EZ2-Import maintains overall system security; if the user’s system requires a
password in order to get into EZ-CARE2, opening an auto-import file will also
require a password to be entered in order for the import to continue.
Creating a .EZ2 File for Automatic Import
An .EZ2 auto-import file is a text file that has the following specifications:
•
It has no spaces in its file name, and the file extension .EZ2. Example names for
this file are REGFILE.EZ2 or CenterRegistration.EZ2.
•
Each import operation is specified on a separate line entry.
•
Each line entry follows the following format:
EZR: [Import Process Name],[Import Data File Name and Path]
is the name of the import process as set up in EZ-Import.
If the import process name does not match any of the processes
set up in the system, you will be prompted to create a new
process with that name at import time.
[Import Process Name]
[Import Data File Name and Path]
is the name and location of the data file.
A sample data file might look like the following:
EZR: Weblink Registration,E:\WEBLINK\INFOSNAP\PMC.CSV
EZR: Ledger Charges,E:\WEBLINK\INFOSNAP\PMC.CSV
► To create an Auto-Import file
1. Start Windows Explorer and browse to the EZ-CARE2 application folder (ex:
C:\Softer\ezcare2 (or the application folder on the server if you are running EZCARE2 in a network environment).
2. From the file menu choose New then Text document.
3. Name the document autoimport.ez2 (replacing the .txt extension). You may
need to turn off the folder option to hide extensions for known file types in
order to change the extension.
Version 7
June 2009
Page 17
Importing Data
EZ-CARE2
4. Typically, the import commands are added to the file by running the .ez2 file and
using the Add Import Command feature (see page 20). You can also edit the
.ez2 file manually using Notepad.
Running an Automatic Import
Important! In order to operate properly, the .EZ2 file must be saved to your EZ-CARE2
program folder (the folder that the program was installed into).
To run the automatic import
1. Close EZ-CARE2.
2. Open Windows Explorer, and double-click the .EZ2 file. EZ-CARE2 will start
up, and the Auto-Import File Status screen will appear:
The Auto-Import File Status screen displays the status of the .EZ2 auto-import
file. The file name is listed at the top of the screen under Auto-Import
command file. Each line entry in the .EZ2 file is listed under Import
Commands, and the Status column indicates whether there are any problems
with the line entry:
Status
Version 7
June 2009
Description
Valid
The import map and import data file are both valid, and they match each
other. This import command is ready to be run.
Invalid Imp Map
The import map specified in the .EZ2 auto-import file does not exist in the
system. It may either be misspelled, or it may have been renamed or
deleted. You can correct this by selecting a different import map (see
“Changing the Import Map Specified in an Import Command” page 19).
Page 18
Importing Data
EZ-CARE2
Status
Description
Invalid File
The import data file specified in the .EZ2 auto-import file does not exist.
Invalid File &
Map
The import map was not found in the system, nor was import data file
found.
Invalid Map/File
Combination
The import map and data file were both found, but do not match each
other. You may have specified the wrong import map or data file, or the
data file may not be a proper .CSV file.
3. Perform one of the following actions.
•
Click the OK button to begin importing. EZ-CARE2 will perform all of
the import commands that are listed as Valid, and then exit. The next
time you open EZ-CARE2, you’ll find your records updated with all the
imported information.
Note: Import commands that are not listed as Valid will be ignored by the
system and will not be carried out.
•
Change the import map specified in an import command (see below).
•
Change the import data file specified in an import command (see below)
•
Add a new import command to the Import Commands list (see
“Adding a New Import Command” on page 20).
•
Verify that an import command is valid (See “Verifying an Import
Command” on page 20).
•
Click the Cancel button to cancel the auto-import function and exit EZCARE2.
Changing the Import Map Specified in an Import Command
You can select a different import map for any of the import commands. Changes made in
this screen will also be made to the .EZ2 auto-import file.
To change the import map specified in an import command
1. Select the import command in the Import Commands list.
2. Select the desired import map from the Import Map list below.
3. Verify the import command (see “Verifying an Import Command” page 20).
Changing the Import Data File Specified in an Import Command
You can specify a different import data file for any of the import commands. Changes made
in this screen will also be made to the .EZ2 auto-import file.
To change the import data file specified in an import command
1. Select the import command in the Import Commands list.
Version 7
June 2009
Page 19
Importing Data
EZ-CARE2
2. Specify the file name and path of the new import data file in the Import Data
File field, or click
to browse for the file.
3. Verify the import command (see “Verifying an Import Command” page 20).
Adding a New Import Command
You can add a new import command to the Import Commands list. This command will
also be added to the .EZ2 auto-import file.
To add a new import command
1. Click the Add Import Command button. A blank line will be added to the
bottom of the Import Commands list:
2. Select the desired import map from the Import Map list below.
3. Specify the file name and path of the new import data file in the Import Data
File field, or click
to browse for the file.
4. Verify the import command (see “Verifying an Import Command” below).
Verifying an Import Command
Once you have made a change to an import command, or added a new import command,
you will need to verify that the command is valid before it can be run.
To verify an import command
1. Select the import command in the Import Commands list.
2. Click the Verify button. If the import map and import data file are both found,
and if they match, the Status of the import command will be changed to Valid,
and the command will be run when you click the OK button.
Version 7
June 2009
Page 20