1
NCR S46 Server
Installing Network Operating System
BST0-2142-41
04/97
The product described in this book is a licensed product of NCR Corporation.
Brand and product names appearing in this manual are for identification purposes only and
may be registered trademarks or trademarks of their respective companies.
It is the policy of NCR Corporation (NCR) to improve products as new technology,
components, software, and firmware become available. NCR, therefore, reserves the right
to change specifications without prior notice.
All features, functions, and operations described herein may not be marketed by NCR in all
parts of the world. In some instances, photographs are of equipment prototypes. Therefore,
before using this document, consult with your NCR representative or NCR office for
information that is applicable and current.
To maintain the quality of our publications, we need your comments on the accuracy,
clarity, organization, and value of this book.
Address correspondence to:
Information Products
NCR Corporation
3325 Platt Springs Road
West Columbia, SC 29170
Copyright © 1997
By NCR Corporation
Dayton, Ohio U.S.A.
All Rights Reserved
Table of Contents
Preface
About This Book.......................................................................................................... iii
Who Should Read This Book ....................................................................................... iii
How This Book is Organized ....................................................................................... iii
Conventions Used in This Book ....................................................................................iv
Related Publications......................................................................................................iv
Chapter 1
Installing Windows NT Server 3.51
Completing a Factory Installation ..................................................................................... 1-2
Confirming the Hardware Setup................................................................................. 1-2
Identifying the Server ................................................................................................ 1-3
Configuring the Network ........................................................................................... 1-4
Installing Server Manager.......................................................................................... 1-5
Configuring the Video Driver .................................................................................... 1-7
Performing a Full Installation ........................................................................................... 1-9
Confirming the Hardware Setup............................................................................... 1-10
Confirming the CMOS Configuration ...................................................................... 1-10
Obtaining the Necessary Media................................................................................ 1-11
Configuring the Disk Arrays Using the Mylex DAC960PL Adapter......................... 1-12
Configuring the Server Using the System Configuration Utility (SCU)..................... 1-14
Configuring the Adapter Settings Using the Adaptec BIOS SCSISelect Utility......... 1-17
Configuring the NCR PCI SCSI Adapter ................................................................. 1-19
Installing the Operating System ............................................................................... 1-20
Reinstalling Windows NT Server.................................................................................... 1-28
Identifying a Target Disk ......................................................................................... 1-29
Installing a Tape Device .......................................................................................... 1-29
Backing Up NT........................................................................................................ 1-30
Formatting the Hard Drive Using the SCSISelect Utility .......................................... 1-31
Restoring Backups ................................................................................................... 1-32
Installing Network Operating System
i
Contents
Chapter 2
Installing Windows NT Server 4.0
Completing a Factory Installation......................................................................................2-2
Identify Information....................................................................................................2-2
Complete User/Server Information..............................................................................2-3
Configure the Network ...............................................................................................2-3
Complete the Installation............................................................................................2-3
Install Service Packs ...................................................................................................2-4
Install Server Manager ...............................................................................................2-4
Performing a Full Installation............................................................................................2-5
Confirm Hardware Setup ............................................................................................2-6
Confirm CMOS Configuration....................................................................................2-7
Obtain Necessary Media .............................................................................................2-8
Configure Disk Arrays Using the Mylex DAC960PL Adapter.....................................2-8
Install the Diagnostic Partition .................................................................................2-10
Configure the Server Using the System Configuration Utility (SCU).........................2-10
Configure Adapter Settings Using the Adaptec BIOS SCSISelect Utility...................2-13
Configure PCI SCSI Adapter ....................................................................................2-16
Install Operating System...........................................................................................2-16
Chapter 3
Installing UNIXWare
Overview...........................................................................................................................3-2
Installation Overview ........................................................................................................3-3
Rebooting the Server and Installing the Operating System.................................................3-4
Inserting the Host Bus Adapter (HBA) Driver.............................................................3-4
Selecting the Installation Method................................................................................3-5
Observing Screen Messages ........................................................................................3-6
Reinserting the Host Bus Adapter (HBA) Driver.........................................................3-6
Rebooting the System .................................................................................................3-6
Entering a Password and Completing the Installation .................................................3-7
Chapter 4
Installing SCO UNIX
Overview...........................................................................................................................4-2
Installation Overview ........................................................................................................4-3
Rebooting the Server and Installing the Operating System.................................................4-4
Entering Setup Information ........................................................................................4-4
Installing SMP ..................................................................................................................4-6
Installing TCP/IP Communications ...................................................................................4-7
Inserting the SMC SuperDisk .....................................................................................4-7
ii
Table of Contents
Preface
The preface provides valuable information about the design and use of this
book.
About This Book
This book provides procedures for installing network operating systems on the
NCR S46 server.
Who Should Read This Book
This book should be used by any person who installs and configures network
operating systems on the NCR S46 server.
How This Book is Organized
This book is divided into the following chapters:
•
Chapter 1 - Installing Windows NT Server 3.51
•
Chapter 2 - Installing Windows NT Server 4.0
•
Chapter 3 - Installing UNIXWare
•
Chapter 4 - Installing SCO UNIX
Installing Network Operating System
iii
Preface
Conventions Used in This Book
The following conventions are used in this book:
F1
A letter, number, symbol, or word in this font
represents a key on your keyboard. For example, the
instruction “press F1” means press the key labeled
“F1” on your keyboard.
Enter
This represents the key labeled “Enter” on your
keyboard.
X+Y
Two or three key names, separated by plus signs,
indicate multiple-key entries. For example, Control
+ Alt + Del means hold down Control and Alt and
press Del.
Note
Notes indicate pivotal information and may be used
to emphasize a recommended sequence of steps.
Warning
Warnings indicate hazards that can cause personal
injury or equipment damage if the hazards are not
avoided.
Caution
Cautions indicate hazards that might cause personal
injury, damage to hardware, or software if the
hazards are not avoided.
Related Publications
For supplementary information, refer to the following books:
•
NCR S46 Server User Guide (BST0-2142-38)
•
NCR S46 Service Guide (BST0-2142-39)
•
NCR S46 Server Support Log (BST0-2142-40)
• NCR S46 AMIDiag Supplement (BST0-2142-42)
Other publications may later become available. Check with your NCR sales
representative for the latest information.
iv
Preface
Chapter 1
Installing Windows NT Server
3.51
Installing Network Operating System
1-1
Completing a Factory Installation
Completing a Factory Installation
If your system was pre-loaded at the factory with Microsoft Windows NT
Server, you need to complete the installation by providing some site-specific
configuration information.
To complete the factory installation, follow these general steps:
•
Confirm the hardware setup
•
Identify the server
•
Configure the network
•
Install Server Manager
•
Configure the video driver
Confirming the Hardware Setup
To confirm the hardware setup prior to powering the system, follow these
steps:
1. Verify that both the mouse and the keyboard are plugged into the
appropriate receptacles in the back of the system.
2. Verify your system is connected to the network onto which it will be
installed. Before continuing, verify you have the following information:
–
–
–
The name of your domain or workgroup.
The unique name of this system.
Whether this system is to be a Primary Domain Controller (PDC), a
Backup Domain Controller (BDC), or a non-Domain Controller
server.
3. Remove the yellow “CAUTION” label from the front of the machine, and
open the disk access door.
4. Turn the system on by pressing the button immediately to the right of the
disk drive inside the disk access door. The system begins POST tests and
prepares for completion of the Windows NT installation.
1-2
Installing Windows NT Server 3.51
Completing a Factory Installation
Identifying the Server
To identify the Server, follow these steps:
1. When prompted for your name and company name, complete the
information and choose “Continue.” You can change these entries if you
enter incorrect information. When the entries are correct, choose
“Continue.”
2. Enter the product ID when prompted. The Windows NT Server Security
Role dialog box appears.
3. Select the security role of the server. If this system is a Primary Domain
Controller or a Backup Domain Controller select Domain Controller then
“Continue.” If not, select Server and choose “Continue.” The Choose
Licensing Mode dialog box appears.
4. Indicate whether your server software license has been purchased on a
“Per Server” or a “Per Seat” basis by selecting the appropriate button.
Enter the total number of licenses purchased if necessary, and choose
“Continue.”
5. Verify that you have read, understand, and agree to abide by the licensing
agreement. After reading the agreement, select the box next to the sentence
which begins “I agree that” and choose “OK.”
6. Specify your server’s unique name by entering the name and choosing
“Continue.”
CAUTION: Be sure that the system name that you select does not contain
spaces, commas, or any of the following characters: ! @ # $ % ^ & * < > / \ ?
|{}[]
7. You are given the opportunity to change the name you have selected.
When your entry is correct, choose “Continue.”
8. You are asked to select the language for your server. Selecting the
language for your server also determines the initial settings for currency,
date, time, etc. Select the language to be used, and choose “Continue.”
Installing Network Operating System
1-3
Completing a Factory Installation
9. Now you can set up a printer on this server. If you want to set up a
printer, select the name of the printer, the printer driver to use, and the
port to be printed to. Choose “Continue.” If you do not want to set up a
printer at this time, select “Cancel”, and then choose “OK.”
Configuring the Network
The installation procedure now prepares to configure the network on your
system by searching for the network card. To configure the network, follow
these steps:
1. If a network card is found a setup window appears prompting you to
select adapter options for the specific network card. Choose “Continue”
when the setup options are correct. Proceed to step 3.
CAUTION: Be sure that the driver installed with the network adapter card is
the driver provided with the adapter. Do NOT use the default drivers provided
on the NT 3.51 installation media.
If no network card is found, you are prompted whether the installation
procedure should automatically detect the Network Interface Card (NIC),
or whether you want to manually select an adapter. Press “Continue” to
manually select the adapter. By manually selecting the adapter card you
are given the opportunity to install Microsoft Remote Access Service
(MSRAS). Select REMOTE to install MSRAS.
2. Select a port and modem type. Once the port and modem are selected, the
installation procedure automatically detects the modem.
3. The installation procedure copies the files for the remainder of the
Windows NT Server installation from the temporary installation directory
into the Windows NT home directory.
4. Select the server domain.
–
1-4
If this system is to be the Primary Domain Controller of a new
domain, select the Domain button, complete the name of the domain,
and choose “OK” to continue.
Installing Windows NT Server 3.51
Completing a Factory Installation
–
If this system is to be a Backup Domain Controller or a Non-Domain
Controller Server on a domain, select the Domain button, complete
the name of the domain, and the User name and password of an
administrator on the domain. When you have completed your
selections, choose “OK” to continue.
5. Icons and program groups are created for your Windows NT installation.
6. Set the time, date, and time zone on your system. When correct, choose
“OK.” Your system reboots after saving the installation configuration.
7. Log on using the Username Administrator with no password. We
recommend changing the password for security purposes after you have
logged on.
Installing Server Manager
A welcome message displays indicating that Server Manager is to be installed.
To install Server Manager, follow these steps:
1. Choose “Next” to continue installation or “Cancel” to abort installation.
–
If “Next” is chosen and a previous release of the Server Manager has
been installed on this system, a message displays asking whether you
want to upgrade the installation of Server Manager.
Select “Yes” to have Setup install Server Manager in the directory
where the previous version exists. Select “No” to specify the directory
where Server manager is to be installed.
–
If “Next” is selected, and a previous release of the Server Manager
has not been installed on this system, the Choose Destination
Location dialog displays permitting you to choose the directory where
Server manager is to be installed.
If “Cancel” is selected, the installation is aborted. However, the next
time the system is rebooted, the installation will attempt to run again.
If NCR Server Manager should not be installed on the system,
execute the following steps to disable future installation attempts:
–
Installing Network Operating System
1-5
Completing a Factory Installation
a. Remove the installation program from the startup group by displaying
the Program Manager, selecting the only program available in the
Startup group, clicking on the background of the Startup group and
pressing Delete.
b. Remove the installation startup files by starting the File manager,
move to the C: drive, select C:\ATTSM, and then delete all files in
this directory.
If installation of NCR Server Manager is desired in the future, installation
can be accomplished from the NCR ValuePlus CD for BackOffice
provided with the server.
2. If you do not want to install in the default directory (c:\svrmgr), choose
BROWSE... and select a directory in which to install the Server Manager
software or type the directory in the Path field and press “OK.” When the
proper directory displays within the Destination Directory window, choose
“Next.” If you want to exit install at this point, choose “Cancel.”
Note: Do not install Server Manager in the Windows NT system directory
(for example, c:\WINNT\SYSTEM). The system directories are reserved for
operating system files only and are not for application files.
The Select Components dialog box appears displaying the system
configuration options.
3. Choose one of the buttons representing a specific system or choose the
“Windows NT System not listed” option if your system is not listed.
Select “Next” to continue the installation.
4. Indicate whether you have a Server Monitor Module board installed in the
system when prompted. Setup begins copying files to the specified
directory. A Setup window displays the completion percentage of the file
copy process.
When the files have been copied, a message displays requesting logon
account information.
1-6
Installing Windows NT Server 3.51
Completing a Factory Installation
5. Enter the name of a pre-existing user account that has full administrative
privileges (for example, an account that is in either the "Domain
Administrators" or "Administrators" group). This account must also have
the advanced user right "Log on as a service." To add this right to the user
account, use the User Manager application that comes with Windows
NT.
This dialog box is used to configure the account that the System Monitor
and Alert Listener services will be started as. If these services do not start
correctly after installation, verify that the account name and password are
correct by going into Control Panel and then into Services. The Hardware
Monitor service, by default starts under the System Account.
6. When the setup process is complete for the configuration option you
selected, the Select Program Folder message displays. You can specify the
Program Folder where Setup should add Server Manager program icons.
7. Type in a new folder name in the Program Folder field or select one from
the Existing Folders list. When the proper name displays in the Program
Folder field, choose “Next.” If you want to discontinue the installation at
this point, choose “Cancel.”
When Server Manager installation is complete, the Program Folder is
created and a message displays prompting you to reboot your server.
8. Select “Yes” to have Setup reboot your server automatically. Select “No”
to exit Setup without rebooting your system.
Configuring the Video Driver
To configure the video driver, follow these steps:
1. The video adapter detected by the installation process displays. Select
“OK” to confirm the selection.
2. Select the video driver configuration, including the resolution, number of
colors, and scan rate.
3. After you have chosen the desired parameters, select TEST to make sure
the video displays the resolution correctly. A pop-up screen informs you
that the test is about to begin. Select “OK” to confirm.
Installing Network Operating System
1-7
Completing a Factory Installation
Your screen’s resolution is set to match the parameters you have selected.
After approximately five seconds, the screen returns to the previous
resolution and you are asked whether the test displayed properly. If so,
select “Yes” to continue the installation. If not, select “No”, return to the
test screen and specify different parameters for the video test. When the
test displays appropriately, choose “OK” to save the settings. Your
system configuration is saved and the system reboots.
The pre-loaded installation of Windows NT Server is complete.
1-8
Installing Windows NT Server 3.51
Performing a Full Installation
Performing a Full Installation
If Windows NT Server was not pre-loaded on your server at the factory, use
this section to prepare your system and install the software. Before beginning
the procedures in this section you will need a copy of each book listed below.
•
NCR S46 User Guide (BST0-2142-38)
• NCR S46 Service Guide (BST0-2142-39)
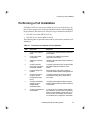
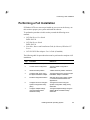
The following table list procedures that must be performed to complete a full
installation:
Table 1-1. Procedures to Complete a Full Installation
Step
Procedure
Reference
1
Confirm the hardware
setup
“Confirming the Hardware Setup” subsection
in this section
2
Confirm the CMOS
configuration
“Confirming the CMOS Configuration”
subsection in this section
3
Obtain the necessary
media
“Obtaining the Necessary Media” subsection
in this section
4
Configure the disk
arrays using the Mylex
DAC960PL Adapter
“Configuring the Disk Arrays Using the Mylex
DAC960PL Adapter”subsection in this
section
5
Install the Diagnostic
Partition
NCR S46 Server User Guide; Chapter 3,
“Hardware Related Utilities and Applications”
6
Configure the server
using the System
Configuration Utility
(SCU)
“Configuring the Server Using the System
Configuration Utility (SCU)” subsection in
this section.
7
Configure the adapter
settings using the
Adaptec BIOS
SCSISelect Utility
“Configuring the Adapter Settings Using the
Adaptec BIOS SCSISelect Utility” subsection
in this section.
8
Configure the NCR PCI
SCSI Adapter
If your server has a NCR PCI SCSI adapter
pre-installed or you are planning to install an
NCR PCI SCSI adapter yourself, refer to the
NCR PCI SCSI Host Adapter User’s Guide
for installation and configuration information.
Installing Network Operating System
1-9
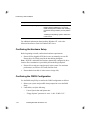
Performing a Full Installation
Step
Procedure
Reference
9
Install Operating System
Caution: You must install the Diagnostic
Partition before installing NT. You cannot
install the Diagnostic Partition after installing
NT without having to delete your NT partition
first.
“Installing the Operating System” subsection
in this section.
For additional information about installing Windows NT, refer to the
Microsoft Installation Guide for Windows NT Server.
Confirming the Hardware Setup
Before beginning to install, confirm these hardware requirements:
•
Ensure all Hot pluggable SCSI devices are not manually set to an ID.
Ensure drives are firmly seated in the hot-docking backplane.
Note: SCSI ID’s within the Hot Dock are dynamically configured by drive
location. Drive termination is provided by the hot-docking backplane.
•
Ensure all bus cards are seated properly in the system. For maximum
performance, use EISA or PCI cards, not ISA cards.
•
Ensure that the boot disk is in the correct slot (top left)
Confirming the CMOS Configuration
Use the BIOS setup Utility to confirm the CMOS configuration as follows:
1. Reboot your system and press F1 when prompted to access the BIOS
Setup.
2. Under Main, verify the following:
–
–
1-10
Correct System date and System time
“Floppy Options” parameter is set to “1.44/1.25 MB 3-1/2.”
Installing Windows NT Server 3.51
Performing a Full Installation
–
“Primary IDE Master, Primary IDE Slave, Secondary IDE Master,
and Secondary IDE Slave” parameters are all set to “Not Installed.”
Note: IDE hard disks are not supported for use under Windows NT on the
NCR S46 server.
3. Under Advanced, verify the following:
–
Under Peripheral Configuration, set the following values:
Configuration
Manual
Standard IDE
Disabled
Floppy
Enabled
– Under Advanced Chipset Configuration, verify the following values:
MPS Version:
1.4
Second I/O APIC:
Disabled
PERR Mode
Disabled
4. Under Security, verify the following:
– Set “User Password,” if required.
– Set “Administrator Password,” if required.
5. Under Exit, press Enter to Exit Saving Changes.
Obtaining the Necessary Media
Before you begin to install Windows NT Server 3.51, make sure that you have
the following media:
•
NCR S46 Server Platform CD
•
Windows NT V3.51 Server installation boot diskettes (3)
•
Adaptec 7800 Family Manager diskette
•
Windows NT V3.51 Server CD
•
Mylex DAC960 Software Kit Version 1.02 (if installing a Mylex adapter)
•
Blank 3.5” high density diskette for creating an emergency repair diskette
•
Documentation kits for all network adapters (NT drivers are included in
the kit)
Installing Network Operating System
1-11
Performing a Full Installation
Note: NT Drivers for each adapter are delivered with the Documentation Kit
for that adapter. The kit includes the correct version of the drivers. Do NOT
use the drivers provided by default on the NT 3.51 installation media.
Configuring the Disk Arrays Using the Mylex DAC960PL
Adapter
This section describes procedures to configure the disk arrays using the Mylex
DAC960PL adapter.
Installing a Mylex DAC960PL Adapter
To prepare the system for the Mylex DAC960PL Disk Array adapter
installation, if not pre-installed at the factory, follow these steps:
CAUTION: Use a grounding strap to prevent harmful static discharge when
handling, installing and cabling host adapters.
1. Turn off the power to the console and the system. Disconnect the system
power cord from either the rear panel of the system or from the wall
outlet.
2. Refer to the NCR S46 Server Service Guide, Chapter 5, “Installing and
Removing Add-In Boards,” for information about inserting and removing
add-in boards.
3. Install the Mylex DAC960PL adapter in Slot 1 of PCI Bus 1 (third PCI
slot from bottom, marked as P4) as instructed in the Mylex DAC960PL
Disk Array Controller User’s Manual and the NCR S46 Server User
Guide. If there are multiple Mylex DAC960PL RAID controllers in the
system, make sure that the bootable drive is connected to the top Mylex
controller.
CAUTION: Do not install the Mylex adapter into an EISA slot. Attempted
installation into an EISA slot will damage the adapter board.
4. Refer to chapter 2 “Installing and Removing Drives and SCSI Hot Plug
Bay” in the NCR S46 Server Service Guide for cabling your Mylex Disk
Array Adapter in a NCR S46 server.
1-12
Installing Windows NT Server 3.51
Performing a Full Installation
5. Connect the desired disk drives to the Mylex DAC960PL Adapter.
Internal drives are automatically terminated correctly by the Hot-docking
backplane in the NCR S46 Server. See the NCR S46 Server User Guide
for more details on the SCSI layout.
6. Make sure, that the CD ROM and tape drives are connected to the narrow
SCSI cable and to the on-board SCSI Channel A (marked as “SCSI A”).
Configuring RAID Disks
To configure the RAID disks, follow these steps:
1. If there are disk drives connected to both the on-board Adaptec controllers
and the Mylex controllers, decide which disk you want to install the
operating system on. The operating system should be installed only on
disk drives connected to Adaptec controller A (SCSI A) or to the Mylex
controller on PCI BUS 1, Slot 1 (P4) ) or to the top Mylex controller if
multiple Mylex controller are in the system.
2. If you want to install the operating system to an array connected to the
Mylex DAC960PL adapter, verify the Mylex BIOS is “enabled.”
If you want the operating system installed on the Adaptec, verify the
BIOS is “enabled” for the Adaptec controller.
3. Boot to the Diagnostic Partition and run Utilities and Diagnostics.
4. Select “System Config Utils”, “Adapter Config Utils”, then “RAID
Mylex” and press Enter. Follow the directions in the NCR S46 Server
User Guide to configure disk arrays. Also reference the DAC960PL Disk
Array Controller User’s Guide, if necessary.
5. For best performance, configure the operating system disk(s) as RAID 1
or RAID 6. Other disks should be configured to match the application,
normally as RAID 5. If desired, leave one disk as a hot standby.
Special Considerations
•
If more than one Mylex Disk Array adapter is used, install additional
adapters in PCI slots lower in the scan order. Additional Mylex adapters
can be used for external disk expansion cabinets.
Installing Network Operating System
1-13
Performing a Full Installation
•
An external disk (JBOD Single-ended configuration) expansion cabinet
attached to a second Mylex adapter must have proper SCSI termination at
the end of each SCSI bus.
Configuring the Server Using the System Configuration
Utility (SCU)
To configure the server using the SCU, follow these steps. Refer to Chapter 4,
“Configuring Your Server” in the NCR S46 Server User Guide for additional
information on the System Configuration Utility.
1. At system startup, press D when prompted, to boot to the Diagnostic
Partition.
2. At the MS-DOS startup menu press Enter to select “Run Utilities and
Diagnostics.”
3. From the Diagnostic Partition Main Menu select ”System Config Utils”,
and then select “Execute SCU.” When the blue System Configuration
Utility banner page displays, press Enter to continue.
4. From the main SCU menu, highlight “Step 3: Change Configuration
Settings,” and press Enter.
5. Specify an administrative boot/configuration password. If the password
has not been specified, you may press Esc when prompted to bypass this
password, or you may specify a new password. This password may be
disabled from the System Board setup screen.
Note: Except for EISA and ISA cards, no board names are used, but are
referenced by class name (for example “PCI SCSI Device”), PCI “Bus
number,” and “Dev letter.”
The device scan order, as specified in the NCR S46 Server User Guide,
can help you determine which specific vendor card occupies which PCI
slot.
“PCI Undefined Device” denotes the INCA (Interrupt and Control ASIC)
chip which arbitrates bus and control handshaking, and can be enabled to
check such things as: internal voltages, temperature, fan failures, and
chassis intrusion.
1-14
Installing Windows NT Server 3.51
Performing a Full Installation
6. Highlight “System Board” and press Enter.
–
Under “MP Spec Version” (Systems Group), verify that “MP Spec
V1.4” is selected.
– Under “Secondary I/O APIC Control Option” (System Performance),
verify “Disable Secondary IOAPIC” is listed.
– Under “PCI System Error Detection” (Management Subsystem
Group), verify “PCI System Error Detect” is Disabled.
– Under “Shadowing ISA ROMs Options” (Memory Subsystem
Group), verify that all memory regions are “Enabled” except for
regions allocated as “shared memory” (memory shared between the
adapter and the system, such as on the EiconWAN adapter or the
Server Monitor Module) or regions assigned as memory-mapped I/O.
An adapter’s memory assignments can be viewed from the Global
Resources Map in the SCU.
Note: ROM Shadowing is automatically disabled for an adapter whose .CFG
file contains the string “CACHE=NO” in its memory references.
–
Under “Extended Memory Options” (Memory Subsystem Group),
verify that “Cache Mode” is set to “Enable” and that “1MB ISA Hole
Control” is set to “Disable.”
– Set the On-Board Communications Devices as follows, if necessary:
– Serial Port 1 Configuration: COM1:3F8h -IRQ4
– Serial Port 2 Configuration: COM2:2F8h -IRQ3
– Parallel Port Configuration: LPT1:378h - IRQ7
When all of the options on this System Board screen have been set, press
Esc to return to the previous screen.
7. Highlight each of the listed devices, and press Enter.
–
–
Ensure that the IRQ, port address and I/O address for the device are
not in conflict with any other device on the system. Conflicts are
typically detected by the SCU automatically.
Ensure that any device-specific configuration options are set
correctly. For example, for network cards with multiple connectors,
specify the connector type as appropriate for your system.
Installing Network Operating System
1-15
Performing a Full Installation
Highlighting a PCI entry and pressing Enter displays the “Enabled:
Current Configuration” option by default. To change the device’s IRQ
assignment, press Enter to change to “Enabled: Manual Configuration.”
Press F6 which enables you to change “Resources.”
CAUTION: Pressing F6 when “Enabled: Manual Configuration” is selected
causes the current PCI device resource assignments to change.
8. When all devices have been examined and configured to your satisfaction,
press Esc to return to the SCU main menu. Choose “Step 4: Save
Configuration” before exiting to save changes you have made.
9. If you want to obtain a printed copy of your configuration, select “Step 5:
View Switch /Jumper Settings,” then press Enter to continue. Press F7 to
specify the output destination.
10. After the changes have been saved, select “Step 6: Exit” and press Enter
as necessary to return to the Diagnostic Partition menu.
Note: If you choose “Step 6: Exit” without saving your changes, the system
prompts you to save before exiting. You must then back out and choose “Step
4: Save Configuration.”
11. Create backup diskettes of the System Configuration Utility and BIOS
flash utility.
–
To create a copy of the SCU utility, select “System Config Utils”
from the main menu, select “Create SCU Backup,” and press Enter.
– To create a copy of the BIOS flash utility, select “BIOS Flash Utility”
from the main menu, select “Create Flash Backup,” and press Enter.
Note: These diskettes are to be used solely for backup purposes. You are not
authorized to copy program files, nor to use these diskettes on any other
system.
12. Remove the diskette from the floppy disk drive and press Esc to
return to the Diagnostic Partition menu.
1-16
Installing Windows NT Server 3.51
Performing a Full Installation
Configuring the Adapter Settings Using the Adaptec
BIOS SCSISelect Utility
The Adaptec BIOS SCSISelect Utility allows you to configure the SCSI AIC7880 host adapter to settings other than defaults. Select one of the options
below to start the SCSISelect utility.
•
If you have a Diagnostic Partition installed, select the “System Config
Utils”, “Adapter Config Utils” and then “SCSI-Adaptec.”
•
Boot the server and press Control + A when prompted for the SCSISelect
utility.
Chapter 6, “Configuring Adapters” of the NCR S46 Server User Guide
provides additional information on configuring adapter settings.
Note: If the system boot device is connected to one of the Adaptec SCSI
channels, then the host adapter BIOS should be enabled for that SCSI channel.
When this option is disabled, the system BIOS does not scan the Adaptec
channel for a bootable drive.
To use the Adaptec BIOS SCSISelect Utility, follow these steps:
1. Under Bus:Device, highlight the entry representing the SCSI-A adapter
and press Enter. Note that SCSI-A is denoted as “0X:0Bh -> ChA” and
SCSI-B is denoted as “0X:0Ch -> ChB” where 0X is the PCI bus number.
2. Highlight “Configure/View Host Adapter Settings,” and press Enter.
–
–
–
–
–
Under “SCSI Bus Interface Definitions,” verify that the “Host
Adapter SCSI ID” is “7” and that SCSI Parity Checking is
“Enabled.”
Under “Additional Options,” choose “SCSI Device Configuration”
and press Enter. Set the fields as specified below:
“Initiate Sync Negotiation” should normally be set to “yes” for
operating devices.
“Maximum Sync Transfer Rate” may be set to “40.0” for all SCSI
devices. This value is the default and defines the “maximum” transfer
rate. SCSI devices typically negotiate their transfer speeds.
“Enable Disconnection” should normally be set to “yes.”
Installing Network Operating System
1-17
Performing a Full Installation
–
–
“Initiate Wide Negotiation” can be left “yes”, even if “wide” SCSI is
not used.
If BIOS is enabled, you must choose to “Send Start Unit Command”
to power up drives on BIOS load of the Adaptec controller. You
should set this option to “no” for the SCSI-ID 7, which is your
controller.
3. Press Esc to return the SCSISelect Configuration Menu and select
“Advanced Configuration Options” from the “Additional Options” list.
The following fields can normally be left as the default.
–
“Host Adapter BIOS” should be set to “Enabled” if bootable drives
are attached.
– “Support Removable Disk Under BIOS as Fixed Disks” should be
“Boot Only.”
– “Extended BIOS Translation for DOS Drives > 1 GB” should be
“Enabled.”
– If desired, enable “Display <CTRL-A> Message During BIOS
Initialization.”
– “Multiple LUN Support” should be “Disabled.”
– “BIOS Support for Bootable CD-ROM” should be “Enabled.”
– “BIOS Support for Int13 Extensions” should be “Enabled.”
– “Support for Ultra SCSI Speed” should be “Enabled.”
4. Press Esc twice to return to the Options menu. If configuration changes
have been made, you are prompted to “Save Changes Made?.” Select
“Yes” to save the changes, and press Enter.
5. From the Options Menu, select “SCSI Disk Utilities” and press Enter.
–
A SCSI channel poll is performed and a current list of all devices the
controller detects is displayed.
–
You may highlight a valid choice and press Enter to view or perform
additional utilities.
Formatting a hard disk performs a low-level reinitialization, and
erases all data.
You may perform a DISK VERIFY operation.
–
–
1-18
Installing Windows NT Server 3.51
Performing a Full Installation
6. Return to the top level menu, highlight the entry representing the SCSI-B
adapter and press Enter. Repeat steps 2 through 6. Note that SCSI-A is
denoted as “0X:0Bh -> ChA” and SCSI-B is denoted as “0X:0Ch ->
ChB” where 0X is the PCI bus number.
7. When complete, press Esc until prompted to exit the Utility.
8. You must reboot at this time. Choose “Reboot System” then “Reboot”
from the Diagnostic Partition menu.
Disabling Adapter BIOS
To boot from an adapter that is lower in the scan order and also to free system
resources, use the Adaptec BIOS SCSISelect Utility to disable the adapter
BIOS as follows:
Note: The SCSI controller cannot be used as the boot controller if the BIOS
is disabled.
1. Under “Bus:Device,” highlight the appropriate entry (either channel A or
channel B, as listed) and press Enter.
2. Select “Configure/View Host Adapter Settings” and press Enter.
3. Under “Additional Options,” press Enter to choose “Advanced
Configuration Options.”
4. Go to “Host Adapter BIOS” and press Enter. Select “Disabled” and press
Enter.
5. When finished, press Esc three times to return to the Main Menu.
6. Press Esc to exit the utility. Select “Yes” when asked to exit the utility.
The system then prompts you to press any key to reboot.
Configuring the NCR PCI SCSI Adapter
If your server has a NCR PCI SCSI adapter pre-installed or you are planning
to install an NCR PCI SCSI adapter yourself, refer to the NCR PCI SCSI
Host Adapter User’s Guide BD10-4939-A for installation and configuration
information.
Installing Network Operating System
1-19
Performing a Full Installation
Installing the Operating System
To install Windows NT Server, follow these steps:
CAUTION: You must install the Diagnostic Partition before installing NT.
You cannot install the Diagnostic Partition after installing NT without having
to delete your NT partition first.
CAUTION: When installing NT, do not use the adapter drivers on the CD.
Use the adapter drivers located on diskette(s) which are supplied with the
specific adapter.
1. Insert the Windows NT Server Setup Boot diskette into the disk drive.
Power on the server. The server cycles through its Power-On Self Tests
(POST), and prompts you to boot to the Diagnostic Partition or to boot
through the normal boot path. Press Enter to boot to the normal boot
path to begin installing Windows NT Server.
2. When you are prompted to insert the Windows NT Server Setup diskette
2, insert the diskette, and press Enter.
3. Windows NT Server Setup gives you several options, including the option
to setup Windows NT now. To select this option, press Enter.
4. You are prompted to select whether you want to perform an Express
Setup or a Custom Setup. Press C to select Custom Setup.
Note: Custom setup should be selected because the default drivers on the NT
3.51 installation media are not the latest versions. Please use the drivers
provided on diskette(s) which are supplied with the specific adapter and NOT
the default drivers on the NT 3.51 installation media.
5. Press S to skip mass storage device detection then S again to specify the
mass storage devices.
6. Select “other” from the list, then insert the diskette labeled “Adaptec 7800
Family Manager” and press Enter.
7. Select “Adaptec AHA-2940/AIC 78xx (PCI) NT v3.5x”, using the arrow
keys, and press Enter.
8. If you have a Mylex DAC960PL Disk Array Adapter installed in your
system, press S to install its drivers.
1-20
Installing Windows NT Server 3.51
Performing a Full Installation
9. Select “other” from the list, then insert the “Mylex DAC960 Software Kit
Version 1.02” diskette and press Enter.
10. Select “DAC960 NT SCSI Driver”, using the arrow keys, and press
Enter.
11. Once all mass storage devices are installed, press Enter.
12. You are prompted to insert the Windows NT Server Setup diskette 3.
Insert the diskette, and press Enter to continue the installation. A
message may appear alerting you that one or more of your hard disks may
actually be larger than the size for which it is currently configured. Press
Enter to continue.
13. NT setup asks whether you want to install from the CD ROM or from the
3.5” diskette drive. If you have not already done so, insert the Windows
NT Server installation CD ROM into the CD ROM drive. Press Enter.
The system hardware and software components are displayed.
14. Make changes to the system hardware and software components if
necessary, then press Enter to continue. A screen will appear displaying
existing partitions and spaces available for creating new partitions.
CAUTION: The Diagnostic Partition created earlier is identified as “EISA
Utilities.” Do NOT delete this partition, but rather create a new partition for
NT in the available space.
CAUTION: Regardless of the drive onto which you choose to install
Windows NT, certain files are placed on the left-most disk drive on the top
plane (the disk drive with the lowest SCSI ID, referred to as C:) to allow the
operating system to boot properly. Microsoft recommends that this disk drive
be a permanent disk drive; not a hot-swappable one. It is recommended that
you install Windows NT on the first disk drive (C:), or that you do not remove
the first disk drive while the system is operating, especially during system
startup.
15. If you want to partition an area of unpartitioned disk space, highlight the
area, press “C,” and indicate the size of the partition to be created. If you
want to use the entire unpartitioned space, press Enter.
16. Select the New (Unformatted) partition just created and press Enter.
Installing Network Operating System
1-21
Performing a Full Installation
17. Next, select the file system you want to use. You are given the option to
format the disk as FAT or NTFS. Select the option you prefer, and press
Enter.
Setup formats the partition as you have chosen. Formatting the partition
may take from a few minutes to a few hours, depending upon the size of
the partition and the type of disk and controller in your system.
18. After the formatting is complete, you are prompted for the name of the
directory where Windows NT Server will be installed. Enter the name of
the directory or accept the default directory and press Enter.
19. Allow Setup to perform an exhaustive secondary examination of your
hard disk(s) by pressing Enter.
20. You are prompted to insert diskettes for any drivers which you loaded
from those diskettes. Follow the prompts as they appear.
21. Files are copied onto your hard disk from the installation CD ROM. Upon
completion of file copying, you are informed that the current portion of
setup has completed successfully, and that you should remove any
diskettes and press Enter. (Do not remove the installation CD.)
WARNING: Contrary to the instructions on the screen, WAIT several
minutes or until disk drive activity ceases before pressing Enter. If you do
not wait, the server’s caching disk controller may not have enough time to
complete all writing operations, and your system disk may not be installed
correctly.
Your system reboots, and you are automatically taken into Windows NT
Server.
Completing the User/ Server Information
Continue the installation by completing user and server specific information:
1. When prompted for your name and company name, complete the
information and choose “Continue.” You can change these entries if you
enter incorrect information. When the entries are correct, choose
“Continue.”
1-22
Installing Windows NT Server 3.51
Performing a Full Installation
2. Enter the product ID when prompted. You can change this entry if you
enter incorrect information. When the entry is correct, choose “Continue.”
The Windows NT Server Security Role dialog box appears.
3. Select whether your server is to be a Domain Controller, or a Server.
Select the appropriate button, and choose “Continue.”
4. Indicate whether your server software license has been purchased on a
“Per Server” or a “Per Seat” basis. Select the appropriate box, enter the
total number of licenses purchased if necessary, and choose “Continue.”
5. To verify that you have read, understand, and agree to abide by the
licensing agreement, select the box next to the sentence which begins “I
Agree” and then choose “OK.”
6. To specify your server’s unique name, enter the name, and choose
“Continue.”
CAUTION: Be sure that the system name that you select does not contain
spaces, commas, or any of the following characters: = + * ? > < | “ / , ; : { } [
]
7. You are given the opportunity to change the name you have selected.
When your entry is correct, choose “Continue.”
8. You are asked to select the language for your server. Selecting the
language for your server also determines the initial settings for currency,
date, time, etc. Select the language to be used, and choose “Continue.”
9. You are asked to specify the optional tasks for Setup to perform. Select
“Continue” to allow Setup to perform all selected tasks.
10. You are asked to specify the optional components to be installed. Select
“Continue” to install all selected optional components.
11. If you chose to install a printer, Setup prompts you to select the name of
the printer, the printer driver to use, and the port to be printed to. Choose
“Continue.” If you do not want to set up a printer at this time, select
“Cancel”, and then choose “OK.”
12. The installation procedure tries to identify the type of network interface
card installed on your server. Choose “Do not Detect” when the Network
Adapter Card Detection dialog box appears.
Installing Network Operating System
1-23
Performing a Full Installation
Note: “Do not Detect” is chosen to prevent the installation of incompatible
drivers from the NT 3.51 installation media. The NT drivers included with the
documentation kit for the adapter should be used to ensure that the correct
driver is installed.
13. Choose “Continue” to pick a network card manually. The Add Network
Adapter dialog box appears.
14. Choose “other” from the Network Adapter Card pull down list and press
“Continue.”
15. Insert the driver diskette(s) requested, press Enter, and follow the screen
prompts as necessary. Setup will copy files to the hard drive.
Selecting the Network Protocols
Continue the installation by selecting network protocols:
1. The Windows NT Server installation procedure prepares your available
choices for network protocols.
You may choose any of the protocol (NW LINK IPX/SPX), TCP/IP, or
NetBEUI. When you have selected all of the protocols you want to install,
choose “Continue.”
2. The services you selected begin to install. If you selected IPX/SPX, you
are prompted to select the frame type for the protocol. You may select
“Automatic” or “Manual Frame” type detection. If you select “Manual”
detection, you are prompted to select from among the frame types shown.
When you have finished, choose “OK.”
3. If you chose to install TCP/IP, select additional TCP/IP installation
components, select “Continue”, and follow the screen prompts as
necessary.
4. When finished installing network components, select “OK.” You can
make network component changes later through the Control Panel if
necessary.
5. Configure the parameters for the TCP/IP transport. Your network
administrator should be able to give you the information you need to
configure this service.
1-24
Installing Windows NT Server 3.51
Performing a Full Installation
6. If you did not complete the WINS address field in the preceding screen,
you may get a message indicating that “At least one of the adapter cards
has an empty Primary WINS address.” If you see this message, choose
“Yes” to continue.
7. Installation of the network components continues.
–
If you previously indicated that this system is to be a Domain
Controller, you need to specify a Primary Domain Controller or a
Backup Domain Controller. Select the appropriate choice, complete
the name of the Domain in the blank provided, and choose “OK” to
continue.
CAUTION: Do not include spaces or backward slashes in the domain name.
When you have finished, choose “OK.”
–
If you previously indicated that you want this system to be a Server,
you are prompted to specify the domain or workgroup this system will
join and choose “OK.”
Providing Additional Setup Information
Continue the installation by providing the following information.
1. The installation process sets up program groups and icons for your
system. You are prompted to enter the name and password for your
Administrator. You need to enter the password twice. When you have
finished, choose “Continue.” If the password is left blank, you are
prompted to confirm that you do not want to specify a password for your
Administrator. Leaving the password blank is not recommended, because
without a password, anyone who has physical access to the system can
gain full control of your system.
2. If you wish to setup a local account, enter a username and password.
When you have finished, choose “Continue.” If you do not want to setup a
local account, press Cancel. You can add a local account later using the
User Manager.
3. You are now asked to specify virtual memory settings. Make changes to
the virtual memory settings or accept the default settings and press
“Continue.”
Installing Network Operating System
1-25
Performing a Full Installation
4. Select the path or driver you want Setup to search then press “Search
Now” to enable Setup to search for existing applications.
5. Setup may prompt you for the names of some program files found on your
system. If prompted, choose the appropriate applications, and select
“Continue.” If you do not know what application is referenced, it is
generally best to choose “None of the Above,” and choose “Continue.”
6. Select “Add All” and choose “Continue” to setup applications.
7. The installation program prompts you to enter the current date, time, and
time zone. After all items have been entered, choose “OK.”
8. The video adapter detected by the installation process displays. Select
“OK” to confirm the selection.
9. Select the video driver configuration, including the resolution, number of
colors, and scan rate.
After you have chosen the desired parameters, select TEST to make sure
the video displays the resolution correctly. A pop-up screen informs you
that the test is about to begin. Select “OK” to confirm.
Your screen’s resolution is set to match the parameters you have selected.
After approximately five seconds, the screen returns to the previous
resolution and you are asked whether the test displayed properly. If so,
select “Yes” to continue the installation. If not, select “No”, return to the
test screen and specify different parameters for the video test. When the
test displays appropriately, choose “OK” to save the settings.
10. You are asked if you want to create an Emergency Repair Disk. NCR
strongly recommends creating an Emergency Repair Disk.
11. Select “Yes” to create an Emergency Repair Disk. You are prompted to
insert a blank high-density diskette into the drive. Select “OK” when you
have inserted the diskette. The disk is formatted, and appropriate files are
copied to it.
Completing the Installation
To complete the installation, follow these steps:
1-26
Installing Windows NT Server 3.51
Performing a Full Installation
1. You are prompted that the Windows NT installation is complete. Remove
all media from their respective drives.
WARNING: Contrary to the instructions on the screen, WAIT three to
five minutes before selecting Restart Computer. If you do not wait, the
server’s caching disk controller may not have enough time to complete all
writing operations, and your system disk may not be installed correctly.
2. The system reboots, and if you selected the NTFS file system for any
volume on your system, the file system is automatically converted to
NTFS at this time.
3. If a Mylex controller is installed on the system and you wish to monitor
and control this device, copy the DACMON.EXE and DACADM.EXE
from the Mylex driver diskette to the \WINNT\SYSTEM32 directory. For
the Startup Program Group, create a Program Item icon for
DACMON.EXE. This utility will run as an icon and report all Mylex
errors to the Event Log (application log). Refer to the Mylex DAC960
Software Kit documentation for additional information.
At this point the installation of Windows NT Server is complete. You can now
install application software such as NCR Server Manager which is on the
NCR ValuePlus CD for BackOffice provided with your server.
Installing Network Operating System
1-27
Reinstalling Windows NT Server
Reinstalling Windows NT Server
If you need to reinstall the Windows NT Server Operating System, perform
the procedures presented in this section. The following circumstances will
require you to perform a reinstallation:
–
You need to install the Diagnostic Partition on a disk that currently
has NT installed
– Your disk has crashed and you need to replace it
– You want to expand the size of your NT partition
– You want to change the type of SCSI Controller in use
Before beginning the procedures in this section you will need a copy of each
book listed below.
•
NCR S46 User Guide (BST0-2142-38)
• NCR S46 Service Guide (BST0-2142-39)
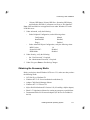
Table 1-2 lists procedures that must be performed to reinstall NT.
Table 1-2. Procedures to Reinstall Windows NT Server
Step
Procedure
Reference
1
Identify a target disk for
the root partition
“Identifying a Target Disk” subsection in this
section.
2
Install a tape device to
backup the root disk
“Installing a Tape Device” subsection in this
section.
3
Back up the files on the
root disk
“Backing Up NT” subsection in this section.
4
Reformat the target disk
(for expanding the size
of your NT partition or
changing the type of
SCSI Controller in use)
If you are using a Mylex Controller, refer to
“Configuring the Disk Arrays Using the Mylex
DAC960PL Adapter” under the section
“Performing a Full Installation.”
Install the Diagnostic
Partition
NCR S46 Server User Guide; Chapter 3,
“Hardware Related Utilities and Applications”
5
1-28
If you are using an Adaptec Controller, refer
to the “Formatting the Hard Drive Using the
SCSISelect Utility” subsection under this
section.
Installing Windows NT Server 3.51
Reinstalling Windows NT Server
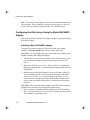
Step
Procedure
Reference
6
Re-install NT on the
target disk (during the
re-installation, you will
select the partition size)
Perform the appropriate procedures found in
the section “Performing a Full Installation.”
7
Restore the backup files
from tape onto the new
root partition
“Restoring Backups” subsection in this
section.
Identifying a Target Disk
The first step in reinstalling NT is to identify a target disk for the root
partition. The target disk should have either the same or a greater capacity
than the drive being restored.
Installing a Tape Device
To install the tape device, follow these steps:
1. Login to Windows NT.
2. Select “Windows NT Setup” from the Main program folder. A Windows
NT Setup window displays.
3. Select “Add/Remove Tape Device” under the Options menu. A Tape
Device Setup window displays.
4. Select “Add.”
5. Choose the tape device from the device pull-down list and select Install. If
the tape device is not listed, select the other item, insert appropriate media
with proper tape device driver, and choose “OK.”
6. Insert the Window NT Server Installation CD in the CD ROM drive and
choose “Continue.” The tape device is installed.
7. Close the Tape Device Setup window then exit the Windows NT Setup
window.
8. Select “OK” when the Setup message displays. This message reminds you
to restart the computer.
Installing Network Operating System
1-29
Reinstalling Windows NT Server
9. Shutdown and restart the system.
10. Login to Windows NT.
Backing Up NT
To backup NT Server, follow these steps
1. Open the Backup utility from the Administrative Tools program folder.
2. Indicate that you want to backup the Operating System by selecting the
drives that contain all the NT system files, and select “Backup.”
3. Press the Backup button then indicate that you want to backup the NT
Registry by selecting “Backup Registry” in the Backup Information
window.
4. Indicate that you want to verify backup by selecting the “Verify After
Backup” check box.
5. Give a description of this backup, in the “Description” text box under the
Backup Set Information section, since more logical drives may be backed
up on this tape.
6. If you want to replace all data on the tape, choose “Replace.” Choose
“Append” to append to an existing backup set.
7. Insert a tape into the tape drive and choose “OK.” The backup status
window displays. When the backup is complete, the Backup Utility
verifies the backup.
8. Select “OK” in the Setup Message window when the Backup Utility is
finished verifying the backup.
9. Repeat step 1 through 7 for all logical drives on that disk. Append these
backups to the tape. Do not replace any existing backups.
10. Select the exit item under the Operation menu in the NT Setup window.
1-30
Installing Windows NT Server 3.51
Reinstalling Windows NT Server
Formatting the Hard Drive Using the SCSISelect Utility
This procedure is used to perform a low level format of the entire disk if you
are using an Adaptec Controller. It is only to be used if you want to expand
the size of your NT partition or you want to change the type of SCSI
Controller in use. Should you require additional information on configuring
adapter settings, refer to “Configuring the Adapter Settings Using the Adaptec
BIOS SCSISelect Utility” under the section “Performing a Full Installation.”
1. Reboot the server and press Control + A when prompted to invoke the
SCSISelect Utility.
2. Under Bus:Device, highlight the appropriate entry (either 1st or 2nd
adapter as listed), and press Enter. Note that SCSI-A is denoted as
“01:0Bh -> ChA” and SCSI-B is denoted as “01:0Ch -> ChB.”
3. Highlight “SCSI Disk Utilities” and press Enter.
4. Highlight the target disk to be reformatted and press Enter. You are
prompted to format the disk or verify the disk media.
5. Highlight the Format Disk option and press Enter. A red warning
message will appear informing you that the drive is about to be low
level formatted and all data on the disk will be erased.
6. Highlight the “Yes” option and press Enter. You are asked to confirm
your decision to format the disk.
7. Highlight the “Yes” option and press Enter. A message appears
indicating how long the formatting operation may take.
8. Once the Formatting Complete message appears, press Enter then press
Esc and follow the prompts to exit the Utility as necessary.
9. Insert the NCR S46 Server Platform CD in the CD-ROM drive and reboot
the server.
Installing Network Operating System
1-31
Reinstalling Windows NT Server
Restoring Backups
To restore backups, follow these steps:
1. Install a tape device by performing all steps in the “Installing a Tape
Device” section.
2. Login to Windows NT.
3. Open the Backup utility from the Administrative Tools program folder.
4. Insert the tape into the tape drive.
5. Choose “Catalog” from the Operations menu to find out all the backup
sets on the tape. The Catalog window displays. You can view the
description to see which drive this set should go on.
6. Invoke the Tapes window and indicate the backup set you want to restore
first by selecting the desired check box.
7. Select Restore. A Restore Information pop up menu displays.
8. Indicate the drive on which the NT files are to be restored by selecting a
drive option under Restore to Drive.
9. Select the Restore Local Registry check box.
10. Select the Verify After Restore checkbox.
11. Press Enter. A Confirm File Replace message displays prompting you to
replace the NT files on disk with files on backup.
12. Select “Yes to All” when presented. The backup files are copied to the
hard drive, and then verified. You will then be notified that “The active
files restored will not become usable until the computer is restarted.”
13. Select “OK” to continue. The verify status checkbox will then be
displayed. After verification is complete, select “OK.”
14. Shutdown and restart the system so active files will become available.
1-32
Installing Windows NT Server 3.51
Chapter 2
Installing Windows NT Server
4.0
The following sections provide information on installing or re-installing
Microsoft Windows NT Server 4.0 on your system.
Before installing or re-installing the operating system, use the table below to
determine which section to refer to.
If ...
Then refer to...
Windows NT Server was preloaded at the factory
“Completing a Factory Installation”
Windows NT Server was not
pre-loaded at the factory
“Performing a Full Installation”
Before beginning to install your operating system, you should read the
introductory sections of the Microsoft Start Here, Basics and Installation
Guide for Microsoft Windows NT Server.
Installing Network Operating System
2-1
Completing a Factory Installation
Completing a Factory Installation
If your system was pre-loaded at the factory with Microsoft Windows NT
Server 4.0, you need to complete the installation by providing some sitespecific configuration information.
Before beginning, get the copy of the Microsoft Start Here, Basics and
Installation Guide for Microsoft Windows NT Server that came with your
server, because you will use it during the procedure.
To complete the factory installation:
•
Identify information required to complete the installation
•
Complete User/Server Information
•
Configure the Network
•
Complete the Installation
•
Install Service Packs
•
Install Server Manager
Note: Before beginning to install, confirm that the mouse and keyboard are
plugged into the correct receptacles in the back of the server, and that the
server is connected to the network onto which it will be installed.
Identify Information
You must answer several questions correctly to complete the installation of
Windows NT Server. If you do not answer these questions correctly, you
might have to re-install the operating system.
2-2
Installing Windows NT Server 4.0
Completing a Factory Installation
Make sure you have the following information before continuing with the
operating system installation:
•
Name of your domain or workgroup
•
Unique name of this system
•
Whether the system is to be a Primary Domain controller (PDC), a
Backup Domain Controller (BDC), or a non-Domain Controller.
Complete User/Server Information
Continue the installation by completing user and server specific information.
Go to the Start Here, Basics and Installation Guide for Microsoft Windows
NT Server manual, Chapter 6, “Entering Your Personal Information,” and
enter the specific information about your business.
Configure the Network
The installation procedure now prepares to configure the network on your
system by searching for the network card.
Go to the Start Here, Basics and Installation Guide for Microsoft Windows
NT Server manual, Chapter 7, “Connecting to the Network” and configure the
network.
Complete the Installation
You are informed that the Windows NT installation is almost complete.
Remove all media from their respective drives.
Go to the Start Here, Basics and Installation Guide for Microsoft Windows
NT Server manual, Chapter 8, “Finishing Installation” and complete the
section.
The pre-loaded installation of Windows NT Server is complete.
Installing Network Operating System
2-3
Completing a Factory Installation
Install Service Packs
Microsoft fixes to NT are provided through Service Packs. The latest service
packs recommended for installation on your server can be found in the
following directory:
C:\SRV_PACK
Go to this directory and read the “readme.txt” file for installation instructions.
Future updates to the service packs are available from the Microsoft web page
(www.microsoft.com).
Additional information on service packs can be obtained from the General
Purpose Computing Global Support Center at 1-800-GOWINNT.
Install Server Manager
The Server Manager application can be installed from the "NCR ValuePlus
For BackOffice CD" included with your server. Installation documentation is
provided with the CD – NCR ValuePlus CD for BackOffice Installation and
Product Overview.
2-4
Installing Windows NT Server 4.0
Performing a Full Installation
Performing a Full Installation
If Windows NT Server was not pre-loaded on your server at the factory, use
this section to prepare your system and install the software.
To perform the procedures in this section you need the following server
manuals.
•
NCR S46 Server User Guide
BST0-2142-38
•
NCR S46 Service Guide
BST0-2142-39
•
Start Here, Basics and Installation Guide for Microsoft Windows NT
Server
•
NCR PCI SCSI Host Adapter User’s Guide (if installed)
The following table list procedures that must be performed to complete a full
installation:
Step
Procedure
Reference
1
Confirm hardware setup
“Confirm Hardware Setup” subsection.
2
Confirm CMOS configuration
“Confirm CMOS Configuration”
subsection.
3
Obtain Necessary Media
“Obtain Necessary Media” subsection.
4
Configure Disk Arrays using
the Mylex DAC960PL Adapter
“Configure Disk Arrays Using the Mylex
DAC960PL Adapter” subsection.
5
Install the Diagnostic Partition
NCR S46 Server User Guide; Chapter
3, “Hardware Related Utilities and
Applications”
6
Configure the server using the
System Configuration Utility
(SCU)
“Configure the Server Using the
System Configuration Utility (SCU)”
subsection.
7
Configure adapter settings
using the Adaptec BIOS
SCSISelect Utility
“Configure Adapter Settings Using the
Adaptec BIOS SCSISelect Utility”
subsection.
Installing Network Operating System
2-5
Performing a Full Installation
Step
Procedure
Reference
8
Configure PCI SCSI Adapter
If your server has an NCR PCI SCSI
adapter pre-installed or you are
planning to install an PCI SCSI
adapter yourself, refer to the NCR PCI
SCSI Host Adapter User’s Guide for
installation and configuration
information.
9
Install Operating System
“Install Operating System” subsection.
and Microsoft’s Start Here, Basics and
Installation Guide for Microsoft
Windows NT Server.
Caution: You must install the
Diagnostic Partition before installing
NT. You cannot install the Diagnostic
Partition after installing NT without
having to delete your NT partition first.
10
Install Service Packs
The service packs are available from
the Microsoft web page
(www.microsoft.com).
Additional information on service packs
can be obtained from the General
Purpose Computing Global Support
Center at 1-800-GOWINNT.
For additional information about installing Windows NT, refer to the
Microsoft Start Here, Basics and Installation Guide for Microsoft Windows
NT Server.
Confirm Hardware Setup
Before beginning to install, confirm the following hardware requirements:
•
Ensure all Hot pluggable SCSI devices are not manually set to an ID.
Ensure drives are firmly seated in the hot-docking backplane.
Note: SCSI ID’s within the Hot Dock are dynamically configured by drive
location. Drive termination is provided by the hot-docking backplane.
2-6
Installing Windows NT Server 4.0
Performing a Full Installation
•
Ensure all bus cards are seated properly in the system. For maximum
performance, use EISA or PCI cards, not ISA cards.
•
Ensure that the boot disk is in the correct slot (top left position in the
primary SCSI hot-docking backplane)
Confirm CMOS Configuration
Use the BIOS setup Utility to confirm the CMOS configuration as follows.
1. Reboot your system and press F1 when prompted to access the BIOS
Setup.
2. Under Main, verify the following:
–
–
–
Correct System date and System time
Floppy Options parameter is set to “1.44/1.25 MB 3-1/2”.
Primary IDE Master, Primary IDE Slave, Secondary IDE Master,
and Secondary IDE Slave parameters are all set to “Not Installed.”
Note: IDE hard disks are not supported for use under Windows NT on the
Server.
3. Under Advanced, follow these steps:
–
Under Peripheral Configuration, set the following values:
Configuration Mode:
Manual
Standard IDE Interface:
Disabled
Floppy Interface:
Enabled
–
Under Advanced Chipset Configuration, verify the following values:
MPS Version:
Second I/O APIC:
PERR Mode
1.4
Disabled
Disabled
4. Under Security, follow these steps:
– Set User Password, if required.
– Set Administrator Password, if required.
5. Under Exit, press Enter to Exit Saving Changes.
Installing Network Operating System
2-7
Performing a Full Installation
Obtain Necessary Media
Before you begin to install Windows NT Server 4.0, make sure that you have
the following media:
•
Server Platform CD-ROM
•
Windows NT V4.0 Server Installation boot diskettes (3)
•
Windows NT V4.0 Server CD
•
Adaptec 7800 Family Manager diskette
•
Blank 3.5” High Density diskette for creating an emergency repair diskette
•
Documentation Kits for all network adapters (NT drivers are included in
the kit)
Note: NT Drivers for each adapter are delivered with the Documentation Kit
for that adapter. The kit includes the correct version of the drivers.
•
Microsoft’s Start Here, Basics and Installation Guide for Microsoft
Windows NT Server that came with your server
Configure Disk Arrays Using the Mylex DAC960PL
Adapter
Installing a Mylex DAC960PL Adapter
To prepare the system for Mylex DAC960PL Disk Array Adapter installation,
if not pre-installed at the factory, follow these steps:
CAUTION: Use a grounding strap to prevent harmful static discharge when
handling, installing and cabling host adapters.
1. Turn off the power to the console and the system. Disconnect the system
power cord from either the rear panel of the system or from the wall
outlet.
2. Refer to the NCR S46 Server Service Guide, Chapter 5, “Servicing AddIn Boards,” for information about inserting and removing add-in boards.
2-8
Installing Windows NT Server 4.0
Performing a Full Installation
3. Install the Mylex DAC960PL adapter in Slot 1 of PCI Bus 1 (third PCI
slot from bottom, marked as P4) as instructed in the Mylex DAC960PL
Disk Array Controller User’s Manual and the NCR S46 Server Service
Guide. If there are multiple Mylex DAC960PL RAID controllers in the
system, make sure that the bootable drive is connected to the top Mylex
controller.
CAUTION: Do not install the Mylex adapter into an EISA slot. Attempted
installation into an EISA slot will damage the adapter board.
4. Refer to Chapter 6 “Configuring Adapters” in the NCR S46 Server User
Guide for cabling your Mylex Disk Array Adapter.
5. Connect the desired disk drives to the Mylex DAC960PL Adapter.
Internal drives are automatically terminated correctly by the Hot-docking
backplane in the Server. See the NCR S46 Server User Guide for more
details on the SCSI layout.
6. Make sure, that the CD ROM and tape drives are connected to the narrow
SCSI cable and to the on-board SCSI Channel B (marked as “SCSI B”).
Configure RAID Disks
To configure RAID Disks, follow these steps:
1. If there are disk drives connected to both the on-board Adaptec controllers
and the Mylex controllers, decide which disk you want to install the
operating system on. The operating system should be installed only on
hard disk drives connected to Adaptec controller A (SCSI A) or to the
Mylex controller on PCI BUS 1, Slot 1 (P4) or to the top Mylex controller
if multiple Mylex controller are in the system.
2. If you want to install the operating system to an array connected to the
Mylex DAC960PL Adapter, make sure of the following:
–
The Mylex BIOS is “enabled” – viewable during Power On Self Test
(POST) sequence. With multiple Mylex cards, the first Mylex card
must be the boot controller.
If you want the operating system installed on the Adaptec, make sure of
the following:
–
The BIOS is “enabled” for the Adaptec controller.
Installing Network Operating System
2-9
Performing a Full Installation
3. Boot to the Diagnostic Partition and run Utilities and Diagnostics.
4. Select “System Config Utils” – “Adapter Config Utils” – “RAID Mylex”
and press Enter. Follow the directions in the User Guide to configure disk
arrays. Also referencing the DAC960PL Disk Array Controller User’s
Guide, if necessary.
5. For best performance, configure the operating system disk(s) as RAID 1
or RAID 6. Other disks should be configured to match the application,
normally as RAID 5. If desired, leave one disk as a hot standby.
Special Considerations
•
If more than one Mylex Disk Array adapter is used, install additional
adapters in PCI slots lower in the scan order. Additional Mylex adapters
can be used for external disk expansion cabinets.
•
An external disk (JBOD Single-ended configuration) expansion cabinet
attached to a second Mylex adapter must have proper SCSI termination at
the end of each SCSI bus.
Install the Diagnostic Partition
Refer to the NCR S46 Server User Guide, Chapter 4 for complete instructions
for installing the Diagnostic Partition.
Configure the Server Using the System Configuration
Utility (SCU)
Follow the procedure below to configure the server using the SCU. Refer to
Chapter 5, “Configuring Your Server” of the Server User Guide for additional
information on the System Configuration Utility.
1. At system startup, press D when prompted, to boot to the Diagnostic
Partition.
2. At the MS-DOS startup menu press Enter to select “Run Utilities and
Diagnostics”.
2-10
Installing Windows NT Server 4.0
Performing a Full Installation
3. From the Diagnostic Partition Main Menu select “System Config Utils,”
and then select “Execute SCU.” When the blue System Configuration
Utility banner page displays, press Enter to continue.
4. From the main SCU menu, highlight “Step 3: Change Configuration
Settings” and press Enter.
5. Specify an administrative boot/configuration password. If the password
has not been specified, you may press Esc when prompted to bypass this
password, or you may specify a new password. This password may be
disabled from the System Board setup screen.
Note: Except for EISA and ISA cards, no board names are used, but are
referenced by class name (for example “PCI SCSI Device”), PCI “Bus
number,” and “Dev letter.”
The device scan order, as specified in the Server User Guide, can help you
determine which specific vendor card occupies which PCI slot.
“PCI Undefined Device” denotes the INCA (Interrupt and Control ASIC) chip
which arbitrates bus and control handshaking, and can be enabled to check
such things as: internal voltages, temperature, fan failures, and chassis
intrusion.
6. Highlight “System Board” and press Enter.
–
–
–
–
MP Spec Version (Systems Group) – verify that “MP Spec V1.4” is
selected.
Secondary I/O APIC Control Option (System Performance) –verify
“Disable Secondary IOAPIC” is listed.
PCI System Error Detection (Management Subsystem Group) –
verify “PCI System Error Detect” is Disabled.
Shadowing ISA ROMs Options (Memory Subsystem Group) – verify
that all memory regions are “Enabled” except for regions allocated as
“shared memory” (memory shared between the adapter and the
system, such as on the Eicon WAN adapter or the Server Monitor
Module) or regions assigned as memory-mapped I/O. An adapter’s
memory assignments can be viewed from the Global Resources Map
in the SCU.
Installing Network Operating System
2-11
Performing a Full Installation
Note: ROM Shadowing is automatically disabled for an adapter whose .CFG
file contains the string “CACHE=NO” in its memory references.
–
–
Extended Memory Options (Memory Subsystem Group) – verify that
“Cache Mode” is set to “Enable” and that “1MB ISA Hole Control”
is set to “Disable.”
Set the On-Board Communications Devices as follows, if necessary:
Serial Port 1 Configuration:
COM1:3F8h -IRQ4
Serial Port 2 Configuration:
COM2:2F8h -IRQ3
Parallel Port Configuration:
LPT1:378h - IRQ7
When all of the options on this System Board screen have been set, press
Esc to return to the previous screen.
7. Highlight each of the listed devices, and press Enter.
–
Ensure that the IRQ, port address and I/O address for the device are
not in conflict with any other device on the system. Conflicts are
typically detected by the SCU automatically.
– Ensure that any device-specific configuration options are set
correctly. For example, for network cards with multiple connectors,
specify the connector type as appropriate for your system.
Highlighting a PCI entry and pressing Enter displays the “Enabled:
Current Configuration” option by default. To change the device’s IRQ
assignment, press Enter to change to “Enabled: Manual Configuration.”
Press F6 which enables you to change “Resources.”
CAUTION: Pressing F6 when “Enabled: Manual Configuration” is selected
causes the current PCI device resource assignments to change!
8. When all devices have been examined and configured to your satisfaction,
press Esc to return to the SCU main menu. Choose “Step 4: Save
Configuration” before exiting to save changes you have made.
9. If you want to obtain a printed copy of your configuration, select “Step 5:
View Switch /Jumper Settings,” then press Enter to continue. Press F7 to
specify the output destination.
10. After the changes have been saved, select “Step 6: Exit” and press Enter
as necessary to return to the Diagnostic Partition menu.
2-12
Installing Windows NT Server 4.0
Performing a Full Installation
Note: If you choose “Step 6: Exit” without saving your changes, the system
prompts you to save before exiting. You must then back out and choose “Step
4: Save Configuration.”
11. Create backup diskettes of the System Configuration Utility and BIOS
flash utility.
–
To create a copy of the SCU utility, select “System Config Utils”
from the main menu, select “Create SCU Backup” and press Enter.
– To create a copy of the BIOS flash utility, select “BIOS Flash Utility”
from the main menu, select “Create Flash Backup”, and press Enter.
Note: These diskettes are to be used solely for backup purposes. You are not
authorized to copy program files, nor to use these diskettes on any other
system.
12. Remove the diskette from the floppy disk drive and press Esc to return to
the Diagnostic Partition menu.
Configure Adapter Settings Using the Adaptec BIOS
SCSISelect Utility
The Adaptec BIOS SCSISelect Utility allows you to configure the SCSI AIC7880 host adapter to settings other than defaults. Select one of the options
below to start the SCSISelect utility.
•
If you have a Diagnostic Partition installed, select the “System Config
Utils”, “Adapter Config Utils” and then “SCSI-Adaptec”
•
Boot the server and press Control + A when prompted for the SCSISelect
utility
Chapter 7, “Configuring Adapters” of the Server User Guide provides
additional information on configuring adapter settings.
Note: If the system boot device is connected to one of the Adaptec SCSI
channels, then the host adapter BIOS should be enabled for that SCSI channel.
When this option is disabled, the system BIOS does not scan the Adaptec
channel for a bootable drive.
To use the Adaptec BIOS SCSISelect Utility:
Installing Network Operating System
2-13
Performing a Full Installation
1. Under “Bus:Device,” highlight the entry representing the SCSI-A adapter
and press Enter. Note that SCSI-A is denoted as “0X:0Bh -> ChA” and
SCSI-B is denoted as “0X:0Ch -> ChB” where 0X is the PCI bus number.
2. Highlight “Configure/View Host Adapter Settings,” and press Enter.
–
SCSI Bus Interface Definitions, – verify that the “Host Adapter SCSI
ID” is “7” and that SCSI Parity Checking is “Enabled”
– Additional Options – choose SCSI Device Configuration and press
Enter. Set the fields as specified below:
– Initiate Sync Negotiation – should normally be set to “yes” for
operating devices
– Maximum Sync Transfer Rate – may be set to “40.0” for all SCSI
devices. This value is the default and defines the “maximum” transfer
rate. SCSI devices typically negotiate their transfer speeds.
– Enable Disconnection – should normally be set to “yes”
– Initiate Wide Negotiation – can be left “yes”, even if “wide” SCSI is
not used
– If BIOS is enabled, you must choose to Send Start Unit Command to
power up drives on BIOS load of the Adaptec controller. You should
set this option to “no” for the SCSI-ID 7, which is your controller.
3. Press Esc to return the SCSISelect Configuration Menu and select
“Advanced Configuration Options” from the “Additional Options” list.
The following fields can normally be left as the default.
–
–
–
–
–
–
–
2-14
Host Adapter BIOS – should be set to “Enabled” if bootable drives
are attached.
Support Removable Disk Under BIOS as Fixed Disks – should be
“Boot Only.”
Extended BIOS Translation for DOS Drives > 1GB – should be
“Enabled.”
If desired, enable “Display <CTRL-A> Message During BIOS
Initialization.”
Multiple LUN Support – should be “Disabled.”
BIOS Support for Bootable CD-ROM – should be “Enabled.”
BIOS Support for Int13 Extensions – should be “Enabled.”
Installing Windows NT Server 4.0
Performing a Full Installation
– Support for Ultra SCSI Speed – should be “Enabled.”
4. Press Esc twice to return to the Options menu. If configuration changes
have been made, you are prompted to “Save Changes Made?.” Select
“Yes” to save the changes, and press Enter.
5. From the Options Menu, select “SCSI Disk Utilities” and press Enter.
–
A SCSI channel poll is performed and a current list of all devices the
controller detects is displayed. You may highlight a valid choice and
press Enter to view or perform additional utilities.
– Formatting a hard disk performs a low-level reinitialization and erases
all data.
– You may perform a DISK VERIFY operation.
6. Return to the top level menu, highlight the entry representing the SCSI-B
adapter and press Enter. Repeat Steps 2 through 6. Note that SCSI-A is
denoted as “0X:0Bh -> ChA” and SCSI-B is denoted as “0X:0Ch ->
ChB” where 0X is the PCI bus number.
7. When complete, press Esc until prompted to exit the Utility.
8. You must reboot at this time. Choose “Reboot System” then “Reboot”
from the Diagnostic Partition menu.
Disabling Adapter BIOS
To boot from an adapter that is lower in the scan order and also to free system
resources, use the Adaptec BIOS SCSISelect Utility to disable the adapter
BIOS as follows:
Note: The SCSI controller cannot be used as the boot controller if the BIOS
is disabled.
1. Under “Bus:Device,” highlight the appropriate entry (either channel A or
channel B, as listed) and press Enter.
2. Select “Configure/View Host Adapter Settings” and press Enter.
3. Under “Additional Options,” press Enter to choose “Advanced
Configuration Options.”
4. Go to “Host Adapter BIOS” and press Enter. Select “Disabled” and press
Enter.
Installing Network Operating System
2-15
Performing a Full Installation
5. When finished, press Esc three times to return to the Main Menu.
6. Press Esc to exit the utility. Select “Yes” when asked to exit the utility.
The system then prompts you to press any key to reboot.
Configure PCI SCSI Adapter
If your server has a PCI SCSI adapter pre-installed or you are planning to
install an PCI SCSI adapter yourself, refer to the PCI SCSI Host Adapter
User’s Guide BD10-4939-A for installation and configuration information.
Install Operating System
The information presented prior to this point has been specific to your type of
server. The instructions for installing the operating system are found in the
Microsoft Start Here, Basics and Installation Guide for Microsoft Windows
NT Server.
You must install the Diagnostic Partition before installing NT. You cannot
install the Diagnostic Partition after installing NT without having to delete
your NT partition first.
CAUTION: When installing NT, use the adapter drivers located on
diskette(s) which are supplied with the specific adapter.
Go to the Start Here, Basics and Installation Guide for Microsoft Windows
NT Server manual and read Chapter 5, “Beginning Installation.”
The following notes are designed to supplement the information in the Start
Here, Basics and Installation Guide for Microsoft Windows NT Server
manual.
2-16
Installing Windows NT Server 4.0
Performing a Full Installation
•
During the initial installation phase, setup scans your computer to detect
mass storage devices, such as CD-ROM drives and SCSI adapters. You
should select “S” to install the latest versions of the drivers provided on
the diskette(s) supplied with the server. The NT 4.0 installation media
may not contain the correct version of the drivers for your system. See
the section in the Microsoft Start Here, Basics and Installation Guide for
Microsoft Windows NT Server manual “Configuring a Mass Storage
Device” section for additional details.
Use the following guidelines when performing a custom installation:
–
–
–
–
–
•
Press S to skip mass storage device detection then S again to specify
the mass storage devices.
Select “Other” from the list, then insert the diskette labeled “Adaptec
7800 Family Manager” and press Enter
If you have a Mylex DAC960PL Disk Array Adapter installed on
your system, press S to install its drivers.
Select “Other” from the list and insert the “Mylex DAC960 Software
Kit” diskette and press Enter.
Continue to press S to install additional devices as necessary
If you are reinstalling NT, it is very important that the previous steps for
system configuration (verification of BIOS settings, SCU configurations,
etc. ) are followed.
Chapter 1, “Installing Windows NT Server 3.51” is geared toward
NT 3.51, but should be reviewed for NT 4.0 reinstallations also.
Installing Network Operating System
2-17
Performing a Full Installation
Complete User/ Server Information
Continue the installation by completing user and server specific information.
Go to the Start Here, Basics and Installation Guide for Microsoft Windows
NT Server manual, Chapter 6, “Gathering Information About Your
Computer” and complete the section.
Complete the Installation
You are informed that the Windows NT installation is almost complete.
Remove all media from their respective drives.
Go to the Start Here, Basics and Installation Guide for Microsoft Windows
NT Server manual, Chapter 8, “Finishing Installation” and complete the
section.
Install Service Packs
Microsoft fixes to NT are provided through Service Packs. The service packs
are available from the Microsoft web page (www.microsoft.com).
Additional information on service packs can be obtained from the General
Purpose Computing Global Support Center at 1-800-GOWINNT.
Install Server Manager
The Server Manager application can be installed from the "NCR ValuePlus
For BackOffice CD" included with your server. Installation documentation is
provided with the CD – NCR ValuePlus CD for BackOffice Installation and
Product Overview.
2-18
Installing Windows NT Server 4.0
Chapter 3
Installing UNIXWare
Installing Network Operating System
3-1
Overview
Overview
After you have setup the system and configured it, you are ready to install the
operating system.
This chapter discusses installing UnixWare on your server.
3-2
Installing UNIXWare
Installation Overview
Installation Overview
To install UnixWare on your server, follow these steps:
•
Confirm the CMOS settings using BIOS Setup - See Chapter 5, User
Guide
•
Confirm the system settings using the System Configuration Utility - See
Chapter 4, User Guide
•
Confirm the adapter settings using the Adaptec BIOS SCSISelect Utility See Chapter 6, User Guide
•
Reboot the system and install the operating system
Installing Network Operating System
3-3
Rebooting the Server and Installing the Operating System
Rebooting the Server and Installing the
Operating System
To reboot the server, follow these steps:
1. Insert the UnixWare Application Server 2.1 Install Disk 1 of 1 disk into
the system, and boot the server.
2. Observe the SCO trademark screen.
3. At the blue Welcome screen, press Enter.
4. At the Keyboard Type screen, press Enter to select the default which is
US (ASCII), or enter the appropriate keyboard type.
5. At the System Licensing screen, enter the serial number and the activation
key.
6. Verify that the desired number of users license information is displayed.
Select Continue Installation.
Inserting the Host Bus Adapter (HBA) Driver
To insert the Host Bus Adapter (HBA) driver and continue, follow these steps:
1. Insert the SCO UnixWare Host Bus Adapter Drivers disk at the Install
Host Bus Adapter Drivers screen and press Enter.
2. The “Please wait, Loading from diskette...”message displays.
3. If using another HBA, you are prompted to enter that additional driver
disk at the “Install Another HBA Diskette” prompt. Select “Continue
Installation” with the arrow keys, and press Enter.
4. To install to a drive connected to the integrated Adaptec adapter when the
system is configured with other SCSI adapters, enter the Device
Configuration Utility (DCU). Otherwise, choose “Continue Installation,”
and skip steps 5 through 7.
5. Select Software Device Drivers, then Host Bus Adapters, and deselect all
drives except adsl, ictha, and mitsum.
3-4
Installing UNIXWare
Rebooting the Server and Installing the Operating System
6. Return to the DCU main menu, select Apply Changes, and exit the DCU.
Verify that only the adsl, ictha, and mitsum drives are loaded.
7. The “Please wait while the system hardware drivers are loaded” message
displays.
Selecting the Installation Method
To select the installation method and proceed, follow these steps:
1. At the “Select Installation Method” prompt, select Install from CD-ROM
(the default), and press Enter.
2. At the verification screen, select Yes, continue the installation, and press
Enter.
3. At the “Destructive Installation” prompt, you select how much disk space
for UnixWare to use. Select Press Enter to select “View/Change Current
Disk Configuration.”
CAUTION: The S46 minitower server comes preconfigured with a DOS
diagnostic partition. Do not delete this partition.
4. When the “Disk 1 Partitions” screen displays, use the down arrow key to
move the blinking cursor to the first unused area below the DOS partition.
Press F2. Select “Unix System” from the menu.
5. Tab to the Status column and press F2 to activate the partition.
6. Tab to the % column, and enter the percentage of the disk you want to
partition for UNIXWare.
7. Tab to the Cylinders column, and enter the number of cylinders.
8. Press F10 to apply the changes.
9. At the “System Node Name:” prompt, enter a short, descriptive name and
press Enter. Press F1 for help.
10. At the “Date and Time” prompt, verify all entries and press F10 to Apply.
11. At the verification screen, press Enter.
Installing Network Operating System
3-5
Rebooting the Server and Installing the Operating System
12. At the “Install Menu” prompt, select View or Change Package Selection,
and select OS Multiprocessor Support.
13. Select Accept All Settings and Install Now, and press Enter.
Observing Screen Messages
You briefly see the “Loading...” message followed by the “Checking the
Primary Hard Disk” message.
Then you see a graph with an increasing completion which displays as a bar
moving from left to right. This process takes some time.
When the process is complete, you see “Making File Systems” and “Installing
Software” messages, followed by another bar graph showing Installation
Progress.
Reinserting the Host Bus Adapter (HBA) Driver
1. When prompted to reinsert the HBA disk you used earlier, do so and press
Enter. The “Setting up UnixWare” message displays. Please wait.
2. When the Choose Platform Support Module screen displays, press Enter
to select the Intel MP Specification. The “Building the Operating System”
message displays. Please wait.
3. At the “UnixWare 2.1 installation is complete” prompt, remove any disk
and CD.
Rebooting the System
1. Press Enter to reboot and restart UnixWare.
2. The “Installing drivers for the Network Card(s)” message displays. Please
wait. When prompted, accept all entries.
3. At the “Enter Setup Values from System Files” prompt, enter any values
where necessary (IP, DNS info, etc.) and press F10 to continue.
3-6
Installing UNIXWare
Rebooting the Server and Installing the Operating System
4. At the “Language Supplement Installation” prompt, enter the country
to select “United States”) and Apply. Please wait.
information (press
5. At the “Mouse Selection” prompt, select 3. PS/2-compatible Mouse, and
press Enter.
6. At the “Select number of mouse buttons” prompt, press
number of buttons. Tab to Apply, and press Enter.
to select the
7. Press Enter to start the mouse test. Follow the on-screen instructions to
test.
8. At the “Owner’s Account” prompt, enter a name and login ID. Cursor or
TAB to Apply, and press Enter.
Entering a Password and Completing the Installation
1. Press Enter at the “Password” screen. Enter the password and reenter it
for verification.
2. At the UNIX System Installation screen, press Enter to continue.
3. Enter the password, and re-enter it for verification.
4. Press Enter to continue.
5. “The system is coming up” message displays.
The installation is complete when the SCO Login screen displays.
Installing Network Operating System
3-7
Rebooting the Server and Installing the Operating System
3-8
Installing UNIXWare
Chapter 4
Installing SCO UNIX
Installing Network Operating System
4-1
Overview
Overview
After you have setup the system and configured it, you are ready to install the
operating system.
This chapter discusses installing the SCO UNIX SCO Open Server Release 5
on your server:
4-2
Installing SCO UNIX
Installation Overview
Installation Overview
To install SCO UNIX on your server, follow these steps:
•
Confirm the CMOS settings using BIOS Setup - See Chapter 5, User
Guide
•
Confirm the system settings using the System Configuration Utility - See
Chapter 4, User Guide
•
Confirm the adapter settings using the Adaptec BIOS SCSISelect Utility See Chapter 6, User Guide
•
Reboot the system and install the operating system
•
Install SMP
•
Install TCP/IP communications
Installing Network Operating System
4-3
Rebooting the Server and Installing the Operating System
Rebooting the Server and Installing the
Operating System
To reboot the server, follow these steps:
1. Insert the boot disk into the system, and boot the server.
2. At the BOOT: prompt, press Enter.
3. At the Installing SCO OpenServer screen, press Enter.
4. Choose Install Media and ID.
5. Select Keyboard type.
6. Enter the license number and code using the exact syntax on the yellow
license card.
Entering Setup Information
To enter setup information and proceed, follow these steps:
1. At the Installation Setup screen, select Fresh for install type.
2. At the Software Setup screen, enter a unique name or use “scosysv,”
which is the default for the system name. The default selection for Domain
Name is normally okay.
3. Select Traditional Security.
4. At the Preparing Your Disk screen, choose “Interactive fdisk/divvy” and
accept the choices.
5. Choose No.
6. At the Configuring Optional Software screen, select deferred for network
card. You must also provide the correct information for your particular
monitor in the Video selection.
7. Enter and verify your password.
8. At the next screen, select OK to proceed.
9. Press 1 to continue with the hard disk initialization.
4-4
Installing SCO UNIX
Rebooting the Server and Installing the Operating System
10. Select “Use Rest of Disk for UNIX.”
11. Select “Activate Partition.”
12. Enter the partition to make active.
13. Press q to quit the drive configuration.
14. Press q again.
15. Press Return.
16. Answer the configuration questions as prompted.
17. After answering the questions, files are copied from the CD-ROM to the
hard drive. This will take awhile.
18. Press Enter when the install message appears.
The installation is complete.
Installing Network Operating System
4-5
Installing SMP
Installing SMP
To install SMP, follow these steps:
1. Insert the install CD in the CD-ROM drive.
2. Enter Maintenance Mode (Press Enter on boot, init 1 or shutdown -i1).
3. Type “/etc/custom” and press Enter.
4. Select Software and Install New.
5. At the “What host to install from?” prompt, press Enter.
6. When prompted to select a media device, press
CD-ROM drive is highlighted.
until the SCSI
7. Press Enter twice. The “Copying files” message will display briefly.
to scroll down
8. When the Select Product to Install menu displays, press
and highlight SCO Symmetrical Multiprocessing Support.
9. Press Enter twice to select Full.
10. Enter the license information when prompted.
11. A message will be displayed saying that an additional processor has been
found. Press Enter.
12. When asked if you have additional CPUs, press Enter to select No.
13. Press Enter to continue.
14. After the software is installed, select Host and Exit.
15. Shutdown and reboot the system for the changes to take effect.
4-6
Installing SCO UNIX
Installing TCP/IP Communications
Installing TCP/IP Communications
To install TCP/IP, follow these steps:
1. Enter Maintenance Mode (Press Enter on boot, init 1 or shutdown -i1).
2. Type “/etc/custom” and press Enter.
3. Select Software and then Install New.
4. At the “What host to install from?” prompt, press Enter.
Inserting the SMC SuperDisk
1. When prompted to insert the media and select the media device, insert the
SMC SuperDisk for SCO UNIX into the flex drive. Verify the Media
to get the choices for the
Device is set for Floppy Disk Drive 0. Press
media devices.
2. Observe the message, “Installing: SMC-SCO LLI 3.4 Super Disk (version
1.1.3a).”
3. At the “Do you want a FULL or PARTIAL installation?” prompt, select
FULL.
4. Ignore all error messages.
5. After the SMC software drivers are installed, return to the UNIX prompt.
Completing the Installation
1. At the # prompt type “netconfig.”
2. Select Hardware and Add New LAN Adapter.
3. Select “smpw SMC 8432, 8434 and 9332 Ethernet Adapter, board 0.”
4. Select Add Protocol. Observe the following:
“Select one networking product to be added to:
smpw SMC8432, 8434 and 9332 Ethernet Adapter, board 0
HW smpw SMC 8432, 8434 and 9332 Ethernet Adapter, board 0
* - SCOTCP/IP
- SCOIPX/SPX”
Installing Network Operating System
4-7
Installing TCP/IP Communications
5. Select the desired protocol, and press Enter.
6. If TCP/IP is selected, configure the TCP/IP settings.
7. After the desired protocol is successfully added, observe the following if
TCP/IP was selected (IPX/SPX may be slightly different):
“Current networking configuration:
HW SCO TCP/IP Loopback driver
SCO TCP/IP
- SCO NFS Runtime System
HW smpw SMC 8432, 8434 and 9332 Ethernet Adapter, Board 0
SCO TCP/IP
- SCO NFS Runtime System”
8. Relink the kernel and reboot for these changes to take effect.
4-8
Installing SCO UNIX