1
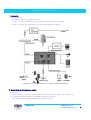
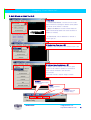
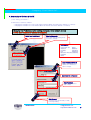
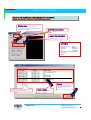
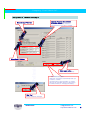
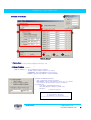
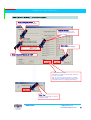
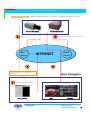
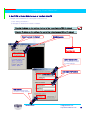
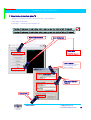
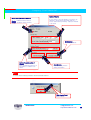
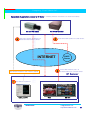
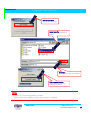
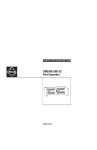
Preliminary Document
Company Confidential
Admin
Admin Tool
Tool
Net Camera & Net Transmitter administration software
User’s Manual
Software Version : 4.40
Avidacom SA
[email protected]
http://www.avidacom.com
1
Company Confidential
Important Notice
This is confidential information. If you do not have signed
Preliminary Document
•
NDA with Avidacom, you are not allowed to read, copy, or
use this manual
•
This is a preliminary version document
•
Avidacom reserves the right to change the content without
notice
•
Avidacom is not responsible for the possible errors in this
document
Notice
TE3xx : Web Camera Engine
Net Cam : Network Camera
Net TX : Network Transmitter
Avidacom SA
[email protected]
http://www.avidacom.com
2
Company Confidential
1. Installation
1) Connecting Power
- Connect the power(12V DC) to Net Cam & Net TX
- Connect a PC and a Transmitter with a Cross Cable (PC to PC, Blue cable that is supplied).
Preliminary Document
- In case of using Hub, use straight cable ( PC to Hub, Orange cable that is supplied).
<Diagram: Connecting TE3xx to PC, Power and the peripherals>
2. Basic Network Circumstance setting
1) Important!!
- Set the IP address of user’s PC to one that is within the same network with the camera. ( Ex : 192.168.1.xxx )
2) To change the camera’s IP address or user setting, run “Admin_Tool4.40.exe”.
- Click [Start]Æ[Program]Æ[WebCamViewer1.45b]Æ [Admin Tool4.40].
Avidacom SA
[email protected]
http://www.avidacom.com
3
Company Confidential
3. Main Window of Admin Tool 4.40
1) Easy Mode
Local and Inter Network : Connects to local or inter
11
network camera by inputting the address directly (When
user knows the IP address of cameras)
Within Local Network : Finds all cameras within the
2
Preliminary Document
Connection Status
Window
3
network automatically (When user doesn’t know the IP
address of cameras)
IP and User Set : Sets IP addresses of cameras or
access right, etc..
2) Medium Mode (Easy Mode + @)
Serial I/O : Sets the speed of the camera’s RS323 / 485.
3) Advanced Mode (Medium Mode + @)
IP Server : Sets the address of the server to get IP
address of the camera in dynamic IP circumstance.
FTP : Sets the schedule to save the video
to FTP server.
NTSC/PAL Decoder : Adjusts image of camera.
FirmWare :
Updates inside program
of a camera.
Reset :
Resets a selected
camera.
Preview :
Allows preview with
changed setting.
Avidacom SA
[email protected]
http://www.avidacom.com
4
Company Confidential
4. Connecting to Net Cam & Net TX
1) Run “ Admin_Tool4.40.exe “.
2) Directions to connect to cameras
- Changing the IP address of a local or inter network camera (When user knows the IP address of a camera)
- Changing the IP address of a local camera (When user doesn’t know the IP address of a camera)
Changing the IP address or other setting of a local or inter network camera
( When user knows the IP address of a camera)
Preliminary Document
Select Local and Internet
Select setting mode
Select and click any setting mode
you wish to change.
Setting Mode
IP and User Set
(Easy)
Serial I/O
(Medium)
IP Server
(Advance)
FTP
(Advance)
NTSC/PAL Decoder (Advance)
Firmware
Reset
Input IP Address & Port #
Input IP address and port
number of a camera you
wish to change.
Input Admin ID & Password
Save Password
Saves user password
that is input.
Click Connect
Connect to the camera that you wish
to change setting.
Avidacom SA
[email protected]
http://www.avidacom.com
5
Company Confidential
Changing the IP address or other settings of a local camera
(when user doesn’
doesn’t know the IP address of a camera)
Preliminary Document
FirmWare Mode
User must know the IP address of
a camera to change the FirmWare Mode.
(See previous page)
Shows all cameras automatically
within the same network.
Avidacom SA
Check Within Local Network
Select & Click Setting Mode
Select any setting mode
that you wish to change.
Setting Mode
IP and User Set
(Easy)
Serial I/O
(Medium)
IP Server
(Advance)
FTP
(Advance)
NTSC/PAL Decoder (Advance)
Firmware
Reset
ReSCAN
Rescans and shows all
cameras within the same
network.
Select a camera
Click a camera that you
wish to change.
[email protected]
http://www.avidacom.com
6
Company Confidential
5. Setting IP address of a Net Cam & Net TX – sets/changes the IP address of a Net Cam & Net TX
1) Run “ Admin_Tool4.40.exe “
2) See page 5&6 to know how to connect to Net Cam & Net TX.
Changing the IP address or other settings of a local & inter network camera (With IP address)
Changing the IP address or other settings of a local & inter network camera ( Without IP address)
Preliminary Document
Check Local and Inter network
When you know the IP address of a
camera that you wish to change.
Select Setting Mode
Setting Mode
IP and User Set
Input IP Address & Port #
Input IP address & Port # of
a camera that wish to
change.
Input Admin ID & Password
Default : root // root
Click Connect
Connect to a camera that
you wish to change.
Avidacom SA
[email protected]
http://www.avidacom.com
7
Company Confidential
Setting Static IP – continued from page 7
Check Static IP Address
Preliminary Document
Check Change IP Address
Input the IP address & subnetmask
& Gateway address
Input the IP & Gateway address &
subnetmask that you wish to change.
Click “Apply”
Apply” button
Applies changed settings.
※ Get Detail Information
Gets basic information automatically when you
connect to camera.
Use this button to get information of camera
that you are connoted, when you input wrong
information while you changing the setting.
Click “Yes”
Yes”
Resets camera as changed.
Avidacom SA
[email protected]
http://www.avidacom.com
8
Company Confidential
< Details of Set Box >
5
1
3
4
2
Preliminary Document
7
6
8
9
10
< Set Box Screen >
1. Camera Name
Camera Name : Input a camera name that user wish to use.
2. Change IP Address
Input IP address of a camera.
[ Static IP Address ] - Set a camera with static IP address.
IP Addr : Input/Change IP address of a camera.
SubNetMask : Input SubNetMask Ex) 255.255.255.0.
Gateway : Input/Change address of network Gateway.
[ Dynamic IP Address by DHCP ]
- Sets a camera with dynamic IP address.
Mail Address : Input e-mail address to get IP info. of a camera.
(To confirm the IP address that is given to a camera.)
ex) Sample mail
from: [email protected]
title : Web Camera IP Notifier from Net Cam1
Message :
< Camera IP Notifier >
====================================
>> Camera Name : Net Cam1
>> Camera IP : 61.254.28.162
====================================
Avidacom SA
[email protected]
http://www.avidacom.com
9
Company Confidential
Notice
Preliminary Document
[ Dynamic IP Address by PPPoE ]
- Sets a camera with dynamic address using ADSL.
ID/PW : Input ID&PW to connect to ADSL.
Mail Address : Input e-mail address to get IP info. of a camera.
(To confirm the IP address that is given to a camera)
ex) Sample Mail
from: [email protected]
title : Web Camera IP Notifier from Net Cam1
Message :
< Camera IP Notifier >
====================================
>> Camera Name : Net Cam1
>> Camera IP : 61.254.28.162
====================================
Mail server of the mail address that you input should support SMTP.
3. Change Admin ID and PW
Inputs/Changes ID & Password of Administrator. ( by checking the box, you can changes the Admin ID & Password. )
4. Change User ID and PW
Inputs/Changes user’s ID & Password. ( by checking the box. You can change each user’s ID & Password.)
5. Admin ID and PW
Appears when you check the “change Admin ID and PW” check box.
Changes administrator’s ID & PW.
6. User ID and PW / GIPO, SIO
User : Inputs/Modifies each user’s ID & PW.
GPIO / SIO ( GPIO : D/O1,2 control right, SIO : Pan/Tilt control right)
: Gives each user access right for each feature.
@ Administrator can access any features without being given of access right.
7. Information
Version : Shows the version of FirmWare inside of a camera. (Auto-updated, by upgrading FirmWare)
Vender ID : The number that is given by MI to Partner companies. (can’t be modified)
MAC Address : The unique number that NIC (Network Interface Card) has. (Can’t be modifies)
8. Get Detail Info.
Gets basic information of a connected camera automatically.
Used when user need to get information of connected camera, since user inputs wrong information while changing
setting.
9. Apply
Applies changes settings.
10. Flicker LED
Lets LED (Back side of a camera, Yellow) blink. ( Shows which camera you are working on..)
Notice
The firmware which is supplied now (Dec, 2003) is version 4.01.
Avidacom SA
[email protected]
http://www.avidacom.com
10
Company Confidential
DHCP ( Dynamic IP) Setting – continued from page 6
Check “Change IP Address”
Address” :
Changes IP address of a camera.
camera
Preliminary Document
Input Mail Address
Input e-mail address to get
dynamic IP information that a
camera’s given.
Click “Apply”
Apply”
Applies changes settings.
Check “Dynamic IP Address by DHCP”
DHCP”
※ Get Detail Information
Gets basic information automatically when you
connect to camera.
Use this button to get information of camera
that you are connoted, when you input wrong
information while you changing the setting.
Click “Yes”
Yes”
Resets a camera that you wish to
change settings.
Avidacom SA
[email protected]
http://www.avidacom.com
11
Company Confidential
How the dynamic IP works – Mail server sends the dynamic IP information to mail address which
which is set in a camera.
3
E-Mail
Mail
Server
4
Net TX Web Transmitter
2
Preliminary Document
Net Cam Web Camera
INTERNET
DHCP
Server
5
Hook up internet line to a camera with
dynamic IP.
1
DHCP server gives web camera a dynamic IP.
User Computer
Set web camera with dynamic IP
Admin_Tool4.40
Avidacom SA
WMC
WM16CH
[email protected]
http://www.avidacom.com
12
Company Confidential
6. Set ID/PW or Control Right for users of Net Cam & Net TX
- Changes user’s ID/Password or control rights for Pan/Tilt or D/O.
1) Run “ Admin_Tool4.34.exe “.
2) See page 5 to know how to connect to cameras.
Changing IP address or other settings of a local or inter network camera (With IP address)
Preliminary Document
Changing IP address or other settings of a local or inter network camera (Without IP address)
Check “Local and Inter Network”
Network”
Click Setting Mode
Setting Mode
IP and User Set
Input IP Address & Port
Input IP Address & Port #
of a camera that you wish
to change settings.
Input Admin ID & Password
Click Connect
Connect to a camera that
you wish to change settings.
Avidacom SA
[email protected]
http://www.avidacom.com
13
Company Confidential
Setting control rights of GPIO/SIO for regular user
Gives regular users the control rights for GPIO/SIO
Check “Change Admin ID and PW”
PW”
Changes administrator’s ID and PW.
Check “Change User ID and PW”
PW”
Sets regular user’s ID & Password
or control rights for GPIO/SIO.
Input/Change IDs & Password for a
administrator and regular users.
Preliminary Document
GPIO : (D/O)
SIO : Pan/Tilt Control
Click Apply
Applies changed settings.
Click Camera Reset
Resets camera.
Avidacom SA
※ Get Detail Information
Gets basic information automatically when you
connect to camera.
Use this button to get information of camera
that you are connoted, when you input wrong
information while you changing the setting.
[email protected]
http://www.avidacom.com
14
Company Confidential
7. Video Setting for Net Cam & Net TX
- Changes FPS (Frames per Second), Resolution and etc. of Net Cam/Net TX.
1) Run “Admin_Tool4.40.exe “.
2) See page 5 “Connecting to Net Cam & Net TX”
Changing IP addresses of local or inter network cameras and other settings (with IP address)
Preliminary Document
Changing IP addresses of local or inter network cameras and other settings (without IP address)
Check Local and Internet
Select Setting Mode
Setting Mode
NTSC/PAL Decoder
Input IP Address
Input IP Address and Port
# of camera that you
wish to change.
Input admin. Name and
Password
Click Connect
Avidacom SA
[email protected]
http://www.avidacom.com
15
Company Confidential
SAA7114 Setting ( Setting manually – User direct control )
Check Change Set Manually
Sets parameters for video of
camera manually.
Default Set
Sets changed values
as default.
1
Preliminary Document
4
5
2
6
3
Get Current Set
Shows values of
current setting.
Apply
Applies changed
settings.
Preview
Shows “Preview window”.
1. NTSC / PAL – Configure Image type ( NTSC / PAL )
2. Luminance Brightness Control – Control luminance brightness.
3. Luminance Contrast Control – Control luminance contrast.
4. Chrominance Saturation Control – Control chrominance saturation.
5. Chrominance Hue Control – Control chrominance hue.
6. Chrominance Gain Control – Control chrominance gain.
Avidacom SA
[email protected]
http://www.avidacom.com
16
Company Confidential
SAA7114 Setting ( Set SAR file load )
Check Load SAA7114 From File
Click Apply
Applies changed
settings
Preliminary Document
Click “Load”
Load”
Select Saa7114.sar
Click “Open”
Open”
Notice
Visit our home page (Partner Support) to download SAR file .
http://www.avidacom.com
Avidacom SA
[email protected]
http://www.avidacom.com
17
Company Confidential
8. I/O Setting of Net Cam & Net TX – sets/changes I/O of
Net Cam/Net TX
1) Run “ Admin_Tool4.34.exe “
2) See page 5 for “Connecting to Net Cam & Net TX”
Changing IP address or other settings of a local/inter network camera. ( with IP )
Changing IP address or other settings of a local/inter network camera ( without IP )
Preliminary Document
Check Local and Internet
Select Setting Mode
Setting Mode
Serial I/O
Input IP Address/Port #
Input IP address/Port #
of a camera that you wish
to change setting.
Input Admin. Name /Password.
Click Connect
Avidacom SA
[email protected]
http://www.avidacom.com
18
Company Confidential
EXAMPLE OF communication setting with receiver ( COM-422 receiver )
BaudRate : 2400
Data Bit[Hex] : 8
Stop Bit[Hex] : 1
Parity : No Parity
Preliminary Document
RS 232C setting
Setting RS-232 communication
process.
Click Get Current Set
Display existing camera
setting.
RS 485 setting
Setting RS-485 communication
process
BaudRate : 2400
Data Bit[Hex] : 8
Stop Bit[Hex] : 1
Parity : No Parity
Click Apply
Apply modified details.
Click Camera Reset
Reset camera.
Avidacom SA
[email protected]
http://www.avidacom.com
19
Company Confidential
▶Receiver and Speed-Doom products supported by WCV software
Manufacturer
Communication
Way of Control
Com-Dome
SIT
19200-8-N-1
RS-485
KOREA
Com-422
COMINS
2400-8-N-1
RS-485
KOREA
VICON
VICON
4800-8-N-1
RS-485
USA
Honeywell
Honeywell
9600-8-N-1
RS-232
GC755 Camera
USA
NewBorn
NewBorn
9600-8-N-1
RS-485
RX integrated
Type
KOREA
Pelco
Pelco
Pelcon
Pelcon
VICON-China
Preliminary Document
Name
explanation
Origin
9600-8-N-1
RS-485
USA
2400-8-N-1
RS-485
CHINA
VICON-China
4800-8-N-1
RS-485
CHINA
SharpEye
SharpEye
2400-8-N-1
RS-485
CHINA
V1200
VICANYX
9600-8-N-1
RS-485
CHINA
LGT-A100L
LG
9600-8-N-1
RS-485
KOREA
Notice
User should set after refer to above information and check receiver/speed Doom which connected Net Cam Web Camera
& Net TX Web Transmitter
Avidacom SA
[email protected]
http://www.avidacom.com
20
Company Confidential
9. Net Cam & Net TX & ADSL(DHCP) Connection setting – Set, change for
Net Cam & ADSL connection of Net TX
1) Run “ Admin_Tool4.40.exe “ .
2) In order to connect to camera, refer to “connection to Net Cam & Net TX ”
3) Using In case of direct connect to ADSL line with Net Cam & Net TX ,. Except this case, do not need setting.
Modify IP address and setting for Internal and external camera . ( Already knew IP address)
Preliminary Document
Modify IP address and setting for Internal and external camera. ( don’t know IP address )
Local and Internet select
Check when user already know
IP address of camera that want
to modify
Select Setting Mode
Check Setting mode which
want to modify
Setting mode
IP and User Set
Input IP Address
Input IP address and port
number of Camera which
want to modify
Input Admin ID and Password
Input admin ID and
password who want to
connect camera for modify
Click Connect
Connect camera which
will be modified
Avidacom SA
[email protected]
http://www.avidacom.com
21
Company Confidential
Check Change IP Address
Select Log-in Method which
used for ADSL service
Preliminary Document
Select ADSL
Select Log-in Method which
used for ADSL service
Input ADSL loglog-in ID and Password
Input User ID and password which got from ADSL
service company.
Input Mail Address
Input mail address which want to receive IP
address information from camera.
Mail address should support ed SMTP
Last Successful Sequence
Display latest Internet connection
status.
Click Apply
Apply modified detail.
Click Camera Reset
Reset camera
Notice
Switch ADSL / Ethernet : Select Internet connection method for internet connection.
@ ADSL : For ADSL service which can use internet with user log-in
SAcan use internet without user log-in. (ex, K.T. IP-xDSL
[email protected]
@ Ethernet : For ADSL Avidacom
service which
service)
http://www.avidacom.com
22
Company Confidential
10. FTP setting – Set FTP server which upload video of Net Cam and Net TX.
1) Run “ Admin_Tool4.40.exe “
2) For Camera Connection, refer to “Connection to Net Cam & Net TX”
In case of modify IP address and setting for Internal and external camera. ( Have IP address )
In case of modify IP address and setting for Internal and external camera. ( Have not IP address )
Preliminary Document
Select Local and Internet
In case user have IP address of
camera which want to modify.
Select setting mode
Select setting mode that want to setting
Setting
mode
FTP
Input IP Address
Input IP address and port
number of camera which wan
t to modify.
Input Admin ID and Password
Input Admin ID and Password.
Click Connect
Connect with Camera
which want to modify.
Avidacom SA
[email protected]
http://www.avidacom.com
23
Company Confidential
Recording Schedule
Setting recording schedule for FTP server
FTP Enable : use FTP Function.
FTP Disable : not use FTP Function.
Check recording time period
Check All : select all time period.
Clear All : unselect all time period.
GMT
Setting Time
difference
Preliminary Document
Setting FTP Usage
Setting enable/disable function of FTP.
FTP Setting
Setting address of FTP server and log-in.
Click Change
Set modified detail.
Click Get Info.
Display camera setting
status
FTP Server : Input IP address of FTP server
Time Server : Input IP address of Time Server
Login ID : Input user ID for connect of FTP
server.
Login PW : Input user password for connect of
FTP server.
Click Camera Reset
Reset Camera
Avidacom SA
[email protected]
http://www.avidacom.com
24
Company Confidential
11. Setting IP Server – real-time transfer IP of
Net Cam and Net TX to nominated computer.
1) Run “ Admin_Tool4.40.exe “.
2) For connect with camera, please refer to “connection to Net Cam & Net TX”.
Modify IP address and setting for Internal and external camera . ( Already knew IP address)
Select Local and Internet
Click when user know IP address of
camera.
Preliminary Document
Modify IP address and setting for Internal and external camera. ( Have not IP address )
Select Setting mode
Select setting mode for
modify
Setting
mode
IP Server
Input IP Address 입력
Input IP address and port number
of camera for modify.
Input Admin ID and Password
Input Admin ID and password
for connect camera .
Click Connect
Connect camera for
modify.
Avidacom SA
[email protected]
http://www.avidacom.com
25
Company Confidential
Setting IP Server
Select enable/disable of IP Server
Preliminary Document
Enable : enable IP Server function
Disable : disable IP Server function.
Setting IP update period of
camera
Input update time period of IP
information of camera for IP
server .
Notice
IP of IP Server : input IP address of IP Server. (IP
address of server should fixed with static IP )
Port of Video Server [Decimal] : Input port number
of IP Server
Click Change
Set modified details.
Click Get Info.
Display existing camera
setting information
IP server which receiving camera IP should fixed with Static IP.
Click Camera Reset
Reset camera
Avidacom SA
[email protected]
http://www.avidacom.com
26
Company Confidential
Explanation of application process for IP Server – 카Sending camera IP information to IP server which already
memorized to camera.
3
Preliminary Document
Net Cam Web Camera
Net TX Web Transmitter
Send user’s dynamic IP address to IP
server which memorized to camera
2
INTERNET
Set camera to dynamic IP
Admin_Tool4.40
Avidacom SA
DHCP
Server
4
Set camera to dynamic IP and connect to internet
1
DHCP server allow dynamic IP to web camera .
Connect web camera by use of IP
Information Which got from web camera
IP Server
WMC
WM16CH
[email protected]
http://www.avidacom.com
27
Company Confidential
12. Upgrade firmware of Net Cam & Net TX
- Upgrade firmware of Net Cam & Net TX.
1) Run “ Admin_Tool4.40.exe “
2) For connect to Camera, please refer to “connection to Net Cam & Net TX”.
Modify IP address and setting for Internal and external camera. ( Have IP address )
Preliminary Document
Modify IP address and setting for Internal and external camera. ( Have not IP address )
Select FirmWare -> Update
Select for upgrade firmware
Select Local and Internet
Select when user know IP
address of camera which want
to modify.
Input IP Address
Input IP address and port
number of camera which want
to modify
Input Admin ID and password
Input admin ID and
password for connect
camera
Click Connect
Connect to Camera which
want to modify.
Avidacom SA
[email protected]
http://www.avidacom.com
28
Company Confidential
Click Open Program
Open program for modify
Preliminary Document
Select Code File
Select CODE file (Firmware) for
modify.
Click Open
Open selected CODE file (Firmware).
Click Download Program
Update selected CODE file
(Firmware) to camera
Notice
* Do not turn off Power during upgrading of Firmware.
- If power blocked under upgrading, it caused serious damage for equipment
Avidacom SA
[email protected]
http://www.avidacom.com
29
Preliminary Document
Company Confidential
If “Flash Write OK” message
appear, camera is resetted
Camera Reset Click
Resetting camera
Notice
If connection status window display “ End Program Download Sequence “ message, user should reset.
Avidacom SA
[email protected]
http://www.avidacom.com
30