1
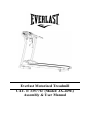
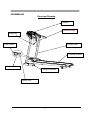
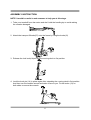
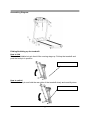
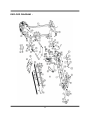
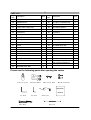
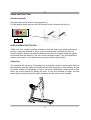
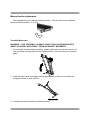
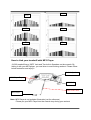
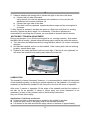
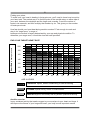
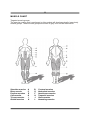
LUBRICATION GUIDE FOR RUNNING DECK Treadmill Deck Lubrication Method Please check your owner’s manual before using Deck Lube as some treadmills require wax and using Deck lube will damage your treadmill Although your Treadmill would have been supplied with a pre-Lubricated Running Belt and deck, after a period of time a further application of Lube will be required at specified interval. Deck Lube has been tested and is proven to be the Most Effective general lubricant available for your Treadmill. Regular applications of Lube will keep your Treadmill operating at its Optimum Performance. Instructions for Use First ensure that your Treadmill is switched off and the mains plug is removed from the wall Lift the edge of the Running Belt enough to locate the Syringe between the surface of the Running Deck and underside of the Running Belt then ensuring that it reaches the centre of the deck slowly release the oil from the Syringe. Repeat a second application to bring the total application to 10ml. The object of the exercise is to ensure that the Lube reaches the middle of the walking/ running area. With normal usage the Lube will disperse evenly outwards in both directions ensuring that all the underside of the Running Belt will be coated. Once Lube has been applied it is important that you walk on your Treadmill at a speed of approx 5km/h for 3 minutes to help evenly distribute the oil. Recommended Applications (Use as an approximate Guide) Home Use below 5hr machine usage per week - apply 10ml every 4 months Home Use above 10hr machine usage per week - apply 10ml every 2 months IN CASE OF EMERGENCY: Hazardous KEEP OUT OF THE REACH OF CHILDREN. Do not swallow. If swallowed do not induce vomiting If product comes into contact with eyes, flush with fresh water and seek medical care. If product comes into contact with skin, thoroughly wash surface as soon as possible Everlast Motorized Treadmill CAT. #: 3357767 (Model: JX-269E) Assembly & User Manual BEFORE YOU BEGIN Congratulations for selecting the JX-269E treadmill from Everlast. Whether you are an accomplished athlete seeking to maintain peak performance or a beginner realizing the benefits of exercise for the first time, the JX-269E Treadmill will help you to achieve your goals. In the “Hints to Help You” section of this manual we have outlined some tips that we hope will help you maximize the effectiveness and fun of your workouts. In the meantime, remember that the benefits of exercise are many and varied including higher energy levels, reduced stress, improved self-esteem, clearer and more radiant skin, greater cardiovascular efficiency, higher metabolic rate, and improved body posture – all of which can result in a longer and more enjoyable life. While purchasing the JX-269E Treadmill will not do all of this alone, it is an important step towards understanding and achieving the benefits of exercise. All Everlast products are manufactured to the highest specifications and this instruction manual should enable you to assemble the JX-269E Treadmill and commence your workout programme. If, however, you have any additional questions, please call out UK Customer Service on +44 (0) 845 600 0464 To help us assist you, please quote the product model number and serial number when calling. The model number is JX-269E. The serial number can be found on a sticker attached to the rear of main treadmill body (located on the left hand side next to the main switch). 1 CONTENTS Before you Begin Content Precautions Preassembling Assembly Exploded Diagram Part list Assembly Part List User Instruction (Initial use ) Training Monitor Computer Operation Instruction Maintenance Trouble Shooting Important Steps Muscle Chart Warm-Up/ Stretching Exercise 01 02 03 04 05 08 09 10 11 13 13 18 20 20 23 24 Warning Before beginning this or any exercise programme, consult your physician. This is especially important for persons who have not exercised regularly before or persons with pre-existing health problems. Read all instructions before using. Argos assumes no responsibility for personal injury or property damage sustained by or through the use of this product. Questions As a manufacturer, we are committed to providing complete customer satisfaction. If you have any questions, or if parts are missing or damaged, we guarantee complete satisfaction. PLEASE CALL OUR CUSTOMER HOTLINE DIRECT. The trained technicians on our customer hotline will provide immediate assistance free of charge. UK Customer Hotline: +44(0)845 600 0464 UK Email:[email protected] Caution Read all precautions and instructions in this manual before using this equipment. Keep this manual for future reference. Model No: JX-269E Serial No: for example: JX-269E /463743/00001 Write the serial number and manufacturing date in the space above for future reference. (Located on the left hand side next to the main switch) 2 PRECAUTIONS WARNING: To reduce the risk of burns, fire, electric shock, or injury to persons, read the following important precautions and information before operating the treadmill. It is the responsibility of the owner to ensure that all users of this treadmill are adequately informed of all warnings and precautions. • Use the treadmill only as described in this manual. • Place on a level surface, with 6 feet (2 m) of clearance behind it. Do not place the treadmill on any surface that blocks air openings. To protect the floor or carpet from damage, place a mat under the treadmill. • When choosing a location for the treadmill make sure that the location and position permit access to a plug. • Keep the treadmill indoors, away from moisture and dust. Do not put the treadmill in a garage or covered patio, or near water. • Do not operate the treadmill where aerosol products are used or where oxygen is being administered. . After using 10 hours, please add 20ml lubricating oil between running deck and belt. • Keep children under the age of 12 and pets away from the treadmill at all times. • The treadmill should not be used by persons weighing more than 100kgs. • Never allow more than one person on the treadmill at a time. Wear appropriate exercise clothing when using the treadmill. Do not wear loose clothing that could become caught in the treadmill. Athletic support clothes are recommended for both men and women. Always wear athletic shoes. Never use the treadmill with bare feet, wearing only stockings, or in sandals. • When connecting the power cord, plug the power cord into a grounded circuit. No other appliance should be on the same circuit. • Always straddle the belt and allow it to start moving before stepping onto the belt. • Always examine your treadmill before using to ensure all parts are in working order. • Allow the belt to fully stop before dismounting. • Never insert any object or body parts into any opening. • Follow the safety information in regards to plugging in your treadmill. • Keep the power cord away from the incline wheels and do not run the power cord underneath your treadmill. Do not operate the treadmill with a damaged or frayed power cord. • Always unplug the treadmill before cleaning and/or servicing. Service to your treadmill should only be performed by an authorized service representative, unless authorized and/or instructed by the manufacturer. Failure to follow these instructions will void the treadmill warranty. Never leave the treadmill unattended while it is running. 3 PREASSEMBLY Open the boxes: You are now ready to open the boxes of your new equipment. Make sure to check all of the parts that are included in the boxes. When taking it out from the box, do not hold the handle grip. Before starting the assembly of your unit, make sure that you have gathered all the necessary tools you may require to assemble the unit properly. Having all of the necessary equipment at hand will save time and make the assembly quick and hassle-free. Clear your work area: Make sure that you have cleared away a large enough space to properly assemble the unit. Make sure the space is free from anything that may cause injury during assembly. After the unit is fully assembled, make sure there is a comfortable amount of free area around the unit for unobstructed operation. Invite a friend: Some of the assembly steps may require heavy lifting. It is recommended that you obtain the assistance of another person when assembling this product. User Weight Limitation: Please note that there is a weight limitation for this product. If you weigh more than 100kgs, it is not recommended that you use this product. Serious injury may occur if the user’s weight exceeds the limit shown here. This product is not intended to support users whose weight exceeds this limit. FAILURE TO COMPLY WITH THIS WILL INVALIDATE THE PRODUCTS WARRANTY 4 ASSEMBLING Overview Drawing Console MP3 Link cable Safety key Power Switch Console Post Running Surface Circuit Breaker Transport Wheels Power cord 5 ASSEMBLY INSTRUCTION: NOTE: It would be useful to ask someone to help you at this stage. 1. Take your treadmill form the carton and don’t hold the handle grip to avoid making the console damaged. 2. Attach the transport Wheels(27) onto the frame by fixing the knobs(12) 3. Release the lock knob(14)and pull the running deck to flat position 4. Lock the knob pin (14) in place again after extending the running deck in flat position. And then turn the console around and make it face to you .Fix the knobs (13) on both sides to secure the console. 6 Assembling Diagram: Folding/Unfolding up the treadmill: How to fold Pull out the foldable lock pin then lift the running stage up. Fold up the treadmill and push the lock pin in position. Pull out the lock knob first How to unfold Pull out the lock pin and hold the rear roller of the treadmill slowly and carefully down Pull out the lock knob first 7 EXPLOED DIAGRAM : 8 PART LIST Ke y No. Description QTY Key No. Description 1 Main Frame 1 51 M5*15MM Dome Head Philip Screw 2 2 Console Mast 1 52 ST4*30MM Dome Head Philip Screw 2 3 Right Handle Tube 1 53 ST4*10MM Dome Head Philip Screw 2 4 Outer Fold Tube 1 54 ST5*12MM Dome Head Philip Screw 6 5 Left Handle Tube 1 55 M6*45MM Philip Screw 6 6 Base Extension Support 2 56 M6*60MM Allen Bolt 1 7 Inner Fold Tube 1 57 Φ8MM Washer 16 8 Front Roller 1 58 Φ6MM Spring Washer 2 9 Rear Roller 1 59 Φ4MM Washer 12 10 Running Deck 1 60 Φ4MM Spring Washer 6 11 Running Deck Rubber Bumper 8 61 Φ10MM Washer 4 12 M8*55MM Lock Knob 2 62 M10 Aircraft Nut 4 13 M8*10MM Lock Knob 2 63 Φ12MM Washer 2 14 Pop Pin 1 64 Φ8MM WASHER 13 15 Φ32mm End Cap 2 65 M4*10MM Dome Head Philips Screw 2 16 □20MM End Cap 1 66 M8 Aircraft Nut 11 17 Handle Grip 2 67 M6 Nut 8 18 Camber Rubber Bumper 4 68 M4 Nut 6 19 φ32 Dome Head End Cap 2 69 M4*10MM Dome Head Philip Screw 6 20 φ19.5MM Rubber Ring 2 70 ST5*20MM Philip Screw 4 21 Motor's Rubber Bumper 2 71 ST4*20MM Dome Head Philip Screw 4 22 Left Rear End Cap 1 72 Φ6MM Washer 3 23 Right Rear End Cap 1 73 ST4*12MM Dome Head Philip Screw 2 24 Console 1 74 ST5*16MM Dome Head Philip Screw 5 25 Cross Handle 1 75 M6*55MM Allen Bolt 1 26 Motor's Cover 1 76 φ13.5MM Rubber Ring 1 27 Wheel Holder 2 77 Running Deck Support Frame 1 28 Wheel 2 78 Running Belt Limitation Bracket 2 29 Side Rail 2 79 Φ5MM Washer 6 30 Φ25 Sleeve 2 80 Φ5MM Spring Washer 6 QTY 9 PART LIST Key NO. 31 Φ25*φ8*5.5 Rubber Bumper 8 Key NO. 81 32 □25MM Sleeve 1 33 EVA Sheet 34 Description QTY Description QTY M5 Nut 6 82 φ31*φ25*173 Handle Grip 2 1 83 M8*75MM Allen Bolt 2 Control Wire Holder Ring 1 84 φ8 Camber Washer 2 35 Controller 1 85 Filter 1 36 Transformer 1 86 Inductance 1 37 Motor 1 87 A1 Wire 1 38 Motor Belt 1 88 A2 Wire 1 39 Running Belt 1 89 Speed Signal Wire 1 40 M6*60MM Philips Screw 2 90 M10*25MM Allen Bolt 4 41 Switch 1 91 M5*30MM Allen Bolt 4 42 43 44 45 46 47 Power Cord Handle Start/off Key Handle Speed Adjust Key M8*75MM Dome Head Allen Bolt M6*20MM Dome Head Allen Bolt M8*90MM Dome Head Allen Bolt 1 1 1 2 4 1 92 93 94 95 96 97 Incline Adjustable Frame Right Rubber Bumper Left Rubber Bumper M6 Nut MP3 Link Ø8 *Ø0.8*16 Spring 1 2 2 4 1 1 48 M8*38MM Allen Bolt 2 98 Ø21 *Ø16*11 Nylon Sleeve 1 49 M12*65MM Allen Bolt 2 99 Ø12.5 *Ø10*21 Nylon Pin 50 M8*45MM Allen Bolt 2 Please see the following parts after opening the carton Lubricating Oil Transport Wheels M8×10 Lock Knob M8×55 Lock Knob Instruction Manual 6# Knob Main Body 5# Knob Safety Key Mp3 Link 1 10 USER INSTRUCTION Start the treadmill: Plug the mains power and turn on the switch (1) . You will hear a signal tone and the LED screen of the Computer will light up. 1 2 OVER CURRENT PROTECTOR : There is a over current protector located on the right side of the swtich (See above picture) , when the treadmill is short circuit or over current, the Button of the over current protector will pop-up and the treadmill will power off, please unplug the power source and push the button of the over current protector inside, turn on the switch to restart your workout. If the button will re-pop up, please contact Argos. Safety Key: The treadmill will only work if the safety key is properly locked in the provided notch of the computer. Inset the safety and attach the clip onto waist part of your clothes. In case of trouble, where it is necessary to turn of the motor immediately, simply push out the safety out of the console by pulling the rope. To turn the treadmill on again, turn the main switch off and then put the safety key back into the notch on the console. 11 Manual incline adjustment The treadmill have two manual Incline positions , Turn the rear incline adjusted frame to desired position. (0 or 6%). Treadmill Movement WARNING: - THIS TREADMILL IS HEAVY AND IT SHOULD BE MOVED WITH GREAT AS INJURY MAY RESULT FROM INCORRECT MOVEMENT. 1. To move this treadmill when assembly, please make sure you pull the lock pin out first and lift the running deck into an upright position .Then lock the pin in position again. 2. Grab the main frame and slightly incline the treadmill so that you can have the transport wheels in work position. 3. Carefully move the treadmill to desired position. 12 Training Monitor Front View Technical Specifications Time 00:00-99:59 Min Speed 0.8-12.0 km/h Distance 0.00-99.9 km Calorie 0.00—999Kcal Pulse 70-200 Times/ Min Computer Operation Instruction A: “Start” “Stop” Key ---, Press to “Start” or “Stop” the treadmill B: “Slow” key ---- Speed Down key C: “Fast” Key–--Speed Up key D: “Set” Key --- Press to select pre-set training programme and level. E: With “MP3” Jack and Two built-in Speaker on the console. By linking it with MP3 player, you can listen to music during workout General Operation 1. Turn on the Power Switch of your treadmill. This switch is located next to the Mains Power Cord inlet. 2. Place the Safety Key into the magnetic recess in the middle front of the Computer Console. The console will give an audible signal and all console window displays will function with a start display value of 0. * Note: - If the Safety Key is not placed correctly or is faulty, the centre Time window will display “E 00 ". This means that the treadmill will not work. If the Safety Key falls off during exercise, the console will give an audible signal and all console window displays will reset to display value 0 and the treadmill will stop. 13 * To stop the treadmill in an emergency, simply pull the safety key off its mount in the console front or simply press the red STOP button in the centre of the console. It is important that you connect the clothing clip to your shirt or other suitable clothing during exercise to ensure that this safety system can operate easily. To get a pre-exercise pulse rate, simply hold both Hand Pulse Sensors on either side of the Handlebar Supports for 10 seconds. The Pulse Range is between 40 ~ 240 Beats per Minute Note: The readings displayed by the computer should not be used for therapeutic purposes as they can vary due to the sensitivity of the equipment and the available pulse signal put out by individuals palms. To get the best accurate readings keep the hands placed flat and firm on the PULSE PADS for between 10 and 20 seconds, as this will allow the pulse reading to average and then settle. For the target workout heart rate zone, please refer below diagram on following pages: Computer Operation 1. Start your console 1. Turn on the treadmill , Press “START ” key on the console or on the left of the Handle to start the treadmill , the current speed is :0.8km/h。 2. Press “FAST” or “SLOW” key to adjust speed or press handle “speed + or Speed“ Key to adjust speed. Press the key one times the speed change 0.1Km/H. 2. Stop your treadmill 1. Press the “Slow” button or press handle “Speed- ” Key to low down the speed , then press the “on/off ” key on the Console or on the left Handle , the treadmill will stop, turn off the switch every time you finish workout. 2. Pull out the Safety Key, the treadmill will stop automatically, all of the LED Window will display “E 00”. Progam Workout Model (P 2—P7) In this mode the user has a choice of Programme P2 – Programme P7. All 3 programmes will have 3 different levels. 1 Press the “ SET “ Key, the “Speed “ Window will display “ P1 –P7” , then followed by the “Fast” or “Slow “ to choose from P2-P7 .then press “SET” again. The “Calorie” window will display (L 1 –L3) 2 Press “Fast” or “Slow “ key to choose from Level 1, 2 or 3. Press “SET” to confirm. 3 The Pre-set value for TIME is 32 minutes. Either press START to commence exercise or “Fast” “Slow“to set the desired exercise TIME manually. The TIME range is 5 ~ 99 minutes in 1 minute increments. 4 Press “START “and the treadmill will count down 3, 2, 1 and commence operation. The start speed depends on which Programme you have chosen. 14 The start speed depends on which Programme you have chosen. 5 For all pre-set values, please refer to below chart Programme Starting Speeds Program Fitness Level Start Speed P2 L1 3.0KM/H L2 4.0KM/H L3 5.0KM/H L1 3.0KM/H L2 4.0KM/H L3 5.0KM/H L1 2.0KM/H L2 3.0KM/H L3 4.0KM/H L1 4.0KM/H L2 5.0KM/H L3 6.0KM/H L1 3.0KM/H L2 4.0KM/H L3 5.0KM/H L1 2.0KM/H L2 3.0KM/H L3 4.0KM/H P3 P4 P5 P6 P7 15 Preset Program Diagram P2-L1 P3-L1 P2-L2 P3-l2 P2-L3 P3-l3 P4-L1 P5-L1 P4-L2 P5-l2 P4-L3 P5-L3 16 P6-L1 P7-L1 P6-L2 P7-L2 P6-l3 P7-L3 How to Link your treadmill with MP3 Player JX-269 treadmill has a “MP3” Jack and Two built-in Speakers on the console. By linking it with your MP3 player, you can listen to music during workout. Please follow below instruction and enjoy it. Built In Speaker MP3 Player Tray MP3 Jack MP3 Link Cable MP3 Player Note: MP3 Player is not included (illustration just for reference) Please put your MP3 Player into the console tray during your workout 17 Maintenance TREADMILL MAINTENANCE Proper maintenance is very important to ensure a faultless and operational condition of the treadmill. Improper maintenance can cause damage to the treadmill or shorten the life of the product and void the warranty. All parts of the treadmill must be checked and tightened regularly. Worn out parts must be replaced immediately. BELT ADJUSTMENT You may need to adjust the running belt during the first few weeks of use. All running belts are properly set at the factory. It may stretch of be off centre after use. Stretching is normal during the break-in period. ADJUSTING THE BELT TENSION: If the running belt feels as though it is “slipping” or hesitating when you plant you foot during a run, the tension on the running belt may have to be increased. TO INCREASE THE RUNNING BELT TENSION: 1. Place 6# on the left belt tension bolt. Turn the wrench clockwise 1/4 turn to draw the rear roller and increase the belt tension. 2. Repeat STEP 1 for the right belt tension bolt. You must be sure to turn both bolts the same number of turns, so the rear roller will stay square relative to the frame. 3. Repeat STEP 1 and STEP 2 until the slipping is eliminated. 4. Be careful not to tighten the running belt tension too much as you can create excessive pressure on the front and rear roller bearings. An excessively tightened running belt may damage the roller bearings that would result in bearing noise from the front and rear rollers. TO DECREASE THE TENSION ON THE RUNNING BELT, TURN BOTH BOLTS COUNTER-CLOCKWISE THE SAME NUMBER OF TRUNS. CENTRING THE RUNNING BELT When you run, you may push off harder with one foot than with another. The severity of the deflection depends on the amount of force4 that one foot exerts in the relation to the other. This deflection can cause the belt to move off-centre. This deflection is normal and the running belt will centre when no body is on the running belt. If the running belt remains consistently off-centre, you will need to centre the running belt manually. 1. Start the treadmill without anyone on the running belt, press [SPEED UP] button until speed reached 6kph. 18 2. Observe whether the running belt is toward the right or left side of the deck. a) If toward the left side of the deck: Using wrench, turn the left adjustment bolt clockwise 1/4 turn and the left adjustment bolt counter clockwise 1/4. b) If toward the right side of the deck: c) If the belt is still not cantered, repeats the above steps until the running belt is on centre. 3. After the belt is cantered, increase the speed to 12kph and verify that it is running smoothly. Repeat the above steps if it is necessary. If the above procedure is unsuccessful in resolving the off-centre, you may need to increase the belt tension. MOTOR BELT TENSION ADJUSTMENT During your workout, if you find the running belt is not running smoothly , that means the Motor Belt is loosing , please follow the below step to adjust the motor belt tension: 1) Turn the motor belt adjustment bolt by using M8 allen wrench 1/4 circle in clockwise direction. 2) Re-Start the treadmill and run on the treadmill, if the running belt is still not working properly, repeat above step. 3) Please do not make the Motor’s belt too much tight, if the belt is over tightened, it’s will cause the treadmill over loading and reduce the motor life. LUBRICATION The treadmill is factory-lubricated. However, it is recommended to check the lubrication of the treadmill regularly, to ensure an optimal operation of the treadmill. It is usually not necessary to lubricate the treadmill in the first year or the first 500 hours of operation. After every 3 months of operation, lift the sides of the treadmill and feel the surface of the belt, as far as possible. If traces of silicon spray are found, lubrication is not necessary. In case of a dry surface refer to the following instructions. Only use oil free silicon spray. Application of lubricant on the belt: z Position the belt so that the seam is located in the middle of the plate. z Insert the spray valve in the spray head of the lubricant container. z Lift the belt at one side and hold the spray valve in a distance of approximately 19 15cm to the front end of striding belt and plate. Start at the front end of the belt. Lead the spray valve in direction of the back end. Repeat this process on the other side of the belt. Spray each side for about 4 seconds. z Wait 1 minute to let the silicon spray spread, before starting the machine. Cleaning Regular cleaning of the striding belt ensures a long product life. z Warning: The treadmill must be turned off to avoid electrical shocks. The power cord must be pulled out of the socket, before starting the cleaning or maintenance. z z z Caution: Do not use any abrasives or solvents. To avoid damage to the computer, keep any liquids away. Do not expose the computer to direct sunlight. After each training: Wipe the console and other surfaces with a clean soft and damp cloth to remove sweat residues. Weekly: To make the cleaning easier it is recommended to use a mat for the treadmill. Shoes can leave dirt on the striding belt that can fall beneath the treadmill. Clean the mat under the treadmill once a week. Storage: Store you treadmill in a clean and dry environment. Ensure the master power switch is off and is un-plugged from the electrical wall outlet. Trouble Shooting Error Code of Display Guide: CODE PROBLEM SOLUTION E00 Safety Key not on the position Re-location the safety key on correct position E001 Controller communication error A: Check the Main Controller Wire B: Replace the controller E002 Over speed protective A: Check the Wire from Motor to controller B: Replace the controller E003 No speed signal E005 Over current protective E007 Monitor communication error E008 Controller Error Replace the controller E09 Treadmill is folded Unfold the treadmill , then press start key A: Check speed signal wire if connect properly B: Replace the speed signal wire C: Replace the controller A: Over loading or over resistance B: Replace controller A: Check the Main Controller Wire B: Replace the controller 20 HINTS TO HELP YOU BEFORE EXERCISE Warning: Before using this product, please consult your personal physician for a complete physical examination. Frequent and strenuous exercise should be approved by your doctor first. If any discomfort should result from your use of this product, stop exercising and consult your doctor. Proper usage of this product is essential. Please read your manual carefully before exercising. Please keep all children away from the equipment during use and when equipment is unattended. Always wear appropriate clothing, including athletic shoes, when exercising. Do not wear loose clothing that could become caught during exercising. Make sure that all bolts and nuts are tightened when equipment is in use. Periodic maintenance is required on all exercise equipment to keep it in good condition. Before beginning: How you begin your exercise program depends on your physical condition. If you have been inactive for several years, or are severely overweight, you must start slowly and increase your time gradually, a few minutes per week. Initially you may be able to exercise only for a few minutes in your target zone. However, your aerobic fitness will improve over the next six to eight weeks. Don’t be discouraged if it takes longer. It’s important to work at your own pace. Ultimately, you’ll be able to exercise continuously for 30 minutes. And the better your aerobic fitness, the harder you will have to work to stay in your target zone. But remember these essentials: Contact your physician before starting a workout or training program. Have your doctor review your training and diet programs to advise you of a workout routine you should adopt. Begin your training program slowly with realistic goals that have been set by you and your doctor. Supplement your program with some type of aerobic exercise such as walking, jogging, swimming, dancing and/or bicycling. Monitor your pulse frequently. If you do not have an electronic heart rate monitor, have your physician show you the proper way to manually check your pulse by using your wrist or neck. Establish your target heart rate based on your age and condition. Drink plenty of fluids during the course of your routine. You must replace the water content lost from excessive exercising to avoid dehydration. Avoid drinking large amounts of cold liquids. Fluids should be at room temperature when consumed. TARGET HEART RATE 21 Finding your pulse: To make sure your heart is beating in its target zone, you’ll need to know how to monitor your heart rate. The easiest way is to feel the pulse in the carotid artery on either side of your neck, between the windpipe and the large neck muscles. Count the number of beats in ten seconds, and then multiply that number by six. This gives you the number of beats per minute. How fast should your heart beat during aerobic exercise? Fast enough to reach and stay in its “target zone,” a range of beats per minute that is largely determined by your age and physical condition. To determine your target zone, consult the chart we have provided. FIND YOUR TARGET HEART RATE Heart Rate in beats per minute 200 180 160 140 120 100 80 20 25 30 35 40 45 50 55 60 65 70 AGE IN YEARS Advanced: Sports, athletic conditioning or interval training FITNESS: Optimal training, aerobic or cardiovascular HEALTH: Beginner, low intensity with long duration produces fat burning Aerobic exercise: Is any sustained activity that sends oxygen to your muscles via your heart and lungs. It will improve the fitness of your lungs and heart: your body’s most important muscle 22 MUSCLE CHART Targeted muscle groups: The exercise routine that is performed on this product will develop primarily lower body muscle groups. These muscle groups are shown in gray color on the chart below. Shoulder muscles Bicep muscle Forearm muscles Calf muscles Triceps muscles Gluteal muscles A C E G I K B D F H J L Pectoral muscles Abdominal muscles Quadriceps muscles Trapezius muscles Back muscles Hamstring muscles 23 Warm-up / stretching exercises A successful exercise session begins with warming up exercises and ends with exercises for cooling down and relaxing. These warming up exercises prepare your body for the subsequent demands made upon it. The cooling down / relaxation period after the exercise session ensures that you do not experience any muscular problems. In the following you will find stretching exercise instructions for warming up and cooling down. Please pay attention to the following points: • • Carefully warm up every muscle group you will be using in the exercise session for about 5 to 10 minutes. The stretching exercises are carried out correctly if you feel a comfortable tension in the corresponding muscle. Speed does not play a role during the stretching exercises. Fast and jerky movements must be avoided. NECK EXERCISES Tilt your head to the right and feel the tension in your neck. Slowly drop your head down to your chest in a semi-circle and then turn your head to the left. You will feel a comfortable tension in your neck again. You can repeat this exercise alternately several times. 1 EXERCISES FOR THE SHOULDER AREA Lift the left and right shoulders alternately, or lift both shoulders simultaneously. 2 24 ARM STRETCHING EXERCISES Stretch the left and right arms alternately towards the ceiling. Feel the tension in your left and right side. Repeat this exercise several times . 3 EXERCISES FOR THE UPPER THIGH Support yourself by placing your hand on the wall, then reach down behind you and lift up your right or left foot as close to your buttocks as possible. Feel a comfortable tension in your front upper thigh. Maintain this position for 30 seconds if possible and repeat this exercise 2 times for each leg. 4 INSIDE UPPER THIGH Sit on the floor and place your feet in such a way that your knees are facing outwards. Pull your feet as close as possible to your groin. Now press your knees carefully downwards. Maintain this position for 30-40 seconds if possible. 5 25 TOUCH TOES Bend your trunk slowly forwards and try to touch your feet with your hands. Reach down as far as possible to your toes. Maintain this position for 20-30 seconds if possible. 6 EXERCISES FOR THE KNEES Sit on the floor and stretch out your right leg. Bend your left leg and place your foot on your right upper thigh. Now try to reach your right foot with your right arm. Maintain this position for 30-40 seconds if possible. 7 EXERCISES FOR THE CALVES/ACHILLES TENDON Place both hands on the wall and support your full body weight. Then move your left leg backwards and alternate it with your right leg. This stretches the back of the leg. Maintain this position for 30-40 seconds if possible. 8 26 For technical support call the: UK Customer Hotline: +44(0) 845 600 0464 UK Email:[email protected]