1
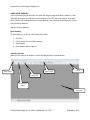
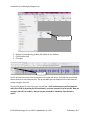
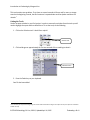
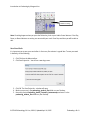
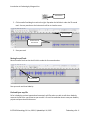
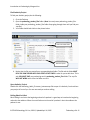
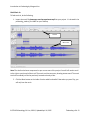
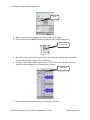
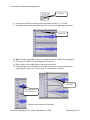
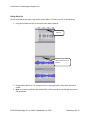
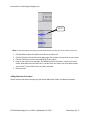
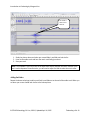
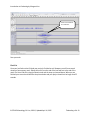
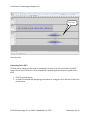
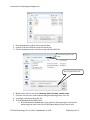
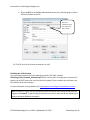
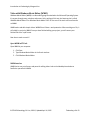
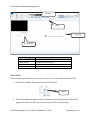
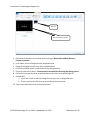
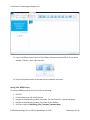
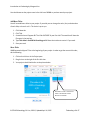
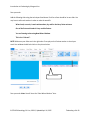
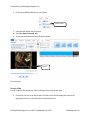
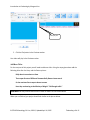
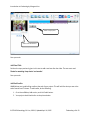
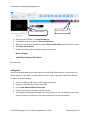
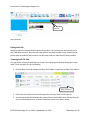
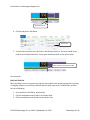
Introduction to Podcasting by Margaret Lion Introduction to Podcasting By Margaret Lion Contents Introduction .............................................................................................................................................. 3 Download Files ...................................................................................................................................... 4 Audio with Audacity .................................................................................................................................. 5 Open Audacity....................................................................................................................................... 5 Audacity Interface ................................................................................................................................. 5 Importing Audio .................................................................................................................................... 6 Cutting the Track ................................................................................................................................... 8 Save Your Work ..................................................................................................................................... 9 Cutting the Track Again ....................................................................................................................... 10 Import Second Audio File .................................................................................................................... 10 Moving A Track ................................................................................................................................... 10 Moving Second Track .......................................................................................................................... 11 Find and Open .aup File ...................................................................................................................... 11 IU SPH-B Kinesiology, M. Lion, ©2012, Updated April 14, 2015 Podcasting v.6b -1 Introduction to Podcasting by Margaret Lion Find Audacity Project .......................................................................................................................... 12 Open Audacity Project ........................................................................................................................ 12 Fading Music In & Out......................................................................................................................... 12 Final Cut .............................................................................................................................................. 19 Converting To An .MP3 ....................................................................................................................... 20 Finishing the Audio Portion................................................................................................................. 22 Video with Windows Movie Maker (WMM) ........................................................................................... 23 Open WMM in STC Lab ....................................................................................................................... 23 WMM Interface................................................................................................................................... 23 Create A Title....................................................................................................................................... 24 Saving Your WMM Project .................................................................................................................. 26 Add More Titles................................................................................................................................... 27 Inserting A Picture Into WMM ............................................................................................................ 29 Add Caption to Picture ........................................................................................................................ 29 Preview Video ..................................................................................................................................... 30 Add More Titles................................................................................................................................... 31 Importing & Adding Video .................................................................................................................. 32 Add Final Title ..................................................................................................................................... 33 Add End Credits................................................................................................................................... 33 Adding Music....................................................................................................................................... 34 Editing Audio File ................................................................................................................................ 35 Preview Your Work ............................................................................................................................. 37 Converting The Project File ................................................................................................................. 37 Publishing Your Podcasting Files ............................................................................................................. 38 References .............................................................................................................................................. 39 IU SPH-B Kinesiology, M. Lion, ©2012, Updated April 14, 2015 Podcasting v.6b -2 Introduction to Podcasting by Margaret Lion Objectives: • • • • • • • • • • • • • • • After completing the project listed in these pages, you will be able to: Identify podcasting concepts Launch Audacity Import audio tracks into Audacity Edit tracks in Audacity Save tracks in Audacity Create a fade in and fade out in Audacity Open files created in Audacity Convert Audacity tracks to .mp3 format Launch Windows Movie Maker (WMM) Import video, audio, and pictures into WMM Create Titles, Captions, and Credits in WMM Edit audio in WMM Save projects in WMM Convert .wlmp file to .mp4 Introduction Welcome to the wonderful world of podcasting! Podcasting is a great and very inexpensive way to communicate with a worldwide audience using the Web. Podcasts consist of audio or video files that subscribers can get downloaded to their computers. Think of podcasting like a magazine subscription. You may see a copy of “Kinesiology Today” in a store. You pick it up and read it. You like it so you purchase that magazine issue. Once you get home you read the magazine cover to cover. It’s great and you want more! So you subscribe to the magazine and every time a new issue is released you get it in the mail. Podcasting works on a similar basis. If you find a podcast that you like, you can subscribe to it using software called a podcatcher (example: iTunes). Every time a new file from your favorite podcast comes out, you can have it downloaded to your computer for your listening and/or viewing pleasure. Some podcasting examples are: • • IU Podcast Portal – http://podcast.iu.edu/Portal/ - Great place to find podcasts created by Indiana University staff and students. IUSportcom.com Podcasts - http://iusportcom.com/category/podcasts/ - Podcasts created by IU students about sport and sport at IU. IU SPH-B Kinesiology, M. Lion, ©2012, Updated April 14, 2015 Podcasting v.6b -3 Introduction to Podcasting by Margaret Lion • • • • Renaissance Festival Podcast – http://renaissancefestivalmusic.com/ - This podcast features music that can be heard at Renaissance festivals, such as Medieval and Renaissance music as well as Celtic music. PotterCast: The Harry Potter Podcast - https://itunes.apple.com/us/podcast/pottercast-1harry-potter/id79138340?mt=2 – Fans of Harry Potter have made this podcast discussing everything from book topics to the movies. MuggleCast - http://www.mugglenet.com/mugglecast/ & https://itunes.apple.com/WebObjects/MZStore.woa/wa/viewPodcast?id=76699727 - Another popular Harry Potter podcast. Multicraftual - http://multicraftual.wordpress.com/ - This podcast focuses on the creative and crafting loves of Jessie and Liby. Also Liby lives in Bloomington, Indiana. Note: You can hear the individual episodes on the above Websites as well as having the episodes downloaded to your computer. In K200 you will make both an audio and video podcast. This will also give you experience in creating audio and video files for any purpose such as uploading to YouTube, making your own DVDs, etc. Each podcast will require you to use a different piece of software. For the audio podcast you will use Audacity. For the video podcast you will use Windows Movie Maker 2.6. Each piece of software is on the IU STC lab computers and can be downloaded from the Web for free. Know that the only acceptable file types for podcasts for this class are .mp3 and .mp4. The audio file is .mp3 and the video file is .mp4. These are the only acceptable file formats for your work in K200. You will not be publishing your files to a podcatcher for the world to hear, but you will get the basics of the file creation. Let’s get started! Download Files Before you being your work you will need to download your student files for this project. These files will be found on the K200 Website, Class Resources page, under Podcasting http://www.iub.edu/~sphk200/resources.html#podcasting. The folder name is podcasting-student-files. Download these files and save them to your Desktop. Since the files are zipped you must unzip them, discard the zipped folder, and then open the folder. IU SPH-B Kinesiology, M. Lion, ©2012, Updated April 14, 2015 Podcasting v.6b -4 Introduction to Podcasting by Margaret Lion Audio with Audacity The first podcasting file you will make is an audio file using the program Audacity. Audacity is a free audio editing program. You will find it on the computers in the STC labs across campus. If you wish, when at home, you can download from its home Website - http://audacity.sourceforge.net/. For this class you will use Audacity. Now let’s examine Audacity. Open Audacity To open Audacity in an STC lab, do the steps in the table. 1. 2. 3. 4. Click Start. Click in Search Files and Folders text box. Type Audacity. Open Audacity when it appears. Audacity Interface Audacity has its own set of toolbars. Compare the labeled picture and table below. Meter Toolbar Menu Toolbar Timeline Editing Tools Audio Control Buttons Workspace IU SPH-B Kinesiology, M. Lion, ©2012, Updated April 14, 2015 Podcasting v.6b -5 Introduction to Podcasting by Margaret Lion Button Menu Toolbar Audio Control Buttons Editing Tools Meter Toolbar Timeline Workspace Purpose Accessing all commands. Use for stopping, starting, or pausing file. Use for cutting, moving, or adding fades. Shows volume level. Shows time length of audio file. Audio tracks will display for editing in this space. Importing Audio In order to edit an audio file you must import it into Audacity. You can import an .mp3 however Audacity changes the file type to .aup. Audacity .aup files have a corresponding folder that must be with the file. For example in Major Project 5 you will use the Audacity files listed as: olympic_discussion.aup olympic_discussion.aup.bak olympic_discussion_data FOLDER The olympic_discussion.aup file is the primary file you will use when editing the work. However you MUST have the olypmic_discussion.aup.bak file and the olympic_discussion_data FOLDER saved with the .aup file in order for the file to work. This is just how Audacity operates. So remember when saving your Audacity work, you must save all of the .aup files and folders. To import your first audio file to Audacity, do the following: 1. Click File on the Menu toolbar. 2. Click Import. 3. Click Audio. IU SPH-B Kinesiology, M. Lion, ©2012, Updated April 14, 2015 Podcasting v.6b -6 Introduction to Podcasting by Margaret Lion File > Import > Audio 4. Navigate to the podcasting_student_files folder on your Desktop. 5. Click on audio1.mp3 6. Click Open. Track name. The file will now have a track name that appears in the upper left corner. There will also be command buttons under the name, Mute and Solo. The up and down blue lines displayed in the track show the volume changes in the track. Press the Play button to listen to the track. You will hear: “Hello and welcome to your first imported audio file in P200. By importing this file into Audacity, you have converted it into an aup file. Now you can play it and edit it in Audacity. Now you can play it and edit it in Audacity. Oops that was a repeat.” IU SPH-B Kinesiology, M. Lion, ©2012, Updated April 14, 2015 Podcasting v.6b -7 Introduction to Podcasting by Margaret Lion This track contains two problems. First, there are several seconds of silence and, for some, a strange sound at the beginning. Second, the third sentence is repeated twice and the speaker mentions the mistake. 1 Cutting the Track You do not want mistakes in your final project. In order to remove the mistakes from the track you will need to highlight the spots and then delete them. To cut the track, do the following: 1. Click on the Selection tool. It looks like a capital I. Selection tool. 2. Click and drag over approximately the first two seconds of the recording to select it. Selected section. 3. Press the Delete key on your keyboard. Your file has been edited. 1 The noise that you may hear at the beginning is the sound of the mouse button clicking on the script for the clip. The repeat is an intentional mistake. No really. IU SPH-B Kinesiology, M. Lion, ©2012, Updated April 14, 2015 Podcasting v.6b -8 Introduction to Podcasting by Margaret Lion Mistake is missing. Note: If nothing happens when you press the Delete key, look at your Audio Control buttons. If the Play, Pause, or Record buttons are active, you cannot edit your track. Press Stop and then you will be able to edit. Save Your Work It is important you to save your work often. In fact every five minutes is a good idea. To save your work in Audacity, do the following: 1. Click File from the Menu toolbar. 2. Click Save Project As… You will see a warning screen. 3. Click OK. The Save Project As… window will open. 4. Make sure you are in the podcasting_student_files folder on your Desktop. 5. Name this project Podcasting_Audio_Firstname_Lastname.aup and save it in the podcasting_student_files folder on your Desktop. IU SPH-B Kinesiology, M. Lion, ©2012, Updated April 14, 2015 Podcasting v.6b -9 Introduction to Podcasting by Margaret Lion Special Note About Time: There are times given in the instructions below. They are to be used as rough guides for your work. If your files do not match up exactly with the given times, that is alright. Being off by a few seconds is allowed. Cutting the Track Again To cut the mistake at the end of the track, use the same steps you used above to cut the beginning. Hint: Start the cut in between the 15 and 16 second marks. Note about Selection Tool. You can use the Selection tool to start play in any part of the track. For example, if you want to start listening to this track at the ten second mark, just click on the Selection tool and then click in the track under the ten second marker. A line will appear on the track. Now when you press the play button, playing will start at the ten second mark. Save your work. Import Second Audio File You can have more than one audio file in your podcast. The second file you will import is audio2.mp3. It is located in the podcasting_student_files folder on your Desktop. To import the second audio file, repeat the previously given import steps. When you have finished importing audio2.mp3, your screen should look similar to the picture below. Note: The track audio2 is longer than audio1. In order to view the entire track, you may scroll right and left in Audacity by using the horizontal scroll bar at the bottom of the window. Moving A Track Moving a track in Audacity means that you will move it left and right. This will change the time the track plays. To move a track, do the following: 1. Click the Timeshift tool in the Menu bar. IU SPH-B Kinesiology, M. Lion, ©2012, Updated April 14, 2015 Podcasting v.6b -10 Introduction to Podcasting by Margaret Lion Timeshift tool. 2. Click on audio2 and drag the track to the right. Stop when the left side is under the 23 second mark. You may need to use the horizontal scroll bar to view the move. 23 second mark. Audio2 track has been moved. 3. Save your work. Moving Second Track Move the audio1 track so that the left side is under the four second marker. 4 second mark. Save your work and close Audacity. Find and Open .aup File So far in Audacity you have imported and converted .mp3 files when you wish to edit them. Audacity converts the file to the .aup format so you can edit. It is crucial to remember how to save your Audacity projects and open them for future use. IU SPH-B Kinesiology, M. Lion, ©2012, Updated April 14, 2015 Podcasting v.6b -11 Introduction to Podcasting by Margaret Lion Find Audacity Project To find your Audacity project, do the following: 1. Go to the Desktop. 2. Open the podcasting_student_files folder. (Note: You may have a podcasting_student_files folder inside your podcasting_student_files folder. Keep going through them until you find your .aup file.) 3. Your folder should look similar to the picture below. Note the file data folder. Note the .aup file. 4. Notice that the file you created has a corresponding data folder. The file and the folder MUST BE IN THE SAME FOLDER WITH EACH OTHER AT ALL TIMES in order for you to edit them. This is why YOU MUST SAVE your podcasting work in podcasting_student_files folder. The .aup file WILL NOT WORK unless it has the folder next to it. Open Audacity Project Double-click the Podcasting_Audio_Firstname_Lastname.aup file to open it in Audacity. You should see your project in front of you. You are now ready to continue editing. Fading Music In & Out Music fading in and out at the beginning and end of a podcast is a good way to introduce the beginning and end to the audience. When the music fades out at the end of a podcast it alerts the audience the podcast is over. IU SPH-B Kinesiology, M. Lion, ©2012, Updated April 14, 2015 Podcasting v.6b -12 Introduction to Podcasting by Margaret Lion Fade Music In To fade music in, do the following: 1. Import the music file danosongs.com-the-experiment.mp3 into your project. It is located in the podcasting_student_files folder on your Desktop. Timeline. Music track. Note: The timeline has been compressed so you can see more of the project. You will still need to scroll to the right to see the end of the track. The music track has two parts, denoting stereo sound. The music track can be edited just like the previously inserted voice only tracks. 2. Click the Mute button on the inside of tracks audio1 and audio2. Now when you press Play, you will only hear the music. IU SPH-B Kinesiology, M. Lion, ©2012, Updated April 14, 2015 Podcasting v.6b -13 Introduction to Podcasting by Margaret Lion Mute. 3. Make sure you see the very beginning of the project by scrolling right. 4. Click the Envelope tool. Note: Below pictures may not match up with instructions. Envelope tool. 5. Move the Envelope tool over the top blue line in the music track. The top blue line should be between the two white triangles of the Envelope tool. 6. Click once. There should now be a white circle on the line. Each line in the audio track has a white circle even though you only clicked the first or top line. White circle. 7. Click the Zoom button three times to get a closer look at the track. IU SPH-B Kinesiology, M. Lion, ©2012, Updated April 14, 2015 Podcasting v.6b -14 Introduction to Podcasting by Margaret Lion Zoom tool. 8. Now click on the blue line leaving a white mark under seconds 1, 3, 5, 7, and 8. 9. You should now have five marks showing on the track from the beginning to 8 seconds. White marks. 10. 11. 12. 13. Note: To create a good fade in, you want to make the blue line look like a slope going up. Click on the first white circle at the beginning of the track. Drag the white circle straight down to the center of the track. Click and drag the rest of the white circles down until they form a slope rising from the beginning of the song to the 5 second mark. This slope creates the fade in. Fade in slope. After dragging down the first white mark. Save your work and listen to the fade in. IU SPH-B Kinesiology, M. Lion, ©2012, Updated April 14, 2015 Podcasting v.6b -15 Introduction to Podcasting by Margaret Lion Fading Music Out You will now fade out the music using similar steps to fade in. To fade out music, do the following: 1. Using the Envelope tool click on the white mark under 8 seconds. Timeline. White circles form 4 to 6 seconds. 2. Drag the white dots from 5 to 7 seconds to form a slope going down from where the fade-in ended. 3. Note: Your fade-in and fade-out should look like a little mountain as one side goes up and one side goes down. IU SPH-B Kinesiology, M. Lion, ©2012, Updated April 14, 2015 Podcasting v.6b -16 Introduction to Podcasting by Margaret Lion Fade out. Note: The line denoting the music after 8 seconds should look like one thin, blue line as it does in the picture. 1. 2. 3. 4. Click both Mute buttons for audio1 and audio2 to turn Mute off. Click the Selection tool and click at the beginning of the timeline in the top track on your screen. Click the Play button to listen to the beginning of your project. Listen to your track to hear the fades. You should hear the music fade in, then the voice from audio1 speak while the music fades out. If you don’t hear this check to see if the Mute buttons are activated. If you still don’t hear any fades, redo them. 5. Save your work. Adding Fades into the Podcast You will now use the same techniques you just used to add another fade in and fade out sequence. IU SPH-B Kinesiology, M. Lion, ©2012, Updated April 14, 2015 Podcasting v.6b -17 Introduction to Podcasting by Margaret Lion This shows a fade in and a fade out. 1. Study the picture above and make your second fade in and fade out look similar. 2. Listen to the audio tracks and hear the music track fading in and out. 3. Save your work. Note: It is acceptable if you hear a little of the audio track before and after the fades. However if the music track overpowers the audio tracks, you will need to adjust the fade to make the music softer. Adding End Fades Repeat the above technique to add a music fade in and fade out at the end of the audio track. When you are done your screen should look similar to the below picture. IU SPH-B Kinesiology, M. Lion, ©2012, Updated April 14, 2015 Podcasting v.6b -18 Introduction to Podcasting by Margaret Lion Fade in and a fade out at end of track. Save your work. Final Cut Once your last fade out has finished your project is finished as well. However you still have several minutes of unnecessary music. Delete the music from the end of the last fade out to the end of the music file. You will do this using the Selection tool and the steps you learned above. When you are finished your screen should look like the picture below and your project should not be longer than 55 seconds. IU SPH-B Kinesiology, M. Lion, ©2012, Updated April 14, 2015 Podcasting v.6b -19 Introduction to Podcasting by Margaret Lion End of track. k Save your work. Converting To An .MP3 The final step to making your file ready for podcasting is to convert it to the .mp3 format. You MUST convert it to an .mp3 in order for it to be acceptable as a podcasting file and to receive a grade for it in K200. 1. Click File and then Export. 2. An Export File window will open giving you locations for saving your file. It will look similar to the picture below. IU SPH-B Kinesiology, M. Lion, ©2012, Updated April 14, 2015 Podcasting v.6b -20 Introduction to Podcasting by Margaret Lion 3. Open the podcasting_student_files on your Desktop. 4. Under the File name: textbox you will see Save as type. 5. Click the drop down arrow on the Save as type and select MP3 Files. Inside podcasting_student_files folder. Save as type drop down arrow. 6. 7. 8. 9. Make sure the name of your file is Podcasting_Audio_Firstname_Lastname.mp3. Click Save. You may see a small window showing the exporting process. Let it run. You will get a warning window. Click OK. The Edit Metadata window MIGHT open. a. IF the Edit Metadata window opens, fill it in with the information given in the picture below using your name; track title of K200 Podcast Weekly Project; and the year. IU SPH-B Kinesiology, M. Lion, ©2012, Updated April 14, 2015 Podcasting v.6b -21 Introduction to Podcasting by Margaret Lion b. IF you do NOT see the Edit Metadata window, do not worry and keep going. It will not affect the playback of the file. Enter your information giving your name, track title, and year. 10. Click OK. Your file will now be converted to an .mp3. Finishing the Audio Portion Save your newly created .mp3 in your podcasting_student_files folder. Load the Podcasting_Audio_Firstname_Lastname.mp3 into the correct section in Assignments in Oncourse for grading. You will NOT submit the .aup file or folder for grading. Failure to submit the .mp3 means you will receive 0 points. No exceptions. For more information on using Audacity visit http://audacity.sourceforge.net/help/documentation. Note: If you wish to create .mp3s using Audacity outside of K200 you must download and install the program called lame.dll. To get this program and learn how to use it, type lame.dll into a Web search engine and read the Websites that appear. IU SPH-B Kinesiology, M. Lion, ©2012, Updated April 14, 2015 Podcasting v.6b -22 Introduction to Podcasting by Margaret Lion Video with Windows Movie Maker (WMM) Windows Movie Maker (WMM) is a video editing program attached to the Microsoft Operating System. It has gone through many variations and names. At the writing of this text, the latest version is called Windows Movie Maker 12 or Windows Movie Maker 2015. For the rest of the text it will be referred to as WMM. WMM makes and edits simple videos. WMM files will have a .wmlp extension. When working on a file, it will called it a project in WMM. Once you have finished editing your project, you will convert your finished file to the .mp4 format. Now time to make a movie!! Open WMM in STC Lab Open WMM in your computer. 1. Click Start 2. Type Windows Movie Maker in the Search text box. 3. Click Windows Movie Maker. WMM Interface WMM has its own set of menus and panes for editing video. Look at the labeled picture below to familiarize yourself with WMM. IU SPH-B Kinesiology, M. Lion, ©2012, Updated April 14, 2015 Podcasting v.6b -23 Introduction to Podcasting by Margaret Lion Menu bar. Ribbon. Project pane. Preview monitor. Area/Button/Menu Menu Bar Contents Pane Preview monitor Ribbon Purpose Accessing all commands. Shows the current project. Plays the project as a movie. Shows commonly used commands. Create A Title The first thing that you will do to start your project is create a title. You see titles on movies and TV. 1. Go to the Home Ribbon, Add section, and click the Title button. Title button. 2. The Text tools ribbon will appear. A title icon will appear in the Project pane and a text box will appear in the Preview monitor. Your screen will look similar to the picture below. IU SPH-B Kinesiology, M. Lion, ©2012, Updated April 14, 2015 Podcasting v.6b -24 Introduction to Podcasting by Margaret Lion Title icon. Text box in Preview monitor. 3. Click inside the text box in the Preview monitor and type: Wizard Rock and Belly Dance by Firstname Lastname. 4. In the ribbon, click the Background color drop down arrow. 5. Change the background color to any color but default black. 6. Click on the Preview monitor as sometimes the text box goes away. 7. Click on the text box to select it. You may need to constantly do this during the editing process. 8. Click on the Font type drop down arrow and select any font other than default Segoe UI. 9. Possible Edits: a. If your text is hard to read then change the font type, size, or background color. b. If text is not all on the title, click on the text box and center the text. 10. Your screen should look similar to the picture below. IU SPH-B Kinesiology, M. Lion, ©2012, Updated April 14, 2015 Podcasting v.6b -25 Introduction to Podcasting by Margaret Lion 11. Look in the Effects section of the Text Tools Ribbon. Choose an animation Effect. For the below example, Cinematic - burst–right was used. 12. Press the Play button under the Preview monitor and watch your movie. Saving Your WMM Project To save your WMM project for the first time, do the following: 1. 2. 3. 4. 5. Click File. From the new menu click Save Project As. Navigate to the podcasting_student_files folder. The Save Project As… window will appear. Navigate to the podcasting_student_files folder on your Desktop. Save your project as Podcasting_Video_Firstname_Lastname.wlmp. IU SPH-B Kinesiology, M. Lion, ©2012, Updated April 14, 2015 Podcasting v.6b -26 Introduction to Podcasting by Margaret Lion You should now see the project name in the title bar of WMM as you have saved your project. Add More Titles You will now add more titles to your project. If you wish you can change the color, font, and animation of each slide, or leave it as it is. The choice is up to you. 1. Click Home tab. 2. Click Title. 3. A new title icon will appear BUT it will be IN FRONT of your first title! The new title will show the file name in the text box. 4. Type This video is for K200 in Kinesiology at IU. Move the text box to center it if you need. 5. Save your work. Move Titles WMM automatically puts Titles at the beginning of your project. In order to get the correct title order, do the following: 1. Click on the title icon in the Project pane. 2. Drag the icon to the right of the first title icon. 3. Your project should look similar to the picture below. Second title is now in at the end. It shows in the Preview monitor because it is selected. IU SPH-B Kinesiology, M. Lion, ©2012, Updated April 14, 2015 Podcasting v.6b -27 Introduction to Podcasting by Margaret Lion Save your work. Add the following titles using the techniques listed above. Each line of text should be its own slide. You may have to edit each text box in order to make the words fit. Wizard rock, or wrock, is music written about, by, and for the Harry Potter universe. One of the first wrock bands is Harry and the Potters. You are listening to them sing New Wizard Anthem. This is the “club mix”. NOTE: Make sure your slides are in the right order. Press play on the Preview monitor to check your work. Your window should look similar to the picture below. Note the title order. Save your work. Note: You will insert the “New Wizard Anthem” later. IU SPH-B Kinesiology, M. Lion, ©2012, Updated April 14, 2015 Podcasting v.6b -28 Introduction to Podcasting by Margaret Lion Inserting A Picture Into WMM You can insert one or many pictures into a project. Since you just mentioned Harry and the Potters there should be a picture of them. 1. 2. 3. 4. 5. 6. 7. Go to the Home Ribbon. Go to the Add section. Click Add videos and photos button. If you need, navigate to the podcasting_student_files folder. Click on the picture Harry+and+the+Potters+PNG.png. Click the Open button in the lower right hand corner. The picture will now appear in the Project pane and the Preview monitor. Picture is in content pane and preview monitor. Save your work. Add Caption to Picture A caption is words super imposed over a picture or video. You will add a caption over the Harry and the Potters picture. To add the caption, do the following: 1. Click on the picture icon in the Project pane to select it. Picture should also show in Preview monitor. IU SPH-B Kinesiology, M. Lion, ©2012, Updated April 14, 2015 Podcasting v.6b -29 Introduction to Podcasting by Margaret Lion 2. On the Home Ribbon, Add section, click Caption. Caption button. 3. A text box will appear over the picture. 4. Type Here they are wrockin' out. 5. Your screen should look similar to the picture below. Caption. Save your work. Preview Video In order to get an idea of how your video is looking you can preview your work. 1. Click on the first title in the Project pane. You will see the thick black play bar move to the beginning of the title. It will look similar to the picture below. IU SPH-B Kinesiology, M. Lion, ©2012, Updated April 14, 2015 Podcasting v.6b -30 Introduction to Podcasting by Margaret Lion Black play bar. 2. Click the Play button in the Preview monitor. Your video will play in the Preview monitor. Add More Titles For the next part of this project you will need to add more titles. Using the steps given above add the following titles after the Harry and the Potters picture: Belly dance is an ancient art form. The troupe director of Different Drummer Belly Dancers loves wrock. So she convinced her troupe to dance to some. Here they are dancing to the Ministry of Magic's "Old Enough to Die." REMEMBER: You may need to edit the text in order to make it fit into the text boxes. When you are finished, you project should look similar to the picture below. IU SPH-B Kinesiology, M. Lion, ©2012, Updated April 14, 2015 Podcasting v.6b -31 Introduction to Podcasting by Margaret Lion Save your work. Importing & Adding Video You are now ready to add some video footage into your video! The steps for adding video are similar to the steps for adding the picture. To add video, do the following: 1. 2. 3. 4. 5. 6. Go to Home Ribbon, Add section, and click Add videos and photos. Navigate to the podcasting_student_files folder on the Desktop. Click on the file ddbd-2008-K200.wmv. Click Open. The video will appear in the Project pane and the Preview monitor. Your work will look similar to the picture below. IU SPH-B Kinesiology, M. Lion, ©2012, Updated April 14, 2015 Podcasting v.6b -32 Introduction to Podcasting by Margaret Lion Video in Project pane. Video in Preview monitor. Save your work. Add Final Title Perform the steps previously given in this text to add a text box after the video. The text must read: Thanks for watching. Keep dancin' and wrockin'. Save your work. Add End Credits WMM allows you to add rolling credits at the end of your project. This will look like what you see at the end of movies and TV shows. To add credits, do the following: 1. Go to Home Ribbon, Add section, and click Credit button. 2. Your project should look similar to the picture below. IU SPH-B Kinesiology, M. Lion, ©2012, Updated April 14, 2015 Podcasting v.6b -33 Introduction to Podcasting by Margaret Lion Credits in Preview monitor. 3. 4. 5. 6. 7. Video in Project pane. Replace the word “CREDIT” with Special thanks to: In the [Enter name here] spot type Harry and the Potters. With your insertion point placed to the right of Harry and the Potters, press the Enter key twice. Type Harry and the Potters. Add the rest of the credits listed below using the steps above. Ministry of Magic And Different Drummer Belly Dancers Save your work. Adding Music You have music playing during the video however the song “New Wizard Anthem” is mentioned in this project and yet it is not heard. It is time to add music to the project, specifically “New Wizard Anthem”. To add music, do the following: 1. 2. 3. 4. 5. Go to Home Ribbon, Add section, and click Add music button. Navigate to the podcasting_student_files folder. Click on New Wizard Anthem Club mix.mp3. Click the Open button in the lower right hand corner. The song will now be playing throughout the entire project. You can see this by the green stripe under the project in Project pane. Your work will look similar to the picture below. IU SPH-B Kinesiology, M. Lion, ©2012, Updated April 14, 2015 Podcasting v.6b -34 Introduction to Podcasting by Margaret Lion Music file. Save your work. Editing Audio File Sometime audio files must be edited to work with the video. If you preview your work you will notice that “New Wizard Anthem” plays over the video and thus interrupts the video’s song. It would also be good to have the audio file fade in and out. You will need to edit the audio file to fix these problems. Trimming Audio File Time First you need to shorten the audio file time so that it is not playing over the belly dancing part of your video. To trim the audio file, do the following: 1. Click the Music Tools tab to display the Music Tools Ribbon. You will see the Music Tools Ribbon. Music Tools Ribbon. 2. Click on the first belly dance title located right after the Harry and the Potters picture. 3. You will now see the thick black play bar move in front of the first belly dance title and after the Harry and the Potters picture. Your work should look similar to the picture below. IU SPH-B Kinesiology, M. Lion, ©2012, Updated April 14, 2015 Podcasting v.6b -35 Introduction to Podcasting by Margaret Lion Black play back bar. 4. Click Set end point in the Ribbon. Set end point. 5. You will now see that the music file ends on the Black play back bar. The music should not be under any of the belly dance titles. Your project should look similar to the picture below. Music ends when first belly dance title. Save your work. Fade In & Fade Out Music that fades in an out is a great way to signal to your audience that something important is starting or stopping. A fade out can also help audiences adjust to when music ends. To add a fade in and face out, do the following: 1. Go to the Music Tools Ribbon, Audio section. 2. Click the drop down arrow by Fade in: and choose Slow. 3. Click the drop down arrow by Fade out: and choose Fast. IU SPH-B Kinesiology, M. Lion, ©2012, Updated April 14, 2015 Podcasting v.6b -36 Introduction to Podcasting by Margaret Lion Save your work. Preview Your Work Your project should be finished. However you will want to make sure that it looks and sounds correct. You will want to make sure that “New Wizard Anthem” is only heard during the beginning of the video. The song should end when the belly dance titles begin and should have a fade in and fade out. Preview your work to be sure the titles and credits work correctly and the song and video are in the correct spot. Converting The Project File Congratulations you have made a video using WMM! However this video is not yet ready to become a podcast. You must save this file in the .mp4 file format. To save your project as an .mp4, do the following: 1. 2. 3. 4. 5. 6. Click File from the Menu toolbar. Click Save movie. Click YouTube. Navigate to podcasting_student_files folder on Desktop. Confirm file is name Podcasting_Video_Firstname_Lastname.mp4 and click Save. A small window will appear showing that your file is saving. Keep your hands off the keyboard and let the computer do the converting. 7. When your project conversion is complete, a new window will open asking if you wish to view it. It will look similar to the picture below. IU SPH-B Kinesiology, M. Lion, ©2012, Updated April 14, 2015 Podcasting v.6b -37 Introduction to Podcasting by Margaret Lion 8. Click the Play button. 9. If you are in an STC lab, you will need to “install” Windows Media Player. Select the Recommended settings button. 10. Your movie will play. 11. If your movie is correct, you may submit it for grading. Submit the file Podcasting_Video_Firstname_Lastname.mp4 for grading in Assignments. Do not submit any other video file. Only your .mp4 file will be eligible for grading. You did it! Publishing Your Podcasting Files Publishing your podcasting files will not be covered in K200. However publishing does mean that you have made your files ready for distribution and podcatchers can download them. To find out more about publishing visit the podcatcher links in References at the end of this document. IU SPH-B Kinesiology, M. Lion, ©2012, Updated April 14, 2015 Podcasting v.6b -38 Introduction to Podcasting by Margaret Lion References Note: These references will also be on the Class Website under Podcasting. Audacity Website - http://audacity.sourceforge.net/ Audacity Website User Manual - http://audacity.sourceforge.net/help/documentation Danosongs.com – Royalty Free Music - http://www.danosongs.com/ Harry and the Potters - http://harryandthepotters.com/ IU Podcast Portal - http://podcast.iu.edu/Portal/ List of Podcatchers - http://en.wikipedia.org/wiki/List_of_podcatchers Ministry of Magic - http://www.myspace.com/ministryofmagicmusic Podcast from Wikipedia - http://en.wikipedia.org/wiki/Podcast Podcasting Legal Guide: Rules For The Revolution https://resources.oncourse.iu.edu/access/content/group/dc14f04f-9ee5-4960-00301843ca30c2a2/podcast_site/overview/Podcasting_Legal_Guide.pdf. Podcatchermatrix.org - http://www.podcatchermatrix.org/ Podcasting: The Basics; University Information Technology Services (UITS) IT Training & Education, Indiana University, Bloomington, Indiana, 2008 (http://ittraining.iu.edu/workshops/schedule_by_group.aspx?group=66#workshop248) What is a podcatcher? – IU Knowledge Base - http://kb.iu.edu/data/auej.html IU SPH-B Kinesiology, M. Lion, ©2012, Updated April 14, 2015 Podcasting v.6b -39