1
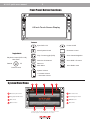
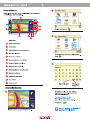
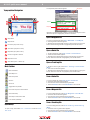
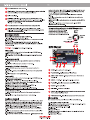
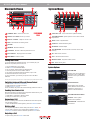
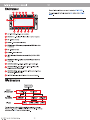
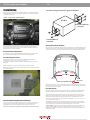
A.V.N.C quick user manual
3
Precautions
WARNING
and 0°C (+32°F) before turning your unit on.
This symbol means important
instructions. Failure to heed them
can result in serious injury or death.
INSTALL THE PRODUCT CORRECTLY SO THAT THE DRIVER
CANNOT WATCH TV/VIDEO UNLESS THE VEHICLE IS STOPPED
AND THE PARKING BRAKE IS APPLIED. It is dangerous for the driver
to watch the TV/Video while driving the vehicle. The driver may be
distracted from looking ahead and an accident could occur. If the product
is not installed correctly, the driver will be able to watch the TV/Video
while driving the vehicle and may be distracted from looking ahead
causing an accident. The driver or other people could be severely
injured.
DO NOT OPERATE ANY FUNCTION THAT TAKES YOUR ATTENTION
AWAY FROM SAFELY DRIVING YOUR VEHICLE. Any function that
requires your prolonged attention should only be performed after coming
to a complete stop. Always stop the vehicle in a safe location before
performing these functions. Failure to do so may result in an accident.
KEEP SMALL OBJECTS SUCH AS BATTERY OUT OF THE REACH
OF CHILDREN. Swallowing them may result in serious injury. If
swallowed, consult a physician immediately.
DO NOT DISASSEMBLE OR ALTER. Doing so may result in an
accident, fire or electric shock.
USE THIS PRODUCT FOR MOBILE 12V APPLICATIONS. Use for other
than its designed application may result in fire, electric shock or other
injury.
USE ONLY IN CARS WITH A 12 VOLT NEGATIVE GROUND. (Check
with your dealer if you are not sure.) Failure to do so may result in fire,
etc.
Moisture Condensation
You may notice the disc playback sound wavering due to condensation. If this happens, remove the disc from the player and wait about
an hour for the moisture to evaporate.
Damaged Disc
Do not attempt to play cracked, warped, or damaged discs. Playing a
bad disc could severely damage the playback mechanism.
Maintenance
If you have problems, do not attempt to repair the unit yourself.
Return it to your VMS dealer.
Never Attempt the Following
Do not grip or pull out the disc while it is being pulled back into the
player by the automatic reloading mechanism.
Do not attempt to insert a disc into the unit when the unit power is off.
Inserting Discs
Your player accepts only one disc at a time for playback. Do not
attempt to load more than one disc.
Make sure the label side is facing up when you insert the disc.
Your player will automatically eject any disc that is inserted incorrectly.
If the player continues to eject a correctly inserted disc, push the
Power button.
Playing a disc while driving on a very bumpy road may result in skips,
but this will not scratch the disc or damage the player.
Irregular Shaped Discs
Be sure to use round shaped discs only for this unit and never use
any special shaped discs. Use of special shaped discs may cause
damage to the mechanism.
DO NOT BLOCK VENTS OR RADIATOR PANELS. Doing so may
cause heat to build up inside and may result in fire.
MINIMIZE DISPLAY VIEWING WHILE DRIVING. Viewing the display
may distract the driver from looking ahead of the vehicle and cause an
accident.
DO NOT WATCH VIDEO WHILE DRIVING. Watching the video may
distract the driver from looking ahead of the vehicle and cause an
accident.
KEEP THE VOLUME AT A LEVEL WHERE YOU CAN STILL HEAR
OUTSIDE NOISE WHILE DRIVING. Failure to do so may result in an
accident.
New Discs
As a protective measure to prevent the Disc from jamming, the DVD
player will automatically eject discs with irregular surfaces or inserted
incorrectly. When a new disc is inserted into the player and ejected
after initial loading, using your finger, feel around the inside of the
centre hole and outside edge of the disc. If you feel any small bumps
or irregularities, this could inhibit proper loading of the disc. To remove
the bumps, rub the inside edge of the hole and outside edge of the
disc with a ball-point pen or other such instrument, then insert the disc
again.
HALT USE IMMEDIATELY IF A PROBLEM APPEARS. Failure to do so
may cause personal injury or damage to the product. Return it to your
authorized VMS dealer or the nearest VMS Service Centre for repairing.
DO NOT PLACE HANDS, FINGERS OR FOREIGN OBJECTS IN
INSERTION SLOTS OR GAPS. Doing so may result in personal injury or
damage to the product.
DO NOT MIX NEW BATTERIES WITH OLD BATTERIES. INSERT
WITH THE CORRECT BATTERY POLARITY. When inserting the
batteries, be sure to observe proper polarity (+ and –) as instructed.
Rupture or chemical leakage from the battery may cause fire or personal
injury.
Product Cleaning
Use a soft dry cloth for periodic cleaning of the product. For more severe
stains, please dampen the cloth with water only. Anything else has the
chance of dissolving the paint or damaging the plastic.
Temperature
Be sure the temperature inside the vehicle is between +45°C (+113°F)
Installation Location
Make sure the A.V.N.C will not be installed in a location
subjected to:
• Direct sun and heat
• High humidity and water
• Excessive dust
• Excessive vibrations
A.V.N.C quick user manual
4
Precautions
WARNING
What's in the Box?
This symbol means important
instructions. Failure to heed them
can result in serious injury or death.
Correct Handling
Do not drop the disc while handling. Hold the disc so you will not leave
fingerprints on the surface. Do not affix tape, paper, or gummed labels to
the disc. Do not write on the disc.
- 1 x A.V.N.C
- 1 x power & speaker wiring looms
- 1 x gps antenna
- 1 x microphone
- 1 x remote control
- 1 x usb adaptor cable
- 1 x quick user guide
- 1 x multimedia plugin loom
- 1 x av plug in loom
- 1 x generic bracket x 2
- 1 x stylus (inserted in A.V.N.C)
- 1 x 1gb sd card (inserted in A.V.N.C)
- 8 x mounting screws
What connections can the A.V.N.C accept?
REAR OF A.V.N.C
Exhaust Fan (Do not cover)
Disc Cleaning
Fingerprints, dust, or soil on the surface of the disc could cause the DVD
player to skip. For routine cleaning, wipe the playing surface with a
clean, soft cloth from the centre of the disc to the outer edge. If the
surface is heavily soiled, dampen a clean, soft cloth in a solution of mild
neutral detergent before cleaning the disc.
Using compact discs (CD/CD-R/CD-RW)
If you use unspecified compact discs, correct performance cannot be
guaranteed.
You can play CD-Rs (CD-Recordable)/CD-RWs (CDReWritable) which
have been recorded only on audio devices.
You can also play CD-Rs/CD-RWs containing MP3/WMA formatted audio
files.
• Some of the following discs may not play on this unit:
Flawed discs, discs with fingerprints, discs exposed to extreme temperatures or sunlight (e.g., left in the car or this unit), discs recorded under
unstable conditions, discs on which a recording failed or a re-recording
was attempted, copy-protected CDs which do not conform to the audio
CD industry standard.
• Use discs with MP3/WMA files written in a format compliant with this
unit.
To customers using CD-R/CD-RW
• If a CD-R/CD-RW cannot be played back, make sure the last recording
session was closed (finalized).
• Finalize the CD-R/CD-RW if necessary, and attempt playback again.
C
D
B
E
F
A
4
3
2
1
8
7
6
5
4
3
2
1
8
7
6
5
H
C - AV I/O (refer to labels on wires)
D - GPS antenna connection
E - Radio Antenna Connection
F - AV input loom (refer to labels on wires)
H - 10A Automotive Fuse
A - Power & Control Loom
1 -- Battery (+12V DC) / Yellow
2 -- Acc (+12V DC) / Red
3 -- Brake/Speed (GND) / Purple
4 -- Amp Control (+12V DC) / Green
5 -- GND / Black
6 -- ILL (+12V DC) / Orange
7 -- Reverse Camera Trigger (+12V DC) / Blue
8 -- Ant Control (+12V DC) / White
B - Speaker loom
1 -- FL +
2 -- FR +
3 -- RL +
4 -- RR +
5 -- FL 6 -- FR7 -- RL 8 -- RR -
A.V.N.C quick user manual
5
Front Panel Button Functions
NAVI
AV
DVD
6.5 inch Touch Screen Display
FM-AM
VOL
PEN
+
-
PUSH ENT
Features:
Eject DVD / CD
Power On/Off
Mute System Sound
IR remote control
Toggle Switch
Play / Pause toggle (DVD)
NAVI
Go to Street Navigation
Switch to AV Channel
DVD
Go to DVD / CD menu
Return to
Main Menu
FM-AM
Go to Radio menu
Playback Control (DVD / CD)
Next Track
Rewind
AV
FF
Previous track
VOL
System Main Menu
+
System Volume
-
+ Increase Volume
- Decrease Volume
8
7
6
5
4
1 Bluetooth phone menu
2 Topographical GPS menu
NAVI
AV
DVD
5 MP3 music menu
6 Street Navigation menu
FM-AM
3 Radio menu
4 Options menu
VOL
PEN
+
7 DVD/CD menu
8 Date / Time
-
PUSH ENT
1
2
3
To select a function, touch the option you desire. For example, if you want to
start street navigation, touch the “NAVIGATION” icon on screen.
A.V.N.C quick user manual
8
The Open Map File windows appears
Topographical Navigation
OK Button
4
3
5
8
6
NAVI
7
AV
folders
DVD
FM-AM
VOL
PEN
map file
+
-
Navigate to the desired folder & select a map file by touching the screen.
When the map file is highlighted, preass the OK button.
PUSH ENT
1
2
1
Map Name
2
Map Screen
3
File menu (drop down menu)
4
View Menu (drop down menu)
5
Map Menu (drop down menu)
6
Current Longitude / Latitude
7
Map Zoom Level
8
GPS status (OFF = GPS is off)
Main Toolbar
GPS information
Open a Waypoint file
1.To open a waypoint file, select FILE > WAYPOINT > Load Wp File
2. The Waypoint File window appears.
3. Navigate to the desired folder & select a waypoint file by touching the
screen. When the Waypoint file is highlighted, press the OK button.
Open a Route file
1.To open a Route file, select FILE > Route > Load Route File
2. The Route File window appears.
3. Navigate to the desired folder & select a Route file by touching the
screen. When the Route file is highlighted, press the OK button.
Open a Track Log file
1.To open a Track Log file, select FILE > Track log > Load Track File
(Mem)
2. The Track File window appears.
3. Navigate to the desired folder & select a Track log file by touching the
screen. When the Track file is highlighted, press the OK button.
Open Map Icon
Start / Stop GPS
Zoom In
Zoom out
Save a Route file
1.To save a Route file, select FILE > Route > Save Route
2. The Save Route File window appears.
3. The file name will be automatically be generated.
4. Press the ENTER button on the KEYBOARD to save the file.
Toggle Mini map On/Off
Find more maps at current locations
View Entire Map
View Map at 100% Zoom level
Save a Waypoint file
1.To save a Waypoint file, select FILE > Waypoints > Save WP File
2. The Save WP File window appears.
3. The file name will be automatically be generated.
4. Press the ENTER button on the KEYBOARD to save the file.
Lock Screen (disabled)
Open A Map
To open a map, either select FILE > OPEN MAP. Or click the OPEN
MAP ICON.
Save a Track Log file
1.To save a Waypoint file, select FILE > Track Log > Save Track Log
(Mem)
2. The Save Track Log File window appears.
3. The file name will be automatically be generated.
4. Press the ENTER button on the KEYBOARD to save the file.
A.V.N.C quick user manual
9
Main Toolbar
GPS information
Open Map Icon
Routes
What is a route?
Routes are a series of waypoints linked together.
Start / Stop GPS
Using the Route Toolbar
Zoom In
The Waypoint Toolbar can be accessed by selecting VIEW >
TOOLBARS > ROUTE CREATE TOOLBAR.
Zoom out
Toggle Mini map On/Off
Find more maps at current locations
View Entire Map
View Map at 100% Zoom level
Add a Route - If selected, a waypoint is added at the position
on the map where you click.
Insert a Route Waypoint - If selected, a route waypoint is
inserted between two waypoints or at the start or end of the
route depending on a best choice.
Delete Route - The current route displayed is deleted from the
map.
Display the Route Properties Dialog - The properties dialog
displays a list of the route waypoints.
Lock Screen (disabled)
Load a Route - the selected route is loaded to the map.
Save Route to File - The currently loaded route is saved as a
(.rt2) file.
Waypoints
What is a waypoint?
Show/Hide Route Waypoint Name - If selected, route
waypoint names are displayed.
Close - Turns off Route Create toolbar.
A waypoint is a position on a map. Waypoints can be used for a wide
range of things from pinpointing points of interest to mountain tops,
to fishing hotspots on rivers and lakes, landmarks etc.
How to create a Route
Using the Waypoint Toolbar
Bring up the Route Create Toolbar by selecting VIEW > TOOLBARS
> ROUTE CREATE.
The Waypoint Toolbar can be accessed by selecting VIEW >
TOOLBARS > WAYPOINT TOOLBAR.
Select the Add a Route Waypoint button. Using the Stylus, insert any
number of waypoints by tapping on the screen.
Add a Waypoint - If selected, a waypoint is added at the
position on the map where you click.
Delete Waypoints - All waypoints are deleted from the map.
Display Waypoint List - A list of waypoints on the map is
displayed. The list shows information about each waypoint.
Load a Waypoint File - Select a waypoint file (.wpt) to load.
Save Waypoints to File - All waypoints on the map are saved
to a waypoint file (.wpt).
Show/Hide Waypoint Name - Waypoint names are displayed
on map / or not.
Auto Show Waypoint Properties - If selected, the waypoint
properties dialog is shown automatically when a new waypoint
is added. Changes to the name and description of the waypoint
can be made.
Close - Turns off waypoint toolbar.
Proximity Warning
By default, Proximity warning to Waypoints is activated. Alarm is
triggered when you come within a certain distance of the waypoint.
These can be used to inform you of arrival at locations or to warn you of
sharp drops or sandbanks.
When you have finished creating a route, select Save Route to File
from the Toolbar to save the created Route to file for later use.
Navigation
When a Route has been plotted on the map, it allows Voice activated
navigation to each of its
waypoints.
1. Select the button on the tool bar & select Route Navigation Page.
2. Select to active the Navigation Toolbar. Select Start Route Forward
button.
You will notice a Yellow/Red navigation line pointing as the crow flies
to the nearest waypoint in of that route. This is a graphical indication
of your relative position to that waypoint. On the side is all the
relevant information to aid in navigation.
While navigating, when a WP is reached, you will hear voice
instruction on how to proceed. Once the WP is passed, it will
automatically proceed to the next WP in route.
Reverse Navigation.
In some circumstances, you may want to navigate from the last WP
to the first WP. To do so, select the Navigation Toolbar and select
Start Route Reverse.
Stop Navigation.
To cancel navigation, select the Navigation Toolbar and select Stop
Navigation.
A.V.N.C quick user manual
10
Radio
10
5. If the station is not what you are seeking, SEEK again. Repeat
until your desired station appears. To save the station, refer to step 4.
8
9
7
MANUALLY TUNE FOR RADIO STATIONS
11
NAVI
AV
FM-AM
1
6
DVD
VOL
PEN
5
+
-
Manual Tune is useful if your desired radio station has a weak signal
and automatic scan does not pick it up. In these cases, if you know
the Station frequency, you can manually tune the radio to this
particular station.
1. Select the Band you desire, either FM or AM.
2. Select a Preset Station that is close to your desired station.
3. Press either TUNE UP or TUNE DOWN button.
4. Once your station appears, Touch & hold the station box for 5 sec
and the station will be saved.
PUSH ENT
2
3
4
1 STATION PRESETS - Each block represents 1 radio station.
2 FM BAND SELECTION - Each Band contains 6 FM station presets
(24 stations).
3 AM BAND SELECTION - Contains 6 AM station presets.
4 SCAN - Automatically scans selected band from lowest Frequency to
highest.
5 SEEK UP / DOWN - Seeks the next radio station up or down
Listening to the Radio
1. press the Radio button in the System Menu or FM-AM button on
the front facia.
2. Choose either FM or AM band by pressing the BAND SELECTION
buttons.
3. Select your desired station.
4. To increase or decrease volume, press VOL+/- on the front facia.
Using the Toggle Switch
STATION DOWN
The Toggle Switch can also be
used to operate the radio tuner.
TUNE UP
6 REGIONAL SETTINGS - US, Euro or Asia.
TUNE DOWN
7 TURN OFF RADIO - Turns off radio tuner
8 MINIMISE RADIO - Radio screen will disappear, audio is uninterrupted.
DVD/CD player
9 TUNE - Manually tune stations
10
STATION UP
8
9
7
10 CURRENT STATION - Displays the station that is currently selected
11 CURRENT BAND - Displays the current band selected.
NAVI
AV
Tuning Radio Channel
DVD
FM-AM
VOL
6
PEN
+
There are different ways to tune in your favorite radio station. They are
1. By automatic SCAN
2. By manual SEEK
3. By manual TUNE
-
PUSH ENT
1
SCANNING FOR RADIO STATIONS.
2
3
4
5
1. Select the Band you desire to scan, either FM or AM.
2. Press the first Station Preset Box.
3. Select the SCAN BUTTON.
4. The first station will appear in the Station Preset Box, if you wish to
save this station. Touch and hold the station box for 5 sec and the
station will be saved.
5. If the station scanned is not what you are looking for, select SCAN
again. Repeat until your desired station appears. To save the station,
refer to step 4.
6. Select the second Station Preset Box and repeat steps 1-5.
1
SEEK FOR RADIO STATIONS
3
Note: The word "chapter or track" means a division of the
recorded picture/sound on a DVD/video CD/CD respectively.
4
Press this button during DVD/video CD/CD play to freeze
frame or pause. To resume normal play, press the button for a
second time.
Seek is useful if your desired radio station is not far from the current
station. For example, if you wish to listen to 101.9FM and your current
station is 101.1FM. You can press the SEEK UP BUTTON. This is
easier than pressing SCAN as SCAN will start scanning from the
lowest possible frequency.
1. Select the Band you desire, either FM or AM.
2. Select a Preset Station that is close to your desired station.
3. Press either SEEK UP or SEEK DOWN button.
4. Once your station appears, Touch & hold the station box for 5 sec
and the station will be saved.
2
Press and hold these button during play to fast backward or
forward respectively. Release the button when you reach the
desired portion you wish to play. Playback starts from that
portion.
Lightly press theses button during DVD/video CD/CD play to
return to the beginning of the chapter/track being currently
played or advance to the beginning of the next chapter/track
respectively.
Press the (REPEAT) button during play to repeatedly play the
chapter/track or title/disc being currently played.
DVD
repeat mode:
Chapter
Title
OFF
A.V.N.C quick user manual
12
Bluetooth Phone
System Menu
6
9
8
6
7
5
4
7
NAVI
AV
DVD
8
NAVI
FM-AM
VOL
AV
PEN
DVD
+
9
10
-
FM-AM
VOL
PEN
+
PUSH ENT
-
1
2
5
3
PUSH ENT
1
4
1 ANSWER / DIAL - Answer or dial a call
2 SCROLL UP / DOWN - Scroll up or down
PASSWORD
1234
2
3
1 TURN OFF LCD - Turns off the screen (NIGHT MODE)
2 SYSTEM OPTIONS - System options such as Time & Audio
Adjustments
3 REJECT / CANCEL - Reject or cancel a call
3 BACK - Back to System Menu
4 PAIR - set bluetooth into Pairing mode
4 OTHELLO - Starts Othello the game
5 KEYPAD
5
NOTEPAD - Starts Notepad
6
FILE BROWSER - Browse the file on the SD card or USB
memory
8 INFO DISPLAY - Displays phone information
7
AV - Starts the AV channel
9 MAIN MENU - bluetooth menu
8
CDC - Starts the CDC channel
9
MOVIE PLAYER - Playback of MP4 movies
6 MINIMISE - Minimise bluetooth
7 # DEVICES - Number of devices paired to this unit
Paring Your Phone
To use the bluetooth handsfree function, you must first pair your
Bluetooth compatible phone to the unit.
1. Turn on Bluetooth on your phone.
2. Select PAIR in the Bluetooth Menu.
3. On you phone, select “Search for New Devices”.
4. Once the phone has found “A2265” select it.
5. You will be promoted to enter the password, input “1234”
6. Follow the instructions on the phone.
6. Once connected, you will see your phone’s ID in the INFO
DISPLAY
10 GO - Starts Go the game
System Options
SYSTEM TIME
System Time can be adjusted in
the system menu. Please Note
that this time is synchronised to
the GPS.
You may pair up to 6 phones with the A.V.N.C. To pair another phone, follow the above steps.
Switching between Different Phones Paired
1. Select MENU > Bluetooth > Device list
4. Select the phone you wish to connect
5. Select Options > Connect
Once connected, this phone will be automatically paired from now on.
Sending Your Contact List
Most phones allow its contact list to be exported. Please refer to your
phone’s user manual for further details.
1. Select Menu > Bluetooth > Receive vCard
2. Send your contacts from your phone.
AUDIO SETTINGS
Audio settings such as Bass,
Treble, Balance & Fade can be
adjusted by pressing the +/buttons on the touchscreen.
SYSTEM OPERATION MENU
Answering a Call
UPDATE - Allows system
firmware to be updated
When an incoming call is received, the Bluetooth menu takes priority
over all other functions.
1. When the Bluetooth screen appears, press the ANSWER button.
CALIBRATION - Calibrates the
touchscreen
Dialing a Call
You may manually dial the number then press the DIAL button, OR
you may pick a contact in your contact list by selecting MENU >
CONTACTS. Once the contact is selected, press the DIAL button.
Rejecting a Call
To reject a call, press the REJECT BUTTON.
A.V.N.C quick user manual
Installation
14
To install using the vehicle’s genuine bracket.
Please note: photos used to illustrate the following steps are of a TOYOTA PRADO 120
series. With different model cars, the installation method may vary. Photos are used for
demonstration purpose only.
STEP 1: Remove original radio.
A.V.N.C
Screws (M5 x 4)
included
Screws (M5 x 8)
included
Start by removing necessary dash trims. As the trims are removed, it will allow the original
radio to be removed by unfastening the original mounting bolts. Please keep all trim
pieces, bolts & accessories in one place. If you are unfamiliar with which positions the
screws came from, it is wise to label them.
Step 5: Position GPS Antenna & Microphone.
Now is a good time to position both the GPS antenna & microphone for the bluetooth. Both are best
suited to the driver’s side, so start by clipping the microphone onto the top of the A pillar plastic trim.
In most vehicles, the door trim seal can be removed and the wires can be hidden behind the trim.
Step 2: Remove radio from original brackets.
In most vehicles, the original radio is bolted to the original brackets by 4 bolts on either
side. Remove these bolts to separate the OE radio from its mounting bracket.
Step 3: Drill mounting holes for A.V.N.C
To make finding the right positions to drill easier, VMS offers premade template
downloads from http://www.vms4x4.com/support/support.html
If you vehicle is available, download the template in PDF format and print out at 100%
original size.
Place the template over your factory mounting bracket, mark the holes & drill.
We strongly recommend the use of a bench drill to drill the mounting holes. This will allow
for a more precise fitment.
GPS Antenna
Microphone
Place the GPS antenna in the corner of the dash on the driver’s side A pillar. Run the wiring under
the dash trim. If the wires are run across the top of pedals, be sure to use cable tires to secure loose
wires from protruding near the pedals.
Step 5: Wiring the A.V.N.C.
VMS offer a range of wiring looms to suit specific vehicles and is made to be compatible with the
original radio harness. If this part is available for your vehicle, please utilise the integration kit.
Plug the VMS factory integration loom into the A.V.N.C, then plug the other end into the factory
wiring harness. Plug the GPS antenna, Microphone & Radio Antenna into the A.V.N.C. (VMS also
provides radio antenna adaptors for antenna configurations not compatible with the A.V.N.C)
Step 4: Insall A.V.N.C onto original factory radio bracket
After the mounting holes are drilled. Install the A.V.N.C on to the original factory bracket
using the mounting screws provided in the package. Do not use screws that are not
supplied with the unit as this may damage internal components on the A.V.N.C.
Please note, use the longer fixing screws on the side of the A.V.N.C with heat sink.
On the factory integration loom, there will be few loose wires labeled, REVERSE (BLUE), AMP CTL
(Green), BRAKE/SPEED (Purple).
- REVERSE wire is used when a reversing camera is fitted. This line needs a 12V+ signal which
can be tapped off the reversing light. The purpose of this wire is to let the A.V.N.C know when the
car is in reverse gear so that the screen can automatically change to reverse mode.
- BRAKE/SPEED wire is used to control the play back of DVDs. This should be connected to your
vehicle’s handbrake (GND). Consult an auto electrician if you cannot find the ground to your
handbrake. If grounded to the vehicle’s body, the DVD player will play at anytime regardless of the
vehicle being in motion.
A.V.N.C quick user manual
15
Step 7: Check for operational status
Navigation.
When all wires have been connected, turn your key to the ACC/ON position and turn on the
A.V.N.C by pressing the POWER button. The A.V.N.C should start with a VMS logo and then
display the main menu.
Make sure the vehicle is outdoor and in an open area, start GPS navigation by pressing the
“Navigation” button. Wait for a few minutes and the GPS should lock on to satellites and display
your position. If not, check your GPS antenna is connected properly.
Press the Radio button and hit scan. The A.V.N.C will automatically pick up radio station and
put them into it’s memory. If there is no reception, check if the antenna is plugged in and
making decent contact. Ensure your radio aerial is fully extended.
Step 8: Completing Installation
Turn the key to OFF position and remove. Secure the A.V.N.C into the dash. Ensure that none
of the wires at the rear of the A.V.N.C are crimped when installing the unit. Replace all trim
pieces.
• GPS cannot be detected.
- Check if both Street Navigation & Topo GPS are running at the same time. If so, close one of
the navigation functions.
• Navigation cannot be started.
- Check if the SD card is present.
Radio
Unable to receive stations.
• No antenna, or open connection in the antenna cable.
- Make sure the antenna is properly connected;
replace the antenna or cable if necessary.
Broadcast is noisy.
• The antenna is not the proper length.
- Extend the antenna fully; replace it if it is broken.
• The antenna is poorly grounded.
- Make sure the antenna is grounded properly at its mounting
location.
• The station signal is weak and noisy.
- If above solution does not work, tune in another station.
CD/DVD
Installing a Reverse Camera
Disc playback sound is wavering.
• Moisture condensation in the disc Module.
- Allow enough time for the condensation to evaporate
(about 1 hour).
To install 1 reversing camera to the A.V.N.C, please refer to the wiring diagram below.
REVERSE (BLUE)
12V+ when car is in reverse gear
run a wire to the reverse wire of the
A.V.N.C from the reverse light.
A.V.N.C
multimedia loom
CCD-IN
(yellow)
Reverse Light
Unable to fast forward or backward the disc.
• The disc has been damaged.
- Eject the disc and discard it; using a damaged disc in your unit can cause damage to the
mechanism.
Video Signal (usually yellow)
VMS recommends using a VMS
reversing camera for compatibility
reasons. model #: CAM-010
12V +
GND
Disc insertion not possible.
• A disc is already in the DVD player.
- Eject the disc and remove it.
• The disc is being improperly inserted.
- Make sure the disc is being inserted following the
instructions in the CD/DVD Player Operation section.
Camera
Disc playback sound skips due to vibration.
• Improper mounting of the unit.
- Securely re-mount the unit.
• Disc is very dirty.
- Clean the disc.
• Disc has scratches.
- Change the disc.
• The pick-up lens is dirty.
- Do not use a commercial available lens cleaner disc. Consult your nearest VMS dealer.
Disc playback sound skips without vibration.
• Dirty or scratched disc.
- Clean the disc; damaged disc should be replaced.
In Case of Difficulty
If you encounter a problem, please turn the power off, then on again. If the unit is still not functioning
normally, please review the items in the following checklist. This guide will help you isolate the
problem if the unit is at fault. Otherwise, make sure the rest of your system is properly connected, or
then consult your authorised VMS dealer.
Basic
No function or display
Vehicle’s ignition is off.
- If connected according to the instructions, the unit will not
operate with the vehicle’s ignition off.
• Improper power lead connections.
- Check power lead connections.
• Blown fuse.
- Check the fuse on the battery lead of the unit; replace with
the proper value if necessary.
• Internal micro-computer malfunctioned due to interference
noise, etc.
- Press the POWER button to reset the unit.
No sound or unnatural sound.
• Incorrect setting of volume/balance/fader controls.
- Readjust the controls.
• Connections are not properly or securely made.
- Check the connections and firmly connect.
Screen not displayed.
• Temperature in the vehicle is too low.
- Increase the vehicle’s interior temperature to operation
temperature range.
Movement of displayed picture is abnormal.
• Temperature in the vehicle is too high.
- Allow the vehicle’s interior temperature to cool.
Unclear or noisy display.
• Backlight plate on the LCD is worn out.
- Replace the backlight plate.
The back light replacement is not free of charge even within
the warranty period, for the tube is an article of consumption.
CD-R/CD-RW playback not possible.
• Close session (finalization) has not been performed.
- Perform finalization and attempt playback again.
Error displays
• Mechanical error
- Press eject After the error indication disappears, insert the disc again. If the above-mentioned
solution does not solve the problem, consult your nearest VMS dealer.
Playback does not start.
• Disc is loaded upside-down.
- Check the disc and load it with the labeled side facing upward.
• Disc is dirty.
- Clean the disc.
• A disc not able to playback with this unit is loaded.
- Check if the disc is able to be played back.
Picture is unclear or noisy.
• Disc is being fast-forwarded or fast-reversed.
- The picture may be slightly disturbed, but this is normal.
• Vehicle’s battery power is weak.
- Check the battery power and wiring. (The unit may malfunction if the battery power is under 11
volts with a load applied.)
• Monitor’s LCD backlight is worn.
- Replace the monitor’s LCD backlight.
Image stops sometimes.
• Disc is scratched.
- Replaced with a non-scratched disc.
www.vms4x4.com
may 2008
Part Number: AVNC2265
Printed in Australia
VMS © is a trademark of XIA GROUP PTY LTD, registered in Australia and other countries and may not be
used without the express permission of XIA GROUP Pty Ltd.
copyright © 2008