1
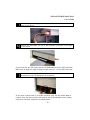
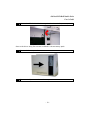
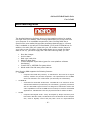
CD-ReWritable
USER’S Manual
48x16x48 CD-ReWritable Drive
User’s Guide
Dear Customer:
Congratulations on the purchase of your CD-ReWritable drive. We all want to
express our sincere gratitude for your decision to purchase our product, and
to reaffirm our commitment to you of providing a product that is easy to
install and easy to use.
You can be assured that your new product is made from the latest state-ofthe-art components and that it has also gone through the most rigorous
testing and quality assurance procedures in the industry.
With an emphasis on products that revolutionize the way people interact with
the new technologies around us, we continually introduce integrated solutions
that enable users to take full advantage of their multimedia experience. Our
ever expanding product line covers the entire multimedia spectrum. Look to
us to as the leader of providing media products ranging from sound and
graphics cards, to DVD and CD-ROM drives, and even to digital imaging and
mp3 audio products.
We hope you enjoy using your new product, and look forward to earning your
business in the coming years.
- 2-
48x16x48 CD-ReWritable Drive
User’s Guide
CLASS 1 LASER PRODUCT
APPAREIL A LASER DE CLASSE 1
LASER KLASSE 1
LUOKAN 1 LASERLAITE
PRODUIT LASER
CATEGORIE 1
DANGER
VORSICHT
ATTENTION
INVISIBLE LASER RADIATION WHEN OPEN. AVOID DIRECT
EXPOSURE TO BEAM
INSICHTBARE LASERSTRAHLUNG WENN ABDECKUNG
GEÖFFNET NICHT DEM STRAHL AUSSETSEN
RADIATION DU FAISCEAU LASER INVISIBLE EN CAS
D’OUVERTURE. EVITER TOUTE EXPOSITION AUX RAYONS.
Copyright Statement
It is a criminal offense, under applicable copyright laws, to make
unauthorized copies of copyright protected material, including computer
programs, films, broadcasts and sound recordings. This equipment should
not be used for such purposes.
Notice:
I/OMAGIC Corporation makes no warranty of any kind with regards to this material, including,
but not limited to, the implied warranties of merchantability and fitness for a particular product.
I/OMAGIC Corporation shall not be liable for errors contained herein or for incidental
consequential damages in connection with the furnishing, performance, or use of this material.
Every effort has been made to ensure that the information in this manual is accurate. I/OMAGIC
Corporation is not responsible for printing or clerical errors.
Mention of third party products is for information purposes only and constitutes neither an
endorsement nor a recommendation. I/OMAGIC Corporation assumes no responsibility with
regards to the performance of these products.
This document contains proprietary information, which is protected by copyright (see below).
Trademarks:
Copyright:
Warranty:
The information contained in this document is subject to change without notice.
Microsoft is a registered trademark of Microsoft Corporation. Windows, Windows
XP/2000/Me/98/95/NT and their logos are trademarks of Microsoft Corporation. IBM is a
registered trademark of International Business Machines Corporation. All other trademarks and
product names used within this manual are the property of their respective companies and are
hereby acknowledged.
© 2002 I/OMAGIC Corp. all rights reserved. No part of this publication may be reproduced,
transmitted, transcribed, stored in a retrieval system, or translated into any language or
computer language, in any form, by any means, without prior written consent of I/OMAGIC.
I/OMAGIC Corporation warrants the products it sells will be free from defects in materials and
workmanship. Consult the warranty card for complete warranty information.
- 3-
48x16x48 CD-ReWritable Drive
User’s Guide
FCC Compliance Statement
This device complies with Part 15 of the FCC Rules. Operation is subject to
the following two conditions:
•
•
This device may not cause harmful interference
This device must accept any interference received, including
interference that may cause undesired operation.
FCC Warning Statement
This equipment has been tested and found to comply with the limits for a
Class B digital device, pursuant to Part 15 of the FCC Rules. These limits are
designed to provide reasonable protection against harmful interference in a
residential installation. This equipment generates uses and can emit radio
frequency energy and, if not installed or used in accordance with the
instructions, may cause interference to radio communications. However,
television reception interference can be determined by turning the equipment
off and on. The user is encouraged to correct the interference by one or more
of the following measures:
•
•
•
•
Reorient or relocate the receiving antenna
Increase the separation between the equipment and the receiver
Connect the equipment into an outlet different from that to which the
receiver is connected
Consult the dealer or an experienced radio/TV technician for help.
Caution
Changes or modifications not expressly approved by the party responsible for
compliance could void the user’s authority to operate the equipment.
For Europe
“The drive is in conformity with the EMC directive and low-voltage directive.”
- 4-
48x16x48 CD-ReWritable Drive
User’s Guide
Table Of Contents
Introduction....................................................................................
Specifications ..................................................................................
Package Contents ............................................................................
System Requirements ......................................................................
Hardware Installation......................................................................
6
7
7
7
8
JUMPER SETTINGS .......................................................................................................9
CONNECTING IDE CABLES ...........................................................................................10
INSTALLING THE DRIVE...............................................................................................11
Driver Installation ..........................................................................14
WINDOWS XP/2000/ME /98SE/95 INSTALLATION...........................................................14
DOS O R WINDOWS 3.1 X INSTALLATION .........................................................................14
WINDOWS NT 4.0 INSTALLATION .................................................................................14
Nero-Burning ROM .........................................................................15
NERO -BURNING ROM INSTALLATION..............................................................................16
SOFTWARE DESCRIPTION.............................................................................................17
BEFORE YOU BEGIN ...................................................................................................17
NERO -BURNING ROM INTERFACE..................................................................................18
C REATE A DATA CD (ISO)..........................................................................................19
C REATE AN AUDIO CD................................................................................................22
COPYING A CD .........................................................................................................25
SAVING AUDIO TRACKS...............................................................................................27
Nero INCD......................................................................................28
NERO INCD INSTALLATION ..........................................................................................28
FORMAT CD-RW DISC ...............................................................................................29
USING NE R O INCD....................................................................................................31
USING NE R O INCD W ITH WINDOWS XP.........................................................................32
Troubleshooting .............................................................................33
SUGGESTIONS FOR RESOLVING COMMON P ROBLEMS ...........................................................33
E RROR MESSAGE DESCRIPTIONS ...................................................................................37
OTHER P ROGRAM MESSAGES ........................................................................................39
USING THE ONLINE HELP .............................................................................................40
Limited Warranty ...........................................................................41
- 5-
48x16x48 CD-ReWritable Drive
User’s Guide
Introduction
Congratulations on your purchase of the CD-ReWritable drive. We are sure
that you will enjoy this product in the years to come. This product is a high
performance IDE interface CD-RW drive, implementing the ATAPI IDE
standard interface.
The bundled CD-RW Mastering Software gives you the ability to archive,
distribute or create your own CDs (CD-ROM XA, CD Bridge, Multi-Session CD,
CD-I, and CD-DA) from your computer’s desktop. The CD-ReWritable drive
can automatically recognize the media placed in the drive, whether a CD, a
CD-R or a CD-RW disc. The application included allows you to read and premaster CD-R or CD-RW discs, plus file system (drag and drop) for archiving,
data interchange and back up, on both CD-R and CD-RW discs.
User friendliness is further enhanced as the CD-ReWritable can be used as a
PnP (Plug and Play) CD-ROM drive for all PC operating systems, such as
Windows XP, 2000, ME, 98, 95 and NT. You can use the quick select buttons
to manually control Music CDs without running any software programs. A
standard ANSI MMC (multimedia command) set is also featured.
The CD-ReWritable drive supporting all writing modes extends operational
versatility and CD formats (CD-DA, CD-ROM etc., include CD-UDF as
standardized by OSTA). Furthermore, the erase function is supported for CDRW discs allowing repetitive use.
- 6-
48x16x48 CD-ReWritable Drive
User’s Guide
Specifications
Interface Type:
Loading Method
Average Access Time:
Writing mode
Writing format
Power requirements
Installation
Temperature
Humidity
Internal E-IDE (Enhanced IDE) (conforms to ATAPI
Version 2.6).
Tray.
<120 msec avg.
Disc-at-Once, Session-at-Once, Track-at-Once,
Multi-Session, Packet Writing
CD-DA, CD-ROM, CD-ROM XA, CD Extra, CD-I,
Mixed-Mode CD, Video CD, Photo CD, CD TEXT,
Bootable CD
DC +5V/+12V.
Horizontal/Vertical.
Operating 5ºC-40ºC, Non Operating -30ºC-65ºC.
Operating 5%-90%, Non Operating 5%-95% RH.
Package Contents
The CD-ReWritable package contains the following items:
• CD-RW Drive.
• One Piece CD Media.
• CD Mastering Software.
• User’s Manual.
• Quick Install Guide.
• Audio and Data Cables.
• Warranty Card
System Requirements
•
•
•
•
•
IBM Compatible PC (Pentium 166 MHz or higher)
Windows XP/2000/ME/98SE/95/NT4
One Available Enhanced IDE port
64MB RAM (128MB recommended)
32MB Free Disk Space
- 7-
48x16x48 CD-ReWritable Drive
User’s Guide
Hardware Installation
Handling Static-Sensitive Devices
The CD-ReWritable drive, like all electronic equipment, is static sensitive.
Please take the proper precautions when handling the drive. Avoid touching
the IDE connector pins as well as the audio connector pins and the jumper
pins. Keep the drive in its conductive wrapping until you are ready to install
the drive in your computer.
Host Interface Connections
It is recommended that you use separate IDE ports for your hard drive and
your drive. The drive should be connected to a secondary IDE controller port
as “Master”. This will ensure your hard drive’s performance and speed are
not affected by having the drive on the same cable. Additionally, if you have
a CD-ROM drive or a CD-R drive, you should attach it to the primary IDE
controller port as a “Slave” drive.
Connect the internal IDE flat cable to the IDE interface port of your host.
Connect the other end to one of the IDE connectors at the rear of the CDReWritable drive.
Before You Begin
The following diagram shows you the rear view of your CD-ReWritable drive.
Familiarize yourself with the drive before installing the unit into your
computer. Locate where the drive will be connected first and then make sure
you have all the necessary parts for the connection.
(Note: Item displayed may vary)
- 8-
48x16x48 CD-ReWritable Drive
User’s Guide
Jumper Settings
On the rear panel of the CD-ReWritable drive, you will find three pairs of
jumpers, CS (CSEL), SL (Slave) and MA (Master). Use the jumper cap to set
the device to CS, SL or MA mode corresponding to your PC configuration (see
fgure below). The default setting is “Slave” mode. Improper or conflicting
setting, will cause the unit to not be detected by your computer.
Note: Before installing the drive into your system, make sure the jumper
setting is set correctly
Master Mode: If the writer is the only device
connected to the IDE cable (gray ribbon), it should
be set to Master (MA).
Slave Mode: If the writer will be sharing the IDE
cable with another device, one device should be set
to (MA) and the other set to Slave (SL). (MA is
recommended for writer on secondary IDE). To set
the drive as the Slave (SL) drive, move the jumper to
the (SL) position
Cable Select: As the name implies with this setting,
the position of the connector on the IDE cable
determines which device is master and which is
slave. The goal of cable select is to eliminate having
to set Master and Slave jumpers. To use Cable Select
(CS), move the jumper to the CS position.
Cable Select (CS) mode is not needed on most normal systems, unless the
drive you are replacing is set to CS already. If you are unsure, please contact
your computer manufacturer.
Note: The middle connection on the IDE cable is the Slave position. The end
connection on the IDE cable is the Master position.
- 9-
48x16x48 CD-ReWritable Drive
User’s Guide
Connecting IDE Cables
Your computer should have 2 IDE controllers on your motherboard. Each IDE
controller supports 2 devices. You should have one Primary IDE controller
with a master and a slave, and an additional Secondary IDE controller for an
additional set of master and slave drives for a total of 4 devices. Determine
where your new CD-RW drive will go and connect to the appropriate cables.
Primary IDE
This IDE controller supports two devices, one for the hard disk (Master), and
the other for a second device such as a hard disk or a CD-ROM drive. The
hard disk should be set as the Primary Master. The PC needs to use the
hard disk to boot up the system (unless you are using a SCSI hard drive).
If you have an empty slot, this cable can connect your CD-RW drive as the
Primary Slave device. Make sure the mode select jumper is set to the Slave
position. (Refer to the last section).
Secondary IDE
If the PC is equipped with a second IDE controller (or card) on the
motherboard, you can connect your new CD-RW drive to this IDE cable. You
should set your CD-RW drive to the Master (MA) setting and your second
device to Slave (SL).
Note: Your motherboard layout may be different then the pictures
above. Please refer to your motherboard manual for your correct
IDE1 and IDE2 slots.
- 10 -
48x16x48 CD-ReWritable Drive
User’s Guide
Installing The Drive
1
Turn off the PC.
Make sure there is no power going to your computer prior to beginning the
hardware installation. This is to help prevent harm to yourself as well as the
risk of damage to your computer.
2
Remove the computer’s cover.
Please refer to your computer’s User’s Guide on how to remove the
computer’s cover.
3
Locate an available 5¼-drive bay.
Locate an empty 5¼-drive bay within your computer. It may be necessary to
remove a square iron plate. Please refer to your computer’s User’s Guide for
assistance.
4
Slide the CD-ReWritable drive into the empty bay.
- 11 -
48x16x48 CD-ReWritable Drive
User’s Guide
5
Connect the power supply cable into the DC input connector on the
back of your drive.
6
Connect the IDE cable into the E-IDE Interface connector on the back
of your drive.
Connect the 40-pin IDE cable into the CD-ReWritable drive’s E-IDE connector.
Make sure to align the redlined edge of cable with Pin-1 of the IDE connector.
7
Connect the analog cable from your sound card to the Audio out
connector on your CD-RW drive (If necessary).
If you have a sound card or an audio interface card, use the audio cable to
connect from the sound card audio port to the CD-ReWritable drive’s analog
audio out connector located on the back panel.
- 12 -
48x16x48 CD-ReWritable Drive
User’s Guide
8
Secure the CD-ReWritable drive against the chassis of your computer.
Secure the drive using four screws included in the accessory pack.
9
10
Reattach the computer’s cover.
Reconnect all power cords to the computer.
- 13 -
48x16x48 CD-ReWritable Drive
User’s Guide
Driver Installation
Windows XP/2000/Me/98SE/95 Installation
There is no need to install any CD-RW device drivers under Windows
XP/2000/Me/98/95/ and NT.
1
Turn on your PC to start-up your Windows XP/2000/Me/98SE/95
Operating System.
2
Windows XP/2000/Me/98SE/95 will automatically detect the new drive
and load the appropriate drivers for your CD-ReWritable drive.
Note: Refer to the troubleshooting section of this manual if Windows
does not automatically detect your CD-ReWritable drive.
DOS or Windows 3.1x Installation
Note: Dos and Windows 3.X do not support CD writing. You can
ONLY use this device as a regular CD-ROM drive. Visit our website
for Dos / Windows 3.X drivers and information.
Windows NT 4.0 Installation
1
Power on your PC.
2
Log into Windows NT.
3
Once in the desktop, click on the “Start” button > “Settings” >
“Control Panel” > “Devices”.
4
Select "ATAPI" from the list and click on the "Start-up" button.
5
When you get the start-up screen, check "Boot" then click the "OK"
button.
6
Repeat the same procedure with “CD-ROM” (steps 4 and 5).
7
Close the “Devices” screen and click on the “Start” button > “Shut
Down” and restart the computer.
- 14 -
48x16x48 CD-ReWritable Drive
User’s Guide
Nero-Burning ROM
The bundled Mastering Software gives you the complete solution for making
CDs right from your desktop. Nero–Burning ROM allows you to copy files from
your computer to a recordable compact disc (Nero-Burning ROM uses a
special write-once media that provides permanent data storage in a format
that is readable on virtually all CD-Recordable (CD-R) and CD-ROM drives. In
addition, the audio CDs you create with your CD recorder can be played in
your home or car CD player. CD-RW media allows you to record and erase
data on the CD, just like a floppy disk. With Nero-Burning ROM, you can:
•
•
•
•
•
•
•
Burn disc images.
Archive data.
Back up a hard drive.
Make CD boot discs.
Create DOS/MAC hybrid discs (great for cross platform software
developers)
Create UDF or UDF/ISO file system discs.
Mixed mode CDs and many other features.
Nero-Burning ROM supports the following formats:
•
•
•
CD-ROM
o Compact Disc-Read Only Memory. A standard for CDs used as a digital
memory medium for personal computers. The specifications for CD-ROM
were first defined in the Yellow Book (see Glossary for information).
CD-ROM XA
o XA stands for Extended Architecture. CD-ROM XA is an extension of the
Yellow Book standard (see Glossary for information), generally consistent
with the ISO 9660 logical format but designed to add better audio and
video capabilities so that CD-ROM can more easily be used for multimedia
applications. CD-ROM XA is also the physical format for Photo CD discs.
CD-DA
o Compact Disc-Digital Audio. Jointly developed by Philips and Sony and
launched in October 1982, CD-DA was the first incarnation of the compact
disc, used to digitally record and play back music at unprecedented
- 15 -
48x16x48 CD-ReWritable Drive
User’s Guide
quality. The standard under which CD-DA discs are recorded is known as
the Red Book (see Glossary for information).
•
•
CD Extra
o A MultiSession CD, containing audio tracks in the first session, and one
CD-ROM XA data track in the second session. Additional characteristics are
defined in the Blue Book standard (see Glossary for information).
Mixed-Mode
o A CD including both computer data and CD-DA tracks in a single session.
The data is all contained in t rack 1, and the audio in one or more following
tracks.
Nero-Burning ROM installation
Follow the installation instructions carefully and step by step. If you encounter
a problem, refer to the troubleshooting section on this manual.
1.
2.
3.
4.
Power on your computer.
Boot into Windows.
Insert the Nero-Burning ROM installation CD into your CD-ROM drive.
The CD will automatically run and the installation program will guide
you through the entire installation process.
5. Nero will ask for a serial number (serial is located on the sleeve)
6. Reboot your computer at the end of the installation.
Note: If the installation program does not launch automatically, follow
these steps:
1. Click on the “Start” button on the task bar and select “Run”.
2. From the command prompt, type D:\Setup.exe (Where D:\ is
your CD-ROM drive).
3. The installation program will guide you through the entire
installation.
- 16 -
48x16x48 CD-ReWritable Drive
User’s Guide
Software Description
Nero is a professional package that gives you many features not found in
other software packages. In the following paragraphs, you’ll be introduce to
the Nero-Burning ROM interface as well as step by step instructions on how to
record CD-R / CD-RW media.
The software has extensive on-line help on all of its features and other
general information. If you are looking for information, click on “Help” within
the Nero-Burning ROM program and you will find a wide variety of topics,
including how to guides.
Before You Begin
Auto Insert Notification must be turned off before you begin. Failure to do
so may result in problematic behavior, such as system hangs and loss of data.
Turn off Auto Insert Notification for every CD drive on your IDE bus,
including the CD recorder itself.
To turn off the Auto Insert Notification, follow these steps:
1. Right-click on the “My Computer” icon on the desktop.
2. Select “Properties” from the menu. The system properties dialog box
opens.
3. Click on the “Device Manager” tab.
4. Click on the plus sign next to the CD-ROM icon until you see the name
of your CD recorder. Select it.
5. Click on the “Properties” button. The properties dialog box for your
drive opens.
6. Click on the “Settings” tab.
7. Deselect “Auto Insert Notification”.
8. Click on “OK” to close the properties dialog box.
9. Click on “OK” to close the systems properties dialog box.
10. Restart your system as prompted.
- 17 -
48x16x48 CD-ReWritable Drive
User’s Guide
Nero-Burning ROM Interface
This is the screen that you’ll get when you first start Nero-Burn ROM.
From here, you’ll be able to do the following:
•
•
•
•
•
•
•
•
•
•
Burn disc images
Make CD boot discs
Create DOS/MAC hybrid discs (great for cross platform software
developers)
Create UDF or UDF/ISO file system discs
Audio CDs (with critical sound filters)
Mixed Mode CDs
Support a wide range of CD-Recorder drives
CD copying
Files/Directories from HD to disc image/CD
Overburning
- 18 -
48x16x48 CD-ReWritable Drive
User’s Guide
Create a Data CD (ISO)
Follow the steps below to burn a Data CD. We will leave all the options with
their default settings. For detailed information, please refer to the Reference
Chapter in the ma nual. The manual is on the Nero CD in the form of an
Acrobat document.
1
Start Nero-Burning Rom
2
Click on the “CD-ROM (ISO)” icon in the new compilation dialog
window. If you get the Nero Wizard, click on “Close Wizard”. If you
have already opened Nero, you can reach this dialog window through
the icon for "New Compilation".
3
Now click on the “New” button at the right.
- 19 -
48x16x48 CD-ReWritable Drive
User’s Guide
4
A new blank compilation window will open. Drag & drop the files you
wish to copy from the “File Browser” window onto the “ISO” Window.
Use the indicator on the bottom to determine how much data you will
be burning and how much free space will be left on your blank media.
5
Now open the “Write” dialog. The easiest way to do this is to click on
the “Write CD” icon in the toolbar. You will then go to the “Write CD”
dialog box, which will undoubtedly look familiar to you: it is the same
box which you saw for the creation of a new compilation, only now the
“Burn” property button is shown on the top.
- 20 -
48x16x48 CD-ReWritable Drive
User’s Guide
6
You will see several boxes, of which some have already been selected.
All of the preferences may now be examined and changed if necessary.
From here you can select your burn speed and other settings. If you are
satisfied with your settings, click on the “Write” button to begin burning
your CD.
Note: If you wish to create a CD-ROM as a single session, you must
click on the “Finalize CD”box. Do not click this box for a session of a
MultiSession CD, unless it is the last session. The CD is write-protected
after this. Now you may confirm by clicking on the “Write” button. All of
the selected steps will now be carried out in sequence including the burn
process. So that you can follow exactly what is happening, a status
window is displayed in which the individual steps are listed.
7
Nero should now begin caching files and burning your CD. When
successful, will see the message "burn process completed
successfully at 48x (7200 KB/s)".
8
Nero will eject your CD when finished and ask to save this profile. You
can save it if you wish to burn the same CD at a later time or discard it
to comp lete the burn. Congratulations, you have successfully burned a
data CD.
- 21 -
48x16x48 CD-ReWritable Drive
User’s Guide
Create an Audio CD
Burning an Audio CD using Nero is similar to burning a Data CD. Follow the
steps below to burn an Audio CD.
We will leave all the options with their default settings. For detailed
information, please refer to the Reference Chapter in the manual. The manual
is on the Nero CD in the form of an Acrobat document.
Note: You can burn your Audio CDs using two possible methods, Track-atOnce, and Disk-at-Once.
• Track At Once allows you to burn individual tracks on a CD one at a
time. This method allows you to burn tracks from different source
CDs without having to save them to your hard disk first. However,
you will not be able to use some features (such as variable pause
length, CD text, or indexing)
• Disk-at-Once allows you to burn an entire CD all in one setting.
The CD Laser never stops burning between tracks. This method is
preferred if you are burning MP3 or WAV files directly from your hard
drive. You can set the pause length between tracks and write CD
text. This method is best for compilation CDs that do not have a 2
second pause between songs, such as remix CDs.
1
Start Nero Burning Rom
2
Click on the “Audio CD” icon in the new compilation dialog window. If
you get the Nero Wizard, click on “Close Wizard”. If you have already
opened Nero, you can reach this dialog window through the icon for
"New Compilation".
- 22 -
48x16x48 CD-ReWritable Drive
User’s Guide
3
Now click on the “New” button at the right.
4
A new blank compilation window will open. Drag & drop the song you
wish to copy from the “File Browser” window onto the “Audio”
window. Use the indicator on the bottom to determine how much data
you will be burning and how much free space will be left on your blank
media.
Note: The latest version of Nero supports MP3 files. This means you can
automatically drag and drop your mp3 songs onto the “Audio” window
without having to convert to .wav format first. Copying, downloading and
transferring music or any other files without permission from the artist or
copyright holder is forbidden. Don’t steal music.
- 23 -
48x16x48 CD-ReWritable Drive
User’s Guide
5
Now open the “Write” dialog. The easiest way to do this is to click on
the “Write CD” icon in the toolbar. You will then go to the Write CD
dialog box, which will undoubtedly look familiar to you: it is the same
box which you saw for the creation of a new compilation, only now the
“Burn” property button is shown on the top.
6
You will see several boxes, of which some have already been selected.
All of the preferences may now be examined and changed if necessary.
From here you can select your burn speed and other settings. If you are
satisfied with your settings, click on the “Write” button to begin burning
your CD.
Note: Your Audio CD will not be able to play on a home or car CD player
unless the “Finalize CD” option is checked. Check this option after you have
finished adding all your songs to finalize the CD, and enable it to be playable
on a home CD player.
- 24 -
48x16x48 CD-ReWritable Drive
User’s Guide
7
Nero should now begin caching files and burning your CD. When
successful, will see the message "burn process completed
successfully at 48x (7200 KB/s)".
8
Nero will eject your CD when finished and ask to save this profile. You
can save it if you wish to burn the same CD at a later time or discard it
to complete the burn. Congratulations, you have successfully burned an
Audio CD.
Copying a CD
To make an exact copy of a CD, follow the directions below. We will leave all
the options with their default settings. For detailed information, please refer
to the Nero-Burning ROM Reference Chapter in the manual. Follow the
instructions carefully.
1
Start Nero-Burning Rom
2
Click on the “CD Copy” icon in the new compilation dialog window. If
you get the Nero Wizard, click on “Close Wizard”. If you have already
opened Nero, you can reach this dialog window through the icon for
"New Compilation".
- 25 -
48x16x48 CD-ReWritable Drive
User’s Guide
3
Make sure to uncheck “On The Fly” if you have an older computer
system. Copying On The Fly is CPU intensive and can cause the burn to
fail. Use On The Fly only if you have a fast computer system and you do
not have available space on your hard drive to cache temporary files.
4
Click on the “Burn” tab to set your copy speed and settings. Click
“Copy” once you are ready to copy.
- 26 -
48x16x48 CD-ReWritable Drive
User’s Guide
5
Nero should now begin caching files and burning your CD. When
successful, will see the message "burn process completed
successfully at 48x (7200 KB/s)".
6
Nero will eject your CD when finished and ask to save this profile. You
can save if you wish to burn the same CD at a later time or discard it to
complete the burn. Congratulations, you have successfully copied a CD.
Note: Some CD’s may not be able to copy due to copyright protections.
We do not endorse software piracy. Only make backup copies of
software that are license to you.
Saving Audio Tracks
The tracks on your Audio CDs are in CDA format. You can save these tracks
onto your system as WAV files. To do this, follow the instructions below:
1. Insert an Audio CD into the CD Rewritable drive.
2. From the main Nero Burning Rom window, select “CD-Recorder” from
the toolbar.
3. Select “Save Track…” from the drop down menu.
4. Use your mouse to select the audio tracks you want to convert to WAV
format. (To select multiple tracks, hold the Ctrl button while selecting
with the mouse).
5. Make sure you choose “browse” with a path of where you want to
save the tracks.
6. Press the “Save” button to begin saving the tracks to your hard drive.
- 27 -
48x16x48 CD-ReWritable Drive
User’s Guide
Nero INCD
Nero InCD is packet writing software that works together with your CD-RW
drive and CD-RW media to help manage your workflow and share data from
one computer to another. By using InCD, it is possible to write individual files
onto a CD-RW disc, making it as easy to use as a floppy disk. Drag and drop
the files and folders directly from your file manager to record them. To delete
unwanted files, just drag and drop them to the trash.
Nero InCD Installation
Follow the installation instructions carefully and step by step. If you encounter
a problem, refer to the troubleshooting section on this ma nual.
1.
2.
3.
4.
Power on your computer.
Boot into Windows.
Insert the Nero-Burning ROM installation CD into your CD-ROM drive.
The CD will automatically run and the installation program will guide
you through the entire installation process.
5. Reboot your computer at the end of the installation.
Note: If the installation program does not launch automatically, follow
these steps:
4. Click on the “Start” button on the task bar and select “Run”.
5. From the command prompt, type D:\Setup.exe (Where D:\ is
your CD-ROM drive). Select “InCD” from the list.
6. The installation program will guide you through the entire
installation.
- 28 -
48x16x48 CD-ReWritable Drive
User’s Guide
Format CD-RW Disc
1
To use Nero InCD, you must first format a blank CD-RW media disc.
2
Right click on the Nero InCD icon located in the system tray and select
“Format”. The InCD Wizard will appear. Click “Next” to continue.
3
Select your CD-RW drive and click “Next” to continue.
4
Click “Next” again to continue.
- 29 -
48x16x48 CD-ReWritable Drive
User’s Guide
5
Select “Normal” to quic kly format your CD-RW media disc.
6
InCD will begin to format your blank CD-RW media. This process time
may vary depending on your CD-RW drive speed.
7
Once done, Click “OK” to finish the format. You are now ready to use
Nero InCD.
- 30 -
48x16x48 CD-ReWritable Drive
User’s Guide
Using Nero InCD
1
To add or remove files from your CD-RW media, just drag and drop
them onto your CD-RW drive as your would any normal file. Nero InCD
functions like a floppy disk drive. To remove files, just drag it to your
trash bin or right click on the file and select the delete option.
2
To eject your CD-RW disk, right click on the “InCD” icon located in your
system tray and select the “Eject” option.
Note:
To read a Nero InCD formatted disk on a separate computer, you must:
•
Have a multi-read CD/ CD-RW drive on the second computer
•
Install Nero InCD on the second computer.
• Or install a UDF reader available at
http://www.nero.com/en/download.htm
- 31 -
48x16x48 CD-ReWritable Drive
User’s Guide
Using Nero InCD With Windows XP
Windows XP does not allow you to install earlier versions of Nero InCD
normally. To fix this, follow the directions below.
1
Download the Nero InCD update file available at
http://www.nero.com/en/download.htm
2
Right click on update file after it has been saved to your hard drive.
3
Select “Properties”, and select the “Compatibility” tab. Click on “Run
this program in compatibility mode for” and select “Windows
2000”
4
You should now be able to install Nero InCD using the update file it
which will run under Windows XP.
Note: This is only a temporary fix until Ahead releases a fully compatible
version of InCD for XP. This temporary fix may not work properly on all
systems. Installing InCD in this fashion is up to your discretion. Be sure to
check the Nero website (http://www.nero.com) for program updates.
- 32 -
48x16x48 CD-ReWritable Drive
User’s Guide
Troubleshooting
To help you identify and resolve some problems you may encounter with
Nero-Burning ROM, this chapter provides the following information.
•
•
•
•
Suggestions for Resolving Common Problems
Error Message Descriptions
Other Program Messages
Using the Online Help
Suggestions for Resolving Common Problems
The following section describes common problems you may encounter, along
with some suggestions for resolving them. You can find a detailed list of
errors and additional updates from Nero’s website at http://www.nero.com
My CD-ReWritable Drive is not found by Windows XP/2000/98/95
If you are connecting the CD-RW drive to the motherboard, read this:
Make sure that there are no conflicts, both primary and secondary IDE
controllers are present and without yellow exclamations marks. To check the
status of your IDE controllers, click on the Start button > Settings > Control
Panel > System > Hardware (for Windows 2000) > Device Manager (under
the Hard Disk Controllers category). Yellow exclamation marks on the IDE
controllers mean that the device is not working properly, not installed
properly or have a resource conflict with another device. Some retail versions
of Windows 98/95 may not recognize some of the IDE controllers. This can
result in IDE devices (such as CD-ROM drives) not being detected or
disappearing from the PC.
There are several ways to correct the problems.
If the Primary or Secondary IDE controllers are not present, read this:
Your controllers are not setup properly and you need to get a patch from your
motherboard manufacture or check your BIOS setup and make sure that both
onboard IDE controllers are enable
- 33 -
48x16x48 CD-ReWritable Drive
User’s Guide
If the Primary and Secondary IDE controllers are present but they
have yellow exclamation marks, read this:
The protected-mode driver for the hard disk controller was not properly
initialized when you started Windows previously. When this occurs, a NOIDE
entry is placed in the registry, preventing Windows from making future
attempts to initialize the protected-mode driver. You might try to resolve the
problem by editing your Registry.
WARNING: Using Registry Editor incorrectly can cause serious
problems that may require you to reinstall Windows. We cannot
guarantee that problems resulting from the incorrect use of Registry
Editor can be solved.
Use Registry Editor at your own risk.
NOTE: You should make a backup copy of the registry files (System.dat and
User.dat) before you edit the registry.
Go to the Start button then Run and type “REGEDIT” Then go to the
following directories to remove the NOIDE entry if it is listed. Once removed,
reboot system.
HKEY_LOCAL_MACHINE\SYSTEM\CURRENTCONTROLSET\SERVICES\VXD\IOS
After you update the registry, restart Windows. Windows will then attempt to
initialize the protected mode driver for the controller. If no problems are
encountered, the file system and virtual memory will operate in 32-bit mode,
and Device Manager will not display an exclamation point in a yellow circle for
the IDE channels. If the protected mode driver is not initialized properly, an
error message will be displayed and the NOIDE registry entry will be recreated. Windows will use the MS-DOS compatibility mode file system the
next time you start the computer.
If the CD-ROM drive is connected to a sound card or controller card,
read this:
Make sure the sound card or controller card are installed properly, working
properly and compatible with Windows 98/95. We do not recommend the use
of a sound card with our CD-ReWritable drive.
- 34 -
48x16x48 CD-ReWritable Drive
User’s Guide
Problems Reading Recordable CDs
If you have successfully written a CD but have problems reading it, there are
a number of possible reasons:
• If the CD can be read on the CD recorder but not on a standard CDROM drive, check in “Disc Info” and “Tools” to make sure that the
session containing the data you just wrote is closed. CD-ROM drives
cannot read data from a session, which is not closed.
• If your CD is ejected, or you receive an error message, or you have
random problems accessing files from the CD, the problem may be
that your CD-ROM drive is not well calibrated to read recordable CDs
or does not support CD-R / CD-RW media.
• If you recorded the CD using the DOS filenames option in the File
Names tab, but there are nonetheless difficulties in reading back the
CD on DOS or Windows® 3.1 system, it may be that you have an
older version of MSCDEX (before version 2.23) on your system.
Problems Reading Multi-Session CDs
If you can see only data recorded in the first session on the CD but not in
subsequent sessions, it may be that:
• You recorded the CD in CD-ROM (Mode 1) format, while your multiSession CD-ROM drive only recognizes CD-ROM XA (Mode 2) multiSession CDs. See the chapter on How to Make a Multi-Session CD.
• Your CD-ROM drive does not support multi-Session at all.
If you can see only data recorded in the last session, you may have forgotten
to link your new data with data previously recorded on the CD. Make sure to
import the session before writing to the CD. See the online help for more
details.
CD-ROM Drive Incompatibility with Recordable CDs
Sometimes, it appears that you wrote a CD without trouble and can read it on
your CD recorder. However, when you put it in a standard CD-ROM drive, the
CD is ejected, or you get error messages such as “No CD-ROM” or “Not
ready reading”, or you have random problems accessing some files or
directories. You may find that the problems vanish completely when reading
the CD on a different CD-ROM drive.
This maybe due to compatibility problems with some CD-ROM drives,
especially older ones. Some CD-ROM drives' lasers are not calibrated to read
recordable CDs, whose surface is different from that of factory pressed CDs. If
- 35 -
48x16x48 CD-ReWritable Drive
User’s Guide
your CD-ROM drive reads mass-produced (silver) CDs but not recordable CDs,
check with the CD-ROM drive manufacturer to determine whether this is the
problem. In some cases, an upgrade is available which will resolve the
problem.
The comb ination of CD brand and CD recorder can make a difference. Use
only good quality CD-R or CD-RW media.
Which Nero Releases supports Windows 2000?
The first Nero release, which supports Windows 2000, is Nero 4.0.8.3. To find
out what version of Nero you have, click on “Help” from the main Nero
Burning Rom window and select “About Nero”. You can update your version
of Nero by going to www.nero.com
Does Nero cause a problem if I update from Windows NT to Windows
2000?
Yes, because the Nero driver for Windows NT does not work under Windows
2000. Please uninstall Nero before you upgrade to Windows 2000.
- 36 -
48x16x48 CD-ReWritable Drive
User’s Guide
Error Message Descriptions
The following is a list of error messages you may encounter, along with
descriptions and suggestions for resolving them. See also the online help for a
listing of additional error messages.
Buffer underrun at sector....
CD writing is a real-time process, which must run constantly at the selected
recording speed, without interruptions. The CD recorder's buffer is constantly
filled with a reserve of data waiting to be written so that small slowdowns or
interruptions in the flow of data from the computer do not interrupt writing.
This message indicates that for some reason, the flow of data from hard disk
to CD recorder was interrupted long enough for the CD recorder's buffer to be
emptied, and writing was halted. If this occurs during an actual write
operation rather than a test, your CD may be damaged.
To avoid buffer underruns, make sure that no screen savers or other
Terminate and Stay Resident (TSR) utilities are active (they can momentarily
interrupt operations) and that your working hard disk cannot be accessed via
a network.
Also, the CD recorder’s position in the IDE bus or the cable length between
the computer and CD recorder may cause data slow-downs. Try connecting
the CD recorder as the master on the IDE bus and, if possible, use a shorter
IDE cable between the CD recorder and the host adapter.
The current CD already contains a closed audio session. If you
continue you may have problems reading the last audio session on
some CD audio players. Continue anyway?
Under the Red Book standard for audio CDs, all audio tracks must be written
in a single session. If you add audio tracks in more than one session,
playback results will be unpredictable. Most CD-ROM drives will play back all
audio tracks on a CD even if they are recorded in several sessions. Most home
and car CD players can only play the tracks in the first session.
- 37 -
48x16x48 CD-ReWritable Drive
User’s Guide
The current CD already contains tracks and or sessions that are
incompatible with the requested operation.
This error appears if you are trying to add data in a different format to a CD
that contains data, such as trying to add a CD-ROM XA session to a CD that
contains a CD-ROM session. A CD containing both formats is unreadable, so
you are not allowed to record the different session type.
The current CD contains a session that is not closed. Close the session
before writing further data to the disc.
CD-ROM drives can only read back one data track per session, so avoid
recording another data track in an open session.
The currently selected source CD-ROM drive or CD recorder cannot
read audio in digital format.
Reading audio tracks in digital format is not the same as playing the music.
Few CD-ROM drives can read audio tracks in digital format.
The destination CD is smaller than the source.
There is not enough room on the recordable CD to copy the source CD. Try
recording to a blank CD. Use 74-minute media instead of 60-minute media.
Some CDs cannot be copied due to the TOC overhead in CD recorders and
also due to the calibration zone overhead. See PCA in Glossary.
Error reading the Table of Contents (TOC) or Program Memory Area
(PMA) from the CD.
Do not try and write to this CD. It has serious problems, and may have been
damaged during a previous write. If this is a CD-RW media, erase it and try
again.
MSCDEX Errors
Versions of MSCDEX prior to 2.23 had problems with filenames containing
illegal characters. If a directory contains a filename with an illegal character,
you can see all the files by doing a DIR from DOS and can open the illegally- 38 -
48x16x48 CD-ReWritable Drive
User’s Guide
named file; however, one or more files listed after the illegal one may not be
accessible or may give errors.
The selected CD track is longer than the image file.
The verify fails immediately because the source ISO 9660 image and the ISO
9660 track on CD are not the same size.
The selected CD track is shorter than the image file.
The verify fails immediately because the source ISO 9660 image and the ISO
9660 track on CD are not the same size.
The selected disc image file was not prepared for the current CD.
Write anyway? (This is not likely to produce a readable CD!)?
These errors occurs if you prepared the disc image file for a blank CD and are
now trying to record it to a CD containing data, or vice-versa. In either case,
you would write a CD that cannot be read at all because the CD addresses
calculated for the disc image are wrong for this CD.
Other Program Messages
The following is a list of other program messages you may encounter, along
with their descriptions.
Adding files to CD image...
As part of the process of preparing to record, Nero-Burning ROM is creating a
database of the files to be written to CD.
Fixing up...
The files in the data track list are checked on the hard disk for potential
problems, such as hard disk corruption, and their length is computed in
preparation for writing.
Generating ISO 9660 image file...
A disc image is being written to hard disk, because write on-the-fly is
deselected or write disc image is selected in the general tab.
- 39 -
48x16x48 CD-ReWritable Drive
User’s Guide
Initializing
The CD recorder’s laser is calibrated and the CD is checked in preparation for
writing. If there are no problems, writing begins immediately.
Loading files from previous track to make linked multi-Session
This message appears when you choose to make a linked Multi-Session CD.
During this process, the ISO 9660 file system information is loaded from the
track you chose in the load contents tab so that it can be linked with the new
files to be recorded.
Mounting...
The ISO 9660 disc structure is prepared on hard disk. This generates a large
temporary file in your set temporary directory.
Using the Online Help
You will find most of the information you need to use Nero-Burning ROM in
the Manual folder within the Nero-Burning ROM CD. Also you can open the
Nero-Burning ROM program and go to the Help Topics from the Help menu to
get started. More information and help with Nero can be found at
www.ahead.de.
- 40 -
48x16x48 CD-ReWritable Drive
User’s Guide
Limited Warranty
Hardware Limited Warranty
This product is warranted to be free from failures due to defects in material
and workmanship for one year from the date of original purchase as
evidenced by a copy of the purchase receipt. During the warranty period,
I/OMagic at its sole discretion will repair or replace at no charge, the
product that, in its opinion, is defective. The original purchaser is responsible
for packing the product for shipment and for the charges to ship the failed
product.
If the failed product has been modified in any way without the consent of
I/OMagic or if the failure is the result of misuse, abuse, or misapplication,
I/OMagic has no obligation to repair or replace the failed product.
Except as expressly provided above, the hardware and accompanying written
materials (including the Users Guide) are provided as is without warranty of
any kind including the implied warranties of merchantability and fitness for a
particular purpose. This specifically does not warrant the operation of the
hardware and will not be liable for any direct, indirect, consequential or
incidental damages arising out of the use or inability to use such product even
if has been advised of the possibility of such damages. Some states do not
allow the exclusion or incidental damage, so the above limitation may not
apply.
- 41 -
R-CDRW4848-02
Ver. 1