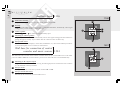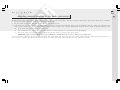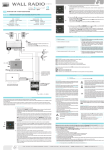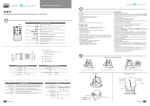
1
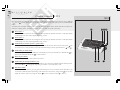
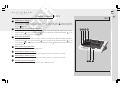
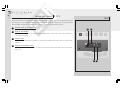
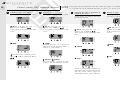
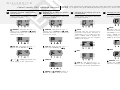
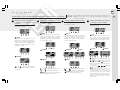
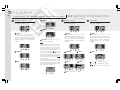
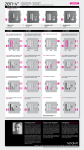
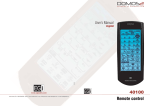
C
M
Y
CM
MY
CY CMY
K
Manual del usuario
Fecha de instalación / Installation date
EG i
User’s manual
Electroacústica
General
Ibérica, S.A.
Avda. Almozara, 79
50003 ZARAGOZA (Spain)
Tel. 976 40 53 53
Export phone +34 976 40 53 56
Fax +34 976 40 53 54
e-mail: [email protected]
http://www.egiaudio.com
Cód. 002466 • D.L.: Z-1.114/01
Empresa instaladora / Installer
EG i
ESPAÑOL • ENGLISH
Electroacústica
General
Ibérica, S.A.
2
Index
1201 - Control console _________________________________________________ 28 - 29
1301 - Audio processor _____________________________________________________ 3 0
1202 - Control console _____________________________________________________ 3 1
Basic operation ______________________________________________________ 32 - 34
Access restrictions ________________________________________________________ 3 4
Advanced functions ___________________________________________________ 35 - 38
Operation of the module for paging over the telephone ________________________ 3 9
Operation of the pre-recorded message player ___________________________ 40 - 42
Central Rack Modules ______________________________________________________ 4 3
1204 - 2-Channel 5 W control unit ___________________________________________ 4 4
1203 - Intercom unit _______________________________________________________ 4 4
1105 - Pre-amplified XLR microphone base ___________________________________ 4 5
1107 - Volume regulator for mic base 1105 ___________________________________ 4 5
1106 - Auxiliary input ______________________________________________________ 4 6
1501 - Wall base for connection of control consoles and music sources __________ 4 6
1205 - 4-Channel 1 W control unit ___________________________________________ 4 7
1206 - Digital control keyboard _____________________________________________ 4 7
1207 - 4-Channel 2 W control unit ___________________________________________ 4 8
Adapting musical sources to the audio processors _____________________________ 4 9
Guarantee _________________________________________________________________ 5 1
27
Overview
Congratulations, you have been provided with a MILLENNIUM sound, intercommunication
and Public Address system that will offer you multiple services.
The MILLENNIUM system begins in the processor module that is in charge of receiving
and emitting the audio and control signals for the installation.
The control consoles manage and control all the features of the installation and messages
and warnings can be emitted from them.
In different parts of the installation, you can have local control units and signal emitters
(microphone inputs and external musical sources) or even intercommunicators between
different zones.
Finally, the speakers and acoustic diffusers will perform the diffusion of the sound,
messages, signals or warnings with power and quality.
Control console 1201
28
1201
Once the Console is turned ON, a menu will appear indicating the control keys for the zones (zone 1 , zone
2 , zone 3 ) and the dial position of the FM radio of the processor (only if the processor includes a FM
radio).
From this menu, and after selecting one or several zones, you will be able to decide what do you want to do
with them: emitting music, warnings or signals. Let us see each one of the control keys.
1
1
2
3
4
Door opener 1
Push button that activates the electromagnetic door opening mechanism selected as 1. This push button
could manage any other output application using a relay.
2
Door opener 2
Push button that activates the electromagnetic door opening mechanism selected as 2. This push button
could manage any other output application using a relay.
3
Push button for selection of zone 3 (general line)
When it is pressed, the symbol > will appear to indicate that the zone has been selected. If zone
has
and ).
been selected, it is only possible to browse the bell and messages menus (push buttons nr.
4
When pressed, you access to the FM tuner in the audio processor (if it includes one). With the key
move up the dial and with the key
we move it down.
5
0840
Push button for radio tuning
we
Reserved push button
Push button to be used in more advanced versions.
6
Push button for turning ON/OFF a zone
Once the zone/s are selected, this push button allows you to turn ON or OFF the ambient music function.
The symbol OF or 1 will appear depending on whether it is turned OFF or ON.
7
Bell menu button
Once the zone/s are selected, pressing this push button gives access to another menu, that allows you
to turn ON or OFF the option of listening to the bell in the selected zone, using button . You can also
adjust the volume of the bell, using the button
to raise it and the button
to lower it.
7
6
5
Control console 1201
8
1201
Push button for talking
will appear while the
Once the zone is selected and after pressing this button, first the clock symbol
pre-warning tone sounds in the selected zone or zones. The system is ready to broadcast a message when
the icon
appears.
9
Push button for accessing the Messages menu
11 12 13 14
Once the zone is selected and after pressing this button, you will be able to adjust the volume of the messages,
using the button
to raise it and the button
to lower it. By means of push button number
we can
select if a pre-warning tone will be played or not.
10
Music menu push button
Once the zone is selected and after pressing this button you will be able to adjust the volume of the music,
using the button
to raiser it and the button
to lower it. By means of push button number
we can
select channel 1 1 or 2 FM. If zone 1 has been wired in stereo, the key will allow us the selection between
mono and stereo.
11
Back to main menu push button
When pressed, it takes us back to the main menu.
12
Push button for selection of zone 2
When it is pressed, the symbol < will appear to indicate that the zone 2 has been selected.
13
Push button for selection of zone 1
When it is pressed, the symbol < will appear to indicate that the zone 1 has been selected.
14
Location of gooseneck microphone
Location for the microphone with gooseneck, only in 1201.11 version.
10 9
8
29
Audio processor 1301
30
1301
This processor allows you to provide sound for facilities with 2 centralised zones plus 1 de-centralised zone (general
line), being these “zones” understood as the different areas which must be considered for message broadcast.
Version 1301.1 incorporates a FM tuner and a dual RCA input for external musical sources.
1
ON/OFF switch for the installation
2
Input for 1201 module
1
2
Phone type input RJ45 for the connection of the 1201 control console. There is also the possibility of
connecting it internally.
3
Antenna input
Coaxial input for FM antenna. It enables the connection of a FM antenna to improve the reception of radio
stations.
Input for external music source
o
4
1301.1
ON
RCA input for external music sources. It enables the connection of an external music source (CD, cassette
player, etc.).
3
4
Control console 1202
The control console 1202 is provided with a 4-line LCD display and a keyboard which allow the user to control
and program all the possible functions.
The operation language can be selected between a total of six at the function menus.
The console enables also the control of up to four radio tuners installed in the 1316 audio processor.
The 127 different zones which can be controlled by the console can be grouped, being 15 the maximum number
of groups. A name can be assigned to each zone or group of zones, and the selected names must have no more
than 7 characters (like “hall”, “room 1”, “room 2”, “lift”, “garage”, etc).
As many consoles as necessary can be used in the same installation, up to 127.
1
Push button for talking
2
Push button for controlling audio programs
3
Push button for controlling voice messages
4
Set-up push button
5
Push button On/Off of the console
6
Push buttons for menu browsing
1202
6
6
0849
2
3
1
4
5
31
32
Control console 1202. Basic operation
1
Turning the system "On" and "Off"
2
1202
Turning a zone "On" and "Off"
3
Changing the audio channel in a zone
4
Altering the volume level of a zone
If three groups -for instance- have been
previously created:
If three groups -for instance- have been
previously created:
If three groups -for instance- have been
previously created:
GENERAL (And the sign " < " appears next
ZONE
to GENERAL) +
If three zones -for instance- have been
previously named:
GENERAL (And the sign " < " appears
ZONE
next to GENERAL) +
GENERAL (And the sign " < " appears
ZONE
next to GENERAL) +
If three zones -for instance- have been
previously named:
If three groups -for instance- have been
previously created:
ZON 001 (And the sign " < " appears next
to ZON 001) +
If the zone was previously off:
ZON 001 (And the sign " < " appears
next to ZON 001) +
If the zone was previously on:
ZON 001 (And the sign " < " appears
next to ZON 001) +
TURN ON
CHAN. 1
Provided that at least 2 channels are
available at the system:
YES
TURN OFF
+ or
– alters the volume level of
the previously selected zone.
Control console 1202. Basic operation
5
Turning a Group of zones “On” and
“Off” in a specific channel
6
1202
Changing an audio channel from
external (AUX) music source to
internal radio
33
7
Tuning of a channel with internal radio
CHAN. 1; CHAN. 2; CHAN. 3;
CHAN. 4 turn the group ON at the
TURN OFF turns
selected channel or
the audio OFF in the selected group.
Making a call to zones which are not
in “private” mode
If three groups -for instance- have been
previously created:
If three groups -for instance- have been
previously created:
GR 01 (And then the sign “<”
appears next to GR 01) +
Provided that there are -for instance4 channels available at the system:
8
Provided that there are -for instance4 channels available at the system:
GR 01 (And then the sign “<”
appears next to GR 01) +
Provided that there are -for instance4 channels available at the system:
CHAN. 1
Provided that there is an internal radio tuner available for CHANNEL 1, and
the channel is in RADIO mode:
CHAN. 1
Provided that there is an internal RADIO tuner available for CHANNEL 1, but
the channel is in AUXILIAR mode:
As long as we keep the button
pressed, what is
said to the microphone will be broadcast in all the zones
belonging to group GR 01.
+ or
– (short press) tunes the
radio 0.1 MHz up or down.
RADIO (And then the sign “<”
appears next to RADIO)
+ or
– (long press) searches for
the next available radio station in a
higher or in a lower frequency.
If the selected group is GENERAL the call will be broadcast
in every zone of the installation.
It is also possible to select several groups or zones, or even
a combination of groups and zones -taking into account that
if we enter a group to select some of its zones, the selection
of that group (as a whole unit) will automatically be
cancelled-.
If the paging line is busy because another call is being
broadcast or a pre-recorded message is being played or
saved from another console 1202, instead of the last two
screens, the following message will appear:
34
Control console 1202. Basic operation
9
1202
1
Making a call when any of the targeted
zones is in “private” mode
If three groups -for instance- have been
previously created:
GR 01 ((And then the sign “<” appears
next to GR 01) +
If, in the selected group, any of the
zones is in “private” mode:
If, instead of a group, a zone had been
selected which was in “private” mode,
the name given to that zone would
appear in the screen.
YES will send the message to the
whole group.
NO will send the message only to the
zones of the selected group which are
not in “private” mode.
Control console 1202. Access restrictions
Enabling and disabling the general
access password
If three groups -for instance- have been
previously created:
As long as we keep the button
pressed, what is said to the
microphone will be broadcast in all
the selected zones.
It is also possible to select several
groups or zones, or even a combination
of groups and zones -taking into
account that if we enter a group to
select some of its zones, the selection of
that group (as a whole unit) will
automatically be cancelled-.
If the paging line is busy because
another call is being broadcast or a
pre-recorded message is being played
or saved from another console 1202,
instead of the last two screens, the
following message will appear:
2
1202
Entering the general access password
If the general access password is active, whenever we want to access to the
advanced functions of the system, the
module for sending messages over the
telephone, or the pre-recorded
message player, a password will be
required by the following screen:
SETUP
Provided that there is NEITHER a pre-recorded
message player (1103) NOR a module for sending
messages over the telephone (1104) in the system:
The 4 bottom keys
;
; SETUP
act here as numeric keys.
and
If we make a mistake when entering the
password, it is possible to start again
ERASE.
by pressing
For each entered digit, a " – " symbol
will be substituted by a " * " symbol.
MORE
PASSWORD
NO disables the general access password.
1+
2+
3+
4 will turn on the led
lamp next to YES.
YES then the code 1234 has
If then we press
been enabled as general access password.
The 4 bottom keys
;
act here as numeric keys.
;
SETUP and
Control console 1202. Advanced functions
1
Giving a number to each zone
This is the first thing that has to be done
in order to configure a system (and it
does not have to be done again if the
system configuration is not modified).
Provided that no groups have been
created yet:
SETUP
If the general access password is NOT
active and there is NEITHER a prerecorded message player (1103) NOR
a module for sending messages over
the telephone (1104) in the system:
ZONES
1202
HERE gives to the control console 1202 the
zone number 1 (the console needs a zone number
only if it must be ready to receive messages).
If the general access password is active the system will require us to introduce it every time we
try to operate one of the advanced functions (see point 2 of “access restrictions”).
2
Labelling the zones with names
If NO groups have been created yet:
3
Creating a group and giving it a number
If NO groups have been created yet:
ZONE SET
When pressed, the system is ready
to assign number 1 to a zone, and all the "zone set"
led lamps of the devices which can be given a zone
number will blink. If, in the mentioned devices,
one of the ZONE SET buttons is pressed, that
specific device will be identified as ZONE NR. 1,
and the system will get ready to assign number 2
to the following device / zone.
By following this procedure we can give
consecutive numbers to all the zones of the
installation without going back to the console
1202 (this is useful for the initial configuration of
the installation).
It is also possible to select a specific zone number
GENERAL (And the sign " < " appears next
to GENERAL) + ZONE
If three zones -for instance- have been
previously created:
ZON 001 (And the sign " < " appears next
to ZON 001) +
If the general access password is NOT active
by pressing
+ or
– and, after pressing
ZONE SET and following the ZONE SET button of
the corresponding device, the selected number
will be given to that device (this is useful to replace
an old device by a new one which must have the
same zone number without repeating the set up
procedure).
GENERAL (And then the sign “<”
appears next to GENERAL) +
If the general access password is NOT
active:
NEW
NAME
YES
ZONE SET cancels all the numbers that
have been given to the zones until pressed.
+
When a zone number has been assigned to all the
zones of the installation, we will quit the labelling
procedure and all the ZONE SET led lamps of the
different devices will stop blinking.
Now it is recommended to start up the system
(point nr. 13) prior to label the zones with names.
>>> (the cursor is placed in letter "O") +
+ ("O" is replaced by "P") +
35
36
Control console 1202. Advanced functions
4
Labelling groups with names
If one group has already been created:
5
1202
Assigning a zone to a group
If one group has already been created:
If the general access password is active the system will require us to introduce it every time we
try to operate one of the advanced functions (see point 2 of “access restrictions”).
6
Changing the order of appearance of
groups in the screen
If three groups -for instance- have been
previously created:
GR 01 (And then the sign “<”
appears next to GR 01) +
If the general access password is NOT
active:
NAME
GR 01 (And then the sign “<”
appears next to GR 01) +
If the general access password is NOT
active:
ZONES
Provided that there are 3 numbered
zones in the system and zone number 2
belongs to group number 1.
GR 01 (And then the sign “<”
appears next to GR 01) +
If the general access password is NOT
active:
7
Erasing a group
If three groups -for instance- have been
previously created:
GR 03 (And then the sign “>”
appears next to GR 03) +
If the general access password is NOT
active:
ERASE
CHANGE
>>> (the cursor is placed in letter
"R") +
– ("R" is replaced by "Q") +
YES
GR 03
ZON 001 +
ZON 002
Now zone number 1 belongs to group
number 1 and zone number 2 does not.
Now it is recommended to initialise the
system again (like in point number 13) so
that the system checks again the
relationships between groups and zones.
Control console 1202. Advanced functions
8
Changing the Public Address volume
level in a zone
9
1202
Enabling and disabling the “private”
mode in a zone
If the general access password is active the system will require us to introduce it every time we
try to operate one of the advanced functions (see point 2 of “access restrictions”).
10
Changing the pre-warning tone of an
announcement
If three groups -for instance- have been
previously created:
If three groups -for instance- have been
previously created:
If three groups -for instance- have been
previously created:
GENERAL (And then the sign “<”
ZONE
appears next to GENERAL) +
Provided that there are 3 numbered
zones in the system:
GENERAL (And then the sign “<”
ZONE
appears next to GENERAL) +
Provided that there are 3 numbered
zones in the system:
SETUP
Provided that the general access
password is NOT active, and there is
NEITHER a pre-recorded message
player (1103) NOR a module for
sending messages over the telephone
(1104) in the system:
ZON 001 (And then the sign “<”
appears next to ZON 001) +
ZON 001 (And then the sign “<”
appears next to ZON 001) +
11
Changing the operation language
If three groups -for instance- have been
previously created:
SETUP
Provided that the general access
password is NOT active, and there is
NEITHER a pre-recorded message
player (1103) NOR a module for
sending messages over the telephone
(1104) in the system:
LANG.
BELL
+ or
– modifies the volume level
of the paging in the selected zone.
PRIVATE
TONE 2 (And then the sign “<”
appears next to TONE 2) changes the
pre-warning tone of the announcement.
ENABLE or
DISABLE enables or
disables the private mode of a zone.
ENGLISH (And then the sign “<”
appears next to ENGLISH) changes the
operation language.
37
38
Control console 1202. Advanced functions
12
Checking the software versions
If three groups -for instance- have been
previously created:
SETUP
Provided that the general access
password is NOT active, and there is
NEITHER a pre-recorded message
player (1103) NOR a module for
sending messages over the telephone
(1104) in the system:
13
1202
Initialising the system
It is recommended to proceed with this
operation after the options described
in points 1 and 6.
If three groups -for instance- have been
previously created:
SETUP
Provided that the general access
password is NOT active, and there is
NEITHER a pre-recorded message
player (1103) NOR a module for
sending messages over the telephone
(1104) in the system:
MORE
MORE
SOFTWARE VERSION
START UP
If the general access password is active the system will require us to introduce it every time we
try to operate one of the advanced functions (see point 2 of “access restrictions”).
YES
Control console 1202. Operation of the module for sending messages over the telephone
1
Changing the length of the time while
a message over the telephone can be
broadcast
2
Assigning a telephone number to a zone
If three groups -for instance- have been
previously created:
3
1202
If the general access password is active the system will require us to
introduce it every time we try to operate this module (see point 2 of
“access restrictions”).
Assigning a telephone number to a group
If three groups -for instance- have been
previously created:
If three groups -for instance- have been
previously created:
SETUP
SETUP
Provided that the general access
password is NOT active, and there is
NOT a pre-recorded message player
(1103) in the system but THERE IS a
module for sending messages over the
telephone (1104):
Provided that the general access password is
NOT active, and there is NOT a pre-recorded
message player (1103) in the system but
THERE IS a module for sending messages
over the telephone (1104):
4
Enabling and disabling the password
for messages over the telephone
If three groups -for instance- have been
previously created:
SETUP
Provided that the general access password is
NOT active, and there is NOT a pre-recorded
message player (1103) in the system but
THERE IS a module for sending messages
over the telephone (1104):
T-PHONE
T-PHONE
ASSIGN
ZONE
ASSIGN
SETUP
Provided that the general access password is NOT
active, and there is NOT a pre-recorded message
player (1103) in the system but THERE IS a module
for sending messages over the telephone (1104):
T-PHONE
PASSWORD
T-PHONE
NO disables the password for messages over
the telephone.
1+
2 + 3 + 4 will turn on the led lamp
next to YES. If then we press YES then the code
1234 has been enabled as password for messages
over the telephone.
+ or
– modifies the maximum
time length while a message can be
broadcast.
The 4 bottom keys
+ or
– modifies the telephone number.
+ or
– modifies the zone number.
ASSIGN assigns the selected telephone
number to the desired zone number.
+ or
+ or
– modifies the telephone number.
– modifies the group number.
ASSIGN assigns the selected telephone
number to the desired group number.
;
;
SETUP and
act here as numeric keys.
This password will have to be entered in the
telephone keyboard whenever the user tries to
broadcast a message over the telephone. This will
be requested by means of a set of commands
recorded in the module 1104. The user will listen
to these commands in his telephone handset after
dialling the extension reserved for the Public
Address system.
39
40
Control console 1202. Operation of the pre-recorded message player
1
Broadcasting a message at a definite time
If three groups -for instance- have been
previously created:
2
Broadcasting a message as a reaction
to an event
If three groups -for instance- have been
previously created:
3
1202
Selecting the destination of a message
If three groups -for instance- have been
previously created:
4
Respecting or overriding
“private” mode of the zones
the
If three groups -for instance- have been
previously created:
SETUP
SETUP
Provided that the general access password is
NOT active, and there is a pre-recorded
message player (1103) in the system but NOT
a module for sending messages over the
telephone (1104):
SETUP
Provided that the general access password is
NOT active, and there is a pre-recorded
message player (1103) in the system but NOT
a module for sending messages over the
telephone (1104):
Provided that the general access password is
NOT active, and there is a pre-recorded message
player (1103) in the system but NOT a module for
sending messages over the telephone (1104):
MESSAGE
MESSAGE
If the general access password is active the system will require us to
introduce it every time we try to operate this module (see point 2 of
“access restrictions”).
MSG. 1
SETUP
Provided that the general access password is
NOT active, and there is a pre-recorded message
player (1103) in the system but NOT a module for
sending messages over the telephone (1104):
MSG. 3
MESSAGE
MESSAGE
MSG. 4
MSG. 2
ZONES
+
PRIVATE
TIME
HOUR + or
MINUTE + or
YES
– changes the hour.
– changes the minute.
programs message number one
to be launched at the selected time.
EVENT
– – – – – – –;
EVENT 1;
EVENT 2 or
EVENT 3 (and then the sign “>” appears
next to the selected option).
Assigns message number 2 to no
event, or to event 1, 2 or 3 (depending on the
previously pressed key).
assigns ZON 001 as first destination of message
number 3, and leaves empty the three other possible
destinations. In order to assign a 2nd, 3rd or 4th
destination, move vertically the symbol “>” with the
4 buttons on the right and select destination between
+ or
the different zones and groups by pressing
– . When everything is according to our preferences,
we must press
YES (and then the sign “>” appears next to
ensures the broadcast of the
YES) +
message in ALL the destination zones.
NO (and then the sign “>” appears next to
will only broadcast the message in
NO) +
those destination zones which are not in
“private” mode.
Control console 1202. Operation of the pre-recorded message player
5
Replay of a message
If three groups -for instance- have been
previously created:
SETUP
REPEAT
Provided that message number 5 is
already recorded:
+ +
6
1202
If the general access password is active the system will require us to
introduce it every time we try to operate this module (see point 2 of
“access restrictions”).
Changing the volume level of a
message
If three groups -for instance- have been
previously created:
+
Provided that the general access password is
NOT active, and there is a pre-recorded
message player (1103) in the system but NOT
a module for sending messages over the
telephone (1104):
7
Monitoring a message
If three groups -for instance- have been
previously created:
SETUP
SETUP
Provided that the general access password is
NOT active, and there is a pre-recorded
message player (1103) in the system but NOT
a module for sending messages over the
telephone (1104):
Provided that the general access password is
NOT active, and there is a pre-recorded
message player (1103) in the system but NOT
a module for sending messages over the
telephone (1104):
MESSAGE
INTERVAL
MESSAGE
+
MESSAGE
MSG. 6
MORE
VOLUME
MSG. 5
+
programs message 5 to
be played 2 times, with an interval of 1
minute between 2 repeats.
+ or
– modifies the volume level of the
message. If reduced to 0, the message will be
played in each target zone at the volume level
that is set for paging there.
MSG. 7
MORE
MONITOR plays the message number 7 (if
previously recorded) by the built-in speaker at the
control console 1202. If the paging line is busy
because another message is being broadcast or
a pre-recorded message is being played or saved
from another console 1202, instead of playing
the message the following message will appear:
41
42
Control console 1202. Operation of the pre-recorded message player
8
Recording a message
MORE
If three groups -for instance- have been
previously created:
9
1202
If the general access password is active the system will require us to
introduce it every time we try to operate this module (see point 2 of
“access restrictions”).
10
Erasing a message
Time setting
If three groups -for instance- have been
previously created:
If three groups -for instance- have been
previously created:
SETUP
Provided that the general access
password is NOT active, and there is a
pre-recorded message player (1103)
in the system but NOT a module for
sending messages over the telephone
(1104):
SETUP
Provided that the general access
password is NOT active, and there is a
pre-recorded message player (1103)
in the system but NOT a module for
sending messages over the telephone
(1104):
RECORD
SETUP
Provided that the general access
password is NOT active, and there is a
pre-recorded message player (1103)
in the system but NOT a module for
sending messages over the telephone
(1104):
EXT MIC (And then the sign “>”
appears next to EXT MIC)
Starts recording the message from the
gooseneck microphone in the control console
or from an external microphone connected to
the RCA socket in the pre-recorded message
player, depending on where the symbol “>” is.
MESSAGE
MSG. 8
As long as we keep the key
pressed a
countdown -starting from 15- will let us know
the time remaining to finish up the record. The
message record will finish when the countdown
,
reaches 0 or when we release the button
whatever comes first.
If the paging line is busy because another
message is being broadcast or a pre-recorded
message is being played or saved from another
console 1202, instead of starting the record the
following message will appear:
MESSAGE
MSG. 1
TIME
MORE
ERASE
+ or
+ or
– modifies the hour.
– modifies the minute.
adjusts the time of the system.
YES erases message number 1.
Central Rack Modules
1
43
1315 Power Supply Unit.
Once connected to 230 V~, it supplies 15 Vdc for the other devices in the central rack and for the
general line as well.
2
Central Processing Unit 1316.
It is the main device that controls the different elements of the system. It communicates with the system
devices, monitoring the control parameters. It allows the adjustment of such parameters through
the control console 1202.
3
Pre-Amplified Audio Input 1101.1.
1
2
3
It allows the insertion into the system of low level audio signals (like the ones supplied by standard audio
sources like CD Players, Cassette Players, etc). Each 1101.1 module provides two audio programs, what
means that no more than two modules of this type can be present in one system.
4
FM Radio tuner 1102.1.
Radio tuner that operates in the FM band (88 – 108 MHz). It can be operated from the control console
1202.
It is equipped with a low level audio input that can be switched with the radio tuner. The 1102.1 module
provides only one audio program, what means that up to four modules of this type could be installed in
one system.
5
Pre-recorded message player 1103.1.
It allows to save and to store in digital format up to eight messages. The maximum length of each message
will be of fifteen seconds.
6
Interface for telephone systems 1104.1x.
It allows the connection, through an analogue extension, of a telephone central unit. By doing this it is
possible to broadcast messages through any telephone handset.
4
5
6
2-Channel, 5 W Control unit 1204
44
1
1204
Push button ON/OFF
1
On press turns on and the next press turns off the sound system in that zone.
NOTE: The control unit can be turned on at a moderate volume level by pressing while the unit is still OFF.
2
Volume regulator
To turn up
3
or down
the volume level of the control unit.
2
Channel selector
2
This push-button enables the user to select the sound channel that will be played in a zone. Each push will
change between the two available channels, and the selection will be showed by the light of a red lamp.
3
Intercom unit 1203
1203
1
Push button to select zone 1
1
By pressing this push button a call will be made to zone 1. It is possible to talk to zone 1 as long as you
keep on pressing the button.
2
Push button to select zone 2
By pressing this push button a call will be made to zone 2. It is possible to talk to zone 2 as long as you
keep on pressing the button.
3
Push button LOCK
2
3
By pressing this push button the zone 2 will stay permanently selected: you can talk to zone 2 even if the
push button 2 is released. A red lamp informs you that the communication with zone 2 is permanently open.
If this button is pressed again the lock function is disabled.
4
Volume regulator zone 1
By turning this screw clockwise we will raise the volume level of the message broadcast in zone 1.
5
Volume regulator zone 2
By turning this screw clockwise we will raise the volume level of the message broadcast in zone 2.
4 5
Pre-amplified XLR microphone base 1105
1
Professional XLR microphone socket
2
Microphone type selector
1105
2
This switch enables the user to select which type of microphone will be connected to the XLR socket: dynamic,
electret without power supply or electret with phantom power supply.
3
3
Pilot lamp ON
It keeps on lighted while the device is working correctly, no matter if there is a microphone connected
or not.
Volume regulator for mic base 1105 1107
MIC
1
1107
1
Push button ON/OFF
One press turns on and the next press turns off the microphone base 1105.
2
1
On lamp
Indicates that the microphone base is avaible to be used.
3
To turn up
4
2
4
Volume regulator
or down
the volume level of the microphone signal.
Pilot lamp for volume regulation
It blinks when the volume level of the microphone reaches its maximum.
3
45
Auxiliary Input 1106
46
1
1106
Push button ON/OFF
1
One press turns on and the next press turns off the auxiliary input 1106.
2
On lamp
It lights when the module is activated by pressing the push button ON/OFF or, automatically, when a signal
coming from a previous module is passing through.
3
Volume regulator
To turn up
4
or down
2
4
3
the volume level of the auxiliary input.
Pilot lamp for volume regulation
It lights only when the module is activated locally, but not when signals coming from other modules are
passing through the auxiliary input. It blinks when the volume level has reached its top.
5
5
Inlet for audio source
An external audio source (CD player, cassette deck, soundblaster, etc.) can be connected here for local use.
A wireless microphone receiver can also be connected here.
1501
Wall base for connection of control
consoles and music sources 1501
1
1501
This wall socket can be used to connect whether a control console or any external audio source to the audio
processors 1301 or 1302. The two inlets that are present in the wall socket can be used simultaneously.
1
2
Pilot lamp for RCA signal reception
It lights when the RCA connectors are receiving an audio signal from an external music source which is
over the minimum sensitivity threshold.
2
Inlet for console
Inlet type RJ45 for the connection of control consoles 1201 or 1202.
3
Inlet for external audio source
RCA inlet for the connection of external audio sources.
3
4-Channel, 1 W Control unit 1205
1
1205
ON/OFF push button
1
One press turns on and the next press turns off the sound system in that zone.
NOTE: The control unit can be turned on at a moderate volume level by pressing
while the unit is still OFF.
2
Volume regulator
To turn up
3
or down
the volume level of the control unit.
2
Channel selector
2
This push-button enables the user to select the sound channel that will be played in a zone. Each push will
change between the four available channels, and the selection will be showed by the light of a red lamp.
3
Digital control keyboard 1206
1
1206
ON/OFF push button
1
One press turns on and the next press turns off the digital amplifier which drives the speakers of that zone.
2
Volume regulator
To turn up
3
or down
the volume level of the digital amplifier to which the digital keyboard is connected.
Channel selector
This push-button enables the user to select the sound channel that will be played in a zone. Each push will
change between the four available channels, and the selection will be showed by the light of a red lamp.
2
2
3
47
4-Channel, 2 W Control unit 1207
48
1
1207
Push button ON/OFF
1
One press turns on and the next press turns off the sound system in that zone. The current status will be
showed by the light of a red lamp.
2
Volume regulator
To turn up
3
or down
the volume level of the control unit.
2
2
Channel selector
This push-button enables the user to select the sound channel that will be played in a zone. Each push will
change between the available channels (up to a maximum of four), and the selection will be showed by the
light of a red lamp.
3
Adapting musical sources to the audio processors
The audio processors allow nearly every type of audio source to be connected to them, like cassette players, radio tuners, CD players, HI-FI systems, compact HI-FI, satellite TV, PC soundblaster,
etc. For a correct operation of the set, you should go through the following steps:
1.
Ask your installer to connect the musical device that you want to the audio processor.
2.
If the musical source has been connected to the audio processor by taking the signal from the loudspeaker output or from the headphones socket (it is usally so in radio-cassette sets,
compact systems, walkmans, etc.) you must set the volume at the music source at a proper level to prevent sound distortion caused by excessive volume. Go through the following steps:
a)
Set the volume of the musical source to the minimum level.
b)
If the musical source is a radio set, tune a FM station, and if it is a cassette, CD player, etc. press PLAY to start the music playing.
c)
Turn up the volume level of the music source gradually until that raise cannot be perceived in front of the speakers.
REMEMBER: If there is distortion in the sound of your installation it is probably caused by an excess of volume in your musical source.
3. In the music source connected to the audio processor using direct audio signal outputs (those that are not affected by a volume regulator) like CDs, radio tuners, HI-FI sound systems, etc,
there is no need of regulation. These direct audio outputs provide the best results and are usually called LINE OUT, REC OUT, TAPE, CD or AUDIO.
49
50
Garantía
garantiza sus fabricados electrónicos y electroacústicos contra cualquier defecto de fabricación
que afecte a su funcionamiento durante 24 meses a partir de la fecha de su producción (indicada
en cada fabricado), comprometiéndose a reparar o reponer los módulos defectuosos cuyo fallo, siempre
, se deba a defecto de fabricación, sin cargos de repuestos.
a juicio de
Esta garantía no incluye gastos de envío de módulos, ni mano de obra de sustitución en la instalación
de los citados módulos electrónicos y electroacústicos. En ningún caso la garantía cubre los
desperfectos o roturas de piezas embellecedoras (rejillas, embellecedores, carátulas, marquillos...).
Esta garantía se refiere únicamente al concepto de sustitución en fábrica de los módulos
, excluyéndose cualquier otra cobertura o responsabilidad sobre el resto de
producidos por
materiales o el conjunto de la instalación puesta a disposición del usuario, pero que
no suministra
ni ejecuta.
Por lo tanto no quedan cubiertas por esta garantía:
a) La instalación e interconexionado entre sus módulos.
b) Las consecuencias de abuso o mal uso del producto, incluyendo pero no limitado a:
c)
, para el
b.1.) No usar el producto para fines normales, o no seguir las instrucciones de
correcto uso y mantenimiento del mismo.
b.2.) La instalación o utilización de los productos de forma no concordante con las normas
técnicas o de seguridad vigentes.
Las averías producidas por la incorrecta instalación de los módulos, o con cable que no sea el
adecuado.
.
d) Las averías generadas por intervención de persona no autorizada por
e) Las consecuencias de mezcla con equipos de otro origen, así como adaptaciones, modificaciones, ajustes y/o tentativas de ajustes, irrespectivamente de que ello haya sido efectuado de
forma técnicamente correcta en principio, siempre que no exista expresa autorización por
.
f) Las consecuencias de accidentes, catástrofes naturales o cualquier causa ajena al control de
, incluyendo pero no limitado al rayo, agua y disturbios públicos.
En todos estos casos excluidos de la garantía, y siempre que los módulos no sean juzgados como
defectuosos por parte de
, su remitente deberá hacerse cargo del importe total de la reparación, y
caso de producirse visita de nuestros técnicos, su solicitante correrá con los gastos originados sin
causa justificada de garantía.
ATENCION: Si Vd. observa algún problema en su instalación
cliente le atenderá de 9h. a 13h.
PREGUNTENOS
EG i
976 40 53 53
nuestro Servicio de Atención al
o consulte a su instalador habitual
Guarantee
guarantees its electronic and electroacoustic products against any manufacturing defect that
affects its operation for 24 months from the production date (indicated in every manufacture), taking
the commitment of repairing or replacing the faulty modules which failure, always to the discretion of
, is caused by a manufacturing defect, without any charge for spare parts.
This guarantee does not include charges for the shipping and handling of the modules, nor the labour
charges for the replacement in the installation of the aforementioned electronic and electroacoustic
modules. The guarantee will not cover in any case the damages or breakings of the trimming pieces
(lattices, trims, masks, frames...).
This guarantee refers only to the concept of replacement in factory of the modules produced by
,
excluding any other cover or responsibility on the rest of the materials or the whole of the installation
that is put at the user disposal, but that is not supplied nor executed by
.
Therefore this guarantee does not cover:
a) The fitting up and the interconnection between the modules.
b) The results from the abuse or misuse of the product, including but not limited to:
b.1.) Not using the product for usual purposes, or not following the instructions from
for the
correct use and maintenance of the product.
b.2.) The installation or use of the products in a way that is not concordant with the technical or
security rules now in force.
c) The malfunctions caused by the wrong installation of the modules, or by an installation with
inappropiate cables.
d) The malfunctions caused by the intervention of a person non-authorised by
.
e) The consequences of mixing with equipment from other sources, and also adaptations, modifications,
adjustments and/or adjustment attempts, irrespectively of those that have been performed in a
.
technically correct way, provided that there is not an express authorisation by
control,
The consequences of accidents, natural catastrophes or any cause beyond
including but not limited to lightning, water and public disturbances.
In all these cases that are excluded from the guarantee, and every time that the modules are not
considered as faulty by
, the sender should take responsibility of the full amount of the repair, and
in the event of a visit from our technicians, the requesting person will bear the expenses originated
without a cause justified in the guarantee.
f)
WARNING: If you notice any problem in your
you from 9h. to 13h (Central European Time).
ASK US
EG i
installation, our Customer Support Service will attend
+34 976 40 53 56
or contact your usual installer
51
Manual del usuario
Fecha de instalación / Installation date
EG i
User’s manual
Electroacústica
General
Ibérica, S.A.
Avda. Almozara, 79
50003 ZARAGOZA (España)
Tel. +34 976 40 53 53
Exportphone +34 976 40 53 56
Fax +34 976 40 53 54
e-mail: [email protected]
http://www.egiaudio.com
Cód. 003778 • D.L.: Z-1114/01
Empresa instaladora / Installer
EG i
ESPAÑOL • ENGLISH
Electroacústica
General
Ibérica, S.A.