1
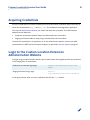
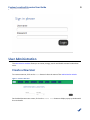
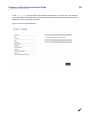
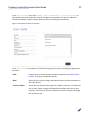
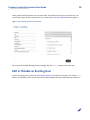
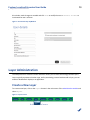
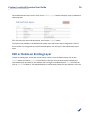
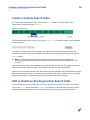
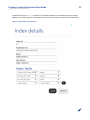
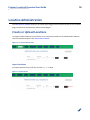
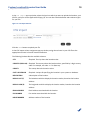
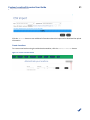
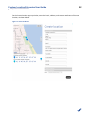
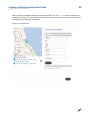
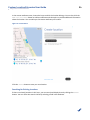
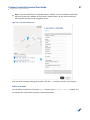
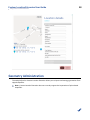
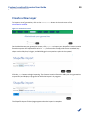
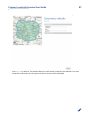
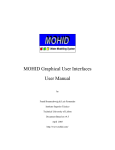
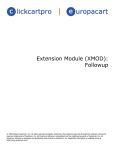
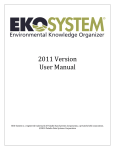
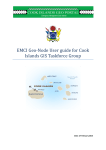
Custom Location Extension
User Guide
Version 1.7.0
Custom Location Extension User Guide
► Contents
2
Contents
Legal Notices..........................................................................................................................................................3
Document Information.................................................................................................................................... 4
Chapter 1: Overview................................................................................................................................. 5
What is the Custom Location Extension?................................................................................................. 6
Why use the Custom Location Extension?............................................................................................... 6
Chapter 2: Using Custom Location Extension................................................................. 7
Acquiring Credentials..................................................................................................................................... 8
Login to the Custom Location Extension Administration Website...................................................... 8
User Administration........................................................................................................................................9
Create a New User............................................................................................................................. 9
Edit or Disable an Existing User................................................................................................... 12
Layer Administration................................................................................................................................... 13
Create a New Layer......................................................................................................................... 13
Edit or Delete an Existing Layer................................................................................................... 14
Custom Search Index Administration...................................................................................................... 15
Create a Custom Search Index..................................................................................................... 16
Edit or Delete an Existing Custom Search Index...................................................................... 16
Location Administration.............................................................................................................................. 18
Create or Upload Locations.......................................................................................................... 18
Generating Location Import Reports.......................................................................................... 25
Edit or Delete Locations................................................................................................................ 26
Geometry Administration........................................................................................................................... 28
Create a New Layer......................................................................................................................... 29
Delete an Existing Geometry........................................................................................................ 30
Chapter 3: Service Support............................................................................................................ 32
Custom Location Extension User Guide
► Legal Notices
3
Legal Notices
© 2014 HERE. All rights reserved.
This material, including documentation and any related computer programs, is protected by
copyright controlled by HERE. All rights are reserved. Copying, including reproducing, storing,
adapting or translating, any or all of this material requires the prior written consent of HERE. This
material also contains confidential information, which may not be disclosed to others without the
prior written consent of HERE.
Trademark Acknowledgements
HERE and Nokia are trademarks or registered trademarks of Nokia Corporation in the United States
and other countries.
Other trade names are trademarks or registered trademarks of their owners.
Disclaimer
This content is provided "as-is" and without warranties of any kind, either express or implied,
including, but not limited to, the implied warranties of merchantability, fitness for a particular
purpose, satisfactory quality and non-infringement. Nokia does not warrant that the content is error
free and Nokia does not warrant or make any representations regarding the quality, correctness,
accuracy, or reliability of the content. You should therefore verify any information contained in the
content before acting on it.
To the furthest extent permitted by law, under no circumstances, including without limitation Nokia's
negligence, shall Nokia be liable for any damages, including, without limitation, direct, special,
indirect, punitive, consequential, exemplary and/ or incidental damages that result from the use or
application of this content, even if Nokia or an authorized representative has been advised of the
possibility of such damages.
Custom Location Extension User Guide
► Document Information
Document Information
Product
Name:
Custom Location Extension
Version:
Version 1.7.0
Document
Name:
Custom Location Extension User Guide
Id:
006518d-1414410616
Status:
FINAL
Date:
2014-Oct-27, 11:51 (GMT)
4
Custom Location Extension User Guide
► Overview
Chapter
1
Overview
Topics:
•
What is the Custom Location
Extension?
•
Why use the Custom Location
Extension?
This user guide introduces the Custom Location Extension
administrator web interface, explains essential concepts, and
describes the common use cases.
5
Custom Location Extension User Guide
► Overview
6
What is the Custom Location Extension?
HERE Custom Location Extension is a service that stores and retrieves custom locations. Upload
locations as CSV files or ESRI standard compliant shapes via an administration website or as XML
files via HTTP POST requests to the RESTful API. Retrieve locations by making HTTP GET requests
to the RESTful API. This document provides information about the administration website. To learn
more about how to retrieve and upload locations using the API, see the Custom Location Extension
Developer's Guide.
Why use the Custom Location Extension?
Custom Location Extension provides solutions for the following high level use cases.
•
•
•
•
•
•
Store custom sets of locations and polygons, for use with other HERE APIs.
Perform a proximity search for custom points of interest and polygons around a specified
location.
Retrieve a set of custom points of interest (POIs) and/or polygons within a specified bounding
box.
Find all custom locations and polygons within an isoline route result.
Find all custom locations and/or polygons within a specified radius of a defined route.
Search custom indices generated from multiple fields from one or more layers.
This document describes the functionality available in the administration website, including the ability
to:
•
•
•
•
•
create a new user or search for an existing user
import and manage locations
manage layers in the system
import geometries, also known as shapes or polygons, for maps
create and manage custom search indices
Custom Location Extension User Guide
► Using Custom Location Extension
Chapter
2
Using Custom Location Extension
Topics:
•
Acquiring Credentials
•
Login to the Custom Location
Extension Administration Website
•
User Administration
•
Layer Administration
•
Custom Search Index Administration
•
Location Administration
•
Geometry Administration
The following sections describe how to create and manage new
users, layers, locations, shapes and custom search indices.
7
Custom Location Extension User Guide
► Using Custom Location Extension
8
Acquiring Credentials
All users of HERE APIs must obtain authentication and authorization credentials and provide them as
values for the parameters app_id and app_code. The credentials are assigned per application.
To access the administration website, you need a username and a password. The administration
website has two addresses:
•
Production environment address: https://customlocation.here.com/admin
•
Staging environment address: https://stg.customlocation.nokia.com/admin
To obtain the credentials for an application or for the adminstration website, contact your HERE
representative or HERE Technical Customer Support, as described in Service Support on page 32.
Login to the Custom Location Extension
Administration Website
To begin using the administration website, open a web browser and navigate to either the production
or the staging URL, as shown below.
Production environment login page
https://customlocation.here.com/
admin
Staging environment login page
https://
stg.customlocation.nokia.com/admin
In the signin prompt, enter your user credentials and click the Login button.
Custom Location Extension User Guide
► Using Custom Location Extension
9
User Administration
The administration website allows you to create, manage, search and disable custom location data
users.
Create a New User
To create a new user, click on the Users button in the main menu of the administration website.
Figure 1: Create a New User
On the Administrate users screen, click on the Create user button to display a pop-up window with
the user details.
Custom Location Extension User Guide
► Using Custom Location Extension
In the User create pop-up window, fill in the basic information for the new user. At a minimum,
you must include a username and a password that contains at least 8 characters and one each of
uppercase, lower, and special characters.
Figure 2: User Create Pop-Up Window
10
Custom Location Extension User Guide
► Using Custom Location Extension
11
In the User settings area, check Display both coordinates in location details to
show display and route coordinates, used for navigation to the location, for the user. When this
checkbox is disabled, Custom Location Extension only uses the display coordinates.
Figure 3: Set Permission Roles for New User
In the User roles area, enable any of the following permission roles by selecting the appropriate
checkbox:
Read:
Enables the user to view locations and their attributes in the administration
website. This option is enabled by default.
Write:
Allows the user to write, change and delete locations and their attributes via
the web interface.
Customer Admin:
Grants the user administrative rights for a specific customer. This allows the
user to view, create, change, and disable both locations and users for that
customer. The first user account created for a specific customer should get
this permission role.
Custom Location Extension User Guide
► Using Custom Location Extension
12
Finally, specify which layers the user can see or edit. If you do not see any layers in this menu, you
must create a layer for this customer first. To create a layer, see Layer Administration on page 13.
Figure 4: Set Layer Permissions for a New User
Once you have finished defining the user settings, click the Create button to save this user.
Edit or Disable an Existing User
To edit an existing user, access the administration website. From the home screen, click on the Users
button. Click directly on the user that you wish to edit to display the User Details pop-up window. In
Custom Location Extension User Guide
► Using Custom Location Extension
13
this window, make changes as needed and click save to modify the user or Disable account to
inactivate that user's account.
Figure 5: User Details Pop-Up Window
Layer Administration
The web platform for Custom Location Extension allows you to create and manage location layers.
Layers typically represent a location type, and by associating custom locations with a layer, you can
enable or disable their display in an application.
Create a New Layer
To create a new layer, click on the Layers button in the main menu of the administration website and
select Layers.
Figure 6: Layers Screen
Custom Location Extension User Guide
► Using Custom Location Extension
14
On the Administrate layers screen, click on the Create layer button to display a pop-up window to
add a new layer.
Fill in the new layer name and description, and click the Create button.
The layer is now available in the Administrate layers menu and can be now be assigned to a user of
this customer. To change the layer name and description, click the layer in the Administrate layers
menu.
Edit or Delete an Existing Layer
To edit an existing layer, access the administration website. From the home screen, click on the
Layers button and select Layers. Click directly on the layer that you wish to edit to display the
Layer details pop-up window. In this window, make changes as needed and click save to modify the
layer or delete to delete it. The website displays a confirmation prompt for layer deletion. You must
Custom Location Extension User Guide
► Using Custom Location Extension
accept the confirmation for the system to remove a layer from the database. When you delete a
layer, all the related items are deleted. You need to reimport the data to restore the layer.
Figure 7: Layer Details Pop-Up Window
Custom Search Index Administration
The web platform for Custom Location Extension allows you to create and manage custom search
indices. A custom search index typically represents one or more fields from one or more layers.
15
Custom Location Extension User Guide
► Using Custom Location Extension
16
Create a Custom Search Index
To create a new custom search index, click on the Layers button in the main menu of the
administration website and select Indexes.
Figure 8: Layers Screen
On the Administrate indexes screen, click on the Create index button to display a pop-up window
to add a new layer.
Fill in a name, application ID and description. The name and description entries can only be 20
characters long. Select the layers and fields to be indexed from the drop-down boxes and click the
Create button.
Note: The application ID (app_id) you enter here must be the same as that used when
performing a search from an application and it must be one that is associated with your user
account.
The custom search index is now available in the Administrate indexes menu. To change the index ID,
application ID, name and description, click an index in the Administrate indexes menu.
When you create a custom search index, the Custom Location Extension may take some time to finish
generating the required index. If a request to a new custom searh index produces an error message
saying that the index is not accessible, the index generation may still be on-going.
Edit or Delete an Existing Custom Search Index
To edit an existing custom search index, access the administration website. From the home screen,
click on the Layers button and select Indexes. Click directly on the index that you wish to edit to
display the Index details pop-up window. In this window, make changes as needed and click save
Custom Location Extension User Guide
► Using Custom Location Extension
to modify the layer or delete to delete it. The website displays a confirmation prompt for index
deletion. You must accept the confirmation for the system to remove an index from the database.
Figure 9: Index Details Pop-Up Window
17
Custom Location Extension User Guide
► Using Custom Location Extension
18
Location Administration
The administration website allows you to create and manage custom locations (POIs) on the Locations
page. Locations can be imported, created, and managed.
Create or Upload Locations
To import custom locations from a CSV file or to create new locations in the adminstration website,
click the Locations button in the administration website.
Figure 10: Location Administration
Import Locations
To import locations from a CSV file, click the Import button.
Figure 11: Import Button
Custom Location Extension User Guide
► Using Custom Location Extension
19
In the CSV import pop-up window, select the layer into which you want to upload the locations, your
CSV file, and your correct Application ID (app_id). You can also edit the delimiter and enclosure types
for your file.
Figure 12: CSV Import Window
Click the send button to upload your file.
In the CSV import column assignment pop-up window, assign the columns in your CSV file to the
appropriate columns in Custom Location Extension.
The following list describes the available columns:
CITY
Required. The city where the location exists.
COUNTRY (ISO 3166) Required. The country where the location exists, specified by 3-digit country
code. For example, use code DEU for Germany.
COUNTY
The county where the location exists.
CUST LOCATION ID
Required. A unique ID specifying the location in your system or database.
DESCRIPTION
A description of the location.
DISPLAY LAT (Y)
The latitude at which to display the location marker, bound to the location
address.
DISPLAY LON (X)
The longitude at which to display the location marker, bound to the location
address.
EMAIL ADDRESS
Email address associated with the location.
FAX NUMBER
Fax number associated with the location.
HOUSE NUMBER
Address number of the location.
Custom Location Extension User Guide
► Using Custom Location Extension
ICON URL
20
URL of the logo file for the location, must be a valid address beginning with
http://, https://, or ftp://.
** ignore this field ** This indicates that the column will be ignored during the import process.
LATITUDE (Y)
The latitude of the location.
LONGITUDE (X)
The longitude of the location.
NAME1
Required. Name of the location.
NAME2
Alternate name of the location, can be used to indicate the name in another
language.
NAME3
Alternate name of the location, can be used to indicate the name in another
language.
NAVIGATION LAT (Y)
The latitude to which a user should be navigated for the location entrance.
NAVIGATION LON (X)
The longitude to which a user should be navigated for the location entrance.
PHONE NUMBER
Phone number for the location.
POSTALCODE
Postal code for the location.
STATE
State in which the location exists.
STREET NAME
Name of the street on which the location exists.
WEB URL
Web address of the location, must be a valid address beginning with
http://, https://, or ftp://.
Click the send button to begin importing. The Custom Location Extension adds your new locations as
specified, and displays a progress bar while the import is in progress.
The CSV import finished page appears when the import is complete.
Custom Location Extension User Guide
► Using Custom Location Extension
21
Click the details button to see additional information about the import and to download the upload
information.
Create Locations
To create a new location using the administration website, click the Create location button.
Figure 13: Create Locations Button
Custom Location Extension User Guide
► Using Custom Location Extension
22
On the Create location pop-up window, enter the basic, address, and custom attributes of the new
location, as shown below.
Figure 14: Basic Attributes
Custom Location Extension User Guide
► Using Custom Location Extension
23
When you have completed the address information details, click the geocode button to display the
location on the map. You can drag and drop the location markers to edit the precise location of either
the display or the navigation coordinates.
Figure 15: Geocode Button
Custom Location Extension User Guide
► Using Custom Location Extension
24
In the custom attributes area, choose the layer to which the location belongs. You can also click the
add new attribute button to add new attribute and value pairs to provide additional information
about the location. You can add up to 50 custom attributes per location.
Figure 16: Create Button
Click the create button to save your new location.
Searching for Existing Locations
If there are already locations in this layer, you can search and display them by clicking the Search
button. You can refine the search criteria by selecting a field in the database.
Custom Location Extension User Guide
► Using Custom Location Extension
Generating Location Import Reports
You can generate reports listing all attempted location imports within a specified timeframe by
clicking on the Imports button in the main menu.
Figure 17: Location Imports Reports Screen
On the Imports screen, choose the timeframe and the layer for your report and click the search
button.
25
Custom Location Extension User Guide
► Using Custom Location Extension
26
The Import reports search results page appears.
Figure 18: Location Import Reports Search Results
Select a report to view details about the location import and to download the upload information.
Edit or Delete Locations
To administrate custom locations, select the Locations button in the administration website,
choose the layer to which they belong from the dropdown list, and enter any relevant criteria in the
search fields. Click the Search button to display the relevant locations.
Figure 19: Administrate your locations
Edit a Location
Click on the location you wish to edit, and modify information in the Location details pop-up
window. You can modify information in the form fields, or move the location on the map manually by
moving the map marker.
Custom Location Extension User Guide
► Using Custom Location Extension
Note: There are two different coordinate markers available, one for the display coordinates,
which are bound to the address of the location, another marker for the route coordinates,
which represent those you can navigate to by car.
Figure 20: Location Details Window
After you have finished modifying the location, click the save button to confirm your changes.
Delete a Location
You can delete a location by clicking the delete button on the Location details window. You
must accept the confirmation prompt to remove the location.
27
Custom Location Extension User Guide
► Using Custom Location Extension
28
Geometry Administration
The web platform for Custom Location Extension allows you to import and manage geometries from
zipped shapefiles.
Note: Custom Location Extension does not currently support the importation of point-based
shapefiles.
Custom Location Extension User Guide
► Using Custom Location Extension
29
Create a New Layer
To import a set of geometries, click on the Geometries button in the main menu of the
administration website.
Figure 21: Geometries Screen
On the Administrate your geometries screen, click Import to import your shapefile. Custom Location
Extension expects the imported file to be in .zip format and to comply with the esri standard (any
shape such as PolyLine, Polygon, and MultiPolygon is accepted as a point in the system).
Click the send button to begin importing. The Custom Location Extension adds your new geometries
as specified, and displays a progress bar while the import is in progress.
The Shapefile import finished page appears when the import is complete.
Custom Location Extension User Guide
► Using Custom Location Extension
30
Click the details button to see additional information about the import and to download the upload
information.
The geometry/geometries are now available in Custom Location Extension.
Delete an Existing Geometry
To delete an existing geometry, access the administration website. From the home screen, click on
the Geometry button. Click directly on the geometry that you wish to delete to display the Geometry
details pop-up window.
Custom Location Extension User Guide
► Using Custom Location Extension
Click delete to delete it. The website displays a confirmation prompt for layer deletion. You must
accept the confirmation for the system to remove a layer from the database.
31
Custom Location Extension User Guide
► Service Support
32
Chapter
3
Service Support
If you need assistance in using the administration website, contact
your HERE representative or Technical Customer Support via email
at [email protected].