1
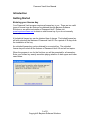
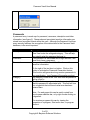
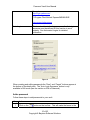
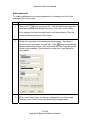
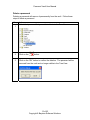
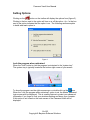
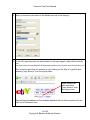
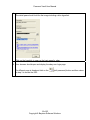
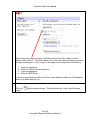
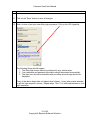
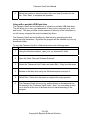
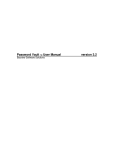
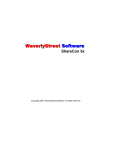
Password Vault TM User Manual
Bayview Software Solutions
version 2.0
Password Vault User Manual
Table of Contents
Introduction ...........................................................................................................3
Getting Started......................................................................................................3
Entering your license key ..................................................................................3
Entering your Master Password ........................................................................4
Program Layout ....................................................................................................5
Tutorial..................................................................................................................6
Categories .........................................................................................................6
Add a Category..............................................................................................6
Edit an existing Category...............................................................................7
Delete a Category..........................................................................................8
Passwords.........................................................................................................9
Add a password ...........................................................................................10
Edit a password ...........................................................................................12
Delete a password .......................................................................................13
Setting Options ...................................................................................................14
Lock the program when minimized ..............................................................14
Hide the password from view.......................................................................15
Copy the password to the windows clipboard ..............................................15
Clear the windows clipboard after two minutes............................................15
Advanced Features.............................................................................................15
Auto Login....................................................................................................15
Print and Export Passwords.........................................................................22
Using with a portable USB flash drive..........................................................23
2 of 23
Copyright © Bayview Software Solutions
Password Vault User Manual
Introduction
Getting Started
Entering your license key
Your Password Vault program requires a license key to run. There are two valid
types of license keys are that can be obtained through Bayview Software
Solutions or an authorized retailer of Password Vault. Please visit
www.bayviewsoftware.net to obtain a valid license key if you do not currently
have one.
A limited trial license key can be obtained free of charge. The limited license key
will with unlock all the features of Password Vault 2.0 for a period of 30 days from
the installation of the key.
An unlimited license key can be obtained for a nominal fee. The unlimited
license key will unlock all the features of Password Vault 2.0 and will not expire.
When the program is run for the first time you will be prompted for a license key.
Enter your license key exactly as written paying attention to both upper and lower
case letters.
3 of 23
Copyright © Bayview Software Solutions
Password Vault User Manual
Entering your Master Password
When running the program for the first time you will be prompted to enter a
Master Password. It is very important to not forget this password as it will unlock
your Password Vault. If the master password is forgotten you will not be able to
access the information that you have stored in the Password Vault.
It is also important to not use a password that would be easy to guess based (i.e.
the name of your children or pet). It is best to use a combination of letters, upper
and lower case, as well as numbers.
The following form will be displayed. Enter the master password twice for
verification.
Once the Master password is entered it will be used as a key element in the
encryption of all other passwords stored in the vault. The Master password is not
actually stored in the vault. This feature as well as the U.S. Government
approved encryption algorithm function to secure your personal identification
information stored within the vault.
4 of 23
Copyright © Bayview Software Solutions
Password Vault User Manual
Program Layout
The Password Vault is designed for easy and efficient navigation. All aspects of
the operation of the Password Vault program have been designed with ease of
use in mind. The following figure shows the layout of the Password Vault main
form.
Menu
Tool Bar
Tree View
Details Pane
Status Bar
Menu
Tool Bar
Tree View
The menu provides access to many of the functions of the
Password Vault. Click on a menu item will display a drop down
list of all available items under that menu. Clicking on the item
on the list will activate that function.
The toolbar contains the most frequently used feature of the
program. Clicking on the tool bar button will activate that
function. Note that some functions require a password or
category to be selected in the Tree View.
The Tree View will display all the Categories of passwords as
well as all the passwords in the vault. A + sign to the left of a
category folder indicates that the category contains one or more
passwords. Clicking on the + sign will display the passwords
stored under that category.
5 of 23
Copyright © Bayview Software Solutions
Password Vault User Manual
Details Pane
Status Bar
The details pane is used to display, enter, and update password
information. The details pane also contains special buttons to
access the Password Generator and the Auto Login Sequence
editor.
The status bar provides information about the operation of the
program.
Tutorial
Categories
Categories are used to organize your passwords. When you create a new
category a new folder will appear in the Tree View. As new passwords are
created and assigned to the category they will appear under the category folder
in the Tree View. Figure 1 shows categories that will be available when you
open your vault, the Banking category is selected.
Figure 1
Add a Category
Follow these steps to add new categories to your vault.
Step
1
Actions
Click on the
button on the tool bar.
Enter the name of the new category into the text box then, click OK.
2
6 of 23
Copyright © Bayview Software Solutions
Password Vault User Manual
3
The new category will now appear in the Tree View.
Edit an existing Category
Follow these steps to change the name of an existing category.
Step
Actions
1
Select the category that you want to edit in the Tree View.
2
Click on the
3
Modify the name of the category in the text box provided then, click OK.
button on the tool bar.
7 of 23
Copyright © Bayview Software Solutions
Password Vault User Manual
4
The edited category name will now be displayed in the Tree View.
Delete a Category
A category can be deleted but any passwords assigned to that category must me
assigned to a new category first. I this step is not taken, any passwords
assigned to that category will be deleted along with the category.
Step
Actions
1
Select the category that you want to delete in the Tree View.
2
Click on the
3
Click OK to confirm the category deletion. Once confirmed the category
will be removed from the Tree View and the vault.
button on the tool bar.
8 of 23
Copyright © Bayview Software Solutions
Password Vault User Manual
Passwords
A password entry is made up of a password, username, description and other
information (see figure 2). Passwords and associated sensitive information are
stored in an encrypted format within the vault. Although the Password Vault has
many security features, the encryption of the data stored in the Password Vault
database, is the most important.
Field
Description
Username
Password
Category
URL
Description
The description of the password that will show up in the
Tree View under the assigned category. This will help
you identify what the password belongs to.
If the password is associated with a login account it will
most likely have a username.
Your password, PIN, Credit Card Number or other
sensitive information.
To the right of the text box is a button. Click on this
button to activate the Password Generation feature.
This function will generate strong random passwords to
you specification. (see Password Generation section).
The category Folder in the Tree View that the password
will be found in.
The Web Address, program shortcut, or network URL
that this password is associated with. This field will turn
into a hyperlink that will launch what ever has been
entered here.
Note: For web pages this can be easily copied from
your browser address bar, or by right mouse clicking on
a hyperlink.
For windows programs this can by viewing the
properties of a program, Start menu item, or program
shortcut.
9 of 23
Copyright © Bayview Software Solutions
Password Vault User Manual
Examples:
http://login.yahoo.com/
C:\Program Files\Outlook Express\MSIMN.EXE
\\servername\sharename
Auto Login
This is a checkbox indicating yes or no. An Auto login
sequence must be defined for this function to work
properly. See Automated Logins for detailed
information.
Figure 2
When creating and editing passwords the “Save” and “Cancel” buttons appear at
the bottom of the detail pane. The “Auto Login Sequence” button is only
available in Edit mode (see the section on Edit a Password).
Add a password
Follow these steps to add passwords to your vault.
Step
1
Actions
Click on the
button on the tool bar. This will make the boxes in the
10 of 23
Copyright © Bayview Software Solutions
Password Vault User Manual
detail pane editable and disables the menu, Tree View, and Tool Bar.
If you change your mind and don’t want to add the password, Click the
Cancel button at the bottom of the screen.
2
Enter information into the detail pane. See figure 2 above for more
information on each field. Click
generation feature.
3
button to activate the password
Click on the
button at the bottom of the screen to save your
new password. The new password will available from the tree view.
11 of 23
Copyright © Bayview Software Solutions
Password Vault User Manual
Edit a password
To make modifications to an existing password or to change your Auto Login
sequence follow these steps.
Step
1
Actions
Click on the
button on the tool bar. This will make the boxes in the
detail pane editable and disables the menu, Tree View, and Tool Bar.
If you change your mind and don’t want to add the password, Click the
Cancel button at the bottom of the screen.
2
Modify the information in the detail pane as necessary. See figure 2
button to activate the
above for more information on each field. Click
password generation feature. Also notice that the “Auto Login Sequence”
button is now available. See the section on the Auto Login feature for
more details.
3
Click on the “Save” button to retain any changes that you have made.
Clicking on the “Cancel” button will discard any changes made.
12 of 23
Copyright © Bayview Software Solutions
Password Vault User Manual
Delete a password
Deleting a password will remove it permanently from the vault. Follow these
steps to delete a password.
Step
Actions
Select that password that you wish to delete in the Tree View.
1
2
Click on the
button.
3
Click on the “OK” button to confirm the deletion. The password will be
removed from the vault and no longer visible in the Tree View.
13 of 23
Copyright © Bayview Software Solutions
Password Vault User Manual
Setting Options
Clicking on the
button on the toolbar will display the options form (figure 3).
Clicking in the box next to the option will turn on or off the option. An √ in the box
next to the option indicates that the option is on. The following sections explain
in detail what each option is.
Figure 3
Lock the program when minimized
When the “Hide” button is click the program is minimized to the “system tray”.
The system tray is typically located at the bottom right corner of your screen.
icon.
To show the program use the right-mouse menu or double-click on the
When the “Lock the program when minimized” option is set, the Master password
login screen with be displayed. This is a safety feature to protect your password
information if you forget to lock your windows desktop and leave your computer.
If this option is not turned on the main screen of the Password Vault will be
displayed.
14 of 23
Copyright © Bayview Software Solutions
Password Vault User Manual
Hide the password from view
This is a security feature that prevents anyone “looking over your shoulder” from
seeing your password displayed on the screen. The password characters are
obscured from view with a repeating character. If this option is not turned on the
password will be visible on the screen when selected in the Tree View.
Copy the password to the windows clipboard
When this option is selected the password is copied to the Windows clipboard
after a password is selected in the Tree View. From the clipboard the password
can then be “pasted” to the password entry box of any login screen. This feature
is useful when the auto-login feature is not practical. See the next option, “clear
the windows clipboard after two minutes” if this option is enabled.
Clear the windows clipboard after two minutes
This option should be selected when the previous option “copy the password to
the window clipboard” option is selected. For added security this feature will
clear the windows clipboard of the password after two minutes have elapsed
since selecting the password in the Tree View. This will help prevent the
password from accidentally being displayed after using the Password Vault.
Advanced Features
Auto Login
The auto-login feature is one of the most exciting features of the Password Vault.
When selected this feature will allow the Password Vault to open a program or
web page and then enter the information necessary to login to the program. This
easy to use feature will save you time and eliminate the frustration of routine
login operations.
Here’s how it works
Let’s say you have an eBay account and you want the Password Vault to open
up your browser, navigate to ebay.com, and login to your account. Follow these
steps to setup Password Vault.
Step
1
Actions
Create a new password by clicking the
section for more information).
button. (see add password
15 of 23
Copyright © Bayview Software Solutions
Password Vault User Manual
2 Enter your account information in the details pane up to the category.
3 In the URL input box enter the web address for the login page for ebay which currently
a is:
http://signin.ebay.com/ws2/eBayISAPI.dll?SignIn&ssPageName=h:h:sin:US&ru=http%3A//www.ebay.com
This is easily copied from the website by right clicking on the “Sign in” hyperlink and
selecting “copy shortcut” from the popup menu.
Right mouse click
here and select
“copy shortcut” from
the popup menu.
This will place the address on the windows clipboard and can then be pasted into the
URL box of Password Vault.
16 of 23
Copyright © Bayview Software Solutions
Password Vault User Manual
When saved this will turn into a hyperlink that can be clicked.
4
Click on the
button to save your changes.
17 of 23
Copyright © Bayview Software Solutions
Password Vault User Manual
5
The detail pane should look like the image including a blue hyperlink.
Click on the hyperlink to open up the login page for ebay.
6 Your browser should open and display the ebay.com login page.
If a different page is displayed click on the
to step 3 to correct the URL.
(edit password) button and then return
18 of 23
Copyright © Bayview Software Solutions
Password Vault User Manual
Notice where the cursor is located. A blinking cursor should be visible in the box
labeled “eBay User ID”. This would allow you to enter your ebay username as soon as
the page is displayed. In fact, to login to this page your would perform the following:
1.
2.
3.
4.
Type your username
Press the TAB key on the keyboard
Type your password
Press the ENTER key
In the next couple steps we will use the Auto Login Sequence feature to tell Password
Vault to do these steps for you.
7
Click the
button.
(edit password) button. This will activate the “Auto Login Sequence”
19 of 23
Copyright © Bayview Software Solutions
Password Vault User Manual
8
button the display the Login Sequence editor. This is
Click the
where you will tell Password Vault what key strokes are necessary to login to eBay.
By default a
typical login
sequence is
already setup.
These are the
keystrokes that
can be added to
your login
sequence. Double
click on the item to
add it. Any item
can be added
more than once.
9
Double click an
item to remove
it.
Use the Move
Up and Move
Down buttons to
set the order of
keystrokes.
A login sequence, in the right window, is automatically created for you based on the
default template. This sequence will work for a typical website login.
The default login explained:
1. Three second delay – this is the time for the browser to display the ebay login
page. This will vary depending on several variables and may need to be
adjusted after testing the sequence.
2. Username – this is your eBay username that you saved in Password Vault.
3. TAB – the TAB key on the keyboard. This moves the cursor to the password
text box.
4. Password – this is your eBay password that you saved in Password Vault.
5. Enter – the ENTER key. Pressing the ENTER key submits the information you
filled in.
Click on the “Save” button to save this login sequence. The form will close and the
edit password screen will be displayed.
10 On the “Auto Login” check box to tell Password Vault that you want to send the Login
Sequence automatically after click the URL hyperlink.
20 of 23
Copyright © Bayview Software Solutions
Password Vault User Manual
11 Click on the “Save” button to save all changes.
12 Now it is time to test your new eBay login sequence! Click on the URL hyperlink.
The following things should happen:
1. The eBay login screen should be displayed in your web browser.
2. Your username and password information should be entered automatically.
3. The login form should be submitted and your eBay account page should be
displayed.
If any of the above steps does not happen don’t dismay. It may take several attempts
to get the login sequence correct. Repeat steps 7 thru 11 to make adjustments to your
login sequence.
21 of 23
Copyright © Bayview Software Solutions
Password Vault User Manual
Print and Export Passwords
The print and export password feature is used to make a readable backup of the
information that you enter into the Password Vault. Of course this information
should be kept in a VERY secure location as this information will not be in an
encrypted format.
Print Passwords
This feature will allow you to create a hardcopy print out of your password
information. You may want to use this feature to place a copy of your password
in a safety deposit box or home safe.
Using this feature is a simple as:
Step Actions
1
From the main menu select File > Print / Export Passwords.
2
Enter your master password and click the “Ok” button.
3
The Print form is displayed. Clicking on the
information to the printer.
button to send the
Export Passwords
This feature will allow you to save your password information in a readable
electronic format. This is another method to back your information to a
removable media and save it in a safety deposit box or home safe.
To use this feature follow these steps:
Step Actions
1
From the main menu select File > Print / Export Passwords.
2
Enter your master password and click the “Ok” button.
3
The Print form is displayed. Click on the “Export” tab to display the
export options and directions.
4
Select a delimiter for the fields in your export file or accept the default.
Click the “Export to file” button to display the “File Save” dialog box.
22 of 23
Copyright © Bayview Software Solutions
Password Vault User Manual
5
Select the location to save the export file to and specify a name for the
file. Click “Save” to complete the operation.
Using with a portable USB flash drive
The Password Vault can be installed on or copied to a portable USB flash drive.
This will allow you to carry your passwords to any of your computers (e.g. work
and home). This also provides a extra measure of security as the information is
not left on any computer that could be shared by others.
The Password Vault can be installed on a flash drive by specifying the drive
during the initial installation. By default the program will be installed in you’re my
documents folder.
To copy the Password Vault to a flash drive perform the following steps:
Step Actions
1
Using the Windows explorer, open your “my documents” folder.
2
Open the folder “Bayview Software Solutions”.
3
Select the “Password Vault” folder and select Edit > Copy from the menu.
4
Browse to the flash drive using the Windows explorer and open it.
5
Select Edit > Paste from the menu to complete the copy operation.
6
The Password Vault can be run by double clicking on the pwdvault.exe
file located in the “Password Vault” folder. Note: you can create a short
cut to this file at the root of the flash drive for easier launching of the
program.
23 of 23
Copyright © Bayview Software Solutions