1
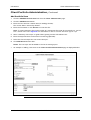
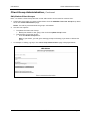
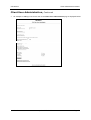
CEO Advisor Client Administrator Manual CEO ADVISOR: Client Administration Client Administrator Manual Table of Contents Table of Contents .....................................................................................1 CEO Advisor Client Administration ................................................................2 Site Administration Main Page ............................................................................. 2 Introduction .................................................................................................. 2 Client Administration Details............................................................................... 3 Introduction .................................................................................................. 3 CRC Details Administration ................................................................................. 4 Edit Client Details ........................................................................................... 4 Client Portfolio Administration ............................................................................ 5 Introduction .................................................................................................. 5 View reports.................................................................................................. 5 Add Portfolio Item .......................................................................................... 6 Edit/Delete Portfolio Item................................................................................. 7 Client Group Administration................................................................................ 8 Introduction .................................................................................................. 8 Add Client Groups ........................................................................................... 8 Edit/Delete Client Groups ................................................................................. 9 Client User Administration.................................................................................10 Introduction .................................................................................................10 Add Client Users ............................................................................................11 Edit/Delete Client Users ..................................................................................13 Client User Access Administration........................................................................14 Introduction .................................................................................................14 View/Edit Client User/Group Access ...................................................................14 View/Edit Client Portfolio/Group Access ..............................................................15 Change Client Administrator User Password............................................................16 Introduction .................................................................................................16 Change Password ...........................................................................................16 User Manual ..................................................................................................17 Introduction .................................................................................................17 View an Administration User manual ...................................................................17 Printing/Saving an Administration User manual ......................................................17 Pocket Slides .........................................................................................18 Overview ......................................................................................................18 Introduction .................................................................................................18 Installing PocketSlides.exe ...............................................................................18 Converting Presentations for Pocket PC Viewing ......................................................18 Viewing Presentations on the Pocket PC ................................................................20 ACNielsen Updated: 05/12/03 Page 1 CEO Advisor Client Administrator Manual CEO Advisor Client Administration Site Administration Main Page Introduction • The CRC Administrator page is displayed after you login as a Client Administrator. • Before going any further, the Client Administrator should select a CEO Advisor site to work with (Pocket PC Client Site). • The Super Administrator assigns the access-rights for each CEO Advisor site to Client Administrators. • Please note, this document only discusses the CEO functions when logged on as a client administrator. Please refer to the AP Web Client Administration document for CRC functions. • An example of the CRC Administration page is displayed below: Choose a CEO Advisor site to work on ACNielsen Updated: 05/12/03 Page 2 CEO Advisor Client Administrator Manual Client Administration Details Introduction • The Super Administrator establishes the original CEO Advisor site. Then Client Administrators use this page (see below) to edit the CEO Advisor information. • After selecting a CEO Advisor site to work on, the Client Administration page will appear. This pages acts as the main administration. • From this page you are able to: • Edit the client’s details. • Add/edit portfolio items. • Add/edit client user group. • Add/edit client users. • View/edit client users/group access. • View/edit client portfolio/group access. • Change password details • An example of the main Client Adminstration page is displayed below: ACNielsen Updated: 05/12/03 Page 3 CEO Advisor Client Administrator Manual CRC Details Administration Edit Client Details 1. From the Client Administration page, click the Edit Client Details link. Result: The CRC Details Administration page will appear. This displays the existing client administration details. 2. Edit the Client Resource Centre Name if required. 3. Reselect the Client image details if required. 4. Reset the Password Expiration Days if required (Optional – overwrites Country default). 5. Reset the Page Time Out minutes if required (Optional – overwrites Country default). 6. Click the Update Client button to update changes or select Return to Administration without editing to return to the main administration page. Note: Only Super Administrators can delete a client. • An example of the CRC Details Administration page is displayed below: ACNielsen Updated: 05/12/03 Page 4 CEO Advisor Client Administrator Manual Client Portfolio Administration Introduction • The Client Portfolio Administration page contains the main content of the CEO Advisor website. • Portfolio items can be PowerPoint presentations, Word documents, Excel spreadsheets, text files and image files. Typically, the Client Administrator converts PowerPoint .ppt files to Pocket PC.cpt files first. The .cpt files are then used to upload to the server for viewing by the end user. View reports 1. Click the Add/Edit Portfolio Item link from the Client Administration page. 2. Enter the start and end date in mmddyy format. 3. Click the View Report button Result: The report titles within the specified period range will be displayed alongside their dates, as shown in the example below. reports. • Note: If there are more than six reports to view, select the >> (Next) link to see the next An example of the Client Portfolio Administration page is displayed below: Continued on next page ACNielsen Updated: 05/12/03 Page 5 CEO Advisor Client Administrator Manual Client Portfolio Administration, Continued Add Portfolio Item 1. Click the Add/Edit Portfolio Item link from the Client Administration page. 2. Click the Add Resource button 3. Enter the Title and the creation Date (in mmddyy format). The current date is entered by default. 4. Enter the File Name or click Browse to locate the file. Note: To view PowerPoint files on the Pocket PC, PowerPoint files must be converted to a .cpt file first. Please refer to the Appendix for information on how to convert files from .ppt to .cpt. 5. Write a summary of this topic to guide others getting into the CEO Advisor site. 6. Enter the keywords that can be used for searching (Optional). 7. Select the Client Groups who can access this topic. 8. Click Add Resource when done. Result: The new topic will be added to the list of existing topics. • An example of adding a new item in the Client Portfolio Administration page is displayed below: Continued on next page ACNielsen Updated: 05/12/03 Page 6 CEO Advisor Client Administrator Manual Client Portfolio Administration, Continued Edit/Delete Portfolio Item 1. Click the Add/Edit Portfolio Item link from the Client Administration page. 2. Select the Topic you want to edit/delete from the list of existing topics. Result: You will be presented with the Topic’s information. 3. You have three options: • • To update the portfolio item: • Modify the item’s detail then click the Update Restouce button. • To overwrite an existing portfolio item: • Enter the File Name or click Browse to locate the file that contains the new changes, then click the Update Restouce button. • To delete the portfolio item: • Click the Delete Resource button Note: If you delete, you will get a message prompt confirming if you want to delete this item. An example of editing an item in the Client Portfolio Administration page is displayed below: ACNielsen Updated: 05/12/03 Page 7 CEO Advisor Client Administrator Manual Client Group Administration Introduction • Client Administrators use the Client Group Administration page to add and/or edit the Client Groups according to the client user’s need. • Client Groups are used to control what individual users can see in the CEO Advisor portfolio. • The maximum number of Client Groups is 40. Add Client Groups 1. Choose Add New Group from the Add/Edit Client User Groups drop-down list on the main administraion page. Result: You will be presented with a blank form. 2. Enter a new Group Name. 3. Enter a Description for the new group (Optional). 4. Click the Add Group button. Result: A message will appear in the same screen, stating that the new group has been updated. • An example of adding a new group in the Client Group Administration page is displayed below: Continued on next page ACNielsen Updated: 05/12/03 Page 8 CEO Advisor Client Administrator Manual Client Group Administration, Continued Edit/Delete Client Groups Note: To delete a Client Group the User access and Portfolio access must be removed first. 1. Choose the group name you want to edit/delete from the Add/Edit Client User Groups drop-down list on the Client Administraion page. Result: You will be presented with the group’s information. 2. You have two options: • • To update the Client User Group: • Modify the details for the group, then click the Update Group button. • To delete the Client User Group: • Click the Delete Group button. Note: If you delete, you will get a message prompt confirming if you want to delete this group. An example of editing a group in the Client Group Administration page is displayed below: ACNielsen Updated: 05/12/03 Page 9 CEO Advisor Client Administrator Manual Client User Administration Introduction • A Client User is an individual who is authorised with access-rights to view CEO Advisor information. • The Client Administrator must first set up the Client Users and assign them to the necessary Client Groups. • A Client User may then access the CEO Advisor using the login area on the ACNielsen web site home page. Continued on next page ACNielsen Updated: 05/12/03 Page 10 CEO Advisor Client Administrator Manual Client User Administration, Continued Add Client Users Choose Add New User from the Add/Edit Client User drop-down list on the Client Administration page. 1. Enter the User Login name (up to 30 characters - email addresses are valid as a login name). 2. Enter the User Password into the User Password box. Note: The password must be at least 8 characters long and include alphabetical and numeric characters. 3. Enter the same password again into the Confirm Password text box. 4. Redefine the Password Expiration Days if the default is not suitable. 5. Redefine the Page Time Out minutes if the default is not suitable. 6. Choose a Login Validation type. You have two options: • A check will be made on User Name and Password • A check will be made on User Name, Password and IP Address • Note: If option 2 is selected, enter the IP address. When defining a Partial IP addresses please note: o The IP address requires input in field directly below this option. o An IP address can be a Full or Partial match. o When defining a Partial IP address only th e far most right digits may be removed. o A Partial IP address must conform to one of the following formats and cannot be empty. • ddd - will match the left most 3 digits • ddd.ddd - will match the left most 6 digits • ddd.ddd.ddd - will match the left most 9 digits Where d must be a single digit between 0-9 7. Select the Client Groups that this user should belong to. 8. Click the Add User button to update details Results: • If the password is correctl a message will appear stating the details have been updated, and a new blank form appears allowing you to add a new user. Note: • The Disable Account check box will deactivate the Client User’s account, if selected. Continued on next page ACNielsen Updated: 05/12/03 Page 11 CEO Advisor Client Administrator Manual Client User Administration, Continued • An example of adding a new client user in the Client User Administration page is displayed below: ACNielsen Updated: 05/12/03 Page 12 CEO Advisor Client Administrator Manual Edit/Delete Client Users 1. Choose the user name you want to edit/delete from the Add/Edit Client Users drop-down list on the Client Administration page. This page (above) will appear. 2. You have two options: • To update the client user: • Modify the user’s detail then click the Update User button. • To delete the client user: • Click the Delete User button. 3. If you delete, you will get a message prompt confirming if you want to delete this user. • An example of editing a client user in the Client User Administration page is displaye below: ACNielsen Updated: 05/12/03 Page 13 CEO Advisor Client Administrator Manual Client User Access Administration Introduction • CEO Advisor groups are used to control users’ access to the CEO Advisor portfolio contents. They are assigned to both Client Users and Topics. • When the Client Administrator adds a new Client User, the user must be assigned to one or more Client Groups, thus limiting the Topics the user is permitted to see. View/Edit Client User/Group Access 1. Click the View/Edit Client User/Group Access link from the Client Administration page. 2. Select or deselect the appropriate check boxes for the corresponding Client Users and Client User Groups. Note: A checked check box denotes that Client User will be included in the Client User Group. 3. Edit Client User details by clicking a Client User name (Optional). The Client User names are displayed vertically down the table. 4. Edit Client User Group details by clicking a Client User Group name (Optional). The Client User Group names are displayed horizontally across the table. 5. Click the Update button to save changes. • An example of viewing/editing client user access in the Client User Access Administration page is displayed below: ACNielsen Updated: 05/12/03 Page 14 CEO Advisor Client Administrator Manual View/Edit Client Portfolio/Group Access • CEO Advisor groups are used to control users’ access to the CEO Advisor portfolio contents. They are assigned to both Client Users and Topics. • When the Client Administrator adds a new Topic to the portfolio, they must choose which Client Groups will see the contents of that Topic. 1. Click the View/Edit Client Portfolio/Group Access link from the Client Administration page. 2. Select or deselect the appropriate check box for the corresponding Client Users and Topics. 3. Edit the Folders/Topics by clicking the document name links (Optional). Document names are displayed vertically down the table. 4. Edit the Groups by clicking Client User Group name links. (Optional) . Client User Group names are displayed horizontically down the table. 5. Click the Update button to save changes. • An example of viewing/editing client portfolio access in the Client Portfolio Access Administration page is displayed below: ACNielsen Updated: 05/12/03 Page 15 CEO Advisor Client Administrator Manual Change Client Administrator User Password Introduction • The Change Password function enables the Client Administrator to change their login details. • The newly entered details should meet the password field requirements. Change Password 1. Click the Change Password hyperlink. 2. Type the new password into the New Password box. 3. Type the same password again into the Confirm New Password box. 4. Click Update button. • • A confirmation message will appear when the password has been changed successfully Examples of changing a client password in the Change Client Administratior User Password page is displayed below: ACNielsen Updated: 05/12/03 Page 16 CEO Advisor Client Administrator Manual User Manual Introduction • The Administrator User Manual page is used to view the CEO user manuals in .pdf format. • Administrator User Manuals may also be printed or saved locally. • An example of the Administrator User Manual page is displayed below: View an Administration User manual Open a manual by either, 1. Clicking on the appropriate link from beneath the Title header. 2. Clicking on the appropriate .pdf icon beneath the Type header. 3. Right clicking on either the link or icon and selecting Open or Open in new window from the pop up box. Printing/Saving an Administration User manual Print/Save a manual by either, 1. Right clicking over the appropriate link/icon from beneath the Title/Type header and select Print Target or Save Target As . . . from the pop up box. 2. Open the manual in a separate window and select File > Print from the menu bar. ACNielsen Updated: 05/12/03 Page 17 CEO Advisor Client Administrator Manual Pocket Slides Overview Introduction Before you can add portfolio items, you must first convert PowerPoint presentations to .cpt files. You then attach then .cpt files in the Client Portfolio Administration page. This will then enable the CEO Client to view the PowerPoint slides/presentations in the Pocket PC. Installing PocketSlides.exe Go to http://www.conduits.com/products/slides/PocketSlides.exe. This will allow you to download a 30-day trial version of the PocketSlides application. Alternatively, you can purchase the application – go to http://www.conduits.com/products/slides/purchase.asp. Once PocketSlides has been downloadeded to your PC, synchronise your Pocket PC, then run the PocketSlides.exe from your PC. Follow the install shield wizard until the application has been successfully installed. Converting Presentations for Pocket PC Viewing 1. Run PocketSlidesExportOptions.exe. Result: The Pocket Slides Export Options wizard appears. 2. Click Next. 3. If prompted, select the output dimenstions for the presentation to be converted. The recommended dimension setting is VGA (640 x 480), as illustrated below: 4. Select the Convert Now… button. Continued on next page ACNielsen Updated: 05/12/03 Page 18 CEO Advisor Client Administrator Manual Converting Presentations for Pocket PC Viewing, Continued 5. In the Convert from text box, enter or browse to the path and filename of the presentation to be converted. Result: By default, the program will automatically duplicate the same path and filename in the Output to text box, but will change the file type to cpt. Note: You can manually change the path for the output file. This will be necessary if you are converting presentations from a local PC and outputting them to a server or remote PC location. 6. Click Convert. Results: • The file will take a while to convert, depending on its size. • The status bar will indicate its conversion progress. Notes: • When converted, the file will be ready to include in the Client Portfolio. • In this screen, you can either close the application or continue converting files. ACNielsen Updated: 05/12/03 Page 19 CEO Advisor Client Administrator Manual Viewing Presentations on the Pocket PC • If the user selected the ‘View after download’ option in the CEO Advisor website, then the Pocket Slides application will automatically open the presentation. Otherwise the user must manually open the application and the file. • The presentation opens in normal view where the user can add notes if desired, as illustrated below. • To view the presentation in slide show mode, click on the Start Show icon on the bottom toolbar. Continued on next page ACNielsen Updated: 05/12/03 Page 20 CEO Advisor Client Administrator Manual Viewing Presentations on the Pocket PC, Continued • After viewing the presentation, the user will be prompted to save changes, as illustrated below: • Once Pocket Slides has been closed, the user may return to the website to view additional news items. ACNielsen Updated: 05/12/03 Page 21