1
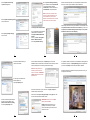
2. Installing the software for searching and setting up the IP cameras
Recommended System Requirements
SURVEILLANCE TECHNOLOGY
• Microsoft ® Windows Vista, Windows 7
• Recommended browser: Internet Explorer 9.0 or later
• Network interface card
• 2.8 GHz Pentium 4 processor or AMD Athlon
• 256 MB video card
• 2 GB RAM
2.1. Insert the supplied CD into your CD-ROM drive. If CD autorun is disabled,
select the CD-ROM drive and run «autorun.exe». In the opened window, select
«Beward IP Installer» (software for searching and setting up the IP cameras on
a network).
Main Features
Quick Installation Guide
BEWARD N Series
Network Cameras
for Microsoft ® Windows
• Progressive scan CMOS sensor
• Resolution up to 1920х1080 (for two megapixel cameras)
• H.264/MPEG-4/MJPEG (H.264 is not supported by some BEWARD IP Cameras)
• Two-way audio
• Viewing live video on a mobile phone
• UPnP support
• Continuous and event-triggered sending of files to e-mail and FTP
• Recording to network attached storage
Package Contents
АГ37
This quick installation guide provides brief instructions necessary to access and
view live video from the IP cameras. For more detailed information for a particular
model, please refer to the related Operations User Manual for BEWARD IP
Cameras or Installation User Manual for BEWARD IP Cameras that are on the
CD that is included with BEWARD N series cameras.
• IP camera (lens pre-installed)
• Bracket
• Power supply
• CD with software and user manuals
• Quick installation guide
• Mounting kit
• Package
IMPORTANT: Package content may vary depending on the camera model. For
more information, please refer to www.beward.net.
3
1
Liability Restriction
This product is covered by a limited warranty. Beward R&D Co., Ltd does not
guarantee that this product will work as required in all mediums and applications, and does not
give any representation or warranty, either expressed or implied, that this product will work
properly in accordance with its performance capabilities and be operable in case of misuse.
Beward R&D Co., Ltd is not liable for damages to this device or its interfaces (network, signal
and other) that occurred as a result of:
1) improper transportation and storage;
2) force majeure (such as fire, flood, earthquake, etc);
3) the product is mounted, installed and operated not in accordance with the instructions
provided in relation to this product;
4) incorrect firmware update;
5) misuse;
6) mechanical, thermal, chemical and other types of impact, if they exceed the product
specification or are not supported by the product;
7) exposure to high voltage (lightning, static electricity, etc);
8) use a different power supply than the one supplied with the product;
9) use the camera outdoors (for outdoor cameras) without lightning protection;
10) use the camera with damaged housing.
Beward R&D Co., Ltd is not liable for operation of Internet service providers,
electricity supply services, emergency services and security services. Beward R&D Co., Ltd is
not liable for failures and errors of computers and network equipment.
2.2. After that, the installation of «Beward IP Installer» software will start.
Follow the instructions of the installation wizard until the installation ends.
1. Installing the IP camera
1.1. Plug one end of an Ethernet cable into your camera, plug the other end of
this cable into the Ethernet port on your switch (router) or directly into the
networking port of your computer (for more details, see the related installation
manual, which you can find on the included CD).
1.2. Use only the power supply that is included with your camera or you can
use a switch (router, injector) with PoE support to power the camera.
No PoE
PoE
3. Connecting to the IP camera (for Windows 7)
3.1. The default IP address of BEWARD N series IP cameras is 192.168.0.99. To
connect to the camera, you need to get your computer and your camera on the
same subnet, which means that your computer’s IP address must be within the
range of 192.168.0.1-255. If you are sure that the IP address for your computer’s
network interface card is 192.168.0.XXX, then you can skip paragraphs 3.2 - 3.9.
NOTE: All Beward cameras have the same default IP address, which is
192.168.0.99. Do not connect several cameras simultaneously to the same local
network for their initial setup! If you are going to use several Beward IP cameras,
you need to change their default IP address so that each camera will have a
uniqe IP address!
3.2. Open [Start] menu
and select [Control Panel].
IMPORTANT: Some BEWARD IP cameras do not support PoE (supplying an
IP camera with power over a twisted pair cable). For information about PoE
support, please refer to the related Installation user manual.
Simultaneous power supply over a switch (router, injector) with PoE support
and the camera’s power cord socket is prohibited!
SURVEILLANCE TECHNOLOGY
Beward R&D Co., Ltd
8 Mikluho-Maklaya st, bld. 3, office 219, Moscow, tel: +7(495) 502-27-29
16 Molokova st, office 355, Krasnoyarsk, tel: +7 (391) 278-92-00
www.beward.eu
2
4
3.3. Select [Network and Internet]
in [Control Panel] window.
3.9. Click [Use the following IP address],
type an IP address similar to 192.168.0.ХХХ
in the IP address field (for example,
192.168.0.100) and set the subnet mask to
be 255.255.255.0 in the opened window.
3.4. Select [Network and Sharing Center]
in the opened window.
NOTE: To prevent an IP address conflict,
contact your system administrator for the
correct IP address for your IP camera.
Otherwise, the IP address conflict can cause
network devices to function improperly.
4. Viewing live video from the camera
4.1. Launch Beward IP Installer software
(default location of the software is:
C:\Program Files\Beward\Beward IP
Installer).
To do so, go to Start – All Programs –
Beward – Beward IP Installer
and choose [Beward IP Installer].
3.5. Click [Change adapter settings]
in the left column.
5
3.6. Select the network adapter your
camera is connected to.
4.5. After successful authorization, you will be prompted to install an ActiveX
add-on. You will see a system notification under the address bar.
7
4.2. The software window will open. Click [Search] button to find all the
BEWARD N series IP cameras that are connected to the local network (to search
cameras in Windows XP, it is necessary to enable UPnP support).
NOTE: Third party software (e.g.
firewalls) may block search of IP
cameras. To avoid it, add Beward IP
Installer software to the authorized
applications list.
4.6. Click right mouse button on the system notification. In the drop-down menu
select [Install This Add-on for All Users on This Computer...] or click on the
area [Click here to install the following ActiveX control] and select [Install
This Add-on for All Users on This Computer...].
9
4.7. By default, Windows 7 blocks launch and installation of software (depends
on selected security level). The [Security Warning] window will appear where
you need to click [Install] to continue the ActiveX add-on installation.
4.8. The ActiveX add-on is installed and if everything was done correctly, you
should get the camera image.
3.7. Click right mouse button on the
selected adapter and
open the [Properties] menu.
4.3. Click left mouse button on your camera, then click [Open in IE] button.
Windows security window will open.
4.4. Enter the camera’s [User name], [Password] and click [ОК] button. After
that, the camera web interface window will open.
3.8. The connection properties window is
opened. To set an IP address, select
[Internet Protocol Version 4 (TCP\IP)]
and click the [Properties] button.
6
IMPORTANT: Default user name is admin,
default password is admin.
NOTE: Web interface windows may vary
depending on the model of your camera.
However, the steps to get live video from the
cameras are similar.
8
10